Foliage crafts for the garden. Autumn crafts for kindergarten and school (136 ideas)
I share with their finds. All or almost all of us have to do crafts with children for kindergarten or school... You will also find fantasies here for home creativity with kids.
We start with trees ...


And now - pumpkins ...


You don't have to do everything for a specific master class... And strictly adhere to the proposed topic. Can just take a craft idea and remake it in your own way.
Candle fantasies ...


Accessories of the "Queen of Autumn" ...


Papier-mâché ... And not only ...


Well owls I did not put first again. They are always with us the very first and most important ...


There are, in addition to owls, and other animals…


And again - improvised material. Not only the one that was found in the forest ... But also "home" ... For example, pistachio shells...


AND door (wall) wreaths... are good not only at New Year and Christmas ... in the fall they especially cozy and bright turn out ...


And again pumpkins... Some of them have a lot of them in their dachas! I'm not a dacha lover (no-no): my mother just gives me buckets of vegetables. But the godmother gave me a pumpkin last year. Aaaaa ... Maybe I'm Cinderella?


If you don't understand how stick around with sheets or dough a bowl from below to get such beauty, watch the master classes ...


Many people make baskets now. A very mundane craft. On this topic "Gifts of Autumn"... Well, the baskets are really very colorful and juicy ...


And again leaves ... And again owls ... And many arts ...


In our kindergarten, Alice's group is very talented, kind and hardworking educators- Olga Grigorievna and Anna Sergeevna. They love children. And adore with them tinkering with all sorts of things v educational process... Or draw ...


For us the crafts of children in the kindergarten educators leave on a large panel- they are attached to clips that hang on the fishing line ... Now I will find a post in the magazine when we made such a panel (with owls, of course) for crafts ...


Some parents ignore creativity... They say that paints are a lot of dirt and stains - you can do only with pencils or felt-tip pens ... Yes, and only kalya-malia comes out ... And plasticine, they say, a child does not understand - it rejects ... Start small- just give your child the materials. For a couple of lessons ... Then again ... And then start gradually prompt and help... To encourage to creativity, to creation ... I also do not really like dolls and LEGO, plastered with plasticine ... But accuracy, diligence and imagination... will not be taken from a child from anywhere if they do not work. Daily.


Of course, time is constantly running out. Of course, a lot of work and household chores. But the child is delighted that his autumn work is also on display in a kindergarten or school. It - pride yourself and your family ...


Maybe this year ... Maybe next ... Your job will be recognized at the exhibition as the best. Even the prize money. It will be a wonderful day. In the meantime, let the autumn candles warm the family evenings, and the photo frames adorned with leaves or acorns flaunt on the shelves ...
By the way, we somehow with a friend from papier-mâché just giant mushrooms made... All the children were made with a palm height ... And we have ... Giants. Mutants ...)))


Who hasn't read mine yet 100 ideas for autumn, be sure to read. And apply - partially ...
We a lot of things have already been applied and done with Alice and Shura- I'll tell you in other posts ...
And I will show you not today, tomorrow ... autumn roller... And pictures. Last fall. We are so beautiful family shooting was. It's just complicated for the video combination of video and photo... Therefore, I wait until Shura will finish the installation. So far he has a lot of work to do.
P. S. Yes, I show you very few personal and family photos. You will get tired of me otherwise ...


Making out various crafts for children with your own hands together with your child is an exciting activity that significantly contributes not only to the development of the child, but also to the strengthening of your relationship with him. Any child will be very happy if he has the opportunity to do something beautiful with his parents. Therefore, even in the most busy schedule, try to set aside a piece of time to devote to activities with children. Sections of our article will present helpful advice how to make a DIY craft from various materials taking into account age characteristics kids.
DIY crafts for children from paper
The most frequently used material for applied arts is, of course, paper. Moreover, it is worth paying attention not only to the usual color sets, but also to its other types: corrugated, velvet, designer. You can create do-it-yourself crafts for children from paper flat (applications), as well as voluminous, using various techniques... For example, having learned how to fold a flower using the origami technique, form beautiful bouquet tulips.


The easiest DIY crafts for beginners
For those who are just starting to teach their child the applied arts, we advise you to start with the simplest solutions, making easy DIY crafts for children. Perhaps you will like examples of caterpillars made of paper rings, an applique made of colorful fish or funny mice on a piece of cheese.


DIY cardboard crafts for children
Cardboard is an easily accessible material, which is well cut, bend, painted, it is often used in children's creative works. In addition to the set of cardboard purchased in the store, cardboard boxes are used, disposable tableware, packaging from cereals, egg "honeycomb", as well as sleeves from toilet paper... In our photo catalog you will see what craftsmen make from cardboard with their own hands for children. For example, a stand for pencils, funny animals, jewelry boxes.


Craft "house" with your own hands
Cardboard houses are made at will of any size - it all depends on their purpose. Perhaps it will be a large construction with a child's height, a "dwelling" for dolls, or a do-it-yourself "house" craft made as christmas decoration, gift wrap. In any case, the manufacturing technology is the same, the differences will be in size and design. We have prepared some sketches for making blanks. If you make small structures, there is enough PVA glue and tape holding the parts together. When building a large house, it is better to use a thermal gun for reliability. DIY Christmas craft "house" is complemented by a decor that imitates snow on the roof (cotton wool, foam balls), and the gift wrap must have at least one opening sash, for example, a door, a roof slope.


How to make a DIY craft out of fabric
Wonderful DIY toys are sewn using fabric. Moreover, not only a single cut, but various scraps, household napkins and even socks. Look at the photo, isn't it, a cute bunny came out of a sock? An older child will do it on his own, and the baby will have to help. Make the necessary cuts and seams, and instruct the child to fill the figure tightly, and also draw the muzzle.
You can also sew crafts for children with your own hands, which will become not only a decoration, a toy, but also a useful little thing, for example, a large soft ottoman duck, a photo of which is in our catalog, a star pillow.


DIY felt crafts for children
Felt is a wonderful comfortable fabric with a vibrant palette of colors. It allows you to sew a variety of DIY crafts for children, and then decorate the nursery with them. Use household napkins (usually sold in a set of four colors) to replace the fabric. Such crafts-toys are sewn with their own hands without help sewing machine, manually.
DIY children's crafts for the New Year
On the eve of new year holidays, children's matinees, rooms are decorated everywhere, lush Christmas trees are dressed up. It is quite possible to make a lot of interesting symbolic additions on your own, without spending money on purchases. These can be the most original balls on a Christmas tree, garlands, other decorations that a child can make.


DIY snowman craft
The snowman is a kind of symbol of winter and, naturally, his presence for the New Year's interior will come in handy. The photos of our selection show options for how to make such crafts with your own hands in stages, using foam balls, socks, pompons. A larger figure, decorated with a thread, is suitable for a kindergarten matinee, balloons, glue. Inflate five balloons of different sizes (two are the same for pens). Wrap each of them with a thread dipped in glue (PVA is quite suitable). When the blanks are completely dry, the balls need to burst, get out from the inside. Finished balls are fastened together. Craft "snowman" with your own hands, almost ready. It remains to arrange the eyes (beads, buttons), the mouth from the thread, the nose-carrot (sew from the fabric). Traditionally, the head is complemented with a bucket, the neck is decorated with a scarf.


Santa Claus do it yourself
V New Year's interior Santa Claus is indispensable. Most easy way- arrange it from thick paper (cardboard). Take advantage of ready-made template, or make a conical shape from the sheet, which then, using colorful paper, "Dress", having designed the face, beard, pens. They do such children's crafts for the New Year with their own hands using fabric (here you will find examples of patterns), plastic bottles, and other improvised means.


Crafts for kindergarten do it yourself
Various creative works for little kindergarten children should be distinguished by simpler techniques and materials. The child is just beginning to learn how to do something beautiful on his own, so you need to choose the most simple, but interesting options.


DIY crafts for kindergarten children: applications
The most common way to teach children to create pictures is with applique. Such crafts for kindergarten with your own hands (photos are presented below) can be designed not only using colored paper, they also take dense fabric, artificial leather, velvet paper, improvised materials (cotton pads, cereals, etc.), natural raw materials (leaves, seeds). Children of older groups can start voluminous work, for example, make an applique in a box "aquarium" with hanging representatives of the aquatic world.


DIY crafts in a garden from natural material
Often, especially in autumn, exhibitions of works are held showing handicrafts for kindergarten do it yourself from natural ingredients. Chestnuts, acorns, cones, sunflower seeds, pumpkins, colorful autumn foliage - all this provides a great basis for the development of children's imagination. To make various figures, compositions are additionally used plasticine, which holds the parts together or forms the base. Pictures of DIY crafts using natural raw materials are presented in our photo selection. Feel free to try using them by making a chestnut caterpillar, a hedgehog, and other samples.
DIY crafts for school
School work varies in complexity. If the crafts in primary school have simple shapes with their own hands, then high school students with enough skills are able to arrange more complex compositions, for example, a bouquet of roses from maple leaves, cardboard town or paper basket with asters.
DIY crafts to school, the photos of which are posted below, involve the use of a large selection of raw materials, including all sorts of improvised means (plastic dishes, DVDs, matches, buttons).


Crafts for schoolchildren with their own hands using the facing technique
Facing is a rather entertaining creative process that is suitable for children. of different ages... It allows you to create "fluffy" pictures that will decorate the room, as well as an original gift relatives. DIY crafts in elementary school have simplified options until the child acquires certain skills. For example, only the outline of the picture can be drawn in this way.
To make a lush applique, you will need corrugated paper, scissors, glue, a match or a toothpick with a blunt end, a sketch drawing on cardboard. Before making the craft with our own hands, we cut the paper into small squares (0.5 cm), which we sort by color. Grease the sketch with glue. We put the match in the center of the square, turn it (so that the corrugation is fixed on it), then glue it with its end to the sketch. Thus, we decorate the entire drawing, applying the necessary colors of the corrugated squares.


Teaching to create beauty yourself is The best way development creativity child. DIY children's crafts significantly develop the imagination, giving the joy of an interesting joint pastime with adults.
DIY crafts for children: a selection of 50 ideas with step-by-step examples updated: May 2, 2018 by the author: Irina Kievskaya
Today we offer a selection of ideas and small master classes on the topic of needlework. It will come in handy for all lovers of making children's crafts with kids. For a kindergarten with your own hands, you can make a lot of interesting things on the basis of the material presented, so our ideas will be doubly useful to those who are doing this on duty. This refers to educators or presenters of thematic developmental circles.
We tried to collect as much as possible more ideas, capable of being useful in joint creativity. Sometimes you really want to do something original, simple and exciting with kids! But offhand interesting options are usually remembered or thought of with difficulty - nothing worthwhile comes to mind "on the fly". It is for such a case that we offer our selection under the title "DIY Children's Crafts for Kindergarten".
Little artists
As you know, there is no limit to childish imagination. Any most original creative idea will definitely be received with enthusiasm. Making crafts with your own hands for kindergarten children is both fun and useful developmental activity. But before embodying intricate fantasy projects, it is worth working out simpler options. Sometimes from a standard set (glue, sheets of colored paper, scissors and a pencil) you can "squeeze" a lot of creativity. And even looking around in search of new available means, you will be surprised - how much so far escaped our attention.
You can see examples of such DIY crafts in the photo. For a kindergarten, almost anything is suitable as a source material! If we stock up on plastic disposable cups, scraps of fabric, bright threads, plasticine, unnecessary packaging, and sometimes toilet paper, our possibilities will be incomparably expanded.
DIY kindergarten crafts - the most popular
Applications are the simplest and most affordable creative option for kids. From "consumables" you only need glue and plain paper (colored and white). The amount that can be obtained from it is almost impossible to enumerate. If you have sheets of cardboard, corrugated or shiny paper, you can make anything from a bright unusual flower or animal figurine to a carnival mask and a fancy greeting card.
There are a great many techniques for working with paper. Having looked on the Internet or armed with special literature, you will learn a lot about scrapbooking, decoupage, quilling, origami. It is not possible to describe each of the technologies here due to the sufficient laboriousness and the huge number of proposed options.
Of course, DIY crafts for kindergarten using complex techniques are not easy to make. And you and I can choose the easiest way - to make together with the kids paper applique... All that is needed for this is glue, a brush, a cardboard base and pieces of bright multi-colored paper sheets.
We organize an exhibition hall
Having chosen the idea of a future masterpiece under your leadership, little masters will get down to business with passion. Without having time to look back, you will receive a whole collection of touchingly inept images of fairy-tale characters, flowers, little people, and even, perhaps, your own portrait. Such do-it-yourself paper crafts will not only decorate the kindergarten, but also make it a kind of picture gallery.
If children are bored with working only with pieces of paper, you can diversify it by offering combined materials. A great idea is to make a large product with the whole group, for example, a wall panel-poster. In addition to a large sheet of cardboard, glue and paper, take buttons, decorative tape, and any little things that each of the kids will bring from home. Such collective creativity will bring a lot of pleasure to children and will serve as a great idea for decorating a children's room or a gift for mom on March 8th.

Back to nature!
These days it is fashionable to make children's crafts for kindergarten with their own hands in the form of so-called ecological applications. They are usually composed entirely of natural materials. It is about all kinds of pebbles, shells, dry leaves, different types loose cereals, seeds, grains. These "tools" are considered environmentally friendly. And how interesting it is to work with them! The small components of our picture are fixed on a sheet or on glue, or on a thin plasticine layer.
Along the way, you will tell the children about the properties of various natural materials and the possibilities that they open up for creativity. Such crafts awaken children's imagination. You will be surprised how much creativity little artists can discover.

There is one more technology that can be classified as a kind of applique. These are DIY crafts for kindergarten from rolled from paper napkins balls. They are very popular with children, and it is not surprising - in the process of creating a masterpiece, napkins not only can, but also need to be crumpled, torn, wrinkled - not like at the dinner table! The material, soft and pleasant to work with, easily rolls up, and then the conceived picture is formed from the balls-blanks.
From waste material
How many useful and useful things we, adults, consider rubbish. But now everything will be different! From yesterday's rubbish, under your strict guidance, kids will learn to tinker not just junk crafts do it yourself for kindergarten, and the most real works of art.
If you invite children to collect unnecessary material for creative purposes, you will be surprised how many new ideas await you. You will be inundated with useful material - torn socks and mittens, empty plastic bottles, disposable forks, and even toilet paper rolls. With a little imagination, with the help of children, you have to transform all this trash into original and very cute fabric dolls, bright piggy banks, outlandish animals, vases and original flowers.

A few specific ideas
By collecting small collection caps from plastic bottles, as a spring craft for a kindergarten with our own hands, we can make a bright, perky caterpillar. The background for it will be a large leaf cut out of a pattern from green cardboard. We make several blank circles, each with a diameter slightly larger than a bottle cap. These blanks are to be cut from paper of different colors.
On the green base sheet, we glue the curved "body" of the caterpillar made of plastic lids, then close each of them on top with a bright paper circle. The last one you can take a little more - it will be a muzzle with funny antennae. From the bottom of the caterpillar, which is curved amusingly on a sheet, we glue a pair of legs close to each of the circles.

If the theme of handicrafts is "Spring", you can also make the following with your own hands in kindergarten. The cardboard egg trays that we routinely throw away will be used to make wonderful flowers. Each cell will serve as the basis for an individual bud. Having cut the packaging, we carefully form flower petals with the help of scissors in the resulting cardboard cups. We paint our products with gouache in bright spring colors. The cores are glued from plain paper or the same napkin balls, and a piece of ordinary wire will serve as a stalk.
Plumbing creative
You will be surprised, but such a banal thing as a hollow tube from a used roll of toilet paper is also suitable as a material for creativity. If these cylinders are not thrown away, then you can get funny stands for pencils and pens out of them, or, having painted with pencils and paints, cute funny people. Cardboard cylinders can be pasted over with ribbons, pieces of cloth or brightly colored paper.

As you know, most of all children love to tinker with all kinds of animals. Anything is suitable for this as a material. For example, suppose you have unnecessary paper muffin trays (called wafers). These are excellent blanks for making smeshariki! Their corrugated sides are straightened, painted in the desired color, dried and glued to cardboard in a straightened form.
A round character is supplied with eyes, ears, a nose and a tail. In addition to smeshariki, from corrugated circles you can make a ladybug, a bright yellow chicken, a cat's or hare's face and much, much more. A child can make such a bright and uncomplicated product, for example, for Easter and give it to parents.
We make chickens and cockerels
Here is another great idea for group children's creativity... The poultry yard can become the theme of the collective craft. Cockerels, hens and chickens are cut out of paper according to templates. Each of the body blanks is drawn from above with parallel lines, along which frequent cuts are made with scissors.
By folding the main part and fixing it with glue, we get a three-dimensional figure. Noodle-cut paper edges form scallops, wings and fluffy bird tails. Pre-prepared eyes and beaks are glued to the figures.
And here's another idea - a funny yarn hedgehog. If you don't have brown, black or gray, it doesn't matter. Our hedgehog can be bright and even colorful. The threads should be cut into pieces of equal length from 2 to 5 cm in size (depending on the volume of the future craft) and then glued to the paper blank of the hedgehog's body. The number of woolen "needles" should be enough to fill the entire space, without bald spots.

Sunny chick
How can I get others spring crafts for a kindergarten with your own hands (for example, for Easter)? If you have a skein of bright yellow yarn, try making a fun fluffy chicken using the Pom Pom Toy technique. You will need a needle with a large eyelet, cardboard, a pair of black eye beads, and a small piece of bright red cloth.
Here is a diagram of such a craft for a kindergarten with your own hands, step by step. We make two pom-poms (a smaller one for the head, a larger one for the torso). Each of them will require a pair of circles of the same diameter cut out of cardboard. We pierce holes in the center of them. Having folded the figures in pairs, wrap them with yellow thread until the inner hole is completely filled. Several turns are made between the cardboard rings with the same thread to secure them.

Then the winding is cut with scissors along the outer edge. Cardboard blanks are no longer needed, we carefully take out and remove them. After that, fluff the resulting pompom and trim the ends with scissors.
The second is made in the same way, then the time of the blanks is connected and supplemented with a beak and legs cut from a red patch. Eye beads are attached with glue.
Other crafts "Spring" do it yourself in kindergarten
Ahead of March 8? Instead of traditional flowers as a gift for girls, there is an alternative - sweet candy crafts. Young gentlemen can be involved in making them. However, girls can also make such handicrafts for their girlfriends for a group of kindergarten with their own hands as delicious souvenirs.
The product can be made in the form of, for example, a ladybug. The body is cut from a pre-selected piece of styrofoam no more than 10 cm thick. Sweets must be wrapped. Each of them is decorated with corrugated paper and looks like a separate bud.
The prepared candies, packed in a bright corrugation, are carefully glued to the body of the ladybug, forming the torso and wings. Decorate the head with dark paper. To lay our sweet products tightly on the surface, you will need at least 20-30 candies. Don't forget to decorate the sweet applique with eyes and antennae.

In general, sweets are a great gift for any occasion. Decorated in the form of an original hand-made composition, they are able to please dads and grandfathers on February 23rd. You can, for example, make a military vehicle or a tank. Of course, such a project cannot be done by children alone - they cannot do without the help of adults. But if you agree with your mother, grandmother or older sister, you can prepare an original and solid gift for the men's holiday.
The body of a military vehicle or tank is made of cardboard. A trapezoid-shaped tower is being built separately. A large box will serve as a base. Don't forget to foresee the tracks and roll up the paper barrel. You can fasten the elements with a glue gun, and they can also strengthen the internal joints.
Having finished with the base, you can do the most interesting thing - pasting the resulting blank with sweets. Before this, cardboard should be decorated with a thin corrugated paper and attach wrapped sweet products directly to it.

Tank tracks are best designed from round bars. If you take sweets in a traditional wrapper with tails, then it is better to glue the protruding parts of the candy wrappers to the "bodies" of the sweets, which will add neatness to the product. The straight sections, as well as the tower, are laid out from square chocolate bars. A sweet medal can be placed on the end of each tank track - it will look very impressive.
Plastic and polyethylene
A separate and very extensive group of materials for children's creativity is made up of items of plastic dishes - all kinds of bottles, disposable plates, etc. This is where there is no limit to the flight of imagination! Disposable plates are great material for making toys, carnival masks, small wall panels for decorating the walls of a children's room.

Hard plastic combined with softer material (such as plastic bags) will give you many ideas for original flower buds, bird and animal figurines. Here you can use foil and much more. If you are already tired of flowers, each bottle can be transformed into any figurine you like - a penguin, a frog, a pig or a funny bug.
It is still difficult for kids to work with plastic on their own, and the unobtrusive help of an adult will be required. You should be especially careful when cutting products from it with scissors. But original craft or a beautiful decor as a result of the work done can inspire any achievement.
Other "chips"
Don't forget about stuff like salty dough or everyone's familiar plasticine. You can experiment in the technique of drawings on sand, which can be replaced with semolina, painted in different colors. Wonderful fantasy paintings can be obtained in typesetting technique using ordinary pencil shavings.
Eventually you can just print paper templates, downloaded on the Internet, of which an unthinkable amount is now offered for every taste, and to glue funny toys together with the kids.
You can play, fantasize and create using food products - buckwheat, pasta (preferably large and curly) and much, much more. Try it, do not be afraid to experiment and you will see for yourself how much joy such joint activities will bring children, and how the kids' imagination wakes up in front of our eyes.
Children, as they say, are the flowers of life. And this saying is reliable and correct, since with the birth of a child, each person literally changes for the better. It becomes softer, kinder and more responsible. All families in which there is at least one baby try to surround him with care from both sides, parental love and warmth. But there comes a time when babies grow up and they need to develop further socially, attending kindergarten. So that the children do not feel a lack of attention on themselves, educators, in addition to drawing, modeling, singing, dancing, physical education, games, are engaged in the manufacture of crafts from a variety of scrap materials, whether plastic bottles, paper, or cardboard, dried leaves of trees, cones, etc. ... If you, being a teacher, are interested in this creativity useful for children, then we advise you to visit our article. In it we will provide 11 photos of ideas for easy crafts for kindergarten with our own hands made quickly, simply and beautifully. Prepared videos with phased master classes that contain an accessible description of all the works offered by us will reveal to the educators the basics of children's applied art. They, in turn, will teach the kids to cope with the task on their own or with a little adult help. In one case or another, handicrafts will bring a lot of positive and skills to the younger generation, allow them to learn the world as deep as possible.
Paper bookmark
The most popular paper craft in kindergarten is the bookmark. It is easy to perform even with small children 4, 5, 6 years old. Fancy, hand-made faces of animals will look very organic. Below you can watch a master class with step by step instructions.
You will need:
- colored paper, A4 size,
- scissors,
- pencil,
- glue.
Progress:
- To create a beautiful bright craft in kindergarten, you first need to draw a square on a sheet of 20 X 20 cm in size. Divide this square into 4 equal parts with a pencil. You should get 4 squares, measuring 5 X 5 cm.
- Divide the upper right and lower left squares with lines so that you get triangles. You need to draw a line from the upper left corner to the lower right. The lines must be parallel. The outer triangles must be crossed out; they will not be needed.
- We cut out a figure from paper with our own hands without taking into account the crossed out areas. Cut off the top triangle. If the paper is laid flat, it looks like a rhombus with two triangles glued on.
- Fold each triangle in half and place it in turn on the base of the rhombus. A pocket that turned out to be a bookmark. He puts on the corner of the page, thereby fixing it.
- On a pocket made of colored paper, you can cut out any applique and glue it. Here is such interesting craft for a kindergarten with our own hands, we did it. Use the idea we have proposed, and let the photo serve as an illustrative example for you.
Video: bookmark for books "Panda" in the origami technique
Christmas ball of pasta
An excellent option for children in kindergarten will be a pasta craft. There are many variations of similar works from pasta, because they are available and everyone has in the house. So you can make a Christmas tree decoration with your own hands - a Christmas ball. In the description below you can find detailed instructions on how to make it. 
You will need:
- balloon,
- glue,
- pasta,
- dye.
Progress:
- Inflate the balloon to the desired size and tie.
- Then we apply glue to each pasta, gluing them together.
- After you have made a small blank of several macaroons with your own hands, we apply the blank to the ball (for convenience, you can fix it with PVA glue, gluing it to the ball). Thus, we glue the entire ball with pasta, leaving a gap from one piece near the knot. Now we are waiting for everything to dry, with Moment glue the drying process will be faster, but if the craft is done together with the child, it is better to use PVA.
- When everything is dry, pierce the ball with a needle and pull it out through the hole, and then glue the remaining macaroons.
- You can attach a string or ribbon so that your Christmas tree decoration could be mounted on a tree. Such a ball can be painted with paints, or you can leave it in its original form. Such beautiful craft can be easily done with a child 5, 6, 7 years old both at home and in kindergarten, through adult care... Remember our idea and the photo adjacent to it, it will certainly come in handy for you.
Video: Christmas balls from pasta do it yourself
Plasticine cow
For kids of the younger group, you can offer to create a plasticine ladybug with your own hands. Crafts from this improvised material can develop not only hand motility, but also the child's imagination both at home and in kindergarten. A cool creation designed for children 7, 8, 9, 10 years old, which can be done very simply by yourself. In order to perform such creative work right, see our master class with step-by-step instructions and a photo idea. 
You will need:
- plasticine (red, black and white),
- plastic cover, 10 - 12 cm in diameter,
- a pen,
- white sheet of paper.
Progress:
- In order to get a colorful and cheerful children's handicraft made with our own hands, we need to mold a round body from red plasticine, and from a black speck on it. Also, black plasticine is used to form the legs and head.
- You need to take a plastic transparent cover and draw a flower resembling a chamomile on it with a pen.
- Place a white sheet under the bottom of the lid so that the outline of the drawing is visible. Then glue the flower along the contour of the image different colors plasticine. In such a simple design, you can create other types of crafts for such holidays as March 8, Easter, New Year 2018 and so on. Decorate exhibitions in kindergarten with them, or simply become an original gift for friends and family.
Video: making a ladybug from plasticine with your own hands
Bee
The material for children's crafts, regarding our photo idea, can also be an ordinary plastic bottle with a volume of 0.5 liters. Such a good get-up for children in kindergarten or at home will delight everyone, because with your own hands the work will seem fun and not difficult at all. In order to figure out how to do it, let's see the step-by-step instructions with a detailed and understandable description. 
You will need:
- plastic bottle 0.5 l and 1.5 l;
- colored paper;
- paints;
- scissors.
Progress:
- A 0.5 liter bottle must be painted with paints or yellow colored paper glued onto it.
- In a similar way, make bold black lines on the bottle with your own hands.
- Cut out the eyes, mouth and antennae of the future bee on a paper cover.
- We cut out the wings from a bottle with a volume of 1.5 liters, and glue them with glue. The result is a cute little yellow bee made of ordinary waste material. Nice craft made for children in kindergarten. It will perfectly decorate any group, playground, annual thematic exhibitions and more.
Video: making a bee from plastic bottle
Vase
Another way to use unnecessary plastic bottles in crafts is to DIY a vase. This bottle can be transformed into a decorative vase with a cute face of cats or other animals. Best photo an idea for kindergarten children is presented in our article with a full description and step-by-step instructions. Help kids create something similar and creative, give them the opportunity to be proud of themselves and their achievements. 
You will need:
- Plastic bottle,
- Paints,
- Sponge (for painting),
- Marker,
- Scissors.
Progress:
- To create crafts with your own hands, you need to cut the bottle in half and take only the lower part for creativity.
- Cut off so that the edges are even and leave two triangles so that we get ears.
- We completely paint over our workpiece with white paint using a sponge.
- Draw the triangles on the ears and nose with a pink brush.
- Draw the cat's face with a marker.
- Our craft in the form of a vase or pot for fresh flowers is ready. If desired, it can be placed in a kindergarten group, somewhere on the street in the courtyard, or presented to mom on March 8 as an unprecedented originality. Such value will be very dear and pleasant to her!
Video: DIY master class on creating a vase from a plastic bottle
Craft "Cipollino"
For handicraft in kindergarten, you can use fruits and vegetables. From already sprouted onions, you can make your own handicraft "Cipollino". Such a creation can be easily done with a child 3, 4, 5 years old. In order to correctly and without problems carry out the idea we have provided, see the detailed description below with a visual photo. 
We need:
- Small head of onion,
- Jar (the diameter of the jar hole should be smaller than the onion),
- Colored paper,
- Scissors,
- Glue,
- Markers,
- Plasticine.
Progress:
- On the bulb itself, you need to draw the eyebrows, mouth and cheeks with a felt-tip pen, and make the eyes and nose with your own hands from plasticine.
- Paste the jar over with paper and draw the body of the cartoon hero on it.
- Insert the "head" of the craft into the jar. It turns out a very cute and believable Cipollino. For a kindergarten, this is a real find that will appeal to all children and educators. Even if your baby is developing at home, you can diversify his leisure time with this creative work.
Octopus
Woolen threads can also be used as material for children's crafts. You can make a funny octopus out of them with your own hands, which your child will really like. This work is very easy to do and it will not take you much time. You can watch the master class with detailed description our proposed idea with a photo to create such a creation yourself. 
We need:
- Woolen threads (60 threads, 35 cm long) and a little more for tying,
- Ribbon,
- Small plastic ball (for the head),
- Colored paper (for the eyes), or you can use ready-made ones from the store,
- Scissors.
Progress:
- To make crafts in kindergarten or at home, take the cut threads and put them together, tie them in the middle with a thread and put a ball under it. Wrap the threads around it and tie under the ball. This will serve as the head of the future octopus.
- From the remaining threads, weave braids in the form of its tentacles with our own hands.
- Draw the eyes on paper, cut and glue, or use purchased ones.
- Tie ribbons on your head, which will serve as a decoration for the craft. Our octopus from the available material at hand is ready.
Video: DIY master class on making an octopus from threads
Butterfly
One of simple crafts in kindergarten or at home there is a butterfly made of paper napkins, even a child of 3, 4, 5 years old can handle such work. This article presents step by step wizard class on this idea with a photo, so that you can easily cope with it. Such a handmade butterfly will delight anyone, and most importantly, it can be conveniently fixed anywhere - in a group on curtains, flowers, or even at home as a creative unusual decoration. 
You will need:
- Napkins,
- Pin,
- Colored paper,
- Felt pen,
- Scissors.
Progress:
- You need to take napkins of two colors of different sizes and fold them on top of each other, with a smaller napkin on top. Gather up in the middle.
- We place the napkins in a clothespin with our own hands, which will serve as a body.
- On a clothespin we draw the face of our beauty, and from colored paper we make antennae and attach them to the clothespin. All our craft in the shape of a butterfly - beauties are ready. For a kindergarten, this will be a great idea.
Video: a master class on creating a butterfly from a napkin with your own hands
bug
Of the usual flat stones small size, you can make various bugs with your own hands together with children in kindergarten. For this, it is desirable to be able to draw. Such a bug will appeal to everyone, without exception, both adults and children. And if you create them in a large number, they will look great on a shelf or in a pot with fresh flowers. To complete this craft, below you can see the full description with step-by-step instructions. 
You will need:
- Beetle-shaped pebble
- Paints,
- Glue,
- Colored paper,
- Scissors.
Progress:
- In order to create a beautiful craft for a kindergarten with your own hands quickly and easily, you need to cut out the base for the antennae and legs and glue them under the bottom of the stone.
- Paint the stone itself with paints in the form of a bug. That, in general, is the whole complexity of this creative work.
Hedgehog
You can make a hedgehog from an ordinary pine cone. This christmas craft handmade decorate the Christmas tree in kindergarten and bring pleasure from the process independent work to all children. Below you can see detailed instructions how to make such a cute hedgehog. 
You will need:
- Cone,
- Plasticine.
Progress:
- We glue the muzzle on the sharp part of the plasticine cone, on the muzzle we also make eyes and the tip of the nose with our own hands.
- Now we make legs, also from plasticine. So we get a very cute and prickly hedgehog.
- Additionally, you can make a clearing by forming leaves from plasticine and molding a mushroom. Such a wonderful craft will become great idea to acquire children's skills in applied arts.
Video: DIY master class on making a hedgehog from cones
Mushroom "Fly agaric" from plastic egg kinder

To make the kids' stay in kindergarten more interesting and memorable, it is, of course, necessary to include in the general lessons lessons, so to speak, of labor. In addition to drawing, it will be fun for children to make something with their own hands from cardboard, paper, plasticine, plastic, fabric and so on. Waste funds can also become improvised materials. Various boxes, bottles, magazines and much more that parents can easily bring for children's games. Today we want to offer you, dear teachers, to organize an unusual activity with children, which will teach them how to create small mushrooms "Amanita" with their own hands, as in the photo idea, from a simple plastic kinder egg. They are certainly found in large numbers in every home with babies. So, let's start creating crafts, referring to our provided master class with a step-by-step description of the course of action.
To work you will need:
- plastic kinder egg;
- cardboard or plastic cover for the stand;
- red cardboard for a mushroom cap;
- sequins for dots;
- stationery glue "Moment";
- satin or other ribbon;
- scissors;
- ready ladybug for decoration.
Process of creation:
- We want to warn adults right away that despite the simplicity of the work, your help and close attention will still be required. Since the glue itself and scissors will appear in the work, and this is not so safe for the guys. We take our plastic base in the form of a kinder egg and glue it to its bottom satin ribbon folded to resemble green grass.
- Flowers can be made from colored cardboard or use ready-made plastic blanks. We attach them with clerical glue to the grass, as in the photo.
- Then we will need to create a mushroom cap. Red cardboard will help us with this. We fold it in the proper way and glue the edges. Instead of black dots, we attach sequins for a more expressive look, and on top of the fly agaric we plant a ladybug bought in a store.
- We make a fly agaric “skirt” from a chiffon piece of fabric and fasten it along the edges of the red hat.
- We install the finished craft on plastic cover or cardboard by means of office glue. So our product is ready, which will serve as an excellent decoration for a group in a kindergarten. With your own hands, you can create other types of originality that will expand the imagination of kids.
Finally
So our article has come to its end, which has provided you with a lot original photos DIY craft ideas for kindergarten. We hope that you still like some of them and you will certainly include them in your program. child development even at home. Moreover, the materials at hand can be so diverse and accessible that your imagination will immediately play out, giving rise to completely new creations. Pass on your skills to the children in an accessible way, teach them to love and respect art from an early age. This will allow the younger generation to be a little kinder friend to a friend, more attentive to the world around us and its inhabitants, will teach to love and appreciate everything that is so beautiful and fragile around us.
The most real mirror in which the beauty of autumn is reflected is autumn crafts for kindergarten. How to make autumn crafts for kindergarten with your own hands?
To create interesting autumn crafts with your own hands, you can use various materials.
Autumn leaf crafts
For example, it is easy to make beautiful appliques from the leaves. All that is needed is to pick up the leaves of the desired shape and color and pre-dry them under a press. You can do without drying, especially if kids are working with the leaves - it is easier for them to handle strong and elastic material. It is enough to supplement the leaves with eyes, as they transform into animals.

From leaves and paper plate you can make a favorite child's character - a hedgehog.

Application from dried leaves "tree". To create such an applique, glue a brown trunk with branches on a white sheet of paper. And here is a great example of the "seabed" leaves applique.

Application from the leaves "seabed"
The base of the craft can be made from a leaf painted with watercolors.

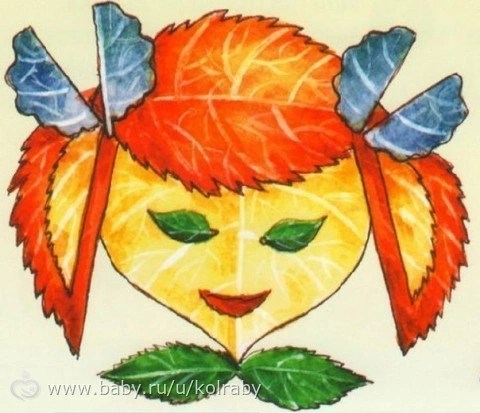
Painting from the leaves "seabed" From the autumn leaves you can lay out a real fairy of autumn. We decorate the base with watercolor stains. We cut out the hands and head of the fairy from paper. After the base dries up, glue the head. Draw a sketch of the future craft around the head with a pencil.

From the head, we begin to collect the entire image of the fairy. The hair, crown, torso and arms find their place. An immense scope for creativity gives fluffy dress fairies.

A touching autumn craft can be made from leaves and a print of a child's pen.

And this is a charming turkey made of paper and maple leaves.

A video master class will help you make a rose from maple leaves:
Autumn crafts from salt dough and plasticine
The unique shape of autumn leaves can also be used to create original pendants. For example, cut out leaves from salted dough. To do this, paint the salted dough in autumn colors.

We crush the multi-colored pieces into a single mass.

Using molds or a plastic spatula for plasticine, we cut out the leaves.

Dry and cover with colorless varnish.

An interesting herbarium can be made from salted dough. We make a round craft base out of salted dough. We leave an imprint on it with a real leaf.

First, paint the print itself with bright colors. Then we cover the rest of the craft with a thin layer of varnish or paint.

Autumn paintings from plasticine
A real masterpiece on the theme of autumn and study can be created from plasticine. First, we make a suitable sketch with a pencil (or print it from the Internet).

Sketch on the topic "start of school and autumn"
We make a background from a thin layer of purple plasticine. On this one we glue a globe and a plasticine book.

Glue letters, pencils, a pointer and a branch of autumn maple on top. Plasticine autumn applique is ready!

You can make a real picture "autumn in the forest" from plasticine on cardboard. We start working with a birch trunk.


Autumn crafts in kindergarten from cones
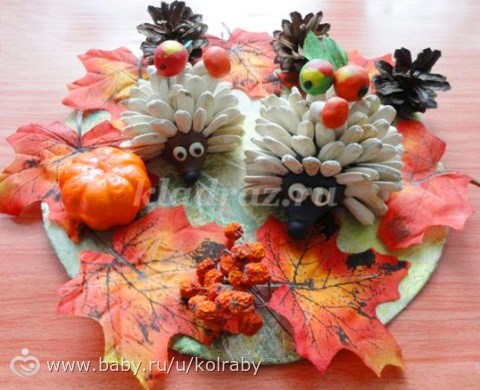
Salted dough and spruce cones can be used to make a charming forest hedgehog. To make it, you need a spruce cone, which is then disassembled into individual scales. The body of a hedgehog is decorated with these scales. The body itself is molded from salted dough.

If you want to make a large hedgehog, then you can take a plastic bottle as a base. We paint the upper part of the bottle with a black marker - this is the future muzzle of a hedgehog. We glue the fabric to the bottle, leaving the painted part free. We glue the cones onto the fabric, trying to arrange them as tightly as possible to each other.

When the entire surface with the fabric is covered with cones, it remains to glue the eyes and paper ears to the hedgehog. We fix apples, nuts, mountain ash and twigs on the back of the hedgehog. The autumn hedgehog made of cones is ready!

Look at the video on how to make a hedgehog from cones using a bottle and plasticine:
You can make a charming squirrel with an acorn from a pine cone and felt. Squirrels with acorns are real symbols of autumn.

Cones, twigs and acorns can be used to make a proud autumn deer. The details of the craft are attached to each other using plasticine.

A very original deer can be made from sticks and branches.

You can make a very beautiful autumn craft "bird nest" from natural materials. From thin twigs weave a nest. We weave the leaves into the bottom, covering the gaps between the branches. From cones, chestnuts and leaves we make a bird family - a mother and two small chicks. All parts of the craft are attached with glue. We glue the eyes and beaks to the birds and place them in the nest. Natural bird nest - done!


In the same technique, you can make a topiary from leaves.

Cones can be made very cozy.

Autumn crafts from vegetables
You can build a real frigate out of vegetables.

We make the sail from lightly boiled cabbage.

You can make paper sails near the boat - they will retain their beautiful appearance for a long time.

Experienced craftsmen with the help of dad will be able to design a real plane from zucchini and carrots.

From large and small zucchini you can make another worthy exhibit of the autumn exhibition - a turtle.

You can make a funny penguin family from a vegetable marrow.

You can make a funny cat from onions and carrots.

You can make a very funny hare out of vegetables. Using toothpicks, we connect two heads of cabbage together - this is the head and body of a bunny. We cut the zucchini into two parts - these are the future legs of the bunny. Cut the second zucchini and fix it on another head of cabbage - these are bunny ears. We make bunny handles from peeled zucchini. We make him a face and attach a carrot. Our bunny is ready. It will decorate any autumn exhibition in kindergarten!

Autumn craft - a bunny made of vegetables
Another wonderful autumn craft is an apple caterpillar. We fasten the apples together with toothpicks. Also, using toothpicks, we attach halves of carrots to the apples - these are the future legs of our caterpillar.

Using a toothpick, attach the head to the caterpillar. We decorate the head itself with eyes, mouth and horns. The craft is ready!

You can make adorable pigs from potatoes and carrots. All parts of the craft are attached to each other with toothpicks.


You can make an elephant from beets. We connect together two beets with tails using toothpicks - we get the head and body of an elephant. Using toothpicks, we fix two halves of the beet - these are the ears of an elephant.

We make him a pen out of a cardboard box, put paper grass and treat him with delicious nuts.

See what an amazing autumn zoo can be made from the gifts of autumn -.

You can make a luxurious vase for an autumn bouquet from a pumpkin.

You can make a small festive bouquet from fruits and berries. Design - any, depending on the products available for sale.

Autumn crafts from needles, chestnuts, acorns and nuts
A wonderful autumn hedgehog is obtained from plasticine or salt dough. The hedgehog's coat is made of pine needles. Even the smallest children will be interested in decorating a hedgehog with needles, sticking them one by one into soft plasticine.

Acorns and matches can be used to make a fast horse.

A beautiful craft on the theme of autumn for kindergarten can be made from horse chestnuts and acorns - if you combine them with each other with a lump of plasticine, you get very natural mushrooms. Supplement this composition with rowan berries and blades of grass - and you get a real piece of autumn forest.

Chestnut and acorn can be used to make a charming autumn squirrel. The legs and tail of the squirrel are made of fluffy wire, the tummy is made of felt, and the muzzle is decorated with factory eyes. We fasten all parts with a glue gun.

From chestnuts, you can make a symbol of wisdom - an owl. We make the wings from chestnut shells.

A very effective deer can be made from natural materials.

Autumn crafts from twigs
You can make a house out of a cardboard box and hollow dry sticks. The roof of the house is decorated with leaves, and the roof is made of dry straw.

You can make a beautiful fall from corn. Autumn dress is made from corn leaves and decorated with berries and flowers.

Craft "autumn" from corn
Foamiran is a kind of foamed rubber. This material is durable and malleable, it can be very bright and colorful. Many needlewomen and teachers have already fallen in love with him. We decided to make an autumn bouquet from foamiran. Cut out autumn leaves: birch, maple and oak. We paint them with paints, trying to emphasize the pattern of veins and edges.

To make the veins, heat the sheet with an iron and press down firmly on the twig - we will have a characteristic pattern.

We make an autumn vase from a plastic bottle and branches. We fasten the branches with double-sided adhesive tape.

We put the leaves in a vase. We supplement the bouquet with natural materials: dry twigs and cones. An autumn bouquet of foamiran is a small art event that will decorate a group or class for years to come!

Autumn applications for kindergarten
Easy to perform and beautiful applique obtained from pieces of colored paper. The child crumples pieces of paper and glues them one by one to the base - the crown of a tree.

This applique is a little more complicated than the previous one. The child crumples the leaf paper and rolls the brown paper for the trunk and branches of the tree.

A very bright and beautiful applique is obtained from colored paper and a real branch. The difference in the technique of execution is that in this applique, not pieces of colored paper are glued, but tightly twisted balls.

In this applique, we glue paper rings.

Highly original idea make fall foliage from eggshells or pasta. Pasta or shells are dyed in colored water, then dried. Material for autumn applique ready!

The application looks very interesting “ autumn tree"Made with painted pumpkin seeds.

From the painted pumpkin seeds, you can lay out the pumpkin itself using the applique technique.

Pumpkin applique
If used in work various ideas, it is very easy to turn a kindergarten group into a real kingdom of autumn.
Autumn crafts for kindergarten from paper
A very beautiful autumn decoration is obtained from paper leaves glued to a rope.

A spectacular autumn garland can be folded from paper leaves.

Beautiful themed products are also obtained with the help of other available means - for example, with the help of cardboard tubes from toilet paper: they are easily transformed into the trunks of autumn trees.

We insert autumn leaves, rowan twigs and other gifts of autumn into the rolls. We place the trees on a thick sheet of cardboard and supplement with chestnut and plasticine hedgehogs. We will have a very simple but effective autumn composition.

Very cute hedgehogs can be folded out of paper.

DIY origami autumn leaf
Watch the video how to do autumn leaf from paper:
We make some colored autumn leaves.

Such leaves can be used to make a very beautiful autumn decoration.


Autumn cards and gifts for teachers and educators
A very effective postcard as a gift to a teacher or educator can be made using the scrapbooking technique.

Another very beautiful idea performing postcards for school autumn theme- "Postcard-apron." We glue several layers to the base. Glue the lace before the last layer.

We decorate the postcard with an apron made of lace and ribbons.

As a gift to your beloved teacher or educator, you can make a stunning bouquet of sweets and corrugated paper.

Another example of an autumn candy bouquet is a bouquet on a palette with pencils. All parts of the craft are inserted into a foam base wrapped in corrugated paper.

The palette is a cardboard base with lids filled with colored plasticine.

But we made such a beautiful stationery stand in the master class ““.

From a plastic bottle, an extremely original gift wrapping with crayons turned out. We fix the upper edges of the bottle with tape and decorate with a ribbon with a bow.

Autumn drawings for kindergarten
An original master class can be given to children by teaching them to put stamps using ... an ordinary apple. To do this, prepare in advance the sheets with the contours of the tree trunks applied to them.

Invite the children to paint the trunk and wide branches with paints. While the paints are drying, make stamps: for this you need to cut a small apple into two even halves. Then we put red paint on one half and yellow on the other, and put prints around the barrel. It turns out to be a real autumn apple tree.

With wax crayons, you can draw spectacular autumn leaves... We put a piece of paper on a regular album sheet. We paint the places where the paper and the landscape sheet meet.

We remove our paper sheet. We will be left with the outline of the sheet on paper. We use leaves of different shapes and paint them in bright autumn colors. We will get a very unusual drawing "Autumn leaf fall"

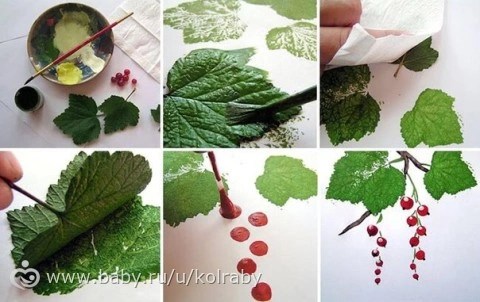
One of the famous painting techniques is painting with autumn leaves.

The leaves are dipped in paint, then leaned against a sheet of paper - a beautiful print is left.

For creating autumn drawings fruit and vegetable stamps work well. See what an amazing flower you can make from vegetable stamps.

Autumn drawing ideas for schoolchildren

Drawing "Clear autumn day with houses and a stream"

You can draw late autumn with white birch trunks.

Drawing "autumn" with birches
Autumn painting from natural materials
An idea that will fall in love with many is an overshadowing picture of natural materials. As usual, making crafts should start with collecting materials: branches, flowers, moss, leaves. We also need buckwheat, some paper, a file and glue.


Autumn applications:
We paint with paints:
Autumn crafts from plasticine:
Autumn templates for cutting


Autumn crafts in kindergarten reviews:
I really liked the animals from vegetables)) (alevita)
And I want to make chestnut and acorn mushrooms with my child in the kindergarten. (wera)
And I like a sunflower hedgehog, but it's hard to find a sunflower))