Craft catcher with your own hands from natural material. Cat and mouse from cones
Elena Abramova
Design.
Subject: « Morce kitten from cotton» .
purpose: Formation in children constructive Skills when creating mord kitten from natural and additional material.
Software tasks:
1. Promote the formation of skills in children to use natural and Additional Material For making toys.
2. To form children's skills to transmit external similarity with the kitten.
3. Develop a figurative and spatial thinking.
4. Develop interest in creativity.
5. Rail interest in the man-made world.
6. Continue to bring up the careful attitude towards animals; Friendly relationship.
Equipment: Cardboard (circles, diameter - 10-12 cm, glue, tassels, cotton, cakes, music for dynamic pause, eye paper blanks, cheeks, ears; Thin strips - mustache; Colored pencils - black and green, napkins, pictures With the image of the kitten, kittens, sample crafts in the package.
Preliminary work: viewing illustrations, photos, familiar with the life of animals (cats, kittens, reading fiction, memorizing a poem about a kitty, didactic game "Name and describe", outdoor games "Movement of animals", "Kittens and puppies", "Cat".
1. Educator:
This morning, guys, the postman brought me a parcel. But before you know from whom she, guess riddle:
This little baby
Sleeps without sheets and pellery.
And under the sulfurous ears,
Do not put the pillows.
He has four paws,
They are sharp scratches.
He walks without a coat
And boots and boots,
Does not put on anything.
This is not a child at all,
It is small (Kitty).
Educator:
That's right, guys, kitten.
The educator opens the parcel and gets a letter and morce kitten, is reading:
"Hello guys! My name is the kitten - fluffy. Everyone on Earth should have many friends. Do you have a lot of friends? I had a lot of friends, but I always offended them, so they left me and do not be friends with me anymore. You know, I am very sad and boring. I understood everything, you can not offend friends.
Never change friends.
They cannot be exchanged as a coin.
You will understand it late -
There is no closer in the world.
Never lose friends
That loss is not measured.
Old a friend will not return to you
I will not replace it with a new friend.
Help your friends again. I will be very grateful. With respect, fluffy. "
Educator:
Well, guys for business. We smear your fingers.
2. Fingering game "I'll tell about the cat"
Substitute palm (Pull the hand back hand up)
I'll tell about the cat (I stroke palm with a different hand)
One, two, three, four, five! (I alternately bend fingers on your hand)
Here is a fist, (Squeeze your fingers in the fist)
But - palm. (We spare them)
Cat sat down on her palm! (Put on the palm fingers of the second hand)
And Slowly steal, ( "Run" fingers hand to shoulder)
And skeins slowly ... (Hide the brush of another hand in the axillary depression)
Seen the mouse lives there!
3. The educator explains and shows the manufacture forers kitten.
The guys make crafts, the teacher helps children.
The educator welcomes the sequence of execution work:
First we glue the ears, we stick to a circle with ears (shape of the head);

Place your eyes, on brushes black dots.

FROM back side Brothers glue mustache.

Brushes with smear glue and glue on cotton, forming muzzle.


We glue the eyes, nose and mouth.


Our cat is ready.


4. Educator:
Well done boys! What wonderful you got kittens.
We will send me a letter with photographs of kittens, he will be very happy. But you are friends do not forget that friends offend and lose it is impossible.
Do not hesitate friends, your tenderness,
Kindness feel free to yours.
Let both of your heart and in appearance
More solar will be rays!
Smile friendly friendly
It is so decorated with your eyes.
And answer mutually politely
There will be every one in my opinion ...


Educator:
Guys! What good cause did we do today? (children's responses)
Children exhibit their work and view, share their impressions.


The bumps are, perhaps, the most common natural material from which you can make bulk toys and entertaining crafts with your own hands. Cones products can be decorating the interior or funny toys. The bumps are different: pine, spruce, cedar, fir. They also differ in size and form. For handicrafts, it is best to use bumps of different sizes, it is suitable as discontinuished and unconcerned cones, depending on the plan of work. From cones and plasticine, in the presence of fantasy and a bit of free time, you can do a large number of craft. Also, this natural material is good because, often does not require painting or other additional processing.
It is worth noting that the creation of crafts from the cones is a very exciting and interesting occupation. These crafts can be done with children in kindergarten, at school or at home in free time. Making crafts from cones, and from any other natural materialThe child feels the beauty of nature and nature itself tells him the ideas of artistic images. This type of work develops creative imagination in children, because even in an ordinary shishke you can see a cat, a mouse, a Christmas tree, a hedgehog, etc. Therefore, if you have a bump assembled in your forest at home, now it's time to find them worthy of use! In this master - class, I will tell you as possible from pine cones to make a funny cat and a mouse.
To work, we will need:
1. Pine cones of different sizes:
- 2 large - for the body and cat's head;
- 3 medium - for cat legs and mouse body;
- 2 small - for the cats of the cat.
2. Two plastic glazing;
3. Small pine twig for a cat tail;
4. Color plasticine;
5. Peter pepper;
6. Two pumpkin seeds;
6. Synthetic brush with long pile.
7. Glue "SuperMent" or adhesive gun (used as desired);
8. Scissors.

Cat from cones
We take two large open pine cones and fasten them with each other way "under the scales". The scales of the same cones - the torso should be directed to another chish, which will serve as a cat's head.

Now let's make your cat's legs. For this, 2 medium unpashes pine cones fasten with each other with plasticine brown color. To glue the cones, you can also use the glue supermanomant or adhesive gun, but if these materials are not at hand, it is perfectly suitable and ordinary plasticine, the main thing is to try to pick it up in the color of the cones.

Our kitty will "sit", so we glue your paws at the bottom of the body, placing the cones with stupid ends forward. 

Tailing Let's make out of a small young pine twig: gently cut the scissors extra centimeters of the twig, thereby lining it, and again, with the help of brown plasticine, we will attach the tail from behind to the body.


For the ears, we specifically picked up small pine chischers. Break them on the head using plasticine. 

Now it's time to arrange a face of kitty. Plasticine or glue glit plastic glazes near each other (the eyes for crafts can be easily purchased at any needlework store). The "cheeks" and a tongue are sculpted from plasticine, and "cheeks" are glued almost close to the eyes, and on top between them, in the formed snatch, glue pepper peas - turned out to be a spout.

Wait we decided to make a regular synthetic brush from a bristle, which are used during repairs. Cut together several bristles and insert them into plasticine for each "cheek". Also, the mustache can be made from ordinary pine needles. Here is a cat ready!


In my opinion, very pretty turned out! And so that she does not bored alone, we decided to make her mouse.
Mouse from the shishk
Mouse do easier simple! Ordinary, medium sizes inexpressible pine conewill serve the torso of the mouse. We stick pepper peppers to the sharp end of the cones - we get a sharp "mouse" spout. Eye will also make pepper from peas. And for the ears we will use conventional pumpkin seeds. All parts are attached with plasticine.


Mouse is ready!
I hope that you did everything just great and this master The class brought only positive emotions! Good luck to all and creative success!


Irina Demchenko
Cheldesenka.ru.
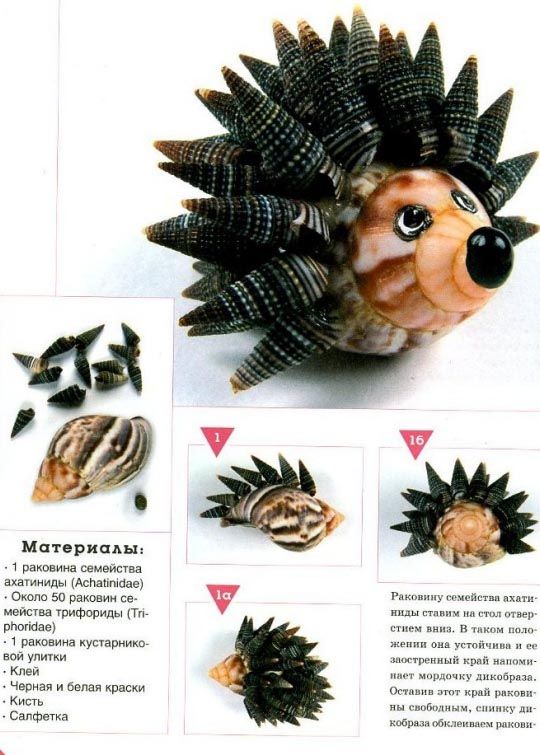
The stredge hedgehog was my first work from the "Fluffy Ball". And then ... I myself began to come up with all new and new works that I like that I really want to tell you about them. But, if you do not want to work more on my instructions, you can not read my articles further and invent new crafts from natural material yourself. All the main techniques of work are already knowing, and I sincerely wish you success.
But if you are still curious to know what else you can do from the cones, barks, pistachios, glasses, read this and the following my articles!
I do not know how you, and I really like to watch cartoons. Many characters of cartoon "fluffy", so I had almost nothing to come up with, but only to remember your favorite heroes and make them in a new way. Here, for example, the "fluffy ball" - a cat from the cartoon "Return of a prodigal parrot".
Since the "fluffy ball" is small, the face of a cat will be a yellow hat, suitable in size and shape.
Musto-nose Make the same as for a mouse.
After you stick a mustache, on the muzzle almost there will be almost no place for the eyes. Therefore, I want to offer you an eye option for small and smallest works.
Take two dried apple seeds (better more larger). Cut each in half, but not along, but across. Very carefully remove a light flesh from the widespread speaker (this can be done with a needle). And now look inside the shell. On a light background you will see a dark spot - it will be the eye. To become expressive to the eye, you need to trim (align) the shell with manicure scissors so that a small light strip remains around the dark spot. It is necessary to do it carefully because the shell is very fragile. You may have to "spoil" several apple seeds before you make two identical (or almost the same) eyes. But I hope everything will turn out.
Before you stick to the muzzle, they need to be glued with each other with an elongated sides. Now the eyes have become one detail, and you can easily choose a place for them on the cat's muzzle (you can make a stock of such details so that you have the opportunity to choose the desired to work).
Cute ears for the cat are obtained from the shell of pistachios.
The tail is made in the same way as for a mouse. But that it is thicker than a mouse, twist the threads folded several times. At the end of the tail, tie the nodule, but do not cut off the excess part. Slide the threads that were behind the nodule so that you have two end. Stretch the ends under the short rows and under the scales of the bumps so that they are clamped. Having tightening the tail to the body, you can cut off the excess part of the ends.
If the threads behind the nodule are short or too thick and do not get under the scales, cut off the extra part (behind the nodule) and tie a strong thread (in front of the nodule) to the "tail" to tighten it to the body.
cat fluffy ball handicraft from a cone with their own hands
The cat is ready, but it is not necessary for the tail of it!
Little Tip:
If any work from the "Fluffy Ball" will not stand on the table as you need, put sandpaper on the table (not the most rough, but not very smooth) and read about it with a crawler, holding in the right position.
This should be done only when the work is completed, because the details that you will attach to the "fluffy ball" can bendled or, on the contrary, straighten the craft.
Nature every year gives us many natural materials suitable for creativity every year. The process of creating with your own hands is developing artistic taste, thinking, memory of the child, is briefing. But most importantly - you can have fun and with benefit to spend time together with friends, pleased with your crafts and others.
Preparation of natural materials for their further use
Nature is the best artist, it creates such natural materials that in skillful hands turn into works of art!


Vegetable materials
Chestnuts
The fruits of chestnut have a bright brown color and a shiny surface, so they are obtained excellent crafts From natural material with your own hands. The shell of fresh chestnut is thin, easily pierced with a seboard. Chestnuts - fertile material for working with small children themselves. You can make many different dolls ,.


Store better in a cool place in boxes.
Justice
Oak fruits ripen in autumn, in September-October. Collect various shapes and magnitude.


At the same time they collect their cups (plins) on which they hold. Pludys are very often used separately from acorns as an independent natural material for various crafts.

Plunas from acorns and balls, swaded from wool
How to swim smooth balls from wool Look in the video Olga Skibina:

Plunas from the acorns and christmas bubber


You can store them for a very long time, pre-well wash and drying. But why just keep stones when you can play fun with them?)


Another way to apply images on river or sea stones See in the video from You can do it craft. You will be surprised how easy it is!
Shelli
You can collect seashells on the shores of rivers, seas, lakes during rest along with children. Many of them are original appearance, in the form - oval, in the form of scallop, elongated, etc.
Boil them for a few minutes to exemplate from living organisms. Shells are washed with a small brush (cannota), then dried, sorted by types and size. Stored at any temperature.
It is also possible to clean the shells in the whiteness and water solution at the rate of 1: 1. The top layer will disappear after a while, and the shell remains with a beautiful brilliant riding.
From large seashells are made of animal figures.

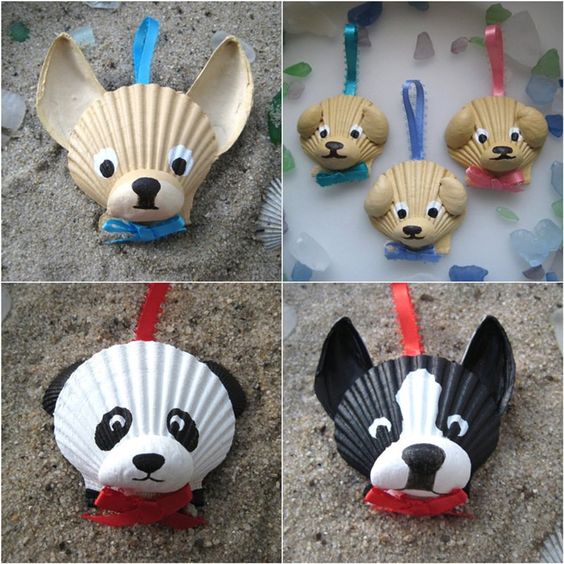
Fine applications, garlands are obtained from small shells:


Shells can be used not only as the main material, but also as additional decor (Wings in birds, ears have a dog, flower petals, etc.)


Sand
Very affordable material that can be collected in any sandbox. It differs in structure. Before working, it needs to rinse well and dry. And then you can use as a decor in your work:


Rules for the storage of natural materials
Crafts from natural material will be flawless, if after collecting, drying, pre-processing you do the properly keep these natural gifts. To do this, you need to adhere to certain rules.
- Dark, cool and well-ventilated premises are the best place to store natural materials.
- You can buy plastic containers for storing each type of materials; use cardboard boxes from under shoes, tea, candy; Take ordinary glass jars with a screw lid. For seeds, as well as for beads, it is better to make a container with a lot of compartments.
- Dried fragile flowers, easily break, so they are placed in a dense box or container. Petals are stored separately from colors. Flowers with a stem can be stored in a vase.
- Prepared leaves are also fragile. You can store them in big books. Also for preservation, decompose them into the signed boxes from under the candy, grab a little scotch, so that they did not accidentally open.
- Shells are placed in glass jars or plastic containers with a wide neck, so as not to be folded.
Additional tools for crafts from natural materials
To create beautiful craft From natural materials, you will need additional tools and materials.

It can be:
- colored paper;
- cardboard;
- trimming skin;
- loskutka fabric;
- bird feathers;
- styrofoam;
- plasticine;
- wire;
- pVA glue, "moment";
- gouache;
- morida;
- varnish, etc.
Papervery often used as an addition to natural materials. Children, bending, gluing her, make work much more interesting.
Plasticineseparate parts of simple toys at the initial stage of work. It is not very durable, but as an addition is often used in kindergarten and in elementary school.

Of wiremost often make a toy frame, connecting it parts. Copper wire diameter 0,29-0.35 mm - soft, flexible and durable - most convenient. And for the frame, the larger diameter wire is used - 1-1.5 mm.
Thicks It is better to take thick, multicolored (No. 10).
Glue It is better to take a white PVA, BF, etc. However, in kindergarten it is better to use PVA glue.
Also used to use foil, pebbles, bones from cherries, bristles.
Additional material is better stored in a small drawer with cells for each type of material.
The use of additional material depends on the plan, the mastery of children, the degree of development of imagination! Suggest your options, but more rely on children's intuition and desire.

It is also additionally necessary to have certain tools for making crafts from natural material:
- artistic scissors;
- awl;
- lobzik;
- tweezers;
- pliers and nippers;
- sewing needles;
- tassels for glue and paints;
- cotton rag for wiping glue residues.
Scissors For children, there must be with stupid ends, small, with convenient for children's hands rings.
Awlit is necessary to take from a durable material with a length of the handle about 6 cm, a diameter of about 2 cm, a stitching part - 3.5 cm
Needleneed a large sewing. It is necessary to maintain it in the needle with a thread in it.
Attention! Pliers, ticks, only adult enjoys the drill!
For applying an outline cut parts needed simple pencil. For example, a dress, doll hats, etc. It is better to take a soft pencil (2m).
Tassels (Soft for drawing, tougher for glue). It is better to buy squirrel tassels (No. 4 and 6). For glue take brushes with solid bristles.
Stack - The tool required for surface treatment of clay or plasticine. The length of the stack for children is about 12 cm. The stack can be made from the brushes that came in dissent: rounded on the one hand, and on the other hand.
Crafts from natural material for kindergarten
The kids are very loved when chestnuts and plasticine are turned into toys with which you can play. Crafts from natural material for kindergarten are not very complex, so any child will cope with an adult. Sometimes they make fruits and vegetables, but most often it is appliques from leaves and animals from cones and acorns.
Crafts from leaves and maple "helicopters"
The easiest and most affordable work even for kids is an applique of leaves. If you first make a song with a child, offer him a picture that will serve as a template. Do not hurry to do everything yourself. Offer the baby to choose the leaves as desired, so that the work turned out to be similar to the sample. So will develop creative skills your child.
Application material:
- colorful leaves;
- dense sheet A-4;
- tassels for glue;
- pVA glue;
- scissors;
- template.
To make a simple composition, you need smooth dry leaves. Put them under the press or in the book. Two days later, the material is ready. Cut the suitable parts with scissors and spread them on a sheet of paper.
Now you can glue. First the background and lower layers, and then smaller details. For example, if you want to make an elephant, then you first make a torso and head out of the leaves, and then glipe the trunk, tail, legs. If there is not enough eyes, they can be drawn by a marker or make trees from seeds.
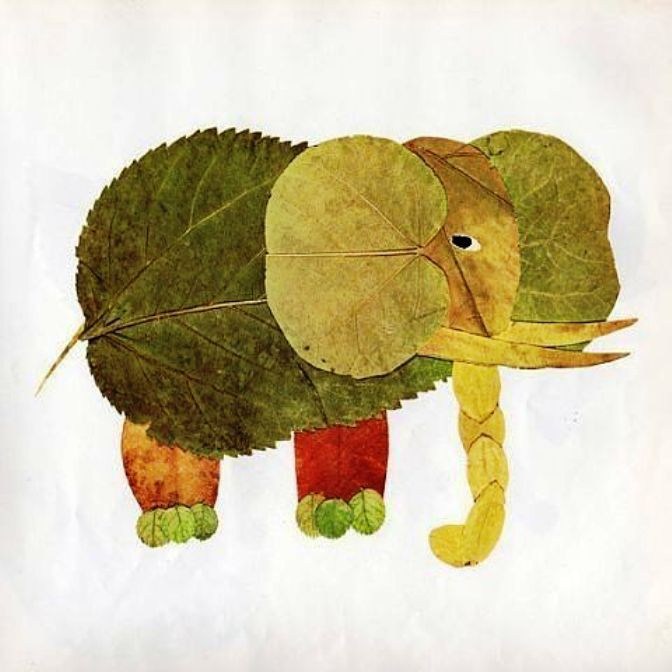
It is not necessary to do everything according to the template. You can come up with a picture yourself and create an original composition of the leaves.


Use as a supplement colored paper, markers, paints, so your appliques will be even more interesting.
Along with the leaves, "helicopters" from Clean are ideal for the crafts from natural material for a kindergarten. Just look at this miracle!

Wings Fays from Cleene Seeds

Dragonflies from maple "helicopters"
Now you are convinced, as beautiful and original can be appliques from leaves. Use these ideas for leisure with children.
Simple master classes for creating children's crafts from acorns and cones
At the end of the summer, the acorns begin to ripen, and one of them turn out beautiful crafts from natural material for kindergarten or school. They are well saved, and long autumn evenings, together with children, you can enjoy a pleasant and useful business, developing small motor Toddler's hands, fantasy and preferably.
The most common crafts from the acorns are animals and various men. From toothpicks, matches, thin twigs you can easily make legs, handles, horns and other small elements. Adult must help children pierce holes in the acorns.
For fixing small parts, you can use a glue gun, glue "super moment", but it should only do adults. And the guys are safer than fasten the parts with plasticine.

Migraikhors from the acorns do even easier! To paint acorns, you need to remove the caps from them, and after drying the paint is glued to the place.


Acorns are very beautiful for themselves, and if they are also painted acrylic paints Or nail polish, then such crafts will decorate any home.

And from painted silver paint hats can be made original decoration on the new Year's Christmas tree. The process of creating such an eco-toy is simple enough: we closely glue on the ball from the foam (you can take old christmas ball) Caps from the acorns. And spoiled new.

We found another video for you, where Niki Junior. tells what a wonderful handicraft will turn out of leaves, cones, twigs and plastic bottle. Look, learn a lot of new things.
Rubric
State budgetary pre-school educational institution
kindergarten № 98
Moscow District of St. Petersburg
Designing from natural material
"Kitty"
Caprielova Elena Vladimirovna
Educator of the senior group
purpose: Continue to teach children to use a rosehip for making a variety of crafts: fix the skill work with a sewer, the ability to analyze the sample of crafts and the roce of its implementation: to form a steady interest in working with natural material.
Material and tools: Rosehip fruits, matches without heads or twigs, pine needles, scales from a bump, sewer.
Progress.
The teacher makes a mystery
Mordeochka sucked
Shub striped,
Often washed
And with water it does not have. (children answer)
The educator shows the finished toy and suggests to consider it, divide into parts from which it is made. Then shows the sequence of action to make the toy and asks to remember it. For the head, you need to take the fruit of a rose and plant it on a small thin twig Or half matches cleaned from sulfur. The selection of eyes to break the eyes, make a mustache from pine needles, and from two sharp bowl of fir bump - ears.
For the body of the kitten, you can use two large rosehip fetus, tightly connecting them with each other with a match. Legs and tail Make from halves of matches, the ends of which paint black paint: it is the pads of the paws and the tip of the kitten's tail.
In the manufacture of this toy, awl use minimally.
Fresh rose hips are soft, and they are easy to gnaw on twigs or matches. But if fractures will be used, it is not to do without sewing. Before you start working with a sewer, the educator resembles children the safety regulations: all the operations with a seboard should be produced on the table, while the fruit of the rose rose to be larger and index fingers of the left hand. Shilo keep in his right hand and enter it into the fruit slowly, slowly, shaking left and right.
After analyzing the sample, children proceed to independently making toys, the educator controls the work of each child, helps to pump holes with a seboard.
Finished toys are put up on the table so that children can see soybeans, give them an assessment. At the end of the lesson, the remaining natural material and the tools are cleaned into place.

On the topic: Methodical development, presentations and abstracts
"How the winter kitten was surprised"
Speech development in the second youngest group "How the winter kitten was surprised" Objective: Svyaznoy Speech: Teach children make up short descriptive stories According to the description of the phenomena of nature; Sl ...
Music entertainment for children of the first youngest group "Cat Murka and Kitten Tsap-Zakaram visiting children"
Entertainment allows the means of musical and artistic activities to create joyful mood in children from meeting with animal characters ....