Craft - do-it-yourself Easter egg for a child in a kindergarten, school, for a competition: a master class. How to make an Easter egg from paper, beads, ribbons, pasta, papier-mâché, thread, newspaper, pasta, salt dough, knitted? Easter egg decorate blank
To share the Easter holiday with kids, you can make an interesting craft with your own hands in Kindergarten... Applications, drawings from unusual materials, Easter eggs and cards for children different ages- there are a lot of ideas. Step by step instructions making crafts, with a description and a photo, are given in the material below.
It's good when every child can make, even if simple, his own creation. And if with the help of these individual creative projects creating a big picture will be even better.
Application painting "Chicken and Eggs"
For example, a picture with a chicken and eggs looks very beautiful and really festive. Both children and parents who come to visit the kindergarten can make such a collective application with their own hands.
The basis is an A1 sheet of Whatman paper, the eggs are cut out of colored paper and pasted over with decorative elements and stickers. And the chicken is drawn in advance, you can also use a pre-printed drawing.
Sand cakes
Of course, the symbol of the holiday is eggs and Easter cakes. If suddenly, by a happy coincidence, it will be possible to get clean sand and bring it to the garden, children will be able to mold their Easter cakes with the help of molds. And how to decorate them - each child will come up with himself.

But more often crafts for kids for Easter are made from more familiar means.
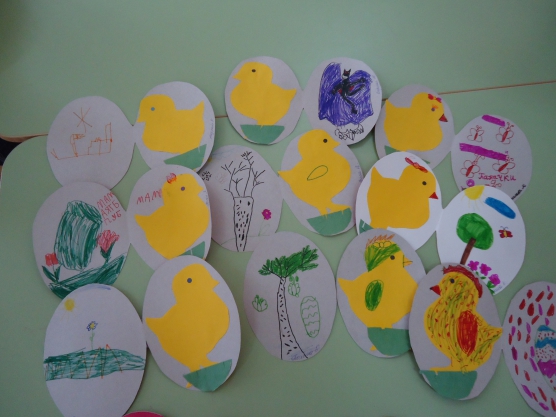
Such different chickens
For example, pretty simple craft: millet chicken.
Millet chicken
A sheet of cardboard is taken as a basis, on which contours are drawn, the beak and legs are painted over, and then sprinkled with millet. The eye can be drawn or made from a button. And the pasta of the same name is perfect as a bow.

Cotton wool chicken
Chicken is generally a winning option for Easter crafts. Children different groups can make it with their own hands from different materials... For example, let's make our chicken out of cotton pads: Let's take cotton pads as a basis and paint them with festive yellow paint. And the rest of the elements can be simply completed.

Cockerel made of threads
Here is the craft "Chicken made of threads" - also quite a feasible task for kids junior group... It is performed on a plate, which parents can then hang over the table, like a panel. Let the decoration please the eye all Easter week - after all, by the way, the holiday really lasts a long time (40 days according to the Orthodox tradition).

Easter dyes (3 options)
But what about the main symbol of the holiday - that is, a bright, beautiful egg, painted in pleasant colors? There will be no problems with this DIY Easter craft. An egg can be cut out by kids 3-4 years old, and creative imagination can be embodied in a variety of forms.
The easiest option that can be is to cut an oval out of coated paper and draw a crack on it, as if a chicken is about to hatch and congratulate everyone on the holiday.

This craft is self-sufficient, but there is another side to it. It can be used as a postcard or you can create a whole applique on it.
Continuing the theme of postcards, we can come to this version of the craft for Easter.

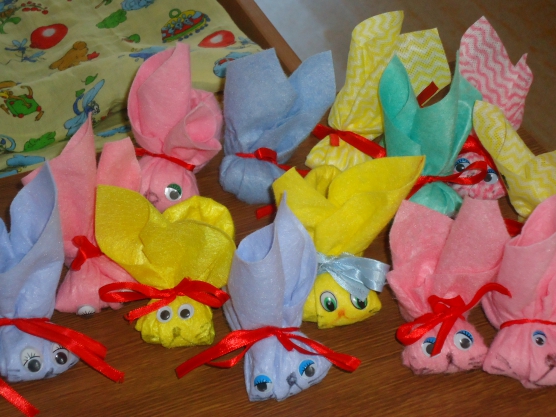
Easter bunny
Now something about rabbits. By the way, what does Easter and the bunny have to do with it? Many people know that this cheerful animal is a symbol of the main Christian holiday in some European countries and the USA. But why?
As is often the case, folk holiday overgrows with its legends, beliefs and fairy tales. According to the legends of the ancient Germanic peoples, one of the most nice days the evil goddess turned the Easter chicken ... into a hare. She wanted to steal the holiday from Christians. But nothing happened - the bunny continued to regularly lay eggs and roll them up with its paws every year so that every baby could get them.
Sharing this beautiful legend with children, you can have time to make an interesting craft for Easter - a bunny from a napkin. You only need eyes and a beautiful, bright ribbon. And the nose and face can be drawn with a felt-tip pen.

But the whole family of hares has turned out! Everyone is ready for a bright holiday!
Crafts for kindergarten with children 4-5 years old
Older kids can already create a real masterpiece with their own hands, including beautiful crafts for Easter.
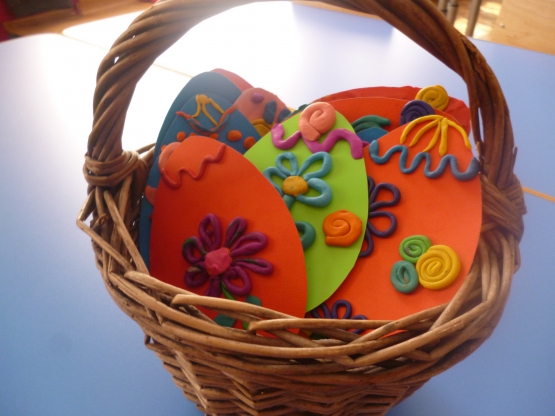
Plasticine egg
With children 4-5 years old, for example, you can organize a modeling lesson. An oval cut from colored cardboard is taken as a basis. If it bends, it is better to strengthen the oval with a second layer - the plasticine is quite heavy. In such a craft, as they say, there is full scope for imagination: you can create zigzags, spirals, bows, flowers and suns. We sculpt all the elements and figures from plasticine, and then attach them to the egg.
Here again we get real collective creativity - every child will be able to literally contribute to the celebration of Bright Easter in a basket prepared in advance.
Easter card
Here's an interesting option. easter card can be done with kids 4-5 years old. In fact, two crafts are combined here at once: the "egg" applique and the base, which is cut out of two circles with curly edges. The letters "ХВ" can be colored according to the template or even use ordinary stickers - it will turn out very neatly.

Magic tree
And here is another result collective creativity... A twig of any tree is taken as a basis (by the way, willows will look appropriate, at the same time you can tell the kids about the meaning of this have an interesting holiday like Palm Sunday).
Eggs can be made from paper, cardboard, scraps of fabric, cotton pads - in short, as your fantasy tells you. And you can decorate them for every taste. That's the beauty of the assignment: kids can realize their individual preferences, and after that - evaluate the result of collective efforts.
"Kinder" - chicken
Imagine that a chick has hatched from the eggs, as it should. Could this happen in the case of a chocolate egg - like a "kinder surprise"?
Everything can be in the imagination of kids. And it's more than possible to make a chicken from such an egg. For the beak, scallop, wings and legs, take plasticine of the corresponding colors. And you can also make a lawn out of colored cardboard, on which the chicken will comfortably sit and wait for the holiday with the children.

Cheerful family (origami)
Origami is a favorite type of children's creativity. And in some cases, an adult too. Origami perfectly calms the nervous system, relieves stress. And for kids, the paper handling technique also perfectly develops fine motor skills hands. And imagination too.
Take a yellow square sheet, make two diagonal folds. Then we bend one triangle, but not completely, but by a third of the entire diagonal.

Now we make a "step" and fold the craft in half.

We bend the legs, draw the eye. And then we put the paws inside the crafts, paint the beak. And don't forget about the wing.
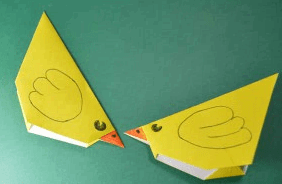
Something is missing? More precisely, someone. Of course, chickens certainly have a mother hen! They do it the same way. They just take a white sheet of paper bigger size... And of course, don't forget to attach a scallop.
It turns out a real family, which is already ready to celebrate the holiday with the kids. All figures stand confidently on the table. Therefore, parents can place them next to the main dish, where they will lie colored eggs and a fragrant cake decorated with bright sprinkles.

Egg rabbit
And of course, let's not forget about the Easter bunny. It can be made from ... an egg. More precisely, from cardboard cut out in the shape of an egg.
So, we take cardboard (you can color), cut out the egg, cut out the ears separately. Glue the ears on top of the egg, then the eyes, nose and elegant stripes on the ears. And we also decorate our rabbit with an elegant bow - it creates a cozy atmosphere. And it also helps to figure out where we have bunnies, and where are rabbits. By the way, carrots also do not hurt!
In a word, all the details are already a matter of taste and imagination.

Crafts for Easter with children 5-6 years old
Well, with such guys, you can take on more complex crafts by Easter - they will certainly be able to make all the figures shown in the photo with their own hands.
Who hatched there?
To make such a cute chicken, you need to take 2 sheets of colored paper (velvet is also suitable) - yellow and blue, paper plate, scissors and glue.
How we will proceed:
- cut the plate in a zigzag
- cut the chicken out of yellow paper
- let's draw eyes and a beak for him
- all that remains is to glue it all on paper - and now, our brand new chicken has hatched from an egg!

Chickens and a basket of balloons
Now again about chickens. From 2 small balloons and yellow threads, you can make such a cute couple.

Of course, in the same technique with children, you can make eggs with your own hands:
- The balloon is inflated.
- The surface is lubricated with PVA glue.
- Threads are wound around it, like on a cocoon.
- After complete drying, the ball is burst and removed - it has already done its job.
And the basket is made in the same way, but from a much larger ball (only the bottom is wrapped).

Unusual eggs
Eggs are generally very simple and at the same time very beautiful crafts for kindergarten. For example, kids from different groups, including preparatory ones, can make these options with their own hands. Threads and buttons are used for decoration. And also peas, lentils, cereals and other materials.


Application "Easter and Palm Sunday"
Is it possible to combine this holiday with Palm Sunday? Quite. As proof of this - here is a variant of the collective application.
It is better to make the verbos here from cotton wool - they will look natural. The sun can be printed and cut out or drawn by yourself. But the strings as a material for the nest bring a special warm note to the overall picture - after all, the holiday will be bright and cozy.

There are more than enough ideas for inspiration for Easter crafts. Easter crafts for kindergarten are different - simple and complex, made of paper and thread, for boys and girls, for toddlers and older children. And they are united by one thing - children's joy, anticipation of the holiday and a particularly pleasant mood that will surely be on the bright day of Easter.
Easter is the most important holiday Christianity. They prepare for this day, fast, and cleanse themselves in body and soul. By tradition, it is customary to visit, give gifts to relatives and friends. For children, this holiday is an anticipation of sweets after long restrictions associated with fasting. In anticipation of this bright day, they can make memorable Easter crafts in kindergarten or at home with their parents. DIY souvenirs will decorate festive table, will bring novelty to the interior of the house or room.
Children's creativity
Applied art is not only fun, but also rewarding. The interests of a child in preschool age change rapidly, as soon as he sees something new. Nobody knows what he will become when he grows up. The child will have more options for personal development if, while still in kindergarten, he gets acquainted with the basics of applied art. It is important that any creativity has a semantic load. To choose a handmade idea, it is advisable to use holiday themes: New Year, Christmas, Mother's Day ...
Crafts for Easter in kindergarten are not only an interesting activity, but also a useful lesson in terms of familiarizing with the young generation. Such creativity develops hand motor skills, trains memory and thinking, teaches to bring what has been started to its logical conclusion. At the same time, in the process of communication, speech is easily and naturally practiced.

Crafts. Easter. Kindergarten
Holy holiday Christ's Resurrection does not have a fixed date, but it always falls on a weekend and happens in April or early May. The expectation of a holiday for kids can be made less painful if, in anticipation of joyful moments, engage in fascinating applied art with them. The result of such activities at home can be successful colored paper applications, Greeting Cards for Easter, thematic compositions from natural materials.
It will be much easier for kids to make crafts for Easter in kindergarten with their own hands if their parents prepare them well at home. It is important not only to be able to properly handle scissors, pencils, glue, a brush, felt-tip pens and other devices, but also to understand the meaning of the planned work. The ability to clearly and clearly express their thoughts, to form their position on controversial issues is simply not given. This ability is developed in and is also an important and integral part of the applied arts.
The creative process for toddlers preschool age has its own characteristics. At this stage, the end result is not as important as the activity itself. How much the educators manage to interest the children will determine their involvement in the process. Whatever the result of labor, it will be important for the development of a forming personality.
Crafts for Easter in kindergarten for different age groups must differ in level of difficulty. Here, a special role is assigned to educators. They, like no one better, see the degree of development of this or that child. In one case, they can suggest how best to act at a certain stage of the lesson, in the other - to make a complex element for the baby so that he does not lag behind the general group.

When a child makes crafts for Easter in kindergarten in middle group a mentor is required. But educators do not need to over-impose their help on the pupil. Without giving him the opportunity to express his individuality, you can miss the moment of manifestation of fantasy, and this is a component of talent. Even if his work is not perfect, the main thing is that it will be original, and from this he will be proud of it.
Colored paper wreath
Simple crafts for Easter in kindergarten with your own hands are easy to make using the application method. A wreath that can be hung on a wall, refrigerator or cabinet door will serve as a good holiday reminder.
To make it, you will need thick cardboard for the base and colored paper... The composition is chosen depending on the age of the baby. These can be paper-cut flowers, butterflies, birds, insects. The number of glued elements and the complexity of their execution depend on the children's ability to cut small parts.
In order to speed up the process and not tire the kids with this activity, all the components can be prepared in advance or given an assignment at home to help parents in this matter. Their participation is also important, because not only kindergarten teachers will evaluate the results of the work.
Ready-made elements are glued to a cardboard or thick paper base. The frame of the wreath can be round or oval... If you make a longitudinal jumper in the middle, then it will be possible to additionally stick on it the letters previously cut out of paper in sequence to get the words "Christ is Risen!"

Natural material
The traditional Easter gift is optional. After removing the egg white and yolk from it, the shell washed with water can be stored for a long time. It can be decorated in various ways.
This kind of souvenirs, decorated with various cereals, look original. Crafts for Easter in kindergarten ( senior group) can already be made at a fairly high artistic level. The shell is coated with glue or paste cooked in flour. The cereals are picked up different colors, shades, sizes and textures. You can take semolina, buckwheat, rice, barley. Millet, lentils, and crushed peas will do.
These components can be stacked in rows in different order on a greased shell with paste, or laid out in the form of traditional Easter patterns. It is convenient to do this along the previously outlined contours. You can use a stencil for these purposes. The color and texture of the croup are selected by contrast. These Easter eggs look very original and elegant.

Hanging souvenir
Decorated crafts for Easter in kindergarten from a blown egg look beautiful hanging on a string or ribbon. In the child's room, such a souvenir will constantly remind of the first or next creative success. With each new holiday, the collection can grow, the decorative finish becomes more complicated. This will be a clear example of creative growth, changing preferences in the process of growing up and choosing new techniques for decorating crafts.
First, the blown egg is rinsed with water. The holes in the shell expand depending on the thickness of the thread or tape. With a needle or a bent wire, the suspension is passed through both holes. A beautiful knot in the form of a bow is knitted from the bottom, and a loop for hanging is formed on top. The length of the thread is freely selectable. Decorative finishing of such a souvenir can be done with paints or applique.

Use of scrap materials
To make a simple DIY Easter craft in a kindergarten from "Kinder", you will need a plastic container-egg of this "surprise". You will also need scissors, floss threads of different colors, beads, sequins, semolina, colored paper. You can fix all this or "Moment". For the convenience of its application, it is better to use a brush.
One half of the "egg" is smeared with glue and, until it has frozen, is wrapped in a spiral with threads, starting from the top. Layers are stacked alternately. After the glue has dried, the procedure is repeated with the second part of the container.
Sequins top and bottom. An Easter pattern in the form of a cross is laid out of beads in the middle of the egg. You can sprinkle everything on top with semolina, and cut out small flowers from colored paper and glue them at the junction of threads of different colors. Whatever the level of complexity of the craft for Easter, a souvenir made by children's hands will always be expensive and nice gift for family and friends.
I always associate Easter with the sun and light. I was happy to paint testicles and make applications for my relatives. I liked walking down the street and shouting "Christ is Risen!"
Growing up, I began to understand that for me it was family holiday when there is peace and tranquility in the soul. The approach of spring and warmth is already felt and a strong feeling is formed that something magical is about to happen.
The child also wants to instill respect for this holiday and one of the stages of such upbringing is to make a craft.
As we know, the symbols of Easter are the egg, the chicken - the meanings are symbolic and imply Life. V Christian holiday there was no Easter Bunny. It came from Western traditions, but it's interesting to make it too.
It will be very easy with children to make a paper craft. She easily takes any shape, so it will be interesting for the baby to work with her.
There are a lot of ideas from paper and cardboard, so let's start with cute figures of a hare and a chicken.

You can draw any shapes, or just a testicle, to which add eyes and a mouth.

Divide half of the figure with a horizontal line.

And from it at a distance of 1 cm we draw parallel lines.

Carefully begin to cut. You also need to cut out five strips of a different color 1 centimeter wide.

One edge of the strips of a different color must be glued. For this, tape or glue is suitable. If you have scotch tape, wrap it on the wrong side.

Thread the strips alternating with the main ones. You will get a weaving technique.

All strips should be the same width, then the result will look neater.
And here's another idea for cute testicles with pet pockets.

A paper stand in the form of a chicken-laying hen. Very bright and thematic craft.

Using this template, you can cut out the hen and glue the stand itself.

An interesting option for a stand from a tray for eggs and chicken made of cardboard.

All with the same paper tray, you can make another version of the coasters.

Cut the tray so that there is one divider and one place for the egg. Remove all unnecessary paper and backing in front of the separator.

Let's paint the workpiece in White color and glue the eyes, beak and comb.

The diagram is shown below.

We cut out according to the template, bend all the allowances and side parts so that the basket can take a semicircular shape.

We glue the allowances and the front sides of the handles.

For those who make postcards, I found such a cute tsipushka. I could not pass by it, by the way, it was made using the scrapbooking technique. It was necessary to come up with the idea to make the eyes of the buttons.

For the next applique, we will take many colorful stripes and two sheets of cardboard. One will be the base on which we will glue all the strips in order under each other.
And in another sheet of cardboard, we will cut out an oval in the shape of an egg and glue it on top of the blank.

We can also create such wonderful bunny-shaped coasters from cardboard. Cut a strip 8 centimeters wide from the cardboard. We form a circle, having previously measured it in the widest part of the egg. And we glue the sides with hot glue or connect with a stapler. Then we measure the bottom and glue it from below. It remains only to add ears and eyes.

Nice present again in shape eggshell can be done in five minutes.

Use this template, which can be sent to print right away.

And any child will be delighted with the thematic garland. Look how rosy and festive she looks, I immediately wanted to smile and start creating.

And here are the silhouettes of bunnies for cutting.

Make more workpieces. It is better to take double-sided and thick paper.

We glue the tail, it can be made from cotton wool or a strand and we connect all the silhouettes.

A funny and very simple congratulations on this. happy holiday you can create in the form of a postcard.

And also a funny wreath for inspiration. You need to find ribbons for him, disposable plate and many different backgrounds printed on paper.

To cut out identical ovals, you need a shape. These helpers are sold at craft stores or in the cookie baking section.

On the glue, lay on top of each other, begin to form egg rows.

There are always a huge number of ideas from paper. As you can see, all crafts are created very quickly, and they are easy to dispose of if you do not want to save them as a keepsake.
Easter crafts made of felt
Chickens, baskets and the testicles themselves are made of felt.
I liked the idea when the fabric is shaped like an egg and beautifully decorated. They can be folded into a wreath or hung on willows, thus making an Easter tree.

Attach loops or string to the blanks so that you can decorate the willow or curtains with them.

The shape of the egg is very simple, but at the same time it gives a lot of room to the imagination.

See how the craftswoman came up with the idea to put the blanks on the skewers. So it is more convenient to hold them, and you can still stick them in the ground with flowers or put them in a vase.

In felt, it is important to close up the edges well so that the inner filling in the form of cotton wool or padding polyester does not crawl out through the seams, otherwise the present will not look neat.

Felt happens different thickness... Do not buy too fat, on such a testicle it will look rough and awkward. It is optimal to choose a thickness of 1.5 millimeters.
Crochet egg patterns
Incredibly beautiful crafts are obtained when the egg is crocheted. Delicate openwork composition on the table will immediately attract the attention of guests, and delight you with its beauty.
Here are some knitting patterns for inspiration so you can start getting ready now.

You can simply alternate double crochets in different colors, or use one of the patterns below.

Here are three more knitting patterns. They are immediately shown how they will look on the egg.

And this is what an egg looks like, tied with single crochet or "elastic". Looks very cool too.

We do not take a real egg, it is too fragile for needlework. Let's use a balloon, inflating it about the same size as the testicle.
Crafts for Easter from plastic bottles to school
A very cute and functional idea that any student can make. Make a storage container.
It is not a shame to show such a craft at school and is convenient to use in everyday life. You can store small things in it and fill it with felt circles, then it will turn out great option decor in the nursery.

Funny animals, right? For them, you will need any bottle, but a small volume is better, a napkin for pastries and decor. The entire master class is shown on the collage.

Also, bottles can be made into a basket, in which the child will neatly lay out his own painted testicles.

Specifically, in this idea, I think the teeth are superfluous, but I do not insist on it.
How to make a satin ribbon craft
With the help of ribbons, you can make an interesting egg decor. Of course, we again take not a real one with a thin shell, but a homemade base. It is better to buy it, but it can be made of foam rubber or polystyrene foam.

Also, such forms in the form of eggs are created from papier-mâché. There are a lot of base options.
As a last resort, you can take an egg, pierce it at the top and carefully pour the white and yolk through a small hole, and use an almost intact shell as a base.

Secure the edges of the tapes with tape or hot glue.

And we wrap, each time fixing the ends from below. Try to keep the strips pressed tightly and there are no gaps between them.
I also applied pieces of double-sided tape on the sides so that the tapes did not move relative to each other.
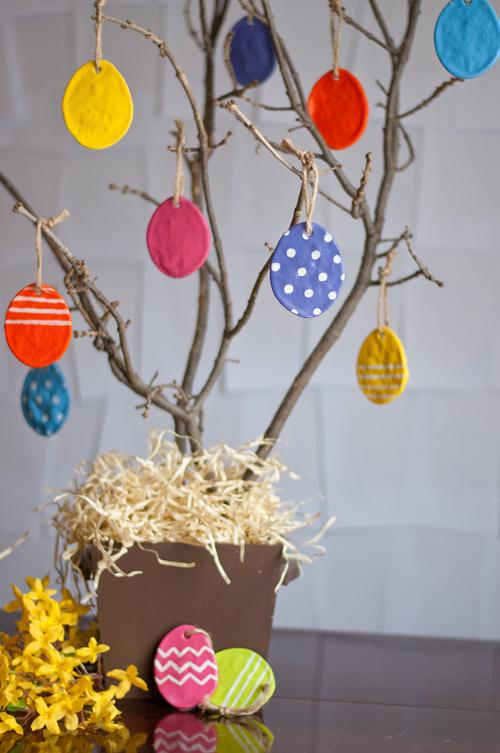
Master class from improvised means at home (threads, dough, etc.)
I really liked the thread shell. Such a cute applique is obtained.
And after all, you can put anything inside, you want a chicken, or you want colorful eggs and sweets. The idea is just great.

For this craft, we will use threads, paste or PVA glue and a balloon.
We inflate the ball, tie the tail tightly so that it does not decrease in size until our structure dries up.

Cooking paste. To do this, take 1 liter of water and 4 tablespoons. flour.
Pour water into the flour and stir to break up the lumps.
Then we put the mixture on the stove and heat, bringing it to a state of a viscous and sticky consistency. We leave it to cool, and then try it for stickiness. It should adhere well.

We wrap the ball with threads, smearing each layer abundantly with an adhesive mixture. You don't have to save it, because the product is completely natural and easily made if the required volume is suddenly not enough.

We are waiting for the paste to dry completely and pop the ball inside. To see the inside, you need to carefully cut out a circle with scissors.

I also liked the children's puff pastry idea. It turns out very colorful and harmless.

Knead the dough in a 1: 1 ratio. So, we will take 1 glass of flour, 1 glass of salt. This will be our base, then we introduce five tablespoons. sunflower oil and add one glass of flour until a soft and elastic dough is obtained.

We give the dough finished form, make holes, mark the drawing and dry.

You can dry it for a day in the sun or 3-4 hours in a warm oven.
Now it remains to paint the blanks with gouache or food colors.

Pass the string through the holes and decorate the twigs, thus creating an Easter tree.

An interesting option for creating an applique using a potato stamp.

Cut off a piece from the tuber. Beforehand, rinse the peel well so that the earth does not crumble onto the craft.

We give the insides of the stamp a simple drawing in the form of zigzags, circles or other simple geometric shapes... We try to make the distance between the lines of the pattern.

We paint the protruding elements and apply to paper.

Here's what you can get. Believe me, such work will captivate a child for a couple of hours.

If you have napkins and disposable spoons left from last year's picnic, we will also use them.

And from a disposable cup we will create a bunny face.

The fantasy of needlewomen and mothers knows no bounds. And ordinary household things you can create a craft.
Simple crafts for Easter from cotton pads
The little ones also have something to do, such as making wonderful chickens out of cotton pads. They not only need to be glued in the right places, but also painted in the desired color. Sprinkle cereals on the glue at the beak, a yachka or semolina will do.
The child will develop fine motor skills and imagination and a warm attitude towards Easter will already begin to form.

Another interesting and simple idea... Self-adhesive paper can be used for the beak and eye.

We use a cotton pad and a disposable spoon. You will need a piece of paper for the wings.

Easter crafts are done quickly and the child does not have time to get tired or overworked.
How to braid an egg with beads and weaving patterns
I think the process of braiding the form with beads is also a craft. It goes not so much as decorating eggs, but rather interesting itself creative work... Yes, and you can take not the testicles themselves, as I wrote above, but any other basis.

The process starts at the very top. A row of six beads is made, then one bead is added between them first, then two beads. And the result is an increase in width.

As soon as you reach the widest part of the base, then, according to the same principle as you started, proportionally reduce the number of beads.

Here is another interesting pattern for weaving.

And you can make a craft in the shape of a cake, it turns out very believable and festive.

Thank you, dear readers, for your attention, bookmark the article so as not to lose it when you want to start creating with your baby.
In our article, you will learn how you can make an Easter egg with your own hands.
In our country, Easter is loved as well as New Year and Christmas. That is why most people start preparing for this bright day prematurely. And the first thing they do is start cooking pleasant surprises for the nearest and dearest.
Most people just go to the nearest mall and buy the right amount of Easter souvenirs there. Of course, you can do the same. But if you want your family to really like your present, then try to make it yourself.
DIY Easter egg made of beads: schemes
Easter egg from beads
 Scheme No. 1
  Scheme No. 2
  Scheme No. 3
 Some novice needlewomen think that it is impossible to decorate an egg with beads without special skills. In fact, beads are exactly the decorative material that even Small child... If you, at all, have no idea what beading is, then use the most simple method decorating an Easter egg with beads.
To begin with, mix beads of different colors in a small bowl, and then take a plaster egg pre-greased with glue and roll it as carefully as possible in bright beads. After they completely cover the entire surface, gently put it to dry. After 6 hours, the Easter egg can be beautifully wrapped and presented to your sister or close friend.
Master class on pasting eggs with a bead thread:
- First, take a natural or artificial egg (it can be made of wood or plaster), degrease it as thoroughly as possible and let it dry.
- While this is happening, start making a thread from beads. Take ordinary fishing line or thin wire and start stringing bright beads on it. Since later you will wrap the egg with this blank, you can immediately gain a great length.
- Next, we take the egg in our hands, grease its widest part with glue and carefully form the first circle of beads. We wait until it grabs a little, grease the surface of the Easter egg again with glue and wrap another row on it.
- We continue such actions until the entire surface of our presentation is closed with a thread of beads. After that, we leave it alone for at least 10 hours and only after this time we attach a thread to it, for which it can be hung.
If desired, you can replace a simple bead thread with some beautiful pattern... Above, we have offered you some interesting schemes that will make your gift truly original.
DIY Easter egg made of paper from origami modules: instructions

 Picture No. 1
  Picture No. 2
 Figure №3
 To make an Easter egg using the technique modular origami all you need is colored paper, scissors and a little patience. If you wish, you can also additionally coat the fastening parts with PVA glue, in this case the finished product will turn out to be stronger.
Instructions:
- First of all, take colored paper and fold it as shown in picture # 1. Do not be lazy and immediately make the required number of blanks. If you want to create an interesting pattern, then make blanks in 2 or 3 different colors.
- At the next stage, you can start connecting ready-made modules with each other. How to do it correctly is shown in figure 2. Try to do everything as correctly as possible, because if at least one model stands up incorrectly, the holiday craft may not work.
- After several full-fledged circles are formed from the models, proceed directly to creating an Easter egg. Recommendations for collecting origami models can be found in Figure 3. In order for your craft to take on the desired shape, gradually reduce the number of models that you use to create the next row.
DIY Easter egg made of paper using applique technique

 Easter egg applique
 Template # 1
 Template # 2
  Template # 3
 Since the application technique does not require any special skills, you can make such an Easter egg even with a small child.
To create it you will need:
- Colored cardboard
- Colored paper
- Satin ribbons
- Scissors
- The simplest template
So:
- Take the cardboard suitable color, attach a template to it and circle it with a simple pencil
- Next, take scissors and carefully cut the drawing along the resulting contour.
- Put it aside for a while and start making decor.
- Cut a few flowers, green leaves, willow twigs, or a small chicken out of colored paper
- Glue the resulting blanks on a cardboard egg so that in the end you get an interesting plot
- If you wish, decorate the Easter applique with small satin bows
Crochet Easter egg: diagram, description
 Scheme No. 1
  Scheme No. 2
 Scheme No. 3
 Of course, you cannot eat a knitted Easter egg, but such a souvenir will definitely be a wonderful gift. And if you still try to make it exclusively from threads and cotton or synthetic winterizer filler, then in the end you will get a pretty cute toy for a child.
Also, such knitted gifts can be used to decorate the house. Since they turn out to be practically weightless, you can decorate the window with them by simply hanging them randomly on wooden branches.
Process description:
- So, type in the required number of air loops and connect them in a circle. This will be the wider part of the egg.
- In the next step, we begin to knit two
- Next, we knit a row with simple air columns
- Then we knit a row, making an addition through one loop
- After that, we knit a row again with ordinary viscous
- Next, we make an addition again on every second loop.
- After that we knit 4-6 rows with an ordinary column
- If you did everything right, then you get half an egg.
- Next, start alternating simple rows with rows in which a decrease will be made in every second loop
- Continue knitting in this way until the hole of the workpiece closes.

 Easter egg from pasta and balloon
  Easter egg from pasta: recommendations for making
 Easter eggs made from pasta always turn out to be very beautiful. Such a decorative material can be painted with any coloring agents available to you, it can be like ordinary paints for drawing and aerosol. Also, in this case, you will have the opportunity to choose the size of the future Easter presentation.
If you want, you can make it as large as possible. Yes, and if you want to end up with a very beautiful thing, then use pasta in the form of butterflies, feathers, circles, shells and flowers to create it.
- First of all, think about how large you want to get the egg, and then inflate the balloon to the desired size (preferably oval).
- Place it in a china bowl to make it more stable. If you will be making an Easter egg in which you can put sweets or cookies, then mark the place of the proposed slot with a felt-tip pen.
- Next, we moisten the brush with glue and coat a small area of the balloon with it. Gently lay this part with pasta and let it grab a little.
- Continue these steps until the entire space of the ball is filled with pasta. At this stage, the workpiece is simply set aside until it dries completely.
- Once you see that the glue is completely dry, you can pop the ball and gently pull it out of the resulting shell.
- Basically, if you like what you get, you can simply paint the egg in the desired color and attach a loop to it.
- In case you want something more original, you can try decorating the Easter egg with an additional pattern of pasta, ribbons and large beads.
DIY Easter eggs from threads
 Manufacturing recommendations
 Ideas for needlewomen
 An Easter egg made of threads is made according to the same principle as the previous craft. In this case, you will also need to inflate the balloon to the desired size, and then wrap it as tightly as possible with threads of the selected color. If you want your egg to look more colorful, then you can try adding strands of a different color from time to time.
When you see that the entire surface of the ball is covered with threads, take a brush and use it to liberally grease the workpiece with glue. Do everything as carefully as possible, without missing the smallest section. When this process is over, place the bead in a bowl and wait until the glue is completely dry. As soon as this happens, you will need to burst the balloon and carefully remove it through some hole.
But still remember that in this case, too, there are nuances of making an Easter egg. If you want it to be as light and delicate as possible, then wrap the ball in such a way that its color is clearly visible through the gaps between the threads. If in the end you want to get a product that looks as much like an egg as possible, then try to wrap the ball without the slightest gaps.
DIY papier-mâché Easter eggs

 Bright Easter eggs
 Papier-mâché eggs
 Using the papier-mâché technique, you can also create a custom Easter egg, if you wish, you can cut a circle in the desired size in it and your product will turn out to be hollow. This will make it possible to additionally decorate the Easter craft from the inside. As for the form that will be pasted over with paper, then in this case you will have a choice.
Depending on what you want to end up with, you can use the same balloon or a plaster piece. The latter can be bought at a craft store or you can make it yourself by simply pouring plaster solution into a mold from a kinder.
So:
- Chop bright napkins into small pieces in advance and white paper.
- Lubricate the balloon with a thick layer of glue and begin to lay out the first layer of napkins.
- When finished, grease it with glue again and repeat the procedure.
- Next, we lay the napkins with ordinary white paper, coat it with glue, and then put 2-3 layers of napkins again.
- If you will be making a non-hollow egg, then using white paper is optional.
- In order for the Easter craft to withstand additional decor, you should have at least 8 layers of paper on the ball.
- Next, we wait until all the layers are dry, take a ball out of the resulting egg and decorate it with ribbons, beads and sequins.
Easter eggs from newspaper tubes

 Eggs from newspaper tubes
 Weaving pattern # 1
  Weaving pattern # 2
 Weaving pattern # 3
  Weaving pattern # 4
 If you really want to surprise your household, then try making an Easter egg from newspaper tubes. Such a product is woven quite easily, so if you wish, you can quickly make a large number of holiday presents of different sizes. If you do not plan to paint over them with paint in the future, then take newspapers with colored drawings for the manufacture of tubes.
Yes, and remember, in order for the egg to weave well, the tubes must be the same size and in no case should they be very thick. For those who will be making such a craft for the first time, we present to your attention an interesting master class.
DIY Easter eggs from salted dough

 Easter egg made in the first way
 Easter eggs made in the second way
 You need to start making such an Easter craft from making dough. In order for it to turn out right, you will need to take equal parts of salt and flour, mix it all with small amount plain water and knead the dough.
To make it more pliable, you can add 2-3 tablespoons of PVA glue to it. Once the dough is ready, you can start forming the eggs. They can be done in two ways.
First way:
- Roll out the dough into a thin layer and use the molds to cut out the required number of eggs
- Take a pencil or stick and poke holes in the resulting blanks
- Dry the blanks in the oven, let them cool, and then paint as you please
Second way:
- Make an oval blank out of cling foil
- Place it in pre-rolled dough and dry it a little at room temperature
- After that, send it to the oven for 3-4 hours, and then take it out and start decorating
Craft: Easter egg from ribbons using the kanzashi technique: instructions, photo
 Easter egg from ribbons using the kanzashi technique
 Egg rainbow
 The kanzashi technique involves the use of satin ribbons for decorating. And since you will not be able to glue them together, you will be sewing them together with sewing pins. For this reason, it will be better if you buy or make the desired shape from foam. Since this material has a soft structure, you can easily stick the required number of pins into it.
To make Easter crafts using the kanzanshi technique, you will need:
- Quality Satin Ribbon
- Sharp scissors
- Sewing pins
- Styrofoam mold
- Lighter
So:
- First, cut the satin ribbon into pieces and singe the edges with a lighter (you can replace the lighter with a candle if you like).
- Next, fold each square so that it forms a triangle, and then bend its edges to the middle, burn them with a flame and press well together.
- As a result, you should have blanks that visually resemble small flower petals.
- The petals prepared in this way must be taken one at a time, applied to the foam form and fixed with a pin.
- It is best to start forming the Easter egg from the narrowest part of the craft. It is necessary to lay the petals in rows, carefully securing them with pins.
Craft: Easter egg from ribbons using the artichoke technique: instructions, photo
 Easter egg from ribbons using artichoke technique
 Easter egg made from ribbons
 Artichoke egg
 The artichoke technique is somewhat similar to the kanzanshi technique. In this case, you will also need to use satin ribbons, although they will be cut into longer pieces. They will need to be folded in a special way, directly on the foam blank and secured with sewing pins.
So:
 Picture No. 1
 - First, take a satin ribbon and cut it into pieces. Depending on the size of the finished product, their length can range from 8 to 15 centimeters. Then take a piece satin ribbon place it on the foam mold, bend it as shown in picture # 1 and secure with a pin.
 Picture No. 2
 - Having formed the first petal and securing it, start making the next one. To do this, place the tape as close as possible to the first petal and fix it with pins. How this is done correctly is shown in Figure 2.

 Figure №3
 - Form such petals, lay them in rows until you completely cover the entire area of the workpiece. When you get to the top, make a buttonhole from pieces of satin ribbon and sew it to the top petal with ordinary threads (picture # 3).
Craft: quilling ribbon Easter egg
 Easter quilling idea
 Picture No. 2
 There are several ways to make an Easter egg using the quilling technique. The first is suitable even for those people who have never done needlework in their lives. In this case, you will need to make a circle from multi-colored ribbons of the required diameter, and then carefully form one half of an egg from the resulting blank. To do this, you will need to press your finger on the center of the circle and gently bend it outward.
After that, in the same way, you will need to make the second half of the holiday product, and then use glue to glue them together. The second method is more complicated, but the result will be more interesting. In this case, you will first need to make a plaster blank, prepare a volumetric decor from paper, and then fix it with glue.
Decoupage and Decorating Easter Wooden Eggs

 Pink easter egg
 Easter egg in vintage style
 Rustic Ornamnet on Easter Egg
 The decoupage technique is more suitable than others for decorating wooden Easter eggs. Due to the fact that paper is almost instantly glued to wood, you can quickly create a real masterpiece. But remember, before proceeding directly to decorating, the wooden blank must be sanded with the finest sandpaper, and then degreased.
Only in this case will you be able to place the drawing on the surface as evenly and correctly as possible. As for the decoration of such festive products, then you will definitely not be limited in your choice. If you wish, you can decorate the finished egg with beads, rhinestones, sequins, colorful ribbons, bright feathers and even dried flowers
Video: Easter eggs made of plastic
Easter is not only the most important religious holiday, but also an excellent occasion for joint creativity with children. The traditions of celebrating this event have developed over the centuries, and historically it has developed that decorated eggs have become the symbol of Easter. In Catholic culture, an integral character is Easter bunny who was so loved by children.
Rabbits and eggs in Western European culture are strongly associated with fertility, a symbol of spring and life. Christians regarded Easter not only as a tradition of praising Christ's Resurrection, but also as a celebration of the end of Great Lent. From here, special butter cakes, decorated eggs, which have become an undoubted symbol of Christian Easter, have passed into modern times.
Such bright holiday with many attributes and traditions is perfectly played in children's creativity allowing not only to develop imagination, creative thinking and the motor skills of a little person, but also to acquaint in game form with the traditions and culture of the people and the country in which the baby lives. And, of course, what could be better than a pleasant creative hour with mom and dad. Today we will analyze in detail and share the secrets of how to do interesting crafts for Easter in kindergarten with their own hands.
Interesting children's crafts with their own hands
When choosing a craft for Easter for preschoolers, it is worth paying attention not only to the beauty and features of the performance, it is very important that the child can take a direct part in creating a family masterpiece. You must admit that this is not a competition between parents from the series “who has hands where they need it from”, but first of all it is a learning process for a child. Joint creativity teaches the kid perseverance, subtle manipulations, develops thinking and imagination, and also teaches to work in a team (yes, yes, you understood everything correctly).
# 1. "Basket with Chickens"
What is necessary :
Colored paper, thick cardboard, decoration tape, scissors, PVA glue, kinder eggs (yellow capsules for toys), plasticine, foam blanks in the form of eggs.
How to do:
1. Cut out a wide strip from a sheet of cardboard - this is our future base of the basket. We glue the smaller edges of the resulting rectangle in such a way that we get a kind of tube;
2. Our basket needs a bottom. It can be made of paper, for this we place the base of the basket on a sheet and outline it with a pencil. We cut out the workpiece, having previously stepped back from the edge a couple of centimeters. Several cross-cuts can be made on the indent for easy gluing to the base of the basket. As a result, you should get a basket with a paper bottom;
3. On a sheet of colored paper, mark the middle and draw a transverse line. From the parallel lines of the edges, we mark a distance equal to the height of our basket, we also draw along a transverse line on each side. We should have 3 lines in the middle of the sheet, and if we measure the length from the edge of the sheet of paper to the nearest drawn line, it should be equal to the height of the basket;
4. Fold the sheet in half and make equal cuts with scissors from fold to line. If you unfold the sheet again, it turns out that there will be cuts in the middle, and if it is bent in half, then a kind of paper loops. This will be the decoration of the basket. We put one half of the sheet to the basket and glue the seams, after which we fold the sheet inside the basket, and then glue it. We should have it so that the paper loops play the role of a kind of border, as in the photo;
5. Cut a sheet of colored paper of green (or any other color) into strips - this will be the filler of the nest (you can use paper for quilling). We put it in a basket;
6. Cut out the "handle" of the basket from paper or cardboard and glue it;
7. Getting started with chickens. We sculpt combs, beaks and eyes from plasticine, and then we put them in a basket on an impromptu nest;
8. Add styrofoam testicles to the composition;
9. The finishing touch will be a decorative ribbon with a nice bow.
# 2. "Easter basket"

What is necessary:
A small-sized ready-made basket (you can make a paper one by analogy with the previous craft), gouache, brushes, wooden egg blanks or chicken eggs.
How to do:
1. Color the eggs in any shape with gouache or acrylic paints... To fix the result, you can sprinkle with fixing varnish. If real chicken eggs are used, then using a needle, you should carefully remove the yolk and white;
2. Place the eggs beautifully in the basket. This craft is simple to perform and is suitable for creativity with younger children.
No. 3. "Basket with butterflies"

What is necessary:
A small rectangular or square box, PVA glue, scrapbooking paper, plain colored paper, butterfly blanks, willow twigs or any suitable ones, egg blanks, sparkles, decorative bows.
How to do :
1. We decorate our basket with scrapbooking paper, fixing it with glue. If there is enough paper, you can arrange the interior as well. We randomly glue the blanks of butterflies to the basket. If there are no ready-made butterflies, they can be cut out of paper and glued, having previously been bent along the vertical axis;
2. "Grass" on the sides of the basket is a strip of paper cut from top to middle. We leave the lower part intact and put glue on it, and then glue it on the inside of the basket. If the paper is single-sided, front side must look outward;
3. Decorate the eggs arbitrarily. V in this case red food coloring and glitter were used. We put eggs in the basket. You can use a filler in the form of cut strips of paper;
4. Cut the willow branches to the same length and set them in the corners of the basket at an angle so that the tips meet at one point. For strength, we plant the bases of the branches on glue;
5. Decorate the finished craft with decorative bows.
No. 4. "Plasticine application"

What is necessary:
Colored cardboard, gouache, brush, pencil, plasticine.
How to do:
1. Draw eggs in random order on a sheet of colored cardboard, paint with gouache;
2. Decorate the resulting Easter eggs with plasticine. This is a great option for a spectacular craft for younger age groups, it perfectly develops fine motor skills and thinking.
No. 5. "Easter Falls"

What is necessary:
A mug and a cup (preferably a pair), hot melt glue, a two-wire wire, a piece of sisal, decorations in the form of styrofoam eggs, flowers and other attributes (at your discretion).
How to do:
1. The whole difficulty is to bend and position the wire so that the structure is stable. To do this, it is necessary to ensure that the emphasis of the cup on the structure is minimal. We bend the wire in such a way as to secure the saucer and cup. First, we glue with hot melt glue to the saucer, the layer of glue must be very abundant, otherwise the design will be very unreliable;
2. When the glue is dry, glue the cup, while the end of the wire should rest against the bottom of the cup for reliability. Also pour abundantly with hot melt glue and wait until it dries;
3. Now is the time for creativity. To hide an unseemly wire, you can use sisal by wrapping it around. Optionally, you can use something else;
4. Decorate with styrofoam eggs, flowers and other decor, trying to hide the wire and glue as much as possible. We also fix all decorative elements with glue.
No. 6. "Golden basket"

What is necessary:
Base (thin plywood, piece of wood, etc.), curly pasta (rings, bows, etc.), PVA glue, hot melt glue, paint in cans, a small deep bowl, foil, Easter egg blanks and any decorative elements.
How to do:
1. We make a basket, for this you need to find a bowl that is suitable in shape. Wrap the bowl with foil and glue the pasta round shape as tightly as possible to each other, leave overnight in an inverted position;
2. Carefully separate the bowl from the pasta structure. We paint the resulting product from a spray can;
3. We glue the pasta basket with hot melt glue on the base and fill it with decorative elements in the form of eggs, chickens, etc .;
4. Decorate the perimeter with pre-colored pasta bows.
No. 7. "Easter panel made of salt dough"

What is necessary:
Colored salt dough (you can make it yourself), plasticine, white salt dough, colored cardboard, glue, decorative items, gouache.
How to do:
1. Roll out the white dough base. It is important that it is at least 1-2 cm thick;
2. Draw Easter eggs in any form using paints. We decorate eggs with elements of colored puff pastry and plasticine in any shape;
3. If desired, you can use not only plastic materials. We cut out chickens, flowers and other decorative elements from colored cardboard, put them on glue;
4. Dry the resulting panel on a radiator or in the open sun. A coat of varnish can be applied to give a glossy shine.
No. 8. "Pasta testicle"

What is necessary:
Curly pasta, a balloon, a sleeve from a wide adhesive tape, a soft lining under the "nest" (we have a piece of foamed polyethylene), food coloring, paint in a spray can (gold), glue, a piece of yellow cardboard, a straw bowl for a nest, feathers and any decorative elements.
How to do:
1. Preparing pasta for painting. We paint the round ones with paint from a balloon, and the "shells" with food coloring.
2. Inflate the balloon to medium size and glue the golden pasta to it with glue, remembering to leave a hole on the side. When the glue is dry, pop the ball and remove it. It turned out a golden pasta egg, which needs to be decorated.
3. At the bottom of the egg, put a foam foam pad (you can use any soft material), and on top of it a piece of yellow cardboard.
4. Making a nest with chickens: glue a straw nest and colored feathers on a yellow cardboard. You can take a finished toy or decoration, as in our case: a yellow chicken and an egg are sitting inside a straw nest.
5. The only thing left is to decorate the hole, the top of the macaroni egg with multi-colored pasta, and add the remaining colored parts in no particular order.
3. We "bake" our cake. To do this, cut a sheet of A4 paper along the center and paint one of the halves with brown paint. We roll up the cylinder with the colored side outward and glue the joint.
4. On the remaining half of the sheet, draw a circle in diameter similar to a cake-cylinder. We also paint in brown, and attention: cut out the circle with a small margin (the stock will be used as a glue line). We make several cuts on the glue seam for the convenience of folding the edge, glue the edges and put them inside the cylinder so that the brown circle is something like a lid for a cake cylinder.
5. On top of the circle, drip a little glue in random order and pour confetti or confectionery granules. We sculpt eggs from colored dough, plasticine or papier-mâché.
6. We lay out beautifully around the cake. The craft is ready!
All of the above crafts for Easter in kindergarten will be a great pastime for you and your little dreamer. Surely the creative process will overwhelm you both, and this is not only exciting, but also very useful! And with what pride and love your baby will carry the joint creation for display to peers and educators!
It doesn't matter how much time and effort this activity takes, the main thing is that you did it together, and the child learned to fantasize, invent and create.
We wish you creative success and congratulations on the bright holiday of the Resurrection of Christ!