Diy satin ribbon elastic marshmallow. Step-by-step master class: gum-marshmallows from satin ribbons
Kanzashi is a world-famous Japanese technique for creating handicrafts in the form of flowers. Such a craft will be a wonderful decoration and emphasize the woman's style. Original products are made from natural silk, but other fabrics can also be used. For example, crepe satin, organza, satin and rep ribbons. The latter are perfect for just beginning needlewomen, because they scorch well and are easily cut off. Flower "Marshmallow" is a beautiful and simple decoration. This master class on kanzashi marshmallows is sure to help handicraft lovers create a small masterpiece with their own hands.


- Young girls can wear kanzashi as many as their heart desires. Married ladies can afford one or two small flowers.
- Kanzashi flowers are worn for weddings, New Years, birthdays and other festive events.
- For each month of the year there is a separate type of kanzashi flower. 12 months - 12 different shades of colors.

What kanzashi should be:
- Products must match the color of the kimono;
- Match the color of the eyes;
- Match the status of the carrier.
Original marshmallow
How to make Japanese jewelry is described in this tutorial.
To work you need:
- satin or rep ribbon in several shades (2.5 cm wide);
- a lighter or a candle for scorching the edges of the ribbon;
- scissors.
Note! The tape can be cut into the required lengths or gradually unwound from the bobbin.
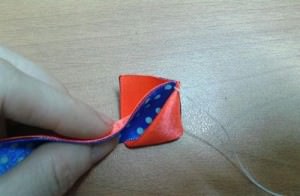
First you need to take a couple of tape segments and connect them on the wrong side closer to the center. Use a lighter to connect.


The pattern must be located along the perimeter, as on the blue ribbon in the photo. In order for the pattern to be inside the marshmallow, it is necessary to turn the patterned ribbon face down.
Then you need to put the tape in the area of the seam on the right side. Measure a tape 2.5 centimeters wide from the soldering point, approximately 5.5 centimeters. A tape with a width of 5 cm is approximately 10.5 cm. Bend the corner on the right at an angle of 90 degrees along the marked line. Then again roll it from the right side to the left. Now the shape of an isosceles triangle should be formed from ribbons of a contrasting color. The result is shown in the photo below. Tuck the protruding tail back.


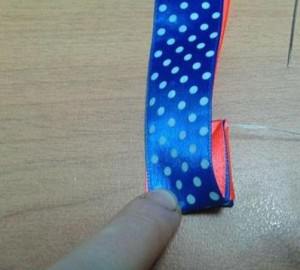
Then take the ribbon, which should be on the left side, and bend it towards the bottom at an angle of 90 degrees. And roll the working tape to the top, aligning the bottom of this element.


With your right hand, wrap the ribbon from the left side to the right side again at an angle of ninety degrees.

To complete the petal for the marshmallow, you must first finish making a shape that looks like an isosceles triangle. To do this, take a working ribbon and roll it from the right to the left side, passing it among a pair of petals. You should get the next element, as in the photo.

Fix another triangle-shaped figure of ribbons with a thread, in the same way as with the first.

Now it's time to start working on the left side of the working thread. Bend the tape 90 degrees and then bend its main piece towards the top. Fold the tape at a 90 degree angle so that the tape goes to the right side.


Make another isosceles triangle. You get the following element for the marshmallow, which looks like this:

Take a thread and fix 3 petals already made.

Repeat this process 16 times on a 2.5 cm wide tape. If the tape is 5 cm wide, about twenty times. The more times, the more magnificent the marshmallow will be.

Having made all the petals, cut off the tail and burn the end. Pull the resulting petals with a thread. Now all that remains is to combine all the created elements into one product. Mk kanzashi marshmallow is finished, the product is ready!
Related videos
Currently, a relatively new type of needlework is gaining popularity, such as the creation of satin ribbons. We owe the emergence of such an interesting technique to the Land of the Rising Sun - Japan.
Original kanzashis are made from natural materials, mainly silk. But this is not at all necessary, needlewomen use pieces of a wide variety of fabrics and ribbons for these purposes. It can be crepe satin, and organza, as well as rep and satin ribbons. For beginners, it is easiest to start learning how to create kanzashi from satin ribbons. It is convenient to burn them with a lighter or candle. They are practically not subject to deformation and from them can be easily cut into squares of the required size. The only thing worth paying attention to is that you will have to find the necessary tone of the tape of the same color scheme and different width. You can also add a variety of decor in the form of beads, rhinestones, sequins and beads to kanzashi jewelry, but so that it does not burden the product.
This master class will consider the manufacture of a Kazakh flower, which is also called a marshmallow. The lesson contains step-by-step photos that will help novice craftswomen to master the kanzashi technique step by step, as well as videos showing a similar process in detail.
Any ribbon flower will be a wonderful decoration for a brooch or elastic band.


Marshmallows are such flowers that have an amazing airy appearance and are distinguished by special beauty and attractiveness. The presented master class (MK) will step by step show you how to create petals from ribbons for delicate marshmallows. Also, for mastering such a technique, at the end of the article, you will be offered training videos.
First of all, you need to prepare certain materials and tools for work:
- satin or rep ribbon in several shades (2.5 centimeters wide);
- a lighter or candle to singe the edges of the tape;
- a needle;
- threads;
- scissors.
At your choice, you can prepare several pieces of tape from 1 to 1.5 meters in length (2.5 centimeters wide) or from 2 to 2.5 meters (with a width of five centimeters). It all depends on how well you master the skill of kanzashi and know how to carefully twist the ribbon. You can also not cut the tape into pieces, but gradually unwind it from the bobbin, so you do not have to worry about whether the prepared pieces are enough.
We start a master class (MK), take a couple of tape segments and connect them on the wrong side closer to the center using a lighter.


Before starting work, decide if you would like the pattern on the marshmallow to be around the perimeter, as in this MK the pattern on the blue ribbon. Then you need to lay the tape with the pattern facing you. If you decide that the pattern is inside the marshmallow, turn the patterned ribbon away from you.
Next, you need to put the ribbon in the adhesion area on the right side. Measure a tape that is 2.5 centimeters wide from the soldering point about 5.5 centimeters. A tape with a width of five centimeters is approximately 10.5 centimeters. Further. According to the outlined line, you need to bend the corner located on the right at an angle of ninety degrees. Roll such a corner again from the right side to the left. Thus, you should get an isosceles triangle shape from a ribbon of a contrasting shade. In the photo, you can see the result. Tuck the ponytail that remains back.


We continue the master class on making kanzashi marshmallows and prepare a needle and thread. It is necessary to fix the corner located on the right side of this element together with the tip.
 The next step, you need to take the ribbon (the part of the ribbon that is in the work should be on the left side) and bend it to the bottom at an angle of ninety degrees. The summer worker folds to the top, leveling the bottom.


Using your right hand, you need to wrap the ribbon from the left side to the right side again at an angle of ninety degrees.
To complete the marshmallow petal, finish making a shape that looks like an isosceles triangle. To do this, take a work tape and roll it from right to left, passing it through a pair of petals. As a result, when viewed from the bottom, we get the next element, as in the photo.
 Next, we fix with the help of a thread another figure in the shape of a triangle made of ribbons, by analogy with the first.
 Now, the master class begins to work with the left side of the working ribbon. At the beginning, this tape is bent at an angle of ninety degrees, then you need to bend its main piece to the top. Once again we fold the tape at an angle of 90 degrees so that the tape. The one who is in work moved to the right side.


To make another isosceles triangle, wrap the ribbon on which the work is carried out in such a way that it finds itself among the new and already made triangular petal. As a result of such actions. We get the following element for the marshmallow, as in the photo:
 We take the thread and fix the 3 made petals.
 According to the described scheme of actions, you need to repeat this process about sixteen times on a tape that is 2.5 centimeters wide. If your tape is five centimeters wide, then about twenty times. If you do fewer reps, your marshmallow will not be as fluffy.
 Having made all the necessary petals, it is necessary to cut off the remaining tape and burn it. After that, we tighten the resulting petals with a thread. At the final stage, you just need to combine all the created elements with one product, which is called kanzashi marshmallow.
Take the starting tip of the tape and glue it into the petal where the marshmallow ends. Flip the product right side up and straighten the petals. It remains only to decorate the resulting flower.


These marshmallows can be used as hairpins, rubber bands or decorate with them. See how these hair accessories look great in the video.
DIY bow-marshmallow
The next master class will show you how to make another, delicate marshmallow, which is the basis of many hair jewelry. To create it, you can use both satin and rep ribbons of your choice. The tapes used in the master class are 2.5 centimeters wide.
For work, prepare:
MK begins with folding the white and colored segments. They must be singed and glued using a lighter for this purpose.
Turn on the wrong side up. We take both ribbons and wrap them up for an initial turn. In the photo, you can see in detail how this process goes step by step:
You need to leave a small tip that will help you hide the elements around the edges at the end of the work. We fix the tapes with your finger.
The edge must be folded back and sewn so that it does not interfere with your work. Peeling back the tape, use a needle and thread to sew the edge with a couple of stitches.
At the next stage of the MC, you need to make another round. The base is placed in such a way that the unused tape is on the right side. Next, you need to bend it to the top at an angle of forty-five degrees. In this case, the line must coincide with a line in the first revolution.
After that, the lapel goes to the left.
The next step is to tuck the ribbon in the middle of the initial turnover and the future. This will duplicate the form of the initial turnover. At the same time, both ribbons went to the right side.


The place of fixation with threads is marked in the photo with a circle. As a result, we get the second turn with the ribbons brought out to the right side.
Let's move on to stitching the corners. Each new one is stitched with the previous one. They do not need to be fixed with each other. Each subsequent one is attached to the previous one.
This is what the four loops look like:
As a result, we get the following lush blank with curls:

The needlewomen working in the kanzashi technique make not only elegant flowers from satin ribbons, but also unusual marshmallows. There are no boundaries to such creative delights. A wonderful and delicate version of such accessories is given in this tutorial - kanzashi marshmallow master class for beginners... A prepared, detailed lesson will be useful for those who are constantly experimenting, looking for new ideas for creativity and want to please someone close to them with a wonderful gift.
For a little girl, perhaps the most desirable will be the pink color of the hair clip, so here are the step-by-step modeling steps on such a ribbon. Although the color can be different, more variegated and saturated. The double white-pink shade gives additional volume and airy effect, so the finished product looks very beautiful.
For one kanzashi marshmallow hairpin, we need:
- 14 pieces of narrow white tape - 1.2 * 6 cm;
- 14 pieces of narrow pink ribbon - 1.2 * 6 cm;
- 10 pieces of narrow white tape - 1.2 * 4 cm;
- 10 pieces of narrow pink tape - 1.2 * 4 cm;
- felt coin with a diameter of 3 cm;
- funny children's middle in the form of a face or any other;
- elastic band or clip 5.5 cm long.
Marshmallow kanzashi master class for beginners:
First, select the color of the hardware. Take a look at the needlework department, you will definitely like a ribbon that will fit the elegant dress of the girl for whom the hairpins are intended. Select the midpoints at the same time. The width of the tape used is 1.2 cm. Cut an equal amount of whites and pinks, each pair will make a petal for a marshmallow. The product must be two-layer. For the top layer you need strips of a shorter length - 4 cm, for the lower one - 6 cm long. Also cut a felt coin with a diameter of 3 cm as a solid base. When the preparatory work is completed, proceed to the main creativity.

Read more:
When operating a lighter, matches or a lighted candle, it is necessary to solder the pink and white stripes of the upper and lower layers in pairs, combining them along the length. At the same time, turn the blanks inside out to each other.

Place the two-layer pink and white blank vertically. Bend the top end 90 degrees from the bottom. You can hold the satin in this position with a needle, tweezers or a clamp.

Make the workpiece four layers by matching the two pieces together. On one side, you should have a corner.

More beautiful hair jewelry:
In the resulting workpiece, fold the top layer in half lengthwise to reveal the pink ribbon. Fold the bottom layer in the opposite direction to get a drop-shaped petal for the marshmallow. Squeeze the bottom part with your fingers on both sides and singe again with any tool of your choice to get a strong product that retains its shape. The petals must be done each separately and set aside at the first stage.

Prepare 14 petal droplets, according to the list of accessories above. Details for the top layer are made according to the same technique, only they will be smaller, since strips 10 cm long are used for their modeling.

Glue the droplets of the upper and lower layers around the circle, as if inserting one petal into the other.

Glue the sweet center on the top flower, gently dripping it with glue. The face of a girl was used here, it can also be a stone, an animal or an insect.

Glue one pink and white marshmallow on top of the other, then glue the felt underneath. The kanzashi decoration can be considered complete.

Here is such a wonderful kanzashi product turned out in literally an hour. After choosing a suitable base for the hairpin, glue it on the back. Since it is planned to model two layers, the resulting product looks more magnificent. The girl will definitely like the elegant experimental fantasy of the kanzashi. Since the accessory is made from ribbons using a simple technique, you can experiment with colors, centers, hairpin bases and sizes of parts. Now you need to try on a new piece of jewelry along with a summer or ball gown, make pigtails or ponytails and flirt, because girls love to dress up so much.

Dedicated to making bows - new marshmallows using the kanzashi technique. Recently, satin flowers of marshmallows have fallen in love with many craftswomen and their clients. They are simple in execution, have an airy shape; they can be made from satin and rep ribbons; the width of the ribbon can also be different 2.5 or 5 cm. Whatever type of marshmallow you choose, an interesting decoration will surely please a little fashionista and not only.
I want to offer you several varieties of marshmallows. Let's start with the school version.
Hairpin marshmallow from a rep ribbon 2.5 cm
For one hair clip, we need:
- 16 pieces of blue rep tape with a pattern - 2.5 * 9 cm;
- one blue felt circle with a diameter of 4 cm;
- one white felt circle with a diameter of 4 cm;
- glass cabochon blue with a pattern, 2.5 cm in diameter;
- strass chain;
- clamp,
- glue.
Step-by-step job description:
1. Photo 1 shows all the material that will be useful to us. We cut the rep tape into equal 9 cm lengths. We process the edges of the tape with a lighter or over a candle flame. Cut out circles with a diameter of 4 cm from white and blue felt.
 2. First, prepare the middle, as it will take a long time to dry. Hot glue a glass cabochon onto a blue felt base.
 3. Then carefully apply Moment Crystal glue along the edges and use the tweezers to lay the chain. The size of the chain depends on how many rhinestones will surround the middle. Leave the middle for one hour and then trim off the excess felt.
 4. We start making petals, they are made in the same way. We take one piece of tape with our seamy side. We wrap one edge at a right angle and lower it down.
 5. We unfold the workpiece to the other side. Now we lift one edge up to one side, and the other to the opposite. To keep the petal, you need to solder to the side. It is better to use a thermal cutter, but you can do with tweezers and a lighter. The petal is ready.
 6. We need these 16 petals.
 7. Glue the petals in a circle. In the middle of the first petal (on both edges), apply glue and insert the second petal. So we make one half of the marshmallow.
 8. We collect the second part in the same way.
 9. We glue two blanks together.
 10. While we were making the petals, our middle dried up. Now you can glue it to the center of the marshmallow with hot glue.
 11. Since the size of the flower is about 9 cm, it is better to make it on a clip. To do this, we need: a clip 7.5 cm long, a blue or white felt circle with a diameter of 4 cm and a 1 * 5 cm felt rectangle of the same color.
 12. Put a small drop of glue in the center of the rectangle, open the clip and glue it to the front side. Then we put glue on the rectangle and the clip and glue it in the center of the felt mug. We trim the edges of the rectangle (cut off the excess).
 13. Glue our finished base to the seamy side of the marshmallow.
 14. The decoration is ready. If you will use a different color of the ribbon, you can make a bandage for little girls. The strass chain, casting shine in different directions, will attract the glances of all passers-by to the marshmallow.


There are a lot of videos on making marshmallows on YouTube. For example, here such a simple one of 2.5 tapes is suitable for beginners, for this MK you can make the first rubber bands with your own hands:
And here's a more original double:
Two-tone marshmallow with beads
 For a delicate mint pink marshmallow, we need:
- 7 pieces of mint-colored rep ribbon - 2.5 * 5 cm;
- 10 pieces of light pink rep ribbon - 2.5 * 5 cm;
- 17 white beads with a diameter of 8 mm and6 mm;
- 2 felt bases of mint color with a diameter of 3 and 4 cm;
- Rubber;
- Satin or rep ribbon 1.2 * 5 cm;
- White half-bead with a diameter of 1.2 cm;
- Rhinestone chain in silver setting;
- White felt circle with a diameter of 2 cm (for the middle).
How to create a marshmallow step by step:
1. First of all, we will prepare all the material that may be useful to us.
 2. Let's start making a marshmallow from the middle. Apply Moment Crystal glue to the white felt base and glue a white semi-bead and a strass chain around it. After the glue has dried, cut off the excess felt. To remove the fluff, you can walk along the edge with a lighter.
 3. Mint and pink petals are made in the same way. Consider the example of mint. Cut off a rectangle 2.5 * 5 cm, process the edges. Fold the segment in half to determine the middle. Then we lower the two upper edges down to the center. Fold the workpiece in half and solder the ends (do not cut anything).
 4. Make 7 mint and 10 pink petals in this way.
 5. Now we will work with a needle and thread. We collect all the petals on a thread and tighten. While our marshmallow looks incomprehensible.
 6. Turn it over to the wrong side and also collect all the petals; you do not need to pull the thread tightly.
 7. Turn over to the front again. We've got a pyramid. Now let's get down to working with the beads.
 8. Take 17 white beads with a diameter of 8 mm. We will sew them into each petal, retreating from the edge of the petal 5-6 mm. When we have collected all the beads in a circle, we need to go through another circle with a thread (without beads). We do this for strength.

 9. Now we make the second row of beads. This time we take a slightly smaller size - 6 mm. Sew the beads under the first row, only between the petals.
 10. Cut out a felt circle with a diameter of 3 cm. Spread hot glue along the edges (not the center) and glue it to the back of the marshmallow.

 11. Now you need to give the correct shape, make an airy marshmallow out of the pyramid. On the reverse side in the center, we pierce with a needle into the edge of the apex of one of the petals, then we pierce the parallel petal and bring the needle to the wrong side and tighten the thread. We do this several times to fix the middle.
 12. Glue the middle to the center of the marshmallow, press the middle well and hold it for a minute. The decoration is ready. The size of such a cute marshmallow is about 5.5 cm. Therefore, the base can be any: an elastic band, a clip, a click-clack hairpin or a brooch. And if you make several of these marshmallows and stick them on a lace-elastic band, you get an ornament for a bun. But this is your imagination. And we will make a marshmallow with an elastic band.
 13. For such a fastening we need: a satin ribbon 1.2 * 5 cm, a mint felt circle with a diameter of 4 cm and an elastic band.
 14. Make two cuts on the felt mug. Glue an elastic band in the middle between the cuts. Then we take the tape and stretch it into one cut, glue it to the elastic band and push it into another cut. On the back side, glue both edges of the satin ribbon to the felt. The workpiece is ready.
 15. Glue the blank to the marshmallow.
 16. The multi-colored decoration is ready. The number of petals in a flower can be changed from 15 to 17. You can also play with colors. You can make them rainbow colored from the remnants of a ribbon or school ones only in blue. Try, create and create your own unique jewelry!

Another video on how to make small beautiful flowers:
In order not to forget the page address and share with your friends, add to yourself on social networks:
Kanzashi is a world-famous Japanese technique for creating handicrafts in the form of flowers. Such a craft will be a wonderful decoration and emphasize the woman's style. Original products are made from natural silk, but other fabrics can also be used. For example, crepe satin, organza, satin and rep ribbons. The latter are perfect for just beginning needlewomen, because they scorch well and are easily cut off. Flower "Marshmallow" is a beautiful and simple decoration. This master class on kanzashi marshmallows is sure to help handicraft lovers create a small masterpiece with their own hands.


- Young girls can wear kanzashi as many as their heart desires. Married ladies can afford one or two small flowers.
- Kanzashi flowers are worn for weddings, New Years, birthdays and other festive events.
- For each month of the year there is a separate type of kanzashi flower. 12 months - 12 different shades of colors.

What kanzashi should be:
- Products must match the color of the kimono;
- Match the color of the eyes;
- Match the status of the carrier.
Original marshmallow
How to make Japanese jewelry is described in this tutorial.
To work you need:
- satin or rep ribbon in several shades (2.5 cm wide);
- a lighter or a candle for scorching the edges of the ribbon;
- scissors.
Note! The tape can be cut into the required lengths or gradually unwound from the bobbin.
First you need to take a couple of tape segments and connect them on the wrong side closer to the center. Use a lighter to connect.


The pattern must be located along the perimeter, as on the blue ribbon in the photo. In order for the pattern to be inside the marshmallow, it is necessary to turn the patterned ribbon face down.
Then you need to put the tape in the area of the seam on the right side. Measure a tape 2.5 centimeters wide from the soldering point, approximately 5.5 centimeters. A tape with a width of 5 cm is approximately 10.5 cm. Bend the corner on the right at an angle of 90 degrees along the marked line. Then again roll it from the right side to the left. Now the shape of an isosceles triangle should be formed from ribbons of a contrasting color. The result is shown in the photo below. Tuck the protruding tail back.


Then take the ribbon, which should be on the left side, and bend it towards the bottom at an angle of 90 degrees. And roll the working tape to the top, aligning the bottom of this element.

With your right hand, wrap the ribbon from the left side to the right side again at an angle of ninety degrees.

To complete the petal for the marshmallow, you must first finish making a shape that looks like an isosceles triangle. To do this, take a working ribbon and roll it from the right to the left side, passing it among a pair of petals. You should get the next element, as in the photo.

Fix another triangle-shaped figure of ribbons with a thread, in the same way as with the first.

Now it's time to start working on the left side of the working thread. Bend the tape 90 degrees and then bend its main piece towards the top. Fold the tape at a 90 degree angle so that the tape goes to the right side.


Make another isosceles triangle. You get the following element for the marshmallow, which looks like this: