Learn to make crafts from matches. What can be made from matches? Complex crafts from matches - an unreal beauty
You still do not know how to make a house out of matches, to create pictures from these wooden elements? Check out the master classes illustrated with 57 photographs!
How to make a house out of matches?

To create it, you need only 3 item names:
- matches;
- plasticine;
- coin.
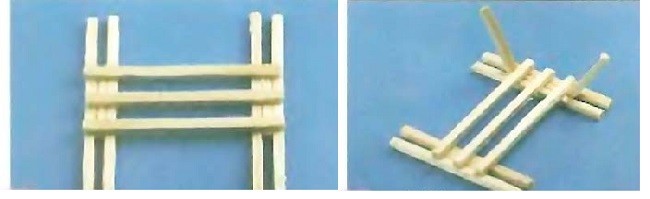
- Put 2 matches in parallel. Secure them to the work surface with plasticine.
- On top, perpendicular to the data, place 8 matches so that the heads and tails are peeking out from both sides of the first two matches. Lay these "beams" at the same distance at home.
- The first tier is ready. The second also consists of eight matches, we lay them perpendicular to the first layer.
- On top, along the perimeter, put 4 matches.
- In total, you need to complete 6 such fragments, consisting of 2 rows of 8 and one of four matches.
- The creation of the frame of the structure is completed by 8 matches, laid parallel to each other and 6, which you will place perpendicular to them. Here's how to help make a match a house further.
- To make the frame strong, press its fragments on top with a coin, and on the bottom with your hand. Holding the workpiece in this way, stick 4 matches in the corners of the house, and then around the entire perimeter.
- Put a coin inside the "logs", press on it so that the elements of the structure are tightly pressed against each other, and the heads of the vertical matches are well marked. Insert 6 matches between them, and the same number - perpendicular to the data.
- Here's how to make a match house next to form the roof. Stick 4 matches in the corners of the frame, and then 7 more pieces into the top of each wall.
- In the resulting roof box, we lay the matches horizontally so that in each subsequent row there are fewer of them than in the previous one, and a triangular roof begins to form.
- There will be 6 matches on one side and as many on the other side of the gable roof, while their heads will intersect with each other, and the back sides of the matches will be held on vertically set "blocks".

Here's how to make a match house without glue.

Such a structure will become an original gift, but it is made of cheap material. If you liked this idea, do not stop there, see what else you can make of matches. These wooden items look great, and you can organize a home exhibition by placing them on a table or on shelves.

What can be made from matches?
Having learned the answer to this question, you can make not only a house, but also a lot of interesting things. Do you want to have a whole composition made of wood? Then see how to make a well and a fence from the same material.

To do this, you need:
- matches;
- stationery knife;
- glue for wood;
- thin brush;
- toothpick;
- board;
- thin thread.
- Prepare the matches first. Place one by one on the board, cut off the heads with gray. They can not be thrown away, but used for firecrackers.
- Put 4 matches, forming a square from them with the ends extending beyond it. To do this, put the first one, place the second perpendicular to this one, but so that at the point of their contact, the end of the first protrudes by 5 mm.
- The edge of the second will come out the same way and in the same way when you connect it to the third match. In this technique, fold all 4 pieces together, gluing the place where they meet.
- In total, you will have 9 rows of "bars" for the house for the well. In each subsequent match, the edges of the matches should come out so that they form an angle of 90 ° with these elements of the previous one.
- To make the pillars supporting the roof of the well, place 2 matches in parallel at a distance of 3 mm. Cut the third into 2 pieces, glue one to the top and the other to the bottom to connect 2 paired pieces. Make another similar column.
- Pass a toothpick into the hole formed on one and the other side, after winding a thread around it. Glue to the posts. Bend a toothpick on one side to form a rotating handle.
- We make the roof. Put 2 matches in parallel, stick on them perpendicularly, putting close to each other, 13 matches. Also create the second half of the gable roof. Connect them by threading the top of two matches into the first ramp, and the top of the other two into the second. From the bottom, glue it horizontally on both sides along a match so that the roof appears triangular from the side.
- Next to the well, put a fence made of two parallel matches, to which a few more elements in the form of a picket fence are glued perpendicularly.

If you want, mold a bucket out of plasticine or make it from a thimble and attach it to the bottom of the rope.
You can make a cart out of matches and complement the landscape of country life with it.

To work you will need:
- matches;
- knife;
- glue;
- rag.

Now we will make the axle for the wheel. The first will be the longest, this is needed to connect the structure. Place the second axis so that it is perpendicular to the given one.

Place four small pieces that will become the radii of this circle. Make the second wheel in the same way.

Glue them together with one match. Perform the second pair of wheels using the same technique.

Now you need to connect these two blanks with three crossbars.

We start making the following fragments, which will tell you how to make matches an excellent building material for home art. For each of them, take two matches, place a small fragment of this material in the center, connecting the elements with glue. The second part is identical to this one.

Now put these two blanks in parallel, connect them with three matches, as in the photo. We glue two matches to the resulting part, placing them slightly obliquely.
There is very little left, and soon you will find out that you can make such an interesting cart out of matches, which will become almost an exact copy of the real one. We glue two diagonal pieces of wood together using the third. We perform the same manipulation on the other side of the part.

Glue one match on both sides of the cart and flip it over to the other side to fill each side with three small wooden sticks.

You can hoist the top of the cart onto a wheeled piece and place a new piece of homemade woodwork next to others.

After you have done a lot of useful things, you will be left with empty boxes, but they can also be used.
The child will be just happy if, together with him, you make such a train, in which you can put small toys.

Here are the items that were taken for this creation:
- match boxes;
- glue for cardboard;
- toothpicks - 9 pcs.;
- wine corks - 2 pcs.;
- several matches;
- threads;
- Scotch;
- cotton wool;
- thick needle.

Craft other cars in the same way. Connect them with a thread and a needle.
In order for the cars to withstand the weight of the toys planted in them, take a strong thread, it is better to use yarn for this.

Now you can make a steam locomotive. To make it, glue an inverted box to the finished carriage, connect them together with another one, which must be placed on the small side.
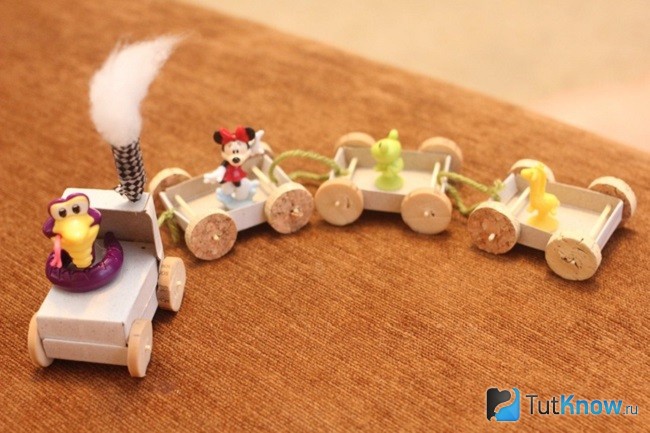
To make a pipe that emits safe smoke, place several matches next to each other and place a toothpick in the center. Put cotton wool on top of the pipe, rewind it all with tape to secure. Attach this finishing touch to the engine by sticking a toothpick into its cardboard surface.
Children will be interested not only in this idea. If you tell them what can be made from matches, they will gladly make a funny picture. Depending on the age of the child, it can be simpler or more complex.
How to make a portrait, a picture of matches?
If the child is small, before giving him matches for creativity, cut off the sulfur from them. After all, a baby can taste it by mouth, and the substance is very harmful.
After wooden sticks will be ready, you can start. So, for such a picture you will need:
- matches without sulfur;
- a sheet of cardboard;
- pencil;
- glue;
- paint with a brush.
After the donkey is created, have the child paint over the background of the picture. You can glue a few small twigs, and the masterpiece is ready.

See how to make a house out of matches so that it is flat.

The walls are square, the roof is rectangular. For trees, a trunk is first made, then branches are laid out from matches.
For older children and adults, a very interesting idea... After reading it, you will learn how to make a portrait from matches.

You will need a lot of them and it is necessary preliminary preparation, since you need to remove the sulfur. To do this, the matches are placed in a basin of water and the spraying unnecessary for further work is washed. Then they need to be dried.

Use an awl or other sharp object to make 4 holes in the box, it is important that they are at the optimal distance. If it is small, then all the matches may not fit, and if it is too large, then the formed cube will become too loose and crumble.

Further, it is necessary to make some kind of a well, the walls of which consist of seven rows of matches.

We fill the inside of the workpiece by placing matches around the entire perimeter. We align them with a coin, after which we remove this cube from the box and very carefully so that it does not crumble, we squeeze it from all six sides.

We put this square blank on its side and fill the upper side with a horizontal row. We also make out the other three sides.

In the process of this work, do not forget to carefully squeeze the cube so that the wooden components fit snugly against each other.
Now about how many matches you need. One cube will take about 150 pieces. In total, you need to make 30 such figures. Place them next to each other so that the heads of uncleaned matches with gray are at the edges. Then they will form a beautiful frame.

It is very easy to connect the squares. Stick 4 matches along the edges of the first and second, press a little so that the two figures begin to fit tightly to each other. Thus, create the first row.

Then, also, connecting the elements with four matches, build a canvas for the picture.

To make a portrait from matches further, print the image. It can be a favorite hero, friend, or self-portrait. Print in black and white using checked paper. If this is not possible, then just line up the photo by drawing rows with a ruler and pencil. The lines that bound the 10 by 10 squares should be clearer.
This is how the portrait should look on the grid. For example, let's create a Paul Walker look from matches.

Looking at the linking, put the matches with the sulfur heads forward where there are dark fragments in the photo. This will select them and be able to take a portrait.

It remains to mask the joints of the cubes so that these places look more accurate, and you can put your work in the most prominent place and be rightfully proud of it!

If you still have any questions, watch the three videos. From the first plot, you will learn how to make cubes for the base.
The second shows how to connect these fragments into a whole canvas.
The third plot will teach you how to transfer the image you like to a stencil and lay it out of matches.
![]()
The most interesting and unusual materials for creativity, as a rule, were created for completely different purposes. One of the striking examples is matches, which, it would seem, have nothing to do with creativity. However, DIY crafts from matches are a huge number of cute children's figurines and serious designs, which will take more than one day to make.
The main advantage of matches is availability. In almost every store, you can buy them without any problems for ridiculous money. And this is another plus, because you will need a lot of matches.
Simple crafts from matches - children's creativity
As you know, children love to create interesting crafts from unusual materials. And although they say that matches are not toys for children, such a game with this material will definitely be safe. In addition, small matches are great for developing fine motor skills, which means it's also useful. You can start creating crafts from matches for children with such a cute and simple hedgehog. It is very easy to make it:
1. We sculpt a figurine of a hedgehog from plasticine. Instead of plasticine, you can use potatoes.
2. Instead of needles, insert matches (not too deep so that the “needles” are long enough, but the matches must hold tightly in the plasticine).
3. For the spout, you can use black peppercorns, for the eye - match heads.

Minimum time - maximum pleasure.
In addition to a hedgehog made of matches, there is still a lot to do with children. interesting crafts... We have collected several original ideas, be inspired!
Back 1 Of 5 Further


Match wheel - no glue needed
Those who are just starting to study the schemes of crafts from matches are often convinced that they cannot do without glue. However, if the matches are folded correctly, the structure will hold even without additional materials. A striking example- a wheel of matches, everyone can make it with their own hands:
1. Draw a circle on a sheet of paper (radius 42 mm) and divide it into 15 sectors (using a protractor we measure the angle, it should be 24 degrees).
2. Using a nail, make 15 holes around the entire circumference.
3. Insert a match into each hole.
4. Starting from the bottom, lay out the matches horizontally, as shown in the step-by-step photos.
5. After finishing all the rows, gently press the matches down.
6. This point is very important. It is necessary to pull the wheel out of the paper, for this we take out the matches one by one, as shown in the diagram.

Making one such wheel from matches takes a little time. They can be made of different diameters by changing the number of sectors of the circle.
A DIY match wheel is interesting as an independent craft, and can also be used to create more complex designs.
Complex crafts from matches - an unreal beauty
The more experience you gain in matchmaking, the higher the difficulty level will be available to you. Experienced craftsmen create complex crafts from matches with their own hands using glue and matches of different sizes. It would seem such a simple material, but what an unreal beauty comes from it!
And most importantly, it is not necessary to repeat the finished crafts step by step. In the process of creativity, you can change something, create your own unique crafts from matches, step by step master class and photos of finished works should be used only for inspiration.
Back 1 Of 9 Further


On our site you will find a lot of inspiring ideas for creativity and decoration of your home, original DIY gifts, interesting and useful games for child development. In order not to miss anything interesting - subscribe to our monthly newsletter in a good mood!
To create complex crafts from matches with your own hands, video master classes will also be useful.
For example, in this video you will be taught how to make a house out of matches with your own hands - simply, quickly and without glue.
And here they will show you how to make the Eiffel Tower from matches - a more complex scheme, but it looks amazing!
It is not only matches that allow us to create beauty from the most ordinary things. An old newspaper can become just as amazing and accessible material for crafts for adults and children.
How to use it and what you can create in the end - read in our article

We try very hard to make our tips, ideas and master classes really useful for you, our beloved readers! Therefore, please share your favorite articles with your friends and, of course, leave your wishes and questions in the comments! Your opinion is very important to us!
Matches are the most accessible and at the same time fairly simple craft material that opens up unlimited possibilities for leisure and creativity! You can create incredible things out of them.
Crafts made from matches are a separate art form that pleases and amazes us no less than, for example, glass crafts and majestic sculptures.
It takes a lot of patience to make anything out of matches.
Just imagine how much work and perseverance is needed to make a house or a well from matches!
What was not made of matches - starting with small houses and ending with huge structures of architecture (the largest match made of matches, which is listed in the Guinness Book, is a clone of an oil platform, this craft has a mass of almost 1 ton and rises up 4 meters, and in length - more than 6 meters)!
Moreover, matches are the most useful material for constructing various puzzles. In addition, they develop in children: intelligence, accuracy of movements; attentiveness to individual parts; creative activity and aesthetic taste; striving to achieve your goals!
Imagine how great and fun you can spend your time designing crafts from matches. The long process of collecting small parts into a single whole has a positive effect on the human nervous system. During this lesson, all attention is focused on the result, the rest becomes unimportant and fades into the background. This is - brain relaxation!
Crafts made from matches are a fun and rewarding way to spend time. By making a variety of crafts, you can glue not only many matches for the house, but also strengthen friendship and understanding between family members!
Making a wide variety of items from matches is quite often compared to the construction of sand castles and palaces, this activity can be just as simple and unpretentious. But the process of working with matches has a certain unique specifics.
There are two main ways to design all kinds of crafts from matches: without the use of glue and with its use.
Of course, the use of glue in the process of work greatly simplifies it, and becomes within the power of small children. By bending matches and gluing them, you can design the most diverse crafts: boxes, figures of animals and people, tables, chairs, beds, houses, cars and even whole pictures! Matches are a material that is excellently glued with almost all adhesives, so making crafts will be simple and fun for both children and even adults.
The second way is the design of various souvenirs, compositions, decorations, in which no glue is used. This is a rather complicated technique that requires some experience and skills in working with matches, so it is better for novice “matchmakers” to start making crafts using glue.
But it is the manufacture of handicrafts without the use of glue that makes it possible to design wonderful specimens, for example, castles, houses, chambers, cubes, mills and figures, from which the construction of larger and more complex products is possible.
At the end of the day, matches are perfectly matched with other materials, which are suitable for making fun and original crafts.
For example, matches may be needed if you want to make a variety of unusual and interesting toys, figures of insects or animals (deer, donkeys, horses, beetles, spiders).
For greater effect, when creating volumetric compositions and appliques, matches can be combined with paper, and also with fabric and threads when creating wall paintings.
Works from matches with multi-colored sulfur heads look very beautiful, which, if necessary, can be painted on their own acrylic paints or varnish.
Recently, unfortunately, it is quite rare to meet people who are seriously fond of "matchbox architecture". For many, working with such fragile material seems very time consuming and boring, but true fans of matchmaking get incredible pleasure and are charged with positive energy in the process of creating paintings, various compositions and other crafts from matches.
There are certain tips for starting the craft making process:
- you need to find a place suitable for creativity;
- cover the table with oilcloth so as not to stain it;
- if the crafts are made with glue, you need a saucer into which you can pour glue;
- it is better to take glue with a toothpick or a sharpened match;
- the work requires a clerical cutter;
- it is necessary to carefully select matches with a smooth surface of the fabric;
- during work, to achieve the best result, cut off the match heads.
You can design real masterpieces from matches! This is not as difficult as it seems at first glance. In addition, this lesson will calm your nerves and give your head a rest more efficiently than any fancy designers. And the tools and materials that are needed for work can be found in every home!
Are matches for children not a toy? But no! We have compiled a selection of the most different ideas crafts from matches for children. They are not only beautiful, but also useful. Working with this material develops logic, imagination, fine motor skills of hands, and also contributes to the development of perseverance. If you add the use of plasticine or paints to the creative process, the kids will be even more happy.
We would advise you to do match crafts with your children. If left to chance, they can give up this activity. If you keep them engaged, the process will be fun. Check out our selection, stock up on matches and get started. We tried to do our best detailed master classes to make it easier for you to master the process of assembling crafts with your own hands.
Simple shapes
Crafts from matches and plasticine can be flat or voluminous. Choose any shape and fasten its body using bright plasticine balls.

In this way, from matches, you can assemble a simple house, a man, a pyramid, any animals. Take a look at the photo to understand the assembly principle and get inspired by ideas. You can easily repeat them.
Any of these shapes can be placed vertically. If you need a craft from matches for kindergarten or elementary school, we advise you to make a house, a person and a dog. Put them on a piece of cardboard - you get a great composition!
Panel
You can make a pretty panel out of matches with your own hands. The craft can be easily turned into a photo frame or a postcard - it all depends on the additional decor.

We need thick cardboard. Measure the length of the match and multiply this number by 4. If you are making a panel bigger size, then multiply by 5, 6 and so on. Trace the cardboard so that you get 16 equal squares. We fill the first square with matches, placing them vertically. One match looks up, and repeats down. Fill the next square horizontally. So we go through the entire cardboard.
Matches are best fixed with plain office glue. Just do not use too liquid, as it will soak the wood. From above, the craft can be varnished for wood. In the center we glue a big beautiful artificial flower, and around the edges of the beads or pictures.
If you are making a postcard, for example, on March 8 or February 23, find ready-made thematic clippings and glue them to such a panel. Or just place a family photo in the center.
Drawing
Most children love to draw trees, houses and the sun. Almost every drawing like this can be made more interesting.

Take the cardboard. Draw large enough images of a typical house, fence, tree, apple tree, sun, or whatever. If the cardboard is not colored, paint it one color.
Take the matches and put them in all the empty spaces. You can fix matches with PVA glue or even plasticine.
All that remains is to decorate the matches in the desired colors. It is best to use gouache, as watercolor requires a lot of water and is not very bright.
Painting on a substrate
It is very convenient to lay out pictures from matches on foam substrates. Wash it well (it probably had vegetables or herbs on it) and dry it.

Come up with a picture with your child. You will need some plasticine and some matches. Lay out bulky parts, and just press the matches into the rolled plasticine.
You can complete the picture with paints. True, the watercolor will not fall on the foam. If you decide to paint the backing, take gouache, and stick the matches on PVA.
Such a craft made of matches can be safely attributed to the competition in Kindergarten or primary school(1-2 grade).
The finished drawing
If you have a child, your house is probably full of different coloring pages. If so, use the close-up image to craft a match. You can also use various stencils and create your own drawing.

Glue the picture onto the cardboard. If there is no background, you can paint over it. Next, we begin to lay out the matches, pressing them tightly to the paper and to each other.
The heads of most matches will need to be cut off beforehand. In some cases, their use may be appropriate.
It is best to glue matches with a canvas on stationery glue. If you need to fix a small part, it is best to choose superglue.
Complete the painting with any decor. If desired, the matches in this craft can be carefully painted with gouache or acrylic paints. Such works look beautiful in combination with autumn leaves and other natural materials.
Locomotive
For this craft, we will need not only matches, but also boxes. You also need to take 2 large "hunting" or gas stove matches. They are long, so they will be an excellent basis for the rails in our craft.

We lay out the rails from two matches vertically, then glue sleepers from short matches to them. Let them stick out a little around the edges. The easiest way is to glue long matches with glue, and then lay standard matches on top.
We make two small holes in the first box - we will insert toy headlights into our train. Fasten the boxes together with threads or matches. We will make the wheels from unnecessary batteries. If not, use the buttons. We attach them to the craft with superglue.
This craft will be very interesting for children, especially boys. After all, we will not just make it and put it on - you can play with it!
Snowflake
For this craft, you can additionally take toothpicks, although it is quite possible to do with some matches. It is not necessary to make a snowflake in winter - they go with a bang for children at any time of the year.

Take a snowflake stencil or cut out a regular octagon as a blank. First, we make the edges - we glue the matches or toothpicks so that they look over the edges. Then we fill each sector with matches, placing them alternately: head up - head down.
It is best to stick the matches first in the center and then lay the edges. If the cardboard shows through, glue cut matches to it.
On top of the first layer, you can lay out the second and third. It all depends on how voluminous you want to see a homemade snowflake. Glue sequins to the central part of the craft (make them from tinsel, rain or wrapping paper). You can also glue a decorative snowflake or foam - imitation of snow.

This craft from matches can be made with a child for the New Year for a kindergarten. Or just as entertainment at home.
Vegetables and matches
Crafts from vegetables and fruits are always popular with children. If you supplement them with matches, it will turn out to be original and funny. Try making a hedgehog. Even the smallest can cope with such work.

Take potatoes and a tiny garden apple. Draw a hedgehog's face on the potato using a marker. Stick in the matches as tightly as possible to make the needles. Plant an apple on top. If you don't have an apple, roll it out of plasticine - this is a good alternative.
The craft is very simple, but it is perfect for kindergarten. And at home you can also play with her. Make a big hedgehog family - it will be fun.
Furniture
With this video of a master class, you and your child can easily make a toy furniture set. The table and chairs are useful for playing with dolls (albeit small ones) or kinder toys.
The assembly process seems to be confusing in words, so it's best to take a look at it. Step-by-step instruction will help you avoid mistakes and glue the matches correctly.
We hope this selection of match crafts will inspire you and help your child make better job to kindergarten or school. As you can see, all the materials are very simple. In addition to a large package of matches, you only need what almost every student has. Success in creative work!
Views: 3 088
It should be noted that working with matches is not only develops imagination, but also perseverance, tolerance, accuracy and attention.
Crafts from matches can be done with or without glue... If you use glue, you can attract children, since such work is easier than making crafts from matches without glue.
Matches stick very quickly and well, so you won't have big problems during the assembly process.
You can also use whole matches, or divide them neatly into smaller pieces.
With the help of matches, you can make both 2D images and 3D, including figurines of animals, pieces of furniture and houses.
For beginners, it is best to do crafts using glue., and when you gain experience, you can create crafts from matches without glue.
Helpful hints:
* The place where you will work with matches needs to be prepared. First you need to cover the table with oilcloth.
* Prepare glue and a saucer into which you will pour it.
* For convenience, it is advisable to take the glue with a sharpened match or a toothpick.
* For front side handicrafts it is better to select matches with a flat face surface.
* If desired, match heads can be cut off (with scissors or stationery knife) - this way you get a smoother craft. Such work should be done by adults and keep children away from sharp objects.
How to make a house out of matches

To make such a house, you do not need to have a special talent, you just need to know the assembly steps, be careful and have patience.

You will need:
7 boxes of matches
2-3 large diameter coins
Disc box.
1. Prepare a base for the craft - this could be, for example, a CD box - and place 2 matches on it parallel to each other.

2. Put 8 matches perpendicularly on the lying matches (the foundation of the house) - this must be done so that there are gaps of the same size between the matches.

3. Put 8 more matches perpendicular to the previous ones (according to the same principle).

4. Now start laying out the matches around the perimeter, as shown in the image. You need to make 7 rows (the heads of the matches should go in a circle).


5. Lay out 8 matches on the last row so that their heads point to the side opposite to the first row of 8 matches (the foundation of the house).

6. Perpendicular to the top 8 matches, put 6 more matches in the middle, and put a coin on top of them.

7. Holes have formed between the last two rows in the corners, you need to insert 1 match into them. Hold the construction while you stick the matches.

8. Now tuck one match into each gap along the walls and cover the perimeter (see picture).

9. Adjust the structure with your fingers so that all the matches fit snugly together.


10. Try to finish building the walls of the house by sticking matches around the perimeter of the walls with the heads up.


11. We make a horizontal layer of the walls. Insert matches around the perimeter so that their heads alternate with the ends. After that, press in all the matches that start from the head.


12. Let's start making the roof of the house. To do this, you need to insert matches along opposite walls (see picture).

13. Alternate the direction of the matches and insert them perpendicular to the ceiling of the house.

14. First you need to put 2 matches, then 4, 6 matches in two central eight.


Video tutorial
How to make a well out of matches

You will need:
Stationery knife
Scissors
Rope
Cloth to wipe off the glue


1. First. What needs to be done is to glue the base of the future match well. It consists of 4 matches (you can cut the heads off for matches).
2. On top of the base of the well, you need to glue another row of matches, while the matches need to be shifted in the opposite direction. All subsequent rows must be done in the same style until the desired height is reached.
3. Now glue the racks of three rods to the inner opposite walls of the well (see the picture) - two rods at the same level and one in the middle - a few millimeters below.


4. Glue two rods to back side each of the rods made in step 3. You will attach the roof of the well to them. Now you can insert the goalpost from the toothpick.
5. Prepare a thread and wind it on a toothpick, having greased it (toothpick) with glue in advance. If you want, you can break the end of a toothpick to make a handle.
6. Glue 2 supports to the uprights so that the roof can be attached to them. Also insert the beam from above.
7. Before starting to glue the matches from above to form the roof, glue 4 beams to the end of each support, and attach the matches for the roof to them.
8. All inclined beams need to spread glue and make a roof of the well, into which you can then lower the thread as a final chord.
Match wheels (diagrams)

In this example, glue is NOT used, and the strength of the product is provided by internal stress and frictional force.
There are several options for the wheel: with laying through 1 support match (it has 15 vertices and 105 parts are used for it), through 2, 3 and 4 support matches, respectively.


Laying through 2 support matches.
The product consists of 95 parts, has 19 points and a small diameter that allows it to fit inside a wheel with a large diameter.
Laying through 3 support matches
The diameter of this design is even smaller. The wheel has 21 tops and is made of 84 matches.
Laying through 4 support matches
This design is the most difficult to assemble. The wheel has the smallest diameter and can fit inside the old match wheels. The design has 22 vertices and contains 66 parts.
Match wheels (instruction)

1. First you need to make an auxiliary tool. To prepare it, arm yourself with a notebook, simple pencil, ruler and compasses. You can use a protractor, but this is not necessary.
2. Draw a template for the machine. In this example, the drawing will help you create a wheel with 15 links. Draw a circle with a radius of 42 mm. Then divide this circle into 15 identical sectors (each sector has an angle of 24 degrees).

* In case you do not have a protractor, make the distance between the legs of the compass 34 mm and draw serifs on the circle.
3. After you have drawn the drawing of the assembly panel, start making the actual panel itself. A hard cover from an unnecessary book, or thick cardboard will come to your aid. In the places indicated in the figure, you need to punch holes in the cardboard using a hammer and a nail.

Cut out the drawing and glue it to the cardboard. Choose a nail with a diameter slightly larger than the thickness of the match. Place an unnecessary book or several sheets of cardboard under the cardboard (so as not to spoil the floor with a penetrating nail).

4. When you have your assembly panel ready, start assembling the wheel - if it has 15 links, then you will need 90 matches.

* It is advisable to choose matches without marriage.
Insert supporting matches into the panel.
4.1 Now consistently fill in the gaps with matches. It is worth noting that each next match in each ring must be overlapped with the previous one.


4.2 Raise the first match in the ring in advance so that it overlaps the penultimate and last support matches.