Wrapping paper products. How to make crafts from ribbons
But in this article we will talk about New Year's crafts from satin ribbons. Crafts can be simple or made using a special Japanese technique - kanzashi.
Herringbone
Let's start our crafts according to tradition with the symbol of the New Year - from the Christmas tree. Some prefer to put big Christmas tree, and for some, such a pleasure is an unaffordable luxury (pets or small children consider it their duty to overturn a forest beauty decorated with lanterns and New Year's garlands). It's okay, you can decorate the apartment with a miniature Christmas tree, which can be made from satin ribbons.
#1 We make a Christmas tree from ribbons with children
If there are small residents in the house, they must definitely participate in the decor process. In addition, joint creativity is a great time spent! Every kid can make such a simple Christmas tree from a dry stick and different ribbons.
#2 Miniature Christmas tree made of ribbons
And here is a more complex version of a Christmas tree made of ribbons. Such crafts can decorate not only the house, but also, for example, the desktop. For the manufacture you will need ribbons, a foam cone blank, a lot of safety pins and a bow for the top. See the step-by-step master class in the picture below.

#3 Christmas tree made of ribbon and beads
You can make a Christmas tree from a ribbon, combining it with large beads. Such a craft can be hung on a real Christmas tree or given to someone as a souvenir. See step by step photo instructions below.

#4 Christmas tree in kanzashi style
And here is a mini Christmas tree made using the kanzashi technique. You will have to tinker with such a craft, because Japanese technology for patient needlewomen. This craft will take a lot of time and effort, but the result is truly impressive! Satin ribbon petals are glued onto a paper cone with glue. Additionally, the finished tree can be decorated with beads. By the way, the Christmas tree does not have to be monophonic, you can combine colors to your taste.

#5 Christmas tree made of flowers in kanzashi technique
And here is a craft very similar to the previous one, there is only one difference: Christmas tree No. 4 is made from individual petals, and this Christmas tree is made from flowers. First you need to make petals from ribbons, then glue the flowers (5 petals each), and only then glue the flowers to the paper cone. See step-by-step instructions with photos below.

#6 Kanzashi herringbone hairpin
Using the kanzashi technique, you can make various decorations, in particular hair clips. For such a hair clip you will need: a hair clip, ribbons, beads. How to make a hairpin, see below.

#7 Herringbone ribbon hairpin
Here's another one original way decorate the hair clip with ribbons. Get a miniature Christmas tree that will perfectly complement New Year's image. How to make a hairpin, see the picture below.

#8 Hairpin herringbone
And you can decorate the hairpin like this in a simple way: with a regular narrow ribbon and a star-shaped bead. Ordinary hair accessories are so easy to make truly festive, and our step by step master class It will help you with this.

# 9 Kanzashi Christmas tree from a ribbon - a souvenir for the New Year
#10 Herringbone from ribbons
Look for more Christmas trees:
Snowflakes
From ribbons, especially using the kanzashi technique, snowflakes of incredible beauty are obtained. You can decorate with such a craft not only a room, a snowflake from ribbons can be hung on Christmas tree or use as decoration.
#1 Simple kanzashi snowflake
It is best to start your creative journey in kanzashi with simple crafts, such as this snowflake. You can master two types of sharp petals without much difficulty. By the way, you can glue the petals in your own way. Well, look at the author's version of the step-by-step MK.

#2 Another simple kanzashi snowflake
And another option is not the most complex snowflake using the kanzashi technique. By the way, such crafts can be fixed on a headband or hairpin and complement the New Year's look with an unusual handmade decoration.

#3 Snowflake kanzashi on the headband
Need to complete the image of a small snowflake? A snowflake using the kanzashi technique on a rim will cope with this task with a bang. Step-by-step MK in the picture below.

#4 Kanzashi snowflake with several types of petals
And this piece more suitable for experienced needlewomen. In the manufacture of a snowflake, a large number of petals are used, the manufacture of which requires special skills. Well, if you are confident in your abilities, then watch MK and create!

#5 Snowflake from ribbons and beads
And here is a variant of a kanzashi snowflake with bead decor. In addition to painstaking work with ribbons, you will also have to work with beads and weave a small flower. Please note that this craft provides for several types of petals, each of which has soy manufacturing features. See the picture below for a step by step tutorial.

#6 DIY snowflake from ribbons
Snowflakes made using the kanzashi technique look unique, but a snowflake looks no less impressive from pieces of tape. For manufacturing, you will need a ribbon and a lighter (you can use a candle) to solder the parts.

#7 Christmas tree toy Kanzashi Snowflake
#8 Double Sided Satin Ribbon Snowflake
#9 Christmas kanzashi snowflake with swirls
#10 Headband Snowflake kanzashi from satin ribbons
See more snowflakes in the article:
Wreath
The Christmas or New Year's wreath is an exclusively Western tradition that has come from Hollywood films into our homes. Well, for those who accept Western values, we have prepared several master classes on creating wreaths from ribbons.
#1 Christmas wreath of bows
A very simple ribbon wreath for the lazy. For manufacturing, you will need a base and ribbons of different colors. Tie ribbons in bows around the base and the wreath is ready!

#2 Wicker ribbon wreath
A wreath of ribbons can be woven. Such a product looks very impressive, but in fact there is nothing complicated in manufacturing. Follow step by step instructions and you will succeed!

#3 Miniature Christmas wreath in kanzashi technique
A mini wreath can be made from kanzashi petals. You need to make basic petals from ribbons, glue them in threes and connect them into a circle. The finished wreath can be decorated with a miniature bow.

#4 Miniature wreath of ribbon and beads
A miniature wreath of ribbon and beads can be hung on a Christmas tree as a decoration, or you can give it to someone as a gift. New Year's souvenir made by hand. For the manufacture you will need fishing line, ribbon and beads. You can also use additional decorative elements, such as a pendant and a bow.

#5 Baby Ribbon Wreath
For sure in kindergarten given the task to do something New Year's crafts with kids. Take note of this simple Christmas wreath. You will need: a base for a wreath, a lot of pieces of different ribbons, glue.

#6 Christmas wreath of satin flowers
And here is a version of the New Year's wreath of satin flowers. Flowers are very realistic and it seems that the manufacture of such a wreath will take a lot of time. Actually it is not. Making such a craft from ribbons is quite simple. You can verify this through MK.

#7 Ribbon Wreath: Making Christmas Crafts with Kids
And here is another great version of the New Year's crafts that the kids can handle. You will need: a base, a lot of ribbons of different colors and sizes, scissors. cut the ribbons into strips of the same length and tie in knots around the base. The wreath is ready!

#8 Simple satin ribbon wreath
very simple wreath of satin ribbons. For manufacturing you will need: foam base, ribbons, safety pins or glue. Wrap the blank with a ribbon and decorate at your discretion: with a bow, a snowflake, or leave it like that.

#9 Kanzashi Christmas Wreath
#10 New Year's wreath "Snowman" from ribbons
You'll like it:
Balls and other Christmas decorations
The ribbons are very pretty. Christmas decorations, for example, balls, bells, cones, lanterns and more. We have found for you simple and complex MK, with which you can create the Christmas tree of your dreams!
#1 Simple Christmas ball of ribbons
To create such a Christmas ball you will need: ribbons, safety pins, foam blank. Roll the ribbons into a ring and secure with a pin to the workpiece. Continue until the entire ball is decorated with ribbon rings.

#2 Christmas ball made of satin ribbons
To make such a ball, you will need: a foam blank, a tape cut into strips slightly larger than the diameter of the blank, two safety pins.

#3 Christmas ball made of ribbons in artichoke technique
And here is a slightly more complicated version of the craft. The real difficulty lies in the fact that you have to spend your time. You can arrange the colors to your taste, and you can learn the secrets of the artichoke technique from the step-by-step MK.

#4 Christmas ball of ribbons
And here is another option for decorating the workpiece with a narrow ribbon. In this MK, glue is used instead of safety pins, and the tape itself does not need to be cut into pieces. The tape is wound obliquely through two points on the surface of the ball. Each time you pass the tape through one of these points, drip a drop of glue and fix a new layer. step by step photo instructions are below.

#5 Artichoke style cone
From ribbons, you can make not only a ball, but a bump, for example. To do this, you will need a special blank, tape suitable color and safety pins in large numbers. Cut the ribbons into identical squares, wrap them into a triangle and fasten them to the workpiece with a pin.

#6 Ribbon cone
And here is another version of the cone of ribbons, that's just easier to manufacture, but no less spectacular. For manufacturing, you will need a blank made of cardboard, a narrow ribbon of a suitable color and glue. Step by step process of making crafts is shown in the photo below.

#7 Icicle on Christmas tree from ribbon
Very simple craft. To make such an icicle, you will need a narrow ribbon, a pencil and a thread. Wrap the tape around a pencil, fasten and leave overnight. In the morning, remove the tape, sew on a thread and you can decorate the Christmas tree!

#8 Ribbon bell and flashlight
#9 Lanterns kanzashi
#10 kanzashi Christmas tree cones
#11 Christmas tree balls from a narrow ribbon
#12 Kanzashi Christmas balls without base
#13 Christmas ball kanzashi
Look more ideas Christmas balls:
Angels
Angels on New Year also came to us from the West. However, for new year holidays Christmas follows and if your family is one of the believers, so why not make crafts for the future, especially since very cute angels are obtained from the ribbons.
#1 Simple ribbon angel
If you are doing needlework with children, especially preschool or younger school age then be sure to take this simple but whole original craft note from the tapes. You will need ribbon, a stapler and beads.

#2 Angel for Christmas tree or for table decor
And here is another very interesting craft that you can hang on a Christmas tree or decorate a Christmas table. You will need a wide ribbon, a bead, a piece of wire (for a halo) and decorative elements.

#3 Kanzashi angel
#4 New Year Angel
#5 Mini Christmas Angel Kanzashi
Bow
What is the New Year without gifts? What is the main thing in a gift? Well, of course, attention and packaging! A beautifully wrapped trifle will bring much more pleasure! A chic bow will help to complete the gift wrapping, which you can make with your own hands from ordinary ribbons.
#1 Christmas ribbon bow
A variant of the classic Christmas bow made of thin ribbons. This bow will be a great addition to any gift. How to tie a Christmas bow from ribbons, see the photo instructions.

#2 Double Ribbon Bow for Gift Wrapping
Or here is another original version of the double bow. It is tied quite simply, but the impression is indelible! Step-by-step MK can be found below.

#3 Bow flower
Delicate bow in the form of a flower will be a great addition to a gift for loved one: mother, sister, best friend. You will need a satin ribbon, a needle and thread, and a bead for the core. See below for how to make a bow.

#4 Big ribbon bow
And here is a big bow to decorate a massive gift. You can decorate absolutely any gift with such a bow, for example, for a beloved man or work colleague. Looks cool and is very easy to do. Step by step photo instructions are below.

#5 Narrow ribbon flower bow
From a narrow ribbon with glue and a button, you can make a charming flower bow. The perfect gift addition best friend, sister or daughter.

#6 Do-it-yourself voluminous bow
And here is a version of a universal bow that can decorate any gift. You will need a ribbon and our master class.

#7 How to tie a simple bow
#8 How to tie a fancy ribbon bow
You will also like Christmas packaging ideas:
Other crafts
You can make an incredible number of a wide variety of crafts from ribbons and it is simply impossible to collect them all in one place. But we tried to find as many of the most different options so you can be inspired and create your masterpieces. And next year, perhaps your master class will be on our website!
#1 Crown
Crowns for small snowflakes and princesses can be made from ordinary ribbons. The crown can be made using the kanzashi technique (for more experienced craftswomen) or in a simpler technique.

#2 Crown of ribbons and tulle
#3 Kanzashi crown from a narrow ribbon
#4 New Year's crown with your own hands
#5 Postcard
Ribbons can be made new year card. For example, folding a narrow ribbon in the form of a Christmas tree. You can decorate with beads or colored buttons.

More Christmas cards:
#6 Candy
As a mini souvenir for the New Year, you can make sweets from ribbons. You will need a narrow ribbon of two or more colors, and then it's a matter of technique!

#7 Christmas garland of ribbons
From ribbons you can make a cool Christmas garland for room decor. To create you will need wide ribbons of different colors and a thick thread. Ready-made flags can be glued to a thread or sewn on. But it takes a long time to sew by hand, so if available sewing machine be sure to take advantage of its features.

You may be interested in:
Help us become better: if you notice an error, highlight the fragment and click Ctrl+Enter.
Holidays and solemn events constantly accompany our lives, and there are regular occasions to give gifts. Agree, it would be great to learn how to pack them beautifully?
Motherhood.ru has already offered, and today we offer instructions for tying bright creative bows for a gift!
Ribbon bows
To make gift bows from ribbons, you will need satin ribbons, or pieces of braid or fabric that “does not fray”. For some designs, you can use paper, thin plastic, fixing the components with a stapler or glue.Strict horizontal bows are perfect for stylish minimalist gift wrapping. In this case, you can use several tapes of different shades.


From scraps of multi-colored ribbons, you can make such a cute bow:

We make larger lush bows according to the following schemes:


We do a bright contrasting bow of two narrow and one wide ribbon as follows:

You can tie a gift with real hair bows. Delicate, beautiful and reminiscent of school childhood! This option is great for wrapping a gift for a teacher.

Ribbon and ribbon animal bows
For gift wrapping for children and themed celebrations, we use the idea of animal bows. See what a cute elephant or bunny you can make!


The dog breeder will be pleased to receive a gift decorated with an elegant dog muzzle.

Paper bows
Fold up paper tapes for quilling or strips of colored paper in the form of multiple rings, cut out an inscription with a wish or anniversaries from other paper. Pin them together for a personalized gift bow.

From paper curls you can collect a large flower, in the center of it there is a place for wishes, additional decoration.


We make a holly flower from many cut-out paper circles. We turn them into a cone and glue them along the edge. Then we collect in the form of a flower.

Paper bow with - simple and beautiful!

If you really want to surprise your loved ones with your original packaged gift, then you should familiarize yourself with detailed diagrams cutting, folding and attaching extraordinary bows. Let's take a look and get to work!


Even a child can make such a bow: fold the paper “in a fan, fasten it with a thread - and the bow is ready! In doing so, you can use colored paper, newspaper and magazine clippings, wallpapers, geographical maps.

Men's bows
For a gift to a man, we are preparing a special bow. It can be a gift decoration with a tie or suspenders.
A paper bag with a gift inside can be made in the form of a shirt with a tie. Use colored ribbons or paper.


The shirt itself can also be used as wrapping paper and a bow. See what you can do!

Jewelry for a gift from natural materials
A bow made of grass or straw is an original and simple solution.
Combine decoration and bouquet - great idea. We decorate the gift with fresh flowers!

Use fresh green leaves and branches to decorate the gift.

We decorate the gift with a vintage masterpiece: sequins, a beaded flower and a real feather.

Unconventional Solutions
The gift can simply be closed with a button.
A gift related to photographs, or a gift for a photographer, it would be very useful to decorate with an old photographic film.

You can make fabric packaging and a bow from a single piece of fabric.


How beautiful to wrap a round gift? A piece of cloth with a handle and double rows of bows will do.

When a pie is given, it is usually brought on a baking sheet in a towel. And what if you add a work of your culinary art beautiful packaging? Edible gift can be decorated tissue paper and decorate with a "bow" of spoons.

Combination of simple bows
Everything ingenious is simple. If you don't want to spend a lot of time tying an original bow, make lots of simple bows. The main thing is to observe their harmonious combination.


flower bows
Flowers are always bright, solemn and tender. Therefore, we take note of decorating gifts with flower bows.We make a flower from two different ribbons.

simple paper flower

From paper, you can make a flower with leaves according to the scheme:


Delicate voluminous flowers can be made from crepe paper or ordinary napkins.

See what kind of flower can be made from ordinary newsprint.


Fabric flowers are very similar to real ones. If you “burn” the edges of the fabric, you can get the effect of real petals. Similar flowers can be made from plastic bottle heating its edges.

We hope that our ideas will surely inspire you to create. Maternity.ru wishes you and your loved ones pleasant gifts!
Photo sources:
universal choice gift ideas for any occasion and occasion. Surprise your friends and loved ones! ;)
Good day, my dear friends! When the time of the holidays approaches (especially the last calls and September 1), such an item as a ribbon bow becomes especially relevant. This accessory is so popular with schoolchildren, mothers and just needlewomen that I could not get around it and decided to dedicate a whole post to bows.
All sorts of bows are actually found in our lives so often that we don’t even notice it - in jewelry, clothes, they are even used as an element school uniform... In general, if you want to learn how to make bows from the most different types ribbons, welcome!
Beautiful do-it-yourself ribbon bows: master classes
In fact, learning how to tie even the most complex bows yourself is not so difficult. Instructions with a large number of photos, which I have prepared for you in abundance today, will help with this. There will be both selections from the Internet and unique master classes specially prepared for you.
How to make satin ribbon bows: step by step instructions
Satin ribbons are the most popular material for creating small masterpieces. Smooth, shiny, relatively inexpensive ribbons have always attracted the attention of needlewomen from all over the world. The material has found application in the most different areas creativity, no exception to steel and decoration based different kind bows.
To create accessories, you can use ribbons of different widths, but it all depends on the chosen design and execution technique. Let's start with the simplest types.
The simplest classic bow
A basic bow that any beginner should learn to make is shown below. For him, you can take both a narrow and a very wide tape - it will turn out from any.
Work process:
- Fold the ribbon over the two halves of the ribbon over the index fingers of both hands.
- Cross the halves and slip one into the other.
- Tighten the product. Ready!

On the basis of such a bow, you can make a chic decoration. It will be enough just to fill it with waterproof glue or shiny acrylic varnish, then attach the rings to which the chain will be fastened.

It will not be difficult to tie the same bow on a fork, with its help it will turn out to be more accurate and even (although you can create a very beautiful accessory on your fingers). There is also a limitation for such an “assistant” - it is useful only when creating very small bows, for larger products you will have to resort to the traditional method.

double tape
The double bow is performed in a slightly different way from the previous one. Two rings of tape and a separately created center, obtained by sealing the edges, are useful for it.
Fold two rings in the middle and sew or glue so that they are in contact with the side parts. After that, the middle is closed with a pre-made part. The design can be attached to a hairpin or elastic band.
Note!
For this accessory, you need to take a medium or wide ribbon; such beauty will not come out of a thin, narrow material. If your choice goes to a width of 2.5-5 cm, then this will be the ideal solution.

A variation of such a bow of two ribbons can be such an analogue: in this case, two rings are superimposed in the middle on each other. You can also experiment with colors- for example, create a red or green bow or even combine one or more shades in one product.
Try to make more than two layers, take ribbons of different widths and textures. Thus, from one scheme for creating a bow, you can create a wide variety of accessories.

Layered puffy bow
A great option for schoolgirls and not only. Such a bow is easy to put on a hairpin or comb to attach to your hair. It is based on two simple bows discussed earlier.
To fold this, you will need to make a base of two overlapping layers. From the ribbons folded in this way, the back will be obtained. The front is similar to the simplest first bow. At the end, they must be connected with glue or thread. Everything is held together by a central piece.

In this way, you can get more voluminous accessories, like the white bow below. There is one difference here - the basis is not two layers, but three.
Romantic and sophisticated, this addition to the image will please any graduate who wants to indulge in nostalgia. But this option, unlike jewelry for girls, is more adult and feminine, and this is exactly what is needed in such cases.

Twisted bow of 3-4 ribbons
Very beautiful bow which is good for head decoration. To do this, three or four (or even more) pieces of tape of the same width, but different lengths you need to sew with the sign of infinity and put one into the other. Draw the middle as in a few microns earlier.

Kanzashi
Many beautiful bows are made using the kanzashi technique. This type of creativity came, as you might guess, from distant Japan. There, in this way, magnificent details are created to complement not only everyday, but also festive outfits.
Bow flower
Making such a flower is not difficult, but painstaking. You will need at least 12 petals, which will need to be pre-cut from a ribbon 2 and 4 cm wide (you can take a different width, but not less than 1.5 cm).
First, make the first layer by stringing six wide petals and pulling them together. Put some kind of decoration between the layers and attach the second layer made in the same way. Don't forget the bead in the middle.

Another variation of simple but beautiful petals is located below. Here the flowers come out more pointed.

A more elegant white flower is created below. IN step by step photos you can see that the flower petals are made by twisting the ends inside the middle. Such a bow can consist of either a pair or five or six layers gradually increasing in number of elements.

Bow for discharge from the hospital
Newborns (and children in general) deserve the best! That is why I have found for you a beautiful bow that will suit both girls and boys. For it, you will need a sufficiently long tape (at least three meters).
In the middle, make a winding of several layers and then a knot as in the photo. After that, you will need to pull out a few petals formed by previously folded rings.
Why leave such long ends around the edges? The fact is that you will need to tie them around the long-awaited bundle, leaving a beautiful center in front. At one time, I generally purchased a five-meter ribbon - the nurse imposed such beauty from it that we still remember with a smile with the whole family.

How to tie a ribbon bow
Rep ribbon is good because, unlike satin, it is less prone to various kinds of damage. Satin should only be hooked once and that's it - appearance bow is damaged. With reps, such a trick will not work, but it also costs more.
Baby bows
The combination of several types of tapes looks very interesting. IN this case colors are also combined, which, nevertheless, look very organic. The polka dot ribbon is just perfect! Such a bow will decorate the girl's head for a holiday and in Everyday life. For him, you will need to connect two tucked parts, as was seen earlier in the master classes. The top will be decorated with a classic variation.

On an elastic band
Collecting a magnificent bow on an elastic band is not difficult. To do this, you will need several layers of bows, decorated as we did earlier. The number of layers is only limited by your imagination and common sense. The difference of this accessory is that under it there is a semblance of crosses with serifs at the ends.
You can connect all this splendor with ribbons 1 cm wide, bandaging the middle. You can attach a bow to the elastic with a glue gun or something similar.

A bright school-themed bow explodes early ideas of what a school accessory should be. It's just a bomb!

Butterfly bow
With the help of rep ribbons, you can even make a semblance of a tie! Yes, the butterfly will turn out small, but very effective. To create it, fold the ribbon, bending the edges under each other, as in the photo below. You will need three of these layers. Under them, attach a longer ribbon so that you can tie it at the back. In MK it is very short, in this form it can be left for a simple accessory.

And here is another fun variation of a bow tie. Nothing more or less bird feathers are used here, connected by a ribbon in the middle. An interesting interpretation of the standard butterfly, isn't it?

By the way, a butterfly bow can also be made from fabric, a master class on this below.


Bows for gift boxes
To tie a bow on gift box you will need not only tape, but also different types of wrapping paper.
big bow
A very large accessory for a very great gift. Such a bow can be made from a ribbon, but it is better to use wrapping paper, which will take a lot for such a work.
Insert a small box into the base of the decorative element. It may be a surprise or it may just be the basis for such an accessory. Place it in the center of the square, which close its edges at the top and bottom. Tuck the free edges as in the photo below (as if wrapping an envelope). Press the middle and wrap it with a small piece of paper of sufficient length. Straighten the edges to make them as fluffy as possible.
This bow can be used on its own or as a decorative piece for a huge surprise.


Beautiful for a gift
The next fluffy bow has an incredible Christmas mood. They literally breathe from him! For this, you will need to fold the ribbon as shown below, overlapping and tying several layers together.
Place a few bows on top of the structure, folded as shown below. Decorate the middle with a beautiful bear in a cap or any other decorative element.

Paper bows: simple, cheap, original. All master classes describe their creation in great detail.


Do you want even more bows for a gift? Read about it in another article.
Nylon bows
Nylon ribbon is traditionally used for graduates and hair decoration. But for other purposes, such bows can be used.
A simple bow on a fork is created in just a couple of minutes. To do this, you take a fork, thread it in the middle thin ribbon, thicker on top of it. Wrap the thicker ribbon around the tines of the fork many times, forming a braid. A thinner ribbon becomes the central part of such a flower.

A semicircular metal template will help to “cut” the petals with a small resemblance of a soldering iron. To do this, two ribbons - nylon and satin - must be folded as shown below. After that, the middle is bent inward and you will need a lot of such petals. They merge into one layer, then into another, etc., until you get a lush layered bow which can be used to decorate hair.

In the next accessory, nylon ribbon is used only as an additional accessory, decorating the base made of fabric. You can create such beauty in a few minutes, and decorated with a nylon ribbon, it will look even richer.

The next bow belongs to the gift category, but I decided to put it in this section, because it is made of nylon ribbon. For it, you will need to fold the tape in many layers, and make an incision in the middle, which will need to be tied with a thin fishing line, around which the ends should be tied. The most important step is coming: you need to pull out all the ends of the folded tape to get a very magnificent design.
Such a bow will decorate a Christmas tree or simply decorate an apartment.

A similar accessory can be made from a denser ribbon and even from burlap. It will be more difficult to pull out the ends, but the effect will turn out to be more unexpected and extraordinary.

Photos of other beautiful bows
How are they not made out! In the form of elegant brooches, bracelets and much more. For example, the accessory below will be an interesting addition to a festive outfit.


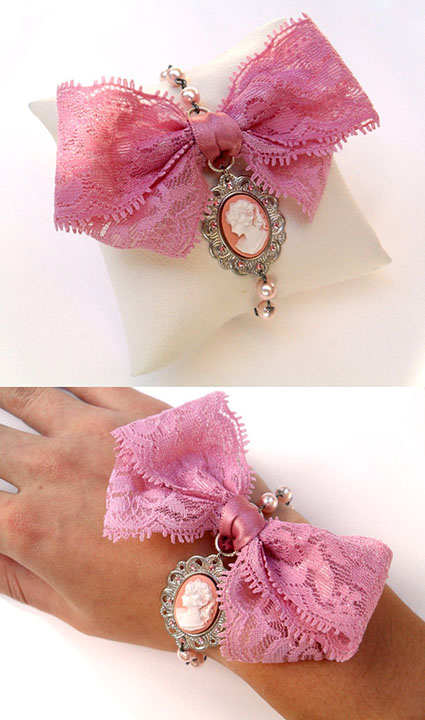
Another lace bow with a bead inside.

In general, thanks to lace, even the simplest design begins to look more original and festive.


Just look how you can spruce up your pen by adding layers of lace and satin ribbons to it.

A bow on the rim will make of ordinary girl doll hurrying to the ball.


Roses as bows. Great, isn't it?

The bow on the dress looks very impressive and original.


MK in video format
Several master classes in video format will be a great help in creating various kinds of bows. Ideas will be especially good for schoolgirls and graduates on last call, graduation and September 1st.
That's all, Dear friends. Tell us how you like master classes and photo ideas for bows and visit our resource more often. See you soon!
Sincerely, Anastasia Skoreva
Satin ribbons are one of the most affordable and spectacular materials, loved and used by many needlewomen. And this is not surprising, because the atlas with proper care can be very durable, which means that products made from it will delight you with their beauty for a long time.
In addition, its consumption during operation is quite small, and the process of manufacturing all kinds of original accessories, exclusive interior decorations, decor elements or unusual gifts- simple and accessible even for beginners.
If you haven't worked with ribbons yet, give it a try and see how easy and beautiful it can be. Moreover, there are many master classes that instruct in detail how to make different crafts from ribbons with your own hands.


"Ribbon creativity", in addition to originality and beauty, also attracts with its diversity, because satin ribbons can be used both for making simple knick-knacks and for creating real masterpieces or works of art.
For example, here are the most simple options ribbon crafts that even your child can do:
- bows or flowers - these can be hairpins, jewelry for a hoop, brooches, etc.;
- baubles and bracelets;
- various decorations for decorating gifts or home interiors - flowers, figurines, animals.


Crafts from ribbons can also be complex, made using various well-known techniques (“kanzashi”, “artichoke” and others):
- whole panels and paintings are embroidered with satin ribbons, aromatic sachets are made from them;
- they are used to decorate Easter eggs and wedding paraphernalia - making bouquets, decorating wine glasses, gift bottles champagne, ring pads, etc.;
- from ribbons and soap with your own hands, you can create whole baskets of flowers that will decorate any interior or be a great gift.
And this is not all possible crafts from this material. For inspiration, you can use existing ideas in master classes or come up with something special of your own.
Satin Ribbon Rose
Of course, you can start with the simplest. To easily do unusual and complex things, you need to understand the basic techniques for creating products from satin ribbons. And it's best to see it step by step in the master class.


Step by step description
- Although tulips, dandelions, hyacinths, primroses, and many other flowers are folded from ribbons, the rose is the most popular flower among craftswomen. Roses are most often made using the kanzashi technique. For the flower, choose a five-centimeter-wide ribbon of your desired color. Trim the edge of the tape evenly and melt it with a lighter so that it does not crumble. After that, lay the ribbon so that it wrong side was facing up.
- Wrap the upper left corner down (there are arrows in the pictures of the master class and the fold lines are indicated by a dotted line), and wrap the lower left corner to the right twice.
- We take a needle and thread of the same color as your ribbon. Fasten the resulting fold (the thread should be long, because you will have to flash the entire tape later).
- Connect the two layers of tape, stitching from the fixed place to the right (it should be about one or two millimeters from the edge) and stop at the edge of the top tape.
- Tuck the long edge of the tape to the left (in the direction of the arrow), and then the entire tape up to the right at an angle.
- Make sure that the right sides match up and you have three layers. Sew them together, up from the bottom corner. Then stop, but do not cut the thread, but tuck the tape down, as the dotted line in the photo master class shows.
- Then fold at an angle to the left and stitch again, only to the left along the top edge. After connecting the three layers, fold the tape in the direction of the arrow to the right, then at an angle down, and continue to sew.
- When there are enough folds (this will take about fifty centimeters of tape), sew stitches along the edge of the last one, capturing two layers. trim excess material and melt it with fire, but leave the thread.
- Tighten the thread and you will whole line petals. Start forming a bud. The first petal must be made from the very beginning of the tape, pulling the thread where you fixed the two folds. Twist it around these folds and you will have the center of the flower.
- Take another needle and thread and pull the bottom edges of the petals together. Then form the second petal, wind it around the bud and hem it in the same way from the bottom.
- Continue on the same principle, adjusting the petals with the thread tension. If you get more assembly on the bud, then your rosette will also be larger, looking like a blossoming beautiful flower. And you can do a little tension, and then a tender bud will come out.
- Then twist the thread to the end and hem each petal from the bottom. Carefully fasten and cut the thread. Straighten your flower.

Depending on how you want to use the rosette, its bottom can be glued with a piece of felt or ribbon, sewn to the leaves, attached to a safety pin (for a brooch), hairpin or hoop, etc. Such a gentle and beautiful product will be a great decoration or a gift for spring holidays like March 8th.
Little roses - simple


Ribbon Poppy
In master classes, there are other ways to create various colors with your own hands. For example, you can cut many parts separately from a satin ribbon, shaped like leaves and petals. Then burn them, form a flower and glue the elements together, decorating them with beads or sequins.


Lily from the tape - photo MK


Ribbon bridal bouquet
The made flowers can then be sewn onto fabric or embroidered with satin ribbons directly on the canvas, making various paintings and panels. Using the same technique, it is easy to make many roses for wedding bouquet bride. It remains only to make the base on which the flowers will be attached.


Easter eggs decorated with ribbons
Wishing to decorate Easter eggs, you can either simply wrap the workpiece with a cloth and then decorate it with flowers or ribbon bows, or use the artichoke technique - fold the ribbons different color in the manner of fish scales and glue them to the surface of the egg.
Balls can be pasted over in a similar way, and then you will get original Christmas decorations or just interior decorations.

A basket of ribbons for a bouquet
To make an unusual basket, take a piece of oval soap and fasten safety pins on it in a circle from above and below (their number should be the same, and you need to place them on the soap at a distance of about six to eight millimeters from each other - just stick them into a bar of soap ).
Then take a ribbon (not very wide - about one or two centimeters), fasten one of its edges with a pin and braid the walls of the basket as follows: hook the ribbon on the top pin, then lower it down, hook it on the bottom one and lift it up, continuing further until you all walls will not be braided.
You will have long end below - you will need it to braid the bottom edge and form the side. Then you need to translate it up to decorate the top edge. Use the remaining ends of the ribbon to create a bow. Make wire for a basket and a handle and braid it with a ribbon of the same color or make an assembly out of it.


Attach the ends of the handle to the soap and decorate the basket. You can put primroses in it and give it to a friend or mother on March 8, or decorate it in any other way.
Making such beautiful and unusual crafts is a great way to show your imagination and creativity and make nice gifts yourself or loved ones.
Video master classes