How to make a pig with your own hands: step-by-step master classes with photos. Crafts for the New Year from bottles Craft Pig from tights with your own hands, a master class with step-by-step photos for beginners
Content
And we are here, as always, with our interesting and original ideas Christmas crafts... This time we will create crafts from plastic bottles. Firstly, do not forget that plastic takes more than 100 years to decompose, so we must use it to the maximum in order to do less harm to nature.
Secondly, these crafts will not require too much cash injections from you. Thirdly, a lot of interesting gizmos can be made from this improvised material. In our article you will find figurines, a garland, a piggy bank, Christmas decorations and many other crafts from plastic bottles.
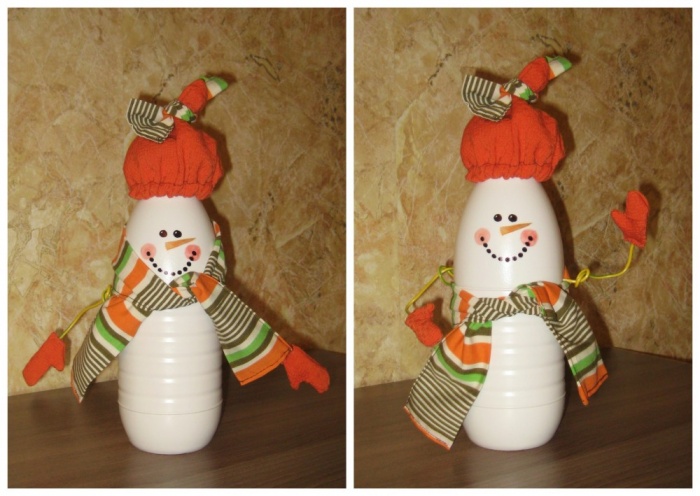
Christmas figures from plastic bottles
These bottle crafts are very easy to create. Here is a set of required items:
- plastic containers;
- scissors and a stationery knife;
- paints, brushes;
- textile;
- Knitting;
- felt;
- glue gun.
For example, you can make adorable penguins. To do this, you need to cut the workpiece in half, and cut off the bottom for the cap. Next, they need to be painted like penguins, glue the parts with a glue gun and decorate the figures with textiles.

A little tip - instead of a glue gun, you can use scotch tape, which you just paint over later.
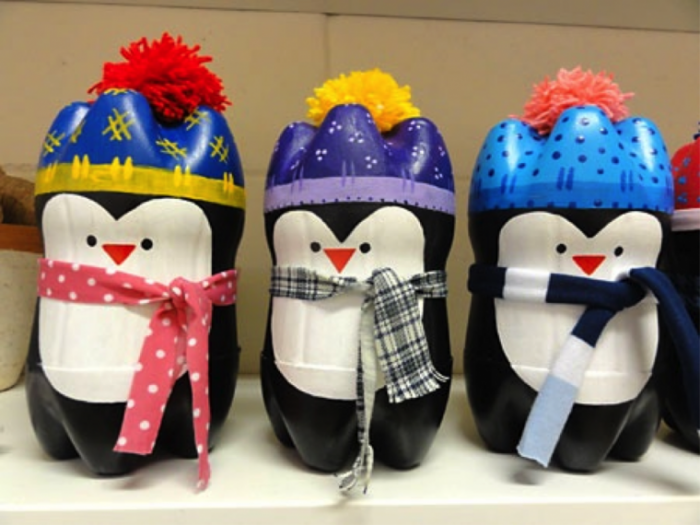
Use acrylic paints, they adhere better to plastic.

From this simple and affordable material, you can also make bright and beautiful apples, which can be placed under the tree or to decorate the kitchen with them. By the way, the decor is suitable not only for the New Year, but also for other holidays.

For a child, you can make a toy - a horse on a stick. If you improvise, you can also create a dog, because this is a symbol of the upcoming 2018. And the color, by the way, is yellow! So use a lot of yellow when creating your wonderful crafts.
Christmas tree decorations from plastic bottles
If the house has collected a lot of the material we need, and you already don't know where to put it, then our advice to you is for creativity! Let this container be creative! You can make wonderful snowflakes from the bases. They only need to be slightly colored and attached with a string so that they can be hung. Use a thin brush to paint the pattern. From such blanks, you can create a whole garland or wreath on the door.
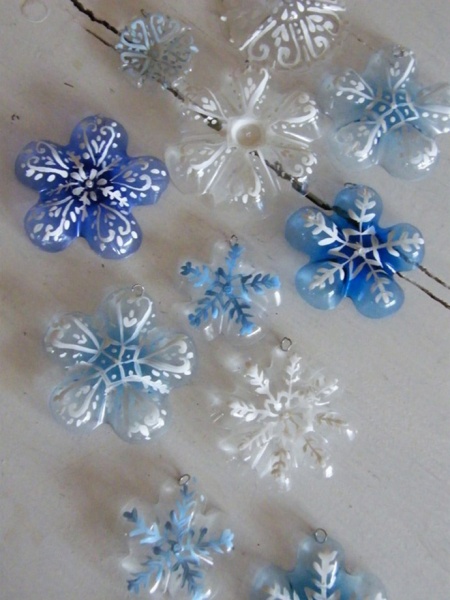
Crafts for the New Year from bottles are both original and not expensive.
But these bells are obtained from the tops:

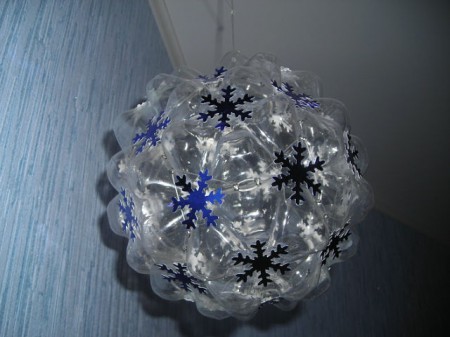
A whole ball can be crafted from bottle bases. Details can be painted, or you can use it in its original form:

Crafts from plastic bottles for the New Year is an opportunity to give a second chance to old things, an opportunity to join the culture of recycling things, sorting garbage. Thus, we consciously approach the use of resources, and besides, you can always call yourself an artist of trash art, and this, by the way, is a very fashionable movement nowadays. In general, such handicraft is good on all fronts!
And the following Christmas balls are made of stripes, which are decorated with various beads, paints, ribbons and other decor:

Snow balls
Another cool idea is to use plastic bottles to create Christmas snowballs. What we need:
- smooth plastic bottles;
- acrylic paints, brushes;
- sequins;
- decorative figurines;
- glue;
- foam or artificial snow;
- sequins, beads.
To begin with, you need to cut off the top and bottom of the bottle so that one tube remains. A circle needs to be cut out of polystyrene along the diameter of the pipe; we will attach our decorative parts to it.
Then, having coated the sides of the foam with glue, it must be glued to the main part of the composition, placing it inside the decoration.
The top and bottom of the pipe can be decorated with cut-off parts of the bottle, glued with a glue gun and decorated with artificial snow and ribbons. Crafts from plastic bottles are ready! You can also sprinkle sequins, sequins and beads inside.

Alternatively, you can use only the top and bottom to create a kind of New Year's snow globe.

Cones from plastic bottles
Another decor option when plastic is used to create a pine cone. It is better to use brown blanks immediately.
From your material you need to cut something like daisies and string them on a string. Make blanks of different sizes so that you end up with a bump. Fir branches can be cut from a green bottle.

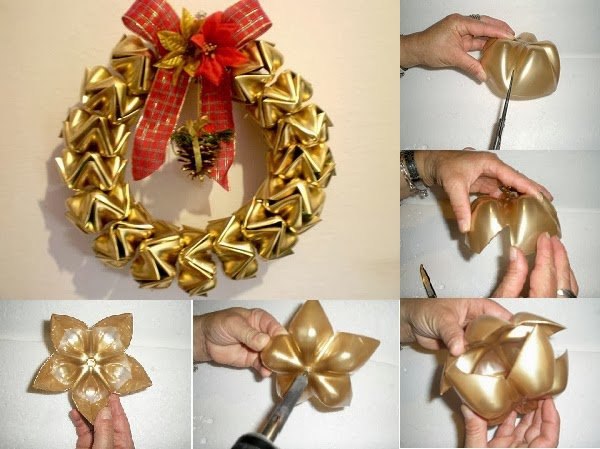
Plastic bottle wreath
For this we need the bottoms of plastic bottles, wire, bow and other decorations.

Details can be painted gold to add pomp and completeness to the craft, as well as disguise the material from which the wreath is made.
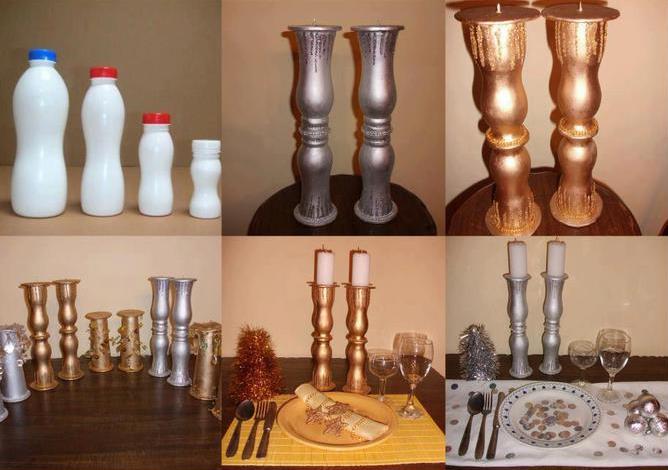
Candlestick for New Year
One of the New Year's attributes is a candle. Well, you and I can make very good candlesticks.

The next candlestick is made of two components, decorated with coffee beans, but, most importantly, this is a beautiful decorative candle.

By the way, do not forget that you can use not only bottles of mineral water or sweet water, but also yoghurts, kefir and other products.
Souvenirs for the New Year
Something comic and funny can be prepared for guests or kids. For example, make a piggy bank out of a plastic bottle. And what? Very original! It will turn out to make a piggy bank-dog - it will be even better!
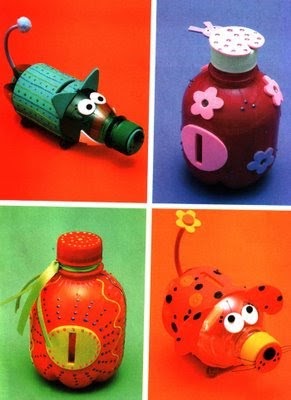
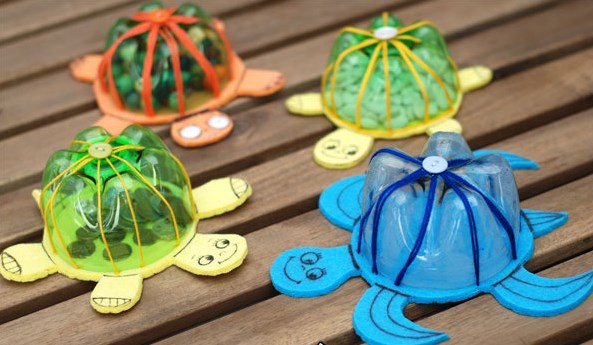
Use acrylic or spray paints, felt details, fabric, beads and various other decor for decoration. But children will definitely be delighted with such funny turtles. For the base, use thin kitchen sponges or foamiran. We have already described how to work with this material in our articles.
How do you like a whole flower bed of tulips in the middle of winter? Such a composition can be used to decorate a summer cottage or a courtyard of a private house. The first time guests will not understand for sure that these beautiful flowers are made from ordinary plastic bottles. As they say, crafts from plastic bottles for the New Year are a manifestation of imagination and ingenuity.

And a few more options for non-winter colors in the performance of the simplest and most affordable material at hand:


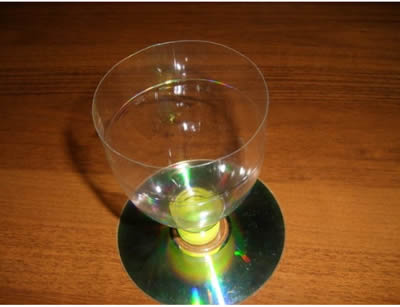
Plastic bottle cup
If you want to stand out from the crowd, have a special attribute, or you need to have a cup in accordance with the costume, then it can very easily be made from the material we know. By the way, read our articles where we tell you how to make crafts for the New Year from a bottle of champagne - this can also come in handy. So, the cup:

Luxurious, right? And, at first glance, you can't tell at all what it is made of, and at the second - too!
The design of a future wine goblet or as a reward might look something like this:

Or like this:
We really like to tell you about various unusual crafts, materials from which you can make amazing things and which are in almost every home. All this in order for you to find a moment for creativity, for relaxation, for your hobby. Slow down the time around you, let, as they say, the whole world wait while you create beautiful things. Well, in conclusion - crafts for the New Year from bottles of video master class:
See how you can create a fun garland that can be hung in the kitchen or in the children's room, or wherever you want, at your discretion.
Post Views: 1 290
Find out how easy it is to craft a rooster from bottles, coffee beans, fabric. See how to make a rooster out of salted dough from egg trays.
Craft a rooster from egg trays

This is what a rooster can be made of. This is completely junk material, but it makes great crafts. For work you will need:
- egg trays;
- acrylic paints;
- thin white paper;
- cardboard;
- newspapers;
- scissors;
- glue gun;
- brushes;
- pencil.
Using a glue gun, cut out the bird's wings from cardboard, glue them with blanks from egg trays that look like leaves.

Most of your time will be spent waiting for the papier-mâché rooster's body to dry. Therefore, it is better to start working with its formation. Cut the newspapers into strips, dilute the glue with water in a 1: 2 ratio in a container. Dip the paper in here, stick it on the inflated balloon. It will take more than one hour to dry this part. When this happens, pierce the ball with a sharp object and remove it through the small hole left.
This rounded workpiece must be cut into two unequal parts, insert the smaller one into the larger one to increase the strength of the part. Glue these elements together with a glue gun.
While the papier-mâché was drying, you had enough time to form the head and neck of the rooster. To a detail that looks like a flower with elongated petals, made using petals from egg tray, glue two triangular beak blanks, comb cut out of cardboard.
Insert the second one into this flower blank, then the third, fourth and fifth. The head and neck of the bird are ready. Glue this piece to the side of the half papier-mâché ball. To do this, use a glue gun to attach a strip of cardboard inside the neck so that it looks out from below. We glue this label to the half of the papier-mâché body.

To make a tail, draw semicircular lines on the lid from under the eggs, cut along them.

Glue the tail to the back of the body. Everything, you can paint the cockerel with acrylic paints, when it dries up, hand the craft to the addressee or put it in the most prominent place in your house, as a bright attribute of the holiday.
You can make a rooster with your own hands not only for the New Year, but also for Easter. Then you put painted eggs in his semicircular body, thus decorate the festive table.
Symbol of 2017 made from plastic bottles
If you decide to celebrate the New Year at the dacha, then make a rooster - a symbol of 2017, which is not afraid of either snow or water. Plastic bottles are perfect for this.

To make a rooster with your own hands for the Year of the Rooster, prepare everything necessary materials, in particular
- a five-liter canister;
- a plastic bottle with a volume of 5 liters;
- metal-plastic tube;
- 2 plastic bottles with a volume of 1.5 liters;
- corrugated pipe;
- thick copper wire;
- plastic bottles for feathers;
- perforated tape;
- acrylic putty;
- fine mesh;
- sandpaper;
- awl;
- construction foam;
- stationery knife;
- glue gun;
- self-tapping screws;
- scissors;
- screwdriver.

Bend the reinforced plastic pipe to make two rooster legs out of it. Attach them to the five-liter canister using self-tapping screws. To make an animal's neck, cut off a large piece of cloth from a 5-liter bottle, roll it up in the form of an envelope, and secure with self-tapping screws. From 1.5 liter bottles, cut off their tops below the shoulders, obliquely. Put them on the top of the bird's legs, and also attach these parts with self-tapping screws or a glue gun.
To make bird feathers, cut off the neck of the bottle. Using scissors, cut out 5 longitudinal feathers.

Put corrugated tubes on the rooster's legs, begin to decorate the thickened parts with feathers. To fix them, make two holes in each with an awl, insert a piece of wire here that needs to be tied to the base.

Cover the body of the bird with feathers, starting from the point where the tail grows. We are not making the backrest yet.

Roll the wire so that you get two paws, each with three fingers, put on these blanks pieces of corrugated pipes.

Cut out long and narrow nails from the bottom of the bottle. Attach them to the glue gun or to the "Moment of Installation".

Cover the resulting blank with spray paint, using one color for the torso and a different color for the legs.

Cut the head of the cock out of the building foam using a utility knife.

Take sandpaper, sand this part with it, then apply acrylic putty.

When this coating is dry, smooth the surface again with sandpaper, then coat with PVA.
To paint well on the head of the cockerel, use a trick, having previously covered it with PVA. In this case, the paint adheres well, and its layer will be more durable.

From a fine-mesh mesh, cut out a part that will become the wings of the back and tail of a rooster, glue long blanks from a plastic bottle to it to decorate this part with feathers. At the top, the wings are made from corrugated bottles.

Paint the wings, when the solution is dry, attach this torso piece with perforated tape and self-tapping screws. Cut from 2.5 and 2 liter bottles of elongated feathers, cutting each container into 5 pieces. Paint them on both sides, after drying, attach with wire to a metal mesh.

To make it easier to paint plastic bottles in a light color, take transparent ones, cut feathers from them for the back. Attach them with wire, 4 pieces at once for self-tapping screws.

Attach the bird's head to its place using long self-tapping screws, cover the already painted parts with plastic, paint the rest. Make spurs for the rooster out of the wire, after which you can put it in its intended place in the country or at home.

It's even easier to make the next bird out of plastic bottles.

To do this, you will need:
- two plastic bottles with a volume of 2–2.5 liters with small necks, and one of the same volume, but with a large one;
- disposable plastic cups in two colors;
- disposable plates;
- wrapping paper or trash bag;
- plastic ball;
- eyes for dolls;
- Scotch;
- stationery knife;
- glue;
- scissors.

For plastic cups, cut the top into strips 8-10 mm wide. In length, they will occupy a third of the height of the glass. Put these blanks on the high neck of the bottle, alternating in color. Cut the bottom of the last glass. Shred this container not only from one side, but also from the other side into thin strips. At the same time, the middle will remain solid.
Just below the rim of the plates, cut the semicircular feathers out of the plastic plates and cut them on one side with scissors to create thin feathers. In the bottle, which is located on the opposite side of the neck, make an incision, insert the tail feathers here, secure with tape.

Attach the ball to the top cup, secure it with tape. Cover the tail cut with wrapping paper or a fan-cut piece from a colored trash bag. Cut the wings out of plastic plates, glue them to the sides of the bird with tape.

Cut the comb, beard, beak of the cock out of plastic plates. Make in foam ball three cuts, insert these blanks here, glue them for greater strength of the connection. Take ready-made eyes for toys, or make them yourself from a white foam plate, cut out the pupils from a black garbage bag. Glue the eyes.

If you want to learn how to make a rooster out of bottles even faster, then watch the third master class in this section.

- Cut the bottom of a large plastic bottle, put it on a fence peg or a stick specially dug into the ground for this occasion.
- If the bird will stand in the house, then glue its lower part with strips of colored paper, make the wings and comb out of cardboard of the appropriate shades. If the rooster is on the street, then these parts must be waterproof.
- Create stripes from colorful garbage bags(by tying or gluing those), wings, nose, comb, beard made of colored plastic.
- Take two white bottle caps, paint black here acrylic paint pupils, glue them to the head.
- The tail is made from bottles of different sizes and colors. Cut off their bottoms, chop them almost to the shoulders into thin strips with scissors. Insert one bottle into another, fix them with wire, tape or glue.
Salted dough rooster
Such a three-dimensional picture looks great, but it is performed in an unusual way.

To make such a panel, take:
- 120 ml of water;
- 180 g fine salt;
- 370 g flour;
- 1.5 tbsp. l. vegetable oil;
- acrylic paints;
- rooster pattern.

- You will make a cardboard image of this bird when you transfer the presented drawing to paper.
- Mix flour and salt, pour vegetable oil and water here. Knead the dough well, cover it cloth napkin to stand for 20 minutes.
- Now you can roll it into a layer, put a template on top, cut a rooster out of salted dough along it. Using the same knife, apply streaks of feathers on the tail, wings, neck to the workpiece.
- If you want the bird to be voluminous, then separately sculpt the wings, buttons, the upper part of the comb.
- Leave this creative result to dry the dough. To do this, you need to place the product in a well-ventilated area to give the workpiece greater strength. Dry it for a day in this way, then heat the oven to 50 degrees.
- Using two cooking spatulas, transfer it to a baking sheet lined with paper and sprinkled with flour. Reduce heat to low, dry at this temperature for 2 hours. Take out the product, cool it down.
- Now we need to paint our fiery rooster with acrylics of different colors, and then varnish.
If you have a colorless nail polish, it works great for coloring a rooster with salt dough.
You can also sculpt a voluminous rooster from salted dough. Then the figurine needs to dry well for two days.

Crafts roosters from coffee beans do it yourself

This is not a simple rooster, but a magnet. To do it, you need to stock up on:
- a piece of burlap;
- a piece of red felt;
- coffee beans;
- a sheet of cardboard;
- rhinestones and sequins;
- crochet;
- threads;
- glue gun.
Use a brown pencil to paint the cardboard body of the cockerel. At the bottom, using a needle, into which the thread is set to match, form two legs of the cock out of it, make the paws out of brown colored cardboard, like the blank of the tail, which needs to be glued into place.
Make a beautiful thread bushy tail, glue it onto the cardboard blank. Also glue coffee beans on the body, bypassing the wing, and attach them to the ends of the legs. WITH back side torso glue the magnet. Decorate the wing with sequins and rhinestones.

We sew, we knit, we embroider crafts of roosters
These needlework techniques will also help you create crafts for the year of the rooster 2017. If you know how to embroider, then the following diagram will help you. Thus, you can arrange a small decorative pillow, an apron pocket made of plain fabric, or make a panel.

If you decide to knit a sweater for a child as a gift, calculate the loops so that this poultry flaunts in the center in front.
The diagram shows which colors to use. To make them all look good, knit a white yarn sweater.
If the listed types of needlework are still beyond your power, then make a cockerel on a stick from the remains of ribbons, threads, and fabric.

Here's what to prepare:
- a square of linen fabric with sides of 15 cm;
- red canvas measuring 5 × 20 cm;
- multi-colored ribbons;
- soft filler;
- threads;
- jute;
- twig;
- red yarn;
- a needle;
- wooden stick.

- Fold the linen cloth diagonally, trim one corner slightly. Stitch one and the other side with a basting seam, but leave free space between these sides, which is marked with a pencil in the photo. Through it, you will subsequently fill the figure with filler, and insert a wooden stick here.
- Insert a twig into the cut hole on the corner, fix it with turns of red yarn. This is the head and beak of the cock.
- Fill the workpiece with padding polyester. Insert a stick there, secure this part by tying it tightly with red threads.
- Take a strip of red felt, fold it in half, and place it on one and the other side of the cockerel's head. Wrap the top and bottom with thread to separate the comb and goatee. Cut the beard at the bottom with scissors.
- Roll in half satin ribbons different colors, attach them to the tail, tie with a red thread. Also form the wings of the rooster, just sew them on the sides.
- Embroider the bird's eyes with black thread or make them from beads. After which the wonderful rooster symbol of 2017 is ready.

Check out another idea by watching the video. It tells how to make a rooster craft from nylon.
If the children want to learn how to make it out of paper, then show them the second video.
In preparation for the New Year 2019, both adults and children can make cute pigs for home decoration, kindergarten or school. Our step-by-step master classes with photos and videos will help you make cool and beautiful crafts in the form of pigs. They will tell you how easy and simple it is to make your own hands the symbol of 2019, the Yellow Earth Pig (Boar) from felt or fabric, paper and corrugated cardboard, cotton pads or regular plastic bottles. All our lessons are accompanied by detailed instructions and also includes sewing patterns and useful patterns.
Volumetric symbol of 2019 Yellow Pig (Boar) do it yourself from paper - master classes for school

Our next workshops are sure to please all middle and high school students. In them, the symbol of 2019 - a yellow pig (wild boar) is assembled with his own hands from simple paper modules. Kids from kindergarten can also help older brothers and sisters in assembling voluminous crafts.
Materials for self-production of the symbol of the 2019 Year of the Yellow Pig at school
- bright paper - 8 sheets;
- gray and white paper - 2 sheets;
- scissors;
- double sided tape.
DIY workshop on making a Yellow Pig - the symbol of 2019 from paper
- Prepare all materials for work. Cut the paper into rectangles (for example, 2x3 cm). Fold each rectangle in half.

- Bend the right corner of the resulting narrow rectangle upward, as shown in the photo.

- Bend the left corner in the same way.

- Turn the workpiece over and bend its upper corners, as shown in the photo.

- Bend the pieces of paper protruding from above (so that you get a neat triangle).

- Fold the resulting triangle in half. You will need about 350 of these small triangles to make a pig.

- Start collecting crafts: initially make a small pyramid.

- Gradually enlarge the pyramid by connecting modules and adding them on the left and right sides.

- Form a ring of 23 modules (each row will have 23 small triangles). Connect according to the principle of brickwork, gradually adding rows to the craft.

- After the second row, gray modules can be added (so that the back of the pig (boar) is gray).

- At the end of the 6th row, you need to make the pig's neck. Therefore, in it, the modules should be placed back and forth, as shown in the photo.

- Also, in the 7th row, you no longer need to use gray modules.

- Optionally, paper hooves can be inserted between the 6 and 7 modules. But also they can then be glued to the finished craft.

- Cut out the blank-patch.

- Add 5 more rows of modules (each of them must be placed back and forth, as in row 7). Then glue the patch, hooves, eyes.

- To make ears, you will need to lay out 5 modules symmetrically to each other on top of the last row on the left and right. Then gradually add modules to clearly highlight the ears.

- From paper white cut out a pair of wings.

- Glue the wings to the craft.

Video tutorial on making the symbol of 2019 of the Year of the Pig (boar) with your own hands from paper at school
You can make another cute pig with the help of the following video. It tells step by step how children from school and the senior group of kindergarten need to collect a voluminous craft in the form of a symbol of 2019.
Cute pig (hog), symbol of 2019 crochet - master classes with photos for school

A cool symbol of 2019 in the form of a pig (hog) can be made not only from paper, but also crocheted. This kind of work, however, is not suitable for kindergarten children, but middle and high school students can easily make an original craft.
Materials for knitting at the school of the symbol of 2019 - crochet pigs
- hook;
- eyes for toys (you can glue or ordinary screwed in);
- Knitting thread.
Master class with a photo - crocheting a cute pig (boar) symbol of 2019 at school
- You should start knitting a piglet from the head. First, a magic ring (the basis for knitting any toys using the amigurumi technique) of 6 loops is typed.
In the 2nd row, all loops are knitted with an increase (12 loops in total).
In the 3rd row, a single crochet and an increase (18 loops) alternate.
In the 4th row, the stitching goes behind the back wall (18).
In the 5th and 6th row, the usual crochet stitching (each with 18 loops). Due to this knitting, a patch will be formed.
In the 7th row, 2 single crochet stitches are knitted (2 sbn) + an increase (pr) alternately 6 times (24 loops in total).
In the 8th: (3 sbn, pr) * 6 (30).
In the 9th: (4 sbn, pr) * 6 (36).
In the 10th: (5 sbn, pr) * 6 (42).
In the 11th: (6 sbn, pr) * 6 (48).
In the 12th and 13th: sbn * 48.
In the 14th: 6 regular loops, then 2 loops are knitted together in one loop of the previous row (decrease - kill). This pattern is repeated for the entire row. Thus, there is a decrease in the knitted ball (there will be 42 loops in a row).
In the 15th: (5 sbn, ub) * 6 (36).
In the 16th: (4 PRS, UB) * 6 (30).
In the 17th: (3 sbn, ub) * 6 (24). Eyes are installed. The toy is filling up.
In the 18th: (2 PRS, UB) * 6 (18).
In the 19th: (1 sbn, ub) * 6 (12). We fix the thread.

- Knitting by making ears continues. For one of them, you will need to dial a magic ring of 5 loops.
In the 2nd row: pr * 5 (10).
From the 3rd to the 7th row: 1 sbn * 10 (10).
In the 8th: (1 sbn, pr) * 5 (15).
In the 9th: 15 PRS. Fasten the thread.
Do a similar job to make the second ear, then sew them to the head. Embroider nostrils and a smile with black threads.

- Knitting the torso is carried out according to the following pattern:
3: (1 sbn, pr) * 6 (18).
4: (2 sbn, pr) * 6 (24).
5: (3 sbn, pr) * 6 (30).
6-7: 1 sbn * 30 (30).
8: (4 sbn, pr) * 6 (36).
9: (5 sbn, pr) * 6 (42).
10: (6 sbn, pr) * 6 (48).
11: (7 sbn, pr) * 6 (54).
12-17: 1 sbn * 54 (54).
18: (7 PRS, UB) * 6 (48).
19: (6 PRS, UB) * 6 (42).
20: (5 PRS, UB) * 6 (36).
21: (4 PRS, UB) * 6 (30).
22: (3 PRS, UB) * 6 (24).
23: (2 PRS, UB) * 6 (18). We fill the torso.
24: (1 sbn, ub) * 6 (12).
25 row: close the ball with decreases.

- It remains to tie a tail in the form of a pigtail from air loops and a hoof. The pig's hooves are knitted according to the following pattern:
1: magic ring of 6 loops.
3: 1 sc * 12 through the back wall (12).
4-7: 1 sbn * 12 (12). Fill the toy with padding polyester.
8 row: close with decreases. Repeat knitting for the remaining 3 hooves. Proceed with sewing together the parts to assemble the toy.

Video tutorial on crocheting a cute pig for the New Year 2019
You can see with your own eyes the simplicity of knitting an original pig by watching the following video. It describes the manufacturing process step by step. beautiful crafts in the amigurumi technique.
The original symbol of 2019 of the Yellow Earth Pig (Boar) with their own hands from fabric - master classes

Using soft or thick fabric, you can easily and simply sew the symbol of 2019 in the form of a yellow toy pig with your own hands. Such a craft can become beautiful decoration at home or used as a real pillow.
Materials for DIY sewing Pigs made of fabric - the symbol of 2019
- thick paper (for creating patterns);
- soft fabric (fleece works well);
- filler (synthetic winterizer or holofiber);
- scissors;
- pins;
- thick short rope (for the tail).
A master class with a photo on self-tailoring from the fabric of a pig toy
- Draw the silhouette of a pig on the side, as shown in the photo. The lower part (neck, hooves, back to tail) is duplicated on separate paper and then mirrored on it is seam to seam. A couple of fabric parts are cut out according to the patterns of the sidewalls.

- One piece of fabric is cut along the bottom. The presence of this insert will make the soft toy bulky.

- A pork ear is drawn separately. 4 parts are cut out of the fabric according to the pattern.

- The prepared pieces of fabric can be overfilled or simply curly cut. This will prevent the edges of the fabric from puckering.

- Sew the lower part to one side piece. Repeat work for the second sidewall. Remember the soft toy must be sewn with seamy side, therefore, the parts must be applied to each other with the front sides. Sew the ears separately and fill them as desired small amount padding polyester.

- Unscrew the prepared soft toy, sew along the contour from above, leaving a place for inserting the filler. Sew on the ears of the pig and sew in the tail-rope.

- Fill a soft toy with padding polyester or holofiber.

- Optionally, you can sew a couple of button eyes on the toy.

DIY video tutorial on sewing a pig (symbol of 2019) from fabric
Even children at school will be able to sew a soft toy in the shape of a pig out of fabric for the next master class. A simple craft is made quickly and very simply.
The original symbol of 2019 - the Yellow Pig (Boar) made of felt with your own hands, master classes for the school

If children at school already know how to work with ordinary fabrics, then for children from the senior group of the kindergarten, making a bookmark toy for the next master class is ideal. In it, we told you step by step how to make a cool symbol of 2019 in the form of a pink or yellow pig out of felt with our own hands. The original craft can be used by children for games or as a bookmark for books.
Materials for self-production at school of a pig, a symbol of 219 from felt
- multi-colored felt;
- thread and needle;
- scissors;
- pins.
A master class with a photo of do-it-yourself felt sewing at the school of the pig, the symbol of 2019
- Cut out one large square and a triangle (half of this square), a couple of small squares, a large oval-patch and a crochet tail from the felt of the main color. You also need to cut out a couple of small dark pink ovals, a couple of white circles, and a couple of small black circles.

- Make eyes from white and black circles (sew on pupils).

- Sew a pair of dark pink ovals onto a large oval - you get a patch.

- Sew the patch carefully to the triangle base.

- Fix the eyes with a dark thread.

- Sew the eyes to the large triangle, remove the auxiliary thread.

- Connect the large square and the triangle with pins. Also fix the small squares-ears.

- Start sewing the details with a backstitch, while grabbing the small squares-ears.

- Remove the pins from the finished base.

- Fix the bent ears on the base, as shown in the photo.

- Tie the ears to the base with a couple of stitches.

- Sew the tail to the base.

- It is better to sew the tail with a seam "back to the needle".

A video tutorial on sewing with your own hands the symbol of 2019 - felt pigs
Children from kindergarten or school can make another beautiful felt pig using the following video tutorial. True, kids need to do such a craft only under the supervision of adults.
Funny symbol of 2019 Yellow Pig with his own hands from cotton pads - for kindergarten

Children from elementary and middle group kindergarten, we have selected a very simple master class. Our lesson tells how you can make the symbol of 2019 Yellow Pig (Boar) from cotton pads with your own hands. Children from kindergarten can present such a craft to their loved ones in honor of the New Year 2019 as a postcard or an ordinary picture.
DIY materials for making the symbol of the 2019 Yellow Pig from cotton pads
- cotton pads;
- gouache and brushes;
- colored foamine or cardboard;
- glue;
- a piece of white cardboard;
- felt-tip pen;
- scissors;
- colored cardboard (for the base).
Master class on making do-it-yourself symbol of 2019 pig from cotton pads for kindergarten
- Paint 3 cotton pads with gouache. Cut two of them in half. Then cut one halves in half again. Cut a small circle-patch out of white cardboard. Cut out a large circle-body from foamine or cardboard. Glue a large cardboard circle to the base.

- Glue three halves of cotton pads, as shown in the photo. These will be the pig's hooves. Glue a whole cotton pad to a cardboard circle. In addition, glue the previously cut patch to it. Glue the quarters of the disc on top, having previously bent them like pork ears. Make a ponytail from a piece of paper and glue it to the body. Draw nostrils and eyes for the pig.

Do-it-yourself simple pig from a plastic bottle - a master class for school and kindergarten

Many interesting and unusual crafts can be made from ordinary plastic bottles both at school and in kindergarten. Using our next master class, children at school will learn how to make a cool pig out of a plastic bottle with their own hands. An original craft in the form of a piggy bank can be made by children from kindergarten together with educators or parents.
Materials for assembling a simple pig from a plastic bottle with your own hands at school
- plastic bottle;
- scissors;
- multi-colored paper;
- water;
- "Paper" thick glue (PVA will not work);
- ordinary scotch tape.
Master class with a photo: making a simple pig from a bottle at school with your own hands
- Prepare materials for work.

- Carefully cut off the neck of the bottle, then cut off the small part of the bottle that remains without the neck, as shown in the photo. Separately cut off the bottom of the bottle and cut out a thin plastic ring (it will act as a support for the piggy bank). Also cut out a pair of plastic tabs.

- Seal the hole left after cutting the neck with tape.

- Glue the cut-off bottom of the bottle to the blank to create a neat wall at the back. Cut a hole for coins at the top of the piggy bank.

- Tie the base ring to the bottom of the piggy bank (opposite the hole for coins) using ordinary tape.

- Mix paper glue with water in a ratio of 1 to 1. Cut the paper into small squares or rectangles. Start glueing the piggy bank with paper.

- Carefully glue the whole body of the pig with paper sheets, leaving only the hole for the coins not sealed.

- In a similar pattern, glue over the plastic ears of the pig.

- Leave the workpieces to dry.

- It may take 12 to 24 hours to dry completely.

- Cut out a couple of small ovals and medium circles from black paper. You will also need to cut out 4 small rectangles. Cut a patch out of pink paper.

- Glue the patch and nostrils to the base.
Making soft toys from tights is a rather complicated but very interesting activity. For our readers, we have selected step-by-step instructions for sewing such a craft. An entertaining master class will tell adults and children from school and kindergarten how you can make a voluminous pig out of ordinary tights with your own hands.
Step-by-step video on how to make a stuffed piggy toy out of tights with your own hands
If desired, parents can involve children from the senior group of kindergarten or school students in making a cute pig from tights. All kids will love this unusual job of creating a cool pig.
DIY funny pig and Peppa pig for the New Year 2019 from plasticine - for kindergarten

All children from kindergarten can make a cute plasticine pig for the New Year with their own hands. Therefore, our next master class will suit both students of the senior group and children from the elementary or middle group of kindergarten.
Materials for making do-it-yourself plasticine pigs for the New Year 2019 in kindergarten
- plasticine;
- toothpick;
- black or dark green beads.
DIY sculpting workshop in kindergarten of a funny pig in honor of the New Year 2019
- Prepare for work: roll a large ball-body from plasticine, small 4 balls for hooves, prepare 3 more small balls for making ears and a patch. Separately, roll a small strip of plasticine and wind it around a toothpick to make a ponytail.

- Roll one of the small balls to an oval and glue to the base as a patch.

- Form the volumetric pyramid ears from the remaining pair of balls.
Bulky yellow pig from corrugated paper - a master class with a diagram and instructions

From ordinary boxes, you can easily make voluminous cool crafts. We have selected for you simple scheme, according to which you can easily and quickly collect a yellow pig from corrugated paper... Children from kindergarten and school students will be able to help adults in their work.
Materials for making a bulky pig from corrugated paper according to a simple scheme
- plain paper (for printing the circuit);
- corrugated paper;
- scissors.
Video and scheme for making a volumetric pig of corrugated paper
- The scheme we have selected must be enlarged to the required size and printed. Then on it you will need to cut out blanks from corrugated paper and assemble them step by step, as shown in the instructions. For ease of making such a craft, we recommend watching a video tip. If desired, the finished figurine can be painted with gouache, acrylic paints.

You can make a beautiful symbol of 2019 Yellow Pig (Boar) with your own hands from different materials: fabrics, felt, paper and even plastic bottles. To create original crafts, we recommend choosing one of our master classes with step-by-step photos and videos. Simple instructions on how to make a pig from cotton pads are suitable for kindergarten children. More complex patterns and patterns, as well as the assembly of paper figures will certainly come in handy for schoolchildren and adults will like them.
A yellow earth pig, made with your own hands from the most affordable materials, will definitely bring good luck for the entire coming 2019! Don't believe me? So, you need to test the power of such a homemade amulet in practice!
What can you make a symbol of 201 with your own hands? From everything that comes to hand! Such a craft is a great opportunity to work with your favorite foundation for creativity or get acquainted with something new and interesting.
Pig from paper plates
For example, you can turn the disposable into a cute pink or yellow piglet paper plate... Just cover it with paint you need colors, stick on a funny face, ears, paws and a crochet tail - and the pig is ready! You can give this craft a more formal look using ready-made toy eyes.

You can make guinea pigs long legs with hooves.

"The paper plate pig version is perfect for the smallest creators!"
And it will be even more interesting if you make the pig not smooth, but soft and fluffy! What is needed for this? All the same paper plate and cotton balls. We glue them on the surface of the plate, cover with pink paint.

Dry. From fluffy wire we make a twisted tail for the pig.

Then we glue the paper eyes, ears, a piglet and a tail on a paper plate. Ready!

Symbol of 2019 year of the pig made of paper
You can make a pig in the form of a stand. All you need is a pair of old wooden clothespins. We glue the piglet itself from cardboard, make the tail from the same chenille wire, but the legs from clothespins, which must first be painted with pink paint. It turns out simple and cute! If desired, you can place congratulations and wishes for loved ones on this stand.

You can make a volumetric symbol of 2019 with your own hands from paper strips... We turn them into a torso-ball, and glue the paper head on top. Don't forget about the fluffy tail!

Watch how to make an adorable striped pig in the video:
Pig from stripes is a hit of New Year's crafts by 2019! It is simple in execution, does not require large expenditures and looks very impressive.
Kids will love the piglet mask. It is easy to cut it out of pink cardboard or thick colored paper.
 Piglet paper mask
 Pig made of plastic eggs
As a gift to friends and to decorate a small Christmas tree, you can make small souvenirs in the form of pigs. Cut out the legs, tail and face from cardboard. We use empty plastic surprise chocolate egg containers as a basis.

We glue the paws to the kinder surprise.

Using a pencil, we make a curl tail out of paper.

We glue the muzzle. The pig is ready!

You can simply glue the ears to the plastic containers and draw muzzles on them.

Place these pigs in an egg container, and let each guest take the one they like as a gift. Inside each of the pigs, you can place a delicious candy or a holiday wish!

Pig quilling on a foam testicle
This pig is very easy to make, and the result will surely please you. A styrofoam testicle can be purchased at DIY stores. First, we need to paint the testicle pink.

We twist pink rolls from a special pink ribbon for quilling. We fix the tip with glue.

When the paint on the testicle is dry, glue the rolls to it.

We glue together the orange and pink ribbon for quilling. Give the colored roll a droplet shape. These are the future ears of our pig.

We glue the ears. We glue the orange roll-legs. We glue the nose with a button and factory eyes. Our pig is ready!
 Quilling pig - a symbol of 2019
 Pig from a cardboard box
For a large Christmas tree, you can make a toy - a pig from a cardboard box - for example, a cereal box.

Cut out the legs on it, paint it pink.

We assemble the head from cardboard parts, glue it to the cardboard body.

If you leave the box open, it can be used as a wrapping for New Year's gifts or as a stand for various treats.

Pig piggy bank from a cardboard roll (video)
This craft will be a wonderful souvenir for the New Year. May this pig bring wealth and prosperity to its owner.
Paper pig head (origami)
The easiest way to make a pig on New Year- make it out of paper using origami technique.

We bend each side to the center.

We straighten the workpiece and fold it across.

Fold the sides to the center and fold the top.

We turn out the corners and press them. We will have a shape that resembles a fungus on a leg.

We lift two corners up.

Bend the bottom corners to the center line. We bend the bottom corner in the center and smooth it through well.

Bend the bottom end again.


We turn the lower part upward.

Turn over and bend the corners (these are the future pig ears).


We draw a piglet for the pig and glue the eyes. Origami pig muzzle is ready!

Pigs from plasticine, dough and modeling mass
A delicate round pig can be molded from plasticine or modeling paste.

See how to mold a pig out of plasticine in the video:
From the salted dough, a very tender New Year's pig-angel is obtained, which can be presented for the New Year or decorated with a Christmas tree.

Pigs (piglets) from vegetables
Perhaps the cutest piglets come from vegetables like potatoes and carrots. For crafts, you should choose a small pink potato and a small carrot. We also stock up on toothpicks.

Cut a round patch out of a cut of a carrot. Cut out the triangular ears. We fasten these parts with toothpicks.


We attach rectangular parts to them - legs.

We glue the eyes with glue. They can be made from peppercorns. The pig is ready!

We make an impromptu farm out of a cardboard box and cut paper. You can decorate the farm with a trough with cereals and spruce branches. It remains to place our pigs on the farm. Children will surely enjoy looking after adorable tenants, feeding them and putting them to bed.

Instead of a box, you can take a plastic bottle as a basis. We paint it pink with acrylic paint.

We glue the legs from strips of cardboard.

Cut out the ears from the cardboard and glue them to the bottle.

We glue paper eyes and a patch! A pig from a plastic bottle is ready!

Check out how to make a whole family of pigs out of plastic bottles:
Pig from a small plastic bottle and yarn
You can not dye the bottle, but wrap it with twine or colored yarn. It is good to take small bottles of drinking yogurt as the basis for such a craft.

We take yarn of soft peach or color pink.

We wrap the bottle with threads, fixing them with glue. When the bottle is completely wrapped up, glue the patch and felt ears. We glue paper or factory eyes. We will make a wonderful new year souvenir!

Pig from a painted plastic bottle
You can only use part of the bottle by cutting off the top of the bottle.

We paint the bottle with acrylic paint. We glue the tail and ears.

We make a muzzle for the pig, glue the eyes and a piglet. Such a pig can become a New Year's candy bowl or a gift stand.

You can make an adorable piggy bank out of a plastic bottle. The top and bottom of the box are made from the bottom of the bottle. The halves are fastened together with a zipper.

Piglets from pom-poms and threads
The original will turn out a pig from fluffy pink pom-poms and foam rubber. Cut out the ears and legs of the pig from the foam rubber (foamiran).

We glue together two pom-poms (they are easy to find in a craft store). We glue the ears and legs.

We glue our factory eyes and a nose-patch to our pig. We have got an adorable pig!

Piglets made from homemade pom-poms and felt
You can make pom-poms from pink yarn yourself. It's not difficult at all, it just takes a little practice. Cut out two identical circles from cardboard with holes inside. We make an incision on one side.

Fold the two circles together and start wrapping with yarn.

When the whole circle is wrapped in yarn, push the thread into the holes on both sides, trying to fix it between the leaves of cardboard. Cut the strings with manicure scissors (leading them between cardboard circles). The thread that we inserted between the circles is gradually moved behind the scissors.

When all the threads in the circle turn out to be cut, we pull together the thread that we led between the circles. We should have a pompom.

Glue pink ears, felt legs and handles to the pompom.
The symbol of 2019 - the Yellow Earth Pig (Boar) can be easily made with your own hands. A small souvenir will bring good luck and prosperity to your loved ones in the new year. You can make a popular New Year's gift step by step using one of the proposed master classes. A pig made by the diligent hands of a child will be an especially valuable and sincere surprise. A children's masterpiece can be presented to a close relative or friend, brought to kindergarten or school.
For simple do-it-yourself work, various foundations are used. Patterns and precise lists of materials help to calculate the consumption of fabric (felt), paper, additional elements. We offer master classes for kindergarten and school with step-by-step photos of varying degrees of difficulty. Piggy made of dyed cotton pads is ideal for the smallest children. There is no need for a precise pattern or sharp needle. Even a two-year-old can work with a brush under the guidance of a mother or a kindergarten teacher. An adult can only cut out the elements of the piglet and help glue the painted parts. A corrugated paper pig or a bottle pig is also suitable for teaching a baby to create, provided that children do not trust children to cut the plastic frame of the bottle or use hot glue.

Plasticine - material for children early age, but the symbol of 2019, the funny pig, can be supplemented with more complex details. A neatly cobbled piggy is suitable for participating in competitions at school. In middle school, a child will already be able to sew a felt pig by hand or make fabric blanks. At this age, many children begin to crochet, and interest in simple paper applications disappears altogether. In comparison with the pigs knitted according to the instructions, the symbol of 2019, the Yellow Pig (Boar) from nylon, created by hand, is aerobatics. The painstaking technique of creating a pig's face can only be understood and mastered by a high school student or an adult. Please select the best way hobby for home leisure or original idea symbol of 2019 made of fabric, bottle, paper and other materials for school or kindergarten.
Funny pig (symbol 2019) crochet - make a pig with padding polyester
Similar to the precise preparation of fabric parts according to sewing patterns, you must strictly observe the mathematical calculation for crocheting toys. Given the large selection of knitted toy master classes, you need to start with simple options. Before the New Year, there is a reason to learn how to crochet a pig in honor of the symbol of 2019, in order to give a ready-made souvenir to a friend at school, mom or grandmother. A master class with step-by-step photos of the symbol of the year for adult housewives will seem no less amusing. The original pig (symbol 2019) crochet is very popular with young children, although it is too early to master the basics of such a hobby in kindergarten. The rules for crocheting in a circle can be studied on any special online resource. Step-by-step photos will only show in general terms the principle of creating a knitted toy using a simple crochet hook.

- acrylic yarn light pink (50 g / 200 m)
- scissors
- hook ("three")
- gypsy needle
- large black beads for eyes
- synthetic winterizer or cotton wool
- marker (pin)
- light thread (for the mouth)
Instruction with step by step photos

Master class for school: how to sew the symbol of 2019 according to a pattern - a Yellow Pig (Boar) with your own hands from fabric (on a typewriter)
Creation soft toys based on ready-made patterns using sewing machine will not take long. A cute symbol of 2019 - the Yellow Pig (Boar), created from fabric with your own hands at home or in labor lessons at school, will become perfect gift... You do not have to waste time on calculations or measurements to make a pig. All details can be repeated exactly as in the step-by-step photos. Since the elements of the pig are sewn both on a typewriter and by hand, the fabric master class is not suitable for the kindergarten level. This version of the symbol of 2019 made of fabric in the form of a Yellow Earth Pig (Boar), where you need to operate the machine with your own hands and sew small details to the body, is suitable only for an "adult" child.

List of materials for the master class
- light pink dense fabric for the head, ears, legs and arms
- any cotton fabric for the torso (suit of soft toys)
- decor tape
- sewing machine
- scissors
- light pink (or beige) sewing thread, needle
- pink button for patch
- large black beads - 2 pieces
Instruction with step by step photos

Yellow Pig (Boar) for school with your own hands from felt - make a symbol of 2019 using an easy pattern
The easiest way to learn to sew is on felt. The material does not stick out and does not spread. Unlike paper, a souvenir made of felt will last for a long time. For these reasons, felt master classes are ideal for kindergarten and school. If in kindergarten the details of a piglet are glued together, then at school they are already learning to sew them. The symbol of 2019 proposed in our master class - the Yellow Pig (Boar) made of felt with your own hands is suitable not only for labor development at school, but also for making souvenirs by adult craftswomen. A pig or a yellow pig can become a keychain, magnet, favorite toy with which the kid goes to kindergarten, or a decoration on the Christmas tree. The pattern can be increased in proportions if you want to make a big symbol of the year 2019 for a school or kindergarten with your own hands. We advise you to sew a lot of symbols of 2019 in the form of a Yellow Earth Pig from felt in advance, so that all close people will have enough. Helpful step-by-step photos will speed up your creative process.

List of materials for the master class
- sintepon
- hot pink acrylic thread and needle
- toy eyes - 1 pair
- felt pink and yellow
- scissors
- black marker (felt-tip pen)
- drawn templates
- pink ribbon 0.5 cm thick

Instruction with step by step photos
- Cut out 2 pieces on paper. You can neatly redraw the templates by attaching a sheet of paper to the monitor, or print a photo on a printer.

- Circle large template made of paper on yellow felt 2 times, and small on pink.

- Hand sew the oval over with a overlock stitch. Try to sew the stitches of the same height with even indentation. Use a marker to put 2 dots.

- Place a small amount of padding polyester between the two yellow parts of the pig. Sew around the edge with a basting stitch.

- Use hot glue to attach the patch to the body. Stick on the eyes and a miniature ribbon bow. The self-created symbol of 2019 - the Yellow Earth Pig (Boar) in the form of a kind animal can be presented or left in your home under the New Year tree.

Yellow Pig (Boar) from cotton pads for kindergarten - the simplest DIY craft
Why not make the first crafts in the classroom in kindergarten not from paper, but from soft circles? One of the most common ideas for workshops is to use cotton pads as the main material. You can find many examples of step-by-step photos and videos of caterpillars, ladybirds, flowers and various animals that the smallest children like so much. Such ideas will take root well in the classroom in kindergartens. You can prepare the symbol of 2019, the Yellow Pig (Boar) in kindergarten, with your own hands from cotton pads as a gift, or just take your baby with an interesting idea at home. If for a school such a pig is too simple, then in the kindergarten the work will definitely be considered very original. You don't need a pattern or paper templates. Pig preparation is too easy, even for the kindergarten level. In 15 minutes, you can prepare the symbol of 2019, the image of the Yellow Pig, with your own hands from cotton pads. An interesting idea is to place a piglet as a symbol of the year on the front of a hand-made children's postcard.

List of materials for the master class
- cotton pads - 2 pieces
- scissors
- gouache pink and white
- tassel
- black cloth

Instruction with step by step photos

Do-it-yourself unusual pig from a plastic bottle for kindergarten or school (quick craft in 15 minutes)
Educational and educational programs in kindergartens and schools are not always diverse in creative pursuits... Thanks to ready-made step-by-step instructions, you can arrange interesting experiments at home with completely unexpected materials. From regular bottle you will get a fashionable transparent piggy bank, a new beautiful decor in the courtyard of a kindergarten, or just a stylish little thing in the form of a pig. To make a pig from a plastic bottle with your own hands, the following are tips for the steps. You can print ready-made templates ears, eyes and outfit or redraw them. The strip that will wrap around the body of the toy can be replaced with yellow paper as a sign of the coming year. Then the craft will become a real symbol of the year. With a non-standard invention for the year of the Yellow Pig (Boar), the child will definitely surprise everyone at school or in kindergarten. Numerous videos on the Internet suggest using painted crafts in the garden or yard to decorate flower beds. According to the step-by-step photo, a do-it-yourself pig from a plastic bottle is made literally in 15-25 minutes.

List of materials for the master class
- 1.5 liter plastic bottle (preferably with a pink cap)
- 4 caps from other bottles of the same color (white, black, or pink)
- printing templates
- large scissors
- hot glue gun
- Scotch

Instruction with step by step photos
- Cut the colored template pieces out of the paper.

- Cut the bottle so that you get rid of the middle part and make a shorter piece from the two remaining halves.

- Insert the halves one into one, as shown in the photo. They can even be glued together with tape, since the seam will not be visible.

- Glue the individual pieces of the pig's ears together and then hot glue them to the body.

- Paste on piggy's eyes. Glue the caps symmetrically on the lower base of the piglet with your own hands. If you want to make the symbol of the year a piggy bank, just make an incision on the back of the case.

Craft Pig from pantyhose with your own hands, a master class with step-by-step photos for beginners
In order to create a pig with the maximum resemblance to a real animal, it is recommended to use a light flesh-colored nylon. If you manage to master simple instructions according to step-by-step photos, then a pig from pantyhose with your own hands (a master class for beginners) will seem very easy to you. Unlike working with plasticine or paper, or sewing according to a strict pattern, here the shape of the finished pig depends largely on sleight of hand. Make a pig out of tights with your own hands according to the simple recommendations of the master class and glue it on a magnet. You get a piggy for the refrigerator. Many videos and step-by-step photos on the Internet offer different options for complementing the toys of the symbols of the year. You can do it yourself by sticking plastic signs, food or writing on the finished soft pig. A beautiful pig on a pin instead of a magnet will flaunt on a children's backpack for school. A toy head can also be the basis for a character puppet theater at school or in kindergarten.

List of materials for the master class
- plastic eyes for toys - 1 pair (can be drawn and cut out of paper)
- pink watercolor and brush
- light beige thread and needle
- sintepon
- plastic parts (sandwich and glass)
- magnet
- scissors
- strong magnet adhesive (e.g. silicone)
Instruction with step by step photos

Do-it-yourself plasticine piggy for New Year 2019, children's craft
The most malleable material for creativity is plasticine. It is difficult to imagine exhibitions in kindergarten without figurines made from this material. Even at home, you will get an original piggy with your own hands for the New Year 2019 from plasticine, if you add a little imagination and diversify the craft. Not only the pig itself, but also decorations can be sculpted from plasticine. Make a pig with your own hands for this New Year 2019 from plasticine right on the eve of the celebration, or practice at master classes and videos right now. The cool pig can be taken to kindergarten or school to show to peers.
List of materials for the master class
- multi-colored plasticine (beige, pink, black, brown, green, yellow and blue)
- plastic spatulas and other tools for working with plasticine (optional)
- working surface
- board, sheet of paper or cardboard for presentation
Instruction with step by step photos

Do-it-yourself yellow pig (Boar) from corrugated paper, the simplest master class
The craft, in the creation of which even 3-year-old children can participate, is a yellow pig-boar made of corrugated paper, which is glued together from two large parts. In kindergarten, it is better to make such pigs (pigs) out of paper using simple PVA glue or entrust the gluing to the teacher. At school, older children can handle corrugated paper with ease. Step-by-step photos demonstrate how you can make the most elementary image of a pig with your own hands. Yellow is chosen to highlight the coming of 2019 Year of the Earth Pig. The New Year's attribute should bring good luck to those who get such gifts under the tree. The easiest part of a master class on making a yellow pig from corrugated paper can even be done Small child... You just need to wind the same strips in a circle one after the other. Since the easiest master classes are selected for kindergarten, you can complicate the task by watching the video. From paper of different colors, you can create complex designs for exhibitions and competitions at school. Such light crafts without paper patterns, by the way, can be done at school even during recess.

List of materials for the master class
- piece of corrugated paper - 30 x 50 cm
- plastic eyes for toys - 1 pair
- hot glue stick gun
- a small piece of black paper
- scissors

Instruction with step by step photos
- Cut strips 1 cm thick. In this case, the paper must be cut along and across the corrugated lines. Otherwise, the pressed surfaces will not cling.

- Wind the strips in a circle. Their number depends on what size you want to get the pig. In this case, the diameter of the finished product is 8-9 cm. Leave one strip intact, and glue the free edge.

- Glue one end of the last tape to the circle. Wind it until there is a free edge about 10 cm long. At this distance, fix the tape with a drop of glue. Make a bend in the form of an ear with an indent on the circumference of up to 1 cm and glue again. Make the second ear as well and glue the free edge.

- Cut strips 6-7 cm thick for a nickle. Twist and fix with glue.

- Cut two small peas out of black paper. Stick them on the patch, and then glue the small part on the large one. Add eyes and you're done.
