Small flowers from ribbons with their own hands. Delicate floral interior decor
By folding the ribbons in a certain way, you can create petals, from which beautiful and original decorations are subsequently obtained.
In that step by step lesson clearly shows how to make simple flowers from satin ribbons for beginner craftsmen. From finished products, you can get hairpins or hair ties, decor for clothes or bags. You can take various colors as a basis, we offer a delicate and relevant for any season white-pink range.
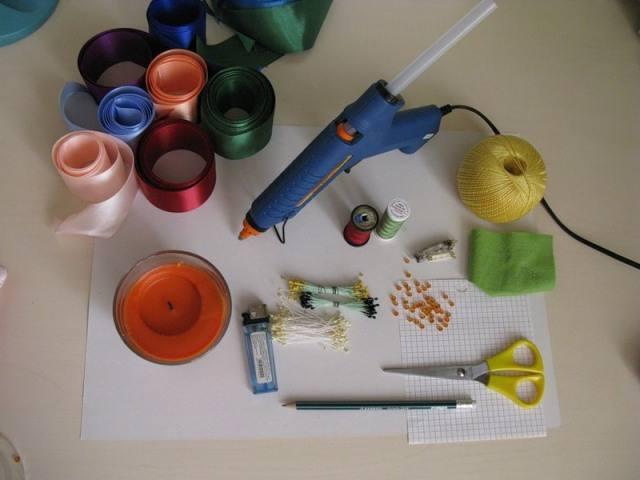
Materials and tools for creativity
For work you will need:
- satin pink ribbon (5 cm wide);
- white ribbon (2.5 cm);
- glue gun;
- lighter;
- scissors;
- tweezers;
- ruler;
- a circle of felt;
- decorative element for the middle of the flower.

The kanzashi technique was used to create the decoration, if this is the first time you come across this type of needlework and do not quite understand the meaning of the described actions, get acquainted with the basic techniques and terms.
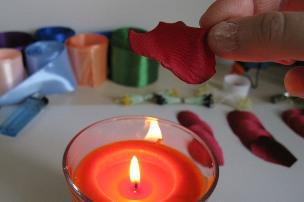
Pay attention to the safety precautions when working with a flame! Do not leave children unattended. You can use a candle instead of a lighter.
Making elements and assembling a flower
The petals will be pink and white flowers. From pink ribbon cut 6 elements 5 cm long, from white you will also need to cut 6 pieces of 5 cm each.

Proceed to the formation of white flower petals from satin ribbons. To do this, first fold the satin ribbon lengthwise.

Then, on the same side, make a small fold inward.

Burn the edge with a lighter. This is necessary to prevent shedding of the material.


Repeat the same for the other end of the white stripe. This is what the petal looks like.

Fold it in half and gently melt the edge again.

white petal in ready-made should look like this.

Make five more of these details for a flower from a satin ribbon.

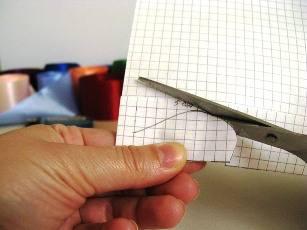
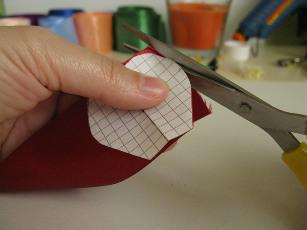
Now move on to creating rose petals. To do this, fold the square blank diagonally.

Bend the edges of the resulting triangle down.

Fold the workpiece in half.

Melt the edge, then grab the petal at the bottom (at an angle).

Cut off this part and carefully singe the bottom of the pink element again.

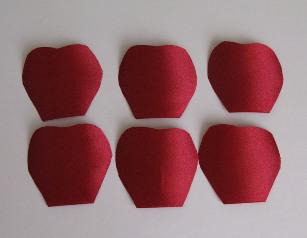
This is what the petal looks like.

Make five more of these elements.

Start shaping the flower. To do this, using a hot gun, first connect the white petals, applying glue to their tips.

Consistently connect all six blanks.

Now between them you need to fix the pink details. This is also done with a glue gun.

Fix all six petals.

Glue a circle of felt (about 3 cm in diameter) on the back of the flower.

Decorate the middle with a decorative element.

A simple but very beautiful white and pink kanzashi flower is ready.

It can be a wonderful decoration for a hairstyle (if it has reverse side fasten an elastic band or a hairpin), a brooch or decor for children's clothing.
With the same technique, you can create beautiful headbands for hair, look at our master classes - and with in the autumn range.
What could be more beautiful than flowers? Only unfading flowers! That is why today we will look at some simple examples in this article, which may inspire you to master more complex techniques.
DIY ribbon rose

Small flowers, animals and various figurines made of fabrics always look very interesting and unusual. Many girls and women have roses as their favorite flowers. However, they can not only be grown in the garden or bought in a store, but also made by hand. Little braid roses will look cute, light and graceful, and will also serve as simple, pleasant home decorations that will create a calm, cozy atmosphere. In addition, such pretty artificial flowers have another nice plus - this is a rather economical option, since large expenses are not required.
To make a large rose, you will need about 50 cm of zigzag braid, it is also called a snake and bindweed, and for a smaller flower about 45 cm, a thin needle, scissors, matches or a lighter to burn the edges of the ribbon, and glue, but be sure to check so that it securely glues the braid. Another important and necessary detail is the threads, which must be the same color as the braid.

So, first, we need to fold the long braid in half.

Then, carefully weave together (without cutting!) The halves of the braid. You need to do this from start to finish and try to get it right.


After that, both ends of the resulting ribbon must be cut off and carefully set on fire so that the edges of the fabric do not crumble or deteriorate.

Now we twist the resulting ribbon into a bud of a future rose and fasten it from below with a thread so that it is not visible from the other side. That's why, the threads should be in the color of the braid: then the end result will look neater and more pleasant.


Well, the final touch - straighten the petals of the flower, slightly bending the very first ones.

That's all: a simple but beautiful handmade rose is ready.

Satin Ribbon Flower
We present a step-by-step instruction-master class for making a flower from a satin ribbon on your own.
To begin with, we take a ribbon of any color about 4 cm wide in our hands, and then cut off 5 pieces about 7.5 cm long and 5 pieces 9 cm long from it, while not forgetting to slightly singe the edges.

Now we fold one of the small pieces of tape in half, aligning the edges, and sew with small neat stitches along the cuts, stepping back a small distance of 2-3 mm. It is desirable to choose a thread in the color of the tape.

We tighten the stitched piece as tightly as possible.


Similarly, we collect in a five-leaf and segments bigger size. Now we glue the resulting flowers together, and as a middle we sew or glue a beautiful button or bead - whichever you like best.

WITH wrong side sew on a small circle of felt. You can also use a cardboard circle or plastic bottle, previously covered with a fabric in color.

A satin ribbon flower can be used in the manufacture of elastic bands, brooches, headbands and other fittings and accessories.

Curly braid flower
In addition to roses, you can make another flower yourself, for example, similar to chamomile. It can be attached to hairpins and elastic bands, and then you get a great hair decoration. And, despite the fact that now the store shelves are full of various accessories, it is much more pleasant to wear jewelry if it is made with soul and love with your own hands.
For this wonderful flower, as well as for a rose, you will need a zigzag braid, a thin needle (it is even better if it is long - it is more convenient to sew with it), good glue or a glue gun, and most importantly, threads in the color of the braid. Perhaps the last requirement must be remembered tightly, since it is necessary for any needlework, be it sewing a dress or making a small piece of jewelry.

Let's start by making a circle from the braid of the required length, and carefully sew the ends together with a single-color thread.

Now we work with the inside of the ribbon circle. It is necessary to sew the “hillocks” of the braid (it resembles a wave, therefore, as it were, “hills”) freely sew with wide stitches so that later, when we return to the beginning, we can pull them off. 


You will get a kind of round "accordion".

This "accordion" and will need to be glued to the hairpin.

To do this, on the flat end of the hairpin, you will need to first fix a piece of paper, and already apply glue to it. In this case, the flower will stick more firmly and will hold on much better.


It remains to add a small "core" of the flower on top. It can be a button in size or suitable light rhinestones.

Flowers from ribbons for hairpins
Hairpins with flowers give the image tenderness and romance. Such jewelry will be appropriate for both the baby and the adult lady.
little flowers
Hairpins and elastic bands, headbands and brooches can be decorated independently by constructing cute small flowers from multi-colored pieces of narrow satin ribbons. Any girl will like such a stylish and original accessory, and, meanwhile, the manufacturing process will not take much time and effort.

In addition to the satin ribbon itself, 5-10 mm wide, you will also need a flower template, a needle and thread in the color of the ribbon, transparent strong glue (for example, moment gel), the hairpin itself or the elastic band that you want to decorate with flowers, any accessories for jewelry, a lighter or matches and scissors.
The template is useful to us to create a flower. We advise you to cut it out of cardboard or any plastic packaging in the form of an arbitrary polygon. However, consider the diameter and number of corners, make sure that the purchased tape is enough for you to decorate.
Now you can start the main work on the bow. We stretch one end of our tape through the hole cut in the center of the template, and begin to braid each corner so that each time the tape passes through the center. If you skip the tape in a circle in 2-3 layers, then the flower will turn out to be very peculiar and multi-layered. In order not to get confused in the order of passing the tape through the corners, they can be pre-numbered.

Be sure to make sure that the tip of the tape does not slip into the hole in the template and does not move arbitrarily to the sides. To do this, hold the tape while winding it around the corner, and then use a needle and thread to make a few stitches at the base. Then, without breaking the thread, carefully remove the flower from the pattern and cut off the rest of the ribbon, slightly singeing the ends with fire.

Now it is desirable to add rhinestones, buttons or beads to the center of the resulting decoration - both for beauty and to hide the stitches that fasten the ribbon. Don't forget to spread your petals! The decoration can be of a certain tone or multi-colored, while connecting and sewing several bows together. Such a flower can be glued to any elastic band or hairpin, gift box- in a word, wherever you want.

Hair ribbon dahlias
It's no secret that all the girls are madly in love with doing a variety of hairstyles for themselves and decorating the resulting "masterpieces" in all possible ways. And on beautiful, shiny and silky hair of any length stylish accessory- whether it's a hairpin with a flower or a headband decorated with beads and rhinestones, it will look incredibly beautiful. And who said that you can buy jewelry for your braids only in specialized stores? Make them yourself, based on own desires and preferences!

Of course, stores are always filled with all kinds of shiny and attractive accessories that perfectly complement the look, but you will be much more pleasant to wear homemade jewelry. And if you turn on the fantasy, then it will look much more original and certainly unique. A flower can be made from anything - use the remnants of organza, mesh or satin ribbon, tulle - whatever you have at your fingertips!
V this case, you will need a tape 2-3 cm wide, scissors, glue (hot glue is also possible), a lighter, matches or a candle to singe the edges, buttons, beads or rhinestones - whatever you want more, and a basis for decoration - for example a hairpin or elastic band. Now have a little patience.
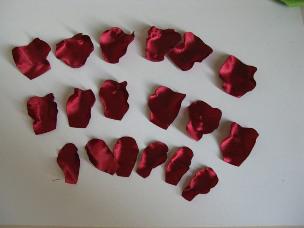
Cut the ribbon into several pieces of 5 cm each. There should be at least fifty of them, and the more magnificent you want to get a flower, the more pieces you will need. Don't forget to cut off the top edges in a cone shape, giving them the appearance of petals. The edges and bottom of the petal must be singed with fire, but not strong - so as not to spoil the ribbon.

With the remaining piece of tape, wrap a small circle of cardboard or plastic - this will be the base. Then carefully glue the petals in turn, squeezing them at the base, placing them from the edge to the middle. The diameter of the flower will depend on the width of the circle you choose.

The core can be decorated with any fittings that you like. At the final stage, attach the resulting dahlia to a hairpin or headband using glue.
So you have a wonderful hair ornament that will decorate any hairstyle and give your image an original feature.
DIY carnation flower
Carnation is a favorite among florists due to its unique sweet smell. The carnation flower has also been and remains one of the most favorite decorations for girls and women of any age. It is quite possible to make such an accessory yourself with just a little bit of diligence and imagination. A bias-folded silk ribbon flower is easy to give a lively and natural look using a wide, straight stitch. No one argues that a bouquet of live carnations looks great, but what prevents a boutonniere made of ribbons from steel is no less beautiful and stylish decoration for hats, handbags, jackets and hairpins?
As an example, a carnation can be made using a silk ribbon of a light cream shade 2-3 cm wide and half a meter to a meter long - depending on the planned splendor of the future flower.

First, let's give the edges of the carnation the proper textured look. Gently fluff one of the edges of the ribbon with your fingers or a needle, and on the other side, skip a straight stitch, stepping back from the edge of the ribbon about 2 mm. Tighten the tape, but not completely, but so that you get an "accordion" 2-3 cm wide and fix it with a knot.
Now we twist the gathered piece of tape inward with a kind of “snail”. The base of the assembly is tightly tightened with a thread and fastened. We straighten the upper edge of the resulting bud, giving the shape of a carnation with your fingers.
Try dipping the finished flower (only the very edge) in fabric dye or a natural dye such as tea leaves, red wine or onion skins - you get the uneven color effect characteristic of a garden carnation. Great waviness and mobility of the petals can be given if the tape for the product is cut along the oblique.
The next step is to plant the bud on the stem. This will require thick wire - painted or braided or corrugated paper(we impose a strip of fabric or paper overlapping in a spiral). The stem is inserted into the stretched base and additionally fixed with a drop of glue. The length of the stem depends on the final goal - longer for a bouquet, shorter for a small boutonniere or threading into a buttonhole.
Perhaps the first flower will take you quite a lot of time, but once you get used to it and “stuff” your hand, you will create exclusive designer jewelry that will attract attention and arouse admiration.
Making crafts from satin ribbons is a fairly popular type of needlework. It is no secret that all kinds of decorative elements can be made from this material. to decorate clothes, wedding bouquet or a gift. Products made using the kanzashi technique are very interesting. You can easily make beautiful flowers from ribbons with your own hands.
Currently, to make flowers from satin ribbons with your own hands, the kanzashi technique is widely used - the Japanese art of decorating hairpins. Its essence lies in folding pieces of fabric in the form of flower petals, which are then attached to the base. Before you start creating jewelry, you need to stock up:
- satin ribbons of different widths and colors;
- sharp scissors;
- needles and threads of different thickness;
- glue gun;
- small tweezers.
In addition, more need beads and centers for flowers, sequins and fishing line, floral sleeve and more. It is best to work at a table, under a table lamp. To work in the kanzashi technique, you still need a ruler, chalk or a bar of soap, a candle for singeing or a lighter.
Master class on creating simple flowers
 To make a medium-sized flower that can be used to decorate a headband, hair clip or clothes, you need to use a ribbon 5 cm wide. To make petals, cut the ribbon into equal squares. After that, fold each square diagonally (as shown in the photo) and lower the side corners to the central one.
At the formed rhombus, bring the side corners back and carefully clamp the cut from below with tweezers. If the cut is uneven, cut it with scissors, and then melt it on a candle. As a result, a round petal came out. Then do a few more in the same way.
 After that, collect the petals on a thread, lock it into a ring, forming a flower, and glue it to the base, and fasten the middle for kanzashi or an ordinary button covered with satin on top. That's all, the decoration is ready.
Very quickly, you can make flowers in another way. To do this, cut the tape into pieces of 10 centimeters. Can you make them different size to make the flowers look more natural. Carefully melt the slices on a candle so that dark, ugly sagging does not form.
On the bottom, make a free stitch with a strong thread. And then pull each segment, forming a petal. Next, assemble a flower from the finished petals: fix small segments in the center, and large ones closer to the edges. Glue a button in the center.
You can decorate flowers with white narrow ribbons, for example, make stamens out of them. Finally, fold the collected flowers into a composition and attach to the base using a glue gun.
There are many ways to make a satin ribbon rose.
Bud in kanzashi technique
To make a beautiful twisted bud, you need a ribbon 100 cm long. The color of the ribbon can be any, but the texture of the satin should have a smooth, shiny front side and matte back side. Before starting work, lay the ribbon on the table so that front side was below. And then for work, prepare a needle, thread, superglue. Instruction:

DIY ribbon decoration is ready. Such buds can be sewn on clothes or a handbag.
There is also another rose making technique. From satin ribbons with your own hands, do the following step by step. Prepare:
- satin ribbon (5 cm) red and green;
- needle and thin threads according to the color of the tape:
- lighter, glue, scissors;
- ruler.
Then, using a ruler, make a markup: 8 pieces of 5 cm each and 5 more pieces 13 cm long. Use a lighter to melt the edges of the resulting blanks from the tape.
Next, form petals from these shreds: for this, bend the two ends of a piece of tape in the shape of an “envelope” and pin it with a pin, and then carefully stitch it. Pulling the end of the thread, pull off the petal and make 8 of them larger, loosely tightening. Tie the ends of the thread with a tight knot so that the petal does not fall apart.
 From the green ribbon, make two petals, which will eventually become the sepals of the product. And then proceed to the assembly of the flower: starting with the smallest blanks, glue them together, trying to give the product the shape of a rose. Finally, glue the leaves, and glue all the ends of the ribbons sticking out from below with a small piece, hiding the cuts.
Thus, using the step-by-step assembly instructions e flowers from ribbons, you can make a variety of DIY crafts that will decorate your interior, hair or clothes.
Very beautiful artificial flowers can be made from fabric or ordinary ribbons. Using some tools that are easy to find in any sewing department, you can make beautiful roses and field flowers.
Following the step-by-step instructions, you will be able to make unique artificial flowers with your own hands, with which you can decorate both the interior, gifts, postcards, clothes, and even your hair.
How to make DIY satin ribbon flowers
You will need:
- satin ribbon
- burlap or felt
- scissors
- pencil
- thread and needle
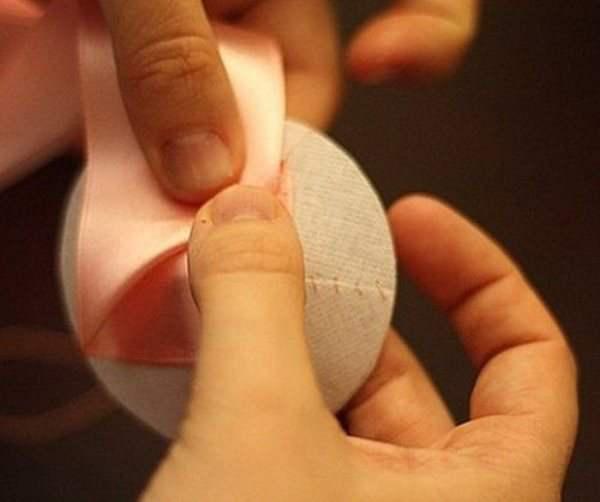
1. First you need to make a round base of burlap, with which you can twist the flower.
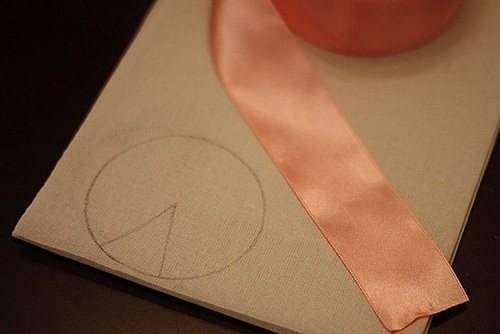
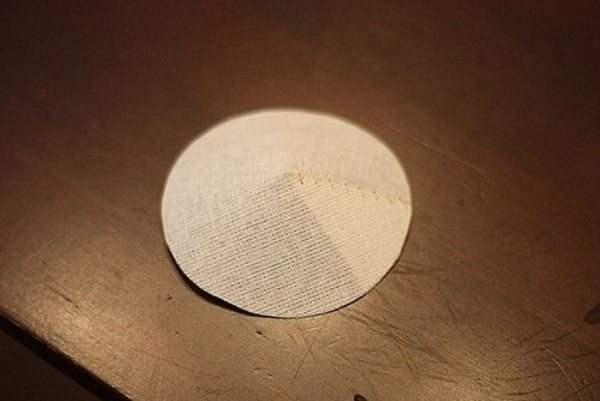
This base can be made from burlap or felt:
- draw a small circle on the burlap (diameter 6 to 10 cm)
- cut out the circle
- cut a small segment in a circle, the larger the segment, the higher the cone will turn out.
- connect the ends of the circle to make a cone.
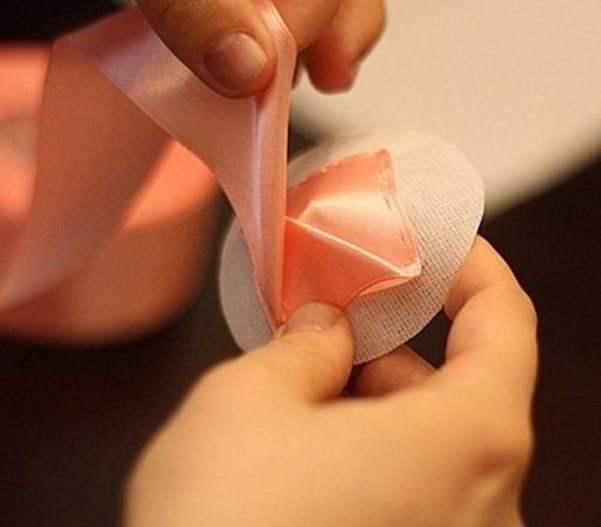
2. Begin applying the tape to the base. Secure it with thread.
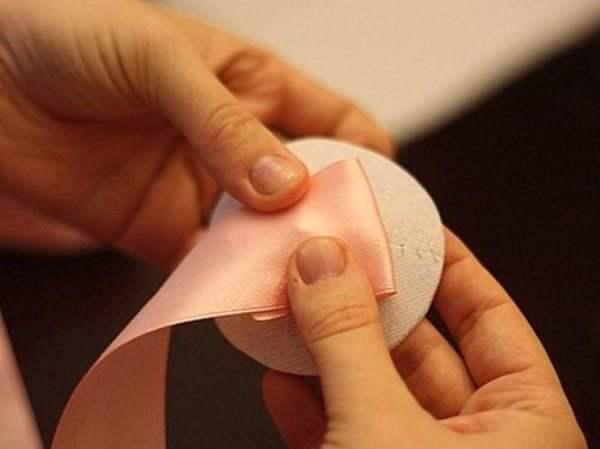
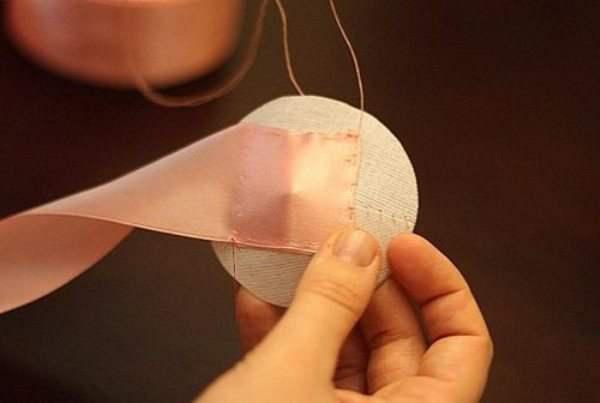
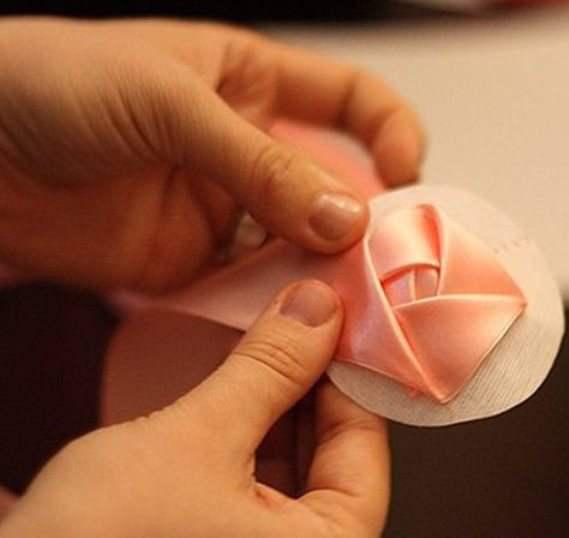
Follow the photo instructions to make a rose.
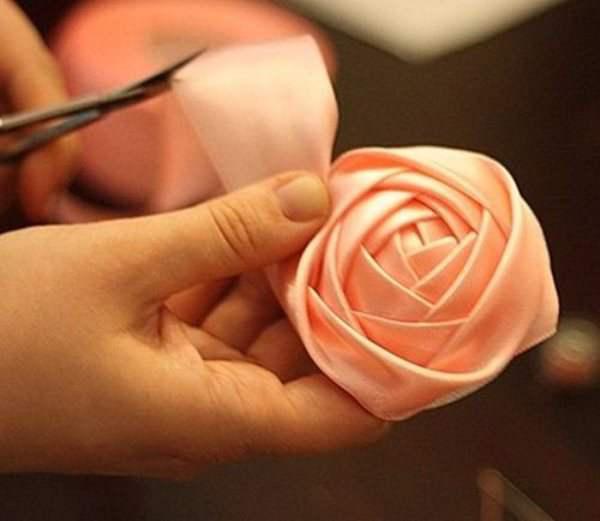
3. Several of these roses can be combined into a bouquet.
The bouquet needs its own base.
Prepare a handle for a bouquet of any sticks that need to be folded into a bundle and secured with tape and then tied with a satin ribbon.
To the base of the sticks you need to glue foam ball. If not, you can use crumpled paper or newspaper wrapped with tape.
Now you can glue roses and beads to the ball with hot glue.

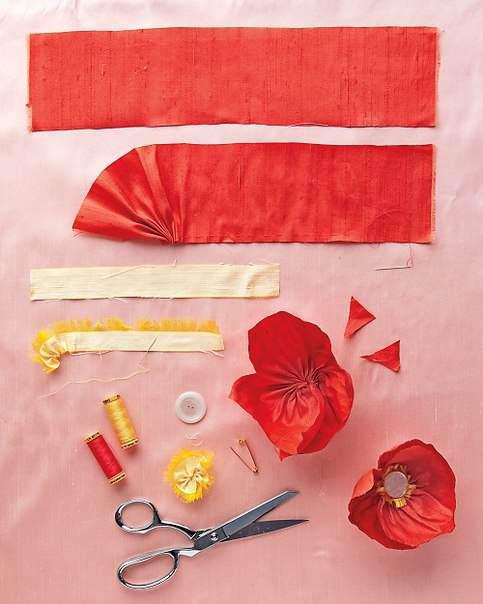
Ribbon Flower Making: Poppies
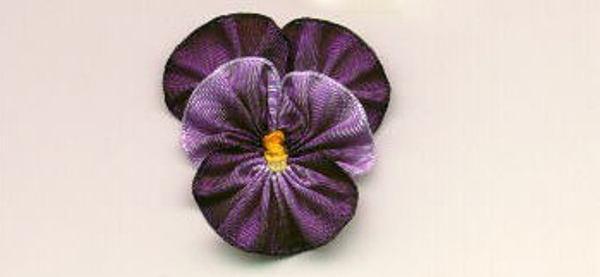
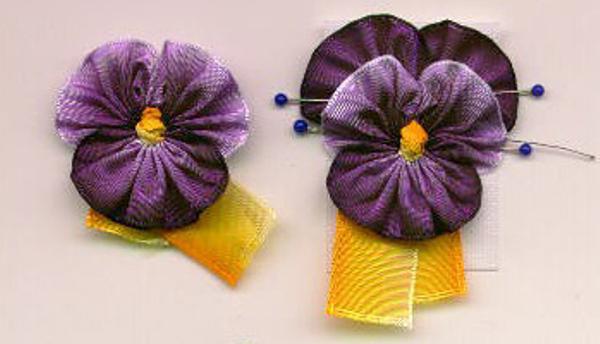
How to make flowers from satin ribbons with your own hands: Pansies

Beautiful ribbon flower

You will need:
- green satin ribbon (width 5 cm, length 10 cm)
- satin ribbon of any color (length 1 meter)
- thread and needle
- scissors
- candle, matches or lighter
- sheet of paper for pattern
- pin, hair clip or hair tie
Optional:
- glue gun
- small piece of felt
- beads
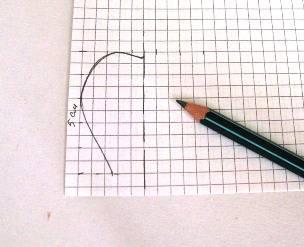
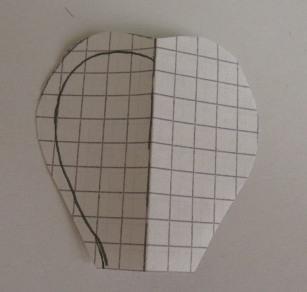
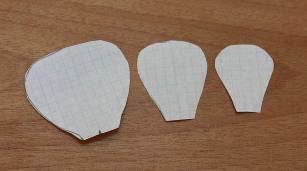
1. Make a petal pattern. You can find out the dimensions from the images (5 cm high, 2.5 cm wide). The width at the base is not more than 2.5 cells.
2. Since the width of the ribbon is 5 cm, the petal should have a slightly less height. Fold in half and cut out the pattern.
3. Put the pattern on the tape and cut out the shape. Cut off the top edge of the ribbon, you may need to lower the pattern below. It is worth noting that the base of the petal with edging.
4. From the tape you need to cut out the petals. You can fold the ribbon and cut out several petals at once. For convenience, you can fasten the tape with clerical clips.
5. Reduce the pattern by 0.5 cm on all sides except the base.
You can make a new pattern.
You should get 3 rows of petals, which means you need to prepare 3 patterns of different sizes.
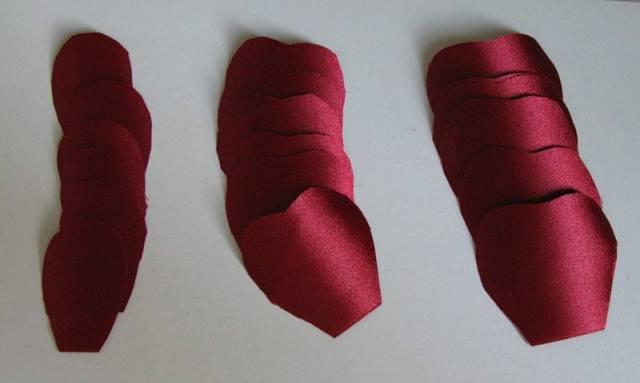
6. When you have cut out 3 groups of 6 petals, begin to gently burn the edge of each petal. No need to burn the bottom edge.
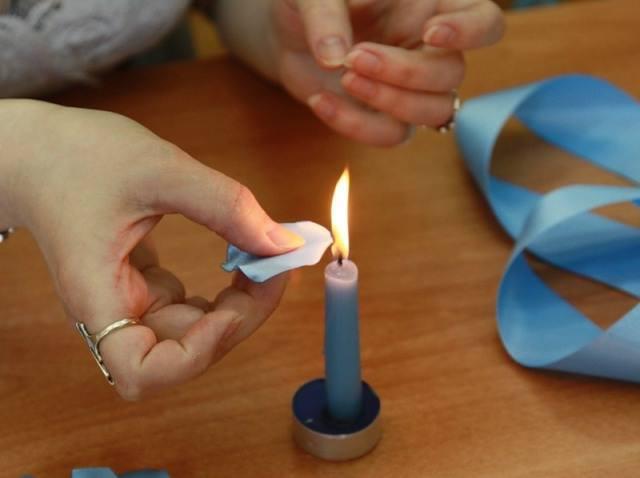
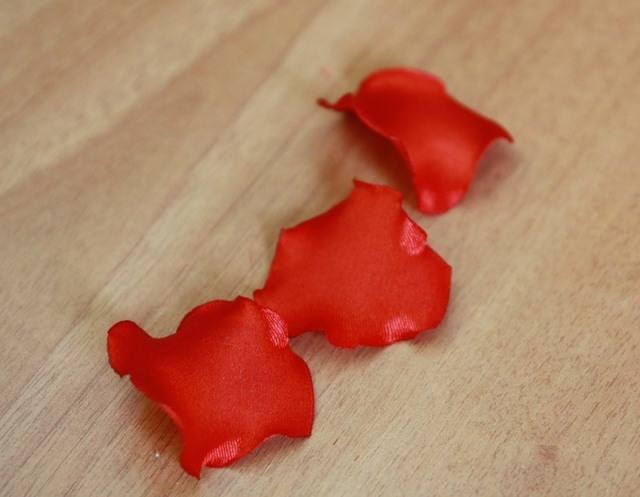
7. Now you need to shape each petal. To do this, you need to gently and briefly hold the petal over the fire so that it bends a little.
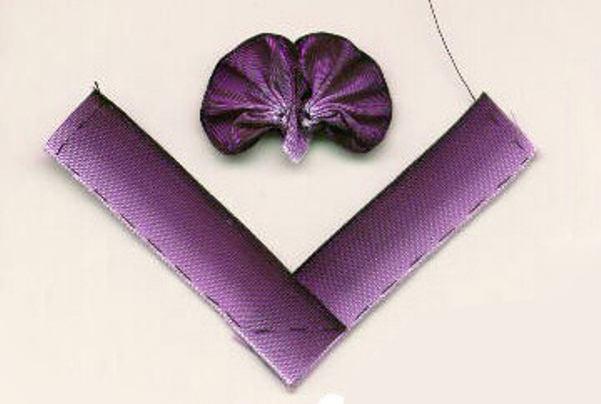
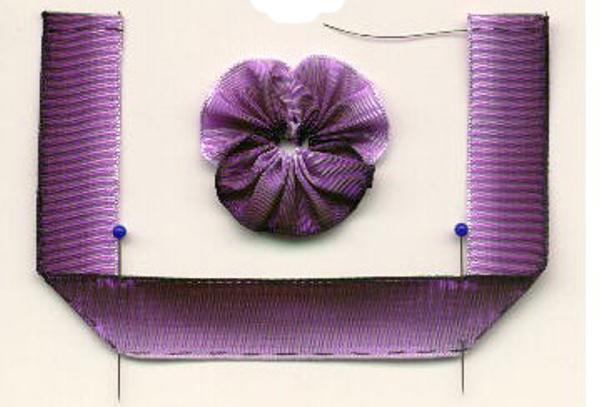
8. We collect a flower.
Prepare 2 petals of the same size and fold them as shown in the image, then sew them with a seam first needle. Continue stitching according to the principle chessboard all 6 petals.
Make 2 more rows of petals in the same style.
Make stamens and insert them into the central hole - secure them with a thread. Stamens - roll the edges of the wire in glue and semolina, then in yellow sparkles or paint. Or glue yellow beads to the ends of the wire.
Girls, do you like flowers and decorations? Every woman wants to look at 100. But it is not at all necessary to buy expensive trinkets. You can perfectly complement any outfit with interesting floral motifs. I propose to consider some options for colors from satin ribbons. They are so unusual. And most importantly, it is quite possible to make them yourself!
What is required to make flowers from satin ribbons?
- Satin ribbon (color should be chosen according to your idea)
If you make for yourself or as a gift, it is better to choose bright colors: orange, yellow, burgundy, scarlet. Looks very good combination different colors in the basket. The size of the product can be quite large.

A present for a younger representative will require delicate shades: pink, purple.

A wedding work may contain white or very pale shades of blue, yellow, green.

In the manufacture of flowers we use silk ribbons of various widths.
It all depends on the shape and size of the future work.
- Scissors
- Threads, and not necessarily in the color of the tape
- sewing needle
- baskets
If you want to make more than just a hair ornament or an accessory that complements the costume, use straw braids or very thin willow twigs in your work. But nowadays you can pick up from multi-colored sisal, paper tubes. The main thing is that the container looks harmonious .

- Filling material
They can serve as a simple foam. It is convenient to stick flowers into it when composing a composition. Also in floristry, a special material in the form of a hard sponge is used. She better fit for professional products.
- Hairpins or rubber bands
Kanzashi flowers look great on little girls' hairstyles.
- Wire
The material is used to fix the flower in the bouquet. There are also various types. At home, the most common will do. I use copper thin thread. But, if desired, you can use a specialized wire, stem.
- decorative elements
Small flowers (for example, for wedding hairstyles), beads, butterflies, bird figurines.
- Lighter or candle
- Tweezers
Required for more safe handling fire of petals and greenery.
- glue gun
This item can be purchased at many craft stores. There are affordable options. The main thing is to choose a representative with a narrow nose. You will need to get used to working with the tool. But it really makes the process easier.
- Photo frame

What flowers can be made from satin ribbons with your own hands?
Roses made by twisting
Mysterious bright, passionate, and sometimes delicate creamy buds. The twisting technique is used. For manufacturing, one long tape is taken. The bottom line is the gradual formation of a bud by turning the tape over.
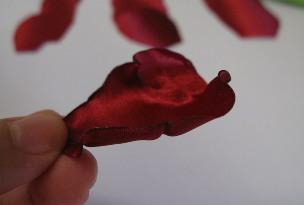
Roses from individual petals
The buds come out just like they are alive.

Petals can be cut in groups. I burn each one and add waviness, slightly stretching the edge in different directions. I fold the first sheet tightly, and fix the subsequent ones with glue from different sides. At the end I give the desired shape.
Kanzashi Flowers
The name came to us from Japan. So they called jewelry on the head of women. There is a huge number of representatives, diverse in appearance.
The execution technique is quite simple. The flower is assembled from individual elements.

For example, representatives of dahlias, peonies with fluffy hats. The bottom layer is made of large petals. Subsequent tiers decrease in diameter. A certain number of elements are strung sequentially on one thread. The group shrinks and closes in a circle. The form of an inflorescence is given. Layers of blanks are glued to each other with a glue gun.
Moreover, petals in such colors can be processed in different ways.
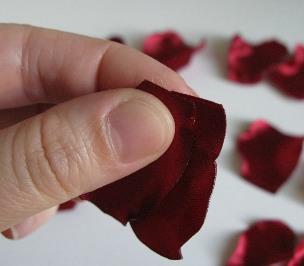
- I just burn on both sides
One side - until the tape is folded (we do what a real petal looks like). I burn the second end, folding it in half. From this side they will be strung on a needle. Or the petals will fold and stitch differently.
When using a thin ribbon, you can tie knots in the middle of each petal. I found this method interesting. Each leaf was sequentially sewn onto a round blank, and in the middle - decoration, beads. Looks unusual. I glued the pin to the base. It turned out a decoration for the daughter of a friend.

- Another way
Each petal folds in a certain way, representing a pointed figure.

The module can consist of 2 or even three colors.
- And you can make a magnificent plant without using a needle and glue
The details of the work are squares. We turn with tweezers from the corners to the center. We assemble it into a whole with a thread, simply winding one to the other.
We make flowers from satin ribbons on our own - step by step instructions for beginners
If for the first time you wanted to put your hands on the manufacture of an interesting representative of the flora, then I recommend that you first make the following compositions.
Single Ribbon Roses
We will need the following materials and tools:
- satin tape;
- threads;
- sewing needle.
Step 1
We take a tape 5 cm wide. Bend the edge to make a corner.

Step 1. Bend the edge of the tape
Step 2
We twist the triangle to form a small bud. Grab the needle.

Step 2. We twist the resulting triangle
Step 3
We begin to turn the long edge of the tape to the outside.

Step 3. Turn the other edge of the tape to the outside
Step 4
Gradually wind the ribbon around the central part of the flower. We fix each turn with a thread with a needle.

Step 4. We wind the ribbon around the central part of the flower
Step 5
At the end, the petal is simply lowered down and sewn.

Step 5. Fix the petals
Leaflets to complement the decoration are also made easily.
Step 7-8
We take a tape 2.5 cm wide. about 6 cm long. Fold in half

Step 7-8. Fold a piece of ribbon in half
Step 9
Cut out the triangle with scissors.

Step 9: Cut Out the Triangle
Step 10
We process the tape (without unfolding) with a lighter or a candle. Press the layers together while they are still hot. So we glue the middle of the green. We turn out the leaflet.

Step 10. Burn the edges with fire

Step 10-1. Glue the middle while it's hot
Flower without glue and needle
We need 4 squares 5 x 5cm.
Step 1
With the help of tweezers, we turn the tape to the center from the corner.

Step 1. Fold the tape with tweezers
Step 2
We keep one side. We turn the second corner. It turns out a strip with two flagella on the sides.

Step 2. We fold the second side in the same way
Step 3
We fold our twist in half and tie with a thread.

Step 3. We turn the twist and fix it with a thread
Step 4
We take a decorative element for the central part of the bud. We attach the first petal to it. And so we add all the others.
Step 5
We connect the parts. Petals can be complicated by adding a ribbon of contrasting color.

Step 5: Add Contrasting Ribbon
From such little ones it will turn out delicate bouquet. A wire wrapped in a green thin ribbon will act as a stem.
simple kanzashi
Step 1
Preparing squares. 8 pieces. I cut. I burn.

Step 1. Cut the squares
Step 2
I fold the square in half diagonally.

Step 2. Fold the square diagonally
Step 3
I fold the resulting triangle again along the midline.

Step 3. Fold the triangle again
Step 4
The last time I fold the figure. Again in the middle. I burn the edge.

Step 4. Roll again and burn the edges
Step 5
I cut the bottom corner and process it with a lighter (candles).
Step 6
I create a product.

Step 6. I collect a flower

Step 6_1. Another version of the flower
If you want, you can put in each petal a square of a different color, smaller or the same, at a slight angle.