New Year crafts from bottles with your own hands. Large DIY Christmas tree toys
Plastic bottles terrify all environmentalists on our planet. The problem is that repeated use of this (seemingly) convenient device harms the body. How to be? The answer is simple - creativity. New Year's toys from old bottles will create incredible comfort. Making them will be as easy and pleasant as possible, and we will show and tell you how to make them with your own hands. Let's start with the video.
The easiest craft
For this craft you will need:
- the bottom of the bottle;
- paint / felt-tip pens / markers;
- needle, thread, fishing line;
- paper;
- ribbon.
It is necessary to cut off the bottom of the bottle (you can take any volume). And then conjure over it: paint or leave the original color, decorate with snowflakes, make a hole and thread a fishing line on which the toy will hang on the Christmas tree. You can make a single design using the same fishing line. All this can be seen in the photo below. We have selected several master classes.


Balloons from a bottle
In this case, we just need to cut our bottle into strips. These strips should be the same length and width. They must be glued from one end, and then from the other in such a way that a future Christmas tree ball is obtained. This ball can be decorated in any way you like: - Metal Ox, so you can build on this, and also refer to traditional New Year's symbols (sequins, ribbons, red / green / gold colors, rain, cones, etc.).


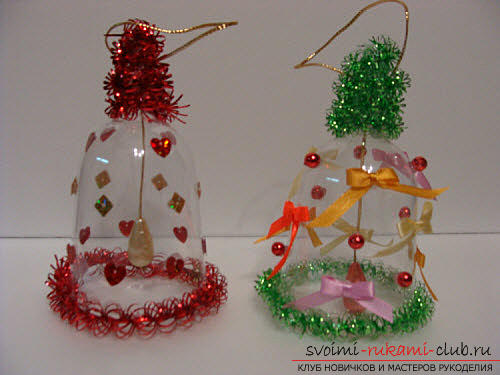
Bottle bells
Bells in the form of a New Year's toy will decorate the Christmas tree with their presence. How to make them - you need the top of the bottle, because it is similar in shape. You will need paper, foil, paints, tinsel, fishing line, ribbons, glue. Part of the bottle must be wrapped with foil, fixed with glue (preferably instant fixation) and decorated with snowflakes, tinsel, etc.


One two Three! Shine Christmas tree!
For this Christmas tree toy, you will need several bottles. Again, we take several upper parts, cut them into small strips, put them on top of each other. The lower part can serve as a base. They can be fixed with glue, but this is an optional item. Decorate with balls, beads or tinsel.

A few more ideas...
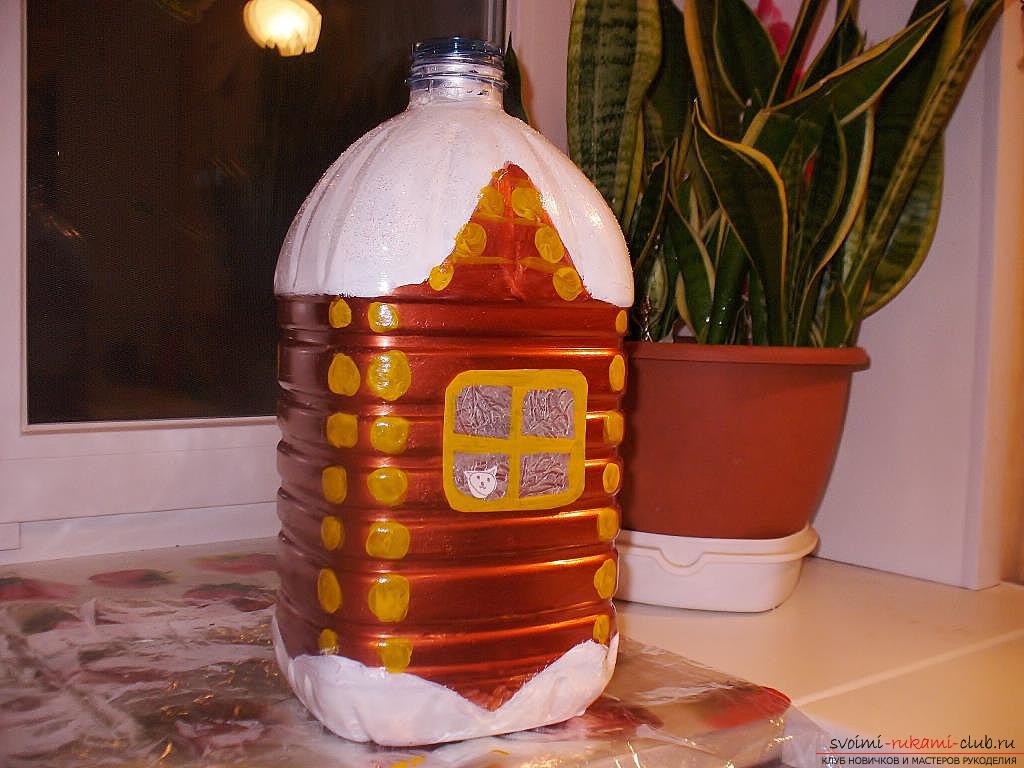
Bottle toys are only your imagination, which can be realized literally with your own hands. Any colors can be used. The shape is up to preference. It is not necessary to take small bottles, for example, you can make Santa Claus from a five-liter bottle (you can make a beard from plastic spoons). Covers can also become a Christmas tree toy. We've picked up a few ideas.


In this article, we will show you how to do Christmas decorations with your own hands on a street Christmas tree using available items. Everything ordinary can be turned into something beautiful and magical.  Decorations for the New Year's beauty are not made from anything: polystyrene, cardboard, cones, pieces of wood and even bottles with light bulbs are used. And every piece is unique in its own way. Look at the photo. These balls are handmade from styrofoam.
It is important to know one important detail. Under New Year not always worth it good weather, it rains often. Therefore, your crafts should not have something that is washed off or soaked. When the tree is in the house, use whatever you want there.
styrofoam crafts
 The material is easy to process and by itself. It will not split, break or hit anyone if it suddenly falls off a branch. Do-it-yourself Christmas toys made of polystyrene foam can be made in any form and in many ways.
Getting ready for work
We need materials and tools:
- Styrofoam;
- soldering iron;
- paints;
- sequins;
- needle and thread;
- glue;
- sandpaper.
Keep in mind that you are making decorations for a street tree, so the paint glue must be resistant to water and frost.
With a knife, we will process a foam blank. The knife should have a thin, sharp blade because the cut should not be too rough. The same applies to the emery skin, choose "zero". Sandpaper will be needed for final processing: we will remove irregularities (burrs, extra tubercles) with it. With the help of paints, we will color our craft, and then lightly cover it with sparkles. We will make a hole with a needle, and send a thread from which a loop will turn out.
Choose strong threads, as a strong wind can easily rip off the decoration!
With a soldering iron, if desired, you can apply recesses in the form of patterns. Glue will be needed if you want to attach to a toy, for example, beautiful bow from tape. 
Observe safety precautions when working with a soldering iron! When processing foam with this device, poisonous smoke will be released that can cause cancer. Keep this in mind, work in a well ventilated area. It is advisable to use a mask or respirator to protect the respiratory system.
Making beautiful balls
It is best to make Christmas decorations from foam balls with your own hands. They are very common in craft stores. This option is offered because you can’t make a ball out of ordinary foam wrappers. We will need large balls, as we will hang them on a street tree. The bigger the tree, the bigger and brighter the toy!
 So, take a clean foam ball and prepare a flat foam pad. We paint it in any color with resistant indelible paint. In order not to get your hands dirty and not to smear the paint from the ball with your fingers, use two toothpicks and stick them into the ball, as shown in the photo. You can paint with a brush or spray can. We stick toothpicks with a ball into the stand and wait for it to dry.
After the ball is dry, you can paint patterns with other paint or glue something beautiful on it. You can apply patterns with the tip of a soldering iron tip, for example, in the form of snakes. Here, play out your imagination. Then take a needle with a thread in the eye and pierce the part of the ball that you think is the top.  The figure shows exactly how to pierce the toy.
Many people use paper clips as a suspension, simply sticking them into the ball, and then tying the thread. In our case, this option will not work: a strong wind will calmly tear the ball off the suspension. The simpler the design, the more reliable it is!
We tie both ends of the thread into a knot, and hide the knot itself. The finished craft will look like a store-bought plastic Christmas tree ball.
Styrofoam figurines
 Styrofoam Christmas decorations can also be made flat, in the form of various figures. You will need foam boards. First, with a pen or felt-tip pen, we make a drawing on the foam. Then carefully start cutting. Rough surfaces need to be sanded with sandpaper, otherwise the craft will not look so beautiful.
 For example, we want to do beautiful snowflake. We draw it on the foam, then we begin to cut out the internal places.
Always start by cutting out the interior. This is much more convenient, and the risk of breakage of the toy is significantly reduced.
Now we start cutting out the snowflake itself from the foam sheet. It will look beautiful and without painting. It is better, of course, to paint it in silver, gold or metallic blue. A hole must be made from the upper ends so that the snowflake on the Christmas tree is turned with its front part to the viewer. If you pierce directly on the plane, then the snowflake in limbo will turn to us with an edge.
 Do not limit yourself to flat figures. cut out voluminous crafts in the form of bells, birds, Christmas trees and so on.
  By the way, such Christmas toys can be made from foam balls. For example, a snowman.
  You will need balls of different sizes. One is big, another is smaller, and the third is even smaller. Glue them together carefully with strong glue. You don’t need to paint such a craft, because the snowman should be white anyway. Use indelible markers to draw his mouth, eyes, nose and buttons. You can make him a little hat.
Amazing snowflake - video
From plastic bottles
 There are a lot of options, both simple and complex. Plastic Christmas decorations are perfect for a street New Year's beauty. They also do not get wet, have a small mass and are easy to manufacture.
Only large bottles, 1.5 or 2 liters, will do. Toys from small bottles will be poorly visible on a street tree.
 Let's make a Christmas tree toy from a plastic bottle with our own hands, which will serve as a bird feeder. We will need supplies:
- 2 liter plastic bottle;
- scissors and awl;
- paints;
- strong nylon thread;
- tinsel, ribbons, etc.
In this option, it is a large bottle that is suitable so that the birds have room to eat in it.
We take a bottle and start painting it in any bright color, along with a lid. Spray painting doesn't take long. We are waiting for the paint to dry. We decorate the bottle with ribbons, for example, we knit a bow and fasten it with glue. You can also use stickers. Then we cut out a small round window (diameter 8 cm) in the wall of the bottle so that it is as close as possible to the bottom. The photo shows interesting variants of feeder bottles, where the upper parts are made in the form of a roof.
First you need to paint the bottle, wait for it to dry, and only then cut out a window for the bird. The paint should not get where the food will lie. An animal can inadvertently swallow a piece of dry paint and get poisoned.
 Now unscrew the cork and punch a small hole in it. Take a thread and make a loop. It is better to make the knot large (tie several times). We put the end of the loop so that the knot rests on the bottom of the lid. A simple and useful feeder toy is ready. We hang it on the Christmas tree, pour food and admire the birds.
Flashlight bottle and delicate bells
 A very simple option, familiar to everyone since childhood. Such Christmas decorations from plastic bottles are also easy to manufacture and process. We will need everything the same as for the feeder. Only now we will cut vertical stripes on the walls.
For this procedure, a sharp thin knife or scalpel is perfect. It is better not to use a razor blade, as they can easily get hurt.
 We cut the strips, the gap between them should be approximately 5 mm. The length of each strip is 15-20 cm, depending on the size of the bottle. Now we need to squeeze the bottle so that all the strips bend in different directions. Let's start painting and decorating. Something bright and shiny can be put into the inner cavity of our flashlight.
A plastic bottle and disposable teaspoons will make a wonderful Santa Claus. 
A white bottle will make a unique snowflake. 
Green bottles will be the basis for the Christmas wreath. 
A little patience and more bottles will turn into a big snowman after a while. 
Do-it-yourself disco ball for a street Christmas tree - video
Helpful Hints
Products made of plastic are used everywhere, as they require less investment to create than products made from other materials.
However, discarded plastic can take hundreds or even thousands of years to decompose, which is why it is very important to recycle it or refuse plastic altogether.
The second option is very difficult to implement today, so recycling comes to the fore. Plastic can be given to special recycling plants, or you can make useful things out of it.
In this collection, you will learn how to make various useful things for your home and garden from plastic bottles.
1. Do-it-yourself ottoman from plastic bottles step by step

You will need:
Plastic bottles
Foam rubber
Knitting needles
Ruler
Scissors
Sewing machine
1. Wash and dry several plastic bottles with caps on. Gather all the bottles in a circle and tape them together.
2. Cut out two circles from the cardboard so that they cover the top and bottom of all connected bottles. Tape these circles to the connected bottles with tape.

3. Prepare two rectangular pieces of foam rubber and one round piece. With rectangular pieces you need to cover the side of the collected bottles, and with a round piece the top. Secure everything with tape.

4. From any fabric, make a cover for your seat. If you like knitting, you can knit a cover.


2. We make a do-it-yourself faucet extension from plastic bottles
It will be more convenient for children to wash their hands.


3. Products from plastic bottles with your own hands: a pocket for a rag / sponge

1. Cut out the desired shape from the bottle.
2. Finish the edges with sandpaper.
3. Hang on the faucet.
4. How to make a plastic bottle bag

Photo instruction


Video instruction
5. What can be made from plastic bottles: cups for storing cosmetics

6. Plastic bottle feeder for a cat or dog
There are many ways to make bird feeders, but this bird feeder is designed for cats and dogs.

You will need:
2 large plastic bottles
Scissors
1. In the middle of one bottle, you need to make holes slightly larger than the neck of another bottle.
2. The second bottle must be cut in half across.
3. Fill the bottom with food.
4. Connect the parts and open the cover.
7. Vase for sweets: a master class crafts from plastic bottles

You will need:
Record, round plastic or thick cardboard
6 two-liter plastic bottles
Wooden or plastic rod (you can use an even branch of a suitable diameter and length)
Super glue
Spray paint and glitter (optional)
1. We make the basis for crafts. To do this, you need a plate, ceramic or glass plate. In the middle of the plate, you need to increase the hole to 10 mm with a drill.

2. The drill will also need to make holes in the center of the three plastic bottle pieces you will be using. It's easier to drill from the inside out.

3. Cut off the bottom of each of the 6 plastic bottles. Put 3 parts on the rod and secure with glue. Glue the remaining parts to the base (plate) around the rod. If desired, you can paint everything with spray paint.

It is worth noting that the rod is held on the base thanks to the plastic part, which is glued to the plate, as well as to the rod itself.
4. If you wish, you can decorate your vase.


8. DIY wicker baskets from plastic bottles (master class)

And here is a variant of a wicker basket made of plastic cocktail tubes:

9. Crafts for the garden from plastic bottles (photo): broom

1. Remove the label from the plastic bottle.
2. Use a utility knife to cut off the bottom of the bottle.

3. Start making cuts on the bottle, leaving 1 cm between each.

4. Cut off the neck of the bottle.

5. Repeat steps 1-4 for 3 more bottles. Leave one bottle with a neck.
6. Place all cut bottles without a neck on top of one bottle with a neck. You will get a blank for a broom.

7. Cut off the top of one bottle and put it on top of the resulting blank.


8. Make two holes through all the bottles and insert the wire into them and wrap the ends.
9. Insert a stick or rod into the neck and secure with a nail. You can also use glue.


Video instruction
10. Modular boxes: a description of crafts from plastic bottles

You will need:
Several large plastic bottles or canisters
Stationery knife
Scissors
Marker or pencil
Strong thread.
1. Use a utility knife and/or scissors to cut a suitable hole from a bottle or canister. It shouldn't be too small for everything to fit, or too big for the plastic structure to fall apart.

2. Start connecting the bottles with a strong thread. Start with two, then add two more already connected to them, and so on. Tie strong knots. You can also try using hot glue or super glue (Moment glue).

3. Assemble the design that is convenient for you. You decide how many rows and "floors" to make. However, it is worth knowing that the higher the design, the less stable it is. You may need to once again secure the entire structure with a rope.

4. It's time to clean up the scattered things on the shelf.
Plastic bottles are no longer garbage, but a material for making various crafts. Disposable containers are used to make vases, dishes, designer jewelry and much more. So why not make a New Year's toy out of a plastic bottle? Moreover, there are a lot of ideas in this direction.
Some skeptics object: “Well, why make Christmas tree decorations from garbage? Indeed, in modern stores you can buy very beautiful products!" There is some truth in this, of course. But New Year's toys from plastic bottles have their own advantages:
Lamp, chandelier or light garland
As you can see in the picture, the bottle was cut in two. With scissors, you shape the flowers and you end up putting small garland bulbs in the bottle ring. We love this plastic spoon candle idea! Well, it's not a bottle, but plastic spoons! We decided to include this idea in our selection because it is really very interesting. The principle of its implementation is very simple - you need plastic spoons, rope and glue. Watch the video to see all the stages of its implementation.
To make the candle holder shown below, you will need a large plastic bottle. Or a squirrel feeder is a very good idea and ecological restoration. A plastic bottle is perfect for this! Just make a hole, fill it with seeds and hang it on your terrace, balcony or in your garden.
In addition, using waste materials, you give them a second life and do not throw them away, indirectly taking care of the environment. A pleasant feeling New Year's fairy tale appears precisely at the time of making crafts. Try it once, and next year you will decorate your Christmas tree only with toys of your own production. These activities are very helpful for children. During the creative process, the child experiences positive emotions. Work with hands also has a positive effect on the cognitive sphere: thinking, memory, imagination, fine motor skills of hands develop.
Feeder for birds and birds for squirrels
Little happy bird of his manger. Refurbished and original candlesticks? Very easy to realize and free you to decorate them however you want! The plastic bottle can be easily transformed into original and practical storage accessories.
Teaching children respect and love for nature
The plastic bottle turns into gem? You can create any kind of plastic jewelry. Teaching children to respect the environment is essential. Even if "green" has been in vogue for a few years, this trend is still not common. Many find recycling unnecessary and generally do not repair old items rather than discard them. If you want to teach your kids to recycle and recover, dedicate a weekend of creative activity. Below you will find two ideas for toys made out of plastic.

Christmas balls
To make a Christmas ball you will need:
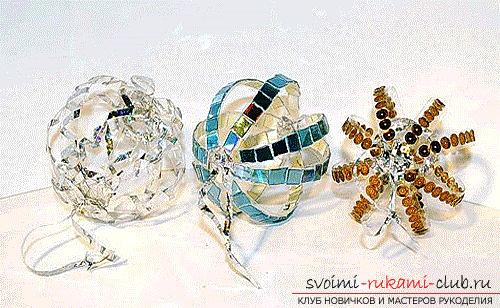
Instruction
From the middle of the bottle you need to cut out several rings (3-4 pcs.). The thickness of the rings should be about 1 cm.
Plastic robot, source: Bottle robot. Every year around Christmas, thousands of plastic items, such as gold and silver thread, aerosol cans and artificial snow, light wires, colored paper, adhesive paper and every year and almost 50% of these products end up in waste. These are numbers that make us think, but what we can do is obviously the solution is not to give up on decorating your homes, as many of you are used to doing, but simply to use recyclable materials, making a lot of affairs.
Now thread one ring into the other and connect with a paper clip. It is desirable that the rings are arranged symmetrically. The blank for the ball is ready.
Let's start decorating. To do this, coat the rings with glue and strew, for example, with beads, sequins, foil of different colors, and so on. Tie a silver thread or ribbon to the ball in the form of an eyelet. New Year's toy from a plastic bottle is ready!
Let's get excited little creative recyclers to make decorations to be displayed at home. Ideas are so many and fun, maybe even engaging young children in a healthy and educational game. If you haven't already, try setting aside newspapers, bottles, and caps, as they will certainly come in handy for preparing your greeting cards.
Simple plastic bottle toys
For decorations, there is nothing to look in the drawers and find something that can be reused: cardboard items, old t-shirts and even plastic bottle caps are great for creating original jewelry to cheer up the house, tree and crib.
cones
Toys in the form of cones were always hung on the Christmas tree. Previously, they were made of glass, today you can buy plastic jewelry. We will make cones from a plastic bottle. If a child participates in the manufacture of crafts, be careful, as you will need to work with fire.
It is necessary to prepare such tools and materials:
Here are some tips on how to decorate your home for Christmas. With seeds, however, you can give birth to Christmas-themed paintings and posters. You just need to have eco glue, eco color shades and game over. A very decorative product, absolutely non-toxic and environmentally friendly, is a happy maza, a game created by a well-known company producing environmental games, consisting of a powdered corn derivative. natural that connects bricks to bricks and through which you can create a crazy father, comet stars, Christmas trees, snowmen and many other characters or themed objects.

Instruction
From a brown bottle, you need to cut 12 square blanks of different sizes (3 small squares should be about ¼ of the large blank).
Now the corners of the squares need to be rounded, making a camomile out of each blank.
How to decorate your house for Christmas without harming the environment: felting
How to decorate your house for Christmas without harming the environment: felt trees. If you have colored "leftovers" in your home, you might consider using them to decorate a tree, table, or gifts. Hearts and stars are perfect for house breeding as well as a quick cleanup. If, however, you try to do something more original, you can play the classic Christmas stars, draw flower silhouettes on paper sheets, and then trim the felt.
In the next step, we will work with fire. Light a candle and bring the edges of the blank to the fire: the petals will fall down. Be careful not to melt the plastic. As a result, you should get some kind of bowl or plate.
Poke a hole in the middle of each blank. To do this, you need to use an awl.
bend copper wire and make a loop (leave room for " pine twig"and beads). Now we need to string our blanks onto the wire: we start with the largest and end with the smallest. Hang a bead between the pieces.
How to decorate your house for Christmas without damaging the environment: deer. It's also useful for creating custom placeholders or decorative balls to hang from a tree. In this case, it is enough to cover a small piece of paper or newspaper to give it round shape and insert colored fabric combs. The most skilled can even create crowns hanging from doors.
How to decorate your home for Christmas without damaging the environment: A crown hangs by the door. Alternatively, you can create interesting shapes by covering small, unused objects. Always with felt you can make an original. And if you have pillow cushions, you can sew a beautiful red and green pillow and then decorate it with old buttons or other "restoration minions" that usually inhabit our homes.
Let's start manufacturing spruce branch. We will make it from a green bottle. Cut out a figure resembling a propeller from the middle and make frequent cuts (needles) along the edges. Hold the workpiece over the fire, forming the shape of a twig.
In the very center of our pine branch, poke a hole and put it right on the bump. Hang some more beads. You can decorate a Christmas tree with a New Year's toy from a plastic bottle.
How to decorate your house for Christmas without harming the environment: felt gloves. You can also try to create beautiful and unusual felt closures. How to decorate your house for Christmas without damaging the environment: it feels. Recycling is always good idea, especially items designed for an awkward box. Glued in between on the rainbow side, you can make sparkling Christmas crowns hang on your door, enriching them with perhaps a red ribbon or a decorative bow.
How to decorate your home for Christmas in an environmentally friendly way: decorating paper and recycled plastic. With old sheet music, you can create stars, balls, or Christmas tablecloths that need to be plasticized for rendering and water repellency.


A wonderful winter holiday is approaching - New Year 2018. It's time to decorate your house for his arrival so that Santa Claus does not pass by on his magic sleigh and leaves good gifts under our Christmas tree. It is very interesting to decorate the Christmas tree and rooms with handmade toys for the holiday. The very process of their manufacture is fascinating, however, like any creativity. Such crafts can be made from the simplest materials, for example, from plastic bottles. From ordinary plastic bottles, you can make a lot of interesting and beautiful things that will successfully replace store counterparts. Our today's story is dedicated to the 7 best and original crafts from plastic bottles for the New Year 2018, which will be held under the sign of the Yellow Dog. Let's look at them in detail in our article.
With old sheet music, you can create stars or tablecloths for your Christmas table. How many times have you thrown discarded colored cardboard, paper sheets and plastic bottles, thinking that they can no longer return to us? With cardboard, you can make personalized postcards and Greeting Cards or wrap your gifts in an eco-friendly way, or make unusual light-up decorations, like a Scandinavian-style mini crib.
Christmas cones from plastic bottles
You can make unusual light-up decorations, such as a Scandinavian-style mini crib. It is also ideal for bookmarks and color locks. Buttons can also be used to create decorative flowers of great effect: get some thick wooden sticks, fix the flask on the hard drive and glue the colored buttons one by one different types and sizes, starting with the one with the largest diameter, or making greeting cards.
Christmas tree
An unusual Christmas tree can be made from simple plastic bottles. It is important to collect the right materials for this craft and follow the master class step by step.
This will require:
- Plastic bottles;
- Scotch;
- Sandpaper (cardboard);
- Scissors.
Progress:
- The bottom and neck of the bottle should be removed, and then a straight pipe will turn out. Then you should prepare blanks from twigs. They must be of different sizes so that the Christmas tree turns out to be cone-shaped.
- Then plastic bottles need to be cut lengthwise into 3 parts so that subsequent tiers are less than the previous ones. On each blank, you need to make needles, and for this they are cut into thin strips, but not completely. In order for the Christmas tree to stand steadily, it is advisable to use the bottom of one of the bottles as a stand.
- A sheet of cardboard must be rolled up into a tube and installed in the neck of the bottle. You can secure it with tape. Now each tier of branches needs to be fixed on the tree. You can put a toy on top or come up with something else. To make the Christmas tree fluffy, the needles should be cut thinner. Usually blue or transparent bottles are used for this. That's all, our craft is ready!
Christmas balls
You can decorate your Christmas tree with handmade toys. In work, it is important to follow all the steps step by step, and then you will get wonderful products.
Christmas balls from plastic bottles
How to decorate your home for Christmas in an environmentally friendly way: recycled materials. Stars, snowflakes, trees, angels, wands, bells and hearts can always be created from recycled paper or bottles from plastic bottles. Draw the shapes on the sheet, cut and color them.
How to Decorate Your Home for Christmas Environmentally Friendly: Edible Decorations
Paper and cardboard stars and balls made from recycled balls. Here is a fun and colorful advent calendar. Not just felt, paper, plastic and buttons. Why not think of letter shaped biscuits or decorate with icing, better homemade so you can hang on the tree and also give to kids and dear friends, perhaps in delicious tins.
This will require:
- Plastic bottle;
- Glue;
- Rain;
- Any shiny jewelry.

Progress:
- The paper needs to be wrapped around the bottle: this will help mark blanks on it. It is necessary to cut 4 rings 1 cm wide. Then the rings must be fastened together according to the “crosswise” principle and secured with glue. The result should be a ball of plastic strips. You need to choose beautiful threads or rain so that the toy can be used for the Christmas tree.
- To decorate the resulting blanks, it is better to use foil, beads, beads, etc. A small ball can be placed inside such a ball. In this craft, you can fantasize as much as you like. For children, this will be a very interesting activity.
Snowflakes from plastic bottles

Here are cornflowers that can be hung on a tree. A cookie to give to children and dear friends, perhaps in delicious tins. The risk here is that your decorations won't be up until December 25th, but it can be a nice way to spend a nice day with the kids and friends. Who could hold on to a sweet garland of colorful cookies or candies?
This will require
A colorful candy garland to hang on your door! Cookies to look at, to pass into the red ribbon and hang on the fireplace and on the walls. From the classic cookie box to cookies of all shapes, with a small hole to hang them on cinnamon sticks. It will be a greedy and creative Christmas for everyone to enjoy!
To expand the range of crafts from plastic bottles for the New Year 2018, you can also make snowflakes from the bottoms of bottles as a Christmas tree decoration. This process will be possible for beginners in this creative business.
For work you will need:
- Scissors;
- Acrylic paints in white, blue, gold, silver - to choose from;
- Plastic bottles, preferably blue;
- Paint brush;
- Wire;
- Pliers.
Progress:
Decorations to eat and hang from tree branches. Also on the table there may be curious decorations in the form of a seedling with cheese and vegetables: unusual way decorate Christmas dinner. Strawberry or Santa hat? Why not imagine a tree-like dessert?
This is the right opportunity to show that you are even more sensitive to nature, which we ourselves endanger. If you want to make your next Christmas even greener, check out these articles as well. How to replace a plastic bottle with a colored pet or a white snowman? Just colored paper, paint, glue and enough. A plastic empty bottle like it was such an inconspicuous thing and so much fun to play with!
- We take plastic bottles and stationery knife or cut the bottom with scissors as low as possible to the base, leaving only the corrugated part.
- After the bottoms are ready, we take up the painting of our future snowflakes. Depending on the desired pattern, we select the thickness of the brush, and then proceed to the artistry. As drawings, you can use various ornaments that come to your mind. This also applies to the choice of color of paints with which you will decorate your New Year's product.
- When your snowflake has turned into a beautifully painted masterpiece, let it dry, and use wire and pliers to make a small eye for the thread. Fasten it to the snowflake and pull the thread into this ring.
Well, ours is ready. christmas toy for christmas decoration which you now have the right to be proud of. A do-it-yourself snowflake can serve as a worthy decoration not only for your home, but also for a kindergarten, if you have Small child, and also act as an exhibit at the exhibition at the school of New Year's products.
Sitting at home with Jas, we organize our own classes. And now there are ordinary plastic bottles for drinks and yogurt. Today, 2 ideas on how to use old bottles to create really interesting things. How to use a regular plastic bottle when playing with a child. Today we will show you how to make snowmen and plastic dog bottles.
To make a snowman, we need. In 2 plastic bottles, we only had white, which made it easier to work with hot glue and such ordinary school scissors with a black cardboard box and eyelets made from any material or paper paint. The bottle, if you don't have a white bottle, can be painted or lined with thin white paper, or perhaps smooth paper. When the bottle is dry, we draw a test tube and make a hat of any color, black cardboard or foam, cut out circles and insert eyes and buttons.
Penguins from plastic bottles

The original New Year's decoration of your home for the New Year 2018 can be plastic bottle penguins, which should be placed in the rooms and under the Christmas tree as a decor. Such a craft will delight all your relatives and guests, and especially children. Without spending a lot of time, you will create a real masterpiece of art with your own hands, which will cause a lot of positive emotions and sincere smiles in your household.
For work you will need:
- Plastic bottles (one toy takes two bottles);
- Scissors;
- Acrylic paints - white, black, red and others;
- brushes;
- Small colored shreds for a scarf;
- Buboes or bows for hats;
- Glue.
Progress:
- We take a bottle and cut off the upper part almost completely or in half to get the body of a penguin. The head is already made from another bottle and also from the bottom, but the workpiece should be slightly smaller.
- We connect both blanks, inserting the upper part, which is smaller, into the lower, which is larger.
- After you have built the body of the penguin, proceed to its coloring. Take acrylic paints and apply gently on a plastic product, imitating the color of a penguin, as shown in the photo. Use more bright colors, because the brighter your New Year's penguin turns out, the warmer and more fun the smiles of your family will be.
- When your penguin looks realistic, you can tie a small scarf around his neck, and attach a bubo or bow to the cap with glue.
Here is such a cartoon miracle you got!
Video tutorial on making penguins from plastic bottles
golden bells

Golden bells will look original on the New Year tree. This work is done very quickly and is suitable for kindergarten.
This will require:
- Plastic bottles;
- Acrylic paint, if desired, fabrics, tapes and accessories can be used instead of acrylic paint.
Progress:
- For work, you should take bottles of 0.5 liters each, but more is possible if the tree is very large. The bottom of the bottle should be cut off. To get the bell petals, you need to cut the edge of the bottle in the form of a zigzag. Since the resulting edges will be sharp, care must be taken.
- The petals of our crafts need to be made pointed, and with a knife you can give them a shape. To make holes for the rope, you need to heat the knitting needle and make holes. You can do this job with scissors, but be very careful. At the end of the work, the bells should be painted, and they will dry within an hour. To give the products a New Year's look, they need to be decorated with tinsel, garlands or sparkles. The instruction is simple, and you can do the work in your sequence.
Plastic bottle candlesticks

This will require:
- Plastic bottles;
- Scissors;
- glue gun;
- Universal glue.
Progress:
- With your own hands, you can make a wonderful candlestick for the holiday. Bottles can be used different colors. Containers must be cut in half. The edges of the part that remains with the bottom should be cut into strips, not reaching 4 cm. The strips can be of different widths. The resulting container will be a stand for a candle.
- Strips of plastic should be melted over the candle. Then, using a glue gun, you need to attach a candle in foil. The space near the candle can be decorated with beads or pebbles. So the candlestick will have a small weight, our craft is ready.
Video master class on making candlesticks
Cone
You can make original cones with your own hands, this craft from a plastic bottle will perfectly decorate your Christmas tree and house for the New Year 2018.
This will require:
- Plastic bottles;
- Scissors;

Progress:
- From a plastic bottle, you need to create squares, after which their corners should be rounded. The result will be products, like chamomile. After that, you need to process the edges of the petals with a candle so that they fall down.
- All details must be strung on a thread in descending order. Between them you need to insert a bead. Then you need to make a sprig of spruce and fix it on the cone. The product is ready to create a festive atmosphere.
Recently, I was visiting a friend of mine. Elena has been doing needlework for a very long time, and it is from her that I often borrow amazing ideas for creativity. Everything that the girl comes up with, she tries to immediately implement.
So this Saturday, she showed me some of her findings, which can be a great help when preparation for the new year and Christmas. After all, it is not at all necessary to spend a lot of money on purchased decor, when it is quite possible to make it yourself from improvised materials.
Christmas crafts from plastic bottles
Editorial "So simple!" prepared for you an unusual master class on how how to make a christmas bell from a cola bottle. Easier than ever and at no extra cost!

You will need
- PVA glue
- linen thread
- packing tape
- plastic bottle

Manufacturing

I also invite you to check out a few more ideas New Year's decor , which can be made from waste plastic bottles.

And we also have a wonderful master class for you on how to create a caramel with the help of plastic bottles, colored packaging garlands and LED flashlights. On the eve of the New Year, do not be too lazy to make such an ornament. It will come in handy more than once, tested on my own experience!
As you can see, even ordinary plastic bottles can be an excellent material for creativity. Especially on the nose of the New Year, which means that you need to create something new and get rid of the old. And these ideas will just help you get rid of the old, while creating an original and beautiful holiday decor.