How New Year's toys are made at the Biryusinka factory. How Christmas decorations are made
Today there will be an industrial report from the Beauty and the Beast series.
When you take out beautiful packaging a bright ball, which you then hang on Christmas tree, you probably don’t even think about where and how it was made.
Yes, the bulk of Christmas decorations now come from China, but still not all.
There are four enterprises in Ukraine that produce good old glass Christmas decorations and it is possible that some of the balls on your Christmas tree are made on one of them.
For example, at a completely old-school factory, which is located not far from Kiev.
It's hard to believe that colorful balloons can be produced in such an entourage trashy place.
Also, how hard it is to believe that each ball is blown by workers to the detriment of their health, because the production of Christmas decorations is incredibly harmful.
So, welcome to the place where the real soviet trash and the magic of the holiday, loved by millions of people, are wonderfully combined - the Klavdiev Christmas tree decorations factory.
2. Klavdievskaya factory has been operating since the distant 1949 and today is gradually getting out of the long-term crisis caused by the collapse of the USSR.
I can imagine how difficult it is for an enterprise that operates only 2 months a year to survive in the face of the massive expansion of cheap Chinese consumer goods.
This is probably why I don’t want to paint this report in critical colors, but just talk about how ordinary people in an old Soviet factory make beauty for the main holiday of the year 
3. The factory has four workshops, which are located in different buildings.
It all starts with the glass blower, which is located in this old two-story building with cheerful multi-colored pipes. 
4. The factory has found a great way to increase profits in addition to the main activity - the production of toys.
It allows you to pay money to see how it's done.
And this is a huge tribute! I love doing industrial reporting and it usually takes some effort to get production shots.
And here the company itself shows how everything is done.
And, needless to say, very successful.
We shot on a weekday and the flow of visitors was just incredible. Literally crowds of children and all arriving and arriving buses. 
5. Scoop here, of course, everywhere.
And it's very ambivalent.
This photo shows two completely different generations of slogans) 
6. I wonder what party they work for here now) 
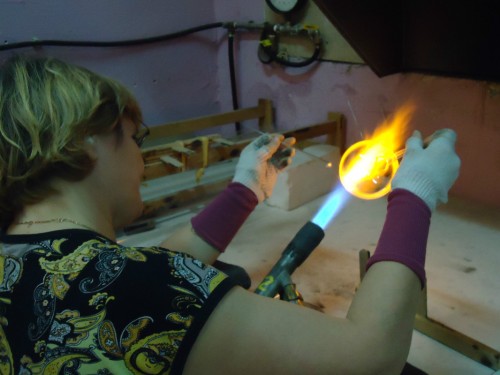
7. Glassblowing shop. The workplace is simple - a gas burner, pipes with gas and oxygen, an exhaust chute and a table. 
8. Hellish labor. In the truest sense of the word. 
9. The raw material for the Christmas tree decoration is ... hollow glass tubes.
First, they are heated and divided into blanks for balls.
Heated glass begins to melt, becomes plastic and ductile. This separates the desired parts of the tube. 
10. Then this elongated fused piece of glass is twisted with a special hook on one side to drown out this strange tube on one side.
Surprisingly, these fused pieces of glass still remain hollow inside.
After all, the ball will then be blown out. 
11. Then the blanks are again heated on the burner to the desired temperature 
12. In the hand of the future Christmas ball 
13. And when the glass reaches the right temperature, the worker simply blows into the tube, blowing out the ball. 
14. Glass should be hot, red. Its temperature is about 1000 degrees. The worker has only a few seconds to blow the balloon.
And it must be the right size.
Sometimes they check the caliber with a special measuring device, which stands on the table nearby. 
15. Ball blanks look like a large transparent drop. The leg through which the balloon was blown does not break off. It will still be needed for silvering and coloring.
One worker blows 150-200 balloons per shift. 
16. Before sending to the silver plating shop 
17. This is a different building. There are workshops for silvering, coloring and decorating balls 
18. And Again, a real old school - safety posters. These photos are for olgalit
. She knows everything about safety and even more. Urgently everyone friend her!!! 
19. She is spying on you! 
20. Instructions from 1989! 
21. But it's time to go to the shop. It is here, in this picturesque place, that real magic is created with balls - they are silvered 
22. Feeling as if we are in some kind of torture chamber. 
23. And here is the tool that I asked about yesterday, offering to make assumptions about its purpose.
This is a needle for injecting a special solution into the ball, which covers the inside of the glass ball with a thin layer of silver paint. 
24. The solution consists of silver oxide, ammonia and distilled water.
It is injected quite a bit, then the workpiece is shaken so that the solution covers the walls inside the ball and is lowered for a few seconds into a bath with water heated to 50 degrees, while shaking.
The silver solution solidifies on the walls of the ball, covering them with the thinnest uniform layer. The process is called the "silver mirror reaction".
Then the balls get to the external painting area, where they are covered with one color or another. And then they get to the most interesting part... 
25. You can’t shoot here, because it is very distracting for workers and prevents them from doing magic.
But we were kindly allowed 
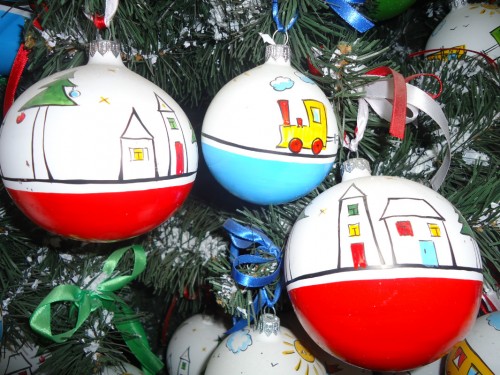
25. Here the balls are turned into those beautiful Christmas decorations that we are used to.
They are painted here. 
26. Each Christmas decoration is painted manually according to a sample template. 
27. All the guys who work in this room are graduates. art schools and schools. After all, their task is to make toys amazing 
28. They draw in parts. For example, first white snow is applied to the entire batch, then a green Christmas tree, then a house, behind a window in the house, etc. 
29. Ready-made toys to dry 
30. Not only balls are made here, but also various three-dimensional toys. For example, such Fushi-Mice. They will also be invented, but inside a special form. 
31. Decorating a train. As for me, the balls are more beautiful and more elegant 
32. After the paint is applied, it is fixed by sprinkling various materials. This creates the effect of rough snow from volumetric sparkles. 
33. Can you imagine the painstaking work? 
34. Stand with layout templates 
35. Workplace of the artist 
36. Half finished balls 
37. It's fun to look for various unusual labels among jars and bottles) 
38. Paint toys with acrylics 
39. Cutting and packaging area. Here the balls are circumcised - they cut off the extra leg 
40. Well, then the toys go to the store.
In the company store at the factory full house 
41. By the way, children can take a small master class where they will be taught to paint toys.
But it's not easy to get on it - there is a huge queue 
42. It's not for you to draw tanks on a notebook sheet) 
43. Add snow and voila! 
44. Final photo. How not to cut your own bow. 
What do you need
- children's white socks;
- foam balls-blanks of different sizes;
- scissors;
- white thread;
- wide red ribbon;
- thin red ribbon
- a piece of colored felt;
- pins;
- black buttons.
How to do
Put in baby sock two foam ball so that the bottom is large, and the top is smaller. Drag the sock between the two balls with a white thread.
Tie a wide red ribbon on top and cut its edges.

Tie a thread over the top segment of the snowman. Turn the rest of the sock inside out. Cut out a rectangular piece of felt and wrap it around the snowman's head to make a hat. Secure it with pins and fold in the brim.

Now tie a thin red ribbon around the top of the snowman's hat. From long ends loop the ribbon.

Pin two black buttons to the snowman's bottom ball. Using small pins with multi-colored heads, make a nose and eyes for the snowman.

2. Salt dough toys
What do you need
- 1 glass of flour;
- ¹⁄₂ glass of water;
- ¹⁄₂ cup of salt;
- baking paper;
- cookie cutters or paper templates and blade;
- tube for a cocktail;
- stamps or toothpicks;
- baking sheet;
- acrylic paints or gouache;
- thin brush;
- rope or thread.
How to do
Mix flour with water and salt and knead the dough. Divide it into several pieces and roll each one out on baking paper. Using cutters or templates and a blade, cut out the shapes you want.
Use a straw to make holes in the corners of the toys. You can stamp the pattern with stamps or a toothpick.
Put the blanks on a baking sheet and place in the oven. Bake for 10 minutes at 130°C.
Color the finished decorations to your taste. With green needles, red and white are best combined.
When the paint dries, you can make loops.
 rainforestislandsferry.com
 What do you need
- a sheet of cardboard;
- a set of push pins (at least 200 pieces);
- multi-colored nail polish;
- foam blanks in the form of eggs;
- Super glue;
- fasteners from unnecessary earrings or paper clips;
- ribbon or thread for a loop.
How to do
Put cardboard on the table, stick push pins in rows and cover them with nail polish. Leave to dry overnight.
In the morning, you can decorate eggs from foam. Carefully stick the buttons into the workpiece. It is important that one row slightly covers the other.
Use superglue to attach a fastener or paperclip to the top of the toy. Attach a decorative ribbon or thread to it.
4. Thread stars
What do you need
- star template;
- a sheet of cardboard;
- pencil;
- scissors;
- Super glue;
- beads;
- any yarn.
How to do
Attach the template to a sheet of cardboard and circle with a pencil. Cut out the star along the outline. Glue a bead to the tip of each beam.
Secure the tip of the yarn in any convenient place with superglue. Wrap the star with yarn. Tie the end of the thread with a loop to hang the toy.
5. Button Christmas trees
What do you need
- multi-colored buttons;
- wire;
- wire cutters;
- thread.
How to do
Sort buttons by color scheme. Line up each set by size. Bend the wire in half. Step back from the bend and throw one end of the wire over the other so that you get a loop. At the end, you can fasten a thread on it to hang a toy.
String on the smallest button. Add buttons one at a time bigger size. Important: push the wire through the two buttonholes each time. For buttons with four holes, use the holes diagonally. Then add some dark buttons in the same way small size: This will be the trunk of the tree.
Twist the wire again and cut off the rest. Tie a thread to the loop.
 makeit-loveit.com
 What do you need
- cones;
- Super glue;
- a skein of thin rope;
- colored tape.
How to do
Glue a string loop to the base of each cone. Tie as many bows as you need. Attach them to the cones with glue.
7. Gift boxes
What do you need
- ruler;
- pencil;
- a sheet of cardboard;
- scissors;
- thread or thin rope;
- wrapping;
- thin decorative ribbon.
How to do
Using a ruler and a pencil, draw a grid of identical squares on a sheet of cardboard. The length of the sides can be any, it all depends on the desired size of the future Christmas decoration.
Cut out cardboard squares. Glue them into cubes. Before gluing the last segment, fasten a loop inside the cube. Let it dry and then attach the lid of the box.
Wrap the blank with paper and tie a ribbon on top.
8. Rope balls
What do you need
- Balloons;
- a bowl;
- PVA glue;
- a skein of jute rope;
- glue gun or superglue;
- can of paint optional.
How to do
Inflate small balloon. Pour PVA into a bowl and soak the rope in it. Tie the end of the rope around the tail of the ball and randomly wrap the future toy. As an option: you can first wrap the ball, and then dip it into a container with glue.
Let the toy dry. Then pierce the balloon and pull it out of the frozen toy frame. Don't forget the loop to hang the decoration.
Make several toys of different sizes according to this principle. Such rope balls look spectacular on a Christmas tree or under the ceiling. Especially if they are painted.
 sugarbeecrafts.com
 What do you need
- Super glue;
- broken light bulbs;
- a skein of thread or ribbon;
- gouache or glitter paints.
How to do
Glue loops of thread or tape to the bulbs. Dip the bulbs one by one in the colored paint. Let the toys dry.
10. Dried oranges
What do you need
- oranges, lemons or limes;
- sharp knife;
- baking sheet;
- baking paper;
- thick needle;
- wire or thread.
How to do
Carefully cut the citruses into thin circles. Lay them out on a baking sheet lined with baking paper. Bake for two to three hours at 100°C.
Make a hole in the future toy with a needle. Pass a thread or plastic wire and fasten to make a pendant.
How are Christmas decorations made? Children from Nizhny Novgorod can get an answer to this question at the factory of glass Christmas decorations "Ariel". Here, all year round - in spring, and summer, and autumn, and winter - they make Christmas balls and funny glass figurines, which then decorate Christmas trees in different countries peace.
The craftsmen of the factory, where the New Year is celebrated non-stop, willingly tell and show to everyone about how Christmas decorations, beloved by both children and adults, are made. And there are quite a few of them: every day the factory accepts 16 excursion groups! About 300 kids different ages- from elementary school students to school graduates and students of technical schools - they come to the factory to get acquainted with the process of creating a Christmas tree toy.
"Journey to the country of Christmas tree decorations" begins with an acquaintance with the history of the Nizhny Novgorod Christmas decorations and the history of fishing. It turns out that the first glass balls appeared in Germany in the middle of the 19th century. With the help of a glass tube, which was first heated on a kerosene stove, and later on a gas burner, glassblowers blew balls of various sizes. Hot glass becomes viscous, and can take the most different forms. At the Ariel factory, glassblowers blow 250-300 balls in 6 hours! Each ball is unique because it is made by hand and not by machine. To be convinced of this, it is enough to look at the bottom of the ball - there was a trace left at the place where the glass thread was twisted - or, as glassblowers call it, a "whisker". The second tendril - on the opposite side of the ball - is either twisted into a neat glass loop, or - which makes work cheaper - they are sawn off and covered with a metal cap, for which they hang the toy on the Christmas tree.
 All balls are initially transparent, as bubble. They are dipped into a barrel of paint, giving a background color - red, blue, green or, for example, gold. And when the paint dries, the master artists begin to work. They manually paint the surface of the ball. It can be an image of a fairy-tale hero, a winter landscape, or some architectural sights from around the world.
Glassblowers can make not only balls, but also different figures. To do this, a heated glass tube is lowered into special forms - in the form of a bunny, a snowman or Santa Claus. Such toys are called shaped. One of the first molded toys that began to be made at the Ariel factory was the Nutcracker figurine. Then dozens of other most different figures: different animals, cockerels, goldfish, heroes, grandmothers with a pockmarked chicken, etc.
You can see all this variety of New Year's toys in the museum of the factory: about a thousand of various Christmas tree decorations are collected here. The museum's exposition includes christmas toys made and painted by Nizhny Novgorod masters in different years, as well as ancient soviet toys produced by different factories of the Soviet Union. From these figurines, one can trace the most important milestones in the development of the country - the first manned flight into space, the massive sowing of corn - a symbol of the era of Nikita Khrushchev, and much more. The exhibition also shows Christmas balls from different collections: balls with the image of Santa Claus and Father Frost - such as he is presented in different countries of the world; balloons with plots of famous fairy tales - "Three Little Pigs", "Little Red Riding Hood", "Cinderella", etc., as well as with the heroes of Russian fairy tales - for example, with Emelya.
A separate place is allocated for the "New Year's Khokhloma": balls and nesting dolls with the famous gold painting, glass spoons and even samovars,  which glassblowers managed to blow out of glass! In the same place, in the museum, you can see fragile Easter eggs and glass medallions with delicate Easter drawings.
Among the exhibits there are balloons depicting Moscow metro stations, made for the anniversary of the metro. On the convex surfaces of the balls, the artists managed to depict both deep metro tunnels and the splendor of old Moscow stations.
A special place in the exposition is given to balloons from the collection of famous people: for example, Vladimir Putin presented balloons depicting the sights of Moscow, St. Petersburg and Nizhny Novgorod to German Chancellor Gerhard Schroeder. In a separate box are balloons with the image of Russians winter fun, which were presented to guests at the reception of Dmitry Medvedev.
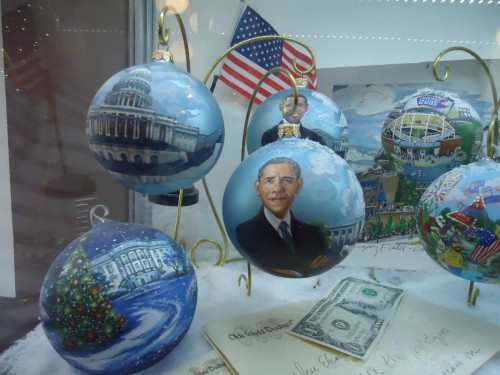 And in the collection of Nizhny Novgorod craftsmen there are balloons with the image of Barack Obama, which were made by special order of the US Presidential Administration. The masters say that a special order for their manufacture was made by the administration of the President of the United States. The agreement was long and not easy: at first, the artists painted an image of Obama with a wide smile on the ball, because they knew that this charming smile was his calling card. But the Americans said that the president in the image was “too cheerful” and asked to portray him more strictly. As a result, the option with a restrained smile was adopted as the basis. And a broadly smiling Obama remained in Nizhny Novgorod as a keepsake!
Masters are especially proud of unique christmas balls, dedicated to the 200th anniversary of the Bavarian crown. Images of Bavarian castles and their decoration, the crown itself, portraits of Bavarian kings were sent to Nizhny Novgorod for work. And the customers were satisfied with the results of the work!
All this is told and shown to the guys who came on the tour by the masters
Ariel factory. Boys and girls watch with bated breath as glassblowers blow out balls of various sizes and make shaped toys - figures of snowmen, bunnies, Santa Claus, etc. Factory employees explain the subtleties and secrets of craftsmanship.
And in the art workshops, in front of the guests, the factory's craftsmen manually paint fragile glass Christmas tree decorations. Children are told about how a drawing is applied, paints are selected, how toys are powdered with glitter and “gold”.
At the end of the tour, the children go to a master class, where they are given the opportunity to paint Christmas tree figurines or balls on their own. Then these toys are packed in special boxes so that children can bring fragile souvenirs home and show them to their relatives. Such balls become the best souvenir of a trip to the factory, where the New Year lives all year round.


In 1992, the factory of Christmas decorations "Ariel" was opened in Nizhny Novgorod. They are manufacturing Christmas balls, candlesticks, medallions and even Easter eggs. The factory is a participant of many international exhibitions and competitions. They managed to attract attention in the Western market almost immediately, so now the Nizhny Novgorod factory is one of two enterprises in Russia that export their products to other countries, including Germany, France, England, America, Italy, Switzerland, and Denmark.
About how Christmas decorations are made.
The process of making Christmas decorations begins with blowing. For this, medical glass is used:

From each such glass pipe, 2-3 blanks are obtained:

First, it is heated in the middle to separate into two parts:

Having received the desired piece, each pipe is heated from the inside so that the craftsmen can start blowing:

blown out Christmas decorations in one breath. Therefore, when you see a huge ball, know that it is made by a different technique. With the help of two antennae, the master shapes:

Depending on what kind of decoration should be obtained, a mold is selected. V this case glassblower makes a "house":

One tendril is twisted into a small loop (mainly for the Western market), or left for further cutting, and the second is removed, leaving a unique mark on the bottom of the ball:

To make an ornament similar to an owl, a special tool is used, with which the glass of the ball is pressed through. In this way, her characteristic eyes are obtained:

For 6 hours, glassblowers blow 250-300 balls. There is nowhere to learn this, so all glassblowers, as in the old days, pass on their knowledge directly to the next generation:

Now only 4 glass blowers work at the factory. Workplace of one of them:

After blowing, the blanks go to the paint shop. Here a layer of varnish is applied, but then the decoration will be a little transparent (for a candlestick, for example), or another layer of aluminum is applied before that. Aluminum completely removes transparency and adds more shine:

The second mustache is cut off immediately:

The painting work is followed by the artistic, the most difficult, in my opinion:

The orders from the factory are different: from presidential gifts to balloons with metro stations. Almost all drawings are performed in several stages (at least 3-4). By the end of the work on these balls will appear:

For drawing, brushes, feathers, sponges and jars of sour cream are used.

There are about 4 times more master artists than glassblowers. Those who work longer in the factory do more difficult work, and newcomers do it easier. But art education is compulsory:

Visual demonstration step by step. You should get a bullfinch:

Final decorative touches:

Most of the time decorations dry:


Toy from the latest collection:


This is what the workplace of a graduated master artist looks like:

There are also tours of the factory. This type of service is even in great demand! Now all the excursion time is scheduled until the end of January:

The completion of such an excursion is a master class on painting balls and figures:


Of course, you can take the result home to show off your work to your parents:

This is how Christmas decorations are made.

Agree, the most pleasant thing in preparing for the New Year is not a table at all and not even gifts.
The feeling of a holiday overtakes us exactly at the moment when we dress up the main symbol new year's eve- Christmas tree.
We take out a green beauty from the closet or buy a live spruce, put it at the head of the room, decorate it with sparkling balls, wrap it with tinsel or light a multi-colored garland. From this moment the countdown begins - there are just a few days left until the New Year.
While everyone is just getting ready to start the New Year's fuss, there is time to buy gifts and decide where and with whom to spend this very night. And it's still too early to get the tree. But we know how fast time flies, right?
Journey to winter Lower it would not be truly winter if not an excursion to fairyland which I am about to tell you now.
I managed to see with my own eyes how they make one of the main components new year holiday- a Christmas tree toy, and even feel like a little artist.
I have already been in a similar production, only not a Christmas decoration, but ceramics, and I can well imagine how the birth of such works of art as vases, plates, jugs, cups, souvenir figurines, etc. takes place. For many years I studied at a school with an artistic bias (Gzhel) and even have a certificate (consider the second profession after a journalist) as a painter. Although that's what kind of artist I am. Once, I wrote a long article about the production of Gzhel ceramics in a magazine near Moscow.
But I have never seen how glass is made, and even more so such a fragile thing as a Christmas tree toy! Everyone has heard of Gus-Khrustalny, Christmas decorations are made in Khimki, Klin, Pavlovsky Posad. The Nizhny Novgorod factory of Christmas decorations "Ariel" is one of such industries.
1. The factory meets with such romantic drawings on a concrete fence.

2. You can’t say that it’s a factory! The factory house is a museum, production begins where the "brick" is. 
3.
4. We went inside and everyone immediately took their breath away. Magic! Adults, like children, rushed to look at toys and take pictures in New Year's interiors. 
5. Herringbone on chicken legs 
6.
7.
8.
9.
Toy Museum. From the past to the present.
The Toy Museum is a real journey into childhood. Soviet plastic Christmas trees, metal retro toys, paper decorations and snow from cotton wool.
10. The exposition of the museum consists of more than a thousand exhibits that have been collected over 20 years. However, the craft itself originated in Nizhny Novgorod in 1936. The factory "Ariel" continues the traditions of the Gorky fishing and cooperative artel "Children's toy".

11.
12.
13. Toys on clothespins, everyone had them! I still have a lot of old balls and figurines in my bins - on New Year we no longer hang them on the Christmas tree, it's a pity to break them. At home, the cat is now only soulless plastic on a green beauty :( 
14. Exactly the same houses! They tell the truth that in the USSR everything was the same for everyone. 
15. While everyone was looking at the balls, I hurried to buy souvenirs. Toys here cost an average of 200-300 rubles apiece, there are even a thousand. It’s expensive for someone, personally I didn’t feel sorry for the money for such beauty. 
16. A lot of rural motives. Russian village, folk tales. 
17.
18. Winter and the same summer landscapes. Very soulful. 
19. There is also a collection of such folk crafts as Gzhel. 
The Nizhny Novgorod Christmas tree decoration factory is the only one in Russia whose products are exported. To Europe, America, Canada and many other countries. What and in what technique they do not draw! And European landscapes and the Russian village, planes (ordered by Sukhoi) and oil rigs (Lukoil), even Barack Obama painted! Putin just has not been portrayed yet, not politically correct, they say.
20. At the factory, you can order any thematic batch of toys. By the new year, so many corporate and individual orders arrive that glassblowers and artists work 12 hours a day!
State orders are also coming. This is a patriotic collection of the "city of Russia".

21. And this is an order from the Moscow metro. Do you recognize the stations? 
22. Paveletskaya! 
Glassblowers. This is where the toy takes shape.
23. It's time to tell how such beauty is born. First, a long glass tube is heated over a gas burner and divided into blanks. Then these parts continue to heat up on fire, after which, the master "inflates" the ball from one end of the tube.

24. Such "chupa-chups" are obtained. Ready lollipops 
25. But first, the master carefully, under fire, removes one of the sticks. 
26. And here you can see the shape in which pimply balls are made. 
27. Like these 
Workshop. Here they draw the New Year.
A toy is not a toy unless an artist paints it. It's time to look into the workshop, where future jewelry is painted with watercolors, acrylics and sparkles.
28. The factory occupies the building of the former bus depot. This, apparently, was once a classroom, do you see posters on the walls?
Today it is a workshop where painters work. Only women, men do not have enough perseverance and patience.
The only representative of the stronger sex at Ariel is Arkady Tersinsky, the director of the factory.

29. Bloggers quickly filled the room, trying to grab a good shot. Poor artists! 
30. Each girl draws her story. Here is a Russian lady 
31. And here is a matryoshka. I know firsthand how difficult it is to outline the finished product with a black outline. If only the hand did not tremble! 
32. Work environment. Brushes, paints, palettes, sponges and jars of water 
33.
34. They draw with watercolors and acrylics, there are also special contour paints that create a relief on the product. 
35. Kefir, even after death, also serves art 
36. Religious motives. christmas night 
37. Officers 
38. In full dress and in sparkles! 
39.
40. The gingerbread series at the factory has existed for more than a year. Really like! I bought two toys from this collection as a gift to my relatives. 
41. Lambs get a fur coat 
42. We remind you that next year is the year of the sheep / goat (meaning 2015). My year by the way 
43.
44. Vases and candlesticks are also painted here. 
Chief by drawing
That was a craft, but who is the master? Lead Artist! It is he who comes up with every story that will be depicted on the toy this year. Each order, each picture for "Ariel" is drawn by Natalia Repina.
45.
46. Creative mess and fresh work. 
47. In the artist's office - examples of collections different years. There, in the background - "the little prince", in the foreground - Russian and foreign landscapes.
On the first ball - Chkalov Stairs, Nizhny Novgorod. 
48. Natalya admitted that her favorite subjects are the landscapes of the Russian village. 
49.
50.
51. The king is inspired by children's fairy tales. This is new for this season. 
52. And this unusual flower collection stands out from the rest of the toys. A completely different technique is the imposition of several layers of paint. 
Do you want to be an artist? Come on.
53. If you suddenly thought: "I could do it too, if I wanted to!" - it's easy to check. You can be an artist and paint yourself a souvenir as a keepsake. Acrylic paints, brush and go!

54. Someone drew from pictures, someone grumbled that he couldn’t draw, some came out with real masterpieces. This was drawn by our tour guide. 