Piggy bank of original New Year's crafts with your own hands for home decoration and gifts. Piggy bank of original New Year's crafts with their own hands for home decoration and gifts Snow figurines from snow for a year
Preparing to celebrate the New Year is another reason to show your creativity and please your children or grandchildren with various beautiful and spectacular works of applied art. New Year's crafts are distinguished by a pleasant property - they do not require any supernatural artistic abilities, or the ability to work with complex tools and devices. It is also completely unnecessary to spend money on expensive materials, especially if you expect to make "disposable" decorations intended for use only for this New Year's holiday.
In the article we will tell you how to make DIY Christmas crafts for the New 2017 Year of the Rooster, consider options for crafts made of paper, cones, sweets, provide a step-by-step guide, as well as photos and diagrams.
We create DIY Christmas crafts with children for the New 2017
New Year is a good time to teach kids the basics of applied creativity, as well as to unite the efforts of the whole family. It is better to plan the work in advance, even in the fall, when you can successfully collect various pebbles, shells, chestnuts, acorns, cones and various berries, which can then become the basis for creating future compositions and small crafts.
Most jobs can be successfully made from paper. This is a very flexible and cheap material from which you can make many different options for products - from festive garlands and Christmas tree decorations to volumetric masks and figures. Colored paper and cardboard are well suited for appliqués, as well as for creating toys and various sculptural groups, including using the origami technique. And from old newspapers you can make at least a rooster, even Santa Claus with a Snow Maiden using the papier-mâché technique.

Young children are very fond of tinkering with cones, acorns and chestnuts. Such products are quite simple to make, but they look impressive and impressive. You can also create simple but well-visible Christmas tree decorations from them, simply by wrapping them in soft and plastic multi-colored foil.

For kindergarten, as well as for celebrating the New Year, the school is often asked to bring various homemade crafts. A variety of products can act in their role, most often these are various garlands, paper "chains" and decorations for the Christmas tree and premises. Together with your child, you can make a Christmas tree made of pasta or a snow globe with Olaf (a snowman from the cartoon "Frozen"). But crafts with the use of sweets will be especially popular among kids: all kinds of bouquets and pendants. Making them is very simple and pleasant, and then the work will not be lost either - the sweets will be instantly disassembled and eaten with great pleasure.

With older children who know how to handle scissors, you can cut beautiful openwork snowflakes. Do you know how to properly fold a sheet of paper so that the snowflake is carved and airy? If not, see the diagram below.

Christmas decorations
A traditional New Year's activity is making Christmas tree decorations. Earlier, when ready-made ornaments were rare and very expensive, every middle-income family was engaged in making decorations for Christmas trees for the whole family. For the most part, gingerbread cookies, sweets, nuts in gilded paper, tangerines and other sweets were hung on the tree, but where members of the family had a talent for handicraft, decorations could be quite complex and very effective. Handicraft is also very much appreciated these days, so you should try to do something yourself as well. For this, there are now a lot of possibilities, devices and various materials.

I do not like the design of Christmas balls - try to paint them yourself. On sale you can find many Christmas tree decorations without decor, transparent and metallized. For work, you will need special paints for glass, acrylic dyes and brushes. You can also use special markers for working on porcelain and glass. With the help of such an arsenal, you can create a variety of compositions - from simple curls and stripes to complex images of the Snow Maiden and Santa Claus or the Red Fire Rooster.

Very interesting Christmas tree decorations are obtained from old incandescent lamps. For example, cute snowmen will come out of them, but you can dream up and arrange light bulbs differently: in the form of nesting dolls, heads of gnomes, mushrooms.
Volumetric decorations will look very original; they can become the main "nail" of your Christmas tree decor. Most importantly, no one in the world will have such things! These are various balls and figures that are technically very easy to make. In one case, for example, it is necessary to cut out many round blanks from paper of the same size, sew them all together in the middle, and glue the leaves together so that it turns out, as in the photo.

In another case, strips of paper are cut, they can be of different thicknesses, colors, textures, they glue one end to the other and connect them all together so that the ball comes out. Such:


A ball of strips of paper can also be made using a different technique by stitching the details. DIY New Year's crafts for the New Year 2017 are very easy to do, look at the photo and repeat.

Christmas decorations are also made of polymer clay. You can dazzle anything: a fish, a bird, an abstract flower, a butterfly, a spaceship or a helicopter. It all depends on your dexterity and imagination.

Christmas decorations may well be flat, previously this style was very fashionable. But to obtain a special density, you need to glue together several figures cut from cardboard at once. For example, let's say you decide to make a cockerel figurine. Draw its silhouette, cut out from 5 to 10 layers from thick cardboard and glue them together, not forgetting to put a load on top, and insert a strong and wide loop for hanging between the layers.
After good drying under the press, the edges of the figure must be sanded with a fine file and sandpaper, then painted on both sides, sprinkled with sparkles, fixing them with aerosol varnish, pasted over with colored paper or thin foil. You can emboss a figurine using a tablespoon handle or other tools.
Using the basics of this scheme, you can make a large tabletop cockerel figurine. To do this, it will need to be fixed on a stand, which can also be obtained by multi-layer gluing of cardboard.
Decor for apartment
For the New Year, it is necessary to prepare not only the tree, but also the apartment. This can be done in stages so as not to leave everything until the very last moment, otherwise the only thing that you will feel is not pride in your handicraft, but immense fatigue.
The house begins with a hallway, so you first need to decorate it, and even better - the front door. For this purpose, you can make a simple but very effective New Year's wreath.

It is best to use a pre-made foam base that can be purchased from a florist store, but it is possible to do without it. The base is spruce, pine or fir branches, natural or artificial. They are carefully and neatly rolled into a ring and fixed in this position with a thin copper wire, which is carefully twisted with pliers, and the ends are hidden inside the work so that no one can get hurt. Then they proceed to the most interesting part - decorating.
As a decoration, cones, gilded nuts, artificial and skeletonized natural leaves, real dried or plastic, foam berries, small Christmas tree decorations and tinsel, ribbons, beads and rhinestones are perfect. The most convenient way to glue all this with the help of "hot" pistol glue is fast and very reliable. The main thing in creating such a decoration is that your sense of proportion and good taste does not change. Remember to attach a sturdy loop to hang your finished wreath when you're finished.

You can make window decor from ordinary Whatman paper by cutting out the silhouettes of snow-covered trees, bunnies, houses and making backlighting. It will look just magical.
So, the front door and windows are decorated, the walls and ceiling are left. On the ceiling, you can fix pendants of snowflakes and various figures on a frame similar to a carousel for a crib, and on the wall a stylized Christmas tree made of branches, Christmas tree decorations, and glowing garlands will look great.

It can be made from anything, even from photographs. Print your best shots of the past year and place them on the wall in the form of a herringbone. An excellent opportunity to remember the most pleasant moments and to celebrate the New Year with optimism.

Festive table decorations
Of course, the table itself needs decoration, where the festive treat will be placed. Crafts for the New Year for the festive table will require more attention. You can offer the following option - a chicken family headed by a royal representative - the symbol of the year.

This decoration for the year of the Rooster will be very appropriate and will symbolize traditional family values.
Making such a composition will not be as difficult as it seems at first glance. Figures of adult birds can be made of cardboard, as already described above, and chicks - from ready-made pompons or lumps of cotton wool, tightly rolled, soaked in a solution of PVA glue tinted with yellow paint and thoroughly dried. A larger lump is a body, a smaller one is a head. The legs and beak can be made from matches, the wings and eyes can be drawn.
In order for the group to look like a complete composition, it must be placed on a large dish or tray, attached in place with hot glue and decorated with artificial grass, flowers, moss and, of course, with a grain of grain. This symbolizes prosperity and prosperity that will come to your home with the year of the Fiery Red Rooster.
Diy New Year's crafts schemes for the New 2017


Photo of New Year's crafts with your own hands for the New 2017


DIY Christmas crafts for 2017 of the Rooster: only the best ideas for New Year's gifts and decorations. Waiting for the holiday is always pleasant, and before the New Year this feeling is reinforced by general preparation. To fill evenings and weekends with children, it is recommended to do all kinds of jewelry making. In addition, various crafts for the New Year 2017 can then be presented to relatives or friends. We will tell you the ideas of such New Year's souvenirs and crafts in this article. You can easily make them yourself, by changing a little and, perhaps, adding something of your own.
DIY edible Christmas crafts for the New Year 2017
Pineapple made from candies and champagne.
Nobody forbids putting them in a bag and handing them to a colleague or friend. It is much more interesting to create such a miracle out of them. Moreover, it will take very little time and colored paper.
Candies for a sweet New Year's gift should be chosen in a gold package so that they look like a pineapple. It is better to glue with a glue gun this way faster and more reliable.
Make leaves for a gift from double-sided colored paper.

Herringbone made of truffle candies.
The latter are supposed to be chosen in a shiny wrapper, because it will become the main decoration of the New Year's crafts. Moreover, the color of the wrapper does not have to be green. The Christmas tree is magical. So why can't her needles be gold or blue, or maybe she will sparkle with all the colors of the rainbow?

Christmas trees on sweets.
With their help, you can grow a fir forest on the New Year's table. It is enough to glue the paper Christmas trees to the skewers and stick them into a suitable candy. Cool DIY crafts for 2017 are ready. It remains to place on the festive New Year's table.

Sweet gift.
It will certainly appeal to every kid or sweet tooth. It is only necessary to pour layers of candy without wrappers into a glass jar. For example, pills, lollipops or mini marshmallows. An additional decoration of such a gift will be a funny face and additional accessories that will complete the image of a New Year's hero. They may be a deer, snowman, Santa Claus, Snow Maiden or a cockerel - a symbol of the coming year.

New Year's craft Rooster - a symbol of the year 2017 with your own hands
It can be sewn, stitched or glued. In the latter case, DIY crafts for the New Year 2017 will consist of colored cardboard and other types of paper. By the way, it is recommended to use children's imagination in their manufacture. They will be able to come up with the most fabulous colors for this character. And the help of adults here will require very little.
The basis of such New Year's crafts is a cardboard cone. All other parts are attached to it. And it is with him that children can have problems. Then cut out the wings, scallop, legs and tail. Moreover, it is desirable to use different materials for these parts. Then the craft will look more natural.
For example, a rigid comb and wings can be made of cardboard. The flexible legs will use colored paper. And the fluffy tail will turn out from corrugated paper. New Year's craft Rooster - a symbol of the year 2017 with your own hands is very easy to do even with the smallest children.

DIY Christmas decorations 2017
Original candlesticks.
Simple salt will help to create a semblance of snow-covered and frozen vessels. To do this, it is enough to grease the places that should be "snow-covered" with PVA glue. Then dip the candlestick in salt. For best results, it is recommended to mix extra (fine) salt with coarse salt (you can take sea salt with blue or blue dyes). Then the snow will overflow like a real one. Especially when candles are placed in such New Year's decorations and they are lit.
To prevent salt from falling on top, sprinkle the craft with hairspray.


Angels.
They can be hung on a Christmas tree or made as a gift for friends and family. Moreover, serious sewing skills are not required. After all, the body of a Christmas angel is two circles sewn together. And his wings are hearts. The main thing is to choose a beautiful fabric for the craft, and to sew an angel for Christmas you only need 1 evening.

2017 Christmas Decorations Kids Can Make
Penguins.
These crafts are based on classic pear-shaped bulbs. They suggest many living things. Penguins are asking to become New Year's characters. After all, they live where it is cold.
And it is very simple to make them: paint the glass bulb of a light bulb in several layers. It is better to use acrylic paints for this. Then draw the faces. Add accessories to them. For example, hats or scarves. Such crafts from light bulbs for the New Year 2017 will delight the little participants of the holiday.


Christmas wreath.
This craft can be used as a decoration on a window, door or wall. The simplest ones: with glued leaves and cones - can be done by small households. And those in which many elements are used, folded in the form of spruce branches, will require the help of adults. But it's worth it, the New Year's wreath turns out to be like a real one, and it will hang much longer.

Christmas tree garland.
These New Year's decorations are a must-have for a home with small children. Mothers and fathers will need to cut identical Christmas trees from colored paper and make holes for thread in them. And offer the child to put these Christmas trees on a blunt needle with a thick thread. He will gladly carry out such an assignment, so that later he can decorate the New Year's beauty with an unusual garland, which is very easy to make.
Take thick white paper or cardboard and cut into triangles from it. Then some multi-colored decorative tapes. They are narrow and there are office supply stores. Glue the decorative tape strips one by one over the triangles. It will look like a Christmas tree. Then, at the top, make a hole through which the thread is threaded. Fasten each triangle with a Christmas tree and a simple craft garland is ready for New Year's decoration at home.

Other ideas for New Year's crafts 2017
Santa Claus from a paper plate
Such a New Year's craft for children will help out if there is no toy Santa Claus in the house. Or the Christmas tree is creative and is placed on the wall, then Santa Claus should be there too. The process of making such a decoration is simple and does not require large expenditures in materials and time.
You will need a red plastic plate, colored paper, eye craft blanks, cotton wool or cotton pads, scissors and glue.
The plate will be the body of the Santa Claus craft. And we cut out all the details from colored paper. as shown in the instructions. We glue it and you're done! This craft is good because it can be done with children in kindergarten.


Souvenirs in jars.
They are useful for interior decoration and for gifts. They can be placed on a table or hung. And the inner content in them is varied. From Christmas trees to silhouettes that reproduce Christmas stories.


Making these New Year's souvenirs is incredibly easy. You will need some small glass jars. A small figure that fits through the neck of a jar, salt or cotton wool, which will imitate snow.
First, put snow on the lid of the jar. We install a tightly decorative figurine on it (you can even glue it with super glue). Close the top of the New Year's composition with a jar. We tie it with a decorative ribbon and an excellent DIY Christmas craft for 2017 is ready.
How to make DIY Christmas crafts for the New 2017:
On any holiday, it is customary to give small souvenirs to friends and family. But sometimes the question arises: there are many relatives and friends, but will there be enough finances to give gifts to everyone. Or maybe these crafts should be brought to an exhibition in a school or kindergarten.
Therefore, DIY crafts for the New Year 2017 will become a budget solution and will surprise each of your loved ones with originality and an unusual composition.
Tools and materials:
- thick cardboard;
- PVA glue;
- cotton pads - 2-3 packs (depending on the height of the Christmas tree);
- scissors;
- White paint;
- decorative elements: beads, rhinestones, ribbons;
- stapler.
Manufacturing process
- Snow-covered needles are made from cotton pads. You need to take the disc, fold it in half and staple it with a stapler. Each cotton pad must be connected separately.
- Now you need to cut a cone out of cardboard and make a Christmas tree frame. The entire surface is wrapped with white tape, so that later it would be easier to attach needles from cotton pads.
- The needles are fastened alternately, one after the other, observing the distance, both in a row and between rows.
- At the final stage, the Christmas tree is decorated with beads, tinsel, rhinestones and a star is attached to the top.
Friends will be delighted with such an original gift.
New Year's craft "Christmas tree lamp"

The unusual craft made can be put on a festive table or taken to an exhibition at a school.
Materials:
- White paint;
- thick cardboard;
- sandpaper;
- small candle or light bulb;
- sequins and rhinestones;
- drill, drills of different sizes.
Manufacturing process:
- It is required to cut a cone from thick paper, fasten it with a stapler and drill holes with a drill and various nozzles. The holes should be different in diameter.
- After working with the drill, roughness formed on the cone. To remove the notches, you need to sandpaper the entire surface of the cone.
- After grinding, the cone can be painted white.
- Now comes the fun part. You need to put a lighted candle inside the Christmas tree, turn off the light in the house and enjoy the overflow of light and an intricate pattern.

DIY snowmen from old light bulbs

From completely unexpected and wasteful material, like burned out light bulbs, funny and funny snowmen can be made.
Materials:
- burnt out light bulbs;
- markers;
- White paint;
- multi-colored fabric;
- glue;
- colored paper in orange.
Making snowmen:
- The light bulb should be snow-white, therefore it is recommended to cover it with white paint. If one layer is not enough, a second or even a third one is required.
- After the paint has dried with a black marker, you need to draw a mouth, eyes, buttons, brown - pens.
- The carrot nose is cut out of orange paper and glued to a light bulb.
- A soft material is suitable for making a scarf. A strip is cut out and a fringe is made along the edge of the scarf. The material is also glued to the light bulb.
- Snowmen can be decorated in the form of a Christmas tree toy. To do this, you need to glue a thin ribbon to the top of the base.
Crafts Santa Claus for the New Year 2017

You can do such cute Santa Clauses with your own hands.
Materials:
- double-sided thick cardboard;
- beads;
- colored paper;
- threads and glue.
Execution process
- First you need to cut strips of the same width and length. Then connect them together and insert beads inside the ball so that the ball takes a three-dimensional shape.
- Cut out pens, mittens, mustache and beard from thick cardboard.
- You can attach a snowflake to the mittens.
- The gift bag is made of the same strips, but brown. A thin ribbon is used as strings.
Funny rooster - a symbol of the New 2017

A universal craft will serve as a decoration for the New Year. If you make several cockerels of different sizes. It will turn out to be a real family.
To make a cockerel, you need colored cardboard.
- Roll a cone out of round yellow cardboard.
- A cylinder will be glued to the cone - this will be the head of the rooster.
- Glue the wings, tail on the cone in the right places and decorate with red waves.
- Glue the eyes, mane, beak on the cylinder.
Craft "Photo balls"

An interesting idea of New Year's crafts with your own hands. They will serve not only as a decoration for the Christmas tree, but also as memorable gifts that will always remind of family and friends.
Materials:
- balls with tinsel;
- Photo;
- scissors.
Manufacturing:
First you need to get the tinsel from the Christmas transparent balls on the Christmas tree. Then cut out the photos and place inside each bead. Photo balls are an interesting idea, grandparents will be delighted with such a gift.

Delicious crafts for the New Year

Gingerbread men are a symbol of Christmas and New Year in many countries. They can be used as souvenirs and presented to classmates, work colleagues. The main thing here is to show imagination and decorate each person with colored glaze.
For example, a gift is intended for the programmer Mishka, who constantly wears a suit and tie. This means that you can draw a tie on the little man. If the gift is intended for an accountant, then glasses should adorn the man's face. All livers must be put in a CD box, tied with a red ribbon and presented with a handmade gift.
Snow balls for the New Year

Every home has plastic Christmas toys. Having shown imagination, you can make an interesting New Year's craft.
Materials:
- herringbone;
- Ded Moroz and Snegurochka;
- Styrofoam;
- cans with screw caps.
Manufacturing process:
First you need to sprinkle the spruce with snow. For this, foam is taken and ground until small grains are formed. Then the spruce branches are smeared with glue and sprinkled with artificial foam made of snow.
A Christmas tree is glued to the iron lid, next to Santa Claus and the Snow Maiden.
Artificial snow is poured into the jar itself. When the glue dries and the figures are securely fixed, you can close the jars with the lids, turn the jar upside down and shake the jar. Artificial snow will circle for a long time over the spruce and Santa Claus with the Snow Maiden, creating a fabulous mood.

Snowman made of plastic cups

To make a craft, you will need many cups of the same size, cardboard in 2 colors: gold and black, carrots, a stapler and a cloth for a scarf.
First, the torso is made, and then the head. The cups are alternately attached to the base blank. Then you need to make eyes from the material, and a nose from carrots. Tie a scarf around the neck. After that, you can craft a hat. A circle and a rectangle must be cut out of black cardboard. The hat should look like a cylinder, you can decorate it with a golden ribbon.
Christmas bells

Luxurious toys are made from materials at hand: yogurt jars, foil, tinsel and colorful ribbons.
Manufacturing process
- Wrap the jar with foil and secure it with red threads.
- Glue a CD to the bottom of the bell, mask the junction with tinsel, glue a beautiful ribbon.
- To make the bells emit light, you can attach a light bulb with a switch inside.
It is not difficult to make crafts with your own hands from scrap materials for the new year 2017. A little diligence, a maximum of imagination - and you will get exquisite things that can act as souvenirs for the holiday.
2015-12-07We bring to your attention a list of the best ideas for DIY 2017 that you can use during your pre-holiday creative activities. Be sure to create even with the smallest children, creating an appropriate fairy-tale mood.
Craft for 2017 - cockerel
Be sure to make it, because this bright, proud bird is a symbol and patron of the coming year.Interesting christmas craft 2017 there will be an antistress cock that will delight both children and adults. With the help of such a funny figure, you can decorate the interior of a room by placing it on a bedside table, table or shelf, of course, you can put it under a decorated Christmas tree in the company of Santa Claus and the Snow Maiden.
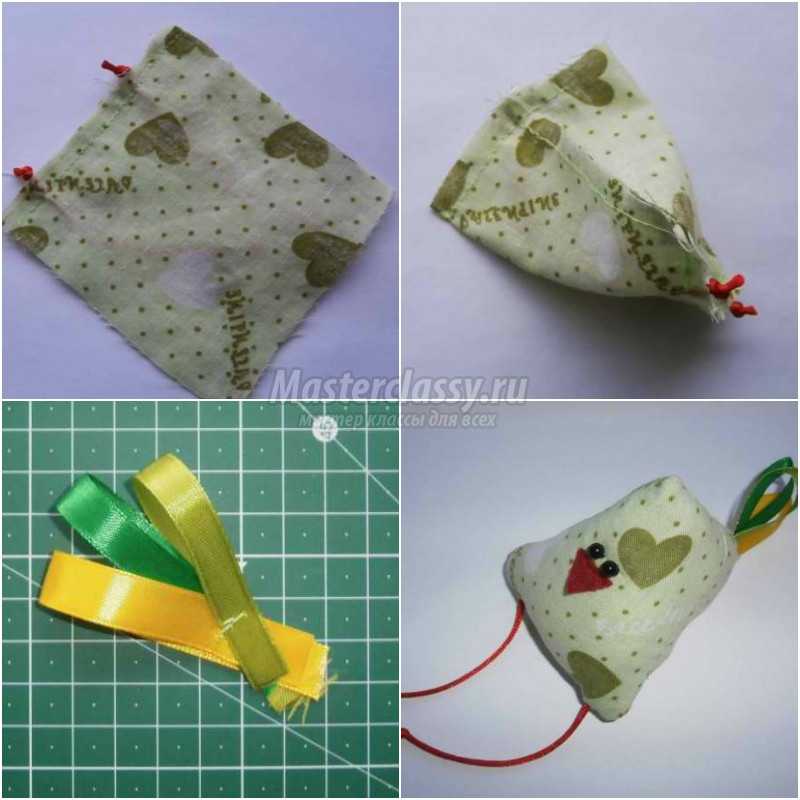
So, first of all, choose a fabric for sewing such DIY Christmas crafts for 2017- it must certainly be bright with a positive print, for example, with flowers or polka dots.
The first step is to cut out a square bag from your favorite fabric. Also cut out the beak, beard and scallop. Then you need to sew these small details into the edges of the bag, a special filler should be stuffed inside (however, you can do with the most ordinary cotton). The remaining edges should be sewn up in such a way that you get a pyramid figure. If you want the craft to look even more fun, then you can attach red thread paws to it.
Crafts for the New Year 2017 - cards
The youngest members of the family can also participate in the process of festive creativity - together with the smallest, you can create cute postcards, and then present to all relatives.For the first option, cut out the cardboard silhouette of the Christmas tree in advance - it should be a stencil. Use clothespins to secure the stencil to the paper base of the card.

The second option is called "Snowman" and it is this winter hero that will be depicted on the greeting card. You will need to cut three paper circles with different diameters ahead of time. The base for this card should be light blue or blue.
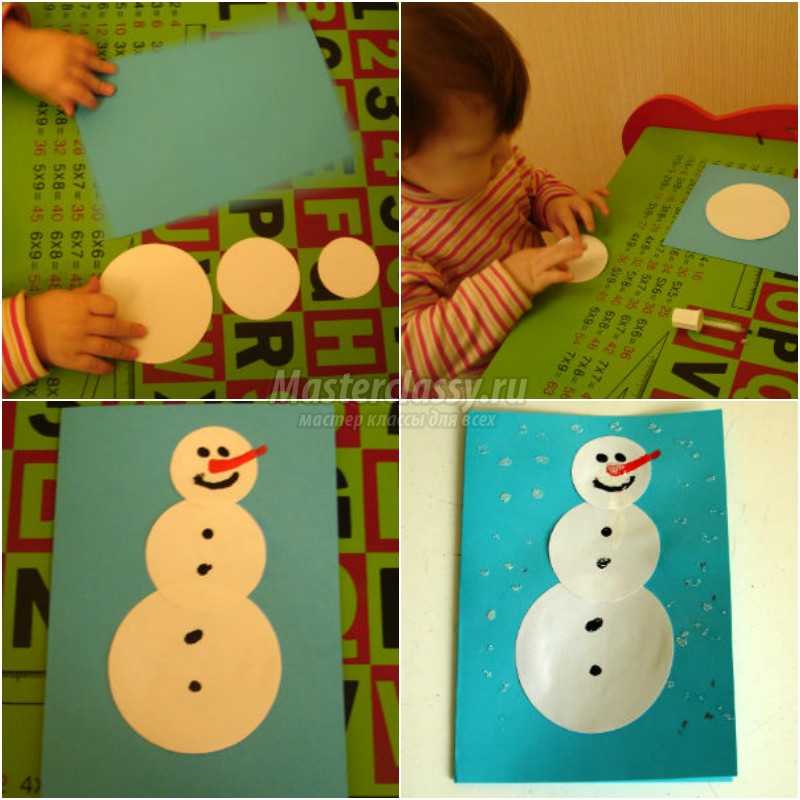
Lay out the circles on the base in the desired sequence - the baby must understand in what order they follow. Now let the child independently smear the round parts with PVA glue and fix it in the right place (you can point your finger at it).
Now let the child take cotton swabs and, dipping them in paint, draw the snowman's nose-carrot, eyes and buttons. point him to the right place, and the nose and mouth will have to be drawn together, because this is still a rather difficult task.
To make the picture more attractive, you can add "snow". An excellent material for this would be semolina. Let the child apply drops of PVA around the snowman with a cotton swab, and then generously sprinkle this area with semolina. Well, now put the postcard on the table so that the excess cereal pours out.

Even a one-year-old kid will submit to the creation of the third version of the postcard called "Snowflakes". You, wielding a brush with glue, should apply an image of snowflakes to the base of the card. Immediately pass the craft over to the crumbs - let him sprinkle it with plenty of semolina. This activity will be extremely fun and interesting for the baby, and such manipulations will be extremely useful for the development of children's motor skills. Shake off the excess "snow", but to keep the card longer, you can varnish it (of course, this stage should take place without the participation of the baby).
The baby will really like the soft one, which you will make for him with your own hands.
DIY Christmas craft 2017 - herringbone
First of all, you need to take a plastic bottle - it should have a narrow neck. It should be pasted over with double-sided tape from the bottom to the top. Remove the protective film from the tape and start gluing the bottle with sweets. It can be caramels or lollipops; in total, you will need about 100 g of sweets.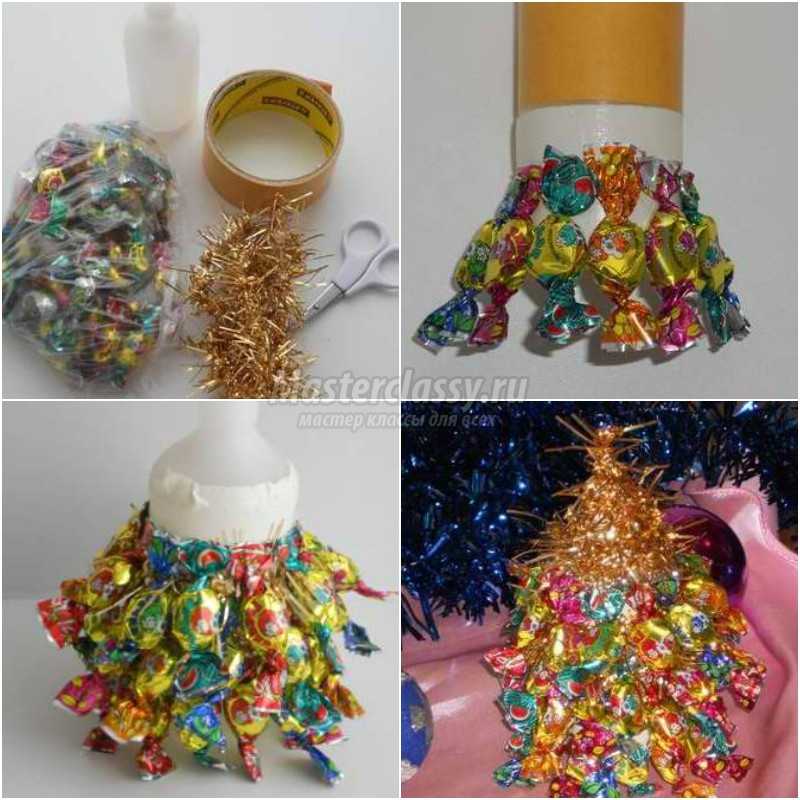
So a wonderful holiday souvenir is ready, which will please both children and their parents.
Make and, the craft is quite simple, but very cute.
Crafts for the New Year 2017 - advent calendar
If you are preparing for the New Year holidays with your child, then do not miss the opportunity to give him a winter fairy tale a few days before the onset of the most important holiday. We are talking about a handmade Advent calendar with which it will be so much fun to celebrate the New Year 2017.
First of all, you need to make the basis of the calendar, which will be a herringbone in outline. You can draw it on a sheet of thick green paper and then cut it out, or you can make a Christmas tree out of your palms - choose the option that you like best.
Among the numerous options for a fairly wide selection of New Year's gifts, which are traditionally given to relatives and friends on a significant New Year's Eve for each person, the most interesting and relevant lately are the exclusive New Year's crafts for the New Year 2017 with their own hands.
Among such original gifts made from the heart, it is customary to include all kinds of textile crafts, accessories from felt fashionable in recent years, crocheted or soft toys sewn from fabrics that are suitable for the texture, depicting the symbol of 2017.
Many crafts for the New Year 2017 are quite easy to make with your own hands. Perhaps precisely because the overwhelming majority of ordinary people want to have something unusual, created individually for him, today such a direction as hand-made has become widespread.
On the eve of the most beloved holiday for the overwhelming majority of people - the New Year, almost every home prepares colorful, original, distinctive decorations and gifts that can create an exceptionally positive mood on a significant night and please everyone who meets a new year that promises transformations in life.
You can fully demonstrate your creative ideas and creativity in the New Year's design of an apartment and the creation of gifts for this celebration in the process of author's decor and independent production of all kinds of crafts.
New Year's crafts 2017 can be made from
- paper,
- table napkins,
- foam,
- felt,
- fabrics,
- yarn,
- knitwear,
- natural materials,
- polymer clay,
- salted dough,
- beads.
Those who wish to please the results of their skills to relatives and numerous friends can take on board several illustrative examples of self-making New Year's crafts, demonstrated in this article.
New Year's wreath is a mandatory attribute of the holiday
Following a long-standing European tradition, the Christmas wreath is becoming increasingly popular among types of interior decor. Given the abundance of natural materials, it can be made without much difficulty in a short time.
To make the future decoration of the front door of the house or the wall in the room where the New Year is planned, you will need:
- ring-base of the wreath (foam or cardboard);
- fabric or burlap for covering;
- bumps or other natural material;
- nippers;
- silicone glue gun;
- New Year's tinsel;
- paints and glitters.

The ring serving as the base of the wreath can be decorated in different ways. Using nippers, cut off the top of the pine cones and attach the remaining bases of the same height to the rim pre-covered with burlap using silicone glue.

The cones intended for decorating a wreath can be colored in different ways, imitating the snow lying on them.
- the top of each bud can be gently dipped in white gouache;

- the outer parts of the open cones are covered with PVA glue, after which they are sprinkled with crumbs of broken Christmas tree decorations and fastened to the wire with the tops down to dry;


- for coloring the cones, they use special paints in cylinders with a spray bottle, which perfectly tint any natural material in the desired color; they can process an already formed product, preferably on a balcony or near an open window, since such paints are toxic.

The finished wreath of cones is complemented with New Year's tinsel: golden bells, small balls, miniature garlands of New Year's gifts.

New Year's crafts from paper napkins

You can use not only natural pine or spruce cones for New Year's home decoration, but also independently made from three-layer napkins for table setting or paper for wrapping gifts and foam. Such an unusual craft can not only serve as an element of interior decor, but also be used as a Christmas tree toy.
At the first stage of work on the craft, rectangles of a certain size are cut, which are folded on both sides, turning into triangles.

The finished paper triangles are attached next to each other with pins, starting from the center of the sharp edge of the styrofoam egg, thus forming the scales of the cone.

Having reached the opposite end of the foam base, a hole is made in the center. On both sides of it, a braid is attached, which will play the role of a loop of a Christmas tree toy.
A plastic twig with several berries is inserted into the hole of your choice.

A spectacular paper spruce cone, easy to perform, will undoubtedly appeal to children and arouse the desire to try their hand at creating crafts for the new 2017 in such an unusual technique.

Snowmen: a variety of materials and techniques
The foam used to create the above craft is a popular material for this kind of needlework. Given its lightness and ability to be processed, polystyrene is in great demand for the manufacture of New Year's crafts.
A common example of a Styrofoam Christmas tree toy is a snowman.

It is very easy to make it yourself. For creative work you will need:
- two foam balls of different diameters;
- stationery knife;
- stationery pins;
- a gun for working with silicone glue;
- scissors;
- marker;
- a piece of fleece;
- buttons, ribbons, sequins.

Armed with a clerical knife, you need to cut off a small layer from each foam ball to get a flat surface.

Smooth surfaces are connected with silicone glue to form a snowman figure.
A scarf and a fringed hat are cut out of fleece.

The snowman is being dressed. A row of multi-colored buttons is placed on silicone glue, imitating the fasteners of his clothes.

With the help of a marker and stationery pins, they shape the eyes, nose and mouth of a funny snowman.

Colorful figures of perky foam snowmen will perfectly decorate the branches of the New Year tree.
In addition to foam, you can use the most unusual materials to create a snowman, for example, a knitted sock.

For self-production of such an original craft, you must have on hand:
- white sock;
- white cotton threads;
- scissors;
- a pair of buttons;
- stationery pins with a black and red ball at the end;
- a narrow piece of fleece or other material;
- a glass of rice cereal.
At the beginning of work, the sock must be cut into two parts.

The bottom of the sock should be reserved for the future snowman hat.

The second part of the sock is used to shape the figure of the toy. First of all, one end is carefully pulled together with a thread, stepping back a couple of centimeters from the edge, and tied tightly.

The required amount of rice is poured into the cavity of the sock.

Having visually divided the figure into two unequal parts, the sock is again pulled with a thread, forming the body and head of the snowman.


A scarf cut from fleece or other fabric is tied at the junction of the head with the body.

Two buttons of a color contrasting with the main material are sewn on the front of the snowman's body. On the front of the head, two pins with black beads at the ends and one with red beads are injected, thereby imitating the eyes and mouth of the toy.

An entertaining snowman can serve as a decoration for a festive table, take its rightful place under the Christmas tree, or become a New Year's souvenir gift.
Felt mitten with exclusive design
What a snowman and cheerful winter time without warm bright mittens at all. Over the past few years, mittens made of felt and decorated with various materials have become an interesting option for both a Christmas tree decoration and a popular New Year's gift.

Such products can be filled with padding polyester or remain hollow. They can be hung on a Christmas tree or given as a souvenir for the holiday. Children will find such an interesting gift filled with sweets.
For self-production of such a colorful craft, use the product pattern proposed below.

As a rule, such a mitten is cut from felt, because this material has a number of advantages for making crafts of this kind:
- keeps its shape perfectly;
- does not cut, which means that it does not need additional processing of the edge;
- presented in a wide range of colors.
Symmetrical details cut out of felt mittens are traditionally connected with a front overlock seam.


The front panel of a mitten is usually decorated in various ways:
- embroidery floss or silk of snowflakes or floral patterns;
- by marking flowers or other elements cut out of felt;
- sewing on buttons on your own or over felt fragments;
- embroidery with beads or sequins.


Crafts made independently for the celebration of 2017 from a wide range of materials will find their admirers and talented craftsmen.
Craft for the New Year 2017: Keyrings "Rooster" from felt
The simplest option for a self-made New Year's gift, which does not require special sewing skills or mastering the complexities of another type of needlework, is to make a keychain from felt - an extremely popular accessory nowadays that can decorate a bag or supplement a bunch of keys.
There are two ways to create such a craft. In the first case, it is enough just to choose a pattern of a flat keyring and felt colors necessary for working with this model. To make such an accessory you will need:
- thick colored felt;
- scissors;
- silicone glue;
- a string or metal hardware for attaching a keychain.
According to the selected template, having cut out the necessary elements of the felt keychain from paper, they are repeated in the material of the selected shades. Given the important nuance that the future keychain is an image of a rooster, it is recommended to use red, orange, yellow, green and black felt for such a craft.
The parts of the keychain cut out of felt are alternately attached to the base of the accessory being manufactured using a silicone glue heated in a special gun for working with such materials.

The final stage of work on such a model of widespread crafts is attaching a thread cord or a metal ring in its upper central part for a bunch of keys or future fastening of the craft to a bag or backpack.
There are various patterns of the described type of key rings, so it is quite easy to choose one of the ones presented by craftsmen specializing in their manufacture to your taste.

The process of making a soft keychain made of felt of a different type is somewhat more complicated. To work with such a craft, anyone who wants to make it needs to master the execution of a decorative seam with silk thread, through which the side of the product is formed.
To create this kind of key fob, you need to prepare:
- felt yellow, orange or red, salad color;
- synthetic winterizer;
- silk thread to match the main material;
- a needle;
- scissors;
- silicone glue;
- black bead.
Following the patterns below, you need to cut out the felt details of the keyring.

Carefully inserting in the designated places between the symmetrical parts of the rooster's body its comb, tail and beak made of felt, securing them, if necessary, with sewing pins or invisibility, after placing the synthetic winterizer inside, the accessory should be swept away, after which the parts of the rooster's body are connected together by means of a decorative seam.

The final part of the work on such a keychain is to decorate its front part with decorating elements. To this end, using silicone glue, heated to the proper temperature in a pistol, peas cut from salad felt are attached. The last one in turn in the process of work is sewn on a black bead that imitates the eye of a rooster.

If you wish, you can use other models of a soft keychain depicting a rooster, consisting of other parts and presented in a different color scheme, to make your gift.

Some variations of this kind of crafts require resorting to the use of a sewing machine capable of stitching the material and the "zig-zag" operation, which requires the seams to decorate the keychain.

Household stuff made of felt as a gift
Crafts for the New Year 2017 can be presented not only in the form of key rings. They can be such always-in-demand gifts as household items needed in the kitchen of every home. These include colorful coasters for eggs cooked for a traditional morning breakfast with the family. It is most successful to make such a craft from the already mentioned felt, which for a long time perfectly retains the shape of the product and preserves the heat of the boiled egg.
Those wishing to give someone from their loved ones such an exclusive craft must have the following materials and tools at hand:
- scraps of yellow, red, green and blue felt;
- scissors;
- silicone glue.
Using the templates below for the details of such a product, the elements of the future stand are cut out of the felt of the selected shades.

On the front side of each of the symmetrically cut parts of the stand, with the help of silicone glue used for such purposes, multi-colored elements of the tail and parts of the head of the rooster are attached in certain places.

Each of the finished components of the stand is neatly inserted into the groove of its pair thanks to the slots made in the felt parts in advance. Inside the stand formed in this way, a ring glued from blue felt is inserted, intended in the future to serve as the basis for the eggs cooked and placed in the stand.

A bright, colorful stand for boiled eggs will create a positive mood at breakfast and, undoubtedly, will give a boost of vigor that is so necessary in the morning for the whole next day to each of the household members.

New Year's craft 2017 - Crocheted grain "Rooster"
One who knows the art of crocheting will surely find another idea interesting that can be implemented in the process of preparing gifts for the new year. This craft, which can become an interesting and useful gift in the coming year, is rightfully considered a kind of amulet for any home, a kind of talisman of its owners, which has become popular in recent years. We are talking about a crocheted grain, which is used to decorate modern kitchens, thus giving the interior of this room individual style features.
To make such a craft for the New Year 2017, you will need:
- woolen or cotton yarn in beige or light brown, red, yellow and black;
- crochet hook No. 2 or No. 3 (depending on the thickness of the thread used);
- scissors.
Work begins on the manufacture of such a craft with the fact that, taking a beige or light brown thread as a basis, you need to crochet a chain of air loops, the number of which can vary from 12 to 20. Their number directly depends on what the height and width will be. grain granules.
Based on what size the craft is planned, using the most common "single crochet" technique, the number of rows necessary for the intended grain size is tied. The result should be a tight rectangle.
Having folded the cloth formed in the process of knitting in half, the resulting square must be crocheted, tying both edges with a single crochet.
Next, you can begin to design the head of the rooster. To this end, red yarn is tied to the thread with which the square base of the grain is knitted and 10-12 loops are knitted with a single crochet over the formed corner. Turning the knitting with the wrong side towards you, make another row in the opposite direction. After that, the strip of the future ridge must be divided into three parts, each of which should be knitted in two more rows separately, evenly reducing the number of loops upwards, so that as a result the ridge fragments acquire a rounded shape. To form a flawless edge, the top of the ridge should be tied with a single crochet. 
Using a similar method, a few centimeters below, typing only 5 loops, form the red beard of the rooster.
Using a yellow thread, between the comb and the beard, you need to dial 3-4 loops and knit several rows with a single crochet, in each next one subtract 1 loop, so that the result is a sharp bird's beak.
The rooster's eye is formed last in turn. This is done quite simply. It is only necessary to make a couple of short stitches with black thread threaded into the needle in the place indicated in the upper part of the grain.
At the end of knitting and design of the grain, you can proceed to the final stage of work on it. A small amount of different grains is poured inside. Most often, they use grains of wheat, barley and oats, symbolizing the prosperity in the house and the well-being of its owners throughout the coming year. Having done this, again resorting to the "single crochet" technique, it is necessary to connect together the folded edges of the grain-grain formed in the form of a pyramid.
Such a product can be placed on a table, placed in a kitchen cabinet or on a hinged shelf, and it will perfectly complement the interior of the room.
The variety of handmade crafts for the New Year 2017 is large enough, and everyone who wants to please their loved ones with something original, one-of-a-kind craft can quickly master the technique of making such a product in order to give an exclusive gift on New Year's Eve.
On the threshold of the long-awaited New Year's holidays, which are eagerly awaited not only by children, but also by adults. After all, New Year is a new hope, new plans, new life. To create a magical atmosphere in the house, we always prepare decorations in advance. Someone buys them in stores, but in this article we will show you how to make interesting DIY crafts for the New Year.
The fiery Rooster will be the patron saint of the upcoming 2017. It is his image that should be present in every home so that the whole year is successful and happy.
You can make a cockerel in different ways. In this case, the main thing is to show imagination. We will present several master classes on making DIY crafts of the symbol of the New Year 2017:
Rooster toy
The product will look like a soft toy. To create it, you need a pattern, cotton wool, two identical buttons and any thick fabric. You don't have to buy one, you can use an old sheet or shirt.

The only items available are two small pieces of red and orange felt to make a beak and scallop. You can also use any decorative elements for the cock. In the photo below, the craftsman used a straw to make a bow.

The uniqueness of this toy is that it is easy and quick to make. In a short period of time, you can sew dozens of such cockerels to present them as gifts to all your friends for the New Year 2017.
If you make small soft cockerels, then they can become decorations for the New Year's tree. It will only be necessary to sew ropes to them, for which they will cling to the Christmas tree branches.

You don't have to make the cockerels bulky. Just cut them out of felt, decorate with rhinestones, beads, feathers, ribbons and other decorative elements, attach ropes to them to hang the products on the tree.

Rooster made of buttons and old beads
- Draw the outline of the rooster on decorative paper.
- Using quick-drying glue, attach buttons and beads to the image, alternating them in colors and sizes
- The resulting product can be framed and hung on the wall in the hallway or in the kitchen

Painting "Rooster" in quilling technique
The quilling technique is very popular among needlewomen, because it can be used to make exquisite products using only special paper, a toothpick and glue. To make a picture with a cockerel, you will need the same material and whatman paper, which will become the basis for future crafts.
The work will be very painstaking, so you need to be patient:
- First you need to cut the quilling paper into strips 5 mm wide and 25 mm long.
- Then screw each strip onto a toothpick. Glue the ends to the finished paper spirals. All spirals need to be slightly lowered and squeezed in the shape you need.

- Glue all the curls on the previously prepared contour of the rooster on a Whatman paper.
- In addition to the rooster, other elements of the picture can be made in the same way - snowflakes, Christmas trees, snowmen, and so on.
As a result, you should have such a beautiful product:

The techniques we have listed are the most practical options for making a New Year's symbol that will last for a long time. You can use many other methods of making cockerels, for example, from disposable dishes or plastic bags, but they are unlikely to retain their original beauty for a long time due to their impracticality.
DIY Christmas tree craft
Despite the fact that a live or artificial Christmas tree is in any case decorated for the holiday in every home, we still make small original crafts for the New Year do it yourself in the form of a forest green beauty, so that the festive mood can be felt everywhere.
Of the many ways to create Christmas trees, we have selected some of the most interesting:
Christmas tree made of bright pictures

- To make such a beauty, you will need old magazines, newspapers or a children's book.
- Of them, using a shaped hole punch, you need to make as many round elements as possible - these can be flowers, ordinary circles.
- Each of the resulting circles must be twisted a little, wrapping them around a regular pencil.
- They will need to be glued in neat rows to a pre-prepared paper cone, starting from the bottom.
Christmas tree made of felt

From the minimum amount of material, you can make such a Christmas tree. You will need:
- felt fabric in two colors
- thick cardboard
- quick dry glue
- thin Christmas tree rain
- First, we make a cone from cardboard, which will be the basis of the future Christmas tree.
- Then we cut out circles of different diameters from felt, cut a hole in the center of each through which these circles will be threaded onto the cone.
- When all the felt details are threaded, you can proceed to decorate the product - glue the Christmas tree rain and other New Year's tinsel that you do not mind in a spiral to the product.
Christmas tree made of floral mesh and garlands

- To make such a tree, you first need to make a paper cone and wrap it with a plastic bag.
- Then it is necessary to cut flaps of the same size from the floristic mesh, moisten them in PVA and alternately glue them onto the cone in several layers.
- When all the layers are glued, the top of the mesh must be greased with PVA again and left to dry.
- After the mesh is dry, it must be removed from the cone. We won't need it anymore. Instead, a garland must be attached to the inside of the tree with a decorative wire.
- If you wish, you can also attach any decorations on the outside of the resulting Christmas tree.
DIY paper crafts for the New Year
Paper is a versatile material for needlework, but you can make short-lived products from it, although they are quite original. In this article, we decided to tell you how to make paper from paper easy DIY crafts for the New Year... We are talking about two designs of Christmas tree decorations.
Crafts from paper tubes

To make such a decoration for a Christmas tree, you will need scrapbooking paper and a ring from an old chain through which a decorative thread will be threaded.
What will be the algorithm of our actions:
- Cut out a circle of any diameter from any cardboard and mark a center on it (the size depends on your desire, to make the same toy as in the photo above, you need to cut out a circle with a diameter of 5 cm);
- From one sheet for scrapbooking we cut out squares with a side of 3 cm, and from the second squares with a side of 2.5 cm;
- Expand all the squares so that they look like diamonds, then begin to bend the left and right ends of the square towards the middle as if you were swaddling a child;
- Glue the resulting elements with quick-drying glue;
- To the center in a clockwise direction, begin to glue the twisted elements to the pre-prepared cardboard so that each tube fits snugly against each other;
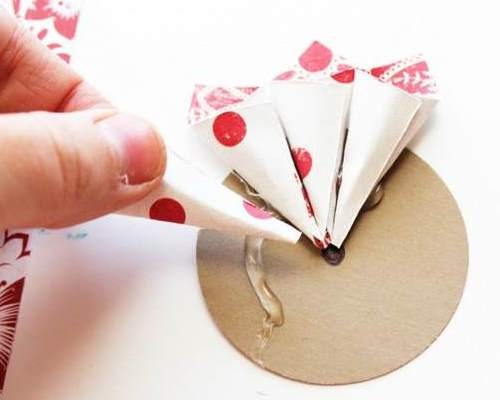
- You will need to make several layers of these tubes so that in appearance the future product begins to remind you of a flower;
- Attach an old brooch or pendant with stones to the middle of the toy, and glue rhinestones along the edges of the tubes.
Craft from paper squares and foam

The basic material for making such a beautiful paper cone is decorative paper and a foam ball. What you need to do with them:
- Cut the paper into strips 2.5 cm wide;
- Each strip must again be cut into squares with a side of 2.5 cm;
- From each resulting square, you need to make such an arrow, as shown in the photo;

- When all the elements are prepared, you can start gluing them to the foam ball in layers from bottom to top;
- You can attach paper sheets and braid to the top of the cone, for which the resulting cone can be attached to the tree.
From above, each of the proposed toys can be covered with sparkles, sprinkled with New Year's tinsel, so that they look festive and elegant.
Crafts from cones for the New Year
Crafts from cones with your own hands for the new year look very original and natural on the New Year tree. From this beautiful natural material, you can come up with a huge number of different toys and table decorations. After all, the cones lend themselves to staining and gluing. As examples, we will present you several options for cone products for the New Year:
- Having painted the cone green and sprinkled with white or silver sparkles, you can make a mini Christmas tree that will look beautiful as a New Year's toy, as a figurine on the fireplace.

- The pine cone can be used as a torso for a toy bird or deer. You just need to figure out what to make them heads and limbs. It can be a sponge, cotton wool, wool - any material and decorative elements.

- Pine cones can be used to make beautiful Christmas wreaths on the door. Moreover, they do not even need to be subjected to any processing. Through them you only need to thread a wire, with which the cone will firmly hold on to the wreath.

Crafts from the dough for the New Year
To create crafts from salt dough for the New Year children can also be involved. As a rule, children really like to sculpt different figures out of it, especially if they are timed to celebrate the most awaited winter holiday.
The most important thing here is to knead the dough correctly. It's very simple: you need salt, flour, starch and water. All these components are mixed with each other in equal amounts. If you already know in advance what color your products should be, then you can immediately add dyes to the dough. If not, then leave it colorless.

- To give contours to future crafts, you can use special confectionery molds - Christmas trees, snowflakes, gnomes or snowmen.
- Cut out the characters, then lay them out on a baking sheet and dry in the oven.
- When the products are dry, take them out and decorate - paint, glue all kinds of decorative elements to them.
Here are some examples of designs for New Year's products made from dough:


Crafts from candies for the New Year
Candy is the most festive stuff. As a child, each of us tied a string to them in order to decorate the New Year's beautiful Christmas tree with sweets. Today, sweets are used in a more original way. With their help, you can create not only interesting crafts for the New Year but also make sweet gifts for your loved ones.
For example, if you are going to visit godfathers or neighbors, you can make a beautiful Christmas tree from a bottle of champagne and loose sweets.

How to do it:
- Lubricate a bottle with a holiday drink with glue, and attach New Year's tinsel to it.
- Then, in a circle, glue the candies in the same way. You can use both the same sweets and different ones.
- Decorate the resulting Christmas tree with bows, beads and that's it - this chic New Year's gift is ready.
If you go to a house where there will be children, then you can also make New Year's sweet gifts for them. Buy assorted chocolates and cane-shaped lollipops. From these sweets, you can make a sleigh:

- Glue the chocolates to the candy canes with a glue gun
- Put the rest of the sweets on the chocolates in the shape of a pyramid and wrap them with a beautiful ribbon
- To complement the sweet gift, you can tie a toy deer to the sleigh
You can also make New Year's clock from sweets. To make them you will need:
- metal cookie box
- candies
- Christmas tinsel

- First you need to decorate the cookie box with corrugated paper
- On one side, make a dial from old beads
- Glue all decorations and parts of the product to the glue gun
- Then glue the candies around the circumference of the box so that they fit tightly to each other.
- From above they can be wrapped with decorative tape.
When the main part is ready, you just have to complete the dial decoration. This is where your imagination comes in handy.
Crafts from disks for the New Year
Everyone in the house probably has old CDs that just take up space on the shelf in the closet. So that they do not gather dust simply, use them to create beautiful DIY crafts for the New Year.
We offer you to make New Year's toys and pendants-panels from CDs. They can be used to decorate the Christmas tree and walls in the rooms of your home.
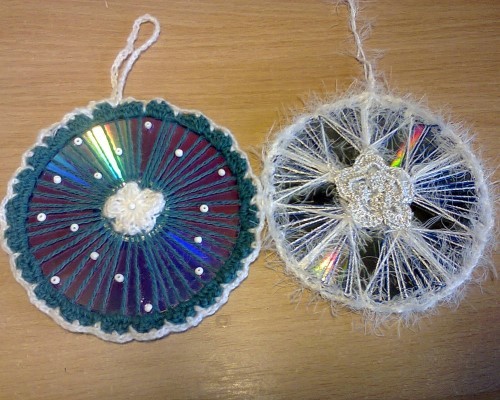
You don't need to show any special talents to create Christmas tree decorations. Even children can handle this work. You will only need to draw a beautiful winter pattern for them on the disk and give out decorative elements - paints, beads, beads, buttons. Children will already show their imagination and complete the decoration of CDs.
The panel pendants are a little more complicated by the manufacturing technique:
- The discs will first need to be coated with acrylic paint.
- Then pass the braid through the hole and fasten it tightly.
- The next step is to glue a pattern to the disc using decoupage technique, which we will need to paint and give it volume with the help of salt, semolina and other improvised means, for example, toothpaste, from which we can make snowy mountains.

Crafts from beads for the New Year
Beading is a real art, and not everyone can master at least the basics. But what to do if you really want to make of this material beautiful crafts for the New Year? There is an exit. We have selected several ideas for creating New Year's beaded decorations that even a child can make.
Christmas ball made of beads
- Take a long, thin wire and string the beads on it in a random fashion.
- Having coped with this task, inflate a small regular balloon.
- Now this ball needs to be carefully wrapped with prepared wire.
- When the whole ball is decorated, pierce it so that you have such an original Christmas tree decoration in your hands, as shown in the photo below.

Christmas tree made of beads
- Make a tight cardboard cone and set it aside.
- After that, string green beads very tightly on the wire, alternating with red.
- You just have to wrap the resulting garland around the paper cone in a spiral, and then remove it so that only the original Christmas tree remains, which can be used as a toy.

Beaded snowflake
- First, fasten three wires of the same length together so that you get an asterisk.
- Then, on each ray of the star, simply string the beads so that you get a beautiful snowflake, which is shown in the photo.

Knitted crafts for the New Year
Knitted ideas original crafts for the New Year great amount. Of course, in order to create at least one of them, you need to undergo special training or train yourself for a long time, relying on video tutorials from the Internet. For those who know how to talentedly knit Christmas decorations, we have selected several patterns that can be useful to needlewomen while preparing home decor before the New Year holidays.
Knitted snowflakes

Knitted Christmas balls


Bulk crafts for the New Year
In this section, we will show you how to make volumetric unusual crafts for the New Year from scrap materials.
The first option for New Year's decorations - Christmas tree toys made of walnuts. To do them, you need:
- First, peel the insides of the nuts so that only the shell remains.
- Cut off a 25 cm long satin ribbon, fold it in half and string a bead on it. Place the ends of the ribbon between the two parts of the shell, and only then glue them.
- Dye the nuts the color you want, decorate and varnish.

The second option is Christmas tree decorations from wine corks... To make them you need:
- Paint the corks in different colors
- Come up with the shape of the future toy
- Fasten the plugs together in the desired shape using a wire
- On top of the resulting decoration, attach a ribbon in the form of a bow with an ordinary decorative pin.

The third option for Christmas tree decorations is the simplest - from burnt out light bulbs... They just need to be painted beautifully - to make them look like penguins, snowmen or Santa Clauses:

Crafts for kindergarten for the New Year
All of the above homemade Christmas decorations can belong to this category. However, we want to highlight here exactly DIY children's crafts for the New Year. As an example, we will give original options for needlework that you can offer your children to make on the eve of New Year's parties in kindergartens.
Magic snow globe
- On regular round cardboard, glue cotton wool that will simulate snow.
- A plasticine snowman and a Christmas tree are attached to it. On top of this craft, you will need to install a small glass jar, the inner surfaces of which must be greased with glue and sprinkled with sparkles to give the impression of falling snowflakes.
- We attach the glass jar to the base of the craft using a glue gun. It turns out such an original product:

Modular Paper Crafts
- In the same way, we first prepare the base. In this case, it will be a cardboard box of chocolates.
- We glue it so that both parts touch each other at right angles.
- We lubricate their inner surfaces with glue and glue cotton wool to them, which will again simulate snow blockages.
- We make different animals out of paper - bunnies, bears, and then we attach them to a horizontally located base.
You can also place a plasticine tree and other homemade products here. For clarity, we will give the following example:

Video: DIY crafts for the New Year 2017
In this video, the needlewoman clearly demonstrates how you can decorate Christmas balls with your own hands in an original way or make unusual elements of New Year's decor.