How to make a shirt out of paper. How to make a shirt out of paper the easiest way
A handmade gift - what could be better? In particular, such surprises are pleasant to those closest to you and dear people... An origami paper tie along with a fancy tiny shirt makes a great gift for Father or Grandfather's Day. This token of attention can be an independent souvenir, as well as a cute postcard or container for a cash or sweet prize.
Necessary materials
A cute origami tie with a shirt can be gifted with or without. There are a lot of men's holidays where this craft will come in handy: February 23, Builder's Day, Father's Day, Railwayman's Day, and so on, not to mention numerous birthdays, anniversaries and others. memorable dates... It takes only 2 pieces of paper and quite a bit of time to create this delightful little thing.
You just need to follow the instructions, step by step, and you will have a unique and original gift... For a shirt, you need a sheet of paper (8.5 cm x 11 cm), and for a tie, you need a square sheet of paper (5 cm x 5 cm). The dimensions are approximate, depending on the dimensions of the craft, they can be varied, however, without violating the aspect ratio.

Making a shirt:
- Step 1: Take a piece of paper and fold it in half, ironing the fold carefully. Then the unroller is back.
Step 2: Fold the left and right edges of the paper towards the center fold to form two flaps.
- Step 3: Take the top inner edge of each sash and fold it outward, creating a semblance english letter"V". These will be the sleeves.
- Step 4: Flip the paper over to the other side and also vertically.
- Step 5: Take the top edge of the paper and fold it down about 2-2.5 cm. This is the first part of the collar.
- Step 6: Flip the project back to the other side. Take the top left and right corners and fold them so that they meet in the center. You now have a collar.
- Step 7: The shirt is almost ready, it remains to bend the bottom edge of the paper (with the letter "V") up.
- Step 8: It remains to neatly tuck the bottom edge just under the collar. It's done, now you have a miniature origami shirt! If you do not make a V-fold, then the shirt will turn out to be sleeveless.
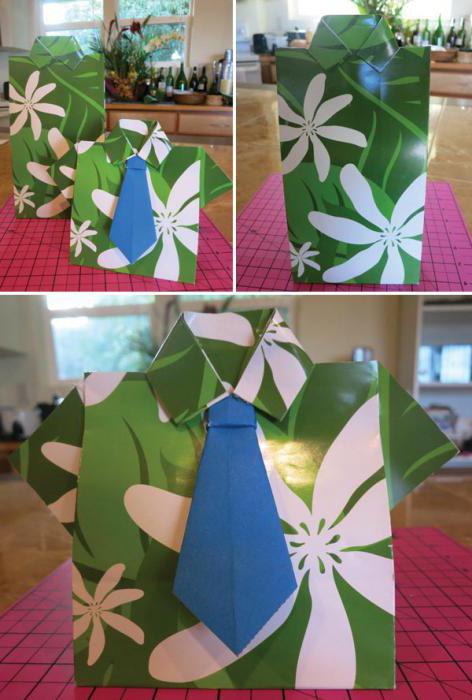
It's time for a tie
To complete the craft, add an elegant origami paper tie. How to do it? Follow the instructions.


It remains to fasten the origami tie to the shirt and that's it, the souvenir is ready. If this is a postcard, you can write a congratulation on it and give it. If the original idea was to build a container for cash gift, then the folded bill can be hidden in the folds of a tie or shirt.
As soon as the time comes for holidays, especially for men, all women begin to think about how to decorate in an original way a gift for a beloved man, be it a husband, father, son or brother. In this matter, every little thing is of great importance, capable of raising the mood and demonstrating all the care and love. When the gift has already been purchased, all that remains is to purchase a postcard or find some unusual packaging. If you want to really surprise your men, then you will certainly like the next idea - a do-it-yourself card-shirt with a tie, made from scrap materials. Today we will tell you how to make such original craft yourself, which can be used as a postcard or packaging.
How to make a shirt-shaped packaging with your own hands?
First of all, let's look at how to make a shirt out of paper with a tie so that you can later use it as packaging for a ready-made presentation. If the gift is flat, not too bulky, then this idea is perfect for you. For work, we use the origami technique, that is, the art of folding all kinds of figures out of paper without using glue. In such a package, you can put not only a gift, but also a postcard with sincere wishes.
Prepare an A4 sheet for work, you can use nice paper for scrapbooking or regular office.
Make packaging following these instructions:
- Fold the paper in half along the long side. Expand, then fold the edges of the sheet towards the resulting fold line.
- Expand the workpiece, fold small triangles at the bottom to the beginning of the folds. Fold the edges towards the center again.
- Fold the bottom edge 5-6 cm towards the center.
- Turn the blank back so that when folded on the sides, the triangles look like the sleeves of a future shirt.
- Turn the craft over to the other side, then fold the top edge 1-1.5 cm.
- Turn the workpiece over again, fold the upper corners to the center to form a collar.
- Fold the blank so that the bottom edge is directly under the collar.
Now you know how to make an origami paper shirt to get original packaging... You can decorate it with a butterfly, pocket, buttons or some other interesting element.
Important! Using the same template, you can cut out a blank from thick colored cardboard for wrapping a voluminous gift. To make a box, it is enough to glue all the elements from above and to the left. Then the gift is placed inside, wrapped, and a collar is glued on top.
How to make a beautiful postcard with a tie?
A postcard in the form of a shirt with a tie with your own hands is even easier to create than packaging. To recreate this idea in practice, it is necessary to prepare the following materials:
- A sheet of paper for scrapbooking or design.
- Several small buttons.
- A thread with a needle.
- Glue.
- Plain paper sheet white, colorful paper so that it matches the color of the future product.
- Envelope for a postcard.
Perform the work according to the proposed scheme:
- Fold the shirt out of scrapbooking paper according to the pattern described in the previous master class.
- Decorate the craft with buttons, sew them on or glue them.
- Fold in the form of a book colored paper, glue a white sheet with slightly rounded edges on top.
- Decorate the top of the card with a finished shirt.
- Write a beautiful greeting.
Such a wonderful postcard can be made without using the origami technique. You will need one sheet of plain colored paper and glue for scrapbooking. Making such a craft will take no more than ten minutes. You just need to follow a few steps:
- Fold the scrapbooking paper in half to make a book.
- Exactly in the middle of the top of the cover, make a small notch about 1-1.5 cm.
- Bend the notched corners to the side to create a shirt collar.
- Cut the tie out of colored paper, then glue it on top of the card.
Everything is ready, it remains to write in it beautiful words to someone dear to you.
How to make an invitation card for a men's holiday?
As a rule, postcards are given in addition to the main gift, but after all, present it in finished form with the standard text is somehow impolite. A do-it-yourself shirt made of paper with a tie can be used not only as a postcard, but even as an original invitation.
For work, you should prepare:
- sheets of colored paper and for scrapbooking;
- simple pencil;
- scissors;
- ruler, glue;
- beads, ribbons, rhinestones or threads for decoration.
You need to do the following to create an unusual invitation.
Making the base
We will make it from simple office toned paper for printing. Three bases will be obtained from one sheet. Necessary:
- Divide the sheet into three equal parts.
- Then fold each rectangle like an accordion, while observing the desired proportions.
- Determine the right side of the stem, because the main text will be located on it.
- Begin folding the accordion on the right side.
- To prevent it from falling apart, connect the inner sides of the product with a drop of glue.
- Iron it thoroughly, put the blank under some heavy object for a while to make the pages even, straight and neat.

Shirt making:
- Choose the appropriate drawing. Better to use scrap paper. Draw a rectangle with sides 15 and 8 cm, then cut it out.
- Determine the middle, just fold the white side inwards exactly in half along the length.
- Unfold the workpiece, then bend the right edge 5 mm.
- Fold the top and bottom sides towards the center line.
- Make an outer cuff on the right side to form the shirt sleeves.
- Turn the figure, bend a 1 cm wide strip on the left side.
- Turn the workpiece again.
- Fold the bottom and top corners towards the center on the left side to form the collar.
- Connect the right and left parts of the workpiece.
- Tuck the right side under the collar.
- Glue the shirt to the card.
Tie making:
- Cut a 3 cm square out of colored paper, then fold it diagonally.
- Fold both sides towards the center.
- Turn the workpiece over, bend the upper corner down a third.
- Then lift it up so that a small crease forms in the middle.
- Turn the figure over and bend the upper corner down.
- Left and right side bend at the center.
- Smooth it well.
- Connect the folded edges with a drop of glue.
- Connect the tie with the shirt.
- Place the postcards on the first page and fix the shirt.
Hello dear masters and craftswomen. I present to your attention a master class on making such an origami swan, and I called it "The Swan in Pink". How to origami a swan? We will make a pink drawing, select the swan with pink modules around the perimeter and put it on a round stand, and also glue small eyes. Please watch this video on how to make an origami swan. V […]
Hello dear masters and craftswomen! Today I bring to your attention a master class on making a tricolor Swan from triangular modules... It seems that what else can you think of, what other options are there for making Swans using technology modular origami... But it turns out that there are still options and this is not the last thing in my arsenal. The tricolor swan is so simple [...]
Hello dear masters and craftswomen! I bring to your attention new master class for making a Swan in black from 3D modules. In the last lesson, you and I did the Swan in red, and now I decided to slightly change the style and perform the Swan in black. The scheme is not complicated and will suit anyone, even a beginner in modular origami. Specially […]
Hello dear masters and craftswomen! I bring to your attention a new master class on making a Swan in red shades. On the Internet, you can find a huge number of different schemes and master classes for making Swans using the modular origami technique. I’m sure you haven’t seen such a swan before. This scheme is quite simple and even [...]
Swan in blue. Video tutorials and diagram. Part 3. In the third part of the master class, I offer you two video lessons and detailed diagram origami how to make a swan. The first video talks about how to make a swan neck and how to make a small stand. The second video talks about how to glue the swan better and faster. Lesson 6 (neck and [...]
Swan in blue. Video tutorials and diagram. Part 2. In the second part of the mother class "Swans in Blue" we finish making the torso. I have prepared for you two video tutorials and a detailed diagram of the origami swan from the modules. To assemble a swan, you will need 1438 1/16 modules, of which: 317 - purple modules 471 - blue modules 552 - blue [...]
Swan in blue. Video tutorials and diagram. Part 1. I would like to bring to your attention a new master class on making an origami swan out of paper from 3D origami modules. The layout is rather unusual and the wing look is not quite classic. In the photo, you can see small through holes and a mesh pattern. Frankly speaking, the scheme is rather complicated! Especially for this scheme, I [...]
“Rainbow Swan” diagram and video tutorials (part 3). The third part of the "Rainbow Swan" master class consists of three video tutorials on assembling the stand. And I also decided that the video tutorial on gluing "Rainbow Swan" will be very useful to you. Lesson 5 (support part 1) Lesson 6 (support part 2) Lesson 7 (support part 3) [...]
How nice it is for dad or brother or beloved young man get a do-it-yourself card for Defender of the Fatherland Day! It is even more pleasant if there are no banal carnations, airplanes and tanks. In this article, we propose to do origami postcard... Such a shirt with a tie will amuse the pride of every man. After all, these attributes indicate that your man is respected and in demand.
To make such a shirt using the origami technique, you will need:
- rectangular sheet of shirt paper
- rectangular tie paper
- PVA glue
Try to first fold the shirt out of a sheet of plain paper, so to speak, a training option, so that if something does not work out, you do not accidentally spoil the colored paper. And one more thing: it is better if the color of the tie is contrasting with the color of the shirt.
So let's get started:
1. Fold the rectangle in half along the long side. Then unfold and fold the edges of the paper towards the middle.

2. Making the sleeves - turn the sheet of paper over face side up and bend the upper corners to the middle of the fold line, then unfold again.

3. Place the sheet face down again and fold the corners back to the fold lines you just made. Just unbending these small corners is no longer required.

4. Now fold the top of the folded sheet where the edge meets the fold lines of the corners.


5. Fold two ribs towards the center of the shirt and form the sleeves while holding one hand with one finger.


6. Form a collar at the other end of the folded rectangle. Fold the bottom edge of the paper so that the collar is half the length of the sleeve.

7. Turn the folded sheet over and form the corners of the collar.

8. Aligning the hem with the sleeves and collar, fold the sheet, straighten the corners of the collar and secure with glue for best results. The shirt is ready, you can decorate it with buttons, a corner of a handkerchief and a tie.

Multi-colored office paper in the hands of even a person far from needlework can turn into a very original postcard for a man. It will complement the gift, or serve as a universal mini-present for any suitable occasion.
You will need: scissors, paper of two colors (on a sheet), PVA glue.
1. For the shirt, cut a wide rectangle from the sheet. The size of such a postcard can be absolutely arbitrary. Fold in half widthwise.

2. At the top of the back half, cut a 3 cm strip.

3. The protruding part on front side carefully cut with sharp scissors on the sides (leaving intact in the middle). The cut line should be exactly in line with the border of the second part of the postcard.

4. Wrap the resulting free strips at an angle (inward).

5. The collar turned out, and the postcard began to resemble a shirt.

6. Cut a beautiful tie out of paper of a different (preferably contrasting) color. You can draw the outlines first.

7. Stick it in the middle under the collar.

8. Simple postcard made of paper is ready. The inside of the spread is for congratulations and wishes.

The final view of the craft. Photo 1.

The final view of the craft. Photo 2.

The final view of the craft. Photo 3.
A postcard in the form of a simple shirt can be made with children for your beloved grandfather, dad, uncle for February 23 or other holidays.
This idea will be a real find at moments when you urgently need to congratulate a boss or a loved one, but there is no suitable gift at hand.