How to Make Halloween Decorations - Scary Beautiful! How to make a spider web for Halloween from cotton wool. DIY decorative wreath for the holiday Halloween How to make a spider web out of gauze
October is outside the window, and we continue to prepare for the most eerie and mysterious holiday - Halloween. In the previous article, we considered, and today we will learn how to make classic Halloween crafts with our own hands - the most traditional and vibrant symbols of this holiday.
Any holiday is, first of all, a mood, an atmosphere. And as unusual as Halloween, even more so. To create an aura that befits this holiday, give your home a mystical setting. We offer several options for handmade decor that will briefly plunge your home into the atmosphere of the other world and mysticism.

The theme of Halloween decorations remains the same - different kinds horrors, the other world and its characters. And the only bright spot of this evening is the pumpkin.

The pagan origins of the holiday have an effect, when the signs of autumn served as symbols - bright leaves, harvest, garden scarecrows.
Pumpkin is traditionally used to make Jack of the Lantern.
According to Celtic legend, the greedy blacksmith, having entered into an agreement with the devil, after death did not go to Hell or Paradise, and his soul wandered through the restless land. The devil gave Jack a tiny coal to light the way. The blacksmith, protecting the ember from the rain, hid it in a pumpkin. From that time on, it was believed that such lanterns helped homeless souls find their way to Purgatory. In addition, they say that the light of a candle in a pumpkin scares away evil spirits, which from October 31 to November 1 move from the world of the dead to the world of the living.
 Halloween pumpkins can be scary, fancy, or funny. It's a matter of taste and your imagination.


Jack's lantern with own hands

Materials for work:
- A bright, medium-sized pumpkin without damage;
- Sample;
- Awl;
- A spoon;
- Candle,
- Garland,
- flashlight;
- Marker;
- Scotch.
1.Decide how we will illuminate the pumpkin. When illuminated with a candle, we cut out the top of the pumpkin, for a flashlight or an electric garland, we cut off the bottom.
2. Consider the option with a candle. Cut off the cap from the top of the pumpkin in a conical manner.
3. Scrape the pulp and seeds from the pumpkin.

4. Take a ready-made template and fix it on the peel (tape). With an awl, we apply the contours to the pumpkin according to the template. You can then, for clarity when cutting, circle them with a marker or felt-tip pen.

5. Cut out the elements of the face along the contours.

6.Place vanillin, cinnamon, nutmeg or coffee beans inside for aroma.
7. We firmly fix inside a candle about 3 times smaller than the size of a pumpkin.

If we cover the pumpkin with a lid - its cut off top, two or three holes should be drilled in it for the heated air to escape.
When using a flashlight or an electric garland, the cut off part will be at the bottom, and put the light source inside.
Halloween wreath to decorate the door - video master class

Another one of the most beloved DIY Halloween craft options - holiday wreath, which is usually hung on the door. You can make it from the most different materials... Only one thing is invariable in the manufacture - the presence of the mystical attributes of the holiday.
How to make a Halloween wreath with your own hands, see the video master class below:


Mystical garland for Halloween decor

One of the most budgetary options for DIY Halloween crafts - thematic paper garlands... It is not difficult even for a child to make them.
We take paper and fold it into several layers with an accordion. Draw a template on the first folded sheet. Then we cut out the part along it, leaving the sides uncut.

Coercion Pattern

Bats pattern

Halloween Symbols Templates 
Pumpkin patterns


Bloody palm and footprints on the floor
Such a "pleasant" little thing will perfectly fit into the general atmosphere of the holiday.
In a flat bowl, dilute the red paint - gouache or watercolor, dip your palm there and leave your print on glass or any other surface. Footprints are made in a similar way.


You can cut out templates for your feet and glue them to the floor with tape.
Less effective, but will save time on cleaning floors
Head in a jar - very scary and realistic DIY Halloween crafts
This super-realistic "decoration" of the holiday can not only surprise the guests, but also scare them.

Find out how to place a severed head in a jar in this video master class:
Vampire candles
Take scarlet gouache or acrylic paint and generously paint over the top of the candle around the wick with it. Burning down, the paint will melt and flow down in "bloody" streams.

Funny Halloween Crafts - Witch Legs
If you have sharp-toed shoes, you can build a funny craft in bright striped stockings, the traditional witch's shoe.
Stockings can be stuffed with holofiber, padding polyester from old pillows or unnecessary things cut into ribbons. The legs can be hung from the door, placed in a pot and decorated.

Scary Glass Stickers

A great option for Halloween decor can be stickers on glass of doors and windows. Print to printer ready-made templates silhouettes of pumpkins, different evil spirits and other mystical characters, cut and attached to glass. Baking paper is ideal for this, and you can find a whole bunch of different "Halloween" templates on the Internet. For example.


Witch roses - beautiful and terrible
Black roses will bring a little mysticism to the general atmosphere of Halloween. For added horror, they can be decorated with "blood" by sprinkling red paint on them.

You can familiarize yourself in our other article, the main thing is not to forget to take paper or other material of the appropriate "frightening color" for their manufacture.
DIY spider web for Halloween

DIY Halloween crafts turn out to be very unusual and bright, they easily create a completely special, mysterious atmosphere in the house, which is not found on any other holiday. For example, only on Halloween can you spread homemade cobwebs with spiders in the form of panels or hang them around the house!
Materials for work:
- Disposable plate;
- Scissors;
- Hole puncher;
- Thick threads (woolen).
This craft is very simple, so it will be interesting to do it with your children.
With a hole punch, we make holes along the edges of the plate and insert threads through them. Then we weave a web of them.


Halloween is a holiday when we, more than ever, can let our fantasy and imagination run wild. And by making various Halloween crafts with your child, you thereby allow him to overcome childhood fears. After all, a ghost or a monster made together with my mother no longer seem so mysterious and scary.

We hope that the ideas proposed in the article will allow you to fill your home with elegant "Halloween" accessories and give this evening a fabulous and mystical atmosphere.
Celebrating Halloween in Russia began relatively recently, while the holiday has a rich history and special flavor. So why not throw a themed afterlife party in mid-fall? In order for the event to be remembered for a long time by all guests, it is necessary to take care in advance not only of the costumes, but also of the decoration of the apartment. How to make a spider web for Halloween with your own hands?
Flat thread decoration
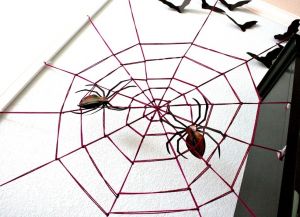
If you need to decorate a wall or floor, a woven spider web is the best option. To create it, you will need threads, the thickness of which depends on the size of the finished jewelry. The braided web will look most impressive on a dark background. For convenience, draw a freehand sketch on a piece of paper. How to make a Halloween spider web from threads? Very simple. Start with the basics. To do this, take several pieces of thread of equal length. Cross the first two with the middle. Fix in a convenient way - studs, pushpins, pins, or will do. Then attach the remaining threads in the same way, making sure that everyone has the same intersection point, and the segments are connected exactly in the middle. At this stage, the Halloween spider web looks like an asterisk. Now you can start weaving: moving in a spiral, you need to connect the guide threads. Avoid excessive tension. Leaving the ends free or fixing them with one more round is up to you.
The spider wrapped around the object ...
 If you want to wrap up a cobweb light, interior little things or a whole wardrobe, you need a couple of spools of fine thread. Wrap it randomly around an existing item. You can allow sagging, or you can form a tight cocoon. This technique will look interesting with white or gray threads. If you wish, you can paint the cobweb in a dirty-dusty color yourself. To do this, you need to soak the thread in a solution of black paint, dry it, and then start winding. To stiffen the web, you can make it from threads impregnated with PVA glue. But remember that it can stain the base. It is ideal for decorating disposable tableware and tableware.
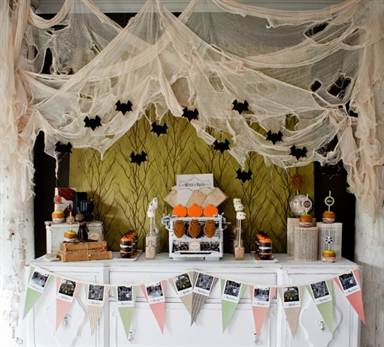
How to make a gauze spider web for Halloween?
Ordinary gauze is also suitable for interior decoration. Cut a piece of this fabric to fit. Start pulling it out at random. You can even break it in places. Such a web looks best in the form of randomly hanging rags. You can wrap it around individual interior items. Dye the fabric as described above for threads, if desired. If the gauze is not at hand, a wide bandage will also replace it. Such a web can be applied in several layers, this will give it an even more realistic look. If you decide not to paint all the gauze used, it is allowed to emphasize its individual areas with a dye composition, which must be applied with a brush.
What else can you decorate with cobwebs?
 It is not necessary to use this decor element only in the interior. You can add a cobweb to a suit or some small accessories. It is very easy to create this piece of jewelry. How to make a Halloween spider web to decorate your little things? It all depends on what material the selected product is made of. If you have enough time to prepare for the holiday, you can even paint the glassware with special paints. Don't forget the tablecloths and napkins. You can draw by hand or using a stencil. You can also transform accessories in a less drastic way, designed for one evening - for example, cut spider webs in the manner of snowflakes from paper and spread them on the table. A spider web for Halloween, drawn on invitation cards, as well as on cards for placing guests at the table, would be appropriate. The interlacing of graceful threads will be a good complement to festive costumes. If you wish, you can simply draw a spider web on the skin. In the embroidered version on the fabric, it will look good too. Do not forget about textile paints that allow you to apply any image to your clothes.
Finishing touches of decor
 Now you know how to make a web with your own hands. If the finished decor element seems too boring to you, you can improve it a little. A cobweb with a spider looks much more interesting. You can buy an arthropod figurine at a toy store or make it from scrap materials. All you need is one body ball and wire or ropes for the legs. Some craftsmen make interesting beautiful spiders from beads and beads. If the size of the decoration allows, you can try to sew soft toy... Also, the cobweb can be whole or in places covered with dry glitter or a special spray. You can decorate a "dirty" piece of jewelry made of dyed threads or fabric by adding colors in specific places. Small debris will also work, such as twigs or dried leaves. Remember what a real cobweb looks like in the attic of a summer cottage. And try to achieve the same effect.
A decent sized hand-made spider will perfectly fit into the atmosphere of any Halloween party. The spider will look good within the general concept of the evening if it is placed on the front door or just at the threshold of the room to meet all the guests. It is very simple to make a spider, improvised materials will be useful for this, and all the work on its manufacture will take no more than half an hour.
Materials (edit)
Before making a large spider with your own hands, prepare:
- a plastic canister (with a capacity of 3 or 5 liters);
- black electrical tape;
- insulating tubes in black;
- table tennis ball;
- felt;
- glue;
- knife and scissors.
Step 2... Wrap the entire plastic canister together with the handle with black electrical tape. Make the turns tight so that the plastic is not visible anywhere.

Step 3... Cut the insulating tube into four equal lengths.
Step 4... Tape the tubes around the spider's makeshift torso with duct tape. The center of the tubing should be right in the center of the canister.


Step 5... At an equal distance from the center of the legs on both sides, make cuts with scissors in each instance. How it should look is shown in the photo.

Step 6... Bend the tubes along the cuts made, bend them and fix them in this position with electrical tape.
Step 7... For the spider to have a finished look, make eyes out of tennis ball... To do this, cut it in half and glue circles of electrical tape as pupils. You can decorate the back of the spider with ornaments made of colored felt. Glue the felt with a heat gun or double tape.
Celebrating Halloween has become a tradition. Creepy, but very fun party gives the opportunity to play a trick not only for children, but also for adults. You can show your imagination and amaze guests with ominous makeup, intricate dishes and table setting with gloomy decor. So we will try to decorate the house in an original way - we will create with our own hands a decorative wreath in the form of a huge shaggy spider that sits in a web.
To make a decorative wreath with cobwebs, we need:
- willow branches
- black spray paint
- white cotton thread
- white fluffy weed yarn
- rose hips and dry herbs
To create a furry spider, we need:
- wool for felting black and gray
- wire
- black woolen thread
- felting needle
- foam sponge
- side cutters
- narrow-nose pliers
Let's make a frame for the web out of willow branches. To do this, we will roll one willow branch into a ring, then we braid the required number of branches around it, creating volume. The ends of the branches do not need to be cut off, the sticks sticking out in different directions will give our web a natural and ominous look.

If desired, you can also stick a few twigs of dry herbs or flowers into the base.
The finished base must be painted black, for this it is best suited acrylic paint in an aerosol. The paint has Strong smell, therefore, you need to use it outdoors, for example, on a balcony. Before painting, the willow base should be placed on newspapers or another surface that is not afraid to get dirty. Leave to dry completely for several hours.

Tie a white cotton thread with one end to the willow base, pull it to the opposite side of the base, as if marking the diameter of the circle, tie the end with a strong knot and cut it off.

In the same way, we stretch a few more threads, trying to make equal gaps between them. I have only 8 strands or 16 rays extending from the center.


Further, we will weave a web from the yarn, the idea is borrowed from the amulets of Siberian shamans, this is how their dream catcher, kytgyem, is woven. The end of the yarn is fixed with a knot at the base of one of the beams, the yarn is pulled to the next beam and again fixed with a knot, thus tied in a knot on each beam.
After passing the first circle, weave in a spiral, gradually narrowing the circles, reaching the center, cut the thread.
![]()
The yarn looks great, giving the web a real look.

Do-it-yourself hairy spider
We will start making a spider with its legs. Using side cutters, cut off the required amount of wire. Three blanks will be the same length, one slightly shorter for the front legs and one very small for the jaws.

We bend the wire in the shape of the letter "M", bend the ends with the help of narrow-nose pliers.


We braid each wire with a black woolen thread, starting from the center, then spiraling one leg, passing the end of the thread into the fold of the wire for better fixation, spiraling upward and braiding the second leg in the same way.


When all the workpieces of the legs are ready, we start making the abdomen, which we will make of wool. Put some wool on a foam sponge and use a felting needle to shape it into an egg-like shape.

We insert all pairs of legs inside the abdomen and fix it, continuing to roll the base of the spider.


In the same way, we make a spider's head by inserting a wire with a jaw blank inside it.


We connect the head and abdomen, cover the top with black wool, if desired, you can also paint the spider with spray paint.


We draw a drawing on the body of the spider, wrap each leg with gray wool and knock out the outline of the cross on the back. We beautifully bend the legs of our spider and put it on the cobweb, it does not need any additional fastening.

We decorate the cobweb to our liking by inserting rosehip twigs, bird feathers and so on into the willow base.
The spider web turned out to be excellent, it remains to hang it on the tree at the entrance to the house or in the room on the wall.

Experiment and surprise guests, happy holidays!
Such an unusual and not all pleasant kind of insects, like a spider with your own hands, is a rather unusual decoration and decorative element. Such an accessory can be made using a wide variety of interesting techniques and materials. In our article, we will tell you about the most popular of the techniques for creating a decorative spider with your own hands.
Shaggy spider made of cardboard and thread: how to make it yourself
To create such an unusual decorative arthropod insect, you will need very few materials and tools. The shaggy spider will be made from cardboard and skeins of yarn.

So, prepare the following tools and materials:
- A ball of yarn of any color. Most of all, black or gray threads are suitable for creating a shaggy spider.
- Sheets of thick cardboard;
- Copper wire;
- Sharp scissors;
- Glue;
- Markers of different colors.
After preparing all the tools and materials for the master class, start making a shaggy spider.
First, you should cut a piece of cardboard to the size you want. The wider the width of the cardboard strip will be. The bigger and bigger your spider will be. Now start winding threads from the middle of the cardboard strip. After that, start inserting pieces from copper wire into the core of the wound circle of thread. Cut off excess cardboard.
Cardboard is best taken in the same tone as the color of the spider yarn. If you cannot find such a color, then you can paint the spider's legs with felt-tip pens or paints.
Now, spider eyes should be cut out of sheets of thick cardboard and glued to the glue. A more economical option for those who do not want to use and spoil good threads: insert bendable tubes into the ball. Make the tubes themselves into spider legs. Use decorative pins or foil balls instead of eyes.

Such a spider can be made sitting on a web of threads or other similar material.
A very realistic way to make a hairy spider with your own hands for a festive decoration
In order to decorate your room for holiday, you can make a spider from special black hairy tubes. For work you need seven sticks of black chenille. Such material is very easy to work with and use. It can be easily twisted and fastened together.

Twist the ends of two chenille sticks together and wind the resulting long wire around the index finger. Leave a small piece of material. Secure the resulting bundle of six shaggy wires with the prepared end of the wire. Straighten the legs of the spider and form a small loop at the end of each of the legs. This will make your match spider more stable.
Halloween spider from balloons: a detailed description of the manufacturing process
You can make many interesting and unusual crafts... We suggest you try to make an unusual spider out of balloons for the Halloween holiday.

To work you will need the following materials and tools:
- Two air balloon black color;
- Sheets of black and white cardboard;
- Sharp scissors;
- PVA glue;
- Rope.
After preparing everything necessary material start making an unusual spider from balls. Inflate two different sized balloons. One ball bigger size for the body of the insect, another smaller size for the head of the spider. Crochet them together with a string.
From black cardboard, cut eight strips of the same length and thickness for the spider's legs. Fold the strips of black cardboard in the form of spider paws and fix with PVA glue on the sides of the larger ball.
Then cut out the eyes and nose for the insect from cardboard and glue to a smaller ball. Your balloon spider is ready. You can use it to decorate your room for Halloween or even for a birthday.
You can make a spider using balloons in a wide variety of colors and shades. Check out some ideas for making this type of spider in the photo below.

Here is another way to create a balloon spider.
A selection of thematic videos for the article
At the end of the article, we suggest you watch a few videos on the topic described above. We hope that after watching the proposed video materials, you will not have any questions on this topic. The demonstrated material will help you learn how to create unusual accessories in the form of a spider. Enjoy viewing and exploring!
Spider web and spiders do it yourself
Spider web - simple and spectacular decoration premises for Halloween, especially if you are planning a party with guests and you need to create an appropriate atmosphere.
The most obvious option is to reel in the form of a spider web woolen thread on the wall, fixing them with pushpins. First you need to fasten the warp threads (diagonal), and then wind the thread in a circle.

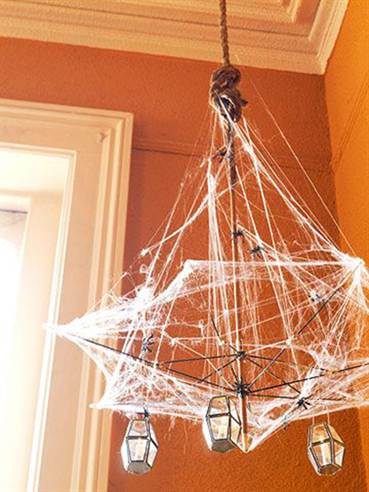
You can fix the spider web on a plastic disposable plate, populate a cardboard spider in it and hang it on a chandelier.

The basis for the web can be the cross of any sticks, for example, thin branches or ice cream sticks.


A cobweb can be cut out of paper or oilcloth according to the same principle as a snowflake for the New Year.

Spiders for Halloween as a decoration on a cobweb or in an independent decor can be bought ready-made or made by hand. It can be just a figure cut out of cardboard or a volumetric version.
These cute spiders can turn out from the same plastic plates... From the materials you will need chenille (fluffy handmade wire) and eyes for toys of different sizes.

But such a not only funny, but also delicious spider can be made from chupa chups and chenille:

More complicated in execution is a glamorous spider made of a decorative mesh, decorated in the form of a bubo.

You can make such a cute spider with your own hands from two foam balls of different sizes.


And one more version of a spider made of a ball, this time wrapped in acrylic thread.

Quite simple to create, but spectacular looking spider - made of a black ball with paper paws. It may well frighten the guest who entered the room!

Halloween Crafts from Toilet Paper Rolls
Rolls (tubes) remaining after use toilet paper- great material for children's creativity... It can be used to make figures of any animals and birds, and for Halloween - monsters, mummies and bats.

To create such mummies, nothing but toilet paper and a peephole are needed. Wrap the roll with paper in random order, glue the eyes - the mummy is ready!


As for the creation of monsters, here you can show the flight of your imagination with might and main.


The same applies to making witches, ghosts and bats - no instructions are needed to make them.


Well, if you do not have extra rolls at home or there is not enough material to realize all your fantasies, use empty juice boxes as an alternative.

Candlesticks
An original decoration of the room decor for Halloween will be a craft in the form of a candlestick. Making it is not as difficult as it might seem at first glance.

Take a glass container (jar) and glue the themed figures cut out of paper (witch, bat, pumpkin, spider, cobweb, etc.). Put a candle on the bottom of the jar, light it - the lamp will light up effectively.


The drawing can also be applied with a marker, and the container can be painted in any color - then the lamps will light up in different shades and will look monstrously gorgeous in a dark room. Buuuu!


You can wrap the jar with gauze and glue the eyes - you get a mummy lamp.

Wrap the cans with thread and plant spiders on them - again we return to the topic of cobwebs.

Fairy lights
A craft option for the holiday, representing unlimited scope for imagination. After all, you can hang anything on a garland!
Paper ghosts.

Skeletons, black cats and bats.


Skulls and ghosts made of felt.


Faces of monsters and witches.

Balls made of thread in the shape of "sugar heads".

Paper pumpkins.

Ghosts made of thread.

Or fabric.

Halloween wreath
A wreath on a door or wall is a very popular home decoration. Now such wreaths are made for many holidays - and Halloween is no exception. As a blank, you can use a circle made of cardboard, plywood or a foam circle - they are sold in handicraft stores.
Such funny monsters can be made if many tulle strips are tightly knotted on the workpiece.


Halloween is a holiday that first appeared among the ancient Celts of Ireland and Scotland. It is celebrated on October 31, on the eve of All Saints' Day and, as a rule, it is celebrated in English-speaking countries, as well as in Japan, South Korea, Singapore, Australia and New Zealand. But since the end of the twentieth century, this day began to be celebrated in many other European countries and in the former Soviet republics. On this day, many put on scary costumes and decorate their homes and offices with cobwebs on interesting holiday Halloween quickly and step by step with your own hands.
We bring to your attention several options for making a spider web for a holiday with your own hands using different techniques, for example, made of paper.
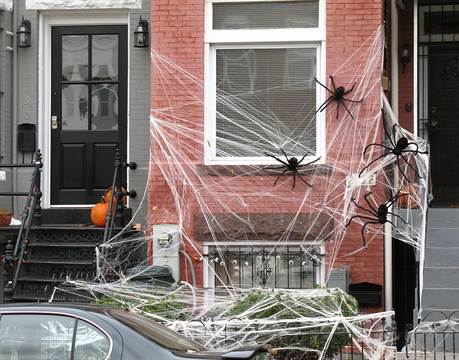
How to make a giant spider web for Halloween with your own hands

To create a large web of rope, you will need the following filling and materials:
- Double-sided adhesive tape;
- The thread is gray or black;
- Spider for decorating a web (plastic or other material).
After preparing all the necessary material and tools, start making a gloomy decorative web from threads. Before starting all the manipulations, think carefully about how your web will look like - what size it will be, and how your threads will go. As a starting point, glue small pieces of double-sided tape to the wall — many pieces are needed.
First glue the pieces of thread that will go out of the center (straight lines), and then start glueing the threads that go in the circle of the cobweb. If desired, attach the toy spider to your large spider web.
Making a spider web from gauze: a detailed description of the work
Ordinary gauze is also suitable for interior decoration. Cut a piece of medical gauze to fit. Start stretching it at will. You can even make holes in the fabric in places. Such a web looks best in the form of randomly hanging rags. You can wrap it around individual items in the room. Dye the fabric any color you want. If you decide not to paint all the gauze used, it is allowed to emphasize its individual areas with a dye composition, which must be applied with a brush.

It is not necessary to use this decor element only in the interior. You can add a cobweb to a suit or some small accessories. It is very easy to create this piece of jewelry. It all depends on what material the selected product is made of, for example, from beads. If you have enough time to prepare for the holiday, you can even paint the glassware with special paints. You can draw by hand or using a stencil. If you wish, you can simply draw a spider web on the skin. In the embroidered version on the fabric, it will look good too. Do not forget about textile paints that allow you to apply any image to your clothes.
We are trying to make a spider web of threads: ideas and description of manufacturing
If you need to decorate walls or floors, the best option will become a wicker web. To create it, you will need threads, the thickness of which depends on the size of the finished jewelry.
For convenience, draw a random sketch on the paper fox. Start with the basics. To do this, take several pieces of thread of equal length. Cross the first two with the middle. Secure in a convenient way - pushpins, pins, wire, or double-sided tape will do. Then fasten the remaining threads in the same way, making sure that the intersection point is the same for everyone, and the segments are connected exactly in the middle. At this stage, the Halloween spider web looks like an asterisk. Now you can start weaving the spider's web itself: moving in a spiral direction, you need to connect the guide threads. Avoid excessive tension. Leaving the ends free or fixing them with one more round is up to you.

If you want to wrap up a cobweb light, interior little things or a whole wardrobe, you need a couple of spools of fine thread. Wrap it randomly around an existing object. You can allow sagging, or you can form a tight, dense cocoon. This technique will look interesting with white or gray threads. If you wish, you can paint the cobweb yourself in a dirty dusty color. To do this, you should thoroughly soak the thread in a solution of black paint, dry it, and then start winding. To give elasticity and durability to the web, you can make it from threads impregnated with PVA glue. But remember that such a decoration can smear the base with the composition. Ideal for decorating disposable tableware and bottles.

Related videos
We offer several videos demonstrating the creation of a web for a holiday with your own hands. Happy viewing!
The tradition of celebrating Halloween is not so long ago in the life of Russians. But this interesting, original holiday is never complete without a sea of impressions. One of the main attributes of home decoration is not only pumpkins, but also a cobweb. DIY Halloween spider web is quite simple. There are several techniques for this, from a wide variety of materials.
We knit decor
You can crochet a very beautiful decorative web, which will give the appropriate entourage to the atmosphere. It is not very pleasant to have a real cobweb in the corners, and such an openwork thing will definitely become the envy of your skill. If you have sufficient knowledge, then you can knit such a product.
To work on more easy option you will need a crochet hook (# 8470 was used in the example) and yarn. You can choose any color, but the material is suitable with a lot of polyester. You will notice the difference when you attach it to the wall, because the material will stretch perfectly. Therefore, the spider web will take about 30-35 cm, depending on the tension of the threads.
The process will not take long if you know how to handle the crochet. For those who are not new to this business, you can suggest replacing the first column in each row with air loops. So your spider web will become not only more voluminous, but also more realistic.
- 1 row: 12 tbsp. with a yarn over the ring.
- 2nd row: 12 tbsp. caps and between each column 2 air loops.
- 3 row: 12 tbsp. and between them 3 air. P.
- 4th row: 12 columns with 2 yarns and 5 air loops between each.
- 5 row: 12 tbsp. with 3 yarns, between loops of 9 vp.
- 6 row: 12 tbsp. with 4 yarns, between each 11 vp.
- 7 row: 12 tbsp. with crochets, between each 15 vp.
It turns out a neat, small cobweb, on which you can attach its owner, also made from scrap materials, from beads, threads, etc. But this is only an approximate size. You can continue to knit until needed.

Strong and reliable
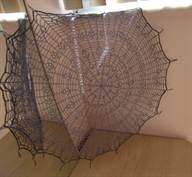
There are several options for how to make a wire spider web. For the first one, you will need several branches, which can be found even in the city strip.
Connect them in the middle with wire, and then continue the spiral weaving from the center, securing the thread to each branch. As a result, you will get a composition from the floor. natural materials... This definitely cannot be ignored.

More complex options will require perseverance and skill. You will need thick wire. Since the composition is angular, it is necessary to make five "rays", the outermost of which will be at an angle of 90 degrees in relation to each other. The ends can be left straight, but twist as you wish, as shown in the photo below. We twist the place of their connection. Along the entire width of the resulting element, we stretch the threads of the cobweb from one ray to another, etc. It is better to start with the wide part and gradually narrow the distance between the threads. Such a composition can be decorated with a homemade spider or dry leaves.

The most realistic spider web
Want to really scare your guests on Halloween or tease your neighbors with your skill? Try to create a truly scary and realistic composition for the holiday.
Such a web is suitable both for the facade of a house and for decorating a small apartment inside.
Gauze web is a safe bet. Firstly, the material is available and everyone will definitely find it. Secondly, it is easy and simple to work with it.
To create a lighter, more airy version, you have to tinker. Stretch each thread of gauze. But the effect exceeds expectations.
Even the workplace can be decorated in this way.

The second option is easier and faster - to hang gauze, stretch it slightly or tear it. The effect of realism will be less, so it is worth placing spiders and the corresponding attributes on the canvas.
A spider web made of threads or ropes will look great. Woolen yarn will do. If the threads are thin, then the white spider web will look faded and not profitable, it is better to use black.
Stretch in the place where you decided to install the composition, crosswise six long threads, secure the ends with pins, nails, molar tape. Closer to the center, attach a thread of the same color to any ray using a knot.

Moving in a spiral, fix the parts of the cobweb, making the distance between the levels more and more depending on the distance from the center. And at the end, secure with a strong knot.
The web is ready! It will look especially beautiful when suspended at the corners. It remains to attach spiders and other decor to it.
Paper option
Paper patina is easy to make according to the principle christmas snowflakes... You will need a square sheet of paper and scissors.


Cut off the lower part so that an even triangle remains.