How to make flowers from satin ribbons. Pink flower in Kanzashi technique
When people hear about flowers from ribbons, then everyone imagines a different picture: someone parody of real flowers, someone's simple gerberas. The truth is that very few people make the imitation of living colors, as they are made quite a long time and require much attention and skill. But the process of manufacturing out of the tapes of beautiful and slender eyes is very exciting. It will help to distract from urgent problems Anyone.
Art of Kanzashi
Kanzashi is the art of decorating ladies, which appeared in Japan. The finest loskutka silk is folded in the form of chrysanthemums and other colors, they are used as decorations of female hairstyles.
Passion for creating artificial colors from satin ribbons has gained vast popularity in our country. Plus, all this classes are that at the end of this action you will get satisfaction, because after 30 to 40 minutes you will definitely get more or less decent flower. Yes, in the first time you will get ridiculous flowers, but over time you will have experience, and the following instances will be more acceptable.
The dignity of occupation is that it does not take you a large number of time and does not require talent. All you need is to gain more experience and view on the Internet a couple of learning videos.
All flowers from the ribbons are made quite durable, but if you make a disposable decoration, then naturally the special strength of the product is nothing. Agree, everyone may have a situation in which the strength of this product is necessary. For example, if the flower serves as an ornament to a gift of a child, the strength will not hurt here, otherwise your flower will last a maximum of two days.

Types of Kazan
There is about nine types of Kanzashi. The most common - Hana Kanzashi.. Usually they are created by Japanese masters of small silk squares using folding. This technique of folding in Japan is called the Tsums. A small square of the fabric is folded using a tweezers or forceps and, thus, turns into a petal of some flower. Then, such petals are connected to each other with threads and needles or attach to any basis to get a full-fledged flower.
Kanzashi Geisha are wearing a month, time of year or holiday. Each month can correspond to its own color. So, for example, there are green, red, white colors in the January canzashi. For autumn months Characteristic, such colors like yellow, red, orange.
Kanzashi needlework is now becoming very popular not only in Japan and China, but also around the world. In Russia, there are already many sites and forums with the description of the Tsumami technique. Send this non-flat technician Can anyone, even a child.
In the creation of Kanzashi, there are two main types of petals - sharp and round. And each of them can have countless versions. Some craftswomen come up with new forms of petals. For example, in the acute petal make a small curl or completely turn the petal inside out.
Each wizard canzashi appears as an artist, as the compilation of the flower itself a variety of shapes Petal - real art. Unlike Chinese and japanese mastersMany Russian craftswomen create canzashi from ordinary satin ribbons. Sometimes any other cloth, ranging from Citz and ending with even denim. Typically, the resulting compositions of petals are attached to hair gum, thereby obtaining a very elegant bow suitable for any holiday. In addition, many masters fasten them to a blank for brooches, manufacturing and picking up colors for a suit or dress.
Also, Kanzashi began to use to compile entire bouquets from the ribbons. Such bouquets are now gaining very popular popularity, as they never become covered and, undoubtedly, will delight anyone even in the most cloudy day.

Roses from tapes
After reading this article, you will know how to make a flower from a tape, which for beauty will not give way to the shop, will serve as an excellent decoration, both to a gift and a dress. If you are interested in this lesson, then do not stop there, and experiment and improve.
You should know that there are several main manufacturer techniques, in principle, all product data are based. Immediately say, do not try to make an exact copy of the living colors, let the will of your fantasy. Only so you can feel deeper than the subtleties of this art.
Before proceeding with the manufacture, you must prepare such props: good scissors, threads with needles, the so-called adhesive gun and a few glue sticks, and the most basic material is, of course, satin ribbons. You will also need a few tongs, beads, a fishing line, and many other things that will definitely find at the avid needlewoman. For convenience, your workplace should be delivered from all over and well lit. Since the quality of your work has depends on it.

Melted petals
Now we will tell about the method that ideally suits people who want to make a volume of work. But that equipment has its own minuses:
- First. The petals that have undergone the reflow procedure have not such an ideal look like flowers made using other ways. So it is undesirable to use flowers of this descent with other works. Since the difference in the accuracy of works will be too obvious.
- Second. You have to gain patience and clearly understand that from the first time such a volume work will turn out far from everyone.
- Third. Choose material with great attention. Since no ribbon is suitable for this method. And find out which material is most suitable for this method only by samples and errors. It is advisable to use satin or the same categorous tapes.

Flower in the technique "melted petals"
Learn to make your own hands
If you make roses from tapes yourself, and not acquire them in stores, then you significantly reduce your costs for this product. We will not go into step-by-step instructions for the manufacture of this product, and in short, we will briefly describe the variations of this type of decorations from the ribbons.
These variations are several. One option is to glue the triangles. This method is fulfilled pretty quickly and not quite difficult.

The second variation is the so-called twisted rose. The beginning of this method is like the previous one, but after the end of the formation of the center, it is necessary to rotate the ribbon, thereby spinning it with a layer behind the layer. When the work is completed, the finished product must be consolidated.
Also, do not forget that the aesthetics of the finished product also depends on the quality of the material from which the ribbons are made. Will look good if you combine a couple of different colors in the same song. It is advisable to choose a tone of a more gentle shade.
If you want to make a bouquet of flowers, it is not necessary to do a bunch of simple colors and combine them into a bouquet. Although you can go and in this way, but if you want to make a bouquet, that is, the way is much simpler. Explain in general terms, as this product is done.
So, for a start, the main part (base) is collected. It consists of a ball of suitable size and handle. We fasten this design and then decorate it with ribbons and flowers from the tapes.

Roses from ribbons of various execution techniques have become a real boom in modern design art. They began to decorate not only gift boxesBut also clothes, accessories, hats and everything that comes across the eyes.
Production of roses without stitching
There is plenty different options Making roses from fabric. Weaving, stitching, twisting, and many other simple movements are based on the technician. In this article, we will offer you a couple of options simple, but very beautiful and neat roses. After studying the material, you yourself choose what method will use.
- For creative work, you will need a tape whose width is 5 cm, and the length is 75 cm.
- First of all, it is necessary to fall the edge of the ribbon so that they do not bloom. Take the edge and run it to the opposite side so that it turns out the triangle.
- Now you need to twist this corner and then fasten. Here, already the middle of our roses is ready.
- Now he will heat the tape to the edge on the other side. Then we fold the ribbon as if we want to do paper boat. Will fasten these actions to the neck "Forward needle", which is still known from the school program.
- We continue to bend the tape and fix it with thread, using this principle until the end of the ribbon. As a result, you should have a spiral.
- Achieve a little spiral of the thread and evenly distribute the folds, which in the future will become the petals of our rose.
- Now we start to form a bud, twist the tape, while flashing the thread from time to time so that our beautiful rose does not fall apart and did not bloom.
- So that the flower is more like a natural, we need a sheet. It is also simple to do it. A small piece of ribbon, a width of 5 cm we fold the edges inside, then once again in half along, after that I will withdraw on the principle of paper chill.
- Bill, we will collect a rose with petals, gluings and everything is ready.
Rose, stitched from satin ribbons
- For this option, the tape will also need a width of 5 cm. This time we cut this tape on equal squares. Each square, later, will become an independent petal.
- Make approximately 25 elements and set them along the edges of the lighter, so as not to break. You can use tweezers for convenience, but you can do without it.
- Square bend in half, now every angle bend to the middle.
- We now turn to the most jewelry action in our work, cutting down the lower edge and smell it over the lighter. You need to do the same work with the rest of the squares that we have prepared for petals.
- We take a blank for the petal and twist it and flash the thread. We apply the second petal, turn it around the first and also flash. The exact same work is done with the rest of the petals, we try so that the petals seem to be shifted along the axis so that the bud is similar to the present.
- The level of petals is also important, with the right execution, the bottom of the bud should be flat. After the bud is ready, proceed to the leaflet.
- A tape is required of 8 cm in length and 4 wide, bend them as if we want to twist. Now we have twice, overlapping one piece to another. After that, you should bend all the corners in one and cut the corner or tail, which will come back. Sleep lines Separate a lighter. Leaf ready.
- It remains the case for a small - collect the whole flower. We glue a bud to leaf and our decoration is ready to use.

Openwork tricolor flower
Tell how to make a lightweight, air and gentle flower on a rubber band from satin ribbons.
We need:
- satin tapes of three shades. Tape width 4 cm,
- narrow ribbon from a reps width of 9 mm,
- to decorate the flower you will need artificial pearls on the thread
- felt circle, rubber band And for the middle of the flower, we need three dairy beads (their diameter of about 8 mm),
- lighter, thread with needle, pins, Babina made of foam as an auxiliary material, adhesive gun, candle.
We begin with your work with the very dark tape. We need 7 segments of 8 cm. Segments fold in half, we roll them with a pin, and cut the corners and edges. It turns out the form of oval. Now in the upper part of the petal we make the scissors of approximately centimeter and a half. Now we make billets from pink tape. From this tape you need to make 4 segments of 8 cm. On the bend we make a cut.
We obtain 4 segments of 8 cm. We fold them again in half, fix the pin, cut the corners and edges. On this petal, do not do. Now, from a dairy tape, you need to make 6 segments of 7.5 cm. Cut on a bend, add another same strip, now three bands are twice as well, and cut into the bending. Total you will have 6 segments. We rock the pin and cut the corner and edges of the tape.
Now we will make petals. For this you need a candle or lighter. Take advantage of also tweezers to protect your hands from burns. Here you need to bring a petal high to the fire, because the atlas melts very quickly, the petals turn 180 degrees, there are two - one to one, folding clamping tweezers and we melt the fire, it turns out a double petal. All petals should turn out to be air and lung. Then we melt the petals of the lower tier, it is with the need. It is necessary to catch the stream of hot air, then the atlas will come up as it is necessary, the ends will come beautifully.

We continue to work
After the petals prepared, proceed to work with Babina. We take a needle with a thread, a blunt end with an eye sticking into a foam with a sharp movement, it is very simple, and now we ride the darkest petals in the needle. We place them so that the breakdown watches down. You can do it in a checker order. Then place the other two colors bend up.
After all the petals are riveted, we take a needle from the foam, stretch the thread and make several stitches to fix the petals. This method is reliable than bonding with glue.
Start the manufacture of a flower. To do this, take three beads and wean them on the usual fishing line, tightly shown, so that they are located in the form of a triangle. The middle of the flower is ready. It must be glued to the felt mug.

Pink Atlas Peonies
We will need: Satin tape pink colour 2.8 cm wide, a little bit is already 2.7 cm, we need a tape with a width of 5 cm. You can take tapes dairy and golden, and to finish the rim, take the imitation of the pearl thread, rhinestones on the thread. Also take a metal rim, placed film, lighter, tweezers, adhesive gun.
- From the ribbon, we make a length of 14 cm long. Folds the tape in the form of a tongue along in half, we combine the edges, then we remove the finger, clamp, and we melt the fire, without reaching the satin edge now.
- In the same way, we proceed the petal of the pink tape, then proceed to the ribbon of lilac color.
- Fold facial side, go to the diagonal to the top corner, weigh the edge in order for the tapes later not separated.
- It should be a beautiful corner with folds, you can clamp it with a tweeze, if it is more convenient for you, and cut the corner.
- To give the leaf to bend, it must be heated.
- We fold in pairs of workpieces, glue them three pairs, the remaining leaves are not glued.
- Now you need to measure the segment of the chain with rhinestones, to the toothpick apply glue. We glue rhinestones very carefully, distributing uniformly at the desired length, and we apply a chain with rhinestones.
- Thus, we harvest the beam of beautiful leaves of 5 pieces, everything should be 10 beams. They need to be glued on bending and clamping tweezers for a few seconds, so that glue froze.
- We glue the harvested stamens of the name and stamens. We apply three drops of glue at the base and glue decorative stamens.
- Such a flower reminds a peony bud. You can make a few discontinued colors and two or three booth.

Multilayer Rosa
We need:
- Alaty satin tape 4 centimeter wide, we will need 42 cm.
- We will also need a finishing tape (the edges of it from organza, and the center of satin).
- Ribbon Gradient - width 4 cm, we will need 96 cm.
- Felt circle with a diameter of 3 cm, and a middle for a flower.
- Lighter, scissors, needle with thread.
Work process:
- Let's start work S. satin ribbon. Cut off 14 cm strip, fold it in half. Then put the front side inside, now we will depart from the fold of 3 cm and cut the corner, but the upper corner do not cut.
- Slice clamp a tweezers, we melt the fire.
- The left 3 millimeters will melt, they will not be visible on the ribbon, but when you will do this way of leaf, this corner will never break, the leaves will be good to keep the form.
- Wash the sheet, make it convex. Now just cut off the corner. Scroll processed fire.
- Wide stitches we flash along the entire length of the cut. We tighten the thread, fix it. You will have a lovely petal. We need them three pieces.


- Now proceed to the manufacture of the flower itself. We will need 8 segments of 12 cm.
- We fold the segment, combining the corners, turn inside out, processed the fire, fold twice, turn again to the center. Align the rib in height, cut off the corner. Scroll to pay. The slice makes it possible to put the petal at an angle of 45 degrees. Most importantly, combine corners and relieve the material well. Corners can be lowered the book, align the bends, crop the corner, melted with fire.
- Such petals need to do 8 pieces, they will never work the same, it is not necessary, such a flower looks more like this.
- Listers glue on a felt circle.

- Petals are glued directly on the workpiece. We apply glue to the cut and put a leaf to the workpiece, so that it watches up.
- Petals glue at a distance of 1 cm, so that it turned out a neat middle.
- Four petals are glued first, and then between them have the rest of the petals.
Narcissa from Satin Ribbon
- For work we will need a tape of two colors.
- Cut from it 6 segments of 14 cm long (tape width 4 cm).
- We use yellow and cream color.
- Felt mugs with a diameter of 3 cm, beads on a thread with a diameter of 4 mm, a stationery clamp, a thread with a needle, a glue gun.
- Let's start working with ribbon sections.
- Then we start collecting the petal. We fold the segment by half the face inside, the right angle, retreating from the edge of 1 cm, cut off. Scroll to melt the fire.

- Now turning, cuts and ends fold, so that the angles are combined. We make an envelope and on the edge of the front side, wear the item on a needle with a thread with small folds.
- Then we do it with a ribbon of another color. Do not forget to melting sections. Soak, the edges we add.
- We collect petals on a needle with thread. It turned out a yellow petal.
- Thus, alternating color, collect all the petals - yellow and creamy. Thread tighten the edges tie. Soak the product, make sure that all corners are from above.
- You can pull the flower, heading the needle in the loop. Cream petals should be on top.
- Such a flower resembles Narcissus. The upper tier is a cup of daffidis.

Narcissus with a yellow middle
Crafts from the ribbons are customary to decorate the interior and clothing. Manufacturing technology is improved by many centuries. Nowadays, such equipment such as Kanzashi and Quilling are popular. Creating tape flowers is an interesting lesson for girls and women. Some do it professionally, shoot video with master classes. Using the advice of experienced masters, you can create a small masterpiece for your room or a gift to a close person. With the help of needlework, you can not only pass the time, but also improve appearance Apartments, as well as learn something new, embody their ideas to life. All works are made in several stages. The first of them is the preparation and processing of the tape. The main part of the flower is then created. The next stage is the formation of the foundation and fixing the petals on it. After that, the finished composition is decorated.
Advantages and disadvantages of creating flowers from ribbons with their own hands
Benefits are much more. First, the creation of flowers from the ribbons helps to preserve the wildlife. Crafts look like real - this is the main plus. Creating flowers from ribbons is simple, and at the same time a low-cost way to decorate the interior. They are not covered and served as much as necessary. Ribbon flowers will be an excellent gift for the eighth of March or Valentine's Day. Products are drawn up in any tones - this is another advantage over alive plants. And adult women and young girls will be interested in experimenting with the form of flowers and the type of finished composition. The masters have the opportunity to use any decorations at their discretion, create interesting, not to similar forms. Products from ribbons have some disadvantages. Newbies need to spend a lot of time to make a bouquet of a large number of colors. The absence of one's own smell is also a disadvantage. Fresh flowers create a special atmosphere due to its fragrance, and artificial devoid of such qualities.
Solid tape rose
You can use a narrow semi-coattimeter ribbon, then the product will be small in height and with dense texture, a large amount of bends. But the optimal option provides for the use of a relatively wide 4-centimeter tape. At first, sticking string from it, and one of the edges is melted with a lighter. On the same side and the main part of the work begins. The end is twice as well, creating a diagonal fold. The corner is flexing down, and the process of twisting the core of roses begins around it. When the diagonal bend is almost not visible, you need to flip the ribbon over your feet. The rolled part is covered, after which the strip is once again turned over. Then you need to continue to "collect" the flower, repeating these actions after each full turnover. Closer to the end of the ribbon begins to form the lower part of the flower. The tail is covered and twisted. The product is fastening the thread.

You should not do too strong tension, otherwise the craft is not so lush.

The easiest way of manufacture is involved in the use of scissors, thread needles, nylon thread, kapron tissue. Rosette folds, starting from the core. The central part is formed by the bending of one of the ends of the tape and its winding the opposite, free edge. The resulting layers are pierced with a needle. The remaining free segment is winding around the center. With every turn, three fill is made out. Each of them will form a separate petal. To fix the product, the flower needs to be treated with thread. There is a more complex embodiment for which the sponge will be needed, acrylic paints, Singry procession, oval or rounded shapes, several pieces of wire. Wire segments will be the foundations of individual petals. Molds are wrapped, and the fragments of the kapron tissue are stretched from above. They are attached thread. The center is made from painted syntheps. It will only be left to attach the stem.

Kanzashi (Kandzasi) is a kind of Japanese jewelry, mainly for women, as well as the name of the technology of their manufacture. Finished products usually consist of flowers and leaves, but there are other options related to plants. In total there are about 5-10 main subspecies of this technique, including Tsumami-Kandzasi, Biracan, Mimikati Kandzasi. Not all of them look like a typical modern canzashi. This method implies the use of a fire source to give the petals and the leaves of the characteristic form. Atlas applies as material for products, less often - similar to the fabric parameters. During the work, you will need such devices like scissors, a glue gun, gum, hairpins, stamens, pins, tweezers. Temperature effect is necessary for manipulations with the edges of the molds, as well as for their connection. Fragments of small length are cut out of the satin material, most often rectangles. Their angles are connected or trimmed (evenly or with rounding).

Simple flower five hundred
Since the product will consist only of a cup with petals, it is better to do a few pieces. Squares of 5 × 5 or 6 × 6 cm square are cut from the satin material. They are diagonally. Then the method of bending the corners from the triangle is made square. Then he repels once again into a triangle, and from the side with the largest amount of free edges, a strip of 2-3 mm wide is cut off. The treated side is captured by tweezers, and the workpiece is brought to the candle. Cropped face is float. Immediately after that it should be chopped. It is necessary to wait ten seconds and start to give the mold convex view. Then the foundation is done: a rubber band is installed on a round harvesting. It is necessary to make cuts and with the help of glue and another circle to consolidate it. Petals are attributed to the flat part of the design, also with the use of glue.
Flowers are best done in different colors:
- orange;
- pink;
- yellow;
- blue;
- red.

Bell
In addition to the main component - satin ribbon, you will need:
- candle;
- wire;
- stamens;
- sewing devices;
- suitable glue;
- line;
- glass;
- egypt.
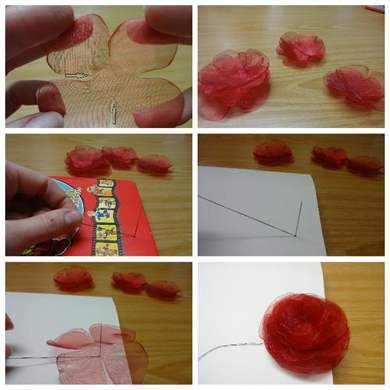
2.5 cm wide ribbon is cut into fragments of 5 cm each. Two pieces are applied to each other with the invalid side. Next they are put on the glass. Using the ruler, the diagonal line is highlighted. All fragments are cut with a hot knife. After that they are soldered along the cut line. The short edges are first stitched by a thread separately, and then join each other. Thereafter front side The acute part of the connected petals is melted with a candle. It is impossible to allow deformation on temperature effects. Next, the end is quickly twisted, so that the bending is turned out. It is necessary to make five such items to create one flower. Then you need to work with stamens: they bend twice as well, tighten the wire and twisted. The top of the stamens are lubricated by glue and five petals are attached to them.

Aster
You will need: thread with needle, several beads, lighter, scissors, green mesh, satin ribbon, thick cardboard, adhesive gun. It is not necessary to choose natural tones to create a flower, any bright shades. The first thing the tape is cut into a large number of segments: from thirty and more. Its width should be 2.5-3 cm, the length of the fragments is 6-7 cm. Each cut is twice in the narrow strip. Then the scissors are cut off a small fragment from one end. It is necessary to do it at an angle of 45 °. The cut edge is melted with a lighter and gluits. Two opposite angle bend inside and melted with fire. And so 30 petals. Then a small circle is cut out of the cardboard. It is covered with satin material. Two rows of petals are glued to this basis. Some add diversity and create another series in the middle, in another color. The finished composition is decorated with beads.

Pion
We will need: base for brooches, ribbon, large bead, needle, bead or monofilament, scissors, tweezers, candle, matches. Circles of different sizes are cut out of the tape. The magnitude of the final product depends on their quantity. All items melted with candles with fire. You need to achieve a wave-like outline over the entire perimeter of the future petal. After that, they are formed near. For this, a small cut is made to approximately 1/5 of the circle was a straight line. The next step is to cross-link several petals in the group. Mugs are combined in a sequence from a large to less. Next, with the help of the thread, the central part of the flower is created: a large bead is attached to the base under the brooch. After that, petals join the product. Now it can be used as a brooch or hairpin or make a gum.

Hibiscus
Read:
- Scissors;
- Candle;
- Super glue;
- Template with a side of 6 cm;
- Thin floristic wire and two satin ribbons different colors - One will imitate the flower (it is better to choose a pink), and the other stem.

You will also need stamens under the color of the pink ribbon. The first thing from the green ribbon is cut with a 6-centimeter rectangle. On the one hand, he needs to give the form of a leaflet: two corners are cut with scissors. Enough one such element. From the pink you need to make five petals. Using the template, the desired number of pieces is measured and cut off. Fragments are cut out molds resembling a drop. One of the edges at the same time is rounded. Perfect form Cut is difficult, so you need to fold all the segments together or use another template in the form of the desired petal. Next, the smooth side of the leaflet is melted. The petals are processed by fire throughout the perimeter, the rounded part is still stretched by hand. Then all fragments are collected together and attached. The stem is made up with green ribbon. It is fastened for a leaf of the same color - the product is ready.

Flower of braid-waves and zigzag braids
Very original products are created from the wavy braid. Need a needle with thread, scissors, one tape-wave 50 cm long or two to 30 cm (preferable). First of all, two segments are intertwined with each other, like curls in the spit. This workpiece is shifted on the typewriter. Then the bud is made: the braid is folded and fastened with glue in several places, it is desirable to once for each turn. The end is converted and also fixed with glue. In this form, the product will mimic the peony, and if you turn the petals - it will be reminded to a rose. Very original non-standard product will be from Zigzag Tales. We need a segment with 20 bends. The ends of the fragment are stitched. For this, the allowance is left in advance. Then, with the help of the thread, you need to flash 10 elements (after one). Then this ring is going to the compact circle and fixes. Then it is plane, and eventually all petals will be directed or counterclockwise.

You will need a mount (rubber band, hoop or hairpin), thread under the color of the lace, the circle of the fleece of the same color, 2 meters of lace. First of all, the material and fastening is prepared. Then no smooth decorative region The needle with double thread is stitched by lace. Seam "Forward needles" is used. Thread stretches and the lace canvas is tightened. Folds are distributed evenly along the entire length of the tape. No need to divide the needle and thread. They are fixed for some time for the end of the lace. Next, you will need a second needle with thread: it is sewn to the fleece circle on the helix. It is necessary to trace the lace "watched" face up. The core of the flower is decorated with their taste: buttons or beads. From the remaining lace tissue, you can make a mini-bud and sew it to the central part of the product. The first thread is now fixed and cut off - the work is completed. It is worth noting the appearance of the products separately. Very original looks of flowers from thick lace ribbon with decorations with diverse stones.

Many remember them since childhood: birthdays, New Year And the feast of St. Nicholas rarely when they did without these jewelry. They are made simply. On a paper sheet, 9 strips are drawn 1.5 cm wide. They are cut, and then decrease to the desired dimensions. It is necessary 3 pieces with a length of 25 cm and as much by 22 cm, two to 19 cm and one strip is 9 cm long. The shortest bends into the ring and fixed by the stapler. All other twists the "eight" and are also fixed. Fragments add up to each other. Inside the bud there will be small "eights". In the very center put a ring. Pieces of bilateral adhesive can be used in both the start of creation of the bud for creating adhesive surfaces on fragments and after, for reliable fastening. The paper itself can be different: just colored or decorative with different stripes.

To create such a product personally, you will need to use:
- paper;
- scissors;
- line;
- pencil;
- stapler;
- double-sided tape.

There will be eight ribbons, four blue and as much purple. Each length should be 15 cm, and the width is 0.6 cm. First, the purple strip is twice as well, and the top of the folded end is lubricated with glue and is attached to a soft round base, smoothly in the center. The rest of the purple ribbons are then glued. This is done in such a way that between the ends of all strips was the same distance. After that, 8 drops of glue are applied to the central parts of these "rays". The end of one sticking strip is attached to the center of neighboring and so throughout the circle. It is necessary to do this part of the job very slowly, otherwise the petals will turn out to be unequal. Next you need to do blue stripes. They are attached on top of purple, and then their edges are carried out through the loops. Then the blue ends are tightened in the same way as purple.

Packing tape for the manufacture of colors
To create a craft, you will need a needle, moulin, tailor pins, a round metal pattern with sticking knitting needles and the packaging tape itself (you can choose a simple transparent). Initially, the template is taken, and the ribbon is gradually wounds. Stitches need to be applied to the opposite edge on the needle. When the tape is wound completely, the center is allocated. To do this, connect the petals in the middle with the needle with a thread. Center snapshots in a circle. The free edge of the tape is cut under the central part. Petal is removed from the needles - it remains only to make a flower. Ditcher should decorate with decorative elements. You can paint it from the canister. The monotonous color will look best, but it is worth trying to use different molds and paint the flower original, for example "in polka dot". There are also many color packaging tapes - ordinary and festive.
It is worth trying to do complex craft Using ribbons of different widths and thickness and with different interlacing.

Flower from the reps tape
Such products can be found in children's clothing: sundresses, dresses. Create a craft from the reps tape will be easy and newcomer. You will need a thread, scissors, pencil, adhesive gun, candle, reps tape. First cut 5 strips of the same length (approximately 5-6 cm). The edges are processed over fire. Then the fragments give the shape of a bow, gluing opposite edges in the middle. All bows are folded in half. After that, they are flashing the thread with a flat side and are going to the circle of five petals. Created by them bud bonds and decorated with a button. Petals attached volume. There are even more simple techniques. The tape can be imposed several times, creating thickening in the center. Then you need to make all the threads, and decorate the product with a button. Another interesting way is to create petals from several turns of different sizes.

Production of flowers from polypropylene tape
From this material are created both small flowers and large, diameter greater than half a meter. The latter are created from the Foamiran (Izolon) - polypropylene fiber. You will need large round sheets with a density of 30, paint, adhesive gun, hairdryer. Billets can be cut independently from a large canvas. Thanks to the power of the material it will be easy. First, two rounded petals with a long side of about 30 cm are cut out. Of these, the core will be made. All other fragments should be more: 35, 40, 45 cm, etc. The lower parts of all elements are cut out noticeably narrower. In the process of work, these segments are covered from the gun and bend. If the bottom of the bottom is twisted and fixed and fixed, then the following is enveloped around the already created design. The desired shape is given and after each change, it is fixed with a hair dryer. When all petals are ready, you will need to make the core from the coil for threads. Then the flower is painted.
It is necessary that the air from the hair dryer is as hot as possible, otherwise the flower can start quickly lose the form or fail at all.

Application of finished flowers
Such crafts decorate ordinary and festive hairstyles. For this, the flowers are fixed on elastic bands, rims, hairpins and are made up by beads, brooches, various small elements. Ribbon flowers with pins decorate the objects of the wardrobe. They are decorated with lapels; Purchase in pockets, attach to the hats. Flowers made of ribbon will become bright gifts for various occasions - for birthday, new year, religious holidays, angel day. These crafts are drawn up various homemade compositions, topiaries, gift boxes. Decorated manual work Rooms are a great place to decorate with bouquets and photo frames with flowers from ribbons. You can also separate the flooring and tulle. Recently, the boutonnieres and bouquets-dubers from satin material have become popular. They are bought not only for solemn events.

Conclusion
Flowers from tapes are sometimes difficult to distinguish from living. A beautiful composition can be created from a simple paper or lace ribbon, or in the technique of canzashi from satin. Ribbon flowers are mainly intended for hair decoration - they can be given to women and girls. To create a flower, you need to go through a few simple stages. First, ribbons are prepared for processing. From them, unnecessary threads are taken, uneven edges are cut. Next, the process of twisting or flashing begins. This is done in different ways, depending on the execution technique. The resulting form is usually sealed with threads, glue or wire. Flowers are decorated with brooches, beads or remain intact to mimic real colors. Color is selected at the discretion of the wizard. As a result, it turns out a "self-sufficient" decoration that can be used and as an element of decor.
Floral decorations made of satin ribbons are very unusual and beautiful. Made with your own hands - they are best gift both for children and adults.
Specificity of the manufacture of colors from satin ribbons
Flowers from satin ribbons with their own hands - the occupation is painstaking, but fascinating.
The main tools for making decorations are:
With the competent use of existing materials, the flowers come out strong, good. They can be mounted on gum, hairpins, rims, component in bouquets.
Types of petals
Flowers from satin ribbons are collected from petals of different shapes. The mains are - the construction and round. Any kind of petal can be made with your own hands. The sharp forms of petals are suitable for the manufacture of flowers such as Astra, chamomile, dandelion, sunflower, bell and others.
The varieties of sharp petals are:

From petals round shape Create flowers such as roses, lilac, ignokulyus, peony and others.
The varieties of round petals are as follows:
- two-color round (double);
- round for roses;
- round turned out;
- round flat;
- round narrow;
- round heart.
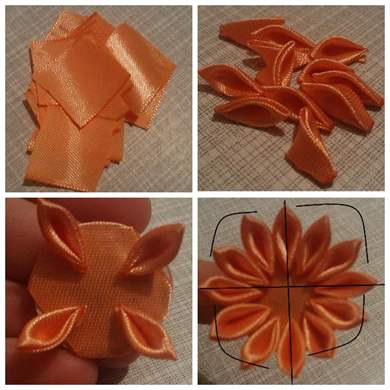
Master class for beginners: Simple flower in 5 minutes
Satin ribbon can turn into a flower literally in 5 minutes. From this you can calculate that, for example, the hairpin will be done with your own hands for 7-10 minutes. It is necessary to clearly follow the instructions.

Step 2. Bottling of petals. This will require:
- square from satin ribbon to add diagonally, designate conditionally sharp ends figures 1 and 2;
- combine the ends 1 and 2. In the resulting triangle, designate new sharp angles with numbers 3 and 4;
- fold the ends 3 and 4, obtaining as a result of a sharp petal;
- cut off excess material (straight angle cut off parallel to the folded side and the sharp corner parallel to the collar);
- pour candle or lighter cropped edges for convenience, fixing the petal tweezers.
Step 3. Forming a flower.The bases of the petals need to be connected to the thread like beads, tighten and arrange a flower. Then you should smoke the petals among themselves for more reliable fixation.
Step 4. Decoration. The middle of the flower must be decorated with a bead or buttice (optional). It is possible to add rhizes or small pebbles to the center of petals.
Flower of satin ribbons 2.5 cm - step-by-step instruction
The tape from the satin of 2.5 cm wide is perfect for creating lush colors with their own hands. IN finished video They resemble a bush rose. The technique of fulfillment is simple.
Step 1. Cooking the necessary materials:
- pieces of ribbon 2.5 cm wide and 7 cm long;
- needle with thread;
- the fire;
- scissors.
Step 2. Billet Petals .
You need to melt the cut edges of the tape, bend on each side of the tape so that the trapeze is to be turned out to be additionally melted to secure. Then you need to do the same with all the ribbons. 
Step 3. Forming a flower. It is necessary to freeze every billet of the petal along the bottom edge, pull the thread and fasten, then sew the bases of the petals so that the flower is turned out.
To give the volume, you can fasten 3 more petals from above or leave a single-layer flower.
Step 4. Decoration. Harmoniously looks glued in the center of beads, mimicing the core of the flower.
For rim
To decorate the rim, any flowers like large and magnificent roses, peonies, chrysanthemums, quince and small roses, jasmine, bell. 
To make a rim with a jasmine branch, you will need:
- a rim made by the satin ribbon of the color of the first greenery;
- bar of the rounded felt 2 × 16 cm of the same color;
- yellow plastic stamens - 1 beam;
- pieces of white satin ribbon 5 × 5 - 25 pcs.;
- slices of green satin ribbon 2.5 × 3 cm - 25-30 pcs.;
- thread, needle, scissors, glue.
Jasmine flowers are formed very simply. It is necessary to freeze with a white thread on a white cut rhombus, then tighten the thread, insert the plastic latch and sew. For the manufacture of 1 jasmine flower leaves 3 to 5 minutes.
Important! When rolling, the thread should not be interrupted, otherwise it is impossible to form a flower.
To make a sheet from the green segment of the satin ribbon, it is necessary to fold it in half and rounded with scissors on the one hand. Then you should melt the edges and, while they are soft, slightly deform them on the manner of the jasmine sheet, dwell the lower edges and melted.
The finished elements are glued evenly on the felt strip so that the jasmine branch is in the end. It is necessary to give her to grab and glue the finished composition directly on the rim.
For bargaining
For the decoration of the hairpins more often choose small flowers of small weight, otherwise the hairpin will be bad to keep hair and slide. An ideal options are considered small roses, one small chamomile, Astra. Very fast and beautiful flower is obtained from only 3 petals. Satin ribbon 5 cm wide is cut into pieces of 5 cm. From the squares obtained, it is necessary to make circles. 
You need to fold them in half and fit the arc, tighten, forming the petal fingers. Then you need to sew 3 petals together, glue the bead to the center. The resulting flower is glued to the hairpin. Note. If the flower is not high enough, you can increase the number of petals to 5-7. However, it is necessary to pick up the core bigger size.
Roses from tapes
Technician performing roses from satin ribbons There is at least 5.
For beginners, the following option is suitable:

Chamomile Kanzashi
For the manufacture of chamomile, you will need:

First you need to prepare the petals. For this purpose, the satin square is diagonally, then sharp corners add up to the center. The resulting petal is bend in half. Cut the tip and fall fire. Then recorded with tweezers on the other hand and cut off the base parallel to the collar. Fill with fire in such a way that the ends are getting together. 15 such petals are harvested.
Gently glue petals at the base, forming a chamomile. The center should stick yellow buttons or a yellow felt circle. Canzashi chamomile can be decorated with a hairpin, a children's handbag or a bandage.
Lush flower of satin ribbon
Lush is obtained flower formed from round petals separated throughout the perimeter. They neatly glued in layers to the base. Petals should be at least 10-12 pieces. They can be both in color and different. 
A set of tools is similar:
- squares from the atlas with a side of at least 5 cm;
- scissors;
- the fire;
- stamens - 3-5 pieces;
- adhesive pistol.
Aster
For the manufacture of Astra, the following accessories will be needed:
- segments of ribbon of atlas 2.5 × 5 cm;
- tweezers;
- scissors,
- the fire;
- glue pistol;
- several mug felt.
For a medium-sized flower, 30-40 petals are needed. It all depends on the desired number of layers and the diameter of Astra. Petal is done in two stages. 
- Stage 1. The strip of satin is folded along in half and clamping with tweezers. The edge is cut under an acute angle and searched with fire.
- 2 stage. From the opposite edge, the strip is folded like an envelope, clamped with tweezers and fixed with fire.
Petals paste on the edge circle on the edge itself. The next layer is glued closer to the center. Petals have visually between the petals of the first layer. Also done with all the layers. The number of petals in each subsequent level decreases. The finished flower decorate the core from the beads. You can also combine the colors of petals.
Bell
In the manufacture of the bell tape, the following materials are necessary:

The bell petals are ordinary sharp petals twisted with seam inside. Each petal is glued on one tip at the base. Then it is necessary to glue their parties with each other, forming the flower itself.
The leaves of the bell make are made similarly to petals, only the tape need to take a smaller width. They must be fastened with a glue gun under a flower to look slightly.
Hibiscus
For the manufacture of hibiscus, you will need:

From the squares it is necessary to cut the drop-like petals. Before assembling a flower you need to corrugate them. For this purpose, the petals are folded by a harmonica in 4 rows, then twisted the harness and penetrate over the fire within a few seconds. The cooled petal unfold.
Half the petal from the wrong side is glued with a wire. Such petals should be from 7 pieces. It all depends on the desired hibiscus volume. Several stamens twist with each other, and a bouton of petals is formed around them. Then the petals are slightly spilled and fused.
Narcissus
For the manufacture of one daffissance:
- scissors;
- the fire;
- tweezers;
- glue;
- 5 squares from satin ribbon white color 5 × 5 cm;
- 3 squares yellow color 4 × 4 cm.
Petal is done like this: 
- The square of white atlas is developing diagonally twice. The sharp corners must be folded by the accordion in 1 row on each side, then clamping tweezers, cut off too much and secure fire. Must get a petal with two folds inside.
- The top edge of the petal is clamped in the middle of the tweezers and melted with fire. It has a slightly pointed shape.
The stitch is made in the same way, only the upper edge is not sharp.
The flower assembly is a sequential gluing of all elements. The resulting Narcissus is almost indistinguishable from the present.
Puancetia
Flower Puancethey from satin ribbons can make them even newbies with their own hands. 
Necessary materials such:
- 5 cm width ribbons and different lengths;
- scissors;
- the fire;
- glue;
- large stamens;
- wire.
Petals need to be cut. For this, the tape segments are diagonally and cut out so that it turns out the petal. On the edges on the edges are made on 2 outbreaks on each side. The billets ignore on fire and slightly deform the edges. Total 3 petals of 5 cm long, 5 petals 6 cm long and 5 petals of 7 cm long. The leaves are manufactured similarly - from segments of 5 × 7 cm.
The flower assembly begins with a consistent bonding between themselves the same length of the petals. The first layer of small petals is sticking to the stitch, then the next one is more from the petals, and the greatest are glued. Petals need to be placed in a checker order.
On the leaves you need to glue the wire with back side. They are attached to the flower method of winding the latch.
Dandelion Kanzashi
For the manufacture of dandelion, it is necessary:

Execution technique as follows:
- The ribbon must be cut into a strip of 7 cm long. Folded each in half and soldering ends. These will be dandelion petals. Green need not less than 25 pcs., Yellow not less than 27 pcs.
- On the circle of felt glue pistol on the perimeter sticks green petals. The second layer in checkers is also glued from green petals.
- All subsequent layers are glued with their yellow petals. Thus, a bulk chamomile is obtained, which is perfect for decorating rims and hairpins.
Sunflower
For the manufacture of sunflower, any kind of acute petal is suitable, for example, like asters. The two-layer flower will need at least 26 petals. On the circle of 5 cm diameter, petals are glued along the edge itself. A little closer to the center must be glued with a second layer in a checker order. 
The middle can make their circle of an even felt or dermatine with a diameter of 4-4.5 cm. Beads or large beads of black are glued on it. The middle is glued on the flower, and the sunflower can be finished ready. Optionally, you can add a decor in the form of a butterfly or bug.
Lilac
For the manufacture of lilac branches, it is necessary:

The ribbon must be cut into a strip of 1.5 cm long. It will take at least 60 pieces. Flowers are made in the same way as the jasmine flowers. Just before tightening the thread, it is necessary to stick a wire with a bisper to the center of the tape with a bisper strung on it. As a result, the flower of lilac on the leg is obtained.
When all the flowers are ready, you need to form a mini branches for 3 pcs. and fix one of the wire legs. From these twigs, the branch of lilac is formed and is winding with a floral ribbon.
Ranunculus
For the manufacture of the Ranuncouleus it will take a standard set:

To make petals, a piece of satin is needed:
- 2 × 2 cm - 18 pcs.;
- 2.5 × 2.5 cm - 18 pcs.;
- 3 × 3 cm - 14 pcs.;
- 3.5 × 3.5 cm - 24 pcs.
Of these, it is necessary to cut round petals, like a peony, trim the base, melted over fire, fold the base of the harmonica, clamping tweezers and secure fire. The core of the Ranuncouleus is made from a 5 × 5 cm atlas piece, which is sewn cotton wool. It turns out a ball on which the petals will be attached.
The flower assembly must be started with the smallest petals, salabing them with a bulb. Thus, it turns out a very beautiful flower that is suitable as a decor to any decoration.
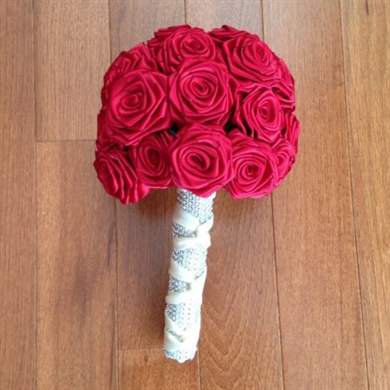
Wedding bouquet of ribbons
Wedding bouquets made from satin ribbons are very popular for the last few years. It is unusual and beautiful. Such a bouquet will delight the eye for a long time, because it does not start.
Flowers from satin ribbons for wedding bouquetMade with your own hands will become a kind of family happiness symbol.
 Combining various flowers from satin ribbons with their own hands, decorations for hairpins or rims are created, as well as thematic bouquets.
 To perform it, it is necessary to make a suitable number of colors from the tapes (more often choose roses) and stick them on a foam ball with a handle. For greater strength and beauty in the middle of each flower, you can stick a needle with a stone at the end. The handle must be wrapped with a solid satin ribbon. As additional decor You can use rhinestones, pearl beads.
Flowers made of satin ribbons - a spectacular way of decor of accessories, household goods, children's things, and even the manufacture of a wedding bouquet.
Video how to make flowers from satin ribbons do it yourself
How to make roses from satin ribbons with your own hands, look in a video clip:
We make flowers with your own hands from satin ribbons:
Bright flowers made of ribbons, you can decorate a gift, hairpin, brooch. You can even make a whole bouquet of them. They will not cause allergies and will not lose their kind even after a whole day of socks. Therefore, such florals are often decorated with wedding accessories. Make the decoration yourself very simple. Even an inexperienced needlewoman will spend on one flower no more than twenty minutes. In the article, read how to make flowers from ribbons. The master class in each section is designed for beginners, and does not require special skills and tools. And the availability of the photo will make the procedure even more understandable.
Solid tape rose
The most popular flower of satin ribbons is a rose. There are many different species: Twisted, in Boot, with separate petals. Do it yourself the easiest way to make a flower of solid tape. We give two simple and beautiful options.
For the first, a segment of a ribbon 2 cm width and a length of no less than half a meter is required.
Instruction:
Flower ready. From several such decorations you can make a whole bouquet. Put it in the Vase or use the wedding as a double. 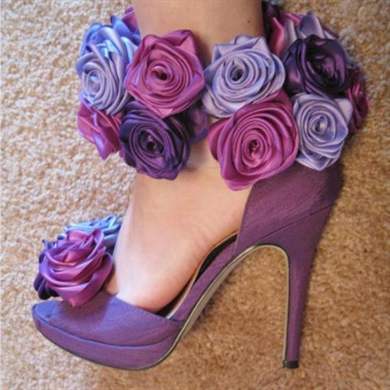
The second option is a twisted rose - very similar to the first. The principle of manufacture they have one, but the tape need to be folded somewhat differently.
The longer the segment of the ribbon, the magnificent the flower will turn out. Experiment S. different colorsAnd you will definitely get the most unusual decoration.
Video instruction:
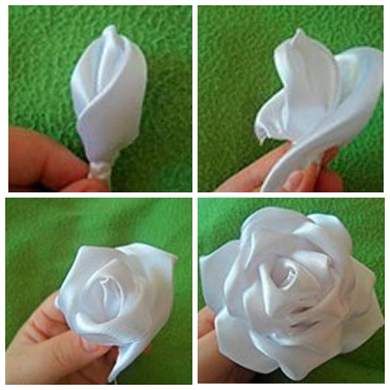
Rose from individual petals
For its manufacture, there will be a tape with a width of five centimeters and a length of at least one and a half meters. The more petals - the magnificent flower. Tell step by step how to make a rose.

Astra from solid tape
The easiest in the manufacture of flower.

Kanzashi flower from ribbons
Kanzashi is an ancient Japanese art of making ornaments of fabric. Today, this technique was successful masters around the world. Vintage recipes were complemented, and we can only use the ready-to-use instructions. One of them we describe below. It will be a flower of sharp petals.
For manufacture, you will need:
- Satin ribbons of orange and white colors:
Orange ribbon width 5 cm. - 1 m.
White ribbon width 5 cm. - 80 cm.
Orange tape 2,5 cm wide. - 30 cm;
- Bead for the decoration of the middle;
- Cardboard circles with a diameter of 3.5 cm and 2.5 cm;
- Glue on the fabric: thermocons or a moment of crystal;
- Candle or lighter;
- Barrette.
Progress:


Flower from organza
From the segment of the organza or kapron tape it is easy to make a large lush flower. Use it as a bow on the hairpin or decoration on the hoop. The decoration is suitable for both young girls and brides on their own wedding. Step by step description:


In this material we introduced 6 step-by-step master classes For beginners, following which, you can make flowers from tapes for manufacture / decoration:
- Artificial colors (interior);
- Wall panels;
- Topiariyev;
- Decorative and wedding bouquets;
- Jewelry (rings, brooxes, necklaces, bracelets);
- Hair accessories (rims, dressings, hairpins, rubber bands);
- Boutonniere;
- Packaging for gifts;
- Decorative pillows;
- Box for jewelry and other trifles;
- Albums and notebooks;
- Appliques for clothes, bags and shoes;
- ... and much more! In this selection of photos, only a small part of the crafts that you can make the mastering various techniques Production of flowers from tapes:

In addition to step-by-step instructions, you will find 30 photo ideas for inspiration as well useful selection video.
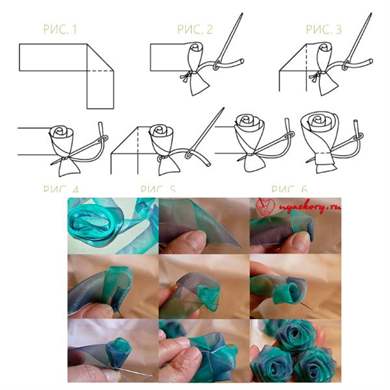
Master class 1. Twisted rose from solid tape
Let's start, perhaps, from the simplest and fairly fast way to make roses from ribbons with your own hands. Having mastered the rose twisting technique from the ribbon, you can make them sitting in front of the TV. Depending on the width and length of the tape used, you can twist both small and lush buds. You can use a ribbon from any material - organza, satin, cotton and even lanes of linen fabric.

What you need:
- Any ribbon - the longer and wider it will be, the larger the bud will turn out. For medium-sized roses, there is enough ribbons with a 2,5-cm wide.
- Thread with needle or hot glue gun.
- Scissors.
How to twist a rose from the tape:
Step 1. Reflect and place the ribbon in front of yourself, then one of the ends of the tape (any), bend over the oblique, as shown in Fig. one.

Step 2. Wrap the tape tip in the roll in two or three turns to get a rose core, fix it with the bottom of the glue or simply position (see Fig. 2).
Step 3. Now we start forming rose petals. To do this, bent the tape on the oblique on the outer side (see Fig. 3) and wrap the core of the rose, holds (and if desired, fixing with thread / glue) from the bottom (see Fig. 4).
Step 4. Next, continue to "build up" layers of "petals" according to the scheme: Bend the tape into the outer side - wrap the bud - bend the tape into the outer side - wrap the bud, etc. (See Fig. 5). Periodically fix the layers of the tape at the base of the bud with a glue or thread with a needle. Remember that most importantly - do not let the ribbon dismiss.
- Experienced decorators can twist a rose, fixing the layers of the tape of just a couple of times (at the beginning and at the end), it is easier to flash the newcomers to enter the "petals" of roses much more often.
- It is more convenient to twist a rose holding the base of the bud between the index and middle finger so that the flower seems to lie on your palm.
Step 5. When the rose reaches the desired size, press the end of the ribbon to the base and tie / glue (Fig. 6).
- Practice twist roses from ribbons of different widths and lengths, experiment with the angle of bending a ribbon, the number of bends per layer or twisting density to achieve that effect you like more. So, for example, the rose twisted from the ribbon can be very multi-layered or, on the contrary, softer, have more sharp corners or, on the contrary, rounded.
If you have any questions, we suggest watching a video how to make a flower from satin ribbon with your own hands in this technique.
Master class 2. Realistic flowers from ribbons (peonies, roses or ringings)
Now we suggest familiarizing yourself with the technique, following which, you can achieve the most realistic and elegant species of petals, which is only possible for flowers made by your own hands. Take a look at this selection of photos and see for yourself.

With all the beauty and apparent complexity, even a beginner can make such flowers from the ribbons.
You will need:
- Candle or lighter.
- 5 cm wide ribbon (for medium peony) from 100% polyester (this can be both artificial silk / atlas and organza). Keep in mind that the ribbons from natural materials will not fit. If you want to make a large and lush peony, then you can use either more petals and / or tape width 7-8 cm.
- Scissors.
- Needle and thread into tape tone.
How to make a peony with your own hands:
Step 1. Cut the tape into squares in the following sizes and accounts:
- 5 × 7 cm (6-10 pcs);
- 4 × 6 cm (6-10 pcs);
- 3 × 5 cm (6-10 pcs);
- 2 × 4 cm (6-10 pcs).
As a result, you should have a minimum of 24 and a maximum of 40 squares. The more you make petals, the more magnificent and the more bouton will be.
Step 2. Now spread the squares of the squares on the stacks. Then cut the petals from each stack (the form is shown in the figure below). Keep in mind that accuracy is not important here, everything can be done on the eye, without measurements and without using templates. The main thing is that you have the petals of different sizes: very large - large - medium - small.

Step 3. It is time for the most interesting - giving shape and volume to our petals. To do this, burn the candle or lighter and, holding the edges of the petal at a distance of about 2 cm from the fire, place them (but do not fall apart!). Rotate the petal smoothly, but quickly. Thus, you need to process all your blanks.
- If you want the petal to acquire more rounded shape, hold it over the fire a little longer, but do not reduce the distance from the fire. However, sometimes slightly blacks from the petals look quite organically.


Step 4. Take one smallest petal, roll it into the roll and make a pair of stitches in its lower part for fixing. You have got the core of your flower.

Step 5. Attach the second small petal and secure it as a pair of stitches. Continue attaching petals one by one, sticking to chess order. When you finish with small petals, proceed to the joining of medium petals, then large and finally the biggest.


Flowers from tapes of two shades

Flowers from ribbons of one shade
Well, that's all, the peony is ready!


For the same principle, but by changing the number, shape, size and color of petals, as well as adding stamens from beads or threads Moulin, you can create roses, tulips, poppies or wounds.

Following our master class, you can make flowers not only from satin ribbons, but also from organza. What is not the reason to put into deal old ribbons for children's bows?
Master class 3. Simple flowers from tapes in 5 minutes
If you need to make flowers from ribbons with your own hands as quickly as possible, for example, for packing a gift, then this step-by-step instruction You will help you out.

What you need:
- Any ribbon;
- Beads;
- Scissors;
- Hot glue gun.
How to make a flower from a tape:
Step 1. Cut from cardboard or tight paper with a small circle with a diameter of about 5 cm. This circle will be the basis of your flower and will be hidden under the petals, so it is not necessary to cut carefully.
Step 2. Start gluing the tape on the top edge of the circle, forming a pleate, as shown in the photo below.

Step 3. Continue to glue the spiral tape in 3 or more layers. When you get to the center, cut off the ribbon surplus, turn it out and take it gently.

Step 4. Drip to the center of the flower is a large drop of hot glue and quickly fill it with beads.

Master class 4. Small flat flower from braid wave
If you want to decorate the flower ring, rim, brooch or necklace, then rose made of braid wave, suitable better Total. After all, it turns out so neat, strong, elegant and small.

What do you need:
- A medium width of a medium width and a length of 50-60 cm (one rose) or two ribbons of different colors of the same width of 25-30 cm long (if you want to make a two-color rose). However, the length can be greater or less, it depends on what size you want to make a bud.
- Scissors.
- Sewing machine.
- Threads with a needle in tape.
Step 1. Take two waves of the same length and twist them between themselves as shown in the photo. Before starting a weaving, secure two tapes by some clamp so that they do not dismiss.

Step 2. Stop the type of your billet to the typewriter to fix the weaving.

If you do not have a typewriter - not trouble. Just walk large stitches along the entire length of the braid.

Step 3. To make a flower, simply start turning the braid from one end, in some places fix the layers of hot glue.

Step 4. When you finish, you have to get something like this bud. The remaining tape tape is simply subjected to flower and fix glue.

Step 5. Stick a small circle of felt, cardboard or tight fabric To the base. In the future, you can glue anything to this foundation - from the hairpin to the ring.
Step 6. Have you noticed that all petals have our flower closed? In this form, it looks more like a peony or ranunculus. If you want the flower to become a rose, just straighten each petal to the outer side one by one.

Master class 5. Puancetia with leaves
It is time to tell you about how to make bulbing tapes that can be decorate anything, for example, the autumn wreath as in the photo below.

What do you need:
- Ribbon 4-6 cm wide, cream or any other desired shade;
- Green ribbon (for leaves) 2-3 cm wide;
- Scissors;
- Needle with thread in tape for petals or thin copper wire (jewelry);
- Beads;
- Hot glue.
How to make bullette from tapes:
Step 1. Cut from the tape three segments of the same length. What length should be segments? It depends on what size flower you need. If you want to make a flower with a diameter of 12 cm, then the segments must be just such a length.
Step 2. Remove the resulting rectangles shape rhombus. You can do this in the following way: Fold the segment with a stack on each other, fold the stack in half, then give the resulting square shape of a triangle, cutting off the excess on the sides. Voila, turned out to be diamond!
Step 3. Squeeze every rhombus in the middle and tie the folds of the thread (you can make a couple of stitches) or jewelry wire.
Step 4. Fold all three blanks next to each other, then tie their thread or jewelry wire to get a flower. If necessary, correct the petals.

Step 5. In the center of the flower, glue several beads-stamens.
Step 6. Now we will deal with leaves. Cut from the green ribbon two segments of 6-9 cm long (the length of the segments should be about three times the width of your green tape). Put one of the rectangles on the table with the involving side up. Bend it the right side down on the oblique, so that the billet acquires a M-shape (see photo). Now fold your letter M in half to get a blank in the shape of a house with a roof. Seam the bottom of the "house" pair of stitches or glue.

Step 7. Now the leaves can be glued / sew to the rear of the puancetics, to the felt round basis (if there is) or directly to the decor object (rim, pillow, etc.).
Master class 6. Flower of lace ribbon
And finally, we present another express method for the manufacture of simple, but beautiful flower do it yourself. The principle of operation in this technique is similar to what is described in MK No. 3, but instead of glue to fix crafts, a thread with a needle is used here, and instead of a satin ribbon - lace. However, you can use any other. From lace colors, beautiful brooches and hairpins are obtained.


What do you need:
- Lace tape;
- Scissors;
- Needle with threads in tape tone;
- Beads;
- Hot glue.
How to make a flower from lace:
Step 1. Take a ribbon along the bottom edge with wide stitches.

Step 2. As soon as you finish sewing, lean the tape by pulling the thread, and connect the two ends so that the circle is closed and the first layer of petals.


Step 3. Stick to the center on the outbreak of the flower a small circle of felt or other fabric. Sew the desired accessories to it, for example, a pin to get a brooch.
Step 4. Stick to the center of beads, rhinestones, stones or another decor.

If you want to continue your acquaintance with the art of making colors from ribbons with your own hands, we offer to view the following step-by-step video instructions.
From this video, you will learn how to make flowers canzashi from a 2.5 cm tape.
In this video, a method for making roses from satin ribbon, differing from our master class No. 1.
Here is another master class on making roses in the style of Shebbi Chic.