Flower arrangement of ribbons with your own hands. Flowers from satin ribbons: DIY beauty
Content
What can be more unique than handmade jewelry. Exclusive items for decoration are made with satin ribbons. Any novice craftswoman can create flowers, and if you practice, you will get masterpieces. Find out how to decorate clothes, a gift in an original way.
How to make flowers from ribbons with your own hands
There are different methods of collecting flowers from satin ribbons... It will take perseverance, but the results will be admirable. Start with simple things, then turn on your imagination and create unique jewelry. To make flowers from satin ribbons with your own hands, you will need:
- lighter or candle;
- sharp scissors;
- needle with thread;
- glue gun;
- tweezers.
Flowers from satin ribbons with your own hands for a rim
Try to decorate the headband using the oriental kanzashi technique. Experiment with colors, the number of buds and petals. The technology of creation will not cause difficulties, but if in doubt, watch the master class: the video is below. To create a flower with five petals, you need 5 pieces of 5x5 cm. You need to take the same number of circles with a diameter of 15 mm, burned around the perimeter. Make a headband like in the photo:

We create flowers from ribbons with our own hands like this:
- fold the piece at an angle three times;
- we make a fold;
- trim the end;
- we burn, fix;
- cut the lower end of the petal;
- we burn, fix with our fingers;
- create all 5 petals in the same way;
- we sew the petals into an inflorescence;
- with back side glue a circle of fabric;
- we fix it on the bezel;
- decorating.
How to make flowers from ribbons - roses
Making flowers from satin ribbons with your own hands is a fascinating handicraft. The original rose, as in the photo, can decorate a hairstyle, dress. Make her different ways, we suggest one of them. If not everything is clear - watch the video. For manufacturing, you need a 25 mm tape. You need to cut off 8 pieces 7 and 5 centimeters long, burn the ends.

Start work like this:
- make 4 petals from a 5 cm workpiece;
- bend one end at an angle of 45;
- the bent edge is heated with a base, fixed with tweezers;
- repeat on the other side.
How do the middle and outer petals, leaves:
- 4 blanks of 5 cm each are also folded in two sides, but they should be sewn with threads, making a seam with a small assembly;
- using the same technology, 8 outer petals are made from pieces of 7 cm in size;
- leaves are cut from a green blank 2.5x5 cm;
- fired around the perimeter, making bends;
- make streaks, bending a leaf, heat, squeeze hot.
Collect the finished product in the following sequence:
- carefully twist the first workpiece with a tube, fix it with glue;
- the next 3 blanks are sequentially glued around - this is the middle of the bud;
- fix the middle and outer petals, distributing them around the perimeter, forming a blossoming bud;
- it remains to glue the leaves, fix the pin.
How to make a flower from a ribbon using the kanzashi technique - chamomile
Decorations will be beautiful and elegant - do-it-yourself flowers from satin ribbons. To create such a spectacular chamomile, as in the photo, you will need to make 40 small blanks.

If you have any questions about technology, watch the video. The craft can be used as a hairpin or a fancy brooch. For manufacturing you will need:
- 1.2 m of white tape 12 mm wide;
- green, yellow - 6 mm wide - 0.3 m each;
- 2 pieces of white felt, shaped like a circle with a diameter of 20 mm;
- barrette.
They begin to make an artificial chamomile like this:
- 40 white blanks are cut into 3 cm each;
- corners are cut from one edge;
- melted with a lighter, making the petal rounded;
- fold the bottom with an overlap, face inside, melt;
- on a felt blank, a circle is drawn 5 mm from the edge;
- the petals are glued along the mark, in a circle;
- along the inner circle, they are fixed in a checkerboard pattern.
To create stamens with your own hands, you need a needle with a wide eye, a narrow yellow ribbon. They do it in this order:
- a needle with a ribbon is stuck from below into the center of the flower;
- pulled at the top;
- a tape is wound on the needle for one revolution, injected downward, fixing the loop;
- repeat the operation in a circle from the center to the edges until the weaving covers the inner surface;
- for leaves, cut the green blank into 3 parts, fold it in half, clamp the fold;
- the ends are crossed, fixed with fire;
- glued to the bottom of the chamomile;
- insert the hairpin into the second circle of felt;
- glued to the flower.
Do-it-yourself lush flower from a satin ribbon - peony
You can learn how to make flowers from ribbons for beginners using the example of a peony. It will look like in the photo. You can decorate a hairstyle with a peony or fancy dress... Make one large flower using the proposed technology, if necessary, refer to the video tutorial to clarify all the details. For making, you need 25 mm satin blanks.

Strips needed:
- yellow - 1.4 m - cut 22 strips 6 cm long;
- pink - 1.3 m - make 27 blanks of 4.5 cm each;
- burgundy - 3.2 m - cut 18 strips 6 cm long and 38 strips 5.5 cm long.
A peony is made using this technology:
- cut off the end of the yellow blank at a slight angle;
- burn both sides;
- screwed onto tweezers, fixing with glue;
- carefully removed - a stamen is obtained;
- take pink stripes, cut off a semicircle (you can use a paper pattern);
- heat the edge with fire - it is better to use a candle, make a wavy surface with your nails;
- the bottom is folded, fixed by heating;
- on burgundy blanks, round off the edge;
- held over the fire - it will bend outward - front side above;
- make a fold from below, fixing with fire.
The assembly is done like this:
- collect the stamens in 3 rows, fixing with glue;
- pink petals are glued, with the front side inward - in 3 layers;
- short burgundy blanks are laid with the wrong side inside, fixed with glue;
- the last row is made of long petals, the glossy side is outside;
- formed by green leaves.
Wedding bouquet of satin ribbons for the bride
A bouquet decorated with your own hands looks very beautiful and will remain in memory of the wedding. Decorating using brooches, beads, lace was originally conceived, as in the photo. To make a bouquet, you first need to make 19 roses, from ribbons of white and purple colors, as, for example, in the video tutorial, which can be watched for a better perception.

To decorate a piece of jewelry, you must have:
- blank-ball made of polystyrene with a handle;
- lace;
- thin lilac satin ribbon;
- wide - white, purple;
- decor elements - beads, brooches.
In addition to the bouquet, this technology can be used to make a topiary - a tree of happiness. The assembly is done like this:
- the handle is wrapped in white;
- lace is attached to the ball, fixed near the handle;
- in the lower part, thin lilac strips folded in half are glued - 12 pieces;
- lace - next row;
- further folded strips of white and purple ribbons;
- roses are tightly glued to the surface of the ball;
- the bouquet is decorated with decor.
No wedding salon or decor store is complete without satin ribbon flowers. Photos amaze with a variety of shapes and colors. Often this "extravaganza" surprises not only with its beauty, but also with prices, so many needlewomen decided to make a decisive move - to learn from satin ribbons with their own hands. The result was so overwhelming that many have opened their own mini-shops with affordable finished goods for those who do not have time to practice, and sites where they give hand-made lessons to everyone.
Flowers from satin ribbons (step by step instructions)
Before you start creating masterpieces, you need to decide for what and what kind of flower we need. Next, it remains to prepare the tools, materials and you can start creating.
What may be required
Advice! It is worth using ribbons of different widths - so the flowers in the general bouquet will look more diverse.
- Satin ribbons. We focus on the purpose: if this is a gift, we take bright, juicy,,, scarlet, etc. young girl choose pastel colors - pink, purple, white etc. A separate topic is wedding accessories. You shouldn't deviate from the classics here, and if you don't have revolutionary red or black dress, it is better to compose blue-white palette or light yellow and.
- Scissors.
- Threads. And not necessarily in tone - they can be anything.
- A set of sewing needles.
- Glue gun or just glue; the main thing is that the tube has a sharp tip.
- Lighter - you will have to set the silk on fire. So that the cut edges do not creep.
- Tweezers are needed in order to secure your fingers when working with fire when firing the edges of the bands.
- Wire - it will be needed to fix many elements.
- Additional items - headbands, hairpins,
Ecumenical choice gift ideas for any occasion and occasion. Surprise your friends and loved ones! ;)
Greetings to everyone gathered on my blog on this sunny (or maybe not so) day. If you dream of learning how to make cool flowers from ribbons, then I highly recommend reading this article to the end.
Flowers made of satin (and not only) ribbons can be used both for decorating gift wrapping and as the gift itself.
Especially if you collect such flowers in an elegant bouquet.
The most amazing thing is that sometimes it is so easy to make the most beautiful of these plants with your own hands that it takes 10-15 minutes even for a beginner (believe my experience).
Recently, I quite often do different flowers and now I will share with you some excellent master classes for making them
DIY satin ribbon flowers
I'll show you 15 cool (and easy) ways to create wonderful flowers. You can take each of the photo master classes with you by copying the corresponding image.
Let's start with the most romantic and popular plants among girls - roses.
Roses from ribbons
Stop buying expensive store roses! Let's learn how to make them ourselves and save the lion's share of the budget.
We'll have a few roses today. The first of these is a rose, obtained by folding triangles as you go. To make it, prepare a piece of ribbon at least 2 cm wide and at least 50 cm long.
Unreported
Form the center by bending one tip as shown in the photo. Twist, secure.

Twisted rose
Distantly, in the way of creation, it resembles the previous one (at least the beginning). After forming the center, rotate the ribbon one by one, twisting it and applying it layer by layer. Secure at the end.

Kanzashi
The peculiarity of this rose is that all its petals are processed separately.

From braid
Finally, a rose, which is obtained by interweaving two wavy ribbons. After weaving, they need to be swept along the edge so that they do not disintegrate. And then just roll up.

Flowers from kanzashi ribbons
In general, kanzashi is originally a "hair ornament" from Japanese. It went back to the days of geisha, which, among other things, were distinguished by the ability to skillfully craft.
There are two petal shapes in kanzashi - round and sharp. The rest is already subspecies. So all flowers to some extent can be attributed to this type of art.
Hibiscus
An exotic guest for whom you will need a wide ribbon (about 5 cm wide), base and stamens.

Just a flower with 5 petals
Sew the center to make pointed elements. Fold the future petal in half and hem from the inside. Prepare 5 pieces, then string them. Decorate the middle.

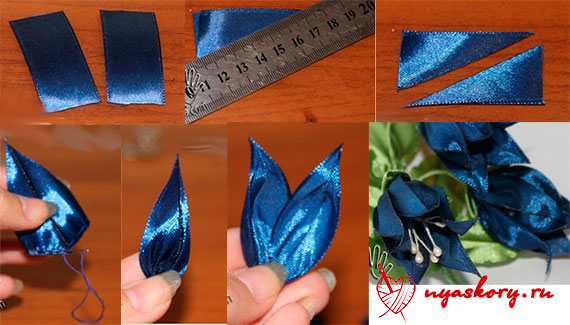
Bell
For the bell, prepare the petals according to the photo. To fold them, fold the petals with high, straight edges to each other and sew the edge (glue the top a little). Pull the thread, collect the resulting parts, decorating with stamens or beads.
Seven-flower
For it, you need to prepare 7-9 petals using the classic method used in kanzashi. Then all the petals are collected on a thread, if necessary, glued together on the sides.

Aster
Just a dream, not a flower in terms of ease of execution. To make an aster, take the tape and zig-zag the basting stitch across the entire width. Pull up, roll up. Everything
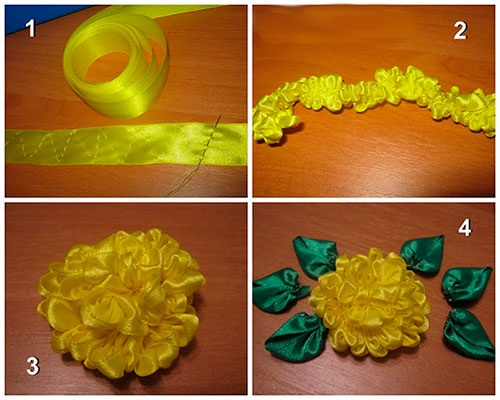
Pion
For the peony, take three ribbons: two for the petals, one for the green leaf.
Please note that the peony consists of two parts - a more closed bud and opening petals.

Color workshops in video format
Not everyone likes to learn photography, so I have prepared some flower-making tutorials in video format for you.
chamomile
To create chamomile, you will need many, many burnt petals (pieces of tape 0.6 cm wide and 3.5 cm long), as well as a base - a circle of cardboard.
Callas
One of the easiest plants in this article. Lighter, perhaps, only the aster.
Sunflower
By the principle of creation, it is very similar to a chamomile, but here you have to tinker a little more with the petals.
Star
An elegant flower consisting of 5 elements and a center.
Snow tale
Flower of extraordinary beauty, made of a wide ribbon. It was difficult to attribute it to any species, so let it be called so
A wonderful effect will be obtained if you combine several types of ribbons from one series. This is easy to do with modern sets of up to several dozen ribbons in the same style.
On this I say goodbye to you. See you soon! Be sure to tell me if you know any other ways to create flowers.
P.S. Subscribe and learn to give cool gifts
Best regards, Anastasia Skoreeva
What could be more beautiful than flowers? Only non-fading flowers! That is why today we will look at some simple examples in this article that may inspire you to master more complex techniques.
DIY ribbon rose

Small flowers, animals and various figurines made of fabrics always look very interesting and unusual. Many girls and women have roses as their favorite flowers. However, they can not only be grown in the garden or bought in the store, but also made by hand. Small roses from braid will look cute, light and graceful, and will also serve as simple, pleasant home decorations that will create a calm, cozy atmosphere. In addition, such cute artificial flowers have another pleasant plus - this is a rather economical option, since large costs are not required.
To make a large rose, you will need about 50 cm of zig-zag braid, it is also called a snake and a bindweed, and for a flower smaller than about 45 cm, a thin needle, scissors, matches or a lighter to singe the edges of the ribbon, and glue, but be sure to check, so that it glues the tape securely. Another important and necessary detail is the threads, which must be in the color of the braid.

So, first, we need to fold the long braid in half.

Then, carefully weave together (without cutting!) The halves of the braid. You need to do this from start to finish and try to get it right.


After both ends of the resulting tape must be cut and carefully set on fire so that the edges of the fabric do not crumble or deteriorate.

Now we twist the resulting ribbon into a bud of a future rose and fasten it with a thread from below so that it cannot be seen from the other side. That is why the threads should be in the color of the braid: then the final result will look neater and more pleasant.


Well, the final touch - straighten the flower petals, slightly bending the very first ones.

That's it: simple but beautiful rose, made by hand, ready.

Satin Ribbon Flower
We present a step-by-step instruction-master class for self-execution of a flower from a satin ribbon.
To begin with, we take in our hands a tape of any color about 4 cm wide, and then cut off 5 pieces about 7.5 cm long and 5 pieces 9 cm long from it, while not forgetting to lightly singe the edges.

Now we fold one of the small pieces of tape in half, aligning the edges, and sew with small neat stitches along the cuts, retreating a small distance of 2-3 mm. It is advisable to choose the thread in the color of the ribbon.

Pull the stitched section as tight as possible.


Similarly, we collect in a five-leafed leaf and segments bigger size... Now we glue the resulting flowers together, and as the middle we sew or glue a beautiful button or bead - whatever you like best.

Sew a small circle of felt on the seamy side. You can also use a cardboard circle or plastic bottle, having previously covered it with a fabric in color.

A satin ribbon flower can be used in the manufacture of elastic bands, brooches, headbands and other fittings and accessories.

Curly braid flower
In addition to roses, you can make another flower yourself, for example, one that looks like a chamomile. It can be attached to hairpins and elastic bands, and then you get an excellent hair accessory. And, despite the fact that now the store shelves are full of various accessories, the jewelry is much more pleasant to put on if it is made with soul and love with your own hands.
For this wonderful flower, as well as for a rose, you need a zigzag braid, a thin needle (it is even better that it be long - it is more convenient to sew with it), good glue or a glue gun, and most importantly - threads in the color of the braid. Perhaps the last requirement needs to be remembered tightly, since it is necessary for any needlework, be it sewing a dress or making a small jewelry.

Let's start by making a circle from the braid of the required length, and carefully sew the ends together with a single-color thread.

Now we are working with the inner side of the ribbon circle. It is necessary to sew the "hillocks" of the braid (it resembles a wave, therefore, as it were, "humps") with wide stitches so that later, when we return to the beginning, pull them off. 


You will get a kind of round "accordion".

This "accordion" will need to be glued to the hair clip.

To do this, at the flat end of the hairpin, you will first need to fix a piece of paper, and apply glue to it. In this case, the flower will stick more firmly and hold on much better.


It remains to add a small "core" of the flower on top. This can be a button-size or lightweight rhinestones that fit.

Flowers from ribbons on a hairpin
Hairpins with flowers add tenderness and romance to the image. Such jewelry will be appropriate for both a baby and an adult lady.
Little flowers
You can decorate hairpins and elastic bands, headbands and brooches yourself by making cute little flowers from multi-colored pieces of narrow satin ribbons. Any girl will like such a stylish and original accessory, and, meanwhile, the manufacturing process will not take much time and effort.

In addition to the satin ribbon itself, 5-10 mm wide, you will also need a flower pattern, a needle and thread in the color of the ribbon, transparent strong glue (for example, a moment-gel), the hairpin itself or elastic band that you want to decorate with flowers, any accessories for jewelry, a lighter or matches and scissors.
The template will come in handy for creating a flower. We advise you to cut it out of cardboard or any plastic packaging in the form of an arbitrary polygon. However, take into account the diameter and number of corners, make sure that the purchased ribbon is enough for you to decorate.
Now you can start the main work on the bow. We pull one end of our tape through the hole cut in the center of the template, and we begin to braid each corner so that each time the tape passes through the center. If you skip the tape in a circle in 2-3 layers, then the flower will turn out to be very peculiar and multi-layered. In order not to get confused in the order of the tape passing through the corners, they can be pre-numbered.

Be sure to make sure that the tip of the tape does not slide into the hole of the template and does not move arbitrarily to the sides. To do this, hold the tape while winding it around the corner, and then sew a few stitches at the base with a needle and thread. Then, without breaking the thread, carefully remove the flower from the pattern and cut off the rest of the tape, lightly burning the ends with fire.

Now, it is advisable to add rhinestones, buttons or beads to the center of the resulting decoration - both for beauty and to hide the stitches that fasten the tape. Don't forget to spread the petals themselves! The decoration can be of a certain tone or multi-colored, while connecting and sewing several bows together. Such a flower can be glued to any elastic band or hair clip, gift wrapping - in short, wherever you want.

Dahlias from hair bands
It's no secret that all the girls are madly in love with making themselves a variety of hairstyles and decorating the resulting "masterpieces" in every possible way. And on beautiful, shiny and silky hair of any length stylish accessory- whether it is a hairpin with a flower or a headband decorated with beads and rhinestones, it will look incredibly beautiful. And who said that jewelry for your braids can only be bought in specialized stores? Make them yourself based on own desires and preferences!

Of course, shops are always packed with shiny and attractive accessories of all kinds that perfectly complement the look, but homemade jewelry will be much more pleasant for you to wear. And if you include imagination, then it will look much more original and certainly unique. A flower can be made from anything - use leftover organza, mesh or satin ribbon, tulle - whatever you can find at your fingertips!
V this case, you will need a tape 2-3 cm wide, scissors, glue (hot glue is also possible), a lighter, matches or a candle to singe the edges, buttons, beads or rhinestones - whatever you want more, and a base for decoration - for example, a hairpin or elastic band. Now, have a little patience.
Cut the tape into several pieces of 5 cm. There should be no less than fifty of them, and the more magnificent you want to get a flower, the more pieces you will need. Remember to tape off the top edges to give them a petal look. The edges and bottom of the petal must be scorched with fire, but not strong - so as not to spoil the ribbon.

With the remaining piece of tape, wrap a small circle of cardboard or plastic - this will be the base. Then carefully glue the petals in turn, squeezing them at the base, placing them from edge to middle. The diameter of the flower will depend on the width of the circle you choose.

The core can be decorated with any fittings that you like. Finally, attach the resulting dahlia to a hairpin or headband using glue.
Now you have a wonderful hair accessory that will decorate any hairstyle and give your image an original touch.
DIY carnation flower
Carnation is a favorite among florists due to its unique sweetish scent. The carnation flower has also been and remains one of the most beloved adornments for girls and women of all ages. It is quite possible to make such an accessory by yourself with just a little bit of diligence and imagination. A silk ribbon folded bias flower can be easily given a “lively” and natural look using a wide, straight stitch. No one argues that a bouquet of live carnations looks great, but what prevents a boutonniere made of steel ribbons is no less beautiful and stylish decoration for hats, handbags, jackets and hairpins?
As an example, a carnation can be made using a silk ribbon of a light cream shade 2-3 cm wide and half a meter to a meter long - depending on the planned splendor of the future flower.

First, let's give the edges of the carnation a proper textured look. Gently fluff one of the edges of the ribbon with your fingers or a needle, and skip a straight stitch on the other side, stepping back from the edge of the ribbon about 2 mm. Tighten the tape, but not completely, but so that you get an "accordion" 2-3 cm wide and fix it with a knot.
Now we twist the gathered piece of tape inward like a "snail". Tighten the base of the assembly with a thread and fasten it. We straighten the upper edge of the resulting bud, giving the shape of a carnation with our fingers.
Try dipping the finished flower (just the very edge) in fabric dye or a natural dye such as tea leaves, red wine, or onion skins for the uneven color effect of a garden carnation. Greater waviness and mobility of the petals can be given if the tape for the product is cut obliquely.
The next step is to plant the bud on the stem. This will require thick wire - dyed or braided, or corrugated paper(we overlap a strip of fabric or paper in a spiral). The stem is inserted into the tightened base and additionally fixed with a drop of glue. The length of the stem depends on the end goal - for a bouquet it is longer, for a small boutonniere or for threading into a buttonhole - shorter.
Perhaps the first flower will take you quite a lot of time, but once you get used to it and "stuff" your hand, you will create exclusive designer jewelry that will attract the eye and arouse admiration.


Flowers from satin ribbons look very beautiful. Every person who sees such a piece of jewelry will want to repeat it with his own hand. This activity is exciting and addictive. At first, something may not work out, but after a while you can learn everything. This will help step by step instructions on folding flowers from ribbons with your own hands.
Making satin flowers
Making flowers from satin ribbons is no more difficult than learning to knit. The main thing is to carefully study the schemes for creating crafts. Then everything will work out. For work, you will need the following materials:
1. Ribbons of different width and color.
2. Threads of various shades.
3. Scissors.
4. Needles.
5. Sequins.
6. Fishing line.
7. Glue gun.
8. Tweezers.
9. Ruler.
10. Beads.
11. Candle.
12. Table lamp.
13. Chalk or soap.
There are two ways to make ribbon flowers - reflow or kanzashi technique.
The second manufacturing method came to Russia from Japan. In this way, the locals decorated hairpins. In this case, several types of petals were used: sharp, round and long. Crafts are used to decorate hairpins, clothes, hairpins or a headband.
Color scheme from ribbons using the kanzashi method
1. To begin with, a workplace is being prepared.
2. You will need a table and a lamp with a bright light.
3. Take a tape 6 cm wide.
4. It is cut into identical squares.
5. The square is folded diagonally, after which the two corners are lowered to the center fold.
6. Thus, a rhombus is obtained.
7. Lateral corners are bent back, the cut point is clamped with tweezers.
8. He straightens himself with scissors and then is pollinated with fire.
9. The result is a round petal.
10. Blanks will need several pieces.
11. The resulting parts are collected using a thread.
12. It turns out a bud that is glued to the base.
13. The middle is glued on top.
Flowers from satin ribbons using the kanzashi method are ready!
Fused petal flower
Another common method for making crafts is the reflow method. Usually the method is used for a large composition, for example, for a basket of flowers. When doing crafts with this technique, some nuances are taken into account:
1. Kanzashi petals look more neat than reflow petals.
2. This method is laborious, so it may not work the first time.
3. Not all ribbons are suitable.
4. Only ordinary brocade, satin or nylon are used.
First, a blank is drawn on a sheet of paper. The template is cut out. A minimum of 12 petals are made. The template is applied to the tape, outlined with chalk, then cut out. Each petal is made smaller in size than the previous one. Flame pollinates the edge of each piece.
Finished crafts are collected in a bud. The work is done carefully to make the flower symmetrical. The base of the craft is stabbed with a needle or pin, a sequin or bead is sewn into the middle. The flower is ready by reflow. Such flowers made of satin ribbons combine well into bouquets for a gift.
Chamomile from satin ribbons
Chamomile has always been a symbol of sincerity and tenderness. You can decorate a bag or clothes with such a craft. Chamomile is done different methods... This will require ribbons of various widths.
A 1.5 cm wide ribbon is taken. To make a flower, you will need scissors, a satin yellow ribbon, a fabric base, a 1.5 cm wide ribbon, matches and a glue gun.
1. The tape is cut into 28 rectangles.
2. The length of each is taken at 4 cm.
3. The top of the section is cut in such a way that a semicircle is formed.
4. The resulting workpiece is melted with a flame so that the edges are bent.
5. Bottom facial corners are folded towards the center.
6. Do the same with the rest of the segments.
7. The base is being prepared, from thick fabric cut a circle with a diameter of 2.7 cm.
8. 14 petals are glued to the prepared base.
9. A few more pieces of blanks are glued under them.
10. From tape yellow color the middle of the craft is twisted.
11. It is fixed with a glue gun on the resulting product.
A beautiful chamomile is ready!
Ribbon flower 5 cm wide
To make the product beautiful and symmetrical, you need to follow the scheme for making a daisy from a satin ribbon. There are two ways to form a flower. First option:
1. For a do-it-yourself chamomile master class from ribbons, you will need the following tools: matches, satin ribbon, tweezers, scissors, glue gun, white satin ribbon 5 cm wide.
2. The white satin ribbon is cut into 14 pieces.
3. Each craft is cut 5 cm wide.
4. A round petal is made using the kanzashi method.
5. They stick together.
6. Then the middle is made: a loop is made from a satin cord, another one is superimposed on it.
7. The hinges are held in place with tweezers.
8. The right end of the cord is punched through 3 holes.
9. A nodule is formed. The edges are scorched with a candle.
10. The finished center is fixed on the chamomile. The flower is ready!
To make crafts according to the second method, you will need a needle, matches, scissors, threads, satin ribbons of yellow and white, glue gun and candle.
The ribbon is cut into thin strips. The length of the workpiece is 7 cm. The edges are singed with a candle or matches. Each piece is folded in such a way as to form a corner. The petals are turned over and the two sides are connected again. It turns out to be one big one. You only need 5 blanks.
The middle of the bud is made, for this a circle of small diameter is cut out of cardboard, a yellow satin ribbon is glued to it. Now the flower is put together. The petals are superimposed on one another, sewn with a needle and thread. The middle is attached with a glue gun. The product is ready.
Craft from a ribbon 0.5 cm wide
To complete the work, you will need a white satin ribbon 0.5 cm wide, fabric for the base, a glue gun, scissors, matches, yellow beads.
The white tape is cut into 24 pieces. The length of each piece is 8 cm. Each piece is folded in two, a fold is formed in the middle. The edges are melted with a candle. All workpieces are done in this way.
Then the base is made, for this a circle is cut out of dense fabric. Diameter 2.5 cm. 8 petals are glued to the base. The rest of the blanks are fixed between them. After that, the middle is made. The blank is coated with glue, yellow beads are poured onto it. When it is sealed, the remnants are shaken off. A circle is formed with a toothpick.
Satin roses
Craft from a satin ribbon and buttons
To complete the work, you will need a ruler, scissors, a tape of small width, buttons, matches and a glue gun. For the manufacture of simple flower the tape is cut into 6 or 8 thin strips. The edges are pressed with a match. The ends of the future flower are glued to the center of the blank with a glue gun. The elements are glued together to form a bud. A button is glued to the center of the joints.
Simple flower
For work you will need scissors, matches, satin ribbon color pink, needle and thread, pencil and glue gun. The pink ribbon is cut into 5 identical strips. The flame melts the edges of the workpiece. Use a pencil to mark the center of each part. A needle and thread are used to fasten the edges of the workpiece.
The strips are folded in two. A few drops of glue are applied to the inner surface of the product and the sewn-in part is glued. The petals are strung on a thread and sewn together. A button or large beads are used to decorate the core.
Felt roses
Flowers are made not only from satin ribbons, but also from felt or felt. For such a rose you need a needle and thread, super glue, tape of blue color, chintz, felt Green colour, wire.
A loaf of the future product is cut out of green felt. Six petals are made of chintz. The wire is wrapped with a green tape, the edges are glued together with a glue stick. The workpieces are folded in two. Along the cut, they are strung on a thread. When the fabric is dry, it can be used for work.
Next, they start making a bud. To do this, an inflorescence is attached to the end of the wire, a stem is put on through a hole in the felt. A finished petal craft is glued into the center. You can make several flowers, combine them into a bouquet. Tie everything up with a beautiful ribbon. This blank is well suited for a gift.
Pansies
Making pansies is very simple - the craft is done using the kanzashi method. For pansies you will need:
1. Purple ribbon 3, 4 and 5 cm wide.
2. Tweezers.
3. Beads.
4. Glue.
5. Hairpins.
Squares are cut out of the fabric, they are folded diagonally. The resulting triangle folds in the middle two times. The edges of the fabric are cut and melted with a flame. It turns out a petal. Several blanks are strung on a thread and tied together. By this method, a sharp-shaped petal is obtained. To get a round petal, the corners are bent towards the center. The same is done on the other side.
