Paper garlands for a photo shoot with your own hands. We decorate the class: beautiful paper garlands for the New Year
Do is the fastest and beautiful way Decorate your home for the New Year. In addition, it does not require large material costs. Such decorations are made from colored paper, fabric, threads, balls, cones and other means. Our electronic magazine about design, interior and decor Dekorin. me will tell youhow to make a Christmas garland with your own handssimple and quick to use various materials to become a real decoration of the house.
DIY paper garlands:balls, snowmen and Christmas trees
From white and colored paper, you can make quite a lot of different beautiful jewelry. To do, you must have some set of stationery, namely: white, colored (preferably double-sided) paper, scissors, PVA glue, ruler, pencil, compasses. For additional decor, you can use sparkles, paints, beads, and more.
From the original lush paper balls, you can form various. In order to make a ball, you need a compass. From multi-colored or just white paper, you need to cut out three identical circles, fold them in half and glue them together with ribs. When gluing, it is necessary to lay a thread inside so that the ball can be hung. To make a one-piece long garland, we take a spool and, gradually unwinding the thread, glue it with balls.
To do christmas paper garlands- DIY snowmen , balls are made according to the same principle, but in different sizes. They are attached to the thread tightly to each other in size: large, medium and small, as shown in the photo.
Christmas tree garlands are very easy to make. Cut out small cones from paper, glue and string three pieces on a thread. To prevent the elements from sliding along the thread, you can fix them with beads or drops of glue from a thermal gun. To make suchDIY paper garlandsit is not necessary to use green paper, you can use different colors, alternating them. You can complement the Christmas trees with sparkles or a light decor made of cotton wool glued to the edges of the cones in the form of snow.


We make a New Year's garland with our own hands: a snake
This is the simplest garland that even a child can make. By the way, to maketogether with children is very useful and interesting. So, it is necessary to cut out thin (no more than 1 cm wide) strips from colored paper, the length of which depends on how you want to see the links. It is important that the strips are the same - then the chain will be even and beautiful. We glue the ends of the first strip to make a link. Next - we thread it into it and also glue the ends. Thus, we form a chain of the required length, which can later be used to decorate a Christmas tree, walls, a window opening or hang it from the ceiling with descending waves using adhesive tape.


DIY Christmas garlands made of felt: patterns and tips for making
Felt is quite often used in the manufacture of various crafts, since its structure is completely different from other fabrics. It is quite dense and products from it perfectly keep their shape for a long time. F eter has many bright colors, that's why New Year's garlands from felt do it yourselfwill be beautifuldecoration for your room. patterns some examples we have given in our th article. For example, you can sew many small green Christmas trees, as shown in the photo, decorate them with gold or red bows, beads, sparkles, etc. Then you need to take a thread with a needle and string the Christmas trees at the top. In order for them not to “move out” along the thread, you can use a glue gun.DIY Christmas garlands from shoes, photo which are presented in our article, will delight your guests if you put various sweets and souvenirs inside. Various stars, bells, snowmen, hearts and other figures can act as elements of garlands. Since golden hues are relevant in the year of the Yellow Dog,make a Christmas garland with your own hands, considering this. Golden ribbon bows, yellow stars and other decorations will be quite appropriate. Dekorin. me picked for you various options beautiful products from felt, which can be decorated in the form of a garland.


We make New Year's garlands with our own hands for 2018, taking into account the symbolism
Symbol the coming year is the Yellow Dog, the corresponding symbolism must be present in the interior. If you know how to sew at least a little, createDIY Christmas toys and garlandsfrom felt will be quite easy. For example, you can sew small dogs that symbolize the coming year, as shown in the photo in our article. You can make a separate decoration of the interior. Stretch a strong thread on the wall along the ceiling surface, wrap it with tinsel and, alternating among themselves, hang dogs and bones from it, also cut out of felt and swept over. SuchDIY Christmas garlands for 2018 year they will significantly enliven the interior, attract the attention of guests and, for sure, appease the owner of the year, which will contribute to well-being in the family.


DIY Christmas garland ideas from improvised materials
Very beautiful jewelry can be made using the materials familiar to us, which can be cotton wool, threads,
The real snowfall is quite simple to arrange if done separately.DIY Christmas pendants and garlandsfrom cotton wool and densely place them on one section of the wall or ceiling. To make one such garland, you need to take small pieces of cotton wool and wrap the thread around them, tightly wrap the ends, like a candy wrapper. For reliability, you can moisten the ends with PVA glue. The garland will turn out fluffy and light.
DIY Christmas decorations-garlandscan be made from buttons. Surely, at home, every housewife has a “warehouse” of all kinds of buttons from old things, as they say, just in case. So, we can assume that this is the very case that will help get rid of unnecessary things and at the same time decorate the interior in an original way. String multi-colored buttons on thin ribbons or dense threads, attach them like pendants to an LED garland, and you will get a beautiful worthy decoration for the New Year.


Do-it-yourself New Year's garland on the fireplace
If the room has a fireplace, this is a huge plus in interior design for the upcoming festival. You can also make it yourself from cardboard boxes, gluing them with the letter “P” and decorating them with white or red brick. Whatever it is, real or artificial,New Year's garland on the fireplacewill be a great decoration.DIY Christmas garland ideasfor the fireplace are inexhaustible: use large ribbons of green tinsel, complement it with red and gold bows, bright glass balls, cones painted with white acrylic paint. Since the main color of the coming year of the Earth Dog is yellow with all its shades, oranges, tangerines and other fruits will serve as decorations, which, by the way, can be eaten after the holiday.
It will look very Christmas-likeChristmas pendants- shoes and garlands, decorated with their own hands that will take place above the fireplace. The composition can be added with slides of candles, a Christmas wreath, and also put a small porcelain or self-sewn figurine of a dog - a symbol of the coming year.


Read also on our website Dekorin. me: How to decorate a room for the New Year 2018, read our article and see 55 beautiful New Year's photos.
FROM DIY LED Christmas garlands
The easiest option is to create a specific picture from a garland, for example, a silhouette of a dog, Santa Claus, a snowman, or just an abstract shape. Butdo-it-yourself LED Christmas garlandscan be turned into special decorations that will be appreciated by guests. For example, using threads, balloons and PVA glue, you can make a variety of transparent light shades that will decorate each garland bulb. Everything is done very simply: inflate balloon(quite a bit) and fix it, dip the thread in glue and loosely wrap it around the ball. After complete drying, the ball bursts and gets out of the wicker cover, which, ultimately, needs to be fixed on the light bulb. SuchDIY Christmas garlands(a photo see in the article) in the evening they will create the most incredible patterns in the interior of the room.


DIY Christmas garlands in kindergarten
On the eve of the New Year, morning performances are held in all children's institutions, and creating the necessary festive atmosphere for the kids is the work of the staff and parents. For example, you can make beautifulDIY Christmas garlands Kindergarten from colored paper. Cut out stars, Christmas trees, snowflakes of various sizes and string them on threads with a needle. Such garlands must be placed as close to the ceiling surface as possible so that children cannot accidentally tear them. You can also doNew Year's garlands from balls with their own hands. We have collected photos of various decorations in our th article. One of them shows how the assembly hall of the garden is decorated with garlands of white tinsel and hanging snowflakes.


New Year's decor can not do without festive garlands. Make beautifulDIY Christmas decorations garlandsnot at all difficult, which is confirmed by our article. One has only to apply a share of imagination and creativity, and your home will shine with new colors on the eve of such a long-awaited New Year.


DIY Christmas garlands - 45 photos of beautiful decorations updated: November 23, 2017 by: dekomin
Any handmade is now at the peak of popularity. Creating creative decorative elements for the home with your own hands is not only profitable, but also stylish, modern, in the spirit of the latest trends. At the same time, it is not necessary to have special skills, rare materials or special tools - most decor ideas are easy to implement and do not require large expenses. To implement some ideas, it will also be possible to get rid of unnecessary things or dispose of household items that only take up space on the shelves. One of the simplest, fastest, but at the same time effective ways home decoration is the manufacture of garlands. Here are 100 ideas for creating a wide variety of garlands for different occasions - get inspired!
paper garlands
Paper garlands are the easiest, cheapest and fastest way to transform a space. A paper garland can act as an accent element of the interior, zone the room into functional segments or highlight a particular place, indicate a certain theme or style of room design, or simply serve as a decorative element.


The easiest way to create a paper garland is flat. Paper blanks (of the shape you need) are simply sewn on a typewriter or glued to twine, thick thread or ribbon. If you carefully handle such a garland, then it can be used more than once.


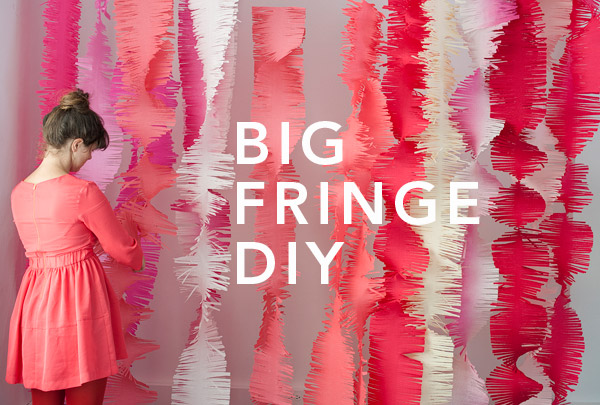
Paper fringe is easy to make, but it looks very elegant, festive. Just use the double-sided fringe for more fluffiness.


Thin paper is perfect for simple and light decor options. Such garlands are literally weightless, they sway from any breath of air, creating an atmosphere of spaciousness, airiness, and lightness in the room. Thick paper is suitable for more complex products with a solid foundation.


Volumetric garlands with paper elements always have a very festive and even solemn look. To give the paper volume, of course, you have to work hard, but the result will be worth the effort. You can use both ordinary colored paper (most often double-sided), and corrugated, crepe, cardboard, foil. You can string volumetric elements on a thin ribbon, twine, any twine. The thicker the paper and the larger the decorative elements, the stronger the base for stringing should be.
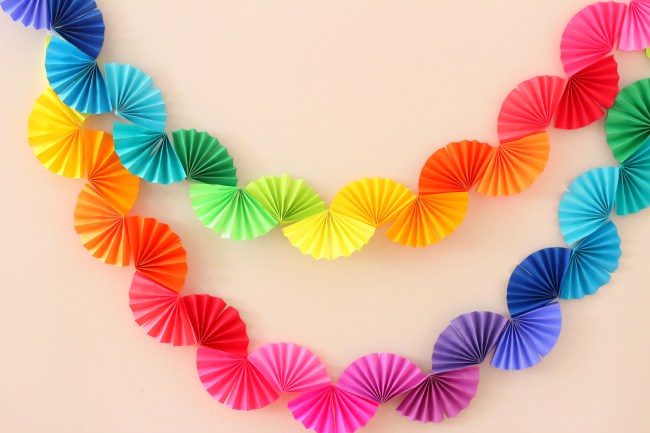

The garland becomes voluminous if ordinary paper blanks are folded or folded.


Family photos can also be used for a paper garland. Such a decorative element can become both an exclusive gift and a wonderful decoration of a room (not only for a holiday).

Garlands of fabric and thread
Garlands of various types of textiles are certainly more durable. paper products. If you have shreds of unnecessary fabric of different colors at home, then with some skills, patience and free time, you can create real masterpieces of decorative handmade.


For example, it has recently become very popular to make any decorative elements from colored felt. The advantage of this material is that it does not need processing, it is dense and holds its shape well, it is sold in all needlework stores and even in stationery departments.


Not less popular is tulle. It holds its shape perfectly and is ideal for making volumetric decorative elements. The garlands are large-scale and even “fluffy”.


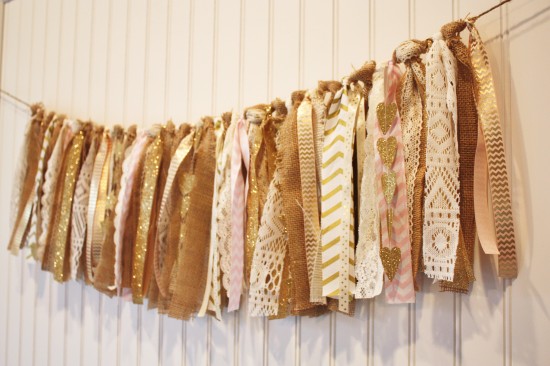
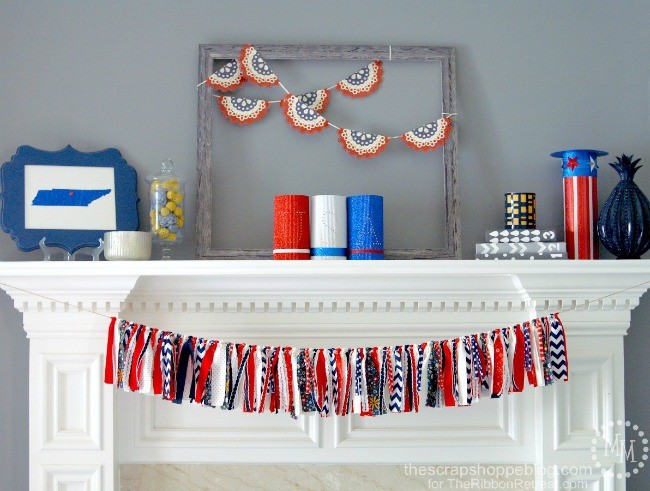
Ribbons are a separate type of material that is very often used to make a wide variety of garlands. The easiest way is to tie small pieces of ribbon different colors on a rope or any other basis.


If you know how to knit and you still have threads of different colors, then The best way disposal of such residues - the manufacture of a durable garland. Not only the reusable use of durable garlands with knitted elements becomes an advantage of such handmade, but also the originality of the design, the variety of options.


Easy to make even for kids, colorful pompoms can be a great garland base for those who have a lot of leftover knitting thread.


We create from improvised means
Who said that handmade classes require a lot of money? You can create beautiful decorative elements for your home from improvised means. There will still be some costs - for accompanying materials and, of course, your time. But the minutes and hours spent on an occupation that brings pleasure can not be attributed to items of expenditure. So, from what you can make original paper garlands:
- old newspapers;
- magazines;
- advertising posters;
- booklets;
- unnecessary maps and atlases;
- playing cards that have exhausted their service life;
- books that are suitable only for delivery for waste paper;
- buttons, beads, beads.

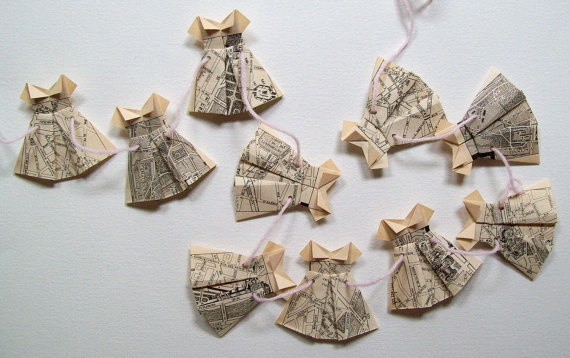


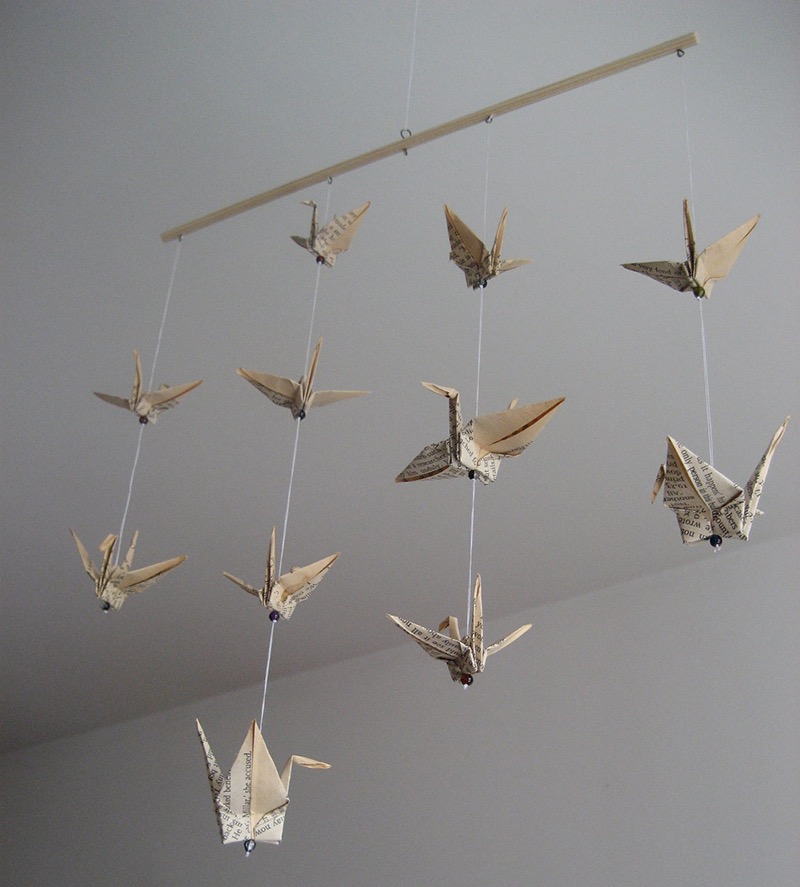

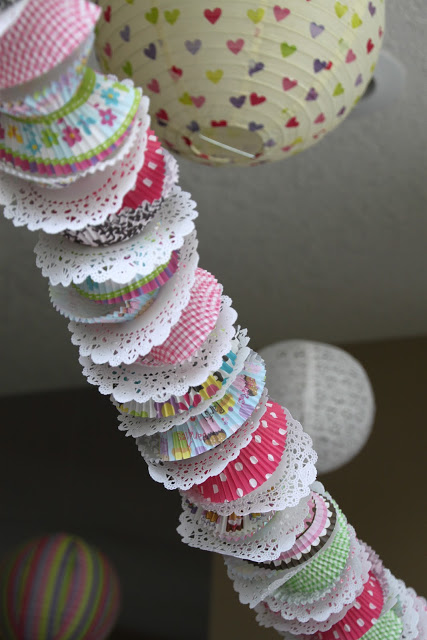
It is easy to turn plastic testicles from kinder surprises into birds or animals. You only need colored paper and twine for making an original garland. It's easy to make garlands out of paper cupcake or cupcake coasters. They are sold in sets. a large number, are inexpensive, but at the same time they can be bright, have an original pattern.


And plastic disposable plates easy to turn into an imitation of soccer balls.

Thematic decorations
The easiest way to decorate any room for any holiday is with the help of garlands. They can be made fairly quickly, used more than once, and repositioned depending on the desired effect. The garland takes up a lot of space, so any space is instantly transformed if you decorate it in such a simple way. The easiest way to organize a festive mood, a hint at a certain theme of a celebration or a particular event, is with the help of garlands. Well, why buy something that you can do with your own hands, and even from improvised means.


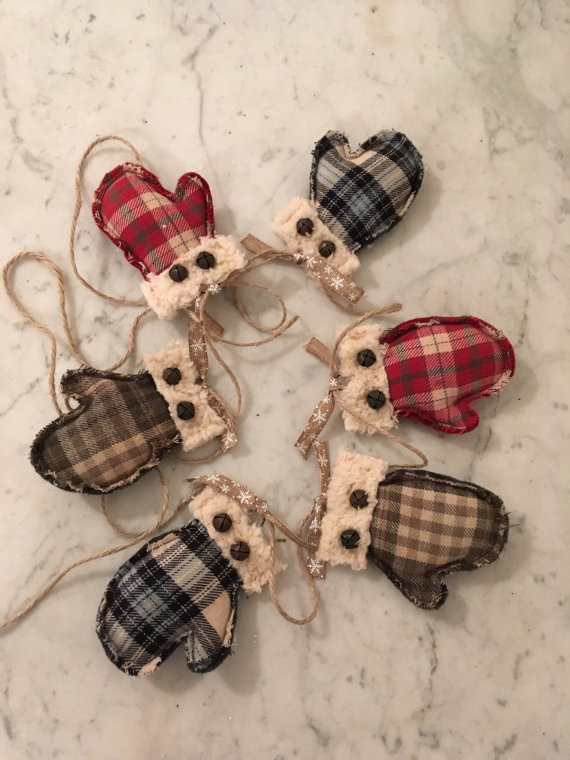
New Year's and Christmas
New Year's garlands are a decoration familiar from childhood, which many made, as soon as they learned how to wield scissors. Paper and fabric flags, chains made of cardboard or shiny foil, carved snowflakes and Christmas trees - any paraphernalia of the winter holidays will be used.


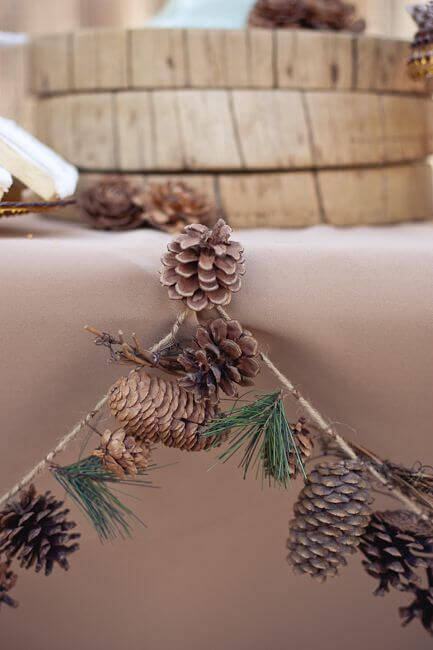
Cones collected in summer can be used to make garlands in winter. It is enough to clean your blanks (cones) or paint the tips of the “branches” of future Christmas trees with white or silver paint (you can use gouache, acrylic paints and even white glue).


For children's party
Perhaps the most common use of garlands to decorate a room is children's holiday. Not necessarily a birthday, any celebration at which children are present, I want to arrange it especially elegantly, festively, and variously. You can decorate with garlands the area of the so-called candy bar (a table with treats and drinks), the space above the table where children will sit or the place where gifts will be stacked. And just garlands stretched across the room or hand-made decorative elements decorating the walls will be a great occasion for a festive mood.


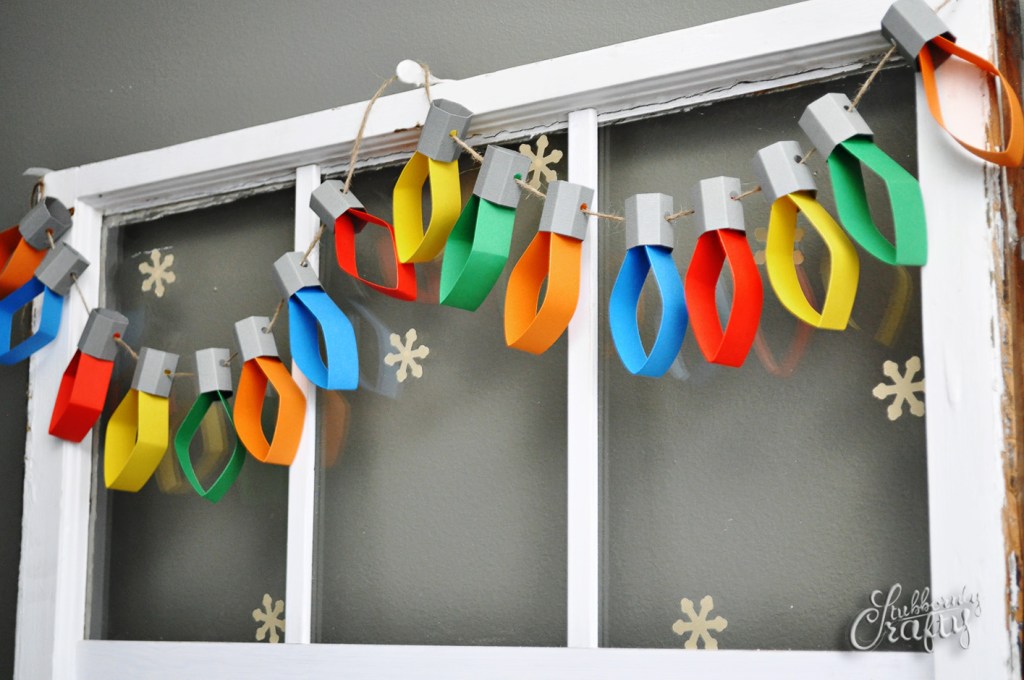
From small colored cylinders (thick colored paper or colored cardboard) you can make dynamite (a hint of the explosive nature of the party) or candles - this is already an association with cake candles.
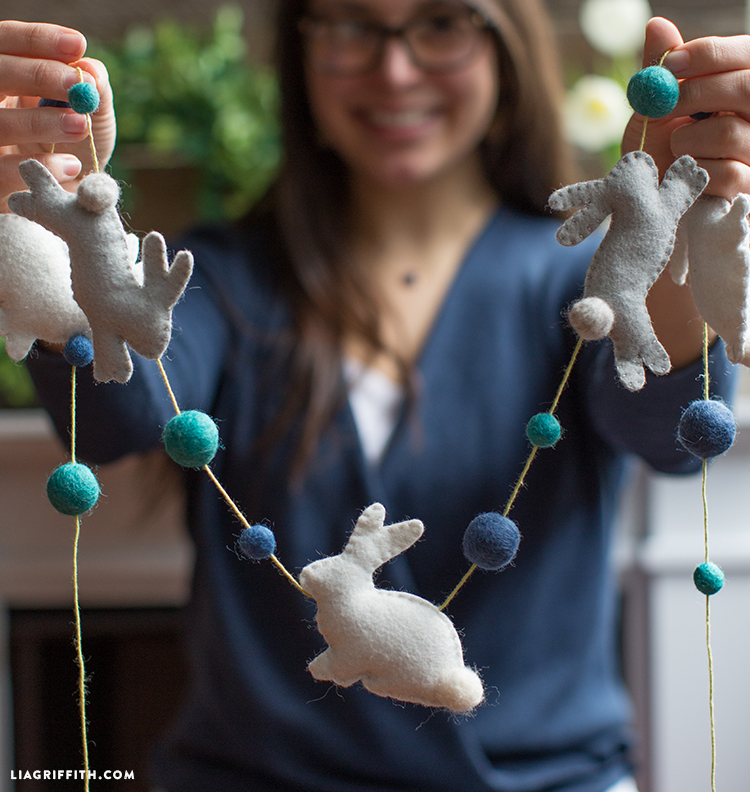
 By combining paper with fabric or thread products, you can create original decor options. For example, paper rabbits with pom-pom tails, which are easy to make even for a child. Ponytails can be made from cotton wool by simply rolling it into lumps.

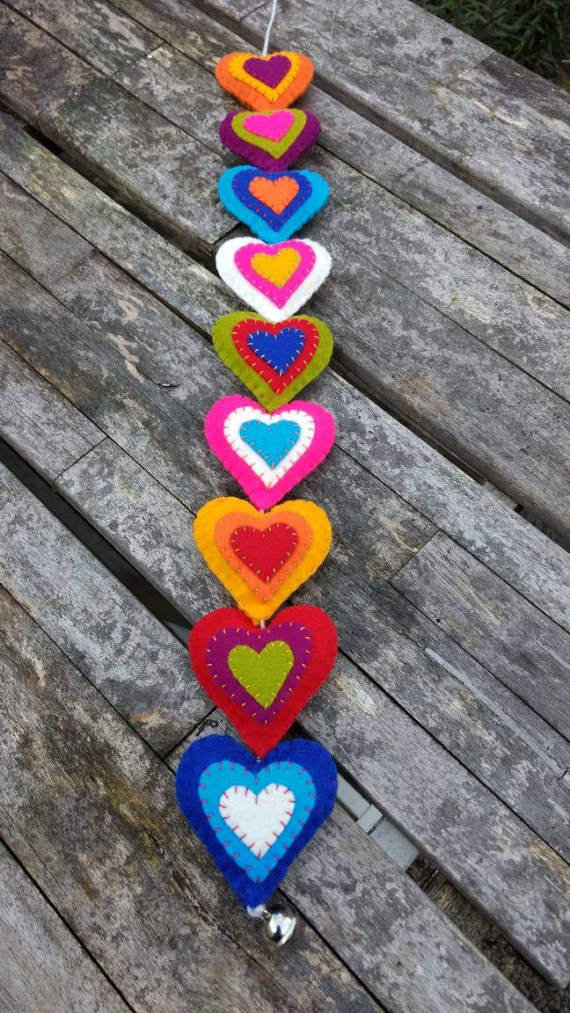
On Valentine's Day, it is customary to give handmade valentines. But you can go further and arrange a whole area for celebration, decorate a place near the table, behind which the romantic dinner, decorate the head of the bed or any other place in the house that is convenient for decorating. Of course, the main motif of garlands for the holiday of lovers will be the use of hearts and all shades of red. By the way, the use of love themes in decorating a room does not have to be tied to any holiday. Girls room interior romantic style similar decorative elements can decorate all year round.


From paper…
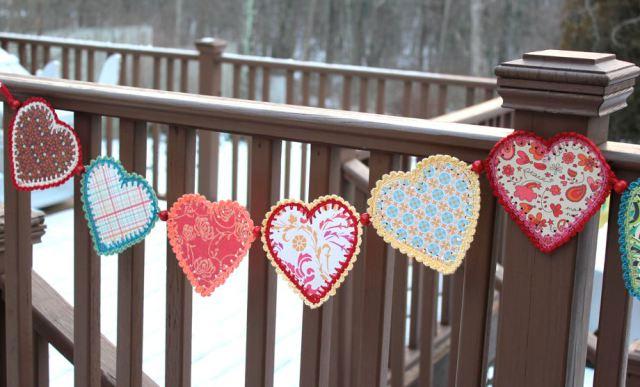

From felt...


Universal option
Regardless of what holiday you are going to celebrate - the birthday of a family member or pet, an anniversary or National holiday, or maybe just one of the relatives returned after a long absence and a party is being prepared in his honor - there are many universal options for making garlands for any occasion. These can be medium-sized balls strung on a rope or a dense thread ...

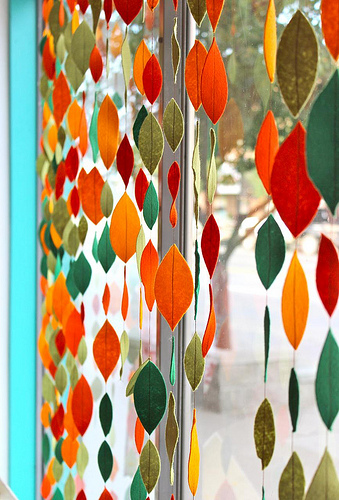
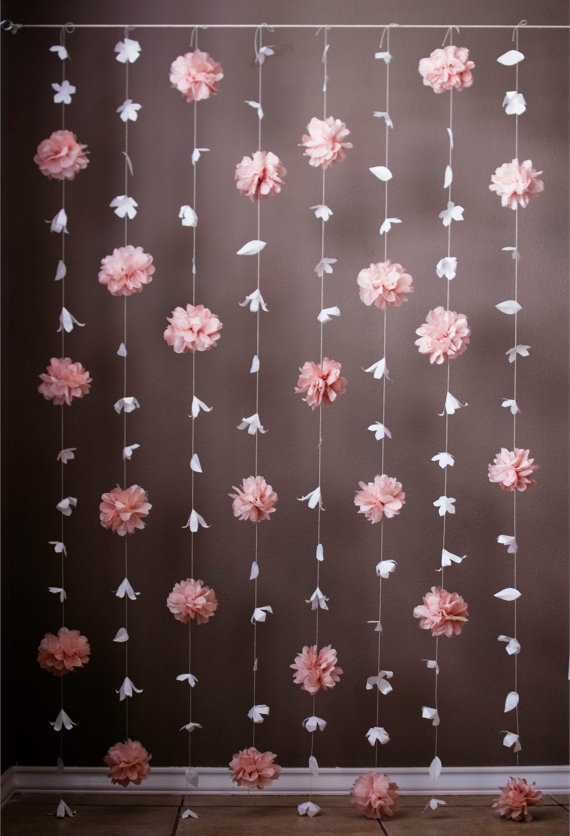
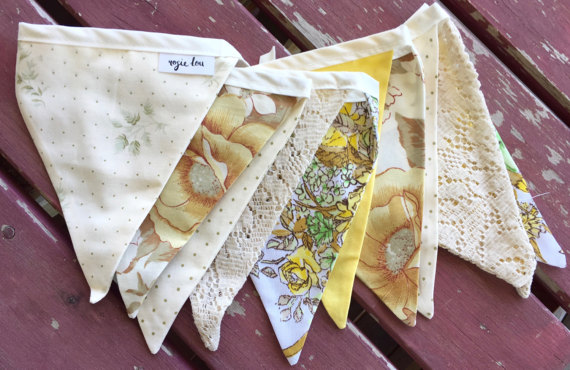
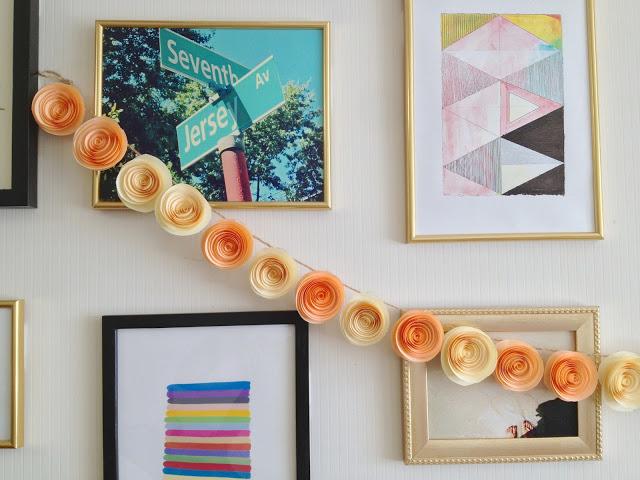
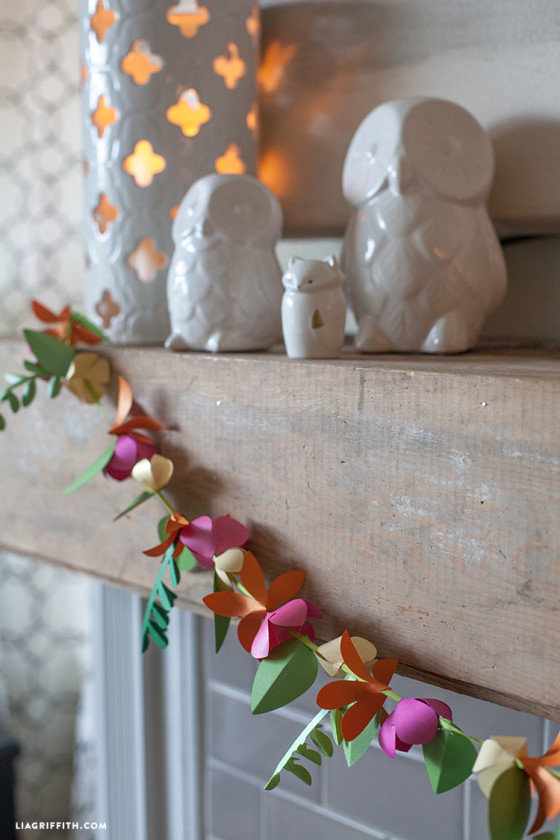
Or flower composition relevant at any time of the year and on any holiday. Moreover, flowers can be made from various materials. Use twigs or twigs for the base and your composition will be closer to nature.


In this article, you will learn how to make several different types paper garlands by yourself. Garland making can be quite fun and easy. Perhaps the simplest tool in a craftsman's arsenal, paper is full of possibilities and purposes. You can turn it into anything. I use it for Christmas home decor, this year the round ones with stitched stitches are the priority. You can use them as decorations for a party, event, or simply. About everything in more detail later in the article.
Making a garland
First of all, prepare many, many paper circles for work. I cut my circles with the help of a scrapbooking punch (in our opinion, a hole punch). But you can find more fancy gadgets for these purposes, of which there are many on the Internet. I chose several shades of pink to create a romantic appearance. I also added a few gold medallions which contrast nicely and make the decoration not boring.
First, I laid all my circles in turn in a row in the order in which I saw them, and my goal was to get an ombre effect. Then she started sewing.
Sew along the center of your first circle, then take the next circle, placing it in front of the presser foot and sew right after the first. Continue moving until you have a chain of circles of the desired length. I used fine stitch on a sewing machine.
Make as many strings for the round garland as you need. For my design, it took about 15 sheets of double-sided thick colored paper measuring 20x30 cm. I installed the finished product on a regular double-sided adhesive tape, adding a couple of threads of decorative light bulbs for a festive mood that were held on a nail, and placed the battery packs right there - at the top of the windowsill, also with double sided tape.
Expendable materials
- double-sided thick paper in several colors;
- metallic paper;
- ponch with a diameter of 5 cm;
- sewing machine
- double sided tape;
- decorative light bulbs.
As soon as you hang all this, you will only have to enjoy, since paper itself is originally festive. Place it close to others holiday decorations, such as Christmas, and you get a festive color.
You will also need a garland for occasional parties. If you have children, they will appreciate this approach and will be grateful to you.
Light elements add a special atmosphere that is inherent in winter holidays. I really love everything shiny, luminous and shimmering, especially during the holidays.
Someone will find the round option boring, or you may not have all the tools at hand. Therefore, I have prepared for you a few more ways to decorate with paper garlands. So let's get started.
Method 1
Geometric
Fold each sheet into a triangle. Start by folding the sheet in half. Then fold the triangle in half to make an even smaller triangle.
Consider making small slits around the edges to make your garland more interesting. Do not make any cuts along the folded edges.
Staple the two triangles together in the middle with a stapler. Do the same for the rest of the triangles so that you have six bonded triangular shapes.
fasten two triangular shape together in the corners. Take two triangles and overlap dots 1/2 inch (1.27 cm). Sew the corners down.
Pin the forms together to keep them in place. If you don't want the staples to show, you can only stitch the inner layers and leave the top layers free.
To make a garland of separate triangles, connect the parts to each other by the edges.
When you're done, fasten the garland to the wall using the buttons.
Method 2
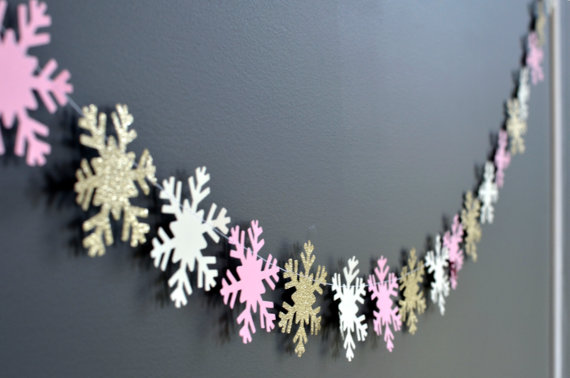
And again a round garland (they are so funny). This time it's a way that doesn't involve sewing machine. The scrapbooking hole punch works the same as regular hole punches, except that the former is different forms and sizes. It can cut circles, hearts, squares, stars and even snowflakes. You can buy a scrapbooking hole punch at any stationery or art supply store. You can also find it online.
If you do not have a figured hole punch, you can use a regular compass. It's a little longer in time, but your perseverance, I'm sure, will overcome the routine.
Walkthrough
- Take colored paper. The best option there will be a choice of special for scrapbooking or cardboard. Craft or origami paper is fine too, but the finished garland won't last long.
- Try using two to three different colors or shades. For example, try light blue, blue, and navy blue.
- Make circles different color using an available method.
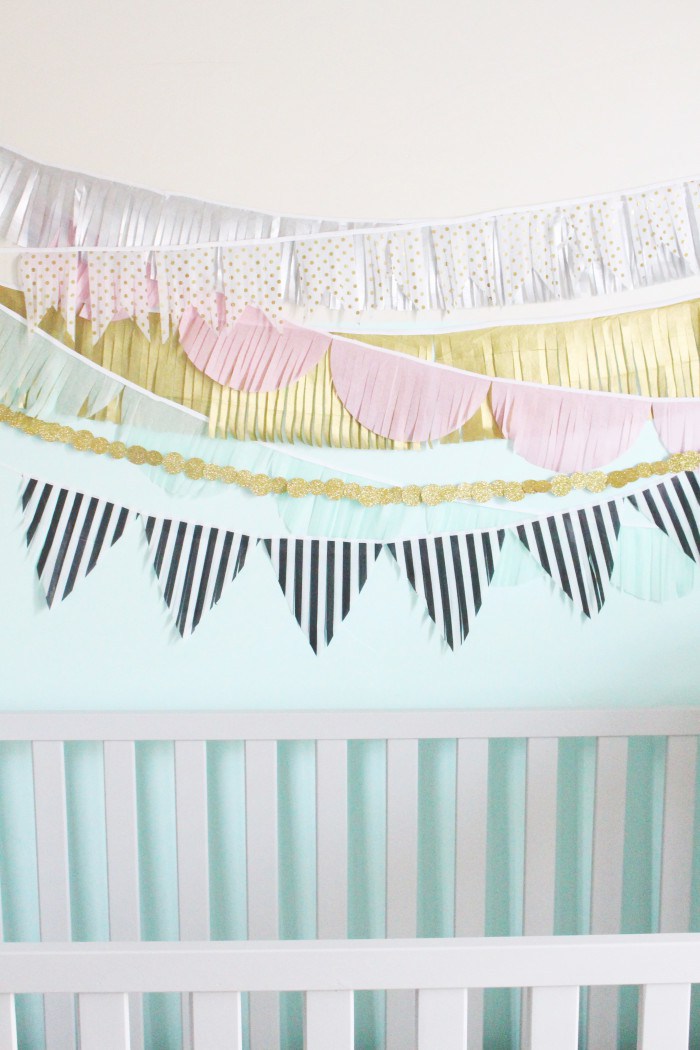
- If you are making a garland for a nursery, use patterned and bright colours. For example, half of your shapes could be bright blue, and the other half of your shapes can be white with bright green polka dots or stripes.
- You can use one punch and get shapes of the same size this way.
- Either go my way - I made two options round shape in different sizes. One is 5 cm and the other is 8.8 cm in diameter. This trick gave my garland some variety.
If you can't find punch, draw circles with a compass!
- Cut out your shapes. If your paper is thin enough, you can cut two or three sheets at a time. Cardboard, however, must be punched or cut one sheet at a time. If you try to pierce too much at once, you will end up with fuzzy edges on the shapes and could damage the blade.
- Align the shapes in a straight line. If different sizes are used, try alternating them. You can alternate them randomly or in a specific pattern.
- Draw a line of glue down the middle. Make sure it goes continuously through all the forms.
- Apply the ribbon over the glue. Make sure that the braid has a tail 30-50 cm long at the end. This way you can hang your garland.
- Lay similar circles with glue on top of the figure with braid, making a “sandwich” out of each shape with twine in the middle. Now our garland becomes like the truth, acquiring the features of a two-sided design.
- Repeat the process with the rest of the shapes. They can be both at a distance from each other, and close to each other. Make sure you have about 30-50 cm of free rope left at the end of the garland, otherwise you won't be able to hang it up later.
Let the glue dry before hanging the garland. Depending on how much glue you used, this can take anywhere from two hours to a day.
Method 3
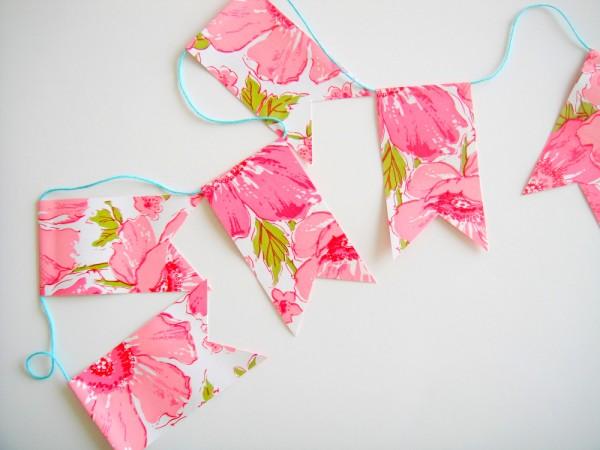
How to make a garland-flags
Step 1
Prepare 20/30 cm scrapbooking paper. You can use any color or pattern you want. To make the flags more interesting, consider using multiple colors, shades, or patterns. For example:
- If the garland is for a child's room, use pink and blue and white paper with pink/blue polka dots.
- If the garland is for an ocean-themed party, consider using light blue and blue color schemes.
Step 2
Fold in half lengthwise. If the paper has a pattern or is one-sided, make sure the pattern is on the outside of the fold. The empty/white part should be inside.
Step 3
Cut in half along the fold line. You should get two copies from a folded sheet of the same size as it.
Step 4
Cut out a triangle from each sheet. To do this, fold the rectangle with the colored side up two times at a right angle. Then cut off the corner to make a rhombus on the spread. In this case, the middle of the triangle should fall at the angle of two folds:
Step 5
Measure the string on which the flags will hang, in addition to the place for the garland, it should have a margin of at least 30 cm at each end for strings, so that you can easily hang the finished product where you want.
Step 6
Open one triangle and cover it with glue around the edges and in the center. You can also add glue in the middle of the triangle.
Step 7
Place the rope along the crease and close the triangle. Iron the flag with the edge of the palm of your hand to flatten it and seal it.
Step 8
Repeat the gluing process for the rest of the triangles. You can arrange them as close to each other or as far apart as possible. However, be sure to leave at least a few inches of space between the triangles so that the garland looks nice when suspended.
Step 9
Consider leaving a message on your banner by placing a letter on each triangle. You can cut out the letters from the colorful and glue them on one side of each flag. You can also paint the letters using a stencil or acrylics.

Creating a cozy atmosphere in the house, thanks to the creation original jewelry for a home with your own hands - this is a very popular trend today.
Handmade has gained acceptance among the majority. And this process is characterized by ease of implementation, elegance of the final result, as well as its economy and ease.

Variable do-it-yourself paper garlands began to attract more and more craftswomen, because with their help you can transform absolutely any home interior.

Paper garlands help create a comfortable atmosphere in the house, a cozy atmosphere and bring a little more warmth to the hearth.
Paper garland - as a way to decorate your home
Many well-known interior designers recommend taking a closer look and exploring ways to decorate and decorate your home with paper elements, in particular, we are talking about garlands. Indeed, in order to make serious changes to the interior, a little money is required, as well as a temporary resource, the replacement of almost all furniture, rearrangement in the house.

And making a change with an element like a garland is easy. People just need to show their imagination and "live" creativity.

You can see a photo of a garland with your own hands on the Internet - all garlands differ from each other in their charm, originality and individuality.
Asking yourself the question of how to make a garland for your home on your own, the most varied solutions and methods of creation come to mind.

To begin the process of creating a garland, you need to mentally decide on their future form and color. After all, depending on what shape the garland will have, the selection of material for its manufacture also depends. There are light garlands made of plain paper, and there are also cardboard ones.

Of course, dense material in the form of cardboard is a reliable and more durable material that will not let you down even after a long time. But the fastening of such elements among themselves should be stronger, and not, as for the first type.

There are several types of garlands that you can build with your own hands:

Garland based on balloons
A balloon garland is generally suitable for single use. For example, you can create it for some event: children's party, birthday or wedding celebration.

But most often it is a children's garland. Bright balloons can be connected in an arch, in the figures of angels, in voluminous hearts, or just sit along the entire length of the wall.

It is more difficult and time consuming to make such a garland at home, so many people order this type of garland already in special establishments in finished form. But, if you start this process at home, you can save your expenses than spend money on the services of special agencies.
paper ring garland
This technology for creating a garland is known to everyone from the very beginning. early childhood. Even at school, everyone made a garland of multi-colored rings cut out of paper. By connecting these rings, you get a long garland in the form of a chain.

It is very simple to make, but if you correctly select colors and give additional decor, then you can get the perfect solution for decorating the whole house.

When connecting the rings to each other, special attention should be paid to the attachment points, since if the garland is poorly attached, you can get a poor-quality result.
Note!


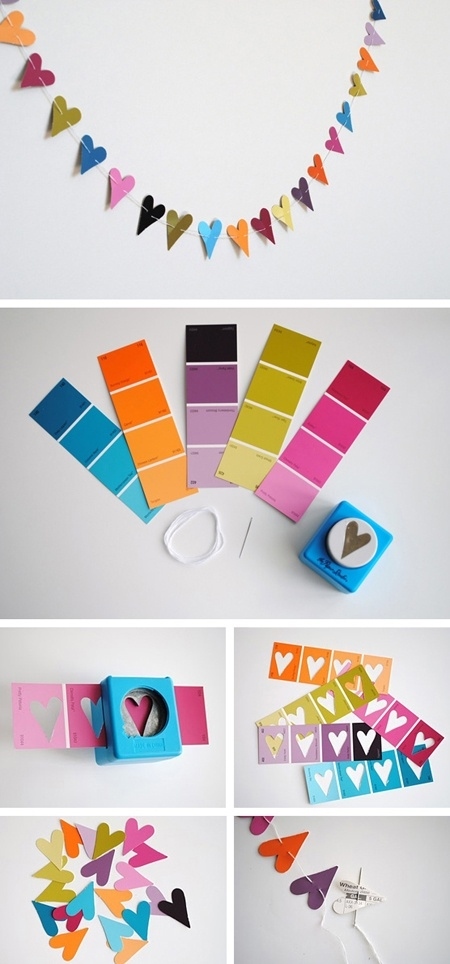
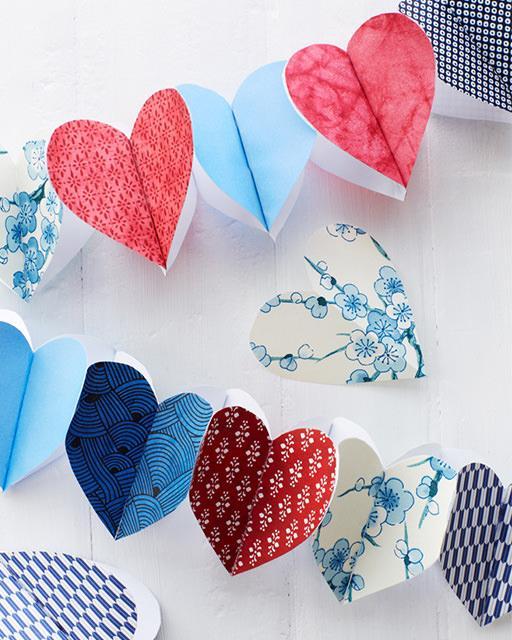
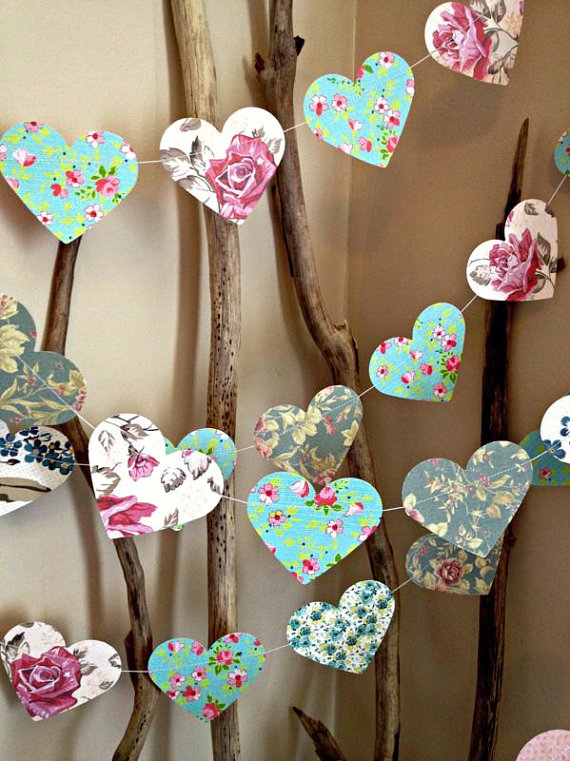
paper heart garland
Many couples in love can create such a garland for romantic evening for two, so as not to spend money on decorating the house. The shape of the garland and of course the vibrant pinks and reds make this garland a must for a holiday like Valentine's Day.

Some create such garlands, and even sell them later on Valentine's Day. And, oddly enough, this manual work are willing to buy. The main thing is to do everything carefully and get the desired result.

When creating paper garlands, it is not necessary to use only high-quality clean paper, some give preference to newspaper sheets, napkins, clippings from a glossy magazine, bright candy wrappers, and old postcards donated for some holidays.

This is also a kind of individual style of making a garland at home. For fastening, both the most common PVA glue and stronger adhesives, such as moment, etc., are used.

DIY garland photo


Note!


Note!


There is very little time left before the New Year holidays, and it's time to start thinking about Christmas. It has been a traditional decoration for more than a dozen years. Since hand-made is now at the peak of popularity, we suggest creating it with your own hands, and a photo step by step instructions help us with this. All our ideas are simple and do not require additional costs, they can be made from improvised means. Be sure to involve loved ones in the work - the kids will like creative evenings with their families.
Garlands are often used by designers for, especially since this is especially true before Christmas and new year holidays. There are a lot of options for their use: you can decorate, fix it near the chandelier, stretch it diagonally, around the perimeter of the room, or decorate a section of the wall, and they are still relevant for them.
If you additionally decorate handmade garlands, you get an original romantic decoration that can be used after the holidays.


Step-by-step master classes for making DIY paper Christmas garlands
The most affordable financial material for do-it-yourself crafts is paper. In childhood, many often glued colorful garlands to decorate the room. Today we will show some interesting workshops on making more complex parts, and for this we need colored paper, scissors, a ruler, a pencil and.
Christmas garland of Christmas trees and corrugated paper tassels
The easiest option is to make a New Year's garland. First you need to draw and cut out the details on it. For this, colored paper, old magazines and.

Cut out several Christmas trees of different shapes and sizes, such a garland will turn out to be more interesting. Then you can make holes at the top with a hole punch and fasten the parts to a decorative thread. To prevent the Christmas trees from slipping, the thread must be pulled through the hole twice.

Corrugated paper brushes
To make a garland, we need different shades in addition, you need to prepare a braid that matches the color. To make the brushes shimmer beautifully in the light of decorative lighting, you can use a little foil for each blank. The order of work is the following.


Festive decoration from colored circles
To make a garland with your own hands paper circles, you can cut blanks using any round object, such as a cup. But it is better to use a special stapler for. It is desirable that the circles be of different diameters and colors. After the required amount has been prepared, take 2 identical parts, lay a thread between them and glue. Glue the next part at a distance of 10-15 cm from the first.

Garland of voluminous pom-pom balls
Master class on decorating LEDs with flowers from egg boxes
To decorate with your own hands a garland of flowers from under the egg trays, we need several containers, scissors and spray paint suitable for yours. The work is quite simple and can be done in just half an hour.
| Illustration | Action Description |
 | Cut the tray at the fold into cells. |
 | Cut off irregularities and straighten the edges outward, the shape will take the form of a flower. |
 | To make a bell-shaped flower, you need to cut off all the edges. |
 | Paint all blanks in a color suitable for the interior. |
 | After the flowers have completely dried, make a hole for the diodes with an awl. |
 | Insert the bulbs inside the flower, alternating lampshades in color. |
 | A beautiful garland can be made under |