Shell decor: do-it-yourself panels. Seashell Crafts Ocean Vase
sailboat
We offer to assemble a sailboat with your own hands.
If you are on the coast, do not buy ready-made shell souvenirs.
Better collect a collection of shells yourself and make an elegant, beautiful sailboat with your own hands!
You will need:
Materials:
- one medium rapan for the hull;
- three wooden sticks (thin skewers or branches) for the masts and one for the bowsprit;
- 6 matches for yards;
- a dozen and a half small shells for sails;
- threads for rigging;
- a large shell-scallop for the stand.
Tools:
- a knife;
- glue (superglue Moment is better, it really seizes instantly. You won’t press the shell to the mast for half an hour, waiting for the sail to stick!)
Manufacturing:
We measure the length of the masts, divide the sticks into the desired segments. We sharpen the tops for beauty with a knife.
We glue the sails to the masts: at the top - small shells, at the bottom - larger ones.
If you want to make the model more complicated and beautiful, we will also glue transverse yards from matches sharpened at both ends to the masts, on which the “rigging” will be attached.
For strength at the junction with the mast, wrap the rails with thread. Let's wait for everything to stick firmly.


Now we will install the masts in the hull of rapana.
For stability, we recommend inserting them into plasticine balls glued inside the rapana, and then fixing them with glue droplets. We are waiting again: it is important that the masts hold tight. For additional stability, you can glue the lower rails to the body.
In front of the sailboat, we glue a sharpened long stick - a bowsprit. We glue the front sails to it and the hull - a jib and a staysail, and at the stern of the sailboat the rear sail is a mizzen. When everything is glued together, we stretch thin white threads between the upper and lower yards of each mast, as well as between the upper yard of the front mast and the bowsprit.
So that the threads do not unwind, drop a little glue. For beauty, you can also stick flags from multi-colored shell pieces on the tops of the masts. Finally, glue the sailboat to the stand. Ready to sail!
Lily

Mom is pleased to receive flowers as a gift, but is it a pity to throw away dried bouquets later? Does she hate artificial flowers? Here is the solution: craft a bouquet of amazing flowers that will never wither, but you can’t call them artificial either - this is how the composition looks original. If in the summer you have collected various shells on the seashore, then the idea of a flower with your own hands is for you.
For each flower you will need:
- 5 small shells for petals;
- a lump of colored plasticine for the middle of the flower;
- a long wooden skewer (straight stick, twig) for the stem.
Making crafts:
We stick the shell petals with the tips into the plasticine ball and press lightly to hold firmly.
Then we stick a skewer-stalk into the same ball from below.


Here is the flower!
The classic chamomile flower is obtained from oblong white-lilac shells. But you can take shells of any shape and color - scallops, toothless; not only white, but also brown, orange, pink - and you will get a bouquet of amazing beauty!
We also add that plasticine balls do not have to be the same color. Much more beautiful if you mix a few bright colors in a lump! Make three or five flowers with your child - while the baby is interested. And give mom an unusual homemade bouquet of shell flowers on a festive morning!
Shell painting
Who among us has not collected shells! Many even collect. And, returning from a holiday on the coast of the sea or river, they bring more and more new exhibits. If you have a lot of them at home - this topic is for you. Try to dream up, be sure to involve your children in the work and build such a wonderful picture.

Progress:
Collected shells (about a hundred) should be thoroughly washed in running water. If some have a matte coating - do not despair. Shine is easy to return by treating the surface with a toothbrush moistened with a 10% hydrochloric acid solution. Sort the shells by color and size.
Now you can start composing. First, lay out the shells on a sheet of cardboard so that you get the desired pattern. There are many options here, it all depends on the choice of your imagination. Take ordinary organic glass (painted or tinted). Then transfer the shells sequentially to the glass and secure. Use glue "Moment" extra strong. When the composition dries, cover the shells with 2 - 3 layers of varnish. Insert our work into the frame.
Ideas from the Internet
panel


These frames are all made from shells.


Flowers


Animals


Compositions


Sea, vacation, beach… Three simple words filled with positive emotions and a fresh breeze. Every summer you want to leave in memory for a whole year, or even more. I don’t know about you, but I bring back from vacation half a suitcase of shells and multi-colored sand polished by salty waves. What to do with all this goodness, the answer is simple -.

Shell trees will decorate a coffee table and keep memories for more than one or even two years - it's not for nothing that you wandered along the beach all day in search of interesting specimens of sea shells.
For shell topiary we need:
- cone made of cardboard or plastic;
- 5-10 cups of shells;
- glue gun.
Spread glue on the cone and glue the largest shells first, then the medium ones, and only then fill in the distance with the smallest shells. A little tip - if you are not satisfied with the small gaps between the shells, you can sprinkle them with white sand - it will also stick to the cone. Such DIY shell crafts You can safely pack and give to friends and family.

To make a ball of shells, prepare:
- ball blank;
- assorted shells of different sizes;
- glue for ceramic tiles (or PVA glue);
- sand;
- spatula, sponge and soft cloth.

- Mix a small amount of sand and tile adhesive in a disposable container. And spread the spatula on the ball, rub the glue with a soft cloth to evenly align the glue over the entire surface of the ball.
- Then proceed to gluing the shells - do not forget - first use large shells, then - smaller shells.
- Wait a few minutes and smooth the surface with a slightly damp sponge.
Shell candlesticks
These two marvelous candlesticks seem to be made for romantic summer evenings. I warn you right away - their manufacture is a task of increased complexity, but, nevertheless, the game is worth the candle.
For candlesticks stock up:
- two old candlesticks
- shells of different sizes and shapes
- corals
- glue "Moment"


First, glue large shells to the candlesticks, and then corals and shells of small diameters. The more diverse your assortment of former shellfish houses is, the more unusual and beautiful the candlesticks will be.
Sea shell bowl

What do you need:
- a plate or bowl, preferably made of wood
- putty
- many sea shells
- hammer
- sponge
- white acrylic paint
- bowl and some water
Lay out the shells on a plate first so you can roughly see what the mosaic will look like. If your shells are too big, use a hammer to break a couple of shells to fill the void between the shells on the dish.
Spread the putty on the dish over the shells. Wipe the surface of the shells with a sponge dipped in water. Then wait a few minutes and cover the putty on the dish with acrylic paint.

Now leave the dish for the whole day, and then you can safely wrap it in a box and give it to your loved ones, or simply decorate a wall or a coffee table with it.
Crafts from shells with their own hands "Sea Network"
This amazing net is perfect for a country house or a nautical-themed nursery.

Prepare for her:
- two wooden sticks
- thick threads
- shells with holes
- small drill
Let's weave our network first. Use a drill to make several holes in wooden sticks and thread the threads through them, fastening them with knots. You should have eight parallel strands. Then we start weaving the transverse threads. There are exactly seven of them and they are fixed very simply - with knots. When the net is ready, tie shells to it and boldly decorate the room.
Shells and other memories in a jar
I saw hundreds of "sands and shells in a bottle" type souvenirs in all the little shops along the beach. They are all neat and uniform, and probably contain shells from China. So I decided to make my own, sandy and seashells in a beach souvenir bottle. It turned out pretty nice! Try it too.

Pour some travel sand into a jar, print your vacation photo on a printer, only on plain paper, not glossy. Glue it on the inside of the jar, put shells washed in fresh water in it and sign it.

Vase from the ocean
This vase is very easy to make. Fill a large, wide-mouthed vase 1/3 full with dry sand. Then top with clean shells, starfish and shells. Use the treasures that you have collected on a trip to the coast, or simply bought in a store. Place the vase in the center of the table or on a shelf and let it delight you every day.

Among crafts made from shells with their own hands, candlesticks stand apart. But I will not go into complexity, but simply show the lightest and most sophisticated candlestick, especially since the complex one was already at the very beginning.

Necessary materials:
- Sand
- Vase or glass
- Candle
- shells

Place the candle inside the vase. Pour sand around the candle to about a third of the vase. Place the shells around the candle pole. You may need tweezers for this.
It will be great if the candle is scented - it will make your evening even more romantic.
DIY shell crafts- children's crafts animals, ships, frames for mirrors, pen holders, candlesticks, paintings and much more that you can do with your children.
Products using shells, shells and pebbles have always been valued, especially by our ancestors, and were also used as decorations.
Shells are different in color and shape, they are sea and river.
Very often it turns out that at the sea, the kids on the beach collect dry shells and different sizes and shapes. Do not throw away these treasures, but use them as a natural material in children's art, because children can be fascinated by making handicrafts from shells.
In addition to crafts, the baby can be told that the shells were a house for the little ones and that the shell is the house in which the little ones live and hide from the fish. You can also talk about different types of maluska and why the shells are different - it depends on the type of maluska: donax (they are also called sea butterflies), mussels, cardium, zebril and others.
You can also tell a lot of interesting things to children about the underwater world, about the inhabitants of shells and how it happened that the shell ended up on the shore in the sand. Thus, it is possible to expand the horizons of the child about the world around him and about the living nature that exists.
Thus, shells will serve well not only in crafts, but also in the intellectual development of the baby.
Before making DIY crafts from shells, ask your child to take a closer look at the shells themselves. And tell you what this or that shell is associated with, what or whom it reminds you of.
Consider together the color, shape, shell finish, whether it is shiny, whether there is mother-of-pearl, etc.
After collecting this creative material, rinse the shells in water without salt, under a tap or immediately in a river and dry on paper in the sun.
The child can sort them by shape, color or other classification.
If you go to the sea or you have the opportunity to relax in the country, collect shells with your baby for further activities. As a rule, children really like the process of searching for shells in the sand.
And now let's move on to what you can do with a child from shells with your own hands at home or in the classroom.
Applications using shells
You need to start from simple to complex. The simplest crafts are crafts that combine plasticine and shells.
You can make an applique of shells. Each shell is taken, a newspaper or unnecessary paper is laid, a shell is placed on this paper. The child can take paints and decorate each of the shells according to his individual author's design. Then, you need to let the paint dry in the fresh air. In the meantime, all this beauty is drying, a separate blank sheet of paper is taken on which it is supposed to create an application in the form of a picture.
Paint is taken and a background is made for the entire length and height of a sheet of paper. Now let it dry completely.
Then, glue and dry painted shells are taken and laid out in some interesting figure first. Details are outlined where and which shell is more suitable. Perhaps some of the shells will need to be moved or replaced altogether, or simply rearranged.
And when the composition is already fully visible and understandable, we begin to carefully glue the shell to the paper on which the background has already been applied.
If desired, the application of shells can be framed and hung on the wall so that it decorates the children's room and fills it with comfort and warmth.

An application made of shells, the theme of the underwater world through the eyes of children, may look like this:

Snail in the house
Roll up the body of the snail, form the head, antennae, eyes, you can also make plasticine or use small seeds for the eyes of the snail.
Next, take a shell that looks like a shell of a live snail (let the child look at the pictures of what shape the shells are located on the backs of the snails) and place it on the body of the prepared plasticine snail.
Paintings
With older children, you can create figurines or paintings using shells of various shapes, paste over caskets, trays and other interior items.
A large number of shells of the same shape are selected, painted and laid out in the form of a picture of the intended pattern. You can stick with glue. Framing can be in the form of a regular frame.
These handmade paintings will look very beautiful and unusual in any interior!


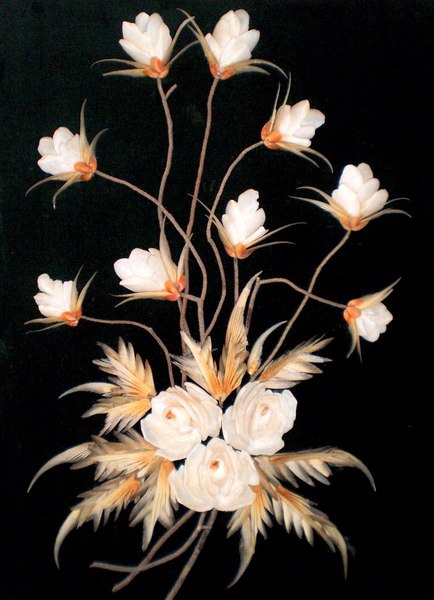
Beautiful "sea" paintings in the form of stunning beauty of flowers! Creating such paintings is a real art.

Decor
Wonderful decorative crafts made from shells with your own hands can be a wonderful addition to the interior. For example, you can collect the most beautiful shells, starfish, shells in one transparent glass vase. If you put it as a composition with other glass vases in which there are multi-colored sand from different parts of our planet, you get an interesting combination decorating a corner in the house.

Stunning beauty box made of shells of various types of maluska and snails. Such a thing is not only beautiful, but also practical for its owners. After all, it is possible to store beautiful vestments, jewelry or precious stones in it.

A summer wreath of wild or garden flowers can be woven together with a child. And decorate it with pre-painted shells and shells of sea or river inhabitants. Such beauty will refresh absolutely any interior.

You can also decorate candlesticks. You can paste over a glass jar with shells and thus renew and revive it, creating a beautiful decorative author's thing.
In the same way, a do-it-yourself pencil holder is made for pencils, pens and felt-tip pens.

Frames for mirrors, photos, watches
Do-it-yourself things like frames are very famous. Frames can be for mirrors, for watches, for photographs. In order to create such creative things, it is necessary to stick already processed shells of various shapes and colors on the selected surface. And on top you can varnish and they will shine.
Such crafts are not entirely for children, but children can take an active part in their creation.


DIY candlesticks
Candlesticks are very easy to make from shells. You can melt the paraffin and insert a wick there. And when meeting the New Year, you can light such beautiful candles with your family.
Also, if the sinks are low, then it is convenient to put such candlesticks in a lamp for essential oils, placing them in size. You can pour some water into the lamp itself and drip a couple of drops of fragrant essential oil. And the room will be filled with pleasant incense.


original dolls
Incredible beauty is created by masters and craftswomen of dolls! The beauty of these works makes you pay attention to these do-it-yourself crafts from shells. The workmanship is incredible!


Decorations
With children, you can create the simplest jewelry, for example, a string of shells or a thin bracelet with an elastic band. To do this, it is first necessary to drill a hole in each shell and then the child can pick up suitable small shells and string them on a string - beautiful beads will turn out.
Adults can try to create more "adult" jewelry in the form of medallions or pendants. Although they are quite difficult to make.


As you can see, you can create amazingly beautiful and very beautiful objects, jewelry and just things with your own hands.
When there are beautiful decorative interior decorations at home that resemble the sea, warmth, sea surf, this brings pleasant memories and improves mood.
It is on cold evenings or rainy days in autumn, when winter and frost are outside, that you can do needlework on your own or make children's handicrafts from shells with your own hands.
Mom can create decorations for herself and her daughter with her own hands, and kids can make interesting figures or applications from marine gifts of nature such as shells, pebbles, connecting them with plasticine.
Bracelets, beads, panels, jewelry, compositions and much more will not only decorate the interior, but also bring a lot of positive emotions to their creators!
Engage in fun activities using shells, rocks, sand with toddlers and beautiful large and intricate compositions with school age kids.
Create beautiful things for yourself from such a chic natural shell material. Such jewelry is worn in the summer on vacation and on weekends.
And how do you use shells in your art with children or what interesting things do you do using seashells and shells from the sea or river? Share your ideas on how you make applications from seashells, the theme of the underwater world through the eyes of children.
After a summer vacation, we come home to city apartments with a bunch of beautiful shells that we have collected on the sea or river with our children. What can be done with these shells? Lots of great crafts! Such crafts will help you and your children have fun and usefully spend time, and the interior of your home will be replenished with new beautiful products. You can make paintings, candles, panels and much more from shells with your own hands.
For example, to make a candle from a shell, you just need to melt paraffin or wax in a water bath, pour it into the shell and insert a wick-rope. So the stylish and original candle is ready!
Seashell photo frames
Photo frames decorated with shells look delicate and refresh photos. Photos taken at sea look especially great in such frames!
To make a frame decorated with shells, you will need:
in fact, the shells themselves,
simple cheapest wooden photo frames,
PVA glue or something else.
You can also use various beads, straw, beautiful pebbles and even river sand. And then it all depends on your imagination. Just experiment and stick shells on the frame. See what photo frames you can make:
 The photo frame is partially decorated with shells, and the main part of the frame is sprinkled with sand |
 The photo frame is decorated with shells around the perimeter |
 |
 Photo frame decorated with sea shells and rhinestones |
By the same principle, you can decorate with shells and a frame for a mirror or even a wall clock
Craft shells can be used as is or pre-painted.
This is a fairly simple craft that is easy to glue. All you need is shells and good glue. The shells are glued together to form a flower (see photo). By the way, various things can be decorated with shell flowers. For example, a jewelry box. A box decorated with such flowers will be a great gift for mom!
Shell craft - pencil holder

You can make a wonderful pencil case decorated with shells with your own hands from clay or salt dough. Such an exclusive pencil holder will decorate any table!
To make a pencil craft, you will need:
clay or salt dough
Color the shells with bright colors. Model a pencil holder of the desired shape from clay or dough and decorate it with painted shells, pressing them into the walls of the pencil holder. For reliability, you can first grease each shell with glue. Now the craft must be dried so that the pencil case hardens.
Sea coast in a bottle
From an ordinary plastic or glass bottle, sand, pebbles and shells, you can make a fun craft - a beach in a bottle. This craft can be made by children of any age. You just need to pour river sand and small shells, pebbles into the bottle and close the bottle with a lid. That's it - the beach in a bottle is ready! By the way, falling asleep in a bottle of sand, pebbles and shells is excellent.
Crafts-souvenirs from shells in the form of animals and people
From shells, you can make funny souvenirs in the form of animals or people of varying degrees of complexity. For example, even a three-year-old child can make a turtle. All you need to do is glue five shells together - one large one for the shell, four small ones for the paws, and one more for the turtle's head. You can draw or stick eyes on the muzzle and attach a cardboard or straw hat to the turtle's head.
More complex crafts are suitable for older children. You may need the help of an adult to make them.

Do-it-yourself paintings and panels from shells
Very beautiful decorative decorations for the interior are panels and paintings from shells. To create such a picture, in addition to shells, you will need paints, glue and any other decorative elements, depending on your desire. You can use beads and seed beads, blades of grass, sticks, sand, fabric, buttons... The process of creating a picture or panel will delight both the child and you, and the result will exceed your wildest expectations! Hang the finished picture in a frame and on the wall and be proud of your creation!
Shells can decorate just about anything!
Who among us has not collected shells! Many even collect. And, returning from a holiday on the coast of the sea or river, they bring more and more new exhibits. If you have a lot of them at home, this topic is for you. Try to dream up, be sure to involve your children in the work and build such a wonderful picture.

Progress:
Collected shells (about a hundred) should be thoroughly washed in running water. If some have a matte coating - do not despair. Shine is easy to return by treating the surface with a toothbrush moistened with a 10% hydrochloric acid solution. Sort the shells by color and size.
Now you can start composing. First, lay out the shells on a sheet of cardboard so that you get the desired pattern. There are many options here, it all depends on the choice of your imagination. Take ordinary organic glass (painted or tinted). Then transfer the shells sequentially to the glass and secure. Use glue "Moment" extra strong. When the composition dries, cover the shells with 2 - 3 layers of varnish. Insert our work into the frame.
Of course, the composition of shells will depend only on your creative abilities. After all, you can not be limited to a simple pattern, but make up whole pictures. Or you can make table figurines and souvenirs.


Beautiful crafts from shells
Now it's time for the holidays! The lucky ones choose bathing suits and pack their suitcases... And someone has already arrived from the southern coasts with a chocolate tan, unforgettable impressions, photographs... And, of course, at least with a handful of pebbles and shells, picked up on the shores of the gentle warm sea, from which you can make beautiful crafts.
When we get to the beach, we, along with our clothes, throw off all our solidity and turn into big children who, together with the little ones, build sand castles and enthusiastically collect seafood. And how not to collect them? Smooth pebbles that are so pleasant to hold in your hands, of various colors and patterns… Fragments of corals polished by waves — mysterious underwater kingdoms that we managed to look into… Wonderful shells — even the most modest of them can be looked at indefinitely, they are so striking in their perfection of forms.
And now in our pockets there is a growing collection of free-of-charge, but no less valuable souvenirs. Well, if we went on vacation with a child, then there is no doubt that our luggage will increase by a pound of “treasures”. And so — in every trip!
Have you ever wondered what to do with these collections? After all, if we keep everything that we collect, in our house there will soon be no place to live! One of my friends came up with the idea: she and her children go to nature to “let go of the stones”!
Well, I have a different recipe. I make beautiful crafts from pebbles and shells in the form of pictures that can take root in your own interior, as a keepsake of an unforgettable trip, or can serve as an original, one-of-a-kind gift.
materials
- Seafood: stones, shells, pieces of coral, wave-turned sticks, etc.
- Tiles, plain or with a slight unobtrusive pattern, any size. Many of us have tiles left over from repairs at home, which we keep just in case. Perhaps this is the case!
- The frame is the right size for the tile. A wooden frame, as a more natural one, looks better. But plastic has an advantage: with it, your picture will be moisture resistant, and therefore, it will be able to decorate the bathroom!
- Any universal glue that glues "everything to everything."
- Standard frame fastener. Or 4 cloves, a paper clip, a hammer, pliers, two small screws.
Operating procedure
- The most important thing is to decide on the composition. It is the harmonious composition that makes the picture a picture, and not a meaningless set of objects. Therefore, pay maximum attention to this stage. "Play" with the items, trying to make them fit on the tile in a nice group. When laying them on a tile, do not forget to put a frame on it, as it is also part of the composition. Avoid direct symmetry, but try to balance the objects, avoid the accumulation of small details on one side of the picture and large ones on the other. Visually, place heavier objects at the bottom, then the picture will look stable. Consider the texture and color of objects. Move them over the surface, replace one with another until you are satisfied with the result.
- Now, one by one, lift the objects, grease them from below with glue and return them to their place, making sure that they take their previous position, and the harmony is not disturbed.
- Insert the picture into the frame using special fasteners or just 4 nails, driving them close to the tile.
- Attach a loop on which the picture will hang - fasteners are often sold complete with frames. If you don't have a ready-made loop, you can easily make a strong loop that can withstand the weight of the picture from an ordinary paper clip and screw it to the top bar of the frame with small screws.
Now you know how to create from shells. Good luck!
We offer to assemble a sailboat with your own hands.
If you are on the coast, do not buy ready-made shell souvenirs.
Better collect a collection of shells yourself and make an elegant, beautiful sailboat with your own hands!
You will need:
Materials:
- one medium rapan for the hull;
- three wooden sticks (thin skewers or branches) for the masts and one for the bowsprit;
- 6 matches for yards;
- a dozen and a half small shells for sails;
- threads for rigging;
- a large shell-scallop for the stand.
Tools:
- a knife;
- glue (superglue Moment is better, it really seizes instantly. You won’t press the shell to the mast for half an hour, waiting for the sail to stick!)
Manufacturing:
We measure the length of the masts, divide the sticks into the desired segments. We sharpen the tops for beauty with a knife.
We glue the sails to the masts: at the top - small shells, at the bottom - larger ones.
If you want to make the model more complicated and beautiful, we will also glue transverse yards from matches sharpened at both ends to the masts, on which the “rigging” will be attached.
For strength at the junction with the mast, wrap the rails with thread. Let's wait for everything to stick firmly.


Now we will install the masts in the hull of rapana.
For stability, we recommend inserting them into plasticine balls glued inside the rapana, and then fixing them with glue droplets. We are waiting again: it is important that the masts hold tight. For additional stability, you can glue the lower rails to the body.
In front of the sailboat, we glue a sharpened long stick - a bowsprit. We glue the front sails to it and the hull - a jib and a staysail, and at the stern of the sailboat the rear sail is a mizzen. When everything is glued together, we stretch thin white threads between the upper and lower yards of each mast, as well as between the upper yard of the front mast and the bowsprit.
So that the threads do not unwind, drop a little glue. For beauty, you can also stick flags from multi-colored shell pieces on the tops of the masts. Finally, glue the sailboat to the stand. Ready to sail!
For crafts made from natural material (from shells), we need additional materials:
- quick-drying glue or plasticine,
- modeling paste, hardening within 36 hours (for the formation of some parts of the body and small elements),
- nail polish (colored and colorless),
- gouache and kolinsky brushes No. 0 and No. 1 (for drawing eyes, mouth, mustache),
- beads, beads and sequins (for the eyes of figures),
- wire, fishing line and pieces of lace (for the tail and horns),
- natural material - grains, seeds, acorn caps, tree branches.
And you also need patience and imagination!
Porcupine Thorn 

Dragon tail. 
Frog Klushka. 

Giraffe Zhenya. 

from the book "Fantasy from shells", Claudia Morgunova