Textile autumn apples and pears. Master Class
I haven’t shown fabric crafts for a long time, today I’ll tell you and in the master class I’ll show the correct pattern on how to sew an apple out of fabric with my own hands. Homemade is quite complicated, it requires some sewing skills. It can decorate any room or give a child as a toy.
For a tissue apple, we need:
Velvet (velor), basis for crafts;
- Artificial velvet;
- Fabric gabardine for the sheet;
- Scissors;
- Twisted cord, approximately 7 centimeters;
- Sintepon, sintepuh, holofiber, any filler;
- Elongated needle;
- Sewing machine;
- Glue gun;
- Pins;
- Threads.

First you need to make the right pattern. Let's draw two such details on paper. On the edge where “fold” is written, we make a fold so that when the part is cut out, it will be mirrored.


These are the cut-out fabric blanks we need.

On velvet, which is artificial, we create many deep cuts.

We make lines along the edges, on the apple itself, as well as on a leaf. We don’t build 1 centimeter on the sheet, we put the filler through this hole.

We cut off the tip of the sheet, turn it inside out, fill it with quite a bit of synthetic winterizer.

We turn the apple blank inside out, fill it, then we usually make basting with a seam. Retreating at the same time 1 centimeter.

Gently tighten the apple and hide the edges inward.

From the side of the stamen we pass a needle with a thread, pull it out at the other end of the apple, and so on several times. Thus, it will give shape to the craft and pull the end of the apple with a thread of resentment.

We roll the original artificial velvet blank into a tube and attach the stamen to the apple with a glue gun.

Cut off the excess length.

Glue the tail to the apple as well.

Glue the leaf too. For reliability, all these things can be additionally sewn.

Here is an original fabric apple turned out to be done.
tissue apple
Often we, women, have a question - what to give a friend for March 8, for Easter or another holiday? It must be, of course, a pleasant, useful and memorable gift.
For example, such as our tissue apple. It can be used as a needle bed, for decorating the interior, a soft or Christmas tree toy.
This apple can be sewn from any fabric - with a pattern or plain, dense or not. It is very convenient to sew from felt, as it does not crumble.
Threads should be used in the color of the fabric, as when turned inside out, they can look through at the seam.
For embroidering veins on a leaf, threads darker or lighter than the color of the leaf itself are suitable.
For stuffing an apple, you can use any filler, such as cotton wool, synthetic winterizer, etc.
For the apple itself, you will need a piece of fabric measuring 7 x 14 cm. For a leaf 3.0 x 4.5 cm.
We re-shoot the apple template from the monitor or print it out (Fig. 1). To see the template in full size, click on the image. 
We cut out the details of an apple and a leaf on it (Fig. 2)

We put the apple parts together with the right side inward and sew them with our hands or on a typewriter (Fig. 3)

We turn the apple inside out (Fig. 4)

We stuff it with synthetic winterizer (Fig. 5)

We tighten the hole with a thread (Fig. 6)

We turn the seam allowances inward, tighten the thread well and fasten with a few stitches (Fig. 7)

We hide the end of the thread in the apple itself: we insert the needle into the top of the apple, and bring it out at the bottom, pull the thread well and cut it close to the fabric (Fig. 8)

We start making the stem: we take a brown thread, insert it into the bottom of the apple (Fig. 9), and then from top to bottom.

At the bottom we make a stitch with a length of 5 to 10 mm and bring the needle to the top of the apple. We repeat again. We get a beautifully designed bottom of the apple (Fig. 10)

We perform the handle as an air loop for buttons, and thread the end of the thread through the handle and fasten it at its base (Fig. 11)

We take a cut leaf and select a thread by color (Fig. 12)

We embroider veins on the leaf. So it will look more natural and prettier (Fig. 13)

We sew a leaf to the apple itself (Fig. 14)

The tissue apple is ready. As you noticed, it will take quite a bit of time and materials to make it.
This work is simple, so it can be done together with children, introducing them to needlework and creativity. This will allow you to devote your time to children, because you will work hand in hand. If the child is small, then he can perfectly serve you necessary materials and tools, watching your actions at the same time. Older children can help thread the needle. Just show your imagination and decide for yourself what to entrust to your child.
Textile needle bed - apple. Master class with step by step photos
Many of us do not even imagine what can be given as a gift. interesting souvenir a woman, especially if she is also fond of needlework. Although even if we do not take this into account, we can safely create something useful for every woman with our own hands. Namely, we are talking about potholders for the kitchen, a case for nail scissors or a needle case. Yes, exactly the needle! Let's remember the old days, I don't know about you, but quite often I met a small pillow attached to the wall near the kitchen curtains, where a needle was inserted. And it was most likely for convenience, because very often force majeure occurs when you need to quickly get a needle and darn something. This is how they felt more comfortable.
But we bring to your attention interesting master a class on sewing an original needle bed, which can also decorate a very interesting interior, but at the same time it is interesting in design and can serve as an original gift for anyone.

What do we need for tailoring needle beds?
In order to create an apple needle bed with our own hands, we will prepare: green cotton fabric, green and marsh felt, threads to match the fabric and synthetic winterizer or other filler, such as silicone, holofiber. The only thing to remember is that cotton wool is not at all suitable for such cases. First, she does not hold appearance, and secondly, when wet, it deforms the work, which cannot be said about silicone and holofiber.

Let's draw the details of an apple and a leaf on a piece of paper, or print a ready-made drawing on A4 sheet format. Specify the number of apple parts.
Cut out paper patterns strictly along the contour.

We fold the green fabric in two layers, face inward.
Pin the pattern to the fabric with pins.

Chalk transfer the pattern to the material according to the contour.
We cut out the details with small allowances.

For the leaves, prepare green felt.
We pin the pattern with a pin. With a chalk, pencil or ballpoint pen, transfer the outline of the patterns to the felt.

Cut out two leaves without allowances.
We grind the details of the needle bar along the marked lines.

We make notches along the seams with the tips of scissors. Thus, it will be easier for us to turn the work inside out, and the work itself in the turned out state will be much more accurate.
We turn the product on front side.

We turn the unprocessed section 1 cm inward. We pin the hem with pins. We iron it.
We fill the detail of the apple with synthetic winterizer.
Over the edge, with hand stitches, we lay a line along the hem for assembly.
We pull the thread to the assembly.
Secure the assembly with a few hand stitches.
We sew the apple through with a needle and bring it out from the opposite side.
Slightly tighten the thread and make a recess from the bottom in the apple. We fix the thread to fix this recess. This made it even more like the real thing!
From brown felt cut out a small square and sew on the center of the apple.
Chalk draw veins on the leaves.
Lay lines along the chalk lines. We tie the ends of the threads into knots and bring the threads inside. Cut off the ends of the threads.
We sew the prepared leaves. We make a leg. And also sew it in the center.
Our appetizing do-it-yourself apple-pincushion is ready. It will be a wonderful souvenir for a girl or woman, and especially a needlewoman will appreciate such a gift!
Create and delight others with your work!
LiveInternetLiveInternet
— Categories
- different conic horses (175)
- sos (11)
- angels (109)
- butterflies (50)
- tags (28)
- paper plastic (81)
- vases, bottles (84)
- felting (86)
- dumplings (308)
- wreaths and wreaths (11)
- patterns for textile dolls/toys (1427)
- embroidery (81)
- knitting (327)
- knitting, vests (34)
- bottle decor (104)
- decoration (400)
- decoupage (140)
- trees, topiary (135)
- For diary (14)
- interior (709)
- for dolls (736)
- houses-huts, from different (14)
- haremania (200)
- winder toys (11)
- from newspaper tubes (63)
- cardboard (176)
- burlap, miscellaneous (60)
- empire of taste (55)
- interesting information, a little bit about different things (20)
- interesting, photo (247)
- pictures - flora and fauna (34)
- pictures,images - animals (101)
- paintings and pictures (336)
- leather paintings (38)
- clipart (32)
- goats, various (41)
- computer (67)
- candy gift (31)
- baskets, from different (40)
- catmania (196)
- coffee toys/dolls (100)
- hosiery dolls/toys (42)
- baby dolls (769)
- dolls, tildes (137)
- sculpt with children (46)
- plastic molding and polymer clay (304)
- modeling from plastic and polymer clay, cold headlights (113)
- literary page (6)
- master class (5148)
- bear mania, patterns and photos of bears (185)
- music (4)
- music (0)
- on the Internet (490)
- folk doll (150)
- insects, miscellaneous (39)
- new year (61)
- health and wellness (67)
- amulets, from different (103)
- review of materials (133)
- sheep (from various) (100)
- panels (174)
- papier-mâché (89)
- papier-mâché (152)
- easter (1)
- Pedagogical piggy bank (11)
- paper art (30)
- different feathers (20)
- leather crafts (241)
- plastic crafts (57)
- crafts different (587)
- crafts with coffee beans (43)
- pillows (3)
- useful reading (437)
- psychology (8)
- birds, various (286)
- various crafts made of felt, felt (185)
- frames (20)
- apartment renovation (12)
- drawers (206)
- fishology (12)
- garden (63)
- Slavs (29)
- elephants/hippos (45)
- dogs from different materials (33)
- tips different (420)
- background creation (13)
- salt shakers (61)
- steampunk (6)
- bags, handbags, wallets (10)
- souttage (15)
- interior textiles (33)
- textile toys, sewing (79)
- various techniques (179)
- drawing techniques (46)
- stencils, templates (137)
- jewelry (188)
- jewelry (256)
- plant care (3)
- filigree, jute (99)
- film library (1)
- photo of dolls (375)
- photogenerator (10)
- flowers (34)
- handmade flowers, vegetable (616)
- sewing (264)
- jewelry boxes (86)
- epoxy (14)
- humorous (59)
— Music
— Diary Search
— Subscription by e-mail
— Regular Readers
— Communities
— Broadcasts
— Statistics
Textile apples and pears with their own hands. Master - classes and patterns.

tissue apple


Cut out on fabric.

And with the simplest seam, we sew the needle forward. It is possible to sew on a typewriter, but such an invoice will no longer work.


We fix the thread at the top.

This is how it looks.

Sew on the tail and leaf.


![]()


A source


The pear was a little crooked and not at all symmetrical. I chose the best in my opinion from all the blanks, transferred it in the same way as with an apple to a sheet, folded it in half and cut it out.
I specially tried to sew a pear and an apple from ordinary very thin fabric. From all sides, everything is neat, nowhere needs to be cleaned or even redone. I was very satisfied with the result.
A source
A source
WE SEW APPLES WITH THE SMELL OF CINNAMON
We will use this pattern, you need to cut out 3 parts
Fold the fabric in three layers and transfer the pattern to it
Hem and turn out
Fill with cotton or synthetic winterizer
Pull the thread and sew
Pierce the apple from top to bottom
Cut out leaves from felt
Take a cinnamon stick
Insert the leaves and cinnamon into the apple
A source
A source
Felt food. Apple
2. Trace the details and cut out.
3. Let's start with a leaf and a cutting.
Everything, and dealt with it
A source
Felt food. Pear
Like this:
Velcro details.
Velcro details.
When all six parts of the pear are sewn, you can join them together. To one of the details, you can sew a sheet and a stalk or make a sheet and a stalk separately with Velcro.
The pear from the parts is larger. And, unfortunately, it does not fit completely. By the way, she reminds me a little of quince
I have more ideas for joining such felt fruits / vegetables; Let's see, maybe I'll try them in the preparation of the next posts.
Part of the slices was sewn similarly to apple slices.
And some of it is this way.
We cut out 1 whole slice and 1 slice without a core from felt. We cut out the core separately from felt of a different color.
Using a glue gun, we connect the 2 parts of the slice and glue the core.
We lay a zigzag line on a typewriter at the junction of the slice and core.
We hide the ends of the threads in the middle of the part. Embroider bones. Ready.
A source
We create a textile developing apple
This apple will be interesting and useful not only for kids! The smallest ones can just look at it, the bigger kids will gladly take the apple into slices, take out a worm made of wooden beads from the pocket and gnaw it, sort through the beads, listen to the leaf rustling and the apple itself ringing softly. All this contributes to the development fine motor skills, color and sound perception, helps to erupt teeth - after all, kids love to gnaw on wooden beads. Children 2-3 years old will learn to string apple slices on a ribbon, and then tie it. Yes, even without a ribbon, the slices stick well together, so you can leave the bullseye at each other instead of the ball (such a soft ball does not hurt at all and is very fun). But for younger students, this apple will be an excellent tool in explaining such a difficult topic as "parts and the whole, shares."
Let's start. We will need:
- fabric for the "skin" of the apple and for the "pulp" of the apple;
- dense, needle-punched synthetic winterizer;
- ordinary synthetic winterizer or other filler for toys;
- beads, satin ribbon(it is better, if such exists, to take a very thin rep tape);
- lightning, wooden beads (I have one of them juniper), small acrylic beads, cotton yarn;
- fabric for the leaf, rustling film, rep tape;
- scissors, needles, pins, block installer, hook.
We copy the patterns, stretch them to the entire A4 sheet and print them out. These patterns are mine, the author’s development, the idea is also mine (but I don’t claim that no one has ever created such an apple, I just haven’t come across such an apple on the Internet).


We cut the outer parts of the lobules only from the main fabric, and the inner parts from the fabric and from a dense synthetic winterizer. In total, you should get 8 external parts, 16 fabric internal and 16 sintepon internal. Be sure to mark where the contact tape will be sewn.
We cut the contact tape into pieces 3 cm long. We pin it with safety pins on the front side of the inner parts of the apple. Do not confuse the location of the prickly and fluffy parts of the contact tape! Arrange all the inner parts of the slices in a mirror image - and on one side the prickly parts of the tape, and on the other side - fluffy.


On the wrong side we pin a dense synthetic winterizer on the same parts.
The synthetic winterizer will retain the shape of an apple slice.


Sew adhesive tape to fabric sewing machine, the synthetic winterizer will also be securely attached to the base.


Thus, we process first 5 slices.


Carefully turn the slices inside out and straighten all the seams. Fill with padding polyester, but not tightly!
The hole is closed with a hidden seam.


In one of these five slices, put a bell inside. We quilt the slices with hand stitches.


It turns out quite a nice apple slice 🙂

Next, we work with the remaining three slices. Let's make a pocket on one of them. We fasten the zipper to the hole that needs to be made on the outer part of the apple slice. Then we sew on a sewing machine. Short sides I processed it with a zigzag, as a large load falls on them.


Now we are preparing a pocket resident - a worm. To do this, you need wooden beads, preferably juniper, as they have a beneficial effect on the child's body (I have only one). For tying, we take small beads - you can also acrylic, but not dyed on top, but dyed in bulk. You will also need thin cotton yarn and a crochet hook.
We collect air loops (the number depends on the size of the beads being tied - I have beads with a diameter of 6 mm, I scored three loops) and close them into a ring. We knit in a circle with columns without a crochet. 1.2 row - we knit 2 loops from each loop, 3 row - two loops from one, but not from each loop, but through one. Then we knit without increments two rows and insert a bead. Then we decrease until the end of the strapping, close the loops and hide the tip of the thread. How much to decrease, I, unfortunately, forgot to fix - I knitted not according to the scheme, just according to the bead.
We collect the worm, alternating wooden and tied beads. We tie knots between the beads, it seemed to me more convenient when the beads do not roll along the thread.
We return to the apple. Take a piece of apple-colored fabric. It should be more details with a zipper. We lay the excess width in the fold, this is necessary in order for the worm to fit into the pocket. On this piece of fabric facial sides sew with a zigzag seam one (free) end of the worm
Then sew to the part with a zipper.
On the next slice there will be a ribbon with strung beads. Beads, I remind you, we take either wooden or dyed in mass.
The last slice will be with a piece of rep tape sewn on. We need a loop for hanging, if necessary.
We take a narrow rep ribbon, fabric for a leaf and a rustling film.
We sew a leaf, insert a rep ribbon into it. We make the end sharp and scorch.
So, we have 8 apple slices and a tape for a strong connection. Now you need to install blocks at the same distance.
Everything! The apple is ready! We collect, admire, play!
Or you can just play like with toy food 🙂
If you liked the idea and the master class, press the "like" button!
Do it yourself
Popular publications
latest comments
DIY textile apples and pears
Oh, an apple, yes on a plate! And beautiful, and fragrant, and with your own hands - for every taste!
Oh, an apple, yes on a plate! And beautiful, and fragrant, and with your own hands - for every taste!
Apples and pears with their own hands. Master Class.

tissue apple


Pattern of an apple, a leaf and a ponytail.

Cut out on fabric.

And with the simplest seam, we sew the needle forward.
It is possible to sew on a typewriter, but such an invoice will no longer work.


And sew up the hole with a hidden seam.

We fix the thread at the top.

This is how it looks.

Sew on the tail and leaf.

We sew an apple


![]()
Pear textile.


French apples (master class) / French apples

Such an apple can be a nice addition to a gift!
Well, for example, on New Year embroider snowflakes on them, hearts on Valentine's Day, pumpkins on Halloween, but you can wait for the holidays at all, but make it just like that, because the apple itself is a symbol of love
Flowers, my favorite autumn oaks, are embroidered with wool, which lately I like to embroider with wool more and more, and for bulk embroidery it is not an interchangeable thing at all. Linda 27 fabric is used as the base.

Master class "French apples"
So, for a large apple, we cut out 6 petals 5 cm high (for a small one 3 cm) + 0.5 cm for stitching and glue the allowances with PVA glue so that the fabric does not crumble

We embroider the pattern strictly in the middle of the petal

We sew the petals from the inside with a seam Back the needle (the smaller the stitches, the better), when sewing the last two petals, leave 2 cm, turn it on the face, stuff the apple with padding polyester and finally sew it with a blind seam

For a leaf, cut out a slightly smaller petal and carefully glue the PVA, give it the desired shape and leave to dry. Then we embroider the leaf itself with a back seam.

For the legs, cut out a square with sides 4 by 4 cm. Fold it in half, and then fold the edges 0.5 cm on each side and iron it, as shown in the pictures

We fold along the long side into a tube and sew to give the shape of a twig:

We collect all the details and the apple is ready!

A source
Textile fruits. How easy it is to make a pattern.


First you should find in your garden (maybe not in your own) or in a store a beautiful appetizing apple, but the most important thing is that it should, if possible, have perfect shape. Well, if you didn’t find one, then a little crooked will also do. First, I wrapped it with cling film, and then with masking tape (the usual one will do, I just didn’t have it). To do this, I cut off small strips of adhesive tape and gently smoothed it on all sides of the apple.


When the whole procedure was over (and this is 1-2 minutes), once again I pressed everything well and stroked it with my palm. I draw a line along the entire apple with a pencil, as if cutting it in half. Then I apply another one perpendicular to the previous one, thus dividing the apple into four segments.

With small nail scissors I cut along the lines, first in half, and then again each half.


The most difficult thing is to transfer the rounded print to a straight sheet. but this is quickly resolved. You should not transfer along the entire length of the segment at once, but in small steps, each time trying to straighten the adhesive tape as best as possible.


The pattern is ready. And it is not at all necessary to transfer all four segments in turn, one is quite enough!

When transferring the pattern to the fabric, do not forget about the seam allowances. That's the whole problem with the pattern, which was so easily solved.

I stitched all the segments in turn. At the very end, she left a small gap, turned it inside out and tightly filled it with padding polyester. Then the same gap should be sewn up with a hidden seam. And yet, in order for the apple to have a concave center, two opposite ends should be fastened with a strong thread. That is, with the largest needle that is in the house, we fix the thread on one side of the apple, in the place where the spine should be, pierce the apple and bring the thread out from reverse side, fix it.

Each apple has a small black “tail” at the bottom. Its very easy to make. I wind a black thread on two fingers several times. I take it off later, fold it in half and tie it up at the top, as if to make a bubo. I cut the threads from the bottom and fasten with hot glue to the center of the apple. Spine and leaves optional. You can, for example, a simple stick and a leaf of felt or heavily starched fabric so that the edges do not crumble.


Look how pretty it is. Correct form, symmetrical. Well, then decorations at will. I decided that the autumn apple must be with mountain ash.

In progress. a bit crooked, the colors were not quite well chosen, and in the end I didn’t really understand the principle of this embroidery, but it is as it is.

On the reverse side of the leaves, I sewed a wire wrapped in floral tape (it is possible without it). You see what kind of needle is in the photo, this is not because I embroider with a maxi needle, but because the leaves are very tiny.

The wire from the tip of the leaf should be bent so that it does not slip out during work.

I did the same with the pear. limada suggested to me that instead of a pear, you can take a pot-bellied light bulb, I think that this can turn out even better.

Insert the leaves and cinnamon into the apple
A source
A source
Felt food. Apple
We will sew a whole apple, a quarter and a slice.
1. Print and cut out the details of the pattern.
For a whole apple, you need to cut out 6 “Outer Part” parts, 1 “Leaf” part, 1 “Shank” part from felt.
For a quarter piece, you need 1 Outer Part and 2 Inner Parts.
And immediately a nuance about the size of the parts. I have not figured out yet what settings you need to set when creating and saving an image so that everyone has the same size when printing. Therefore, for comparison, I added a square with a side of 1.1 cm to the pattern sheet. If, when printing the pattern, the side of this square is 1.1 cm for you, then you will get an apple with a diameter of about 6 cm.
I like this size - not very large, perfect for kids.
Dimensions, of course, are not fundamental here: you can sew an apple both larger and smaller, based on your preferences.
Everyone knows how to print a pattern larger or smaller? Or do you need to show? In the print settings, just change the scale.
2. Trace the details and cut out.
3. Let's start with a leaf and a cutting.
We make characteristic teeth along the edge of the leaf: carefully cut the edge at an angle. We draw the veins with a disappearing marker.
Now, starting from the bottom of the sheet, we “embroider”: we make a basting with small stitches to the top.
We reached the end, we tighten the thread a little, so that the leaf is slightly gathered and more natural.
Now let's go back. To do this, we make the stitches in reverse: if the thread passed from the top of the sheet, now it should pass from the bottom, etc. It turns out a continuous path of stitches, the same on both sides. When we reach the side veins, we fold and embroider them as well
Fold the stalk in half along the long side. Sew over the top with overcast seam. If it is not clear, there is a video below that shows how to make this seam. We sewed to the end of the handle, fixed it, but we do not cut the thread (then we will sew the handle with it).
4. We proceed directly to the details of the apple. We take 2 pieces and put them together. Sew across the top with overlock seam
We sequentially sew together the sides of all 6 parts. We stuff with holofiber or synthetic winterizer, sew it up.
At the resulting ball, we make sepals (remnants of the flower), while sewing up the junction of the parts.
Now we stick the needle again and pull it out from the opposite side of the apple (where there will be a leaf with a handle). It is convenient to do this with a long needle. We pull the thread and get a recess where we have sepals.
With a few stitches at the top of the apple, we fix the thread tension. We insert a leaf and a stalk somewhere 1 cm deep into the apple and sew. First, you can use a brown thread from the handle, then fix it and cut it. And then sew with a red thread, with which we sewed the parts of the apple.
When everything is beautifully and firmly sewn up, we stick the needle again and pull it out from our sepals. Again we pull the thread to make a recess at the handle. We fix the thread well and cut it off.
Now we start sewing a quarter of an apple.
We sew the outer red part with the inner white parts (this is the middle of the apple). We fill with holofiber and sew 2 internal parts together.
We mark and embroider the "bones".
Last but not least, apple slices. How about we bake a cake?
Here we no longer sew anything, only cut and glue.
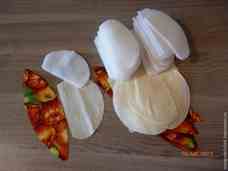
We cut out the slices according to the pattern of milk felt - 2 blanks for one finished slice.
We cut out the peel from felt using a ruler and a roller knife. You need a strip less than 1/8 inch wide (about 2-3mm).
Now we take a glue gun and glue together 2 slices-blanks (let the slice be thicker). By the way, felt is glued very well. And it holds up great.
Now we apply glue to the end of the slice and apply the “peel”.
We bring them to mind: cut off the excess peel, cut, if necessary, the edges. If the peel turned out to be thicker than the slice itself, cut off the excess protruding part of the peel. Cut out the "bones" from the slices.
Everything, and dealt with it
A source
Felt food. Pear
This and subsequent posts will no longer be as detailed as the post about apples. After all, the principles of tailoring do not change. I will only focus on key points.
Again we will sew a whole pear and its parts.
1. We sew a whole pear according to this pattern. Found on the Internet. Unfortunately, I do not know the author; anyway thank you very much
With a part length of 12 cm, the finished pear comes out about 8 cm high.
We cut out 4 parts and gradually sew them together
The leaf and the stalk can be cut out according to the pattern of the leaf and the stalk for an apple, or you can use the second pattern - see below.
The leaf of the pear is smooth along the edge, so we do not make notches. We embroider the veins more densely than that of an apple.
We embroider the sepals, pull the bottom of the pear slightly inward to form a recess, sew in the leaf and the stalk, form a recess along the top of the pear. I think it turned out great
2. Parts of a pear: a quarter and a sixth.
If you want to sew a quarter of a pear, you need to cut out parts No. 1 and No. 3.
If a sixth of a pear, parts No. 2 and No. 3.
Sew together the outer part of the pear with the inner parts. Be careful here.
We start sewing from the bottom, combining the marks on the details of the inner and outer parts.
Like this:
We sew, slowly unfolding the inner part relative to the outer part, combining the cuts.
So we will form a pear bend.
They sewed, stuffed, embroidered bones and sepals. You can add a cutting and a leaf. Ready.
We sew the sixth part (it is clear that it is narrower than a quarter) and a pear from Velcro parts (from 6 parts).
Here I have 2 sewing options:
1) 3 parts of the pear I sewed with Velcro;
2) 3 parts of pear with velcro fabric (if you don't have velcro fabric, all 6 parts can be sewn with Velcro).
Velcro details.
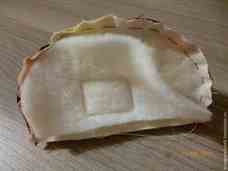
We cut out parts No. 2 and No. 3 from felt. We seal parts No. 3 with a doubler collar (I do this so that when disassembling / collecting a pear, the felt does not bend, but keeps its shape well).
Please note that parts from dublerin must be cut out in a mirror way, i.e. Don't forget to turn the pattern over before cutting the second piece.
Using a hot iron through the iron, glue the dublerin to the felt (the inside of the pear). Embroider bones. We cut out the Velcro and attach it to the pear on a typewriter. We hide the ends of the threads on the wrong side of the details.
Velcro details.
Velcro fabric is a special fabric to which the stiffer side of the Velcro is attached. It has a layer of glue on the wrong side.
I work with Velcro fabric for the first time.
We cut out part No. 3 from Velcro fabric with allowances of about 7 mm. Do not forget that the details are also mirrored.
We cut out 4 parts from the doubler collar (I strengthen the Velcro fabric with 2 layers of doubler, because it is thinner and softer than felt).
We glue on the wrong side of part No. 3 doubler. We cut the allowance of the Velcro fabric in the places of rounding and wrap the Velcro fabric on the doubler (on the inside).
From above, from the wrong side (where the allowance is wrapped), we impose the second part of the doubler and glue it with an iron through the iron. Thus, we simultaneously strengthened the Velcro fabric and hid the raw edge inside.
Felt products are absolutely unique and charming items that can be used in a variety of ways. For example, a felt apple will be a great addition to the interior in the living room or kitchen, it will delight your child, because children love to play role-playing games with food, and can also be a great decoration for a handbag, gadget cases, for a baby stroller and for many other things.
Sewing an apple out of felt on your own is not at all difficult. For this you will need:
Red and green felt.
Threads of the corresponding colors.
Filler for an apple (synthetic winterizer or holofiber).
Tweezers.
Patterns (as in the photo, the size corresponds to the desired size of the apple).
Let's start manufacturing.
1. Cut out 5 identical parts of the future apple from red felt using a pattern.
2. Cut out 2 small leaves from green felt (2nd pattern).

3. Sew together alternately all five parts of the apple.

4. As a result, you will get a semblance of a small case, which we will fill.

5. Using tweezers, turn out the cover - the basis for the apple.

6.Fill it with synthetic winterizer or holofiber.

7. Embroider a pattern similar to a natural leaf pattern on the leaves with green threads.

8. Pull off the top of the apple and sew on top of the leaf.

9. The finished felt apple can be used for its intended purpose.

Your child will definitely like this original toy. And you can also sew a whole “kilogram” of such apples, put them in a basket, decorate with ribbons and give them to your mother, boss or just a colleague! They will be delighted!

Natalya Plakhteeva
Autumn is a wonderful time of the year. A rich harvest has ripened. Bright autumn fruits Unfortunately, they do not retain their beauty for long. But you really want them to decorate our houses longer and always cheer you up.
And here fantasy, a little free time, as well as a desire to simply enjoy the unusual vision of ordinary objects can come to our aid.
With the help of fabric, you can make a whole collection of fruits. At the same time, they will be as similar as possible to the real ones.
I offer a very simple master class for making fruits from fabric, synthetic winterizer and natural material
I needed:
Scraps of fabrics of different colors and types (silk, satin, chintz, cambric);
green fabric;
Twigs of apple and pear;
Sintepon.

Preparation method
Cut out an apple and pear template from paper

I attached the template to the fabric and circled it along the contour. I basted along the intended line, and then stitched it on a sewing machine. Removed the basting

Turned the workpiece out and filled it with padding polyester

Gathered the top edge onto a thread and pulled it tight. Fastened the thread

I threaded the needle and thread into the middle of the bottom edge and passed the needle back up, tightening the thread a little. This gave the workpiece the shape of an apple. Fastened the thread

Sewed the leaves to the top of the resulting apple

In the middle of the upper part of the apple, I inserted a stalk - a small branch of an apple tree

In a similar way, you can make a pear. Only it does not tighten the upper part, like an apple, but vice versa - the lower one.
Such fruits made of fabric can have a variety of purposes. These crafts are good to use in your work with children.

Also apples and pears self made I can be original gift for your family, friends and loved ones!
Related publications:
Here is such a doll "Maslenitsa" appeared on my eve Pancake Week. I made it a little in my own way, that is, my doll turned out.
Master class "Flowers from fabric". To make a flower, we need: fabric ribbons with a width of 5 cm or more (the wider the ribbon, the larger the flower).
Master class "Flowers from fabric" making a rose For work we need - fabric (silk, nylon.) - scissors - cardboard for templates - pencil thread.
In order to make a camomile, we need - fabric - scissors - cardboard for a template - a pencil - threads with a needle - beads, buttons, etc. for.
Painting on fabric involves a huge number of different technologies. I suggest you consider acrylic paints on fabric on the example of Gzhel.
Purpose: to introduce colleagues and teach them one of the ways to make dolls from various materials; show the versatility of the doll;
Preschool age is one of the most critical periods. It is in this age period that the foundations of health are laid.
Or maybe get down to business together? Ragdoll will become another character of children's games or a gift for loved ones. Your attention - detailed master class with patterns of dolls and photos.
I was taught to sew when I was very young and spent many happy hours making outfits for my dolls. Having mastered the simplest stitches, I began to enjoy the fact that I could create clothes from scraps, and I was proud that beautiful things were made with my hands.
When I got older, I began to sew clothes for myself, and since then I have constantly used the skills acquired in childhood. Now my daughters are learning to sew and enjoy it as much as I once did.
Collect buttons and ribbons and store them in jars and boxes. Don't throw away old clothes. From all this, you will then create amazing models. Don't be discouraged if it doesn't work right away: with practice, the stitches will become neater and smoother. And remember: when you see that a thing is made with your own hands, this gives it a special value.

rag dolls
Add one of these adorable dolls to your toy collection. You need to get a large piece of plain fabric: white, flesh or even dark brown(if you want your doll to have a bronzed tan). And you will also need a one-color patch for hair. For the rest, you can get by with fabrics of any colors that you have on hand.
You will need:
- paper and pencil
- Scissors
- Felt for body, arms and legs
- Felt of a different color for hair
- pins
- Mouline thread and embroidery needle
- Fiber filler (or wadding)
- Pieces of felt for eyes and mouth

How to make a pattern
Print the template, put a sheet of tracing paper on top, through which the outline of the template will be visible. Circle the outline with a pencil and cut out the part. This is the pattern. Before attaching the pattern to the fabric with pins, lay the fabric on a flat surface so that there are no wrinkles. If the fabric is wrinkled, iron it. Position the pattern close to the edges of the fabric to reduce waste. If you need two identical parts, then fold the fabric in half and then attach the pattern. Cut out the pieces as close as possible to the edges of the patterns, and then remove the pins and remove the patterns.
- Using templates, cut out paper patterns for the torso, arms, legs, and hairstyle. Set your hair patterns aside. Fold the felt for the torso, arms and legs in half. Pin the patterns on it with pins so that the long edges of the patterns fall on the fold of the fabric. Cut out two parts for the body, arms and legs. Do not forget to remove the pins and remove the patterns.

- Pin the two parts of the torso together. Thread the floss thread into the embroidery needle. Make a puncture with a needle from the inside of the body and sew both parts with a blind seam, but do not sew the bottom. Fasten the thread also on the inside of the body. Don't forget to take out the pins.
Blind stitch
Used to connect two layers of fabric or to sew gaps in the seams. Secure the thread with a few short stitches or tie it in a knot. Then pierce with a needle and thread from the bottom up both layers of fabric a few millimeters from the edge and pull the thread. Grab a few threads on the second layer of fabric with the needle, then pass the needle and thread through the first (closest to you) layer of fabric. Get a stitch. Continue doing the same stitches. They must be quite tiny. Do not tighten the thread too much, otherwise the stitches will be visible from the front side.

- Take the felt part of the leg, fold it in half lengthwise and secure with pins. After tying a knot at the end of the floss thread, sew the edges, except for the top, with a blind seam. Take out the pins. Sew the second leg and both arms in the same way.

- Stuff the torso, arms and legs with filler, gently pushing it with a pencil into hard-to-reach places. Don't use too much filler or the seam will crack. Take the filler in small pieces and distribute them inside the parts not very tightly. Leave some free space in the upper parts of the arms and legs.

- Insert the legs into the opening of the torso and secure them with pins. Tie a knot on the floss thread. Stitch with a running stitch to connect the legs to the torso and sew up the opening at the same time. Fasten the thread with a knot.

Basting stitch
This is the easiest of all seams, but not very durable. They can sew two layers of fabric or embroider. Secure the thread in one of two ways. Pierce the fabric and bring the needle and thread to the front side. Make a short stitch and pull the thread to the wrong side. In this way, sew stitches at a small distance from each other. Try to keep the seam even.

- With blind stitches, connect the unsewn edges of the arms to the upper body. Use frequent stitches for a stronger seam. Fasten the thread with a knot.
- Using the patterns you made, cut out the hair details from the felt. Tie a knot at the end of the thread. Sew the pieces together with blind stitches. Fasten the thread with a knot. Place the hairstyle over the doll's head and secure with a few small stitches. Then cut out small circles for the eyes and a smile from the felt. Sew them to the doll's face, securing the thread with a knot. If desired, you can sew or glue a bow or a beautiful flower to the hair.

Next time we will sew clothes and treats for dolls.
Hello, dear participants of the joint venture!
I hasten to reassure those who are worried. The joint venture will; everything is fine. Just small technical problems (did you ever have a voltage of 390 volts in the network? And today we had (((Everything ended well, but I had to sit a little without electricity).
So, apples are on the agenda today)))
We will sew a whole apple, a quarter and a slice.
1. Print and cut out the details of the pattern.
For a whole apple, you need to cut out 6 “Outer Part” parts, 1 “Leaf” part, 1 “Shank” part from felt.
For a quarter, you need 1 "Outer" part and 2 "Inner" parts.

And immediately a nuance about the size of the parts. I have not figured out yet what settings you need to set when creating and saving an image so that everyone has the same size when printing. Therefore, for comparison, I added a square with a side of 1.1 cm to the pattern sheet. If, when printing the pattern, the side of this square is 1.1 cm for you, then you will get an apple with a diameter of about 6 cm.
I like this size - not very large, perfect for kids.
Dimensions, of course, are not fundamental here: you can sew an apple both larger and smaller, based on your preferences.
Everyone knows how to print a pattern larger or smaller? Or do you need to show? In the print settings, just change the scale.
2. Trace the details and cut out.


3. Let's start with a leaf and a cutting.
We make characteristic teeth along the edge of the leaf: carefully cut the edge at an angle. We draw the veins with a disappearing marker.

Now, starting from the bottom of the sheet, we “embroider”: we make a basting with small stitches to the top.

We reached the end, we tighten the thread a little, so that the leaf is slightly gathered and more natural.

Now let's go back. To do this, we make the stitches in reverse: if the thread passed from the top of the sheet, now it should pass from the bottom, etc. It turns out a continuous path of stitches, the same on both sides. When we reach the side veins, we fold and embroider them in the same way.

The sheet is ready.

Fold the stalk in half along the long side. Sew over the top with overcast seam. If it is not clear, there is a video below that shows how to make this seam. We sewed to the end of the handle, fixed it, but we do not cut the thread (then we will sew the handle with it).

4. We proceed directly to the details of the apple. We take 2 pieces and put them together. Sew over the top with overcast seam. You can see it in the video.

We sequentially sew together the sides of all 6 parts. We stuff with holofiber or synthetic winterizer, sew it up.


At the resulting ball, we make sepals (remnants of the flower), while sewing up the junction of the parts.


Made?
Now we stick the needle again and pull it out from the opposite side of the apple (where there will be a leaf with a handle). It is convenient to do this with a long needle. We pull the thread and get a recess where we have sepals.

With a few stitches at the top of the apple, we fix the thread tension. We insert a leaf and a stalk somewhere 1 cm deep into the apple and sew. First, you can use a brown thread from the handle, then fix it and cut it. And then sew with a red thread, with which we sewed the parts of the apple.

When everything is beautifully and firmly sewn up, we stick the needle again and pull it out from our sepals. Again we pull the thread to make a recess at the handle. We fix the thread well and cut it off.

The apple is ready

Now we start sewing a quarter of an apple.
We sew the outer red part with the inner white parts (this is the middle of the apple). We fill with holofiber and sew 2 internal parts together.
 We mark and embroider "bones".


And the last - apple slices. How about we bake a cake?
We cut out the slices according to the pattern from milk felt - 2 blanks for one finished slice. 
We cut out the peel from felt using a ruler and a roller knife. You need a strip less than 1/8 inch wide (about 2-3mm).


Now we take a glue gun and glue together 2 slices-blanks (let the slice be thicker). By the way, felt is glued very well. And it holds up great.
Now we apply glue to the end of the slice and apply the "peel".

Here are the blanks obtained.

We bring them to mind: cut off the excess peel, cut, if necessary, the edges. If the peel turned out to be thicker than the slice itself, cut off the excess protruding part of the peel. Cut out the "bones" from the slices.
Everything, and coped with it)))

What's next? First, there will be a separate post about textile apples. Secondly, felt pears)))
I hope you enjoyed sewing with me))) Come again!
P.S. The gallery for each stage will be open for 10 days from the date of publication of the post.
To upload your work to the gallery:
1. Click the blue "Add your link" button.
2. Fill in the fields that open in the new window.
LINK: paste a link to your post about sewing apples and click on any empty space on the page (to load data from your blog).
LINK TITLE: agree to the title of your work automatically inserted from the blog or write another option.
email: enter your email address (it will not be visible on the blog).
3. Choose from the photos below best photo of your work, click on it.
4. Press the blue "DONE" button at the bottom of the page on the right.
5. In the window that opens, press the blue button "TAKE ME BACK TO THE LINKUP!" and back to the blog.