How to cut the neckline. Features of the manufacture of clothes in the atelier of the highest category (Fashion Houses)
Municipal state educational institution "Gorkovskaya special (correctional) general education boarding school for students, pupils with disabilities health "
Lesson topic:
Processing the neckline of the dress and the armhole with a cut trim.
7-8 grade.
Compiled and conducted:
vocational teacher
Novikova Natalia Nikolaevna
With. Gorki, 2017
Lesson type : consolidation and development of knowledge, abilities, skills.
Target : to improve the skill of correctly performing labor operations for processing the cuts of the armhole of a dress with a tailoring, based on past experience.
Tasks:
- to consolidate the knowledge of students on the topic "One-Piece Dress" and generalize their knowledge on how to handle the neckline of a one-piece dress;
Correct the ability of students to memorize when repeating the material covered;
To contribute to the development of motor skills, speech, the ability to work according to instructions, through the inclusion of practical tasks and correctional and developmental exercises in the lesson;
To cultivate diligence, accuracy, independence.
Equipment and visibility:patterns of facing, pattern of the back, subject-technological cards, cards with words - terms, proverb, punched cards "Types of facing", threads, needles, sewing machines, sheets of paperpens, work plan cards, computer, projector, presentation.
Dictionary: trimming, trimming trimming.
- Organizing time.
WITH Good morning... The day has begun
The first step is to drive laziness.
Don't yawn in class
And work and answer.
Today we work under the motto:
Working with a proverb« The more science, the faster the hands ".
What does the proverb say? (You need to study a lot to become a true master of your craft).
Over what garment are we working now? (1 Piece Dress)
Why are dresses called one-piece -the details of the front and back are cut out of the fabric intact.
- Knowledge update.
Exercise 1. "Puzzle" (slide 2).
Having opened the letters, solve the encrypted word.
Sewing workshop. (STUDIO)
Textile fabric made on a loom. (THE CLOTH)
Name the contour line of the front pattern. (SIDE)
Cut part. (CROWN)
Decoration of clothes. (FINISH)
Read the word. (WASHING)
What is edging? (STITCH a strip of fabric that is used to trim the cut edge)
What types of facing do you know? (There are seams: lobar, transverse, oblique and cut.)
Task 2. Independent work with a punch card.
Checking the job:
LARGE CUTTING
CROSS WASHING
OBLIQUE WITTING
FITTING FITTING
Find the extra one by combining the rest into a group
(the name of the facing is derived from the direction of the thread in the fabric)
What have we already processed? (neck)
3. Message of the topic of the lesson:
What is the topic of the lesson. (Processing the cuts of the armhole with a cutting edge)
Today you have to process the cuts of the armhole of the dress with a cut trim.
The purpose of our lesson is to consolidate the knowledge gained earlier.
4. Preparation for practical work:
Let's try to remember the sequence of processing a cut with a cut trim, using words - terms.
Exercise.
Individual work (each has words on the table - terms, they write on sheets of paper).
Words are terms: apply, sweep, bend, sweep, sweep, stitch, trim, frill, armhole ,.
5. Phys. a minute. "Fingers" (exercises to revitalize the brain).
Exercise "Greek", "Cross".
Checking the work plan on the board. Arrange in the correct order:
Work plan:
1. Apply piping, pin down, sweep.
2. Sew the hem to the armhole.
3. Fold back the piping, straighten and sweep the seam.
4. Bend the cut of the facing, sweep.
5. Sew the facing 1-2 mm from the hem.
What slice have we already processed according to this plan? (neck of the dress)
What slice do we have to process according to this plan? (cut armhole)
Will the plan change if we need to process the notch on the duvet cover?
Let's conclude:
The processing of any cut with a cut trimming is performed according to the same scheme.
What proverb did we start the lesson with?
Is there enough knowledge to carry out practical work?
Safety training.
What tools and accessories will you need in your work?
Children answer: (scissors, needle, sewing machine, iron, pin cushion)
B / B briefing.
6. Practical work.
Ongoing briefing as needed.
During work, control over the fit, the position of the work on the table, the safety of working with the needle, on sewing machine
Quality control of work:
Same width piping.
The stitching stitch is even at the same distance.
Roll of the seam in 1-1 mm.
7. Reinforcement on the topic.
Task cards
(Indicate the sequence of operations for processing the armhole with a cut-off stitching)
8. Reflection.
What did you manage easily?
What caused difficulties in your work?
(Answering questions)
9. Evaluation.
Exhibition of students' works, discussion, grading.
Self-analysis of the correctional and developmental orientation of the lesson.
“Mind, heart and hands -
that's what needs to be developed
in children as a whole.
Sh.Amonashvili
Labor training lessons create the most favorable conditions for correcting (correcting) the deficiencies inherent in mentally retarded children in labor activity. Vocational training is based on the mental and physical capabilities of students, the ultimate goal of which is to prepare students for independent work, independent life in society, the development and education of the individual.
In the process of labor training, the following is carried out:
Defect correction cognitive activities, especially thinking:(the formation of students' intellectual work skills) and physical development students (development of accuracy, dexterity, coordination of fine hand movements);
Development of speech;
- development of general labor skills, that is, the ability to: navigate the production task, plan a sequence of actions, perform and monitor the progress of work;
Teaching schoolchildren to professional work methods and instilling in them the appropriate work skills;
The development of positive personality traits: purposefulness, the ability to bring the job started to the end, independence, a sense of collectivism, etc.
Today you attended a working lesson on the topic "Processing the neckline of the dress and the armhole with a tailor-made trim. "
This lesson is the second in the grid of clocks on this topic.Purpose: to improve the skill of correctly performing labor operations for processing cuts of the armhole of a dress with a tailor-made trim, based on past experience.
The lesson used verbal methods based on visualization (survey, independent work students on drawing up a plan for key words, frontal work on drawing up a deformed work plan, independent work with punched cards).The lesson is adequately equipped with visual material (punched cards, vocabulary words, instructional - technological map, samples of edging, samples of finishing the neckline, cards with reference words).Usage various means clarity helps students to articulate thought more clearly, creates the necessary conditions to activate the passive vocabulary of students.A practical method was used (independent work on processing the armhole of a dress with a tailoring, according to the plan and based on the past experience of the students).
All the methods and techniques used worked to achieve the main goal of the lesson.
The organizational moment of the lesson pursued the goal of relieving psychological stress among students, creating a positive attitude towards learning activities, and focusing the attention of students.
In my work I often use the most common form of proverb - admonition.
Working with proverbs develops not only speech, but also logic, organizes thinking, forms life values.
The proverb "The more science, the faster the hands" attracted students to reflection, to formulate their understanding of this proverb, and contributed to the active involvement of students in the work.
As practice shows, students with disabilities slowly acquire elementary technical terms and forget them very quickly. Therefore, work on the terminological dictionary is carried out at each lesson. It is important to clarify the meaning of the term, since children often memorize the meaning of a word, purely mechanically, without understanding the meaning. (1 Piece Dress, Tailoring)
Carrying out didactic games in the lesson contributes to the establishment of strong semantic connections between the subject and the word. It also grabs the attention of all students in the workshop.
Completing the "Puzzle" task at the stage of knowledge activation helped to solve the following tasks:
To consolidate the terminological vocabulary on the topic "Shoulder product";
To activate mental processes (attention, memory, verbal - logical thinking);
Lead to the repetition of the passed material and the consolidation of new terms (edging, trimming).
The use of punched cards made it possible to obtain accurate information about the learning outcomes on the topic "Types of facing".
When analyzing the work performed, I could not miss the opportunity to conduct an exercise for development thought processes(comparison, classification, generalization).
The survey involves training students' memory, thinking, the ability to build a coherent statement, leads to a logical conclusion. So in the lesson, students answering questions:
Why is the edging called "cut-up"? (It is trimmed to the shape of the cut that is processed by this edging.)
What cuts in a dress can be trimmed with trimming?
(trimming trims can be used to cut the neckline and armholes)
Which cut did we process?
were able to independently determine and formulate the topic and purpose of the lesson.
At the stage of preparation for practical work, the students were asked to draw up a written report on the work done on the processing of the neck with a cut trim, based on words - terms and a ready-made sample. Written work makes it possible to follow the progress of assimilation teaching material every student. The use of combined tasks (speech - action - speech) is of great benefit.
Work planning is viewed as a means of activating children, increasing their independence, developing basic logical operations (analysis and synthesis, abstraction and generalization) and, in general, all their mental and speech activities.
"The more science, the faster the hands."
1. Workshop for tailoring. 2. Textile fabric made on a loom. 3. Give a name to the contour line. 4. Cut part. 5. Decoration of clothes. A P T O B A 5 3 1 2 C 4
We propose to process the neck with a facing. Edging is a part that completely repeats the shape of a certain area of the product. What is it for? In order for the curly sections of the product to be beautifully and cleanly processed, and so that the product has a decent appearance... The neckline, waist cut, the area of the bottom of the product and the bottom of the sleeve, etc. can be trimmed.
Today, for example, we will show in detail how to process the neck of the product. You can use our recommendations when sewing such models - Dress No. 149, Dress No. 83, Dress No. 48, Dress No. 68. If there is a zipper in the product, then in this case the cut is processed by turning not quite usually and there are a lot of processing options. But there is one way that we love very much. We hope you enjoy it too. 1. Prepare the area for cutting the facing.
2. Cut out the facing of the required area. For example, the facing of the neck can consist of both one part and be one-piece, or it can be divided into parts of the back and front. If the fabric allows, sew the overcast in one piece. There will be no extra seals. 3. Duplicate the edging with non-woven fabric.

4. We overcast the outer edge of the facing on the overlock.

5. Sew the zipper into the middle seam of the back of the product. 6. Fold the face of the piping with the face of the product. We cut it off with pins.

7. Cut the ends of the trim on both sides to the width of the zipper tape.

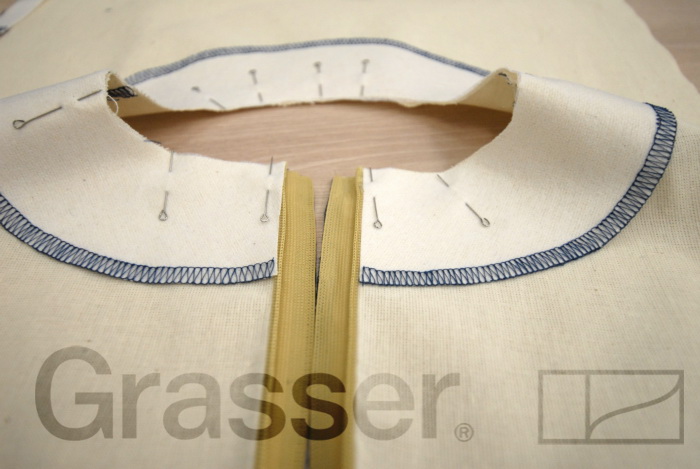
8. We connect the ends of the piping with the cuts of the middle seam of the back. This will create a bubble. Do not be alarmed, it should be so!
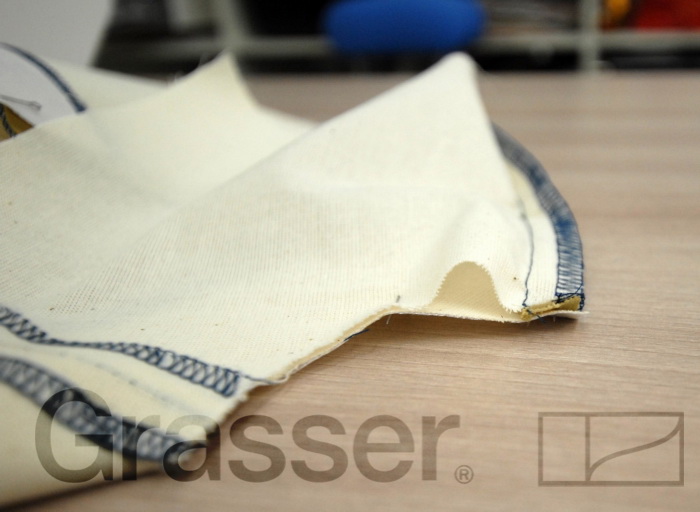
9. Sew the ends of the zipper to the edges of the middle seam of the back.

10. Bend over all the allowances for the edging. The bubble should now disappear.

11. Fasten the folded allowances with pins.
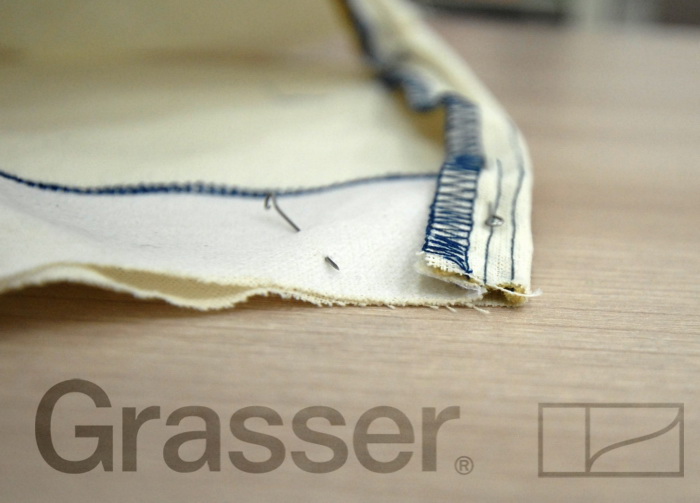
12. We grind the neck with a facing.
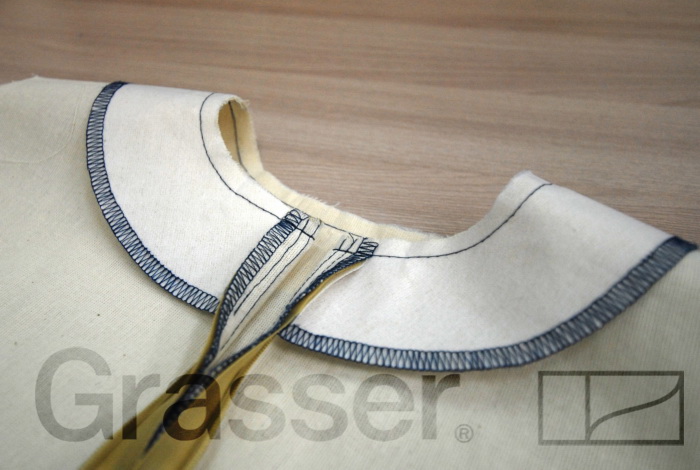
13. We cut the neck turning allowance so that the allowance does not interfere with turning the turning.
14. We spread the edging and the product in different directions. We direct the allowances to the facing. We iron.
15. We lay a functional line along the facing 1 mm from the seam of the grind. This way, the seam allowances will be fixed to the piping and the piping will never come out. You will not be able to line the line from the zipper itself. Therefore, back off about 3-5 cm.

16. Fold back the edging on the product. We iron. 17. We fix the edging along shoulder seams hand stitches.

Probably, every dressmaker faced a choice - how to process the neckline and armholes in a dress without a collar and sleeves, so that it looks beautiful and neat. In the proposed master class, the most difficult, but also the most advantageous option is considered in detail - processing the neck and armholes with edging. You are ready?
Master Class. Processing the neckline and armholes with a single facing in products without collars and sleeves
Elena:"Products without a collar and sleeves have been successfully used for a long time, do not go out of fashion, and over time they only acquire some features. For example, the shoulder width may be greater or smaller, a narrow shoulder may be more displaced towards the armhole or towards the neckline. , the depth and shape of the neck cut also varies from model to model.
There are several methods for processing such products. For example, the neckline and armholes can be edged or processed with a bias tape, but in these cases, a stitching will be visible on the front side of the bodice along the neckline and armhole, and this does not always look appropriate.
How to process the neckline and armholes so that there are no lines on the front side of the bodice? There is only one way out - to grind! Those. process the neckline and armholes with edging. V this master class let's see how to combine the neck and armhole facing, and also find out what other advantages single facing... This processing method is used for sewing sundresses, dresses, vests, children's clothing from almost any fabric; it is used both in lined and unlined products.
To master this processing technology, I recommend that you initially take a product (preferably for children) from cotton or linen fabric.
PS. I love this processing method very much and use it often. I am sure that you will succeed, because in the master class I shared with you all the technological secrets and features of high-quality processing. Good luck! "
Armhole processing in sleeveless garments
Processing of the armhole with a stitching-yoke
Processing of armholes with edging, inlay, edging
The way of processing armholes in products without sleeves is mainly determined by the properties of the material (thickness, flaking, transparency, elasticity) and the model (presence or absence of finishing stitching, trimming, piping along the edge of the armhole).
The armholes and the neck in products made of woolen fabrics, thick elegant silk fabrics, thick linen fabrics with lavsan are processed with cut trimming.
Armholes in products made of cotton and thin linen fabrics are processed with a double bias tape (cut at an angle of 45 ° to the lobe direction of the thread, folded twice).
Processing is carried out before the side seams are grinded. In products made of linen and dense cotton fabrics, processing is carried out after sewing off the side seams with laying the ends of the inlay on top of each other.
The processing of the armholes and necklines in corduroy fabric products (vests, sundresses) is carried out with cut trims with overcasting of the inner cut and then hemming it on a s / m blind stitch. Allowed in some models stitching on a stitching machine.
The processing of armholes and necklines in products made of woolen fabrics and knitted fabrics (vests, sundresses) with a finishing line of 1.0 cm or more is carried out with cut-to-length stitches with overcasting of the inner cut without subsequent attachment.
Armholes in products without sleeves or with short one-piece sleeves are processed with a trimming seam, an edging seam with one open cut, with two closed cuts on a machine with a special device, one or two lines on a machine without a special device, and also using a double folded bias tape.
Overhead seam processing.
Before processing the armholes, connect the side and shoulder sections.
Trimming armholes.
This method is most often used in blouses and dresses where there is a collar or some kind of fancy neckline, where it is impossible to apply uniform processing neck and armholes with one-piece edging.
An indisputable plus of processing the armholes with edging is that the armhole looks very neat from the front side of the product. With this method, no lines from the face are visible, in contrast to the processing of armholes with oblique inlays.
The configuration of the piping completely coincides with the armholes of the front and back.
On the facing, no darts and unnecessary seams, which can be avoided, are never (!) For example, if the model has embossed seams starting from the armhole, this does not mean that the same embossed seams should be on the facing of the armholes. When re-capturing the details of the facing of the armholes, you must immediately close all the darts and reliefs that may be on the armhole of the product.
The facing serves as a means of fixing the shape of the armholes and protecting them from stretching. In order for the facing to keep its shape, it is reinforced with an adhesive material, which must be selected in terms of thickness and properties for each type of fabric.
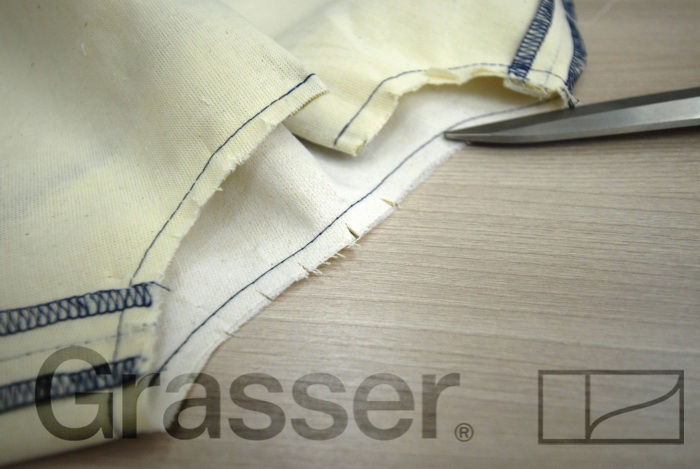
The parts of the facing are folded with the front sides inward, equalizing the cuts, and grind the width of the seam 0.5 - 0.7 cm. The seams are ironed out. The inner sections of the facing are bent towards the wrong side by 0.5 - 0.7 cm and overlaid at a distance of 0.1 cm from the folded edge. In products made of easily crumbled fabrics, the sections are pre-swept on a special machine.
The facing is folded with the product with the front sides, equalizing the cuts, the armhole is grinded (seam width 5-7 mm). On the rounding, the allowances are cut, the edging is turned to the wrong side, the edging is straightened and swept out of the armhole (edging width is 1-2 mm). The edging is fixed by stitching the hemming seam allowance for the facing.
The edge of the facing is attached to the allowances of the side and shoulder seams by hand or machine. In expensive products, the edge of the facing is sewn to the product with blind hemming stitches in several places.
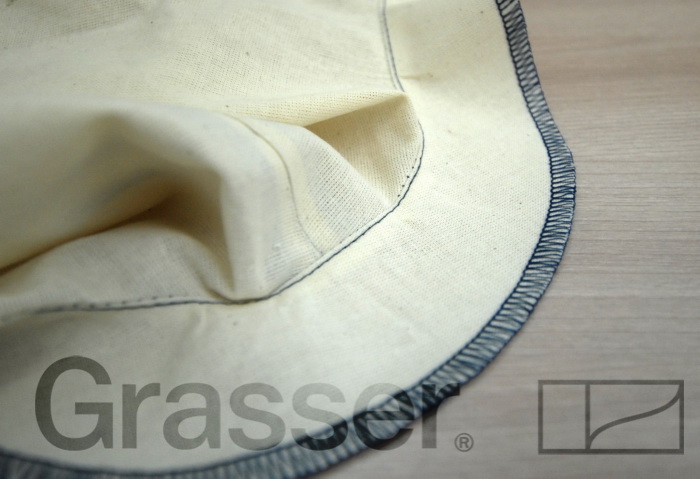
If the ends of the edging are not stitched, the turning of the armhole begins, stepping back from the ends of the edging by 3-4 cm, the unstitched ends of the stitching are grinded. The seam is laid out and the armhole is grinded in the remaining area.
The edging is folded back to the wrong side of the product, forming a piping. Armholes in finished form iron on.
Double inlay. The width of the inlay in the cut is 2.5 - 3 cm. It is ironed twice in length, equalizing the cuts. The armhole is grinded with a double-folded tape, placing the tape on the front side of the product and equalizing the cuts of the armhole and tape (seam width 5-7 mm). Seam sections in rounded sections are notched. Adjust the turning seam onto the inlay (the seam width is 0.1-0.2 cm). The inlay is ironed on the seamy side of the product with the formation of a piping from the armhole; tune the fold of the inlay onto the armhole with a seam 0.1-0.2 cm wide.

Single stitching tape... In products where a trim is provided along the edge of the armhole, a single stitching tape is used for processing. It can be made from both basic and finishing materials. The armhole is processed with a stitching inlay as in an open form (with an unstaged side seam), and with connected side cuts. In this case, the inlay is pre-grinded along all the cuts, i.e. into the ring.
The binding (in products made of thin materials, it can be pre-tanned) is laid face side to the seamy side of the product, equalize the cuts and grind the armhole (seam width 5-67 mm). After turning the tape inside out and straightening the edging along the edge of the armhole from the tape, the free edge of the tape is folded over and sewn. A finishing stitch can be added along the inner edge of the tape.
The width of the tape should be the same along the entire length of the armhole.Edging seam processing
To process the armhole with an edging seam, the inlay is cut out at an angle of 45 ° to the warp thread. Pieces of inlay and ends are grinded. The line should run parallel to the base thread. The seams are trimmed, leaving an allowance of 0.5 - 0.7 cm. The seams are ironed out.
When using a machine without a special device, they are edged in two steps, first stitch the tape along the cut of the armhole from the front side, then, bending around the seam allowances, fold the tape over to the wrong side, fold the edge and overlap, placing the stitch in the seam (that is, from the wrong side of the armhole, it goes along the edging, at a distance of 1- 2 mm from the inner fold, and on the front side - along the edging, along the armhole).

It is allowed to grind the ends of the tape simultaneously with the side cuts, while the upper and lower edges of the edging in the side seam must match, and the seam allowances are sewn onto the product with a double reverse machine stitch, positioning it across the edging at a distance of 5 mm from the seam.
When processing armholes with an edging seam in products made of thick materials the inner edge of the bias tape is not folded, the inner edge is pre-swept on a special machine and covered without bending.

When using a special device for a sewing machine - an edging - the armhole is edged in one go. To do this, the edging strip is tucked into a special device and sewn with a machine stitch. In one step, you can also hem the armhole on the universal sewing machine, if you use a ready-made bias tape. It is ironed so that the lower edge is 1 mm wider than the upper one, it is swept along the cut of the armhole, tweaked along the upper side at a distance of 1 mm from the inner fold

In products made of thin materials for edging armholes, use double piping hem seam, which allows you not to sweep the inner cut, bending it, but simply stitch the fold of the double binding. Do not grind the ends of the double tape. The binding is folded along in the middle with the wrong side inward, the cuts are leveled, the cut of one end of the facing is folded inward by 1 cm and placed on front side the armholes are folded towards the product, the cuts of the inlay and armholes are leveled and grinded from the side of the inlay. The width of the seam depends on the model, while the raw end of the inlay should go beyond the folded edge of the inlay by 1 - 1.5 cm. In this case, the fold of the inlay must necessarily fall under the stitching from the inside out and the stitching must pass at a distance of no more than 0.3 cm from the edge (fold). The ready-made armholes are ironed on.

In products made of thin transparent materials, the edge of the armhole is edged with a strip of the main or lining fabric in color, cut along the oblique. Then the edged edge is folded back to the seamy side, the edging is straightened from the armhole. The fold is ironed on. The inner edge of the bias tape is attached to the seam allowances.
Cut trims are used to process armholes, necklines and other cuts that have the shape of oval lines, corners, etc. (notches with cape, square). They are cut out after trying on the product, when the shape and size of the cutout for the details have already been specified. The direction of the common thread in the facing and the part must match.
Instruction card
Cutting the neckline
Tools and accessories: work box, product, paper, cloth.
Progress
1.
Fold the product in the middle with the right side inward.
2. Equalize bust darts, shoulder seams, neck cuts, pins.
3. Put a sheet of paper under the product, circle the neckline of the backrest and the shelf, indicate the direction of the shoulder seam.
a - backs,
6 - shelves without fasteners,
в - shelves with clasp to the top.
4. Remove the product. Set aside on paper along the lines of the middle of the front and back of 3.5 - 5.0 cm - the width of the facing of the neck of the back and the shelf. Design the lines of the edging. Cut out patterns.

a - backstitching,
b - facing the shelf without a fastener,
c - front facing with a clasp up to the top.
Note
In products with cuffs, the trim of the shelf is not cut out, only the trim of the neck of the back is cut out.
5. Fold the fabric with the right side inward along the shared thread, put piping on it, as shown (in the picture below, position - a), pin it with pins, circle along the contour.
6. Break off the sewing patterns, mark the shoulder cut allowance on the fabric (position b in the figure below).

a - trimming of trims on the fabric,
6 - facing with an allowance along the shoulder cut,
c - ready-made edging for a product without a fastener,
d - ready-made edging for a product with a clasp to the top.
7. Cut out the piping for the neckline, shelf and back (in the figure, position - c).
Instruction card
Tools and accessories: work box, product.
Work sequence
1. Fold parts of the facing with the front sides inward, equalize the cuts, sweep and grind (a - facing for a product without a fastener, b - facing for a product with a fastener to the top).

2. Press the seam seams open. Process the inner cuts of the facing zigzag stitch or with an open hem.

1.
Place the facing on the front side of the product with the front side, equalize the cuts, baste and stitch the facing of the neckline, the shoulder seams of the product must coincide with the seams of the facing (a).
Note: If there is a fastener in the product, then first you need to stitch the ends of the facing to the hem or allowances for processing the fastener, iron the stitching seams towards the facing, and then grind along the cut of the neckline (b).

2. Bend the turning seam towards the facing and stitch on the front side of the facing at a distance of 0.1 - 0.2 cm from the facing seam, make an incision in the seam in an oblique direction to the warp and weft threads, not reaching the line 0.1 - 0.2 cm ...
3. Bend the hem to the side of the wrong side, sweep along the contour, forming a piping from the main fabric. Press the piping on both sides. Attach inner piping to shoulder seams and center back with blind stitches.

Self-control
Check:
- the width of the facing along the entire cut;
- the accuracy of the stitching seam;
- the accuracy and evenness of the edging along the entire cut of the neck;
- the accuracy of processing the bottom edge of the facing;
- the quality of the wet-heat treatment of the neck.
Questions and tasks
- What are the ways to handle the neck?
- How do I cut out a trim hem?
- How is an oblique facing cut out?
- Tell us the sequence of processing the armhole with a sewing cut.
- Draw up an instruction sheet for processing the neck with an open cut edge seam.
"Serving Labor", S. I. Stolyarova, L. V. Domnenkova

Practical work Instruction card Performing the second fitting Tools and accessories: work box, product. Work progress: Put on the product, pinch along the line of the fastener, aligning the center lines. Check the correct processing of the side and shoulder sections, their direction. Check the length, direction of the darts, the accuracy of their processing. Check the fit of the product along the armhole, neckline. Check the symmetry of the patch pockets. Check the length of the product….

Pockets are different types: overhead, slotted, in seams, internal. Most often, patch and welt pockets are used. In appearance, patch pockets are simple and complex, they can consist of one, two or several parts. The figure below shows the most common types of patch pockets: a - simple, b - with a facing imitating a valve, c - with an opposite fold, ...

Instructions card Tools and accessories: work box, cut products. The sequence of work Processing the bead with one-piece hem 1. Overcast the edges of the hem on the sewing machine with a zigzag seam or a hem with an open cut. 2. Bend the trim to the front side along the bend line, sweep bottom sections picks, grind. Straighten the corners, turn to the front side, sweep the sides along the line ...

Instructional card Processing of darts Tools and accessories: work box, cut products. Sequence of work 1. Sew shoulder darts, starting from the shoulder cut to the end. Press on shoulder darts on both sides. 2. Press the shoulder darts towards the center of the back, pressing the slack at the end of the darts through a slightly damp iron. Note: Chest straps are treated in the same way. darts. They are ironed in ...

After the first fitting and correction of defects, the product is prepared for the second fitting: the darts are processed, the pockets are processed and swept, the side and shoulder sections are ground and swept, the sides and finishing details are processed. Then wet-heat treatment of darts, shoulder and side seams, sides and finishing details is performed. Wet heat treatment products Wet heat treatment is an important part of the technological process of making clothes. Appointment ...