We make DIY Christmas decorations out of paper. DIY decorations for the new year
Neither bright balls from the supermarket, nor lights blinking in different colors, nor expensive designer kits for decorating Christmas trees can be compared with handmade decorations.
Of course, such jewelry from the supermarket will make an evergreen guest bright, modernly decorated, but they are unlikely to be able to carry it with such joy. good New Year spirit like a toy made by yourself.
Ways to do Christmas decorations a lot, but the simplest, most attractive and not time-consuming toys are made of paper. To create them, you may need very little, improvised materials that are stored by each hostess at home. Stock up on a drop of patience and wings for a creative flight of imagination.
Christmas balls
What is the most common decoration on a Christmas tree? Of course, balls! Glass, plastic, you can always buy in the store, but we will try to make them out of thick paper. This includes colored cardboard, old postcards and unnecessary magazine covers. Balls made of colored cardboard, monophonic, will give a Christmas tree or room that you want to decorate with a uniform style, and multi-colored balls will bring an atmosphere of celebration, magic and a winter fairy tale.
Before you sit down to do new toy, prepare:
- thick paper;
- use old magazines, cardboard boxes or candy boxes with bright pictures;
- glue, PVA is best;
- scissors;
- a compass or any other object that you can circle, getting an even circle.
Take your cardboard and circle twenty-one identical circles on it, then cut them out with scissors. Each circle is to be folded as follows: bend the circle in half twice, on one side and the other, then unbend, this will outline the center of the circle.
Bend only one side of it again, so that the edge of the circle is exactly along the marked center. Bend the two sides again so you get a triangle. Cut out this triangle in one of twenty circles, it will serve as a kind of stencil for the rest of the circles. All that remains for you is to superimpose the triangle on the remaining circles, trace it and bend the edges of the circles outward along the office.
Take the first ten circles and glue them in a strip, alternating: five down - five up. Glue the resulting strip into a ring, this will serve as the basis for the toy.
Divide the other ten by five and glue them into a circle. By gluing them, you get two caps.
The top and bottom covers will have to be glued to the base in the same way. Think of a loop to hang the toy from.

Children can easily help you make such a New Year's toy: you will need scissors, colored paper, packing ribbons.


See more:
A great idea for a Christmas tree toy is a miniature paper Christmas tree. You can make it from thick paper or old postcards, and you can hang your masterpiece on a regular thread.

By the way, if you don't have a real Christmas tree, you can make your own magic christmas tree... A more ideas see the article:
Large volumetric snowflake
Snow - obviously the most main attribute winter, and the snowflake is the main decoration of the house for the new year. The snowflake can be cut out of paper, glued to the window, as is often done. What about voluminous snowflakes? Making it is as easy as cutting it out. To create it, you just need scissors, a stapler and, of course, paper.

Cut 6 squares of the same size, fold each square diagonally and then in half. Make parallel cuts along the folds with scissors. Unfold the squares, and wrap and fasten the inner stripes together. The resulting petals are connected together with a stapler, although you can also use glue. Such a large snowflake can be sprinkled with sparkles or a garland. You can decorate it with a window, walls or hang it under a chandelier.


What could be easier decoration than large, bulky paper candy? It is very easy to make them, for example, from old foil or beautiful wallpaper left over from repairs. You will definitely find paper with a bright pattern. And for this you just need to measure out a small rectangle, twist it with a tube, tie it with ribbons at the ends. If you are afraid that your toy will lose its shape, then twisting it between the paper you can put any unnecessary thing in the shape of a cylinder, for example, a cardboard toilet paper cylinder.

Family Photo Toys
Some types of paper balls can be made using family photos. Such Christmas toys will be the most special, because the important and significant moments of the outgoing year seem to remain with you, and in the next New Year the toy of memories will again remind you of pleasant moments. By the way, do not forget about pets, let them also remain on your memorable toy, because a dog, cat or even guinea pigs are also waiting for the New Year's holidays!

Flashlights from childhood
And the flashlights? You must remember from childhood how to make paper lanterns. With a little fantasy, you can easily come up with a new design for a simple flashlight. To diversify completely simple craft, you can decorate it with sequins, make it out of colored paper or printed paper, paint it with paints, add new details. Everything is up to your taste.


Paper angels on the Christmas tree
and how about new year angels? Do you also remember how to do them? Angels can be made from gold paper or newspapers by coloring or adding glitter to them.


Paper cones
What is a tree without cones? Can be decorated christmas tree ordinary cones from the forest, but you can make your own magical ones. There are several ways to make paper cones: it all depends on your preferences, free time and patience. The easiest option is a bump from old postcards.


You may be interested in:


Lace garland
A magic lamp can be created from a simple glowing garland, all you need is paper and small scissors, with which you can easily cut lace snowflakes. You can find schemes for snowflakes on the Internet or print them out so that you can then cut out figures around the office. You can put light bulbs from a garland into holes cut out in snowflakes, hang such a garland on a window or on a Christmas tree will be very beautiful.

A little life hack: if you don't have time to cut out lace snowflakes, or you can't make them even and neat, buy lace napkins at the supermarket, this will shorten your work time, and store napkins will look much neater. The garland will create a bright New Year's mood. Feel free to get to work!

See more garland ideas:
Cardboard Santa Claus
You can diversify the decoration of your home and Christmas tree with the help of snowflakes, flowers and lanterns, stars and balls, but what is the most important thing new year miracle- Father Frost? From small cardboard Santa Clauses, you can create a funny garland, especially if you add different facial expressions to the grandfathers.

To make things easier, you can find stencils for making toys that only need to be cut and glued.

Christmas tree house
You can decorate the Christmas tree with a paper house. Such a toy looks especially great if you put an electric candle or a garland light inside. Then the windows of the house will glow, as if someone lives in it. Making paper houses is very simple, you can do without a template. You will need paper or old postcards, scissors and glue.


Stars
You can decorate the Christmas tree with paper stars. They are done very simply, even kids can cope with this task, but they look very original!


A New Year's or Christmas wreath is usually used to decorate the front door or hang it on the wall. But you can make a mini paper wreath that will look great on a Christmas tree as a toy.

Well, if you want to make a real Christmas wreath with your own hands, then see:
Toys that you made for the holiday with your own hands are a guarantee of a cozy holiday atmosphere. Happy New Year!
Help us become better: if you notice an error, highlight the fragment and click Ctrl + Enter.
Simple New Year's paper crafts and decorations are great because they can be done with your kids. Agree, very often we, in the pre-holiday mess and constant household chores, forget to devote time to our relatives.
And then the holiday is approaching, so it's time to get together and start creating paper decorations: these are Christmas tree decorations made of paper, and lanterns, and paper garlands.
DIY paper tree
Small herringbone, example one
A decoration for a real Christmas tree in the form of a voluminous hanging Christmas tree can be made from ordinary cardboard.

To create we need:
- multi-colored cardboard;
- glue;
- awl;
- threads;
- scissors.
We draw the most primitive children's Christmas tree with splayed branches, the main thing is to observe symmetry, cut it out, then circle the exact same Christmas tree on another sheet of cardboard and get a second blank. We bend the workpiece along vertical symmetry and glue it together. Decorate our paper toy can be rhinestones... Then with an awl we pierce a hole in the upper part and thread it. The decoration is ready.
A cardboard craft that you can either put on your desktop or hang on a Christmas tree.
About original decoration Read the Christmas tree in this article: you will find here fresh ideas, original options for decorating the Christmas tree.
Another Christmas tree, option number 2
Another example of paper crafts. At the heart of such a Christmas tree - cardboard cone ... To create we need:
- multi-colored paper;
- glue;
- Scotch;
- scissors.
Manufacturing procedure:
Here's a Christmas tree we got:

Bright Christmas tree can decorate any room
Christmas tree from the magazine
Unusual but very easy craft origami... In every house there will definitely be an unnecessary magazine - so you can make an original Christmas tree from it.
In the magazine, we fold each page like this: the upper right corner towards us at forty-five degrees, then we fold the sheet diagonally in half.

The bottom corner has gone beyond the boundaries of the magazine, we turn it up.

We add all the pages like this.
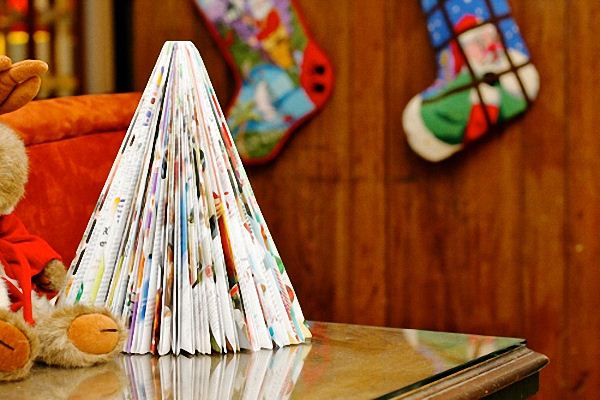
Here is such original craft turned out. As you can see, nothing complicated, but a lot of pleasure because you were able to make it yourself.
Christmas paper lanterns
We made the Christmas tree, now the next step is the do-it-yourself paper lanterns. Consider a few simple options on how to make paper lanterns with your own hands.
Flashlight made of stripes
To create such a flashlight, you need to cut strips of colored paper of the same width and length: the longer the strip, the larger the flashlight will be. Average length the strips will be 15 cm.

Your kid will love to create unusual crafts with you.
Fold the strips and pierce holes at both ends. We fasten the end of the lace on one of the sides and fasten it so that the lace does not pop out. Then we thread the lace into another hole and tighten it. The stripes will bend in a semicircle.
We spread the flashlight so that the stripes form a ball shape... The flashlight is ready.
Chinese lantern
How to make a DIY Chinese paper lantern? To create such a craft you will need:
- scissors;
- strips of colored paper (18 pieces);
- glue;
- two paper circles with a diameter of 4 cm;
- needle with thread.
Bend the strips in half. Using a needle, thread a circle first, then one side of the strips, then the second and last circle. It will look like a spiral.

DIY Chinese flashlight, photo
We tighten the thread so that the strips form a ball, and straighten it. Top and bottom can be decorated with beads. We glue the loop. Our Chinese paper lantern is ready, you can hang it on a fluffy beauty - a Christmas tree.
sky lattern
How to make a paper sky lantern with your own hands? To create a craft, you need to take a sheet of colored paper 24x60cm in size. We bend the sheet in half, then fold it with an accordion.
We unfold the sheet and along the central fold we make triangular creases at all the folds of our triangular accordion.

Sky lanterns can be made colorful
We make the same creases along the lower and upper edges of the sheet. We glue it into a cylinder. Sew a loop on top.
Advice. Such a flashlight can be glued from any paper, but preferably in bright and saturated colors. Abstract drawings or oriental motifs will look very good. You can first paint the paper to your taste before creating such a craft.
Paper garland
How to make a paper garland with your own hands? We offer to execute decoration of paper balls .

Photo paper garland from homemade colorful balloons
To make such a garland, we need strips of the same length and width... In order to make it easier to fasten them with tape, we make the upper and lower parts pointed. One ball will need 4 strips, preferably if they are different color.

We braid the strips into a pigtail until they form into a ball
We take two stripes, glue them with tape and start weave a pigtail... As weaving, the pigtail will twist and turn into a ball. When the ball is ready, you will need to hide the loose ends between the weaving. This action is worth doing until the ball is completely formed.
For creating long garland you will need to twist a lot of balls.
Then we string each ball on a colored thread. The garland of paper balls is ready: you can decorate with it both the Christmas tree and the room.
Volumetric paper toy on a Christmas tree
Our next craft is volumetric star made of paper... What should be done?

This is what a finished three-dimensional paper star looks like.


The Christmas ball is ready!
New Year's angel from napkins

With such an angel, you can decorate a table, a Christmas tree, or make a gift for your family. To create you will need: scissors, glue, threads and ordinary table napkins.

We fix the head of the angel with a white thread

Raise the covers up
The angel is ready!
Christmas snowflake
Let's do beautiful snowflakes made of paper for the new year. How to cut beautiful voluminous snowflake? A paper snowflake can be cut according to a pattern or made using the "quilling" technique. The instructions for making paper snowflakes are simple: prepare blanks from paper and make a ready-made snowflake out of them. Glue the details together.

This paper snowflake is made using origami technique
To create such delicate and airy crafts, you only need office paper. Twisted in a special way, they look like real snowflakes... First, we will prepare the strips of paper. To create a curl, a strip of paper must be twisted tightly on a skewer. After screwing it up, we correct the curl of paper and remove the "washer".

For those who like to craft with their own hands, we suggest making such a miracle as a kanzashi tree; the master class will help you master the creation of the necessary elements of the Christmas tree.
Read how to decorate a house for the new year 2015 with your own hands, here are all the secrets festive decoration rooms, walls, doors and windows, decoration tips.
For a master class on New Year's wreaths, see: http://dom-mechti.com/pomeshheniya/prazdnichnyj-dekor/novogodnie-venki.html
Snowflake blanks
We need to come up with a pattern for our snowflake. The number of rows can be from one to four. The main thing is that the patterns allow all the details to be glued together.
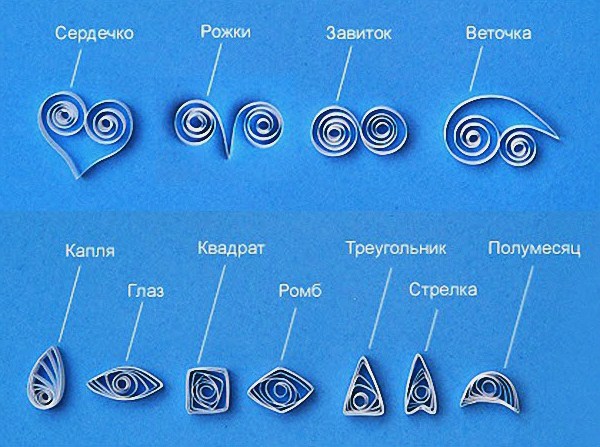
Details of origami snowflakes blanks can be of the most diverse shapes.
First row- on the sides we glue six "drops";
Second row- six "arrows";
Third row- six "squares";
And here's a sample of a snowflake:

You can fantasize and make a variety of applications on glass or thread a shiny thread into a snowflake and hang it on a Christmas tree.
As you can see, you can make a great variety of New Year's paper decorations with your own hands. We have shown you only a small part of what can be made from paper. These Christmas crafts, paper decorations, toys and origami snowflakes will perfectly highlight the festive New Year's decorations on both the Christmas tree and the interior.
Photo gallery (23 photos):


Hello dear readers! A beautiful, stately and spectacular Christmas tree is a necessary attribute of the New Year's celebration, and in order for the Christmas tree to amaze with its splendor, it must be decorated accordingly. For this long-awaited holiday, store shelves are literally bursting with an abundance of all kinds of Christmas tree decorations, but if your soul asks for something exclusive, made with your own hand, then this article will be very interesting to you. In today's review, I want to bring to your attention master classes, the basis of which is the use of all available material - paper! Let's get started ...
DIY paper Christmas decorations.
In the manufacture of the Christmas tree decorations presented below, in general, you will need: thick paper, scissors, glue, a simple pencil, as well as decorative elements - rhinestones, satin and gift ribbons, rivets, sequins, beads, beads, shells.
Paper star.
For work you will need: thick paper, scissors, a pencil, a ruler, glue, a can of paint, small decorative beads.
We redraw the prepared template (photo below), it can be printed on a printer. Two such blanks must be prepared, i.e. the production of one star will take two submitted blanks. Better to take thick paper.


We cut out our blanks.

We bend the workpiece in half.


We bend the workpiece in half from the cutouts (see photo).

Bend the star's right wing.

Bend the left wing of the star.

We also do with the second blank, as a result we get two halves of one star.

We connect the halves of the star together by threading them into the cut out grooves (see photo).

We paint the star with paint from an aerosol can, after it dries, we glue several small beads or rhinestones in a chaotic manner (this item is not necessary, the star is so very effective).

Paper skis.
For work, you need to prepare: thick white and red paper, scissors, glue, a pencil, two toothpicks, two black sequins, two small beads, decorative tape.  Christmas decorations made of paper photo
We take thick paper of two shades - white and red. We cut out two strips of white paper 8 mm wide, 6 cm long, as well as two strips of red paper, 8 mm wide, 4 cm long.

We draw semicircles at the ends of the blanks (the nose and back of the future skis).

Cut out ski blanks with rounded ends.

We glue the red strips of paper under the white paper cuts, so that the red stripes protrude outward by about 2.5 cm.

We take toothpicks, put black small sequins on their ends. And at the top of the toothpicks (future ski poles) we glue small gold beads. We glue the skis together cross to cross, from above to the base of the skis we glue the resulting ski poles (see photo).


We glue a string to the seamy part of the skis.

We decorate the skis with a ribbon. The decoration looks very impressive, moreover, it fully corresponds to the New Year theme.


Christmas decorations made of paper - snowboard.
You need to prepare: thick paper, scissors, pencil, thin gift ribbon, a few beads or rhinestones, glue, paint in a spray can.

We take thick paper, cut out a segment 10 cm long, 1.5 cm wide. Round off the ends of the future snowboard.

We cut out the template of the foot mount, and already along it we cut out the main mounts (foot prints).


We glue the ribbons to the “leg mounts” (see photo).

We glue the "leg bindings" to the base of the snowboard approximately in the center, at a distance from each other. Then we paint the snowboard with spray paint, spraying paint from a long distance, so that only a few drops of paint (splashes) settle on the surface of the product.


We glue several small beads from the right edge of the product. On the left side we glue several shades of curly gift ribbons.


WITH seamy side snowboard glue the rope.

The themed product looks really fashionable!


House made of paper, decorated with lacquer flowers.
To make the product you will need: thick paper, a pencil, glue, scissors, a can of paint, gray lace, golden beads, white beads, thin wire, nail polish - white, gray and red.  Christmas decorations made of paper photo
We redraw the template of the house, cut it out, glue the future house out of it.


We paint the house with gold paint from a spray can.

We glue a piece of gray lace on the roof of the product.

We glue the lace along the bottom of the house and its middle.


We pierce the roof of the house in the center with a needle through and through, thread a thread through the resulting holes, tie a knot.

The Christmas tree house is ready!


Paper house decorated with a shell and beads.
It is necessary to prepare: thick paper, glue, pencil, scissors, pink paint in a spray can, pink beads, one whole and one broken shell (painted with silver paint), a bow made of a gift ribbon.  Christmas decorations made of paper photo
Redraw the house template, cut it out.

We glue it together.

We paint with pink spray paint.

We glue the roof of the house with pink beads, and in the center of the roof from its end part we glue a small shell painted with chrome paint. We glue beads, pieces of shell (chrome color) and rhinestones on the walls of the product.

We fix a gift ribbon bow on the roof of the house. We pass the string through the holes previously created for it. The New Year's house is ready!


Silvery paper sleigh.
For work you will need: thick paper, a pencil, scissors, silver paint in a spray can, glue, black sequins, lacquer flowers, dried grass (for example, a string), a bow from satin ribbon.  Christmas decorations made of paper photo
Redraw the sleigh template onto thick paper.


We cut out all the components of the sled, and paint them with silver spray paint.

We glue the sleigh into a single whole (see photo).


We glue the sleigh along the edge with black sequins.

We create lacquer flowers, you can find out how to make them. Then we paint the dried grass with spray paint (I used the grass of a series) and tie a miniature satin ribbon bow. We glue all decorative elements to the outer parts of the sleigh.


Golden sleigh made of paper.
It is necessary to prepare: thick paper, scissors, glue, a pencil, a piece of red cloth, thread, Walnut, gold paint in a spray can, gift ribbon, a few rhinestones.

Redrawing the template onto thick paper.


Cut out the sleigh of Santa Claus.

We bend the product along the dotted lines, glue it together.


We paint the sled with gold paint from a spray can of a bulletproof machine. We glue small rhinestones to the side parts of the product.

We sew a bag of Santa Claus from red fabric, put a small walnut inside, and tie a ribbon on its neck.

On both sides of the sled, we create punctures with a needle, into which we thread the threads, tie knots at each end, as in the photo below.


We put the sack of Santa Claus in the sleigh and admire the result. It should be noted that the sleigh looks amazing!


Antique key made of paper.
For work, you need to prepare: thick paper, a candle, matches or a lighter, scissors, a pencil, a knife, a can of gold paint, a thread of golden beads, a red satin ribbon.

Redrawing the key template onto thick paper. Do not take a template that is too complex, it is better to be simpler, otherwise the candle wax will be difficult to distribute.


Cut out the paper key.

We cover the paper key with the wax of a burning candle, just drip it over the surface of the key. Excess wax can be removed with a knife; it is better to do this while the wax is not sufficiently hardened. We do the same with back side paper key.

So we have achieved the volume, our key has acquired the required thickness and the effect of antiquity, we paint it with gold paint from a spray can of a pulverizer. We are waiting for the paint to dry completely.
 We decorate the key with a chain or decorative beads, and also tie a satin ribbon bow. The key is simply amazing!


Christmas balls made of paper (video):
Dear readers, today you learned how to make Christmas tree decorations out of paper, I hope you liked the ideas presented! It would seem that an effective material can be obtained from such a simple material as paper, but today's review has proved the fact that paper is a very malleable material, which, if supplemented with other decorative elements, changes noticeably! Christmas paper decorations look very fresh and interesting, they will be a good addition not only to the New Year tree, but to the interior as a whole.
Can we digress ?! Find 15 differences.

Show hidden content

Useful Tips
You don't have to buy a lot of toys and ornaments to decorate your Christmas tree or home.
If you have colored paper, cardboard, glue, and a few extra simple materials, you can create a ton of Christmas crafts.
Here is just a small part paper crafts for the new year:
On our website you will also find:
What can be made of paper for the New Year: tube decoration

You will need:
2 sheets of cardboard of different colors or 2 sheets of scrapbooking paper
Scissors
PVA glue
Chain ring (optional)
1. From one piece of cardboard, cut 14 squares approximately 2.5 cm on a side.
2. From the second sheet of cardboard, cut 14 squares with a side of about 3 cm.

3. Begin bending the opposite ends of the squares as shown in the image — one end on top of the other. Add some glue where the ends overlap.


4. From any sheet of cardboard cut out a circle with a diameter of 5 cm. Mark its center.

5. Apply glue to the circle and start gluing the prepared tubes - first the large tubes, and then the small ones - they are glued over the large tubes.

* Try to stick the tube to the tube evenly.
* You may not need all the prepared straws for the craft - this is normal.


* As additional decorations, glue some rhinestones to the craft (this is optional).
6. Add braid - it can be glued or threaded into the ring attached to the jewelry.
DIY Christmas paper cones

You will need:
Colored paper or cardboard
Ruler and pencil
Scissors
PVA glue or pins
Foam ball
* If you have not found foam ball, then it can be replaced with a crumpled sheet of paper in the shape of a ball, wrapped in thread that secures the shape.
1. From paper or cardboard, cut out strips that are 2.5 cm thick.

2. Cut each strip across into small pieces 2.5 cm wide - you will get several squares.
3. Fold each square as shown in the image - make an arrow by bending the opposite ends.

4. Prepare a ball and start gluing (or pinning) paper blanks to it as shown in the image. Do everything in layers - first the bottom row, then move up, creating new rows.

5. Glue the braid to the top of the head so that the tree can be hung on the tree, and you can also add some artificial leaves as a decoration.
New Year's paper crafts in quilling style

You will need:
Pages from old magazines or newspapers
PVA glue
Baking tins (optional)
Thread or braid and bead.
1. Cut strips 4-5 cm wide from paper.
2. Fold each strip in half lengthwise. Unfold the strip and fold again, but this time each side to the center, and then the whole strip again in half (see image).
2. Prepare the glue and start rolling the strips into circles, adding a little glue to keep them from spreading.


3. Take another paper strip and fold it as in step 2. Prepare a baking dish (in this example, it is in the shape of a star) and insert the paper strip into it, carefully laying it out inside the mold.
4. Now begin to lay out the curled paper circles inside the mold. Apply glue to them so that all the circles connect to each other and to the strip inside the mold.


4. When the glue is dry, remove the blank from the mold. You can add more glue to make the piece even stronger.
5. Pass a string or braid through the craft and add a bead for beauty. Tie a knot.
* For such a craft, you can use different molds, for example, a heart.
Wall decoration of colored paper for the New Year

You will need:
10 paper plates
20 sheets of green paper
Stapler
Double sided tape
Scissors
Cardboard decorations (can be cut from old postcards or painted and cut)
White braid (optional).

1. Cut out large squares from green paper - one square from one sheet. The square must fit inside paper plate... Reduce its size if necessary.
2. Fold each paper square with an accordion, and then in half.
3. Secure the ends of the half-folded accordion to form a semicircle.
4. Repeat steps 1-3 for other paper.
5. Connect the two semicircles together using double-sided tape or a stapler to form a circle.
6. Using double-sided tape, attach the circle to the middle of the paper plate. Glue double-sided tape or glue to the back of the plate so that you can stick it to a wall or other surface (you can stick it to plywood, wooden board, cardboard and then put it on a shelf or hang on the wall).
7. Make 10 similar blanks.
8. Start making your Christmas tree decorations. Cut out paper Christmas tree decorations and glue them together to form a circle. Having made several circles (3-4 pieces), they can be glued to the plates, like Christmas tree decorations.
* You can add a white braid to the top of the Christmas tree, on which the Christmas tree supposedly hangs on the wall.
Christmas decorations made of paper: 3D paper droplet

Vyou will need:
Colored paper
Pencil
Scissors
1. Draw a large droplet on the cardboard and cut it out.
2. Use the blob template to create a few more - place the cardboard blob on the paper, trace and cut out.

3. Fold a few drops into one stack, fold the stack in half and cut out a circle in the middle (see image).
4. Begin to glue the sides of each drop to create one bulky drop. In this example, 16 droplets were needed to make one volumetric, but more can be done.
* You can add thread or braid to hang the decoration on the tree.

Christmas paper toys: balls from cones

You will need:
Paper (old magazines can be used)
Scissors
Thread and needle
Double-sided tape or glue.
1. Cut out circles of the same diameter from paper (choose any size)
2. Make a radius cut in each circle.

3. Make two cones from each circle - twist the paper from one end and the other (from the notch) to the middle, and secure the blank with glue or tape (see image).
4. Also make two cones from each of the remaining circles.

5. Prepare a thread with a needle and thread them through each blank so that a ball is formed from 10 blanks. Tie a knot.

6. Add string or string to hang the toy on the tree.

How to make Christmas lanterns out of paper

You will need:
Stationery knife
Pencil and ruler
Heavy colored or decorative paper
Needle and thread

1. Prepare a sheet of paper, fold it in half and cut into two rectangles.
2. Place one rectangle on a flat surface that you can cut on. By using stationery knife make several transverse cuts from one end of the paper to the other - the distance between the cuts is the same, and they should lag about 1.5-2 cm from the edges.


* You may need to mark the incisions first. Use a pencil and ruler.
3. Roll the paper into a tube as shown in the image. Secure the ends with tape.
4. Take a needle and thread and start threading them alternately over and under the strips that formed after the cuts.
5. When you have wrapped the thread around the entire piece, tighten it and tie a knot.

Approaching is a joyful event loved by everyone since childhood. The home keepers and the female half of the office workers strive to create a festive atmosphere. The easiest way to decorate your favorite place to stay is by making paper crafts. In this article, readers will find out what paper decorations can be with their own hands for the New Year, a photo for printing is attached.
In families with children, kids need to be involved in decorating the house. Kids will be happy to draw, glue, paint crafts. And how nice it will be for the child to see his work in the house.
Ideas for New Year's decor
Conditionally holiday decorations can be divided into two categories: for windows and rooms. The main ideas for paper decorations are those listed below.
1. Stencils. This decoration is suitable for both home and work. Just print it out. Then paint and cut. You can attach the decoration to the table, window and enjoy. An example is a stencil on pictures, click on the picture to enlarge and print!


2. Snowflakes. A standard window decoration will brighten up any space. Schemes templates for printing:


For the manufacture of a corrugated product you will need : office paper, scissors, stapler, glue. The first step is to cut an A4 sheet in half. Then fold both sheets of paper like an accordion. Then you need to find the center point on the sheets folded like an accordion. To do this, fold the accordion sheets in half and unfold them back. Fasten the center point with a stapler. The next step is to cut out the pattern. When choosing a pattern, you should be aware that for symmetry it will have to be repeated on the second sheet of paper. Then unfold the sheet and glue the ends with glue to form a semicircle. The final step is to connect the two halves of the snowflakes into a single whole. The finished result is shown in the figure:

3.Quilling snowflakes. The quilling technique involves the use of spirals from narrow strips of paper. An example of such a snowflake is shown in the figure - enlarge and print:


4. Christmas tree toys. A standard children's craft in the form of a flashlight will perfectly decorate not only a workplace, but also an apartment. The drawing reflects one of the variants of such a toy.

5. Garlands. The easiest option for decorating a room is a simple chain garland. To make it, you will need plain or colored paper, scissors, glue. Cut the paper into strips, glue the ends of the strips together. Can be connected with a stapler. The end result is shown in the figure.


6. Origami.
A Christmas tree made of paper in the figure diagram will look unusual and stylish. 
7. Door decorations. This decor can be done even with a small child. To prepare such a decor, you will need: plain or colored paper, glue, scissors, paints, a flat round plate, a small round saucer.

8. Children's crafts. The most popular children's craft is making Santa Claus. To do this, you will need the following items: cotton pads, black and red felt-tip pen or small charcoal tablets, scissors, colored and ordinary paper, glue, rope or thread. A circle must be cut out of plain or colored paper. Then from colored paper red or of blue color you need to cut out a semicircle, because it will be Santa Claus's hat. You need to stick a thread or rope on the cut out circle. Then glue the semicircle onto the thread. Next, you need to glue the beard from cotton sponges. Then draw the eyes and nose with felt-tip pens. Beautiful craft- The decoration is suitable for a Christmas tree, room, window and office.

9. 3-D decoration. The main feature of this decor is volume. Decorating funny things using 3-D technologies will harmoniously fit into any interior. To prepare such a decor, you will need: glue stick, scissors, paper, a needle and thread, a pencil. At the first stage of making jewelry, you need to cut 10 identical circles out of white paper. Then you need to draw a radius with a pencil on each circle and cut the radius line. In the next step, you need to make 2 cones with glue. The figure shows a diagram of the appearance of the decoration.
Similar actions need to be done with the rest of the circles. Then you need to sew the double cones to each other using a thread and a needle. It must be borne in mind that all the cones must be connected to form a ball. Extra thread will come in handy as a loop for the ball. Appearance product is shown in the figure.

10. Paper panorama.
This decor will perfectly decorate the windows. It is enough to cut out the stencils presented in the figures from paper. Then glue the constituent images onto the windows. 
Stencils for printing:


