Bunny from beads. Step-by-step lading Bunny Bunny
Beadwork is very fascinating occupation Not only for girls, but also for boys. Rooster from beads, as well as dolphin, hare, swan or horse are very beautiful. In addition, voluminous beading toys weave very simple. This article will step by step described how to perform such crafts.
Beadwork is a very exciting occupation not only for girls, but also for boys
Weaving such toys for beginner craftsmen should not seem difficult, the main thing is to strive to get beautiful product. The only nuance: novice is not recommended to do too big work, as it can cause complexity.
Master Class:
- To heat the rooster, you should prepare beads different colors, Wire and scissors. Scissors can be replaced with nippers.
- For the rooster of the standard size, 2.5 meters of wire will be needed. The start of work is to ride 1 beerinka on wire. It should be blue. At first weave the tail of the bird.
- Each dialed row must be bandaged on the right or left. This way, weaving becomes volumetric.
- Feathers are made from different pieces of wire, on each of which 6 beerts are risen. To the bird turns out to be colorful, it is recommended to make hints of different sizes and colors.
- In the course of work, the feathers are invested in the tail.
- The beak and the bee of the rooster must be made in 2 rows until the end of the weaving. For the beak, it is enough to dial 4 red beads.
- To make a scallop, on a separate piece of wire, you need to dial 4 bubbles of red or barding color, make a loop and turn them through this loop.
- From the other end of the same wire, 6 beads are recruited, after which they are fought in the last beerinka.
- Then the paws are made. They rush out of yellow material, at the end of each claw should be black behead. They are attached on the body of the rooster wire.
Bead cock: Brick weaving technique (video)
Gallery: Toys from beads with their own hands (25 photos)


Complete dolphin from beads with their own hands: master class
Such a dolphin can become an excellent suspension or keychain.

Such a dolphin can be an excellent suspension or keychain
Scheme of work:
- It will take blue and white material for such a job. Getting started: For the middle of the wire you need to wear 2 rows of beads. The first row is 1 white beer, the second row is 2 blue.
- Then both rows are done through a wire loop.
- After that, both ends of the wire should align and stretch them along the length.
- Then the wire eats and rods from light material. In 1 row there must be 2 bispers.
- There should be 7 beads in the blue row. It is important to weave the dolphin so that the white rows lay down with white, and blue - with blue.
- In order for the dolphin to be volumetric, it is necessary to use a pencil when weaving. It is inserted inside the shape and pressed on the back of the dolphin. The field of how the back will become rounded, the same action and tummy should be done.
- Dolphinchiku must be made fins. They are attached to the body of the wire.
- Before weave the tail, you need to make sure that the length of the wire remains is at least 8 cm. Weave the fins need a parano, directing both ends to the tip of the dolphin's body.
At the last stage you need to fix the wire for broaching.
How to moisten a hare or rabbit from beads?
The rabbit from the beads is wearing such a scheme:
- First you need to form a bunny's head. Weaving begins from the top of the left ear. 23 bispers are rolled on the wire. Two of them will be headed.
- After one ear, the second is made. Ring among the first 2 beads closes.
- After that, the ears should be tightly attracted to each other, well tightening the wire.
- In the next row, the rabbit eye should be used. If it is done from white material, as an eye, you can use black or green beads.
- When the head is done, weaving must be pulled. You can proceed to weaving the bunny case.
- The neck will be made from the three elements of the material of the same color as the head.
- Then, each next row must be 1 beerink more. This will make the composition volume.
To make a bunny tail, it is necessary after weaving the last row to ride the wire 7 beerin and tighten them along broach. Our bead hare is ready!

Beautiful bead swan
Master Class:
- To make a small swan, you need a piece of wire up to 2 m. The first three rows of the swan are made flat.
- The swan should have feathers. They are made from individual pieces of wire. Feathers should be made the same, that is, to ride the material of the same size and color to each piece of wire. Optimal swans feathers consist of 5-6 elements.
- When a swan head is placed, it is important to skip several rows before finishing work on it. Due to this, the bending of the head will be created.
- Do not forget about the eyes of the bird. They must be made of black elements.
- After the head of the swan is made, the wire is necessary through the lower row. Then you can drive the top rows beaded.
- To create a bend when moving from weaving a head to the body, 1 top row must be skipped. How it's done? Wire stretches through the adjacent row.

If desired, you can weave the real work of art
After a set of material on a wire, can weave the bleached torso.
Beaded horse for beginners
The horse from this material is very beautiful. How to do it?
- The horse is wearing a volumetric method. In order for the work to be more colorful, it is recommended to alternate several colors of the material, for example, black and white.
- The first row of the body is wearing the alternation of black and white beads. Low material is located in the center of the wire.
- Next, the weaving is fixed, as the loop will be formed.
- The second row of beads is recruited. The tip of the first row is drawn through the tip of the second row. The blank is tightened again. Thus, the horse's body is weaving.
- The sixth row of torso is the beginning of work on the ears and head of the horse. Seven elements white color Wood on the wire and twisted to the center of the body. The material must fit tightly to each other.
- To spread the ears, it follows on the first row to ride 3 beers, on the second -2, and 1 on the last row. The triangular ears are obtained.
- When weaving will go down, you need to make horses eyes.

Ideas for weaving figures from beads There are a huge set. Choosing a suitable diagram or master class, you can absorb almost any representative from the world of animals. The subject of this article is a bunny of beads. Such an exercise will become not only a wonderful gift option or keychain, it can still be used as a decor in the interior to light holiday Easter. In addition, to such a kind of Easter rabbit, you can still weave the egg in an appropriate technique available to you. To choose from we offer you phased master class with detailed photos as well simple schema Weaving and small video lessons. One of these ways will definitely teach you the creation of a bunny of small beads.
How to Split Bunny
In this embodiment, the bead bunny will be snow-white. Therefore, the color of the material is selected respective. There are no strict rules here, and you can change the color of beads and choose it on the basis of personal preferences.
 So, to work on this figure, you should cook beads at number eight white color, a pair of black beads and one - pink. You also use the wire for beading with a diameter of 0.3 millimeters, as well as a thin line (at the end, it will be necessary to flash a hare).
In order to rinse the animal torso, for the specified bead number you will be enough wire with a length of eighty centimeters. If you decide to choose a larger beads, prepare a larger segment.
A hare from beads will make on the basis of the volumetric weaving technology when the work is distributed over two tiers: from above and below. The top will place the back, and at the bottom - the tummy.
Weaving begins with a set of one pink and a pair of white bisper on a wire. Next, this low moves to the center of the segment. Then, it is necessary to turn the wire tip, from the side where the pink beads recruited, a couple of white beads from the second tip. After that, the wire must be accurately shy so that all beads are fixed in the center. Thus, two tiers are obtained in the first row, where the pink beads are the upper level (Wu), and the white respectively - the lower (well).
In the second row (r.) Hide five white beads (BB) and spend the second tip through them. Tighten the weaving and move the beads that were scored on top of the BB of the initial row. It will be Wu.
For well, three BB is recruited, through which another wire tip also has been taking. Tighten the process. Place the beads on the onside Wu in the current row.
Thus, the weaving of all the remaining rods of the body of a bunny of beads continue.
Third R.: For Wu, the set sequence, as follows: 2 BB, one - black, 3 BB, one - black, 2 BB. Well, consists of 4 BB.

Fourth R.: Wu - 10 pcs., Well -3 pcs.
 In woo fifth r. Take the nine BB, but do not fade the wire. At this stage, you will need two additional segments of twenty centimeters each. They should be traded by a biserini number three and four of the ones scored for each of the sides. To begin with one of the sides, impose the first segment of the third and fourth beads, after which you do the same actions on the other side.
Now, the working wire can be tightened and continue the process. Additional segments at this stage are not touched. Next, with their help, the bunny's ears will be made.
Well - 2 BB.
In the sixth and seventh row, the level sequence is as follows: Wu 6 and 6, well 6 and 8, respectively.


For the eighth R.: In Wu, range 5 BB. For well - 10 BB. Here the wire is not tightly tightened, since it is necessary to insert two more addition segments of twenty centimeters each. Neither also go to the beads under the number three and four on each of the parties at the current level. After you pull the working wire can continue the weaving process. These additional segments are also ignored. Later there will be a pair of front leg bunny.
In the ninth and ten RR. In tiers, dial accordingly: Wu: six and well: for twelve BB.

Eleventh R.: Wu - Five BB. For well, set eleven BB. Wire is not very tightened. Here will be inserted by the last two additional segments of the length of twenty centimeters. Insert them should also be in the beads three and four on both sides at the current level. After tightening, you can continue the weaving of the body of the bunny. These segments will continue to serve as the basis for creating a back pair of paws.
The twelfth and thirteenth RR: for Wu 3 and 2 and for well 8 and 4, respectively.


Fourteenth river. It consists only from the top level and from two beads.
Works work on the torso formation of a bunny tail from one bead.
To secure the working wire, spend any tip in the previous beagle row, twist two end with each other and cut them out. After twisting the remains, hide among the rows of beads.
At this stage, the workpiece is as follows:
 Having finished with the corps, you can move to the weaving of the buns of the hare on additional segments prepared earlier. Two ears are made based on a single technology, which is called parallel weaving. The scheme of work on the ranks is as follows: 3, 4, 3, 2. Having made one ear, fasten the wire by looking at any end to the preceding beagle row. Next you will need only twist two tips together and cut off the excess. Remove balances and hide among the ranks.
By analogy with the first, make another ear for the bunny.
For the front and rear pair of the feet, parallel technology is also used. Weaving scheme for the rows of front pair: 2, 2, 1. Rear pair: 2, 2, 2.


That's all, the snow-white figure of the bunny of beads is ready. But its form is not a stable slightly. In order for the bunny look more presentable, the craft will need to flash the fishing line. The firmware will help firmly combine every beagle row with each other, which is why the product will become more stable.
At first, on a thin fishing line, nodules are made in the number of two pieces. Then, they are tightened. Next, the needle is dyed under the final beagle row at the bottom, passes through the knot and is fixed in this way on the bunny. Now all rows are stitched together. Neigh this passage under beaded rows. Leske tighten in this way. So that she walked in the center of all row. Based on such a scheme of actions, the lower rows are first styled, and then the upper one. After completing the process, pull the line on the knot and hide the remaining part inside the product.
Flat figurine weaving scheme
In the first part, we looked at weaving bulk craft Bunny of beads. Next, we suggest you to study the scheme of work on creating a easier option - flat figurines.
For weaving, select the base bispers (three grams), pink - three things, dark - two eyes for the eyes and one - for the nose. The process will pass on the wire in fifty centimeters with a diameter of 0.3 millimeters.
The first is the head of the bunny. Here she woves the first ear. Type 23 bispers, of which 21 are the ear, the remaining - the first r. Heads.
 Block the circle between the initial two beads. How to properly weave the following scheme.
 The second ear is done at a longer end. Slide a couple of beads and release. Thus, you have almost formed the first row of the head of the bunny with ears. Then there are still 23 pcs. They need to be stretched into a circle through the first two beads.
In the next turn of the beads woven eyes.
 Continue to work according to the scheme until the last row, which ends with the head (9 pieces). For nine bispers there are three. This is a transitional series. Here are three beads on any of the tips and let them go. At the second end, the same actions are made. Now, on any wire, we have three more bispers, and the other pull through this set towards one another. Having pulled the mord of the bunny, you can start working with the torso, according to the scheme, starting with 3 beads. After you made the body, it remains to form a tail. To do this, type 7 beads, and the tip itself lock among the broach. Having passed 4 of them, you can trim the excess part. That tip, which remained on the second side is attached here.
 Weaving such a bunny of beads - a lighter and simple option. Even a child who has no experience in beading can easily make a similar flat figure. And in the future, he will definitely want to replenish his collection not yet one funny animal.
 In addition to master classes with photos, as well as weaving schemes, there is another type of training - these are video lessons. This method is the shortest way to master the weaving of this or that animal. Therefore, the following videos will show you the basics of weaving with your own hands of the bunnies of beads.
Schemes

Video: Weaving Lessons Bases
A pretty craft of beads in the form of a bunny with a carrot can be made with their own hands in a matter of minutes. See how just this cute homemade is made.
Now the figures from beads are very popular. If you want to try, we will show you how to weave animal beads on the example of this bunny.
For weaving a bunny of beads we will need:
two wires of any color of 70 cm in length for a bunny and one 40 cm in length for carrot with a diameter is preferably 0.3 mm;
beads number 10 or №11 six colors;
Carved mugs for eyes. 
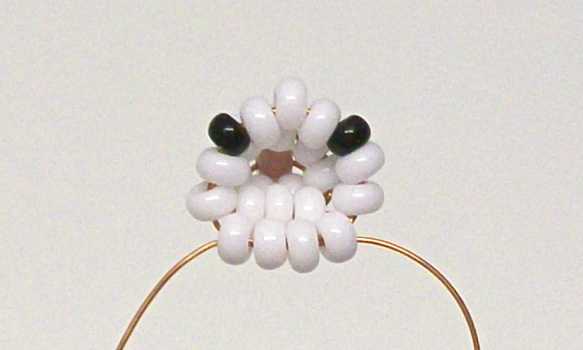
At the end of any wire length we ride 7 beads of blue color, Then in the first bearer we skip the other end of the wire, then tighten in such a way that the beads are in the middle of the wire - the bunny's tail is obtained. Next, on each end of the wire we ride 4 white beads and descend them to the tail.

We take the second long wire, we ride 10 white beads on it, having them in the middle of our wire. On both end of the same wire we put on 2 white, 2 blue and 2 white beads (just 6 pcs. At each end of the wire). Then every end of the wire we skip through the extreme white beads located in the middle of the wire. Next, the wire is tightened - in this way two bunny legs should turn out.


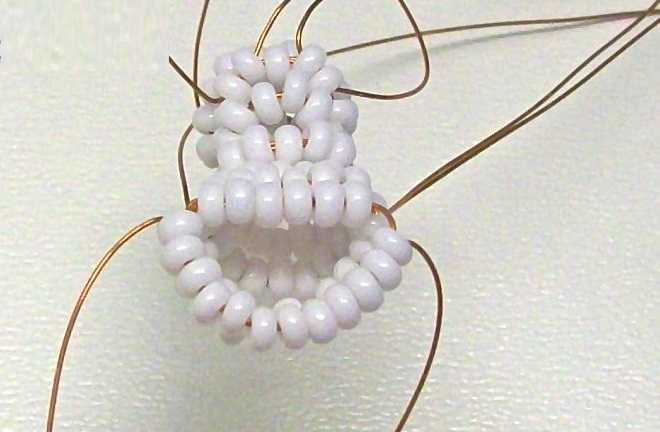
At the ends of the wire, where the paws are located, we stretch 9 white beads and tighten the wire. 
Turn the bunny and we ride a row of 9 white bispers. 
We start wearing the bunny's side - for this, on the ends of the wire we ride 7 white beads and tighten the wire. 
The same actions should be done on the other hand.
On the front third row of bunny first 2 white beads, then 5 blue and 2 white. Tighten the wire again - the front third is ready. Rear row weave from 9 white biserin, side rows - out of 7. 
Fourth front row weave from 1 white, 7 blue and 1 more white bisper. Rear row of 9 white. On the fourth side rows, wearing legs - first we ride 4 white beads, descending them. Next, score 8 white beads, then 2 blue and 1 white.
We skip the ends of the wire through the first beerin, thus forming a paw. After the foot, we recruit 3 white beads, tighten the wire.
On the fifth front row we ride 1 white, 7 blue and 1 more white beads. On the rear fifth row - 9 white beads. On lateral - 6 white beerin. 
The sixth front row weaves from 1 white, 3 blue, 1 red, 3 blue and 1 white bisperin. Rear sixth row - out of 8 white. Side - from 4 white. 
The seventh front range is from 2 white, 2 blue, 1 black, 2 blue and 2 white beads. The rear seventh is from 7 white, side - from 3 white. On the eighth front row weaving the eye of the bunny - on the end of the wire we ride 2 white beads, then a circle and 1 black beerin. Then the end of the wire we skip through the circle. 
Next, score 4 white bispers. Similarly weave the second eyebound. 
The rear eighth row weave from 5 white beads, side - from 2 white. On eighth side rows Next, we make ears - one-end wire we ride 9 white, 3 blue and 9 white beads. Next, this end of the wire we skip through 2 lateral beads. 
Then we ride two final rows of white biserin - one row of 5 pieces, the second of 4 pieces. 
At the end of the weaving, the wire must be tightened, tighten the ends, cut off. Swirling ends wrap inside the bunny.
Head with ears, Taurus in clothes, legs and handles - these are six parts from which it will consist. Take beads of different colors on each row. The monophonic version also looks good. Do not forget to glue beads, imitating mouth, eyes and nose, or create these parts from paper.
Beaded rooster for beginners: Step by step description
At the beginning we make a bunny ears separately. Also, first make ears and then pick up a chain of beads that will serve a bunny body. The further weaving continues in the same way as on the other half the bunny. Only not this half the use of bead colors, mostly all weaving is carried out by pink beads. Schemes of weaving beads for beginners, children and professionals. Weaving beads (beadwork) - the art of weaving from beads and beads of various articles and decorations: paintings, icons, necklaces, harnesses, bracelets, bulk trees and colors.
Weaving such toys for beginner craftsmen should not seem difficult, the main thing is to strive to get a beautiful product. To heat the rooster, you should prepare beads of different colors, wire and scissors. Feathers are made from different pieces of wire, on each of which 6 beerts are risen. To the bird turns out to be colorful, it is recommended to make hints of different sizes and colors. The beak and the bee of the rooster must be made in 2 rows until the end of the weaving.
Beading of small figures - not only an exciting occupation, but also a useful kind of needlework that helps children develop small motor. Weaving the hare begins primarily with the selection of materials and tools. For the weaving of the second ear will use the long tip of the wire. Thus, two more bispers partially formed the initial row of crafts. Further weaving work is carried out according to the scheme to the final line of the head, developing and z nine bisper. Such a figure will definitely be the beginning of a small bead collection. original craftsMade with your own hands.
The horse from this material is very beautiful. The first row of the body is wearing the alternation of black and white beads. The tip of the first row is drawn through the tip of the second row. The blank is tightened again. Thus, the horse's body is weaving.

Rooster from beads, as well as dolphin, hare, swan or horse are very beautiful. In order for the dolphin to be volumetric, it is necessary to use a pencil when weaving. The field of how the back will become rounded, the same action and tummy should be done. In the next row, the rabbit eye should be used. When the head is done, weaving must be pulled. To make a small swan, you need a piece of wire up to 2 m. The first three rows of the swan are made flat. To create a bend when moving from weaving a head to the body, 1 top row must be skipped.
Beaded Break Chain
Welcome to my master class on beading in the technique of brick. Today I suggest you make gentle barerors in the form of a bunny. It is not difficult and my master class will be understood. The arrow is marked by a row, from which we will start the weaving of the canvas. And the two edges of the fishing line, which stick out from the beerki, tied together with two knots, cut the edges and adhered to the lighter. At the end of the work, attach accessories to our loop. Thank you for the instructions for the beautiful Snowman's handicraft.
All your fly is ready! It can be used as a separate original decoration Or include as an integral part in any composition.
Be very careful, the tangle with a thread should be at the left hand, and the free (sliced) end of the thread is a worker, it is it that we wrap it! We repeat the paragraphs from 7 to 14 until we have 5 (6) loops of the necessary for the part. 15-16 When we scored the number of loops we need carefully remove the ring from the finger. If you are more convenient to knit and enter in one, you can and so, there is nothing terrible in it, it is possible only to the knitting will be a little more loose. 19-22. Knit a column without Nakid.
Much we will perform using the following beads. First we will produce four wings of flies (see Fig. A). Take a wire segment about 20 cm long, beads and silver flaker glass. By analogy, we carry out three more exactly the same details.

For example, such an hedgehog from the bead is no different from the present. The lower tier of the same row is 7 pieces of beige beads. From this row, the hedgehog can be placed with needles. Take another 3 of the same fingers in the same way.
Woven from beads Bunnies are cute figures that will make a warm and perky note on any dwelling and become an excellent gift. The main technique of weaving when creating such a hare is parallel. Next, give the shape and tying to the tank. Similarly, we make foot and tail.
Passing 3 - 4 broach, cut the rest of the wire. The second end is fixed on the other side. Our animal from bead-bunny, ready.

Having mastered the method of folding a hare from paper triangles, you can collect any other figures using the same technique. Make some more such triangles - for the assembly of the figure you will need a lot of modules. Look at the modules - you will see that they are easily put on each other. Thus, from triangular modules You can collect almost any sculpture. Get the ears and the tail to the rabbit body.

Stop, bunny, do not run for Topics yzinka.
Lych you beat your tail your kypggyznyy.
Fox kputs along TPE.
Whether he is looking for him! Irina Tokmakova
We continue to prepare for the new year. Today we will learn to weave the bunny of beads.
For work, we will need white beads (beige) color about 3 grams, 3 pink beads for frills, 2 green (blue, black) for peepholes, and 1 black (raspberry) for nose. Wire with a length of 50 cm, with a diameter of 0.3 mm.
Bunny of beads. Weaving head.

1. We start with the first ear.
In the middle of the wire, we recruit 23 bispers. Of these, 21 - will go to the eye itself, and 2 is part of the first row of the head.
2. Close to the ring through the first 2 bispers.
The diagram shows only part of the beads out of 23.

3. We are the second ear: on a longer end you wear 2 bispers and let go (this is part of the first row of the head). If the ends are the same, then any.
4. On the same end, we wear 23 of the bispers and do "in the ring" through the first 2, as in the first.
5. Pretty the ears well to each other. 6 Bisperin of the first row of the head must lie tightly, without intervals.

7. We continue to weave according to the scheme until the last row of the head of 9 beery. Because After 9, there are 3 beads at once, then the row needs to be transitional. Recall how we selected a similar transition from
One end of the wire we put 3 bispers and let go of them,
On the second, we also wear 3 bispers and let go,
Then, on any end you wear the remaining 3 beads of frills and
We told the second end through them.
Pretty tightening ends and go to
Borrowed beads. Weaving torso.

8.The in the diagram to the very end, ranging from 3 bisper.
9. After the last row, we do the tail: on any end you wear 7 beads and immediately fix the end of the software. Passing 3 - 4 broach, cut the rest of the wire. The second end is fixed on the other side. Our animal of bead- Bunny, ready.