A beautiful bezel for a child with their own hands. It's simple: how to make a bezel with your own hands
The headband is not only a popular, but also a very fashionable hair accessory. Here are several fashion seasons In a row, fashion creators adorn the heads of their fashion models with beautiful headbands. And we are worse than you? We also need headbands! But finding a headband that you like is not so easy. We offer you to make a bezel with your own hands!
But in general, making a bezel is not so simple. Of course, if we are not talking about a rim-elastic band. But the elastic band is not so good for New Year's hairstyles - there is not enough holiday in it. It is much easier (and more interesting) to decorate a headband with your own hands - beads, rhinestones, beads, ribbons ...
DIY headband from scratch
Well, at the same time we will tell you how to make an elastic band. Nothing complicated - you just need perseverance and maximum accuracy. You will need something beautiful (braid, lace, an old jewelry necklace) or not very beautiful (leather laces, thin strips of knitwear of a beautiful color - even from an old T-shirt). You will also need a small piece of elastic band. We firmly fix the elastic band on a typewriter or with our hands at the ends of the braid, lace, or, with the help of a needle and monofilament, at the edges of the necklace. It’s a little more complicated with laces-strings - you can create intricate weaving from them (pigtail, macrame, “happy knots”), and then fix the ends with an elastic band in the same way, closing in a circle. Look at the picture how it is done, you will quickly understand.

However, elastic bands are not suitable for every hairstyle. Therefore, we will try to decorate simple plastic rims. Here is the expanse for creative nature!
The decor of the rim can be carried out with any materials suitable for the occasion. You probably remember that mom, dressing you up in Kindergarten Snowflake, decorated the bezel with tinsel. But we'll go further - we do holiday decoration headbands so that they can be worn not only in New Year, and in general on any holiday.
 Decorating headbands with rhinestones is the very first thing that comes to mind. There are several solutions here at once, which can be combined into two groups.
The first is decoration with rhinestones of the same size, but different colors. In fact, the same diamond mosaic, only without a diagram. It is done like this:
- choose an ornament-stripe (you can search among cross-stitch or jacquard knitting patterns);
- select rhinestones of the required colors in sufficient quantities;
- stock up on transparent glue (suitable, for example, Moment Crystal) and tweezers with thin legs - at least from the same diamond mosaic;
- carefully, lubricating small sections of the rim with glue, from the middle of the workpiece and from the middle of the ornament, fill the entire surface with a pattern of rhinestones.
Alternatively, you can choose a pattern that will decorate the bezel, but not hide it entirely in the brilliance of rhinestones. In this case, they work differently with glue - they lubricate the rhinestones themselves, and not the bezel.
The second is the decoration of the rim with different-sized rhinestones. In principle, you can add any other jewelry to rhinestones - beads, beads unsuitable for weaving, even fragments of jewelry. We work in a similar way:
- from the existing decorations we come up with a composition, laying them out in a varied order;
- when the composition is invented, we draw a diagram or a sketch so as not to confuse anything;
- using glue and tweezers, we decorate the bezel with a composition of rhinestones.
Do I need to say that both decoration techniques can be combined?
 The decoration of hair bands with beads is more diverse.
Firstly, you can work with beads in the same way as with rhinestones - it will turn out original decoration in the Huichol technique.
Secondly, the rim can be braided with beads. Of course, you only need to braid the outer part of the rim. Again, here you can go two ways: braid the rim with monofilament, immediately fixing the weave on the rim with broaches, or first create the weave, and then just stick it on the rim. By the way, such luxurious beaded motifs as wicker flowers, snowflakes, leaves, as well as beaded cabochon stones look wonderful on the rim.
Thirdly, the rim can be embroidered with beads. Of course, only if you have a fabric bezel. However, for those who really want to achieve something, a plastic blank is not an obstacle - after all, it can also be covered with a cloth.

Beads are almost the same beads, only large ones. Therefore, you can decorate the rim with beads in the same way as in the case of beads - stick, braid, embroider. However, it is worth noting that the beads still differ from the beads in their size. Therefore, there is one more point - the decoration on the rim of beads. The decoration is created separately on a leather or felt backing, and then glued onto the headband.


Headband with ears
And yet we are now talking not so much about holidays in general, but about New Year's Eve. What is the New Year? Not only a Christmas tree and Olivier, but also a costume ball! Do not believe me - ask the children or remember your own childhood. This means that you may need to new year's eve headband with ears - if you wish to transform into a bunny, a squirrel or a symbol of the coming year, a dog.


Various headbands, headbands, hairpins, hair ornaments - all this is stylish, beautiful, interesting and in demand. Why not make your own hair product? It can be a headband, a turban, flagella or fabric bandages. For girls, you can make a crown or beautiful flowers on the rim with your own hands. If you work hard, you will get an unreal masterpiece that will amaze everyone.
Techniques and manufacturing options
There are options that will require a lot of hard work, but the result is worth it. So, make a product self made can be done by the following methods:

If, after reading the list, you are confused and do not know how to make a decoration with flowers with your own hands, then recommendations and detailed description ways to help you solve the problem.
The easiest way
If you have little time and little experience in needlework, then this method is a great opportunity to make yourself an unusual piece of jewelry.
Work sequence: buy a pair of hair ties with beautiful flowers, size and colors, and also a bezel, better than the immediately necessary tone. Cut or peel off the flowers from the rubber bands, create a composition from them and attach them to the product.
Everything is ready. Anyone can make such a product.
In the same way, you can make a bezel with your own hands from satin ribbons.
Complicated creation method
Making your own jewelry is very easy. Handmade headbands will cost a small amount of money, and their creation does not take much time. But it will be a wonderful product made by you. In general, making things helps to show your Creative skills, saves money and hours to find the necessary jewelry in the store, gives you a chance to feel like a real designer. Making your own hair ornaments is a real pleasure.
Necessary materials
Most of the materials for this product can be found at home, properly arranging them.
 Materials that will be required for work:
- Rim for the base.
- Textile.
- Decorations.
- Quality glue.
- Sharp scissors.
- Desire and strength.
Making the base
So, the bezel itself is needed for the base. To make a base, you need to take an already existing simple rim, or, if not, make it yourself. This will require a piece of very large and flexible wire. You can take it from your dad, brother, friend, or buy it in a store that has everything for needlework.
Having cut off a wire of a certain length, it is necessary to make the ends round.
Next, giving the base the selected shape, you need to make a cover for it. It can be sewn quickly and easily. You can also paint the base with a special sprayer. To do this, you can use standard black and white or other shades. Everything will depend on your imagination.

Product decoration
After creating the base, you can proceed to the manufacture of decorations. This will require a small piece standard grid, piece quality fabric. For the base, you can take black and white colors which are always in fashion. So, for example, you can use black velvet material and a white mesh. From these 2 fabrics, fold the bows in turn, then fix them in this position with glue. If you like, arrange them in the form of flowers or butterfly wings.
When folding the bottom part of the decoration I need to make a ring through which the decoration will be put on the product itself.
It works best when the pieces of material are rotated in such a way that each of their components is perfectly visible.
 If imagination and strength allow, you can make a small hat by attaching it to the product. Such an ornament looks no less interesting and fashionable than a floral one. Plus, you can braid the bezel with ribbons.
Another trend this season is the nautical theme. Therefore, you can make a seagull or an anchor. A seagull can be created from the same black and white fabrics. Making it a shape is pretty easy. To make her look more elegant make it bigger, you can also decorate it with beads.
You can ask the anchor to make one of the familiar men from the same piece of wire. After that, with your own hands, you can simply paint it in a black or golden hue. When all the details are dry, you need to throw them on the rim.
The product is fixed with the help of a ring, and not just with glue, because in this position it can be dragged to any side as you like. So you learned how to make a headband with flowers with your own hands. You can also make kanzashi hairpins for this decoration. A master class with recommendations will help in this work. Choose any method, buy materials and fixtures. Make your own unique items.
Attention, only TODAY!
Since last season, headbands have thoroughly entered the wardrobe of fashionistas. At one time they were an explosion on the catwalk, and now any of their variations are still in trend. In our article, you will learn how to make a bezel with your own hands without spending a lot of time and money. Everything is easier than it might seem!
How to make a Greek bezel with your own hands?
What you need: T-shirt, sharp scissors, T-shirt-colored thread, sewing needle.Since we are looking at the most budget options, we offer the simplest: you don’t even need to go to the store. Our main tool is an unnecessary old T-shirt, which is not a pity. As a result, we get a comfortable elastic band that can be used for hairstyles in Greek style. So let's get started:
- We start from the bottom of the t-shirt. We need to cut three to five ribbons from it. It is important that the ribbons are the same length.
- We sew all five ribbons at the base, it is desirable, of course, that the threads be in the color of your T-shirt. Further, a simple classic braid is braided from five ribbons.
- Once the braid ends, sew the ends together. Then we connect the sewn ends on both sides to make a headband.
- Our accessory is almost ready, it remains only to hide the seams. You can use the same T-shirt for this. We propose to cut a small rectangular piece and carefully sheathe the place where the ends are fastened. By the way, for a similar rim, ribbons can also be bought in .


How to make a wreath of flowers on the head?
What you need: some ribbons (colors of your choice), sharp scissors, wire, some artificial flowers.- It is important to distinguish a wreath from a rim. Therefore, to begin with, it is imperative to measure the volume of your head. If you don't, chances are high that the wreath will just fall off your head. Based on the measurement, we carefully make a wire frame.
- You can use any flowers for a wreath: only your finances and imagination play a role here. Usually good stylish options you can choose among ordinary artificial flowers, which you can buy for a penny at any store. If we use a large flower, then be sure to cut the stem: this way you can quickly and conveniently push the wire through it to fix it on our base. If we use small flowers, then it is best to make several small compositions from them (from three to four flowers).
- The last stage of work is fixing the flowers on the rim. For the best aesthetic effect, we recommend alternating them in tone and size.


To see clearly that it is really simple, watch the video with master classes "How to make a headband with flowers."
How to make a headband from ribbons?
What you need: a few satin ribbons (colors to taste), plastic headband, thread and needle, glue, sharp scissors, cotton pad, lighter, artificial flowers, wire.- We take a hoop and carefully wrap it with ribbons. The main thing is not to forget to periodically coat the ends with glue so that the tape is better attached.
- As soon as the rim is wrapped with ribbons on all sides, you can attach several artificial (or even fresh) flowers to it. It is best to use a special wire for these purposes, on which the flowers will be attached.
Hair Jewelry made of polymer clay
What you need: polymer clay (you can buy it in specialized stores), glue, scissors, headband, toothpick, paper napkins, clear nail polish.- Mixing two colors polymer clay- white and yellow. It is important that the color is uniform.
- From a small piece of clay we sculpt a drop of medium size. The drop is not completely cut into four parts. Petals are molded from each part. For this purpose, you can use an ordinary toothpick.
- By the same principle, we prepare flowers. We suggest using green clay. The edge of each petal is slightly pinched.
- Let's get to the buds. We cut the drop, but do not open the flower. Ready buds and flowers are best put on paper napkins for a while until the clay is completely dry.
- Next, we need a flat circle that is cut out of green clay.
- It is best to glue ready-made flowers with a special gun or hot glue.
- After the flowers, buds and leaves are fixed, they can be covered with a transparent varnish.


How to make a headband with stones?
It will turn out just a trendy option. It is not difficult to make such a bezel, and most often it is called "in Dolce style& Gabbana.What you need: as many stones as possible, ranging from pearls to large rhinestones (you can buy them in specialized stores), glue, a bezel (preferably a neutral color. If you find it, suede is ideal), a toothpick.
- For convenience, we recommend using a small wooden board, on which you can pour a few drops of glue, with which we will attach the stones to the hoop. In order to apply glue directly to the stone, we use an ordinary toothpick.
- Depending on what stones you have, it is best to think over the drawing in advance. In principle, creative impromptu will do. We begin to apply stones to the hoop. The most stylish and successful is considered to be a uniform distribution in the pattern of pearls, flowers of delicate tones and stones of the same tone (for example, silver). If you really want to get stylish jewelry for hair with your own hands, it is important that the result does not turn out to be clumsy.
- Please note that the ends of the hoop do not need to be sealed with stones. About five centimeters can be left without decoration, they will still hide behind the hair.


Headband with organza flowers
What you need: organza (colors to taste), glue, headband, toothpick, sharp scissors, tulle, lighter.- We take an organza, from which we cut several circles. Please note that they must be of different sizes. rule beautiful flower organza is simple: the more circles of different sizes, the more magnificent and impressive the flower will turn out.
- A lighter is needed in order to carefully burn each blank along the edges. Organza is a specific fabric that tends to spread. If the edges are burned, then this will not happen.
- Let's get to the tulle. You need to cut a couple of squares. Their sides should be equal in size to the circles already cut out. The squares need to be folded in four, and then cut off along the edges. So the expanded square will take the form of a circle. We fix all the blanks with glue.
- The flower is almost ready, it remains to gracefully outline its center. You can add one or more pearls. We also attach the flower to the rim with glue.

- Our fashion blogger has inspected more than one hair accessories store. As a result, I chose the best: in fashion review presented for all occasions. Here are the prices, photos and addresses of stores where you can buy them.
- In order to make a hair band with your own hands, you will need a lot of additional details. Our author in his list indicated all the best shops for hand-made. Stones, beads, ribbons, wires…. Everything you need at reasonable prices.
- In our catalog you will find almost all the shops in Minsk that sell accessories. See link.
Headbands for hair became insanely popular last season. This year, their relevance has become no less. On the contrary, designers are increasingly focusing on this stylish accessory, which not only gives the image the necessary notes, but also fixes the hairstyle very conveniently. Hairstyles with headbands have become the most popular search on the Internet in their field over the past months. Not surprisingly, headbands are very easy to use, and based on them, you can make a huge number of all kinds of styling for any type of hair.
This accessory looks especially beautiful with Greek hairstyles and boho hairstyles.
Creative fashionistas prefer to make their own hair bands. This gives a lot of advantages:
- you do not have to waste time looking for the right rim,
- you can in a very short time make exactly the headband that you need for this or that outfit.
What can be used to make a headband?
In fact, do-it-yourself hair bands can be made from anything, even chains and leather (lesson 6).
If you already have an old plastic headband, then you can update it with fashionable elements in the form of flowers, bows and beads.
If you are making a bezel from scratch, then this option is quite simple. All you need to have for the base is a regular elastic band, which is sold in any leather goods and sewing store.
Relevant and practical for everyday wear fabric headbands for hair. They are easy to make from any old T-shirt (lesson 1 and 4). Below you will find detailed instructions.
Headbands made of rhinestones, beads (lesson 8) or shiny tinsel (lesson 2) are suitable for special occasions.
Celebrities just love this one fashion trend. Headbands are not only a way to keep your hair in your hair, but also to distinguish yourself from others. DIY hairbands can say a lot about you as a person. We offer the simplest lessons on creating homemade headbands. However, you can show your imagination and decorate your accessory with additional decor.
Photo tutorials on creating headbands for hair:
lesson 1 lesson 2 lesson 3 lesson 4 lesson 5
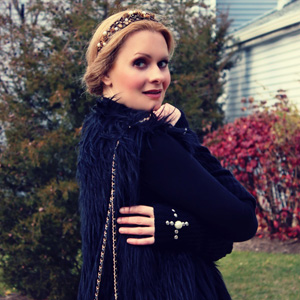
From the master class you will learn how to decorate a regular wide headband in the style of Dolce & Gabbana.
You will need:

- Wide headband covered in black fabric
- Glue "Moment"
- Acrylic paints of gold color in three shades: golden espresso (rich espresso), Venetian gold (venetian gold) and beautiful golden (glorious gold)
- paint brush
- Sandpaper
- 7 medium sized pearls and 4 small ones
- 5 plastic flowers and 5 plastic roses
- 5 large size flowers
- 35 smallest plastic elements (these are butterflies, flowers 5 mm in size, cone-shaped beads and oval shape size 5 mm)
Step 1
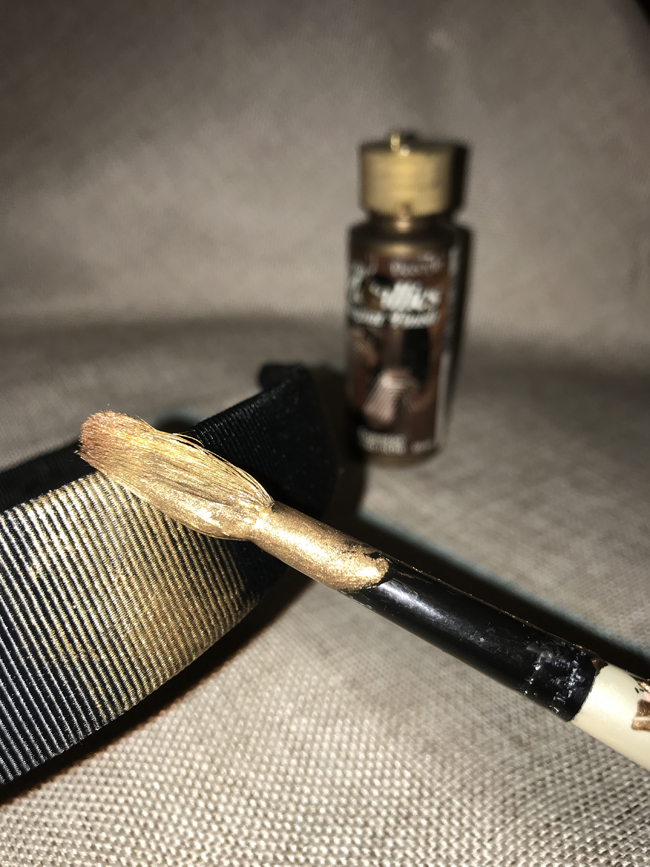
Color the bezel acrylic paint shade of "golden espresso" (rich espresso). Start staining from the center, gradually reducing the spray intensity. In this case, the edges of the rim should remain black. Let dry for 1 hour.
Step 2

Paint all the beads, flowers and other decorative elements with gold paint. Alternate three shades of gold paint, coloring elements to decorate the rim. Large flowers, medium-sized plastic roses and the smallest elements (5 mm in size) are painted with a shade of "golden espresso", this will give the flowers a more vintage look. Color the rest of the elements with a shade of "Venetian gold" (venetian gold).
do it yourself
Step 3

In order for pearls and other beads to adhere securely to the headband, lightly grind off one side of the beads with sandpaper. It is with this side that we will glue each bead.
Step 4

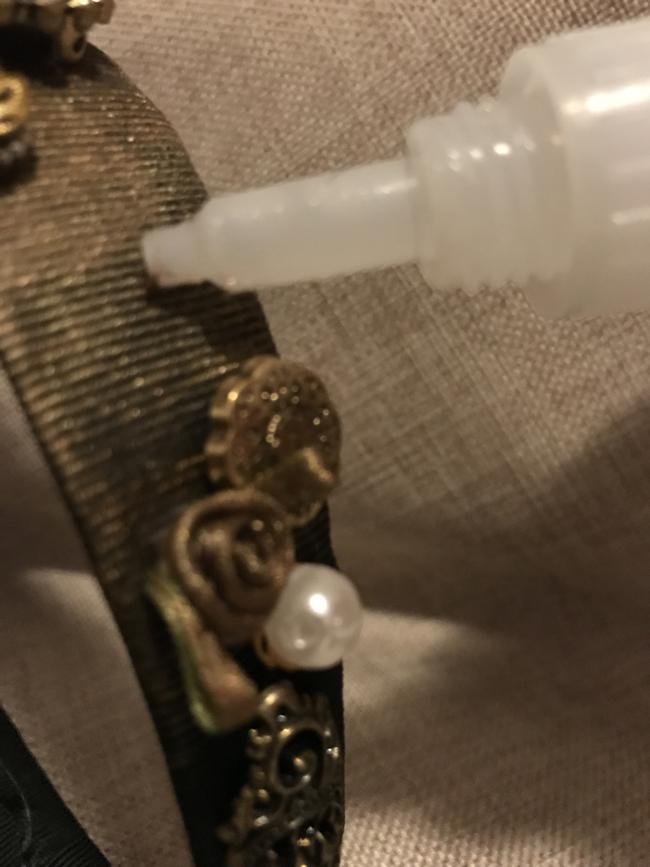

When the paint on the beads and the rim is dry, you can start decorating. Glue large flowers first at 3-4 cm intervals, then pearls, medium-sized beads and flowers to fill the space between large elements. Then fill in the remaining open areas with small decorative elements. Sequence in this case It doesn't matter, the more variety, the better.

Ready!
: Master Class
Olga Bukia
Olga has been doing needlework for over 10 years. It was Burda magazine that helped her take the first step towards creativity, which to this day is a source of inspiration for her. It was from Burda that she learned to knit and embroider. In all her projects, Olga pays great attention to detail.Today Olga sews, embroiders, creates her own accessories and bags. Her work can be found on the pages