Princess costume from improvised materials. Children's carnival outfits
Making a carnival costume with your own hands is not difficult at all. The most important condition is that the outfit is light and allows you to move and dance freely. At the same time, it is necessary to have details in it that would emphasize the characteristic features of the chosen image. Creating a costume may not be associated with monetary costs, if we take the existing clothes as a basis. You just need to decorate it in a peculiar way: sew something, glue it, paint it.
Candy carnival costume for girls
New Year- it good mood, fun, Christmas tree, fruits and, of course, a wide variety of sweets. Children always look forward to gifts that will certainly contain sweets. For a New Year's party, it would be very appropriate to make a carnival costume for a girl with your own hands in the form of a candy. For manufacturing you will need:
- fabric, preferably pink satin;
- tulle white and green;
- a sheet of cardboard or thick paper;
- a piece of pink corrugated paper;
- PVA glue;
- scissors;
- decor items: beads, glitter, ribbons.
Sewing instructions:
- Sew a pink satin trumpet. Sew, alternating different colors, ribbons diagonally.
- Hem the edges at the top and bottom to pull through the elastic.
- Sew straps from the same ribbons, you get a yoke for a dress.
- Cut out 2 strips from tulle of both colors: one wide for the skirt, and the other narrow for the ruffles on top.
- Sew a skirt in the form of a cylinder of double tulle, make white on top.
- Sew narrow stripes together along the edges, also white tulle, laying on green.
- Sew a skirt and ruffles to the yoke.
- Insert soft elastic bands from below and from above into the filing.
Sarafan-candy is ready. To complete the image, it remains to make a hat. For this you need:
- Cut out a rectangle from a sheet of cardboard or thick paper, the length of which is equal to the circumference of the head plus two centimeters for gluing the edges, and a height of about 15 cm.
- Cut a rectangle of the same length from corrugated paper, make it twice the height of the workpiece and glue it to it.
- Tie the top of the crepe paper in a bun using ribbon or foil.
To decorate the costume, sew on sequins, beads. Glue circles of colored paper on the hat. Do-it-yourself carnival costume for a girl is completely ready. Appearance the little ones will resemble a princess.
Snowman costume for a boy for a holiday
Winter is always snow, frost, skiing, sledding and snowball fights. When the thaw comes and the snow becomes soft, the children go out into the yard to make a snowman. This image is often the character of New Year's parties in schools and kindergartens. Making a carnival costume for a boy with your own hands is not difficult.
For manufacturing you will need:
- fleece white and black;
- orange cardboard;
- linen gum;
- a bucket of popcorn;
- tinsel, sparkles, snowflakes, stars.
Sewing instructions:
- Sew the upper part of the suit - a jacket. To do this, you need to find a finished pattern that matches the size of the child. Make the following changes to it: expand the bottom and increase the length. The pattern should be in the shape of a trapezoid.
- On it, cut out the details and sew them. Hem the sleeves and the bottom of the jacket, decorate the collar.
- The jacket will look voluminous if you put a wire or elastic band into the bottom edge.
- Pass the elastic to the bottom of the sleeves to give them the shape of a flashlight.
- Sew large black buttons on the jacket. They can be bought or sewn from black fleece or other material, putting foam rubber inside to add volume.
- The lower part of the suit is also sewn according to a regular pattern with an additional allowance for seams for volume.
- After the product is ready, insert the elastic band into the upper and lower parts of the pants.
- Decorate the costume with sparkles, sew on snowflakes, stars, tinsel.
So the carnival costume for the boy is ready. It remains to make additional attributes with your own hands:
- Nose. Make a cone out of orange cardboard. This will be the carrot nose.
- Broom. You can make it from a stick by attaching a bunch of branches to it or ready to buy in a store. Decorate the stick with sparkles and snowflakes.
- Scarf. For him, it is better to use a light bright gas material so that it is not very hot.
- Cap. For a headdress, use a popcorn bucket or make it out of cardboard. Glue the finished nose onto the hat and decorate with sparkles.
It turns out that making a carnival costume with your own hands is not difficult at all. Get your child to work on it. He will be very pleased.
Carnival costume for a woman for a party
Everything is ready for the New Year: the Christmas tree is decorated, the apartment is decorated, gifts are prepared, the festive menu is thought out. It remains to come up with a carnival costume and surprise family and friends with your reincarnation. This problem can be solved as follows: sew something to order, rent it, alter old clothes yourself by making accessories for decoration from improvised materials. Or, for example, make a carnival costume with your own hands. And the woman will become a good sorceress. How to make it happen:
- The basis of the costume can be any outfit, added with a fluffy skirt. There will always be fancy dress which has not been worn for a long time.
- Sew from stiff taffeta fluffy skirt. To do this, stitch a rectangular piece of fabric like a pipe. Hem the top edge and insert the elastic. Trim the bottom edge with cloves or sew lace to it.
- Wear a tailored skirt under the dress. Tie with a belt that can be woven from ribbons.
- Prepare small bows from ribbons and pin up the hem of the dress in several places so that the petticoat sticks out from under it.
- Decorate the headband with paper flowers.
So they made a carnival costume for a woman - the mistress of the house with their own hands. good sorceress in new year's eve you can work miracles.
Dog costume for New Year's party
For a child, this costume can be sewn using patterns of a shirt, pants and a hood from magazines, and then, cutting out circles of different sizes from a material of a darker color, sew them onto the clothes. Attach fabric hanging ears to the hat. If there is no time at all, then you can get by using the available things. So, to make a dog carnival costume with your own hands, you need to take:
- A one-color suit in white, black, gray or any brown tones.
- Put the hood of the jacket over your head, sewing the ears to it. In the absence of a hood, a ready-made hat or baseball cap is suitable, to which you also need to attach ears.
- Put on ready-made gloves on your hands, decorating them with circles of fabric.
- Make up on your face.

Instead of a suit, matching shorts with a T-shirt, which are also sewn with appliqués, are also suitable. And a hoop with sewn ears and a muzzle of a dog is put on the head. For a boy, it is made of paper, and a girl may well use plastic hair. It's simple, do-it-yourself dog carnival costume is done very quickly and with virtually no cash costs.
Carnival clown costume for a man
V new Year's Eve everyone should be in a good high spirits. So that no one gets bored, the owner of the house can transform into a clown and bring joy to both children and adults. In this case, he will need colorful bright clothes. Having decided on the role in advance, you can make an excellent carnival costume for adults with your own hands. The clown outfit consists of:
- Overalls. For sewing, you will need a pattern, which must be taken from a sewing magazine. Halves of overalls are best made from different color bright fabrics of your choice. Sew colorful large pompoms made of faux fur or yarn onto ready-made clothes.
- Cap. Roll up a sheet of paper to make a cone. The circumference of its base and head must be equal. Moreover, at the edges of the pattern, add a centimeter for gluing. Sheathe the finished cap with fabric and attach a pompom and hat elastic to it.
- Shoes. You can use large sneakers by attaching large pompoms to them.
- To complete the look, add a do-it-yourself carnival costume for an adult owner of the house with a red wig and a red nose. It is convenient to make a wig from yarn by attaching it to the edge of the cap. For the nose, cut a circle with a diameter of about 12 cm from red material, gather the edges onto a thread and fill with cotton, leaving room for your own nose.

Apply bright makeup to a colorful costume on your face. Make large white circles around the eyes and mouth, draw a large laughing mouth, small black eyebrows.
Carnival costume for a girl
With your own hands it is easy to make vestments for any event. V holidays New Year, Halloween, birthday, Christmas, youth parties are often held, to which a girl can appear in a carnival costume, for example, Disney Princess Merida. To transform into an image, you need to get acquainted with her lifestyle:
- This is an energetic, witty girl, she keeps well in the saddle, is engaged in archery, enjoys walking in the forest, climbs sheer cliffs beautifully.
- The figure is fine, stately and graceful.
- Clothing style - dress in blue tones, flared and fitted, floor-length. A cape, a bow, a quiver with arrows, a leather belt, a necklace around her neck, a bracelet on her wrist are her accessories.
- bright red curly hair and makeup. To create an image, it is better to choose a wig, or you can experiment with your hairstyle.
For makeup you will need:
- foundation for eye shadow;
- shadows brown and blue;
- eyeliner (black and brown);
- eye shadow (white);
- mascara (black).
Makeup for a do-it-yourself carnival costume is done like this:
- apply a base on the eyelids under the shadow;
- draw an arrow above the upper lash line with a brown pencil;
- create a black arrow along the bottom of the eyelashes;
- cover the eyelids blue shadows, and above to the eyebrows - white;
- paint eyelashes with black mascara.
In this image at the party you will be irresistible.
Gypsy costume for carnival
On the new year party it is very effective for friends to appear in the image of a gypsy. A woman can sew a carnival costume with her own hands, having a minimum of skills. This will require:
- fabric with flower arrangement;
- bright monophonic material;
- a flower made of paper or matter;
- sequins;
- threads;
- sewing machine.
Tailoring details:
- Blouse. Use material with floral patterns. Choose any pattern that matches the size. The sleeve is straight to the elbow, and then it expands sharply. This effect is achieved using a wide frill made of plain material. Make the collar open or sew on the collar.
- Skirt. Its cut is sun-flared, ankle length. At the bottom, you can sew a frill from a plain fabric.
- Shawl. This is an essential attribute of gypsy clothing. The scarf must be tied at the waist so that a corner hangs from one side.

Large beads, earrings, monisto, bracelets should be chosen for the costume. At the end, make a bright make-up using tone cream for the face, bright lipstick, black mascara and eyeliner. Attach to hair artificial flower. Using the description, try to make a do-it-yourself carnival costume for a woman, the photo of which is above.
Gnome carnival costume for a boy
For toddlers, this costume is very popular. Its kit includes:
- Shirt. It can be sewn by taking any shirt as a sample and adding two centimeters in the seams. Lengthen the bottom by a few centimeters. Choose the color of the fabric at your discretion, preferably bright colors. Instead of a shirt, any turtleneck will do.
- Vest. For her, use a dense material of a darker color than the shirt. Make lacing on the front shelves. To do this, make holes and thread the braid.
- Trousers. For a sample pattern, take shorts. In the seams, add a few centimeters for a free cut. Length is just below the knee. Make pants with an elastic band and at the waist, and at the bottom.
- Cap. Measure the head with a thread. Fold the material in half, measure half the size of the thread from the fold, add two centimeters to the seam and draw a triangle from the resulting point. Sew and insert an elastic band into the base.
- Beard. It can be made from white yarn by sewing threads to an elastic band, fur can also be used.

Gird a shirt with a wide belt, sheathe a hat with fur or sequins, put boots on your feet. You can make a carnival costume for a boy with your own hands from the photo above.
Butterfly costume for a festive evening
Favorite little animals, heroes of cartoons and fairy tales are popular with parents and children. Many costumes are often made from used clothes, but the outfit is still attractive and delights children. Here is the simplest butterfly costume that you can make inexpensively and quickly. To create an image, the girl puts on an elegant plain blouse, a dark-colored skirt, tights and shoes. On the head is a wide dark hair band. A wire antennae with beads at the end is attached to it. It remains to make only the wings. For this you need:
- take a piece of silk, plain;
- cut a semicircle;
- stretch and draw acrylic paints symmetrical patterns;
- dry the fabric, gather in the center and attach on the neck, the ends on the wrists.
The outfit is ready, before going to the carnival, do your makeup.
Fly agaric costume for a children's party
This image is suitable not only for the New Year holiday. Often, schools and kindergartens celebrate autumn holidays, to which children come in clothes that identify animals, plants, mushrooms, trees. A fly agaric costume is just right for such a celebration. The most important thing in it is a hat, which can be made in several ways.
For its manufacture you will need:
- red fleece (70x70 cm);
- chintz or cotton in white color (70x70 cm);
- foam rubber or penofol (70x70 cm);
- tape 2 cm wide, 1 m long;
- white felt sheet (50x50 cm).

Step by step manufacturing instructions:
- Make a hat pattern. Draw a circle on paper with a radius of 35 cm. This can be done using a tailor's meter.
- Transfer the pattern to chintz or cotton, the wrong side of the hat.
- Cut out a 90 degree sector from the circle. Apply the pattern to the fleece, adding 1 cm to the seams. Do the same on foam rubber, without making additives.
- Sew the upper part of the fleece, you get a cone.
- Fold the foam rubber and fleece on top of each other, baste with a thread.
- Sew the lining on top, gathering the edges.
- Pull the center of the wrong side to the top of the fleece cone.
- Sew on ribbon for ties.
- Cut out circles of arbitrary shape from felt and attach to the hat.
The hat is ready, and it will not be difficult to make a jumpsuit for a carnival costume according to a pattern with your own hands. A white dress and tights for a girl will completely complement the image of a fly agaric. The boy can wear white shirt and trousers or shorts. A light white scarf should be tied around the neck.
Little Red Riding Hood carnival costume
baby on New Year's party or Halloween in the costume of Little Red Riding Hood from the fairy tale of the same name by Charles Perrault will look very impressive. It can be purchased at the store, but here it will be described how to make a carnival costume with your own hands.
This will require:
- fabric (white, gray, red, black) color;
- red ribbon;
- lace;
- elastic;
- eyelets;
- cord.
Making costume details:
- Blouse. Make a pattern on a T-shirt or reshoot from a magazine. Cut out pieces from white fabric. Sew them. For lantern sleeves, cut out two parts, gather and sew. Sew an elastic band down. Process the gate. Make a clasp at the back.
- Skirt. Cut out a rectangle from gray material, sew the side. Trim the top and bottom. Insert an elastic band at the waist.
- Beanie. Cut out two rectangles of the same size from red material, 40 cm long and 25 cm wide, and two drops 12x7 cm (dimensions may vary). Sew lace on three sides of the rectangle between the lining and the top. Sew the free side to the droplet. The hat is ready.
- Apron. Cut it out of white material. Tuck the edges, sew on lace. Make a belt and ties satin ribbon.
- Corset. It should be 5 cm above the waist. Cut two rectangles of the same size from black material. Glue the adhesive fabric to one part. Sew them together at the same time as lace. Treat the bottom with a satin ribbon, and the holes for the cord with eyelets. Make lacing.

It's time for the child to try on a carnival costume made by himself. The photo may tell you a slightly different version of the outfit.
Instead of a conclusion
New Year is a holiday of magic. The Christmas tree and the room are decorated, many guests come, a table is laid with delicious food. Parents dress up their kids in costumes, transforming them into snowflakes, little gnomes, funny little animals. But adults themselves do not want to celebrate in business suits. They also want to look stunning and be irresistible, so many people make carnival costumes with their own hands in advance. On New Year's Eve, everyone makes wishes and expects something unusual.
In anticipation of the arrival of the New Year, both children and adults carefully think over New Year's images in which they will celebrate the holiday. Looking through bright photos of New Year's costumes, it is not always easy to make a choice, because they are presented in a fairly wide range.

Among all the variety of outfits suitable option find both children and their parents.
Beautiful Christmas Fairy costume (with photo)
Here in the photo are New Year's costumes for girls, among which you can see fairy-tale characters, princesses, and animals:


If you cannot find a suitable outfit for a particular New Year's image, the most correct way out is to make it yourself.
Pay attention to the photo of a beautiful New Year's costume for a girl, where she is in the image of a fairy-tale character - fairies:


It is not difficult to make it with your own hands, for this it is enough to put on a dress for the baby delicate color- pink, lilac or cream, attach wings, and use a magic wand as a mandatory attribute of a fairy.


Wings can be bought at fancy dress stores, but if desired, parents can make their own.
To do this, you can use two options:
Cut out a frame for the wings from cardboard or make it out of wire and cover it with a transparent material - old guipure or mesh, for decor, you can paint the material with glitter varnish.
When a girl walks, such fairy wings will flutter in time with the movements of the child.
You can make wings out of fabric by cutting them in the shape of a half-flare, make rubber bands at the ends and put them on your fingers.
New Year's costume for a child "Amanita" (with photo)
In these photos new Year costume do-it-yourself for Amanita:


It is better to dress in such an outfit when children's matinee the child should appear in this image.


The outfit is suitable not only for girls, but also for boys. A white turtleneck will perform the upper part of the festive costume, leggings or panties of the same color - the bottom. The main role in creating the image of the Amanita is given to the headdress.
To make a mushroom cap, follow these steps:


Measure the baby's head with a centimeter tape and, according to the measurements made, cut a strip from a wide elastic band.


Cut out a circle from cardboard, approximately 45 cm in diameter, glue it with a red cloth on the outside, and white on the inside.


Glue white circles on top of the red fabric.


Sew the elastic to the inside of the fly agaric hat.


The upper and lower parts of the Christmas mushroom costume can be decorated with rain. Shoes can be chosen according to your choice.
Children's New Year's costume Squirrels (with photo)


Not a single New Year's children's party is complete without such a character as Squirrel.
In the photo, the children's New Year's costume for Belochka looks bright and elegant:


The main attribute of the attire of this furry animal is a large and fluffy tail, pulled up.
That is why work on creating such an outfit for the New Year should begin with a pattern of a luxurious tail:


Draw a tail on cardboard, cut it out.


Transfer the pattern to a piece of red, gray or brown fur, fix it with pins and cut it out. Do not forget about the seam allowances - add 1.5-2 cm on each side. Sew the details of the tail on the sewing machine.


The finished tail will need to be securely attached to the suit. To do this, it is important to make a fastening system: with wrong side sew a button to the tail, thread a fishing line into it. Turn the tail out, bring the ends of the fishing line out.


Further, in order to fix the tail in a vertical position, it is necessary to make another design: cut three pieces from a wide elastic band - two on the shoulders of the child, the third - to fix these two parts on the back. Tie the ends of the fishing line that hold the tail to an elastic band located in the middle of the child's back.


For the squirrel, you still need to make ears. To do this, take two hangers, a headband, some fur, organza and a satin ribbon. orange color. Wrap the rim with a satin ribbon, fixing its edges on both sides with glue. Cut out two ears from the shoulders, wrap them with organza so that on one side it is folded once, on the other - twice. Then carefully sew them to the headband with the side where the organza is folded once. Sew some fur to the tips of the ears.


As a costume for Squirrel, put on a turtleneck and a skirt of the same color as a ponytail. If there is a fur vest, it will be a great addition to the New Year's outfit.
In these photos, children's New Year's costumes for girls are presented in a wide variety of options:


At the children's party you can appear in the costume of Little Red Riding Hood, Snow Queen, Christmas tree, Snowflakes.
Beautiful New Year's costumes and photo images for boys
Among the New Year's costumes for the boy in this photo, all parents will certainly be able to pick up a beautiful fancy dress:


You should not dress up a child in a bear, wolf or hare costume if he does not play the role of one of these animals.
Pay attention to the beautiful New Year's costumes for boys in the photo and choose the original version:


The image of Carlson is perfect for mobile and active kids. The costume of this funny character consists of large plaid shorts and a T-shirt or shirt.


Sew a large bright button on the front of your pants, make suspenders from a wide elastic band or ribbon. To complete the image of Carlson, who lives on the roof, a bright orange wig will help.
Other New Year's costumes for the child in the photo below:


For the New Year, boys can be dressed up in the costume of a Musketeer, Aladdin, Batman, a pirate.
Do-it-yourself New Year's astronaut costume with step-by-step photos


Many boys dream of becoming astronauts. For a while, all parents can make a child's dream come true if they make an astronaut suit for their son.
One of the options for a do-it-yourself New Year's astronaut costume in the photo with step-by-step instructions below:


The main attributes of the astronaut's suit are a helmet and a balloon. We will make a helmet using the papier-mâché technique.
For this you will need the following materials:
- air round ball;
- old newspapers;
- flour;
- water;
- white latex paint.
Helmet do this:


Tear the newspaper into small pieces. Mix flour and water, you should get a mass resembling sour cream.


Inflate the balloon about twice as large as the child's head and start gently laying wet pieces of newspaper soaked in a water-flour solution on top of it in layers. Please note that the bottom hot air balloon should remain unglued.


The balloon must be pierced and removed from the helmet. Now top coat this important astronaut accessory with white latex paint.


Draw a hole for the face with a pencil and cut it out with scissors. On the contour you need to stick a white adhesive tape to hide all the bumps.


To make a balloon, use two bottles, scotch tape and an old hose with washing machine. Connect two bottles with tape, wrap with tape, attach a hose.


Use a sports suit as clothing for an astronaut. If there is such old clothes, top coat it with silver spray paint.


Rubber boots are the best footwear.
New Year's costumes for adults and photos of the best images of 2018


Parents do not want to lag behind their children, so they also carefully consider the image for the New Year.
Pay attention to the photo of New Year's costumes for adults:


A woman can choose the outfit of an angel, a pirate, a mermaid, a witch, a fairy or a good sorceress.


Men often choose the costumes of Zorro, Batman, Spider-Man, Superman to celebrate the New Year. Kids will love this superhero dad.


The costumes look beautiful in pairs, when both the man and the woman are dressed in outfits of famous characters. For example, Jasmine and Aladdin, Santa Claus and Snow Maiden, Wolf and Little Red Riding Hood.
Your attention is presented to the best New Year's costumes of 2018 in the photo below:


Any sniper can easily make several types of shaggy Gilly camouflage. Since the manufacture of Gilly is not particularly difficult, it is desirable to have several options for such camouflage.
- - Full camouflage kit (jacket with pants);
- - Cape-poncho;
- - Hoodie.
The most simple cape to make is the poncho, which is both comfortable and versatile. The most difficult option to manufacture is a complete set consisting of a jacket with pants. Everyone is free to choose a disguise to their liking. However, both in the manufacture of a complete set and in the manufacture of an incomplete set, there are common points.
First you need to select the right materials.
- We start with a grid-painter. The more you have, the better, as part of the mesh will have to be spent experimenting to find the best color for masking. Usually, a cut of 3-4 meters and a width of one and a half meters is quite enough for the manufacture of a costume and preliminary selection of color. The initial color of the grid does not really matter, but the cell size should be limited to the range of 1-2.5 cm.
- Second desired material- jute thread. To obtain it, it is best to use brown bags, in which potatoes are usually stored. It is not recommended to buy a bobbin of jute thread, as it is much stiffer and thicker than the one you will get from the bag. If we also take into account that the thread will become even stiffer after dyeing and drying, then it will be very difficult to work with it. Therefore, it is better to buy 5-6 bags of jute and dissolve them into threads.
- Finally, paint. When choosing a dye, be sure to look at what fabric it is used for. You should choose those that can dye both cotton and synthetic fabrics. The selection of colors will be discussed below. The color is selected by trial and error. It is recommended to have the following colors:
- - several shades of green;
- - olive;
- - black;
- - soft brown (natural colors of clay, sand, etc.);
- - yellow.
- To stitch the individual parts of the camouflage suit, you will need about a hundred meters of ordinary white nylon thread with a thickness of about 1 mm.
- In addition, you will need 25 meters of a nylon cord having a thickness of 3-5 mm. It will be needed for ties and strengthening (reinforcement) of the suit along the edge.
How to prepare materials:
After all the materials are available, they need to be prepared for use. The main stages are as follows: the bags are unraveled into threads, the mesh is cut, after which the cut parts are sewn together. Then comes the staining in the selected color. All this should be done carefully, since the camouflage of the sniper depends on how well the clothes are made.
Let's say the sniper has already chosen a camouflage suit option: a hoodie. It is a cross between a complete set and a poncho cape.
In order to sew it, you will need the following details:
- - The front part ("face");
- - Back ("back");
- - Hood;
- - Sleeves.

The face and back are cut in the same way.
These are rectangles that are as long as a person's height minus 1.5 - 2 head lengths, and one meter wide. The length of the part is equal to the distance from the ankle to the shoulder.
From the edges, the parts are sewn to 1/3 of the width, so that in the center there is
head hole.

The numbers in the figure indicate:
4 - Neck.

Two sleeves should be made.
These are rectangles measuring 40 X 70 cm. Since such a camouflage robe will have to be worn on a variety of clothes, perhaps even on a padded jacket, allowances should be made to the maximum. Having cut out the sleeves, they are put off until the time they paint.
The hood is sewn, so one square with a side of 20 cm and 3 rectangles measuring 20X40 cm are cut out for it. Then the parts are sewn according to the scheme. The finished hood should be of such a size that it almost completely covers a bucket of 10 liters.
On the image:
Item 1 has a size of 20x20 cm.
Parts 2, 3, 4 are the same, 20x40 cm.
All prepared parts of camouflage clothing are not yet sewn together, this must be done at the very end.
Then you need to prepare the threads. To do this, carefully dissolve the purchased bags. To do this, the seams in each bag are cut off or unraveled, then the bag begins to unravel along the thread. If you work daily for about five hours, then it takes about five days to dissolve one bag. After the bags are unraveled, you should have 5-6 skeins of jute available, one skein from each bag.
Coloring and drying of materials:
After cutting the mesh and dissolving the bags into threads, you can start experimenting with coloring. Here the scope for imagination is unlimited! The main thing to remember is to dye according to the instructions for the dye, it is printed either on the package itself or inside it.
Before you dye everything, take the time to check what color different dyes will give on different types of fabrics. For example, using green dye for synthetics on jute threads, you will get a beautiful dark olive color. And the synthetic nylon thread will receive exactly the color that was declared on the package - green.
Once, as a result of experiments, you have established what and how you will paint, you can begin the main painting. First, divide the skeins into several groups, according to the number of camouflage colors. For example, if the manufacture of a camouflage coat involves the use of four colors, say, light green, olive, brown and the main dark green, then the available seven skeins should be distributed as follows:
2-3 skeins will be dyed dark green, 2 skeins light green, 1-2 skeins brown and 1 skein olive.
If dark green is chosen as the base color, then not only 2-3 skeins of jute are dyed in this color, but also the details of the costume cut from the net, as well as nylon thread and nylon cord. What needs to be dyed in the base color is divided according to the type of material (cotton or synthetics), and dyed one by one. Painted parts are dried for 1-2 days. At this time, paint everything else in other colors.
After painting the details, you should rinse them very well, otherwise, even after a light rain, your camouflage will shed, staining you and your clothes in various shades of green, brown and olive.
Drying of the threads should be done in the shade, without direct contact sunlight. Since natural jute thread has an inexpressive brown-brown color, the same as withered grass, two or three skeins can be left without coloring.

Weave camouflage:
When all the details and materials have dried after painting, you can start weaving camouflage. Since this is not an easy task, you first need to properly prepare the workplace. In order for the upcoming work to be not a burden to you, you will need the following:
- Machine. It provides a convenient approach to cut parts and quick access to materials (cord, jute, nylon thread).
- Comfortable chair. Choose the one that suits you the most.
As a working machine, you can use an old drawing board (if you have one). Install it at an angle, half lowering the mesh from above. The second part of the mesh hangs down at the back. The second version of the machine, on which the manufacture of a camouflage coat will also be quick and convenient, is an installed ironing board. Having laid out the mesh parts on it, you should proceed to the preparation of "lohm". V this case"Lokhma" we call a bundle of 4-5 threads of the same length, folded in half. Since such “lokhmas” are what disguises us, their manufacture should be approached with all responsibility. There are certain points in the manufacture that should be considered.

The length of the threads for camouflage should not be too short and not too long.
Too short "hairs" will lead to the fact that the sniper's camouflage coat will look more like a cactus.
Too long "lokhma" will not only make you look like a bobtail, but they will also cling to everything that comes in your way.
Practice has shown that it is best to cut the threads into pieces 40-55 cm long. When folded in half, such threads will give a bunch of optimal length: 20-27 cm.
Lokhmy of this length will perfectly "blur" your outlines on the ground.

Method of weaving camouflage. Although Gilly's camouflage clothing is weaved in a standard way, there are several peculiarities in the process of weaving. So, with the “chess cage” weaving method, “lokhma” of the same (base) color is first prepared and woven like chessboard, into the corners of mentally drawn squares with a side of 9-10 cm. Then threads of the second, third and other colors are woven. The second way will be somewhat different. In this case, "lokhma" of all available colors should be immediately prepared, then they are woven into the grid according to a special scheme.
Like every business, Gilly's camouflage weaving has its tricks. For example, if you are using a fine mesh with a 1 cm cell, do not try to cram hair into each cell - this is not only very difficult, but also impractical. The optimal step for weaving is 2-3 cm.
Weave follows from the bottom up. First, you weave the bottom row, then comb the woven "hairs" down, weave the second row, also comb it down. And so on until the very end. The sleeves should start to weave from the wrist, the hood - from the back of the head, the jacket and legs - from the bottom up (that is, from the legs). Shoulders weaving from the neck.
Thanks to such tricks, the sniper's camouflage coat becomes very shaggy. By shaking your camouflage a few times, you will be sure that the shags will fall the way you need.
A few notes about weaving:
Making a camouflage robe with the first weaving method (chess cage) is faster. By weaving the “lokhma” alternately, you will quickly weave Gilly. The second method can be considered more correct, it gives a uniform distribution of "shags" of various colors over the entire surface. On the other hand, a costume made in the first way gives more color options. By rearranging the "shags" so that a different color appears on top, or simply shaking your goblin suit, you can get the color that best suits the color of the area. The second method of weaving gives greater uniformity of color and greater shaggyness.
Below are the main color options for Gilly's camouflage suit:
Woodland:


leafy green:


What should be paid special attention to:

Gilly sleeves are the fastest and easiest to weave.
They are not sewn before weaving. After finishing work, they are sewn from the inside to the details of the body, in a straight line, acting as an armhole. After everything is sewn together, a general blank is obtained in the form of an irregular cross with a hole in the middle (for the head). The blank is folded in half, so that the edges of the sleeves, back and face coincide on the sides. The edges are sewn together with a dyed and dried nylon thread, from the hand to the thigh, approximately to its middle.

No. 1 - a seam that connects the front and back;
No. 2 - a seam that connects the sleeves to the back and front;
No. 3 - fastening seams.
The most difficult to weave is the hood. Once sewn together, it takes on volume and is difficult to weave on a flat board. For weaving, you should use a simple improvised tool - an ordinary bucket. Putting a hood on it, you can easily weave "lokhma" into the cells of the hood. For convenience, a dyed nylon thread should be passed along the edge of the hood, which will not be a tie, but will only play a handy role. When the hood is braided with “tufts”, it, like the sleeves, is sewn from the inside to the neck (the unsewn part in the middle).

To make sewing more convenient, it is recommended to make a mannequin. We take two bars with a square section of 2x2 cm, make a hanger in the form of a cross. The design should be slightly higher than you (about a head), and have a span of "arms" of one and a half meters. The bars need to be sanded so that the "shags" and all the camouflage do not cling to it. The head should be made of plywood nailed to the top.
After that, the torso with sleeves sewn on the shoulder is thrown over the mannequin, aligned as accurately as possible, and then sewn along the edge (see figure).
In the same way, the hood is pretended and aligned along the edges and in the center, and sewn from the inside out. The main thing to remember when sewing on the hood: the seam is made along the collar, in the direction "front - back", 10-15 cm long. Since the length of the hood along the bottom will be greater than the length of the neck, the hood is partially lowered onto the back, aligned and sewn on .
When everything is sewn, we arrange a strict check for our costume. If we find holes (areas without “lohm”), we immediately fill them with threads of the desired color.
That's all, Gilly's camouflage suit is ready.
But that's in theory. In practice, you can do a lot more with it. For example, continuing side seams to the bottom, make cuts, add ties to the sidewalls and wear the suit like an OZK jumpsuit. In this case Gilly will be worn over the head. You can put a tie down the neck so that the camouflage does not fall off, but in this case you can open the shoes, which will attract attention.
In this way, you can make a Gilly suit of a wide variety of configurations. The most practical is the poncho cape, which is similar in design to a military cape. The only difference is the material: the tarpaulin in Gilly's poncho is replaced with mesh with "tufts" woven into it.
Making such a shaggy poncho does not take much time. For a poncho, you will need a piece of mesh measuring 1.5 m X 2 m, reinforced along the edges and in the middle with a nylon cord. After the tufts are woven, loops are made in the corners from the same nylon cord. This variant of Gilly can be used as both a camouflage cape and a camouflage net. Very good for hunting ambush. In the same spirit, you can make a full camouflage suit.
Things to remember when storing and operating Gilly:
Such camouflage should be stored in a closet, hung on a coat hanger and carefully straightened and smoothed out the "hairs". With proper storage, "shags" do not become "curls", do not cake or curl.
A wet suit (for example, after rain) should be dried well.
And one more thing: in a Gilly costume, they ambush, and do not run through the forest. If you need to move in it, do it carefully and slowly.
If for some reason (lack of experience, time, material) you cannot sew a Gilly camouflage suit for yourself, then you can purchase it from our store.
New Year's costumes for children: do it yourselfAdults, unfortunately, are losing their naive childish faith in miracles and the ability to immerse themselves in a fairy tale or even turn reality into a fairy tale with the power of their own imagination.
Adults - yes, but not children! And if on ordinary days they can still afford to doubt something like that, then the time new year holidays leave no room for doubt.
And, by the way, adults also become infected with this universal anticipation of a miracle, especially if they accept Active participation in preparation for the New Year's children's holidays. And children (especially girls) are waiting not only for gifts and holidays, but also for the New Year's masquerade, when you can try on the outfit of a fairy-tale hero, turn into a princess or a wizard for a while, become a dashing cowboy or an omnipotent Golden Fish. By the way, many images can be brought to life by making children's New Year's costumes with your own hands. Here, for example, what outfits for girls are moms and grandmothers able to make?
Malvina costume
 <<>>
<<>>
If you are good at sewing, you can start sewing Malvina's beautiful fluffy dress, and in addition to it, make pantaloons with lace trim. However, there is a simpler option that will suit even those mothers who do not know how to sew and cut, but want to make a costume with their own hands.
So, the dress. For a Malvina costume, almost any elegant pastel-colored dress is suitable. But it is best if it is blue or pink. An option with knickers for those who cannot sew - pajama pants suitable color. Just insert the elastic bands at the bottom of the legs and sew a lace or tulle frill along the edge. If you don’t want to mess with panties, then make a puffy skirt for the dress from a cut of organza, tulle or chiffon, which will be white or the same color as the dress, but will cover the legs below the knees. Embroider the dress with ruffles of lace or stripes of the same organza, or nylon ribbons. And, by and large, the main part of the costume, made by hand, is ready.
Hairstyle. If there is an opportunity to buy a ready-made wig with blue hair - great! This means that another problem has been solved. The second option (suitable for a girl with long hair) - do without a wig, and make a hairstyle from the child’s own hair, winding doll curls. The main accessory of Malvina's hairstyle is a huge butterfly bow, which can also be made with your own hands from satin, nylon, chiffon, organza and attached to the headband. It is desirable to decorate the belt on the dress with the same bow, and place the bow at the back.
Shoes. Any white, pink or blue shoes, as well as Czech shoes that you will turn into Malvina's doll shoes with your own hands, if you simply attach bows made in the image and likeness of what Malvina flaunts on her head to them. That's all. Add white stockings or tights to the costume and make your Malvina the appropriate makeup - blue shadows, rosy cheeks, pink lips. Your Girl with blue hair is ready to go to the masquerade ball.
Golden Fish Costume

Consider that the Golden Fish costume is already ready for you if the girl’s wardrobe has any elegant dress in yellow, orange or even red. And if there is a golden dress, then the fish will turn out just perfect. You will have to do only two things with your own hands: a headdress and a cape (cape). By the way, to heighten the effect, the dress of your Golden Fish can be sheathed along the hem with gold Christmas tinsel, and if the style of the dress allows, then also decorate the bodice and sleeves.
Now the cape. In principle, if you have a golden dress, there is no need for a cape. But if there is such a need, then sew it from any golden fabric. Cape can
make it long (on the floor), and short and fluffy, like a cape. This element of the costume will not require special skills from you, and almost any mother can make it with her own hands.
Headdress. Here you have two options. Firstly, if you go the simple way, then the easiest way is to make a crown out of wire and gold tinsel. First you put the tinsel on the wire, and then bend this wire in the form of a crown.
The second way will be more difficult, but the image with its help will be more recognizable. In this case, you will have to make a cap in the form of a fish out of cardboard or whatman paper with your own hands. To do this, you need to draw two silhouettes (in mirror image) of some cute cartoon fish and paint them with ordinary gouache, depicting eyes, gills, fins, a tail, and, of course, scales. By the way, the fish needs to be drawn in the crown, and its tail can be decorated with a golden Christmas tree rain. Now you need to fold both fish together (with the painted sides out) and glue both parts along the upper contour, making a kind of pioneer (or army) cap out of the fish. You put a cap on a child's head, fasten it with invisible hair and admire the outfit of the Golden Fish, which, by the way, you made with your own hands.
Little Red Riding Hood Costume

Let the idea of this costume seem beaten or even outdated and worn out to you, but your child, believe me, has a completely different opinion. For him, everything in this world is new, and the image of Little Red Riding Hood, which appeared back in the seventeenth century, is just as relevant for your daughter (granddaughter) as it is for you at her age. So, without particularly bothering, try to make a Little Red Riding Hood costume with your own hands.
The main element of the costume is a red cap (panama hat, beret). All other parts of the costume can also be found in your child's wardrobe or rented from relatives or friends. A white blouse is in the wardrobe of any schoolgirl. But not only a blouse is suitable, but also a turtleneck or a T-shirt with long sleeve. Vest of any dark color (blue, black, burgundy, green). Finding this element of the costume for you is also not difficult, like almost any fluffy skirt. By the way, to complete the image, you can sew lace along the hem of the skirt or even sew an underskirt, the edge of which will peek out from under the hem of the top.
The apron is the last important detail that you may have to sew with your own hands. And, of course, a wicker basket will complete the Little Red Riding Hood costume. You can put a bouquet of artificial flowers in the basket or even put cookies and sweets that Little Red Riding Hood can treat her friends to.
Bee costume

A very popular New Year's costume for girls of any age. For both babies and schoolgirls, the basis of the costume will be a short dark-colored dress or trousers with a turtleneck. Your task is to embroider this costume with yellow stripes of fabric. As an option - a yellow skirt and a striped T-shirt. Another option is black trousers and a yellow turtleneck trimmed with black stripes. By the way, fashionable colors in the style of "beeline" can be found on knitted gloves or golf. If you have these, or you suddenly acquire them on occasion, then they will become
a great addition to the Bee costume. And, by the way, you can knit yellow-black striped leggings or mitts with your own hands in a couple of evenings.
The hardest part is making the wings. To do this, you will need a strong but soft wire, such as aluminum. Fold the wire into a figure-eight and fasten it at the crosshairs and at the ends. Then find a suitable translucent fabric (tulle, nylon, organza or even tulle) and wrap the wire with this fabric. Suitable for this purpose and white nylon tights, in which you need to cut off the legs and cut the upper part of the tights into two parts along the front and back seams. In extreme cases, wings can even be made from thin paper.
The New Year's costume of the Bee is completed by a rim with pom-pom antennae. These headbands are easy to purchase at the store or even make your own by attaching the same wire with pom-poms or large beads at the ends to a regular headband.
Snow Maiden

The outfit of the Snow Maiden, despite the current popularity of Disney characters, will always be relevant, especially among those who are not enthusiastic about secondary roles. In order to make a Snow Maiden outfit, you need to get a children's dress of blue color, which can be easily turned into a New Year's outfit: we sew snowflakes on it, we trim the bottom of the sleeves and the hem with faux fur or white fabric.
We select a hat in that outfit. To the hat, you can sew a white braid made of cotton wool. If, after all that has been done, you still have white fur, you will get a beautiful muff!
Angel

One of the most touching New Year's reincarnations is the image of an angel. What will we need? Without a doubt, it is worth stocking up on white fabric, sequins, feathers, rain, rhinestones and everything that you could not fit on a Christmas tree.
The basis of the costume is a white airy dress. Wings for our angel can be bought at any market for a symbolic price. If you are ready to create wings with your own hands, then you need to cut them out of cardboard, spread them thickly with glue and sprinkle with feathers.
A halo should be made on the head of a little angel. To do this, you can resort to using a wire wrapped in serpentine or rain. The most suitable hairstyle for an angel, of course, will be charming curls.
Pippi - Longstocking

Does your girl have the opportunity to braid her pigtails? Put on a colored sarafan.
Braid two braids with ribbons of different colors. On one you can build a bow, and on the second an untied bow (but so that the pigtail does not unravel).
On the face very carefully apply large freckles.
You put on long, striped stockings of different colors on your legs, and a toy monkey in your hands.
The image is ready.
Snake costume - a symbol of 2013

The upcoming 2013 is the year of the Snake, so the snake costume will become the most relevant at the New Year's celebrations. We suggest you try to make a snake costume with your own hands.
How to make a snake costume with your own hands - step-by-step instruction.
(information provided by the site 2mira.rf)
Step 1. We prepare materials. Buy green fabric. For a snake costume, it is better to choose a fabric that stretches - it will fit better on the figure. You will also need: red fabric or felt for the snake's forked tongue, yellow or white fabric, and black oblong buttons (all of which will come in handy for creating the snake's eyes). Oblong snake pupils can be simply embroidered.
Step 2. We carry out basic measurements. We take measurements from the future owner of the snake costume. We need to know: the diameter of the child's head, the height of the head - from the top of the head to the collarbones, as well as the height of the child (based on the height, we can calculate the length of the snake's tail).
Step 3. Getting ready to cut out the suit. Fold the fabric in half.
Step 4. We create a pattern: a hat and a tail. Mark the silhouette of the snake costume on the fabric. In fact, we should get a deep hat with a long tail behind. The window for the face can be cut out immediately, or you can leave this work for later.
Step 5. Shape the suit. We sew the head of the costume along the edge - we get a hat. Trying on a suit. If it sits well, you can sew the edges of the snake tail, and then stuff the resulting pointed “sausage” with synthetic winterizer. The tail of the snake can be left unsewn (then it will lie on the back like a narrow cloak).
Step 6. We finalize the details. After the main work is done, it remains to finalize the details. Cut out the snake's eyes and tongue from fabric or felt (you can also use fleece). It is better to attach them to the costume when it is put on the child. So you can arrange the details in their rightful places: the tongue is above the child's nose, the eyes are above the eyebrows.
Step 7. Decorate the costume. If desired, the snake costume can be decorated with sequins or made of shiny material. You can run a chain of black diamonds along the back (cut the black felt into squares) - this will remind you of snake scales.
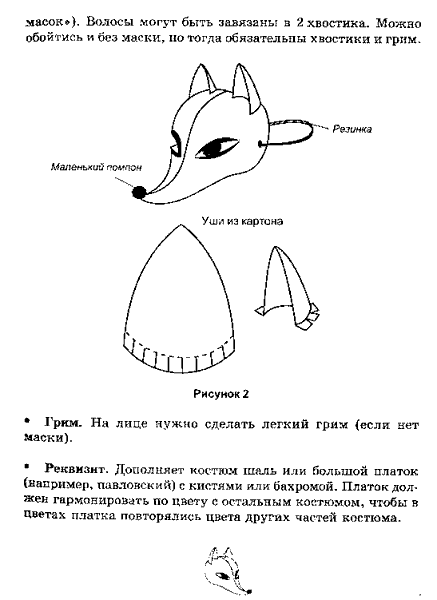
Suit "Fox"


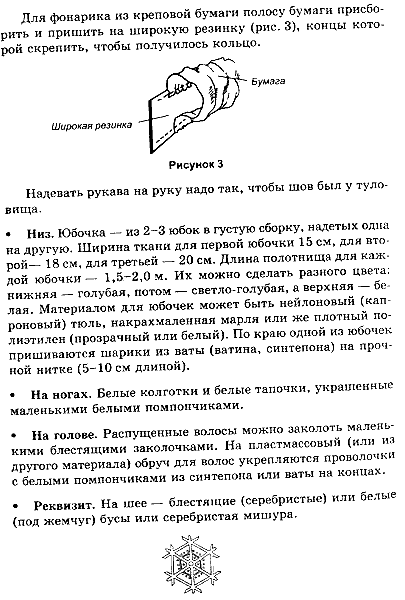
Suit "Snowflake"

Suit "Asterisk"


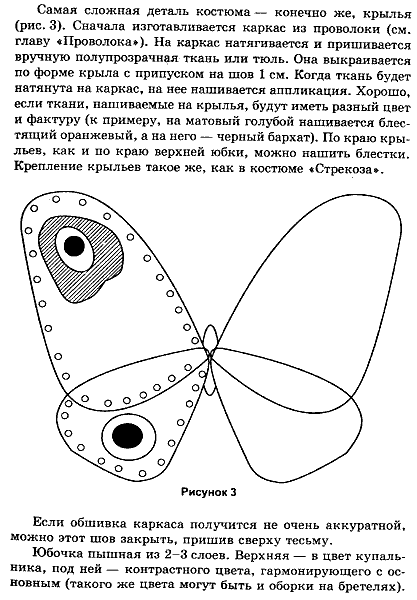
Suit "Butterfly"


cowboy costume

There is nothing easier to make a cowboy costume for your son. This image among boys remains popular to this day.
So, we take a suede fabric and sew a vest out of it (or take a ready-made one). Now on the vest you need to make a fringe. Take a light shirt, preferably even white.
Jeans choose quite well-worn and frayed. We tie bright neckerchief. By the way, you can also attach a fringe to jeans.
The easiest way to buy a cowboy hat is in a store or borrow it from friends if you don’t have one. We complement the image with suitable shoes and accessories: lasso, cowboy pistols.
Costume "Indian"


Suit "Mushroom"

universal choice gift ideas for any occasion and occasion. Surprise your friends and loved ones! ;)
Hello everyone! Skoreva Nastya is in touch and today we will learn a few interesting ideas how to make your own Halloween costumes.
Halloween is coming soon - on the night of October 31st to November 1st. And many celebrate it with might and main (this is especially true for English lessons and youth parties). Both those and those need bright and original ideas for unforgettable images
Of course, not everyone has the opportunity to purchase a cool suit in the store. Still, the price tags for festive attributes leave much to be desired there. In addition, it is likely that you will need a suit once, and then it will gather dust in the closet as Wedding Dress(for which, by the way, this is quite appropriate: a turning point in life, after all).
Today I will show you such options that can be easily implemented at home and at the same time use the created outfits for other purposes in the future.
There are ideas for both boys and girls.
TOP of the best Halloween costumes in 2019-2020 do-it-yourself for girls with photos
We'll start with women's suits for Halloween, as they like to dress up a lot more than the guys. There will be both classic and very extravagant outfits.
Nurse
A budget idea for a cool Halloween outfit. You will only need a nurse's uniform (you can buy it both in specialized stores and in shops for renting and selling festive costumes). A hat, an abundance of syringes and fake blood will complement the image.
Maybe you want to take a swing at the image of the nurse from Silent Hill? This will be a little more difficult than the previous option.
For a doctor's assistant, you will need to wrap your face with an abundance of bandages soaked in tea leaves.
In detail, the components of the image look like this: a simple nurse uniform, a lot of bandages and tea bags, and fake blood (sold in specialized stores). Soak the suit with bandages in tea leaves and add some fake blood. Wrap your face with bandages, leaving holes for breathing and vision.

A dead bride
It will be more difficult to create such a now popular bride's corpse costume, but it is quite possible to make it at home. Stock up on blue makeup tinted shampoo or a wig and an outfit resembling a wedding dress. Its edges will need to be processed accordingly. Artificial flowers complete the look.


Do you want to move away from the image of the heroine Burton? Then you will be rescued by a beautiful evening dress and an abundance of makeup that creates the impression of a tired, beaten and very scary face.
Doll
Very simple and original suit, which is quite inexpensive to implement. You just need to take a dress simple cut, white stockings and apply makeup that mimics fatigue and soreness. An abundance of bows, toys and long eyelashes are welcome. The party look is ready!


A vampire
In a vampire (or vampire) costume, the main thing is to observe the “dress code”: a large number of black things, a mask, gothic jewelry and defiant makeup. For Dracula, you can also make up the face with light shades. Small fake fangs and red lenses will also come in handy.


Nun
For a nun, take a simple festive dress (you can even buy for the occasion). Complete it with a white homemade collar and headpiece. The latter can be made from a white border of fabric and a long piece of black fabric sewn to it. Unusual image more suitable for adults.


Death
Absolute freedom for creativity! Don't forget to wear matching jewelry, like the one below. It alone will already make you the queen of the holiday, even if there is no costume specially made for this occasion.

Harley Quinn
Take a close look at the components of a cool Harley costume that is worn for Halloween. Much of this can be made by yourself or purchased in specialized stores.

If you simplify the image of the heroine, then you can get by with black leggings and ankle boots and generally use styling.

Fairy
Let's not forget the cute costumes. Such an outfit can be made from improvised materials. For example, if you stock up on artificial ivy, then from ordinary sandals you can make beautiful unusual shoes for a forest dweller.
For a suit, take a long piece of transparent fabric, a base (tight cord) and a hem under the bottom (thin blouse). Lay a cord along the neck of the blouse and tie many strips of fabric next to each other, pressing them tightly together. Don't forget the wings and wand.
Fallen Angel
What is the main element of an angel? That's right, wings. That's what we're going to create today.
Prepare feathers, thick cardboard, glue gun, white paint, a wide satin ribbon, newspapers, scissors and a brush.
All you need to do is draw and cut out a suitable blank from cardboard (it should consist of two parts). Then glue some newspapers on top to make the wings look more natural.
After both parts are finished, glue them together and wrap with tape. From the tape, make fasteners that can be tied (in the master class with a photo, the possible location of the tapes is also shown).
These wings can be worn with any white dress, and it will become a full-fledged angel costume.

Witch
For the witch, you will need a couple of old t-shirts, scissors, thread, a small plastic cone, black felt, and assorted decorative items.
Cut the black t-shirt according to the photo. But from green in combination with black, sew a decorative strip, make cuts on it.
Sew the center wedge back. Trim the sleeves and make numerous cuts on them. Sew the updated sleeves onto the old T-shirt. Decorate with ties. Everything!

For the hat, cut out a circle of felt with a hole in the center. Then make a cone (fold part of the circle) and attach on top. Decorate as desired.
By the way, an original and unexpected accessory would suit such an image. For example, an unusual mask. Among all the witches, you will definitely be the most unusual with her

A more playful and light version can be built using cardboard and corrugated paper. As a base, take a headband or hair clips.
Maleficent
The true story of this unfortunate fairy has touched many. And the image invented by the authors inspires to transform into this heroine.
clowness
A flirtatious look for real ladies.

Little Red Riding Hood
A light dress and a couple of discreet accessories are all you need.

Cartoon or anime heroine

Black catwoman
The most time consuming costume, but it's worth it
So what do you need?
For ears:
- artificial fur main color;
- fleece for the inside of the ears (preferably pink, white or black);
- a piece of long-haired fur;
- wire with a diameter of 3 mm for the frame (you can take any, as long as it keeps its shape);
- threads;
- hair clips (it is better to choose the most similar to the color of your hair);
- wire cutters.
For the collar:
- leatherette (artificial leather);
- decorative gum (see photo);
- rhinestones (a few dozen, depending on the girth of your neck).

For paws:
- artificial fur;
- fleece for pads;
- lining fabric for the wrong side of the legs (fleece can also be used);
- linen gum;
- safety pin.
For the ponytail:
- faux fur (the width should be equal to the estimated length of the tail);
- satin ribbon;
- decorative metal ring (or wire for such a ring);
- bell;
- brooch attachment (sold in fabric stores, see photo).
Additional materials:
- synthetic winterizer;
- bells;
- metal rings (they can be created from wire);
- scissors;
- pattern paper;
- pencil;
- glue "Moment".
Ears
- Copy the ear patterns. The height should be approximately 7-9 cm.
- Now transfer the pattern in two mirror copies to faux fur and fleece. Do not forget about the seam allowances (about 0.5 - 1 cm)! Sweep and then sew the ears on sewing machine or manually.
- Take the wire and attach it to the ear, cut, focusing on the resulting length with a small margin, and wrap the remaining tip around the other. You will need about 40 - 45 cm.
- Turn the ears out and insert the wire frame inside. Sew the edge with a hidden seam, folding the edges inward. Give the ears the desired shape.
- From the inside, sew a piece of long-haired fur as in the picture. Drip a little glue on the middle of the edges of the hairpins and quickly press to the middle of the ears.

Collar
- Measure around the neck. From faux leather cut 2 pieces in size (2.5 cm x neck circumference in centimeters), and cut the same amount from decorative elastic. Rubber bands may or may not be used.
- Cut two pieces of satin ribbon about 15 cm long, burn the edges so that they do not crumble. Spread the elastic and the edges of the tape well with glue on both sides and put it between two pieces of leatherette. Glue on the rhinestones.

Paws
- Print the patterns. With raspberry lines on the first pattern, I marked the places for sewing on the pads. Transfer the templates to the fabric and cut out, leaving 5 - 7 mm for the allowance.
- At the bottom of the legs, you must leave 1.5 - 2 cm for bending and inserting the elastic! This applies to both the main parts and the lining. After the parts are cut out, sweep, and then sew together two parts of the outer, fur layer, and the wrong side, fleece for each foot.
- Now turn the wrong side for each foot and put it on the main parts that have not yet been turned inside out and sew the edge with an overlock stitch by hand or with a zigzag on a sewing machine.
- Without turning the entire workpiece, overcast the edge of the paws so that it does not crumble. Turn the edges of the legs under as shown in the illustration and sew 5 mm from the border. On the side in one place, make a small incision to insert the elastic.
- Cut the elastic band so that the wrist is comfortable + a small margin for stitching.
- Pass a pin through the cut off piece of gum and pull it through the hole left until the pin shows up from the opposite end. Pull the pin, sew the ends of the elastic.
- Turn out. Let's start with the pads: sew all the pads along the edge with a “forward-needle” seam, and then pull it off a little and stuff it with padding polyester. Fasten a little with a few stitches.
- Drag the largest pillow with a thread in two places. Sew the pads to the paws with a blind seam so as not to snag the inner lining. Everything)
Tail
I made the length of the tail about 80 cm, but it can be shorter.
I don't recommend doing too much. a long tail, because turning it inside out will be sheer torment. To achieve the desired length, simply extend the pattern by continuing the straight lines.
- Cut out the tail as shown below. (The side without a seam is the fold line.) Leave allowances.
- And now sew, folding in half, and leaving an opening for eversion. Now slowly turn it out while stuffing the workpiece. Sew up the opening with a blind or overlock stitch.
- It remains only to sew on a brooch mount and decorate the tail with a ribbon bow with a bell (optional).

Other kitties
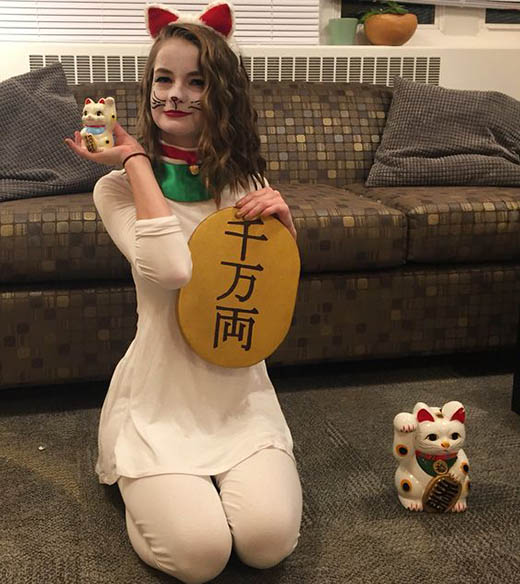
An unusual idea would be a Maneki Neko costume or a thief cat. Try on the image of the Cheshire cat.


For pregnant
Nevertheless, this beautiful female state imposes some difficulties in choosing a costume. On the other hand, you can pay attention to more daring and extravagant options.


Couple Halloween Costumes
For a couple (or even for a whole family), it’s much more interesting to come up with costumes with your own hands, because it’s very easy to create monjo. unusual composition. For example, a family of bees.

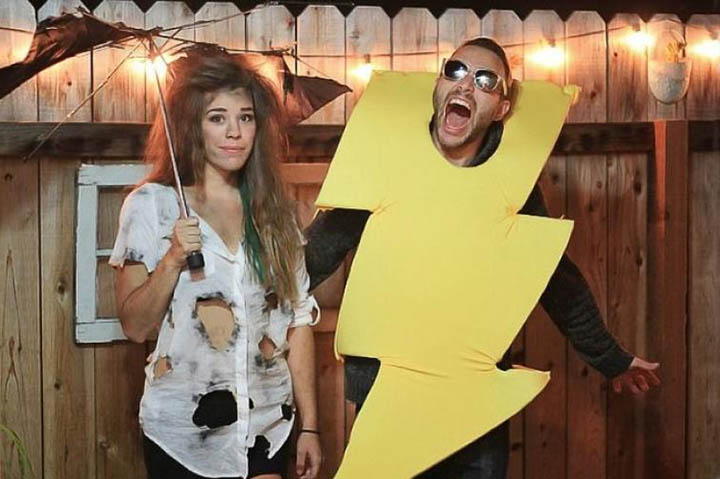
Lightning and its victim.
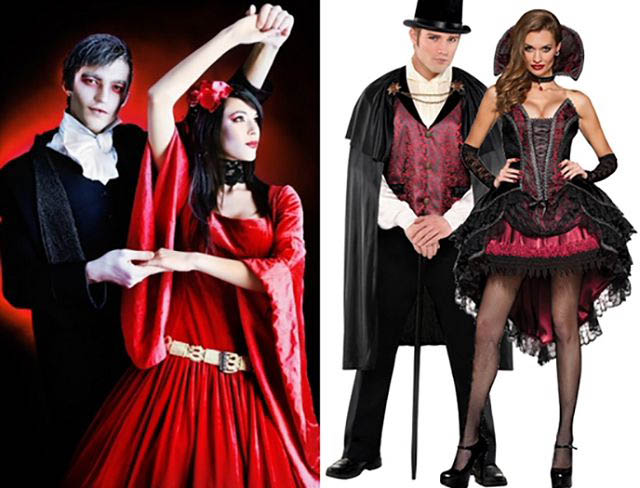
Dracula and his vampire.
And a couple of robbers are generally beyond praise.

Well, everyone's favorite clowns after the sensational film "It".

Men's costumes for the holiday
For men, aesthetics are not as important as the fear of the public. From here we will push off.
Zombie
The main element for zombies is definitely a make-up. For it, you will need a package of face paints, matte black eye shadow and a marker.
The process of creating a terrible image, see the photo.
This makeup is suitable for a skeleton, and for a zombie, and for a vampire. For zombies, I would also recommend applying numerous bruises with red lip gloss.

Mummy
Surely everyone knows classic version mummies with wrap toilet paper. But you must admit that such a very short-lived option can easily ruin the whole event, even if it doesn’t rain (suddenly knock over a glass on yourself?))
To create a more durable costume, you will need: white cloth (bandages are fine), some safety pins and some black (or gray) dry pastel and hairspray.
The creation process is ingeniously simple:
- Cut the fabric into long strips about 8-12 cm wide and the length you need.
- Remember and rub the material in your hands, if the fabric is loose, then pay special attention to the edge.
- In some places of bandages or fabrics, rub it properly with fine dry pastels. This is necessary for the effect of aging bandages.
- Spray it on with varnish so that the pastel doesn't rub off.
- Wind the fabric in the right places and pin it with pins so that it does not fall off.

To complete the effect, you can also apply makeup, but more on this in the paragraph about zombies.
Skeleton
For him you will need black clothes. It can be a dress, and dark jeans with a T-shirt, or just black long pajamas.
Consider two options for creating:
Option 1: In addition to clothes, prepare bone patterns (you can draw it yourself), a pencil and acrylic paints.
Option 2: Again, you need patterns, a pencil. But instead of paints, prepare a few pieces of white felt (you can buy it at any fabric store). Also, do not forget to take scissors and white thread.