Step-by-step weaving pots for macrame flowers. Weaving pots in macrame lessons for beginners
Many craftswomen ennoble their nest thanks to hand-made crafts. Everyone loves comfort and peace at home, at a party. Therefore, a flower pots made using the macrame technique for flowers can help to enrich your interior for the better.
As you know, the macrame style is quite common among DIY crafts, so it will be easy and simple for you to create your little masterpiece without leaving your home and with a little patience and time.
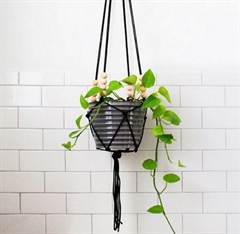
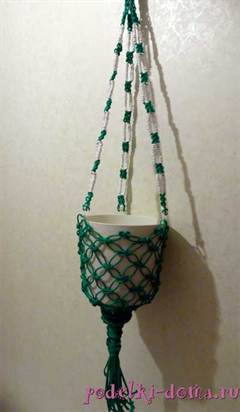
Not every person has a dwelling size that can accommodate a hanging pot or a bulky craft. But there are many alternative ways out of this situation with a small workspace in your living space. In the photo below you can see a compact and beautiful macrame planter for a flower pot.  The threads for your craft can be lengthened. Depending on how long you need the craft. The easiest way is to combine the material that melts. If your threads are not as flexible, then you can tie them.
What will be the material - only your choice. It all depends on your desire and imagination. Of course, it's good if it is not easily soiled and durable. This will improve its performance. The material must be malleable. If you want to get a clear pattern, then you must weave the planter tightly enough. Basically, the future macrame planter created for flowers is solely your choice.
We make pots using the macrame technique for flowers with our own hands
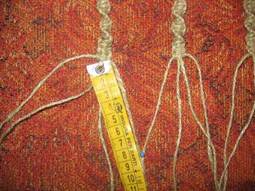
You will need:- Material - threads, about 20 - 25 meters.
- Scissors
- Working surface
- Pins or fasteners for paper
As you know, one of the common knots is double flat. It is not only simple to perform, but also beautiful. It consists of two simple nodes - right and left. Schemes for performing such nodes will not be difficult for a novice craftswoman.
Today, macrame is often used to decorate rooms and give them a more solemn look.
Initially, macrame was called knot weaving. And only in the last century they began to call the capacious word "macrame".
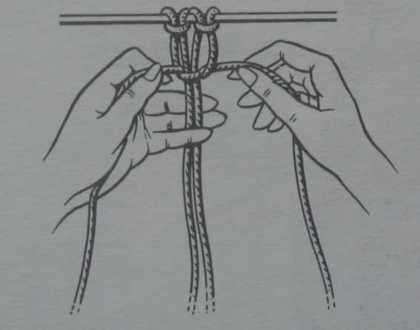
We fasten on the thread support. They must have 4 ends. We put the right thread on top of the left one, which in turn is located across the warp. We form a loop from the left thread. Pull the end of the right thread under the base. We stretch it into a loop from the left thread. Slowly pull on the outer threads and a knot is obtained. In order to weave the right-side knot, we do these operations in reverse. Having tied these knots, we get a double flat knot.
Thus, continuing weaving, you get a support tape for the planter. When the support tape is ready, take it as a base for the pot. How to knit a flowerpot will be clearer if you have a pot at hand. So it will be easier for you to navigate what size your macrame planter will be. There are many knots in the macrame technique. It will be useful to study the instructions for making some of them. For example, the "Josephine" knot will help to continue the craft.
When you decide on the choice of the knot you need for your craft, tie it around the pot. Secure your garment with a tight knot under the bottom of the flowerpot. If you still have some thread, trim it with scissors and possibly fluff it up. 
The flowerpot is common as an interesting interior detail. It can serve as an unusual decoration.
To make such a decorative craft with your own hands, you will need:- White cord
- Glass vase
- Scissors
- Scotch
- Artificial daisies
We collect 8 strands and bend them in the middle.
We wrap them with one more thread and fix them.
Cut the thread with which we wrapped the collected cords.
We divide a bundle of threads into 4 groups, in each of the bundles there are 4 threads.
We carry out weaving with a double-sided knot.
Tie the ends of the thread, cut and secure with a lighter. It is possible to design the tips with a brush. Clip the vase into your new planter and place decorative daisies inside the vase.
Video tutorials at the end of the article
You can find how to make macrame pots with your own hands in the following videos - lessons and master - classes:
See today macrame pots as easy as in the distant 70s of the last century, and, moreover, to be seen not only in the offices of budgetary organizations and in the apartments of old grandmothers, but in catalogs of fashionable decor and modern interiors. It turns out that fashion, again, as often happens, has made a sharp turn, and, made using the macrame technique, is again at the top of popularity. Isn't this a reason to learn this interesting needlework so that you can organize fashionable vertical gardening at home.
Macrame planter for flowers
In the sense that we are used to putting into the word macrame, it is a technique of weaving from many knots, simple and complex, which as a result create patterns on the canvas. In this case, silk, smooth laces are most often used, on which these same knots are obtained best. The only drawback of such macrame planter for flowers performed in classical technique, just that their appearance just very much traditional, does not fit with modern trends. The main thing in an effort to master such a knitting technique is not to overdo it in the complexity of the pattern, because the simpler and more concise the fake, the more fashionable it will look.

It seems that the appearance of old patterns of weaving pots macrame and was conceived to close the not-so-attractive flower pots that were ubiquitous back then. Until now, such samples, in which not only the pot is not visible, but even the plant itself is somehow lost, can be seen in some interiors, which somewhat spoils the reputation of the ancient oriental art of knot weaving. Today, as they say, the industry works great, and there is no problem in finding the very perfect pot that would fit well into the interior of any style and any colors... Convenience and practicality of vertical gardening comes to the fore. It is enough, after all, the fasteners in the ceiling or wall, to which the wicker is suspended, and you can hang pots with plants on it, while freeing the window sill, for example, to organize an additional corner for reading on it. That is why in the vast majority of the examples that we have selected for you today, there are no very complex loops and schemes, everything is limited to the standard set, which is studied literally in the first lesson in macrame. Instead, auxiliary materials are actively used, which make it possible to transform the standard technique, breathe a new trend into it - these are wooden, glass and plastic beads, leather laces, metal fittings, wooden sticks other. Each example of a new type of pots will prove to you that the thing is not at all alien, but, on the contrary, fits perfectly into the concept of hand-made and eco-design.

Weaving macrame pots
Options for schemes and varieties weaving macrame planters there can be many, but in most cases you will need a basic knowledge of knots and loops to make them. You can fully find this in specialized literature, since there are plenty of materials devoted to this ancient art to date. This technique will be somewhat different from science, even despite the somewhat similar end result, because in this weaving you do not need a special tool, just the thread itself and additional decor are enough.

In the pictures you can see the most basic schemes and types of loops that you can use in your work. After you learn how to make them, you can not only easily read the schemes proposed by the masters, but also design the original ones yourself. macrame-weaving patterns for flower pots... The main thing with which any work of this kind begins is the main knot, which is also called Herculean, it is on it that the entire main load is assigned to the severity of the flower pot, so it must be knitted with special care.

The main threads for weaving diverge from the Herculean knot, the number of which is better to choose an even number. The work will be somewhat similar to reproduction, which also expands to the sides from the neck. So, in order for the pattern to begin to fold into a volumetric figure, it will be enough to knot two laces from the existing ones, and then connect the laces of two adjacent pairs even lower. The easiest way would be to demonstrate such a suitable macrame pots scheme with an example to make it more clear how simple knots are knitted.
Macrame planters for beginners
So, the easiest way to learn macrame for beginners - pots on eight laces. This is not only a very simple, but also a very effective product that looks the most advantageous among its kind, in a set. Since the knots that will be tied in this case do not even belong to knots of medium complexity, there will be no special requirements for the choice of material, it just has to match your color, be convenient to work with, inexpensive, in a word, everyone is free to choose it for yourself individually. A good choice would be a knitted braid with the addition of elastic threads, it will stretch well, but it will also be strong enough to support the weight of even a rather large pot.

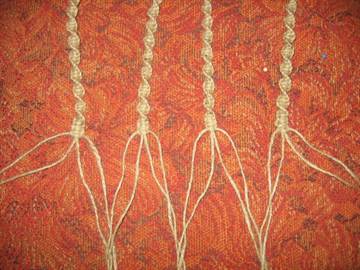
By appearance such a craft will slightly resemble a fashionable and sought-after accessory. To enhance the similarity, to fix the craft in the interior, we will use metal rings, with which it is convenient to hang the pots, say, on a chandelier hook on the ceiling. Cut a skein of knitted braid into eight identical pieces, each one meter long (in fact, the length is very conditional and will depend on whether you want to end up with a product so long in size, the length can be increased up to two meters), assemble them into bunch and thread through the ring, after that they are tied with a knot. It is necessary to mask the place of transition, to make it more attractive, for this we wrap our bundle below the ring with another additional piece of tape, fixing it at the bottom with a knot with another free tip. After that, we got a piece with a ring on one side, eight long tips and eight shorter tips. We carefully cut the short ones with scissors and let the long ones around them to hide the place of the cut, so that the tips diverge from the knot in different directions.

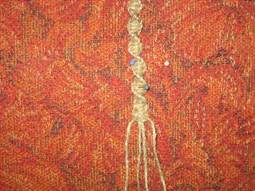
Now we start weaving, retreat from the knot about 5-10 centimeters and tie two adjacent threads in a simple way... You need to make sure that all the nodules are strictly at the same height. After that, take a bead through which a thin fishing line is threaded, attached under the knot, and fixed with another one from below. The same should be done with the other three lines. Then we take one tip from adjacent points and also tie them, supplying a bead in the middle. We get a decorative semblance of a string bag. You can make another row of such knots, and then measure them in size with a pot or a vase and find a place for that very Herculean knot - take all the ends and at the same time pull them into each other, pulling them tightly so that the threads do not disperse under the weight. For greater reliability, you can not leave tassels or fringes at the bottom, but make another row of knots decorated with beads.
Weaving macrame flower pots
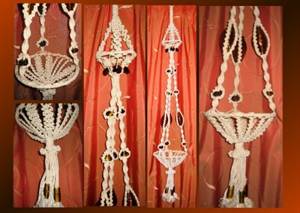
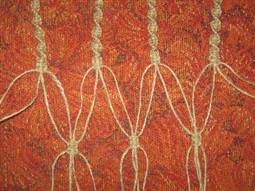
In the photo below you can see another beautiful option weaving macrame pots for flowers... More complex knots are already used here, and it is they that become the main decoration of the craft. It is possible in this case do without beads and other decor, highlighting just the accuracy and skill of weaving.


They are so good because the synthetic, nylon threads, which in most cases are used, are very resistant and perfectly withstand all atmospheric influences, they do not break under the weight of pots, under the pressure of a strong wind. But if such a super task in terms of strength is not in front of you, then for home use you can easily take natural materials, wool, silk, that is, what, from your point of view, will be most relevant in your interior.

A good idea for combining and weaving macrame is presented in the next photo. As you can see, you can not only put the pot inside, but also a large enough wooden platform that can withstand the weight of several plants, and can even become a convenient hinged shelf for the kitchen or living room. You can braid the proposed wooden blanks, and drill holes in them in order to thread the threads inside, at your discretion. Moreover, they are used in pots for flowers macrame scheme the most simple and understandable, since the task of the threads in this case is only to emphasize the beauty of the platform-stand, pots, and indoor plants that will exist inside such a pots.
Diy flower pots macrame
In the last section, you can see variations on the theme do-it-yourself flower pots. Macrame in this case, it becomes the basis, but with the help of auxiliary materials, the final result becomes completely different from the classic models.

For example, it is interesting to use leather straps of varying thickness for weaving. If thin ones can be tied to each other with additional fixation, then with thick ones this method will definitely not work, rivets will come in handy, which can be bought at any hardware store. It is enough to connect the two ends of the belt to each other and hit the rivet harder with a hammer, as it will securely fasten the resulting structure.

You will get a charming original if you use unusual shapes, such as metal tubes, inside which there will be threaded threads. If you do not have such tubes, then you can easily get out of the situation by painting the cocktail tubes with paint with a metallic sheen, and then use them for their intended purpose. It is also worth taking large, bright beads and combining them with light, monochromatic yarn, then such a neighborhood will look especially harmonious.
You will need
- - thread 40 m;
- - a ring with a diameter of about 4.5 cm (you can use key rings or eyelets for curtains);
- - scissors;
- - needles;
- - small elastic bands (stationery or for hair);
- - a pillow for securing the product with needles.
Instructions
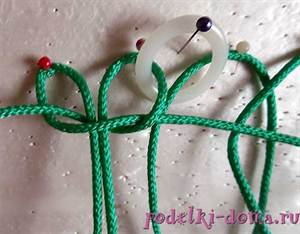
Preparation Cut 8 threads, 5 meters long. Fold the thread so that one end is 3.5 m and the other 1.5 m.Attach to the ring: put the folded thread under the ring, loop up, fold the loop forward, thread both ends of the threads into the loop and tighten.
Fold the next thread so that the first end is 1.5 m and the second 3.5 m. Attach to the ring in the same way. It turns out the order of the threads is as follows: 3.5 m - 1.5 m; 1.5 m - 3.5 m. To avoid tangling the threads during weaving, tie them with an elastic band. Internal (1.5 m) together, and outer (3.5 m) separately. Secure the ring with needles.
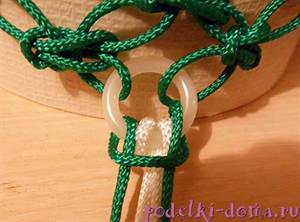
We braid "handles" "Handles" perform a flat single left knot according to the scheme. 3.5 m of thread by workers, 1.5 m of thread - knotted (Figure A). During weaving, the knotted threads are practically not consumed, and the working threads decrease quickly. IN left hand take the 1st working thread, bend it at an angle of 90 degrees, put on top of both knotted threads - 2 and 3 (Figure B). Right thread - 4th, put the 1st on top with your right hand and wind under two knotted ones (Figure B). With your left hand, pull the 4th thread from above the 1st from the loop that formed between the 1st and the knotted threads (Figure D). Tighten the knot by pulling the right and left working threads in opposite directions at the same time.
Continue to weave in knots under each other, they begin to twist with an edge to the right. When the cord has turned to you with an edge, twist it so that the left working thread goes to the right, and the right one goes to the left. Continue braiding with the thread on the left. The cord should be 50 cm long.
We proceed to weaving the "setting". Perform it with the flat single right knot technique. The technique is the same, but in a mirror image. Weave the right knot first, then the left knot, and then the right knot again. The planter handle is ready. Weave 3 more handles by analogy. Diagram for clarity.
Weave a basket Perform the basket with the flat knot technique. Start weaving knots from the left and end with the left - only 5 pieces. This knots are jumper. Place the cords at a distance of 4-5 cm, observing the order of attachment to the ring. Lay out the threads as shown.
Measure 8 cm from the cord to the jumper. Secure the measured place with a needle and weave a jumper. Weave 2 more jumpers. To the next jumper, measure 6 cm, also secure with a needle and weave two jumpers alternately. Now we connect the canvas into one piece. Weave one strap on the weight, keeping a distance of 8 cm. The first circle is closed. After 6 cm, weave two jumpers of the second circle. Take a look at the diagram.
Fitting and braiding Hang the planter and position. Use an elastic band to measure where the braid should fit. Separate all threads, and tie the braiding place with one. Cut off 50 cm of the rope. Fold so that one end is 40 cm and the other 10 cm. Attach the thread to the bundle, loop up. With a long thread, wind the bundle together with the loop from bottom to top. Make about 6-8 turns. Place the coils evenly and tightly. Thread the long end into the loop, and tighten with the short bottom end. The plexus should be inside the braid. Trim the ends carefully. Trim the tail to any length you like. The ends can be tied into knots, decorated with beads, or simply left on. The simplest techniques have been used to weave this planter. If you have ever tried to weave, everything will work out without problems.
Don't be afraid to get started. Remember, when you read it, everything seems complicated and incomprehensible. But once you start, and before you have time to look back, the planter is already ready!
Sources:
- Master class: Weaving pots
- how to weave macrame pots
If you have a lot of old knitwear lying around, then don't rush to throw it away. I suggest you use it in an unusual way- weave a pots for flowers from it.
You will need
- - knitted yarn;
- - plastic hoop with a diameter of 65 centimeters;
- - scissors;
- - hook number 8.
Instructions
First you need to make the basis for the future pots. From knitted fabric, cut 5 strips 1.3 meters long. Next, take one of the resulting threads, fold it in half. Then throw the thread over the hoop and make a loop through which you should push the ends knitted yarn- thus it will be fixed. The remaining loose ends must be tied on the opposite side. Do this with all the pieces of fabric. As a result, all the threads should cross in the center of the hula hoop.

Cut a strip from the jersey that is exactly 1 meter long. Fix it on the hoop, pull it towards the center, and then tie all the central threads with it. Weaving can begin. Through the warp threads, it is necessary to push a knitted strip from above, then from below, that is, in checkerboard... When you are finished braiding the row, pull the braid towards the center. Remember that the first 5 circles must be woven tight. Once you have done them, loosen the interlacing of the threads.

When you weave about 60 rows on the hoop, you need to tie a few more warp threads, otherwise the product will be loose and fragile. Therefore, you should cut another 5 strips, the length of which is 80 centimeters. Fix them in the same way as the first ones, only a little the other way around: first for the weave, then for the hoop. You can continue weaving. The number of rows will depend on the size of the future pots.

At the end of weaving, it is necessary to untie the warp threads from the hula hoop, then knot together in pairs. Just hide the ends that remain in the yarn.

It remains to make a suspension for the pots. To do this, crochet several chains of air loops of the required length. Fasten the ends of the chains obtained as follows: slip them between the weave for 20 rows, and then tie them to the warp threads. The planter is ready!

The art of weaving knots in Slavic culture was equated with pagan rites, because amulets and amulets were made using this technique. Nowadays macrame art has become not only fashionable, but also a practical hobby... Modern craftsmen combine weaving with decor from beads, rhinestones and semi-precious stones... Let's try to master this interesting technique on our own.
How to make macrame according to weaving patterns
Acquaintance with macrame weaving patterns for beginners
Not only panels and hammocks can be weaved using the knotted weaving technique. Craftswomen create earrings, necklaces, belts and lace to decorate items of clothing.
First you need to decide on the quality of the threads for weaving and take into account several nuances:

For work you will need a board or a book in the format of a landscape sheet. Some craftswomen attach the threads to a special tube or a small diameter barbell. But it takes some preparation to knot a canopy.
Preparation before work:

Now the first training knots can be weaved on this blank.
Macrame knots and patterns for beginners
A single flat knot consists of one loop. How to do this can be seen in the diagram.

The double flat knot is used for weaving - floss baubles - or other types of thread. Pay attention to the sequence of weaving: each next knot should be a mirror image of the previous one. Otherwise, the resulting flat thread will begin to twist in a spiral.


You can weave a rhombus from square knots, as shown in the diagram.

The number of nodes is measured in tens. We'll go over the basic techniques with the corresponding diagrams.
Knotted chain.

Chameleon knot.

Tatting knot.

On the diagram, you can consider and try others, no less beautiful techniques creating nodes.

Patterns of weaving panels on the wall using macrame technique (with step-by-step photos)
A wall panel is a great reason not only to practice the weaving technique, but also the opportunity to create an original thing for the interior with your own hands.
For the panel you will need:
- 10 threads, 5 m each; scissors;
- wooden plank 45-50 cm long (it will become part of the future panel).

Operating procedure:

Diversify home decor and create original decorations it is possible and with the help of flowers from beads.
How to weave a macrame belt (master class for beginners)
To work you will need:
- beautiful cross-fastening buckle for threads:
- silk or synthetic threads - 3 pcs. 10 m each;
- scissors.
Operating procedure:
- first you need to master the weaving of a double flat knot with a central thread (you can choose a different color for the central thread);

- attach the threads to the buckle, as shown in the figure;

- to finish weaving, use the "diagonal beaded bead" knot, as shown in the diagram;


This technique can be used to weave a watch strap.


Pattern for weaving macrame for pots (step by step for beginners)
Diy weaving patterns for macrame flower pots are diverse and popular among craftswomen. Someone weaves a pots from the top edge, someone starts weaving from the bottom. Let's look at simple schemes for beginners.
For work and training, you can use threads cut from old colored T-shirts... How to make such yarn can be seen in the photo.


Scheme for weaving pots from below:

To work you will need:
- 8 blanks of threads, 2-3 m each (depending on how high you plan to hang the pot);
- flower pot; scissors.
Operating procedure:

According to the same scheme, you can weave the pots, starting from the top. To do this, you will additionally need a thread attachment ring. The lower part can be tied with a common knot and make a second tier for the second pot.


Here are some examples of interior decorating using simple planters.


If you have a ready-made planter, but no fresh flowers, you can do it yourself — bead trees—.
Many practical and sophisticated things can be created from knots. Designer jewelry is highly valued, and the abundance of blanks for jewelry and decorative items in handicraft stores will allow you to create original pendants and earrings. Original —beaded bracelets— will be a worthy addition to the set.
To get started, you can practice on simple patterns and weave, for example, a keychain. For additional clearance you you will need large beads, a key ring and multi-colored cords... How to do this can be seen in the diagram.


Handicraft shops are a separate universe, once in which it is no longer possible to leave without a purchase. - Beaded brooches - look refined and elegant, because no one else in the world will have such brooches.
Pendants and necklaces can be made from any materials at hand. Lace, multicolored threads and cords, multicolored beads and openwork ornaments are used. The order of work and the diagram can be seen in the photo.
Video with a step-by-step macrame weaving workshop for beginners
- A macrame owl in the form of a keychain can be your friend, and simple circuit weaving will help to weave it in one evening. For the owl's eyes, you will need some large beads. Check out other ideas — beadwork — and you might find some new inspiration for yourself.
- The technique of weaving a glamorous leash and collar for your favorite macrame dog is shown in a detailed master class. In this way, you can please your four-legged friend with your skills.
- The video shows detailed master class on weaving bags using macrame technique according to a simple pattern. A detailed story about the choice of material and additional tools that you may need in the process.
Write how you liked the idea of weaving original jewelry macrame? Any comments will be welcome.
What is a planter? This is a decorative container in which a flower pot is placed. Thus, you can hang the plant, and at the same time decorate the pot. You can make macrame pots for flowers with your own hands. Step-by-step instructions will help you figure out how to do this.
Let's start simple
What you need:
- 3 strands of 4 m white cord;
- 3 strands of 4 m and 18 of 4 m green cord;
- 3 small rings;
- 1 large ring for fasteners;
- Pins;
- Scissors;
- Flower pot.
You need a flat surface of 60 × 60 cm for weaving. Fold 18 segments in half and pin them to the surface, every 3 cm. Fasten the rings in 3 places, as in the photo.

Weave a double flat knot.

Tighten loose ends. Also weave knots on other ropes. Then arrange the nodes in a checkerboard pattern. Leave the last two ropes free.

Remove the pins and wrap the pot with the blank. Continue to weave in reverse order, completing the rows. At the bottom of the pot, weave flat double knots tighter, the ends of the segments should be closer to each other.

Bringing the knots closer, tie several rows with rep knots. Gather loose ends and weave several double flat knots, one after the other.

Fasten the segments and trim the ends. Tie white and green ropes of 4 meters on the rings.
Tie 3-4 double flat knots from the green segments.

Take white ropes and wrap the green ones evenly.

Again weave 3-4 knots in a row. Alternating between these methods, bring the handles to the desired length. Connect and attach them to a large ring. The excess must be cut off. The planter is ready.
Second option
Other patterns of macrame planters are considered here.
Cut 8 strands of 5 m each.Fold so that one end is 3.5 m and the other 1.5. Attach to the ring. To do this, you need a folded thread, put a loop up under the ring, bend it forward, thread it into the ring and tighten.


Fold another thread, first 1.5 meters, and then 3.5 m. Attach the same as the previous one. You get the following order: 3.5 - 1.5, - 1.5 - 3.5. To make it easier to weave, wind up the ends and secure with an elastic band. On the edge, 3.5 separately, one and a half together.

Fasten the ring to the pillow with needles. Now we need to weave the handles. Use the left flat knot to knit.


Threads 3.5 - working, one and a half - knotted.
Tie knots one under the other. They will begin to turn, do not interfere with them in this. When the cord unfolds with an edge, tighten it, as in the photo.

Weave in this way 50 cm and fasten using the right flat knot.

Weave: right - left - right knots. One pen is ready.
Also weave 3 more pieces. Now it's the turn of the basket. Make it from flat knots in groups. The group consists of left, right, left, right and left nodes. You can call them a jumper.
Place the laces at a distance of 4-5 cm.
Measure 8 cm from lace to bridge.
Pin this place with a needle and weave a jumper.

So 2 more things.
Now measure 6 cm, fasten and weave the first and second jumpers.

Attention! Connect the blank panel. Maintain a distance of 8 cm and weave the canopy, closing the circle. Then 2 jumpers of the second circle with a distance of 6 cm.