String Art Templates. String Art Master Class for Beginners
To learn String Art is simply, and the possibilities are almost endless! In our review - the story of String Art and all about how to start it.
String Art: History and Modernity

This kind of hand-meid of art lies in drawing threads - stretched on the carnations on the board, threads form a picture. "String" translates from English as a "string" or "Rope", another unusual view of the needlework is called "Way": from "Image" + "Thread".
There is no single opinion on how this type of art appeared. According to one of the versions, I was invented by English weaves in the XVII century. They created openwork ornaments for the house with the help of dug, threads and nails.

Several centuries passed, and in the middle of the XIX century a semi-forgotten way of working with thread revived Mathematics Mary Everest Bul. She found original way Demonstrations of their students to build geometric shapes. For classes, she used a small board with nail nails, on which triangles, squares and more sophisticated figures.

The first person who wrote his name in the history of String Art as Hand Made Art, became American John Eichnger, Chief Designer of Open Door Company (Los Gatos, California). Discarding in the "geometric" technique "the pictorial" potential, Eiefher began to create pictures on the skirts with the help of threads and nails. In his work, the designer appealed to the eastern art of the mandala (sacred symbolic and schematic image from Buddhists), noting that the lines of threads stretched on nails can form similar patterns. The mandalas created by Eichlenger since 1972 were distinguished by the grace, unique optical illusions and compliance with the laws of mathematics - to all of them, they were very beautiful. The designer had followers - in practice it turned out that in the technique of String Art, it is possible to "draw" not only symmetrical, but in general any pictures.

John Eichhenger work
Today in String-Art, three main directions are distinguished:
Creating abstract paintings and drawing geometric shapes;
The creation of asymmetric artistic images (portraits, landscapes - in essence, any pictures);
Volume drawing threads.


We master the basis of String Art
You will need:

Wooden plate (a piece of chipboard or a similar material is also suitable, which is easy to score nails, most importantly - so that the board is enough thickness);
If desired, paint, a veil or other coating for the preparation of the board (you can make a picture and on a clean board);
Nails with a hat, the length of the nail - 1-2 cm (can be slightly longer, it is important that the tips of the nails do not get out of the offline);
A small comfortable hammer;
Durable threads for creating a picture (for a start, the "iris" is suitable or not too thick and fluffy threads for knitting, you can use sewing threads, Moulin and so on);
Pencil or marker for applying markup on the board;
Pliers;
Scissors;
Pattern pattern (copied, printed or created independently).


Technology for creating work in the Street Art technique:
1. Preparation of the foundation (plate, if needed, trimming, sanding the edges, if you wish, paint and so on).
2. Transfer of drawing based on the layout of the arrangement of nails.
Hobbies - a way of self-expression and every handmakeker chooses a hobby, which becomes a reflection of his relationship to the world around. In an effort to make this world is better, more beautiful than the kinder, experienced and beginner masters with their own hands from the primary materials create real masterpieces. The unique works of art can be called pictures and panels made from ordinary nails and threads in the technique of String Art. Using threads different colors And the shades, the masters create uniquely on the beauty of the canvas, showing fantasy and not spending significant funds for the purchase of materials for work.
Having mastered the technique of String Art, create pictures that are particularly attractive. Bright, voluminous, multifaceted. This is a great opportunity to make it yourself. original gift Friends, relatives and loved ones for any holiday. Products made in this technique are full elements of the decor. They do not just decorate and complement the surrounding space. Pictures and panels help create homemade comfort, deliver joy, raise the mood.
Pictures of threads and nails made on a dense basis is not only decorative panels.
Having mastered the technique of String Art, you can do it yourself:
- postcards;
- covers for albums;
- bookmarks.
In essence, String Art is a kind of weaving by threads that are fixed on nails. Another name of this method of creating decorative panels and paintings - native graphics.
In this way on a solid base, which uses a dense cardboard or a wooden plate, create a volumetric image. If a lot of holes are made in the cardboard or a tree with a rough surface, through which stretch the threads of various colors and shades, then we are talking about is a mode.
In cases where the threads are used for fastening the nails, the technique of creating paintings and decorative panels are called String Art. Nails can be replaced with special hooks, and colored threads - rope, fishing rod, a kapron cord. In this way, not only drawings, but also inscriptions, patterns, ornament are made.

Qualified psychologists recommend to teach the hend-meid of children, starting with 3 summer age. While working on the picture or pattern, the young Creator is formed by the concept of corners, abstract thinking, fantasy and small motility develops. The child learns, remembers the directions (up, down, left, right), meets the concepts of circumference, height, chord, middle. Top, edge. It makes String Art not just a fascinating type of creativity, but also very useful, developing.
The thread chart can be a scene and subject, artistic and graphic. Any image is characterized by a high degree of realism and originality. The novice master is enough to know how the circle, angle or arc is filled correctly.
During the work, the ability to control the level of thread tension and the correct intersection.
Those who take care of the picture in the technique of String Art for the first time, there is no need to independently invent her plot. To find the required skills will help ready-made patterns, the use of which facilitates the learning process. Handmaker need to pay all attention to the correctness of the interlacing to fill the corners qualitatively, arc and circle.

It is the patterns that will help master the basic techniques of String Art.
The number includes filling and forming such elements as:
- a circle;
- circle;
- angle;
- arc.
These knowledge and skill will help perform a wave-like relief, a complex pattern from the threads of different colors, filled out figures with contrasting edging.
Using the same template, you can make several different patterns, filling the threads of one color all the elements using threads of different colors and shades, of various quality and diverse thickness. In another embodiment, the main arc is, in the other - a wide circle or ring, the drawing remains empty, and the threads will turn the entire free area of \u200b\u200bthe base, driven nails not only along the image contour, but also throughout the perimeter of the plank or cardboard.

Before you start creating a masterpiece. It is necessary to prepare all the tools and materials that will need a master while working on a picture, a postcard or decorative panel. But first should prepare a workplace.
To solve this problem, it should be approached, thoroughly thinking all the nuances:
- Lighting.
- Place and method of fastening the base.
- The table and chair corresponding to each other.
- Stand or shelf for storing tools and materials.
- Garbage container.
It is impossible to perform work without preparing a convenient tool. In the process of creating even a small picture of the picture, it will have to score with maximum caution to the hard surface of the base of nails, so it will take a light hammer.
The master of the master should not have a significant tension, which means a large, heavy tool cannot be used.

Wooden varnish will be needed to prepare the working surface. Accordingly, it is necessary to take care of the purchase of high-quality brush that is not losing a bristle in the process, and a sufficient amount of solvent for cleaning the brush after the completion of the preparatory work.
If the child is performed, the foam or cardboard is used as the basis. Materials are light and comfortable. Polyfoam does not require additional coating. As for the cardboard, it is possible to make it more brighter using a water-based simulat.
In order to transfer the template (point drawing, sketch) to the prepared surface of the base, you need to stockpile paper. Pliers (Pasal) will be needed in order to hold or remove nails. Scissors will trim the ends of the threads whose quality depends on the features of the future image.

Coil sewing threads are used when creating lightweight, air plexuses, Iris will help make a bright picture, a kapron cord is necessary to create graphic drawings. With the help of the fishing line make the background when working on the plot web. Threads choose quite long and durable. It is impossible to bind torn in the process due to a strong tension. Nodules on the finished product should not be.
Easy the process of pulling the threads, make it more convenient to help the ballpoint pen will help. It is enough to remove the rod, make a hole in the cap and stretch the selected thread, which will be used during operation.
Learn how to make a significant decorative panel or small greeting postcard In the technique of String Art may have anyone.
To do this, it is necessary to master the main techniques, including filling and formation:
- Circle.
- Corner.
- Circle.
- Arcs.
Oval, wave, rectangle. Square or rhombus - additional, derivative elements that make it possible to make the image as realistic and complete.

Get certain skills will help the workout on filling figures drawn on the plank:
- On the working surface of the drawing angle, the length of the sides of which is 5 and 10 cm. Each of them is divided into 10 equal parts, mark the boundaries in which small carnations are driven. All points need to numbered. On the vertical segment, the numbering begins from the top point in which the digit is set 1. The top of the angle is indicated by the number 2. Further, the number 4 is written, and next to Two - 3, after 4 - 5. After 3 - 6. And so on, considering The direction of the thread and the movement of the hand with the filled handle (up - down, or to the right - left).
- To make a circle need to draw a circle. To do this, you can use lecturers or circulation. Make a hole in the circumference, the distance between which will be equal. Better if there are no less than 20-30 such holes, but the exact number depends on the density of the pattern (weaving) and the length of the circle. Points 1 and 2 are diametrically located. All other numbers arrange the same principle. As when filling the angle.
- The felive nails pattern in the form "8", create a clear outline of the circle.
- The arc is making numbers in the diagram (usually made in the form of a circle) points located at an equal distance from each other. The first thread is fixed at the point, which will be indicated by the number 1. From her, moving clockwise, 9 nails are counted and stretch the thread by wrath it around the latter, which will be marked with a number 2. The movement continues in one direction. Tensioning the thread by connecting point 2 and located below around the circle 3. From it stretch up the thread up to the nail, driven next to 1. It will be point 4. So continues until the thread returns to the point 2. The result is the right arc.
Studying examples of the stages of the product, one can notice patterns in repetition of movements. All of them are directed strictly clockwise on the principle of "there - back". Of course, stretching the threads can be carried out in chaotic order. This technique is used when filling in the inside of the pattern or to create a dense background, on which the image is immersed.

Self bright examples Ready works - Exotic flowers, two-layer drawings. Complicated graphic images. The thinner the working thread, the more interesting the result of the work.
With the help of black and white sewing threads, you can make a drawing, on which not only the central (main) figure will be highlighted, but the shadow falling from her.

The most bright and memorable are panels and plot patterns in which the action or a number of events are traced. There are several heroes here, each of which has its own characteristics and features. Such products are made using a plurality of large and small parts and only an experienced master can make them.

Multicolored threads, of which the complex patterns are woven by themselves attract the look, and flowers made of them, birds, butterflies can be called a real masterpiece.
Beginner handmakers are better to abandon the execution of such complex works and start with graphic patterns. For weaving it is worth choosing threads Moulin or Iris, which are characterized by a high degree of extensibility and strength.
Giving advice to beginners who created a sufficient number of paintings or decorative panels of needlewomen recommend to start mastering the techniques for filling the corners, circles and design of the arc. In the future, this will help without much effort to make interesting, intricate patterns or depict flowers in the pictures consisting of many elements of any form.
Today, a variety of directions of Hendmade received widespread. Unlike the usual knitting, embroidery or sewing, String Art is an unusual and interesting view of the needlework. With skillful use, simple nails and threads turn into luxurious three-dimensional paintings. Technique String-art is quite simple, therefore, it will be able to alter anyone.
String-art (stupid) is a variety of art in which various images are created from the threads and nails, simple or complex. Pictures consist only of smooth lines, but, despite this, volumetric drawings are obtained. At first glance it seems that the main feature of the String-Art technique is the usual intersection of threads stretched on nails. In fact, to get beautiful patterns You need to be attentive. This is a painstaking work that requires preliminary calculations.
The word "String" is translated from English as "pulling", "string" or "rope". Art - filament art, and to spin - embroidery on various solid surfaces. String Art is already interlacing threads on cloves.
The history of this needlework began about 4 centuries ago. Invented his English weaver, which in a certain sequence stretched the threads on the cloves, driven into the boards. As a result, a panel was obtained to decorate the premises. At the end of the 19th century, Mary Bul, Mathematics and Researcher, became interested in technician, improved it and used to teach kids, portraying a variety of geometric patterns.
Modern String Art was popular thanks to the designer from America - John Eichinger. Mandalas made by them are striking the imagination of the grace of lines and unique optical illusions. At the moment, the fame of unusual paintings made by the String-ART method is only grown.
Works of art in the technique of String-ART organically fit into modern interior design, especially in Modern styles, High-tech and classic. Original decor In the form of names, silhouettes, logos, flags, patterns, animals looks fresh and bright.
Main directions
There are many concrete art techniques that allow you to create original paintings from the threads and nails. The most popular methods include:
- Literal design. Famous trend developed in the West. Various words are interesting to look in the interior. Despite the use of sharp nails, pictures made in the technique of String Art, may look gently. Such decorations are relevant for use in the hallway or living room.
- Animalism. Often the masters make silhouettes of various animals and birds. This direction of String Art today is never relevant. Images of elegant deer, noble horses, spectacular zebras, majestic elephants are popular.
- Portraits. People involved in the art of String Art professionally create stunning large canvases, in which the features of individuals, for example, celebrities are easily guessed.
- For kids. It is useful to engage in the art of String Art with a child. Kids will be able to raise the prishability, carefulness to the trifles, will open small motor. As the basis in this case, foam is used. Popular children's schemes in Technique String Art: Cats, Fish, Dolphins, Hearts and others.
- Additional decor. When creating songs, a variety of decorations are used: different colors, the same pictures with a contrasting tinge of nails, rhinestones, beads, rivets.
To make the original key, it is enough to take a small plank, attach several hooks to it and perform the decor using the String art technique. Decorate the composition key or tree, various inscriptions.
 Letter Design
  Animalism
  Portraits
  For kids
  Additional decor
 Materials and tools
To perform weaving in the String-Art technique, you need to prepare tools and materials. First of all, the basis is selected. It can be a small plate of plywood, fiberboard or traffic jams. Such substrates are optimal for working by the String-ART method, since their surface is conveniently coated with tinting, painting compositions, varnish or film.
A good option for working in the technique of String-Art will be a foam base that is suitable for applying acrylic paints. But in this case, it is necessary to replace cloves with pins.
The number of nails should be sufficient to create a picture by the String-ART method. It is necessary to give preference to furniture, decorative and carpentry varieties. Their main dignity is the small dimensions of the products themselves and the hats. As for the threads, the string-art knitting technique is ideal for work: Moulin, twisted, thin iris. Silk yarn is constantly slipping, so delivers inconvenience when weaving.
If the String Art technique is used for the first time, it is not necessary to take for complex images. Start better with the most simple options. The ideal solution will be templates with numbers, where each movement of the thread and the type of connection are marked with special arrows. To work on the composition in String-Art style, other tools will be required:
- pliers;
- a hammer;
- scissors;
- buttons;
- clothespin for fixing nails.
Experienced masters advise use for such a kind of drawing case from ballpoint handles. The rod is removed, and instead the thread is inserted. This method provides uniform tension and convenience of the workflow.  The foundation
 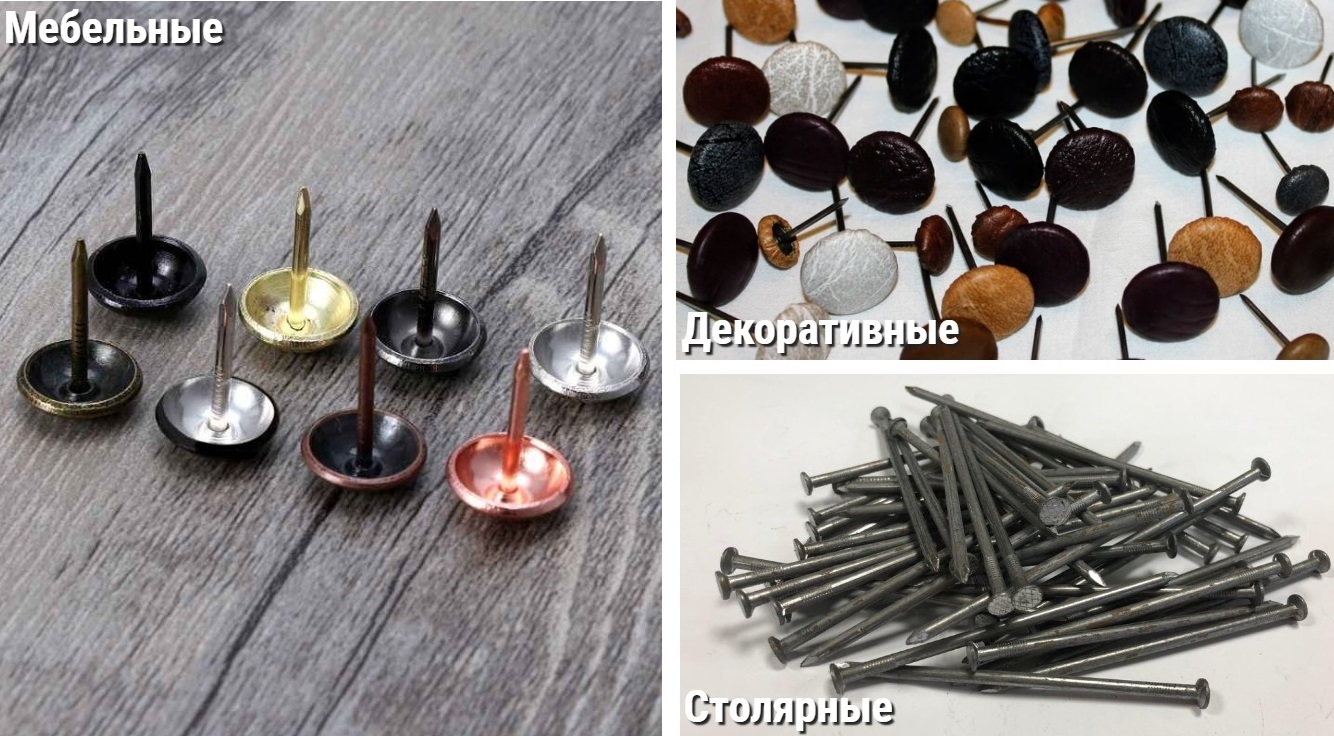 Nails
Nails  Thicks
  Templates
  Additional tools
Stages of work
To compile an attractive style composition in Sting Art, you must select the appropriate pattern, think through its size and coloring. Actions are produced in stages, in compliance with the recommendations of specialists. Newbies during work is important not to rush to avoid mistakes.
Drawing picture
After preparing materials, you can proceed to work. In order to apply the selected drawing to the base, you should act according to the instructions:
- It is created on or printable ready.
- The scheme is applied to the prepared substrate.
- If the base is soft, the contours are marked with a needle, if hard - carnations are driven.
- The sample is deleted, it will not need anymore.
If necessary, you can fix the template of painting tape. Then, with further work, it will not go. This is especially convenient when studying string-art with children.  Prepare a substrate
  Print the template to attach the basis
  Drive nails in the drawing, remove the sample
Locking nails
To work in the technique of String-Art, it will take a small hammer. Actions are executed step by step:
- Nails are neatly driven around the perimeter, you can start from any plot.
- To protect your fingertips from damage to the product adhere to pliers or by the usual clothespin.
Carnations are driven at a distance of 1 cm. You should leave the length that will be convenient for winding the threads. The more voluminous and multi-layer pattern, the higher the robbed nails should be stitching.  Start heading nails from any site
  Use a finger protection clothespin from damage
Filling the space threads
The same sketches in the technique of String Art may look different. After placing nails, the threads are filled directly pattern or surrounding space, background. This is done as follows:
- The first thread is tied to the carnation, the creative process begins.
- When you need to change the color, the node is tied to fix the pattern.
- Upon completion of the work, all unnecessary tips are cut off.
If the thread breaks, it is necessary to touch it carefully and continue to create. When creating complex multi-layer compositions in the String-art technique, it is important to adhere to a certain sequence, due to which the three-dimensional effect is achieved. In other cases, chaotic is welcome.  Bind the thread to the carnation, create a pattern
  In the end, crop out extra tips
Edging drawing
Finished shapes filled with threads are often decorated with edging. Color may coincide or contrast with the main elements. The finish is made along the contour of the pattern, to outline the boundaries, giving careless external view Picture. Blue letters, for example, perfectly decorate the yellow edging.
Basic tricks for beginners
For a first acquaintance with an interesting technique, String Art should not immediately take on complex compositions. Start better from the simplest techniques, using one color. When choosing it is worth paying attention to special stencils in which each figure denotes the order of actions and the type of connection. They work with them the main movements, allowing you to go to a new level of skill. The beginners are recommended to fill the angles and circles, other forms are derivatives, so they are mastered much easier.
Angle
To work in the technique of String-Art will require a ruler. Next, all manipulations are performed according to the instructions:
- The substrate is drawn the angle, stupid, straight or sharp.
- The figure is divided into equal zones, where pairwise holes are created. The peak remains free.
- Thread is done by S. invented side, By selected scheme.
Corner filling should not be performed so that opposite points are connected, which are located at the same distance from the vertex.
Arc
This pattern in the technique of String Art is used for floristic ornaments. Make it quite easily. Enough to act according to the instructions:
- Draws part of the circle.
- The holes are connected by the thread in such a way that between them there is a smaller distance compared to a half arc.
- Equal intervals are left between the holes.
Drawing by the String-ART method is strictly in one direction.
A circle
To perform work, the circus and awl. A similar element of string-art for beginners is manufactured according to the instructions:
- The circle of the desired dimensions is drawn. A small diameter is preferred.
- The holes are located in the same way as the numbers on the clock clock, all of them will turn out 12. The holes are numbered.
- In a hole number 1, the thread is stretched to the hole number 5.
- The holes number 2 and No. 6 are connected, then No. 3 and No. 7 and further by analogy.
You can connect other points in accordance with the selected schemes. The only rule that cannot be broken in String-Art is the distance between the holes should not exceed the diameter of the circle.
Circle
This reception will be required to create a beautiful colors in the technique. The figure is performed as follows:
- The arc in the form of a fan and a small cut.
- Tags are located at an equal distance from each other.
- The holes on the arc and the segment are connected.
The string-art method allows you to make flowers, leaflets, buds. As a result, it turns out a real floral composition, which you can decorate any room.
Master class for beginners
Art string-art sometimes causes newcomers. Avoid them will help step by step instructions. The simplest figures for making in the technique of String Art: Machine, letter design and chanterelle.
A car
First of all, the basis is selected. A small plate of 15 x 20 cm is suitable, the angles can be rounded. The surface is sandwiched and is covered with varnish or by a verse. Threads, hammer, scissors, pliers, greasy tape are prepared. All actions are made step by step:
- A machine is drawn on a clean leaf, or the finished stencil for string art is printed.
- In the picture at equal distances, points are set in places of arrangement of carnations.
- The leafle is attached to the painting tape for the substrate, nails are nails. After that, the picture is removed.
- In the upper central nail, the thread is tied, the tip is drawn along the diagonal, cling to the next element and then by analogy.
- When all carnations are processed, the thread is tied and cut.
In the same way, it turns out to make a heart, maple leaves, snowflakes and other pictures. Exactly following the instructions, you can achieve an excellent result.
 Print stencil, place points in the location of nails
  Attach a picture to the base, drive nails, delete template
  On the central nail to tie a thread, create a pattern
  At the end to tie and trim thread
 Letters
To work, you will need a standard set of tools and materials. The master class will help make the original composition in the String Art technique:
- The base is grouped, painted in the selected color. The right word is selected, popular expression or logo.
- The letters are printed or applied on paper.
- The template is attached in the central part of the substrate. On the contour at the same distance, nails are driven apart.
- Paper is cleaned. The thread is fixed under the hat of the carnation, is carried out to another. So it is necessary to act until the elements are fully filling.
- The work is completed by the fixation of the thread, cutting the tips.
Letters can be used as a decor for photo shoots, thematic wedding ceremonies or residential premises. When driving nails it is recommended to put something for the basis. It will save the surface of furniture and floors from damage.
A fox
A cute fabulous animal, which is associated with cunning and seamless, will become an excellent home interior decoration. For its manufacture, the String-Art method needs to perform several manipulations:
- A plate or a piece of plywood suitable size is polished, covered with paintwork.
- The drawing is selected. It may be a fabulous fox completely, her head is either a geometric picture.
- The image is applied to the substrate and nailed with carnations along the contour. Paper is deleted.
- The space between nails is filled with threads, you can use several colors.
Redhead chanterelle will be the perfect decoration of the living room or children's room. Make such a decorative element using the Sting Art method with children.
Pictures made in the technique of String Art look luxurious. They are suitable for decorating modern interiors, can become perfect gift For loved ones. Work is useful for children, as String Art develops a small motorcy, abstract thinking and feeling of beautiful. Fill the space of the threads
Video
Photo


Today, needlework is a lot of different types of creativity that can satisfy craftsmen with the most arrogant requests. For those who want to try new techniques, unlike simple knitting And embroidery, it is recommended to spinning or string art. This technique allows you to create pictures without any special knowledge and skills. All you need to master this kind of needlework is given in our description below.
String art - what is it?
This technique for creating compositions is invented in England in the 16th century. Using the most ordinary nails and threads, weathered learned how to create amazing decorative images on the planks, which were then applied as decoration in the house. Over time, the technique complicated and recycled, and as a result she became a popular view of the needlework, who were fond of masters of all ages.
Equipment to stating is very popular with the filing of the English Researcher Mary Boulev. With the help of nails and threads, she conducted teaching children algebra and geometry.
What tools to use in String Art
Watch is one of the least costly techniques. To create your first composition, you need to take only threads and nails. Carnations you can buy by visiting any construction store. It is only necessary that they have a suitable length and width of the hat. Threads for this technique eats, probably, all needlewomen. It can be a thick yarn for knitting, and the version of the threads of Moulin or Silk, dense sewing threads.Also need to be prepared:
board or plywood plate;
Lovers of dense cardboard - it can be used as an alternative to plywood to make postcards;
diagram or ready image;
paint to emphasize individual elements of the picture;
hammer or awl.
Application "Will" - where to start
Those who have never come across the String-Art technique before, it is recommended to start with simple compositions. It is better to take a small, monophonic scheme. Beginner needlewomen often use diagrams where numbers and arrows are indicated, which indicate the movements of the thread and how they are connected. To create a picture of the technique of string-art, download schemes and templates with.
To master the technique, first need to be explored, according to which principle, the corners and circles are filled. Other forms, such as the square, oval, letters are derived from base elements, they are mastered easier.

At first glance, create a picture, using such familiar materials as nails and threads, is the case without the slightest difficulties. However, the technique of String-ART provides such an important moment as correctly intertwined threads. After mastering this moment you will learn to make impressive volumetric compositions.
It is distinguished by one big advantage - this is the ability to choose for a picture of almost any sketch. It is very convenient, for example, if you start creating a unique portrait, or drawing with numbers and letters. At first, it is better to use monophonic threads in String Art. Then gradually flower palette You can complement other shades, as a result you will have a multicolored panel.

It is believed that images of colors, animals, people should contain smooth transitions, do not contain angular elements and not differ correct geometric lines. Nevertheless, it exceeds it perfectly performs this task and transmits the depth of the color, since the threads of different tones can be used in this technique and at the same time nails of different lengths.
String Art: Master Classes for Beginners
So you stored all the tools necessary for string art. What's next? Use the scheme and prompts as the basis. Better, if you can learn something from the needlewomen, which are already engaged in the technique of Isoni. From this article, you will learn about master classes of different complexity and see the process and the result of creating compositions in the form of needlework as a string-art.

One of the most simple drawings, which choose novice masters is a heart. A child can make such a picture, unless, of course, adults will help him, driven nails in a skip. Such a cute work done by your own hands will serve good giftShe will also become a harmonious decoration on the wall in the living room of your home.


So, we take a blank sheet of paper, carefully draw a heart. You can print the drawing on the printer. Now on a skid in an arbitrary order, we put the point where we will navigate the cloves. The distance between the marks should be the same, as it will affect the final type of composition. We put the sheet of paper on the paneur and in the marked points you feed the carnations. Now the sheet needs to be removed from the plank.


After that, go to threads. On the central nail at the top we make a neat nodule, and the tip stretch on the diagonal. I pull thread to the nail in such a way that sharp corners were obtained. When all nails are wrapped with thread, it must be fixed and the end gently cut.
Below you can see the basic schemes for the formation of angles and circles in the technique of stupid. When you master them, you will create quite simple and at the same time impressive paintings with the effect of volume.


Those who have already mastered the string-art and confident in their abilities, it is necessary to move to the next level - to create spectacular portraits with nails and thread. Basis Let you have a portrait of a man who you intend to turn into an object of Art String Art, or it can be a well-known or just a beautiful person, or a pet.


You need to create such a complex image, starting not from the central nail, unlike simple master class. First, we will fill the background - it means that we will cover the more dense parts of the picture with threads - for example, where clothes, shadows, deeper, dark zones are depicted. Then we will fill the remaining elements - a face, hands, etc. When working in String-Art, even professional masters use ready-made schemes, because due to just one direction of the thread chosen incorrectly, the perception of the picture can be spoiled.

You need to try to perform smaller knots that have nowhere to hide. Threads should be stretched as much as possible so that in time the pattern does not blame, and did not lose in appeal.

Wrong is among the needlewomen new technicianwhich is just starting to gain popularity. The fact that even on a small plywood with cloves and threads can occur with a spectacular picture, is truly impressive. And if you become a professional master, in thoroughness having mastered the technique of String Art, you can create unique compositions for sale and earn a very good amount of money.