Tulip from A4. DIY paper tulip: a new approach to origami technique
Tulip is spring Flower, which is associated with femininity and tenderness, but, unfortunately, the lifespan of a bouquet of live tulips is short-lived. If you want these fragile flowers to delight with their beauty all the time and become an interior decoration or a great gift to a loved one, then you can make a craft from flowers with your own hands.
Making a flower using origami technique
The word origami translated into Russian means "folded paper". This kind of decorative art originated in Ancient China many years ago, you can use it to make a variety of figurines. It is very popular to this day, because origami is not only interesting, but also useful activity thanks to which the logical thinking, patience and perseverance, as well as a great way to relieve stress.
There are many ways and methods of creating origami figures:

A few origami rules for beginners:
- Choose thin sheets of paper as they are easier to work with.
- You need to start by making lightweight figures. And after you fill your hand, you can start making more complex products.
- The folds must be carefully worked out with a ruler, finger or nail.
- Do not deviate from the scheme, perform the work in stages.
- To choose a comfortable place to work for yourself and not to rush - to do everything carefully and thoughtfully.
Step-by-step production of a tulip
Before making an origami tulip out of paper, you need to take:
- Office paper red, yellow, orange and color pink... For a flower bud, 1 sheet is required.
- Green office paper. To make a stem with a leaf, you need 1 leaf.
Then you can start folding a tulip bud from red paper:

Then start making the bud:

Craft from corrugated paper
A delicate bouquet of tulips with candies hidden inside can be a wonderful present for your loved one. To make flowers you need:
- Corrugated or crepe paper. You can use napkins.
- Candies.
- Tape tape.
- Scotch.
- Wire and pliers.
 Take pink corrugated paper and cut it into 20x2 cm strips. Twist each strip in the center one turn and fold in half. Then attach the candy to the wire using tape. Fix the petals to the base of the bud with tape tape. First of all, wind one part of the stripes, superimposing them on top of each other, and then the other. The end result is a tulip with three petals. Tie the next petals in the same way. Then wrap the base of the flower and the stem with tape. Cut leaves out of green paper and tie them to the stem using tape.
In this way, the desired number of tulips can be produced from corrugated paper, and then wrap the bouquet with tape.
Can you do luxury paper tulip bouquet differently... To create a craft, you need to stock up on:
- colored corrugated paper;
- teip tape;
- glue gun;
- wooden skewers;
- scissors;
- pattern printing paper and pliers.
First you need to print the templates of the tulip parts, and then transfer them to corrugated paper and cut them out.
To create one tulip you need: 6 lilac oval petals, 1 center circle yellow color, 2 green leaves and black corrugation fringe.
 Using a glue gun on the upper end of the wire, fix the yellow center by piercing it in the center. Then wrap the black fringe around the stem - these will be the stamens of the flower. By stretching individual pieces of paper and forming folds, give the desired shape to the petals. In turn, glue the lilac petals to the base, giving them the shape of a bud. Wrap the stem of the flower with tape and glue the leaves.
That's all, the tulip is ready. You can make a few more copies of the same and form a beautiful one out of them.
Thus, using paper you can make a luxurious bouquet of tulips v different techniques... One has only to show a little imagination and follow the step-by-step instructions.
Attention, only TODAY!
Tulips are spring flowers loved by many. But, unfortunately, tulip blooming time is quickly coming to an end. And cut flowers soon lose their attractiveness.
But paper tulips will remain intact for a long time and will delight you and your loved ones at any time of the year. If you want to do original gift that will never fade - present a handmade tulip. Or make a whole bouquet and decorate the room with it. Today we will look at several techniques for making flowers.
Lesson number 1: volumetric tulips from paper triangles 
The first lesson is the most difficult to implement. But this only makes it more interesting! To assemble this flower, you will need a large number of triangular pieces (95 for each flower). They are done as follows:
1. Cut an A4 sheet into 16 equal squares. 
2. Take one of the squares and fold it in half horizontally. 
3. Fold the square vertically again, then unfold it. 

4. Fold both edges of the rectangle along the centerline and carefully smooth both folds. 

5. Turn the shape over and cut off the protruding ends. 

6. Fold the bottom edge of the shape up and smooth the fold. 
7. Fold the shape in half towards you. 
8. Repeat all these steps on the remaining squares. 
Having made the required number of parts, you can start assembling the flower:
1. Form rows 1 and 2 by joining the pieces through the slots in the end face. 
2. Make a circle of 15 pieces in each row. 
3. Add a third row. 
4. Turn the piece over and squeeze it into a bud. 

5. Add rows 4 and 5 with 15 pieces each. 

6. Next, build up the structure on one side so that you get a triangle: 
Row 6 - 4 pieces Row 7 - 3 pieces (over row 6) Row 8 - 2 pieces Row 9 - 1 piece
Repeat the superstructure on the opposite side of the flower, opposite this triangle. 
It remains to make the stem. To do this, take a sheet of thick paper and, rolling it into a solid thin tube, wrap it with green floral tape. 
Apply some glue to the end of the stem and stick it into the tulip. 
Cut and glue 1-2 oblong leaves to the stem. 
The tulip is ready! 
Master class number 2: tissue paper tulips 
In this lesson, you will learn how to make very delicate, airy, thin and graceful tulips. At the same time, they will be quite simple to manufacture, only perseverance and a little skill in working with watercolors are needed. They can be a great gift not only for a mother from a child, but also for a girlfriend.
Materials:
White, yellow and green tissue paper
Watercolor paints
Several poached eggs (boiled egg holders)
Drinking tube
Glue
Operating procedure:
1. Cut out identical petals with slightly wavy edges from white tissue paper.
2. Stick two petals on top of each other (one layer of tissue paper is too thin, it will be difficult for you to work with it).
3. When the glue is dry, spread the petals on a flat surface, such as a tray, and paint with watercolors.
4. Without waiting for the petals to dry completely, gently lift them off the tray and place them in the poached makers to shape them in a curved shape.
5. Place poached makers near a heat source to dry the paper. 
6. Cut a wide strip of yellow tissue paper, fold it in half lengthwise and make a small fringe along the double edge.
7. Wrap the strip around the edge of the drinking straw and secure with glue - this is the core of your flower.
8. Remove the dried petals from the poached pot and glue them to the tube around the core.
9. Cut a strip of green tissue paper and, securing its edge under the flower, wrap the entire tube. Cover the opposite end of the tape. 
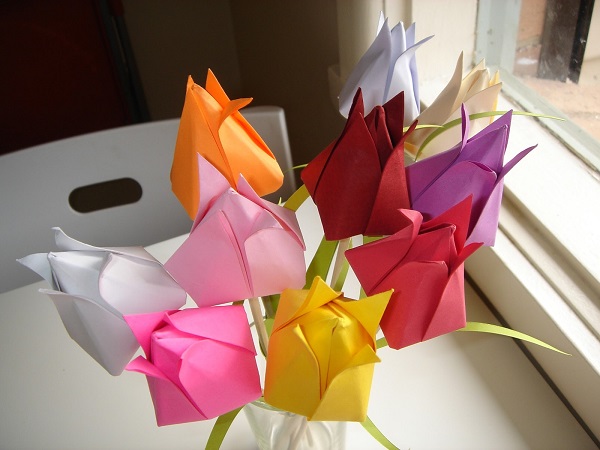
Instruction number 3: tulips from thick colored paper 
The easiest way to make flowers. It is perfect for small children.
Materials:
Dense colored paper(about 270 g / sq.m)
Wooden sticks for stems
Green acrylic paint
Hot glue
Stationery glue
Green soft-tip pen
Flower template that can be downloaded here
Cardboard sheet
Operating procedure:
1. Print or draw on cardboard and cut out a template for flowers and leaves.
2. Cut 4 flowers and 1 leaf for each tulip. 
3. Fold the flower blanks in half along the center line (if the paper is single-sided, the colored side should remain inside). Iron the fold and unfold them to their original position. 
4. Glue two pairs of blanks as shown in the photo. 
5. If the edges of the parts are not perfectly aligned, trim off the excess. 
6. Paint the sticks with green paint and let them dry. 
7. Now glue the two pairs of flower blanks by inserting the edge of the stem stick between them. While the glue dries, the parts can be pressed together with paper clips. 
8. Cut leaves out of green paper and draw center lines with a green felt-tip pen.
9. Glue the leaves onto the stems. 

Lesson # 4: a classic origami tulip with a stem 
Not the easiest, but far from the most difficult option for creating a paper tulip using the origami technique. This lesson can also be realized with your child. For this project, you only need square sheets of paper - green and yellow.
Flower head
1. Lay the yellow sheet colored side up, fold vertically and horizontally in half, then return to its original position.
2. Flip the sheet over and make two diagonal folds, then unfold again.
3. Fold the square into a triangle so that the two side points meet at the bottom. 
4. Bring the side corners of the shape's top layer up along the center line. Then flip the shape over and do the same on the other side. 
5. Change right side diamond to the left, then flip the shape and do the same on the other side. You will get the same diamond shape, but with a smooth surface. 
6. Flatten the edges of the top layer and nest one into the other. Smooth out the folds around the edges and make sure that A and B are equal. 
7. Repeat the same on the other side of the shape.
8. Grasp the cones obtained on both sides, slightly spread them to the sides and inflate the bud through the opening at its base.
9. Fold back the edges of the petals at the top of the bud. 
Stem
1. Lay the green square on the table, colored side down, as shown in the diagram, and fold vertically. Then return the square to its original position. 
2. Fold the corners towards the center along the first fold line. 
3. Next, bend the formed corners again along the same line, and then again. 
4. Flip the shape over reverse side and fold in half lengthwise, lifting the bottom corner to the top.
5. Fold the resulting shape in half widthwise.
6. Fold out the top edge of the outside of the shape.
7. If you did everything correctly, you will get a stem like this, which you can put on the table: 
Now just slide the tulip head onto the vertical rod.
When giving gifts to loved ones, I want to come up with something really original. A paper tulip is a good alternative to a postcard. Its petals and leaves can be decorated pleasant wishes... Such greeting card attached to the gift will surely surprise the recipient. In this article, there are a few ideas on how to make beautiful paper flowers.
Pyramid tulip
The bud of this tulip resembles a volumetric triangle. Described below detailed instructions how to make such a tulip with your own hands.

You need to choose the colors of the bud and stem. You can make it classic - a red or yellow tulip on a green stem. Crafts from pure white paper or any unconventional color combinations will look great too. It is advisable to take into account the tastes of the person to whom the gift is intended.

The paper for the future bud should be square. The square must be folded in half so that a triangle comes out - for example, attach the upper left corner to the lower right. Then open and bend again, only this time the upper right is applied to the lower left.
Thanks to the previous point, bend lines appeared on the paper. One more strip should be added to them, arising from folding the square in half.

A sheet of paper must be taken so that the left side of the last strip is in one hand, and the right in the other. If you bring the fingers of both hands together, the square will fold into two triangles.

The other two corners must be attached to the top of the triangle. Then repeat with another triangle. If everything works out correctly, 2 rhombuses will come out.

The left and right edges of the diamond must be attached to each other. Do a similar action on the other side. After the action, a separate strip in the middle disappears from the rhombuses.

The right side of the rhombus must be pressed to its center, then the left. To prevent the sheet from aligning to the previous position, the edges can be fixed by thrusting one edge into the folded pocket of the other. If at this stage it is difficult to fix them, you can attach a small piece of tape in the center. Similar actions must be done with the rhombus on the other side.

The result is a pyramid with two pockets just below the center. You need to stick your fingers into the pockets and pull slightly in different directions. This action adds dimension to the shape. And to finish a tulip bud, you need to find a small hole at the bottom of the bud and blow into it.

The result is a flower with unopened petals. At the discretion of the creator of the decoration, you can open all the petals or several of them.

The hole with which the tulip was inflated is for attaching the stem and leaves. The stem can be twisted out of paper.

These ten points describe how to make an origami tulip out of paper. The first time it may seem difficult, but then the hands themselves will repeat the memorized actions.

Children's applique
This method is similar to the previous one, but much easier to create. How to make such a tulip out of paper is easy to understand even for a child. However, its significant drawback is the lack of volume.

The beginning is similar to the previous one - you need a square, which will become a bud. It is folded in half to form a triangle. The right tip rises to the apex of the triangle, but does not attach to it, but goes slightly to the left. Likewise, the left tip is up and slightly to the right.

This makes a very simple bud. It remains only to bend the sharp part from below, since the flower at the stem is usually wider than the petals.
Note!


For the stem, the square folds diagonally to mark the center. The left and right edges of the square are bent into this center. Further, the craft is folded along the intended strip.

In the resulting triangle, the bottom two corners are raised with a slightly uneven fold. This creates a simplified stem triangle and leaf triangle. The stem connects to the bud and the flower is ready.

Candy tulips
The most adorable and realistic tulips can be made from corrugated paper. Another advantage of them is that you can put candies in them. It is easy to make such flowers:
The corrugated paper for the petals is cut into strips of 20 by 2 cm. In the middle, the paper is twisted and folded in half.

A stalk of wire is prepared, 15 centimeters long. Candy is attached to it with adhesive tape. At the end of the process, the candy will be inside the bud.

The petals are attached to the wire with tape or special green floral tape. The side of the fold is the tip of the petal. It is desirable to have more petals so that the bud is lush enough.
Note!


Leaves are cut from green corrugated paper and attached to the stem. In the photo, corrugated paper tulips resemble real ones, especially in a large, voluminous bouquet.

An easy way to make a tulip for a postcard
These paper tulips are very easy to do with your own hands and attached as volumetric applique on a postcard. The stem and petals are flat. They are glued to a piece of paper with a background or drawn on it.

A bud blank is cut five or more. The bud should be attached to the background only in the middle, applying glue with a vertical line. So, in layers, all 5 blanks are attached. It remains only to fluff up the petals and the applique becomes voluminous.

Graceful paper tulip
This method is almost the same as the previous one, only a little more voluminous. A stick or wire is chosen as the stem. The same blanks are attached to it as in the method above.


You can glue the stem with blanks so that it is in the middle. If the details of the bud are 4-5, it will be rather modest, if you do more, it will fluff. However, with a large number parts must be ensured that they are attached symmetrically in relation to each other.

Note!

Photo of paper tulips


Tulips are very popular in spring, and the main reason for this is International Women's Day. A bouquet of tulips is a traditional gift for March 8 to mom and grandmother, sister and friend. But not only fresh flowers are so in demand - paper tulips too! Many people prefer paper flowers, because they are made easier than flowers made of fabric or polymer clay.
"Cross" will tell you how to make paper tulips with your own hands. And you promise to make them and give them to your loved ones)
Tulips made using the Quilling technique are distinguished by their special grace and sophistication. Not a lot of materials, tools and skills are required, but the result will please, so we will do just them.

Prepare everything you need:
- strips of paper for Quilling (pink, light green and light brown colors)
YOU WILL FIND OUT
You can buy paper for Quilling as a set. This will allow you to create without limiting yourself in your choice of colors.
- white paper
- cardboard
- toothpicks
- a small cylindrical object (you can use a tube of PVA glue)

Wrap a pink strip of paper around the cylindrical object and glue the tip a small amount glue.

Carefully remove the resulting circle from the cylindrical base. Make 9-15 such blanks (the number of blanks must be a multiple of 3).

Then squeeze each round piece on one side to shape it into a teardrop shape.

Take a toothpick and roll the pink strip of paper into a tight "roll", leaving a small part of it unrolled:


Continue to twist about 6-9 strips of paper in this way (you should have blanks like in the photo):

Make as many blanks as you have "tears".
And then just put the spiral blanks in the "teardrops" and get tulip petals out of paper!

Now we will make the leaves. Roll a strip of light green paper with a toothpick, remove and let it loosen to some extent.

Glue the tip:

Squeeze the workpiece on both sides to shape it. english letter S. This is how the leaves are made)

On paper or cardboard white glue 3 petals, but before that, think over the whole flower arrangement in advance.

Make some of these paper tulips with your own hands.

Fold the light brown strip of paper in half and glue both halves together.

Give this strip a nice curved shape, and then brush with glue on one of the sides.

Glue it neatly next to one of the flowers, thus making a stem.

Glue the stems to all tulips:

And then glue the leaves too.

Now you know how to make paper tulips - not difficult at all, right?

The tulip petals can be sharpened more on one side, then the flowers will turn out like this:

Such blanks of petals and leaves are useful for creating different tulips from paper with your own hands:


However, a full-fledged element can also be made from strips of paper, which in Quilling is called exactly the same - "tulip".
A 2-petal tulip is done like this. First, roll the traditional "roll" on a toothpick, and then, holding it with the fingers of one hand, press on a cylindrical object such as a pen or pencil. As a result of the paper deflection, 2 petals will be obtained:

To make an element "tulip" with 3 petals, the twisted "roll" must be held in one hand, and with the index and thumb of the other hand, squeeze the midpoint, making it slightly higher than at the ends.
Flowers are a wonderful gift, interior decoration, a reason to smile and Have a good mood... But in order to please loved ones or decorate a room, it is not at all necessary to buy fresh flowers. Updating a bouquet in the house is quite an expensive pleasure, but there is such a simple solution as making a tulip out of paper. Hand-made paper flowers will bring even more comfort to the home atmosphere, and the process itself will give fascinating creative moments.
This type of creativity brings to mind origami - the ancient art of creating various figures from paper. It originated many centuries ago in the country where paper was invented - Ancient China. It became widespread in Japan, hence the name: Origami translated from Japanese means "folded paper". Once upon a time this was done only for religious purposes, preparing for various rituals. Such a skill was considered an indicator of high class in society, since only representatives of the upper classes owned it. Nowadays, origami is used to decorate the interior of a house, to create interesting original details in a summer cottage or balcony. Folding paper figures is an exciting activity, which is a pleasure to devote your free time to. It is especially useful to do this with children: it captivates and develops a child of any age, allows you to spend time with your family. Paper tulips in a vase First you need to decide on the color of the tulip. It will be inconvenient to paint it in finished form, so you should immediately take colored paper or paint a white sheet with pencils or paints before starting work. Paper of different sizes and colors is perfect for creating a bouquet. Fold the sheet diagonally, corner to corner. It turned out a triangle, leaving a strip of paper at the bottom that needs to be cut off with scissors. Before us is an even square. Set aside the cut strip and use it later. Then fold the square diagonally to the other side. We get two equilateral triangles in one square. Turn the square over with its convex center up, now fold it in half. Let's unfold, fold in the same way in the other direction. Now we collect all the sides (folds) together and press. Turning the triangle upside down, bend it to the center of its edge. We turn it over, and bend the edges of the triangle in the same way on the other side. We got a small square, which for convenience we place on the table, directing one of the corners towards us. Bend half of the sheet to the right on one side, turn it over. We do the same on the second side.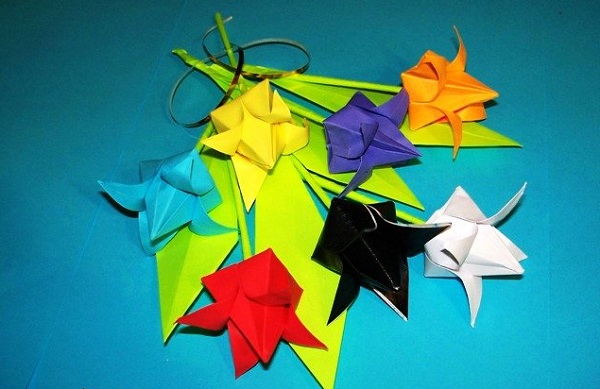
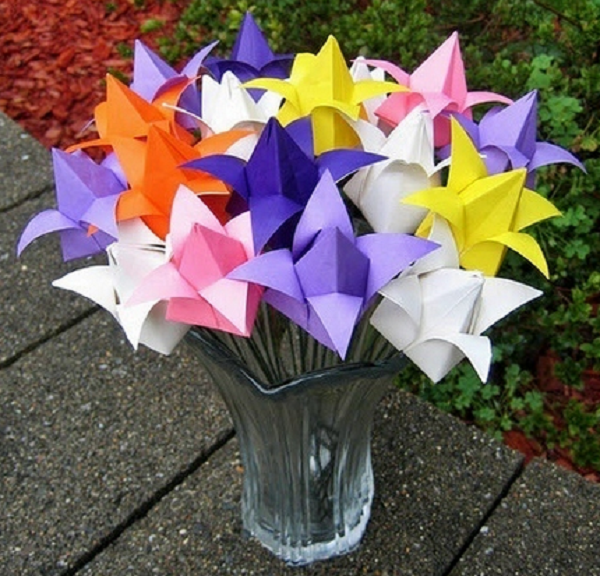

Bud creation scheme
Finally, we come to the formation of the bud itself. Bend the corners towards each other to the center. Press them down with force and repeat the procedure from the second side. We got two pockets. Now our task is to open the tulip. We hold the base with our thumbs and gently push the pockets apart with our indexes. A hole appears in front of us through which you can straighten the bud with a pencil or simply blow inward, if the paper is not very thick. The same pencil is used to shape the petals. They are bent to the sides - for this we just wind each petal on a pencil.

Tulip bud
Now is the time to remember the postponed piece of paper that we cut off at the very beginning. The tulip stalk will be made from it. If colored paper of red or pink color was used to form the bud, then cut a strip of the same size from the green leaf for the stem. If the paper was painted before starting work, then this part is simply painted green.
It is especially important to make the stem from thick paper, since it holds the entire structure. Fold the strip three times, insert it into the head of the bud. A beautiful volumetric tulip is ready!
Bouquet of tulips on the window
How to make a paper tulip according to a simplified scheme
For creative play with younger children or for a wall panel, there is an easier way to make a paper tulip. The process will take only a couple of minutes, the bud will turn out to be flat, but at the same time textured and original.
You should start with the same steps as in the manufacture of a more complex structure. We make a square out of a rectangular sheet of paper by folding it in the form of a triangle and cutting off the extra strip of paper. We fold the resulting triangle in half, marking a line from the middle of its base to the top. It is important to make all the lines as clear and even as possible, this will allow the paper flower to look neat and beautiful.
We outline the middle of the line between the top and the base, conditionally divide it in half. Bend up the right corner of the triangle along this conditional point. So the prong-like angle is pointing up. We do the same with the left corner of the triangle.
At the bottom, there is a base in the form of an angle, which must also be bent and hidden inside the structure. The result is a beautiful flat flower that can be used to decorate the interior both separately and in the composition on the wall. To do this, we glue it on a sheet of paper or fabric together with other parts of the intended collage and hang it in a frame on the wall.

How to create a flat flower
How to make a tulip paper stem
The stem of a paper flower can be made by not just folding a thin strip of paper, but by making it naturalistic and voluminous. You will need a sheet of green paper, from which we make the already familiar square, cutting off a strip from a rectangular sheet. Along the outlined folded line along the diagonal of the square, we bend its edges inward. This must be done so that the wrong rhombus is obtained. The same figure is obtained by folding an airplane out of paper. Next, fold the rhombus along that fold in the middle. We bend the resulting irregular triangle again: the short side is folded towards the long one, forming a leaf on the stem. Now it can be inserted into the base of the bud with the sharp side, and a full-fledged flower is ready.