Christmas wreath made of bottles. New Year's crafts from plastic bottles - a creative approach to the upcoming holiday
Here is such a pretty wreath you can make yourself from plastic bottles... This craft will brighten up any room or utility room. Decorative, simple and interesting.
Necessary materials
Not a lot of materials are required. As a base, of course, you need small plastic bottles. The smaller the volume of the bottles, the smaller the finished wreath will turn out, and the neater it will look. But sometimes, for large rooms or for a garden, it is better to use bottles bigger size so that the craft does not get lost in the foliage.
For connecting individual workpieces in this case it is best to use strong, thin and flexible metal wire. Of course, it is quite possible to connect the parts in any other suitable way, it all depends on personal preference and the materials at hand.
In addition to the basic materials, you should also pick up additional decorative elements in order to decorate the finished wreath from plastic bottles.
You will need a little from the tool: a hole punch, an awl or a nail, good scissors or a sharp knife.
Preparatory stage
The bottles must be thoroughly washed beforehand. You can use the usual detergents, but then the plastic bottles should be rinsed well in clean water. Also, all stickers and labels are stripped from the bottles. When everything is ready, you can proceed to the main thing - to create a wreath from plastic bottles.

We make blanks for a wreath from plastic bottles
To begin with, the bottom of properly prepared plastic bottles is cut off. It is curly and has a standard shape that allows you to make interesting details like flowers.
With the help of large scissors, which are very convenient to work with in this case, these blanks are shaped into flowers, as shown in the photo below.
A lot of such details will be required, but it all depends on the size of the wreath, the larger it is, the more blanks you need to make.

We connect the blanks in a wreath
Ready-made blanks from plastic bottles are combined into a wreath. To do this, each individual part is attached to the other in checkerboard using soft wire. Before this, the workpieces are pierced with a hole punch or a hot awl (nail).
Wash and remove all plastic bottles from labels. Using a sharp knife, cut off the bottom, stepping back from the lowest points 4-5 cm.The remaining parts of the bottles will also be useful for Christmas crafts, so do not throw them away, let them wait their turn for a while. Fold them up more compactly by inserting one into the other.
Paint the bottoms with acrylic paints in New Year's colors. Since Christmas wreaths are made from fir branches, green color desirable among these elements. If you have green plastic bottle bottoms, you don't need to paint them.
Step 2
While the bottoms are drying, we will prepare the core of the garland from a strong wire, onto which we will string the elements. In each bottom, use a heated nail to make a hole in the middle. In addition, you can give a different configuration to plastic bottoms by jamming or straightening the edges, or by making a curly edge using scissors. You can stick glitter, colored buttons or bows on the plastic.
Step 3
Now we string the bottle bottoms onto the wire in an alternating color sequence. After the wreath is assembled, we hook the edges of the wire. Tie the junction lush bow where you can attach a bell or Christmas tree ball.
You now have a bright new Christmas wreath.
The easiest and fastest way to make a Christmas decoration.
Cutediyprojects.com
What do you need
- Bulk base made of foam or cardboard (read below how to make it yourself);
- pencil - optional;
- wide tinsel;
- stationery pins or tape;
- fabric - optional;
- glue gun, fishing line or thread - optional;
- any
How to do
If you don't have a suitable base, cut the ring out of heavy cardboard. If you want to make your workpiece voluminous, glue paper or film to it.
Wrap tinsel on top and secure it with pins or tape. If you are afraid that the base will be visible, you should wrap it with a fabric of a suitable color.

Using glue, fishing line or thread, you can decorate the wreath with Christmas decorations, pine cones, ribbons or other decorative elements.


Christmas wreaths from Christmas balls
Such a wreath is also made quite quickly. You just need to stock up on a mountain of balls.
What do you need
- Thin hanger;
- Christmas balls;
- tape of a suitable color.
How to do
As in the previous tinsel method, the hanger must be bent to form a ring. Then the top of the wire should be untwisted.
Put a lot of Christmas balls on the hanger and secure the wire on top. Tie a large bow from the ribbon on the hook.
You can diversify the wreath by adding artificial pine branches with decorations to it. To do this, leave some space on both sides of the hook without filling it with balls. Then glue the branches there, and already on them - a bow.
The balls can also be fixed on a volumetric base for a wreath using a glue gun:
An original wreath can be made by simply wrapping the base with any fabric or thread and adding festive decorations.
 sadieseasongoods.com, loveoffamilyandhome.net
What do you need
- Bulk base or cardboard;
- cloth, burlap, twine or yarn;
- scissors;
- glue gun;
- stationery pins or - optional;
- any new Year decoration.
How to do
Such wreaths can be made from both a volumetric and a flat cardboard base.
If using cloth or burlap, cut them into wide strips. Wrap the base, securing the chosen material with glue, pins or tape.

Then glue some decorations to the wreath. It can be Christmas decorations, artificial coniferous branches, christmas decor and much more. Here are some ideas for inspiration:


Christmas wreaths of ribbons
If the previous options for winding the base are too simple for you, decorate the wreath with ribbon figures. Here you have to make an effort, but the result is worth it.
What do you need
- Hairbrush;
- glue gun;
- narrow green ribbon;
- narrow red ribbon;
- narrow gold ribbon;
- scissors;
- cardboard;
- pencil;
- green felt;
- Christmas balls;
- red pom-poms;
- wide colored tape;
- thread;
- needle.
How to do
Use a comb and glue to make the green, red and gold ribbon figurines as shown in the video.

Cut a ring out of the cardboard. Now use it to make a second felt ring. Glue both blanks.
 YouTube channel MARLENA-Hand Made
On the side of the base where there is no felt, make a loop of gold ribbon and glue the Christmas balls. Cover the place where they are attached with felt.
 YouTube channel MARLENA-Hand Made
Glue ribbon blanks and pom-poms to the same side, as shown in the video. Sew a bow from a wide ribbon and fasten a small piece of gold ribbon in the middle. Place a bow over the balls.
 YouTube channel MARLENA-Hand Made
And here is another interesting version of the ribbon wreath. A circle cut from a disposable plate was taken for the base. But you can also use a cardboard ring, as in the previous method.
Christmas wreaths made of pompons or balls of yarn
Pompons can be bought or made by hand. We will show you how to make a wreath from homemade pom-poms.
What do you need
- Yarn;
- a device for making pompons or a fork;
- scissors;
- glue gun;
- bulk base or cardboard;
- Christmas decorations are optional.
How to do
From yarn - preferably multi-colored - make a lot of pom-poms. If they are of different sizes, the wreath will be more interesting.
In the video above, pompons are made using a special device. But you can use other methods as well.
A similar device is easy to make from cardboard:
You can make small pom-poms with a fork:
No less beautiful will turn out without any devices, if you just wind the yarn around your fingers:
Trim the edges of the pom poms with scissors. This will make them more flavorful and fluffy. Glue them to a bulk base or cardboard ring. If you wish, you can decorate the wreath with decorative items.
This is how unusual pom-pom wreaths look like:


In the same way, you can glue small balls of yarn to the base. Such jewelry looks no less original:


Christmas wreaths of cones
For lovers of making masterpieces from natural materials.
What do you need
- secateurs - optional;
- twine;
- glue gun;
- cones;
- Christmas balls;
- dried;
- nutshell;
- fruit pits;
- sponge;
- orange paint;
- White paint;
- artificial snow spray.
How to do
Twist the rods into a ring, as shown in the video. Cut off excess with pruning shears. As a basis, you can use a volumetric blank - ready-made or made by hand, as shown in the first method.
Make a loop of string on top and secure with glue.
Glue cones, balls, peels, shells and seeds to the wreath. Use a sponge to tint the wreath with orange and white paint. Sprinkle it with fake snow.
Here are some more examples of decorating cone wreaths:


A volumetric base can be made from a video about a tinsel wreath or use the tips from this master class:
A wreath with a flat cardboard base will also turn out very beautiful:
Christmas wreaths from branches
For such wreaths, you can use both live and artificial.
What do you need
- Willow rods or volumetric base;
- wire;
- secateurs;
- fir branches;
- threads;
- glue gun - optional;
- Christmas decorations are optional.
How to do
If you choose rods as a base, twist them into a ring and wrap them with wire.
Cut large spruce branches into several small ones with pruning shears. Attach them to the base with wire. If desired, make a loop out of the last one (this is not necessary, since the wreath can simply be hung from the base).
Wrap the threads around the branches to keep them from sticking out. Decorations can be glued to the wreath or screwed with wire.
Wreaths made of branches, especially natural ones, look very beautiful and elegant:


Christmas wreaths made of paper
Beautiful decorative elements from the usual colored and corrugated, as well as from unnecessary newspapers.
Plain paper wreaths
What do you need
- Scissors;
- cardboard;
- pencil;
- White paper;
- glue;
- green double-sided paper of different shades;
- Red ribbon;
- red double-sided paper;
- dense film;
- flat beads;
- threads;
- needle;
- beads with a hole.
How to do
Cut a ring out of cardboard, and then - according to the resulting template - the same one out of white paper.
Glue two green leaves and draw a pencil around the cardboard ring. Draw a circle with a larger diameter and a smaller one in the middle. Cut the workpiece along the last marked lines.
Lubricate the cardboard ring with glue and glue to the green paper blank. Make cuts in the paper and glue the resulting rectangles to the ring. Place a loop of tape on the same side. Lubricate the ring with glue and cover with a blank of white paper.
Fold a few sheets of green and red paper across and cut along the fold. Then fold them into a narrow accordion, as shown in the video. Cut each accordion into small pieces. Opening them and alternating colors, place the blanks on the base in a circle.
Draw a small circle on the foil with glue and place the beads along the outline and in the middle. Cut out this circle and sew some thread to it, putting beads on it in the process. Glue flat beads on the other side of the workpiece.
Tie the resulting toy to a wreath. Instead, you can take a ready-made Christmas ball or other suitable decoration. Make a bow out of the ribbon and tie it to the top of the wreath.
Taking as a basis disposable plate and gluing strips of colored paper to it, you can quickly and easily make a Christmas decoration:
Of twisted paper strips you get such a cute wreath:
Newspaper wreaths
What do you need
- Knitting needle;
- newspapers;
- glue;
- brush;
- green paint;
- red paint;
- Red ribbon.
How to do
Using a knitting needle, twist two sheets of newspaper into a tube, fix the tip with glue. Turn the straw into a ring by gluing the edges together.
Fold a few more newspaper sheets into wide strips and glue them in half lengthwise separately. Wrap them around the ring, making a thick base for the wreath.
Use knitting needles to make many tubes from pieces of newspaper. different lengths... Twist each of them and squeeze out the middle with your hands. The video shows this process in detail.
Glue the resulting blanks to the base. Color them green and red. Make a bow out of the ribbon and glue it to the top of the wreath.
And here is a version of a completely different wreath from the same newspaper tubes:
 happinessishomemade.net
What do you need
- Cardboard;
- scissors;
- green corrugated paper;
- pencil with an eraser at the end;
- glue;
- red pom-poms;
- Red ribbon.
How to do
Make a wide cardboard ring. Cut the paper into small squares. Through back side pencil, bend each of them and glue to the base.
 happinessishomemade.net
Attach pompons or other decorations to the wreath. Make a loop out of the ribbon by passing it through the ring.
An original and simple wreath can be made just by wrapping corrugated paper around the base, tying a bow and attaching Christmas decorations:
From corrugated paper you get beautiful poinsettia flowers that need to be glued to a flat base:
Christmas wreaths from plastic bottles
Instead of throwing away unnecessary plastic containers, turn them into an original decoration.
What do you need
- Stationery knife;
- pliers;
- drill;
- spray red paint;
- rope;
- Christmas tree beads;
- decorative bells;
- glue gun is optional.
How to do
Cut the bottoms off the bottles. Make vertical cuts on them along the lines of the hollows. Bend the corners of each cut piece inward. For security, clamp the folds with pliers.
Drill a hole in the middle of each workpiece. Paint the plastic with red paint on both sides. Take two blanks and connect them with teeth inward, as shown in the video. Pass a rope through them.
Put the rest of the blanks on it, alternating them in the same order.
At the end, tie the rope tightly, forming a wreath from the blanks. Put beads on it and attach bells on top. They can be hung on beads or glued.
You can also make a wreath of plastic "leaves":
"Christmas wreath" made of plastic bottles.
Necessary materials:
Beads for a bow
Long strong wire
Scissors
Pliers
Plastic cups in two colors, but one size
Bow ribbon
How to do:
Cut off the bottom of the baklets using scissors. The cut should be neat. It can be wavy if desired. The height of the cut-off bottoms must be the same. Further work must be continued with the bottoms. Take a pair of pliers, fold the top edge, fold inward to shape them. Take an awl, heat it over the candles to make a hole. The wire should pass freely into it. String the bottoms on the wire, alternating green bottoms with white ones. Tie some wire to create a wreath. At the junction, attach or tie a ribbon bow. Additionally, decorate the bow with beads.
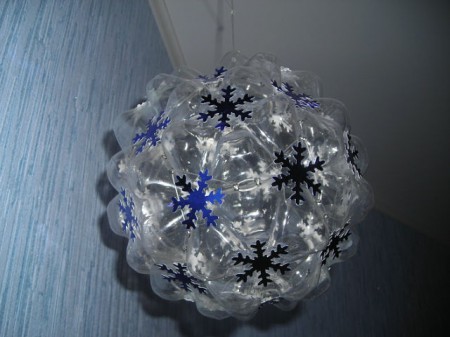
"Snowflakes" from plastic bottles.
It is necessary to cut the middle part of the bottles into separate squares.
On them you paint snowflakes in blue and white with gouache. Glitter glue can be used.
Then cut the image along the contour and tie the string.
This is simple toy that even children can handle.


"Flowers for the Christmas tree" from plastic bottles.
You need to use the very bottom of the bottle -.
Cut out such blanks from them so that the petals are visible. They can be round or pointed.
Paint in different colors and glue the caps in the center of the base.
You can revive the flowers and glue their eyes, smiles.


"Christmas balls on the Christmas tree" from plastic bottles.
To make the simplest New Year's crafts from plastic bottles, we need:
Empty plastic bottle, preferably clear white plastic; - acrylic paint (in this case red and white); - glitter nail polish; - glue; - scissors.
Cut off the neck and bottom of the bottle. We cut the middle part into rings 0.8-1 cm wide. We glue the resulting rings together to make a ball. When the glue is dry, we start painting our christmas ball and decorating it with braid, sequins or rhinestones. Then we carefully thread under one of the rings from below, where they were glued, attach a chiffon bow.


"Christmas tree bells" from plastic bottles.
Another cute Christmas tree decoration from a plastic bottle that is easy to make with your own hands is a bell. Christmas decorations such as plastic bottle bells on a Christmas tree are made from the top of it. Their edges can be made even or, for example, in the form of petals. Then, in the case of evenly cut edges, the decoration from the inside is evenly painted with acrylic paint, for example blue, and decorated with an ordinary red bow, as well as New Year's tinsel. A bell made of petals will look beautiful if it is painted golden and decorated with tinsel.

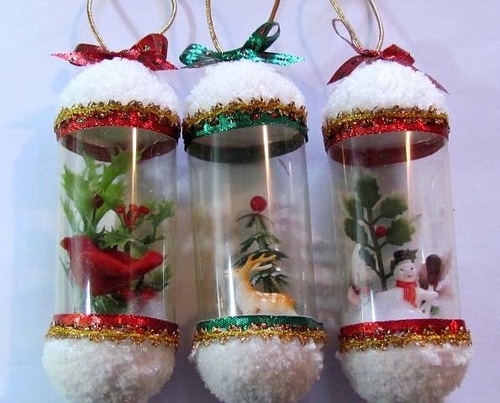
"Decorating a plastic bottle".
For this New Year's craft, you will need any plastic bottle, better transparent if we provide interior decor. At the same time, we cut off the bottom, decorate the bottle with cotton wool, New Year's characters, glue the bottom, decorate the bottle from the outside (with sequins, rhinestones, snowflakes, braid, ribbons).
For outdoor decor, we cover the bottle with golden paint, you can stick on New Year's self-adhesive and decorate with New Year's foam, ribbons and serpentine.

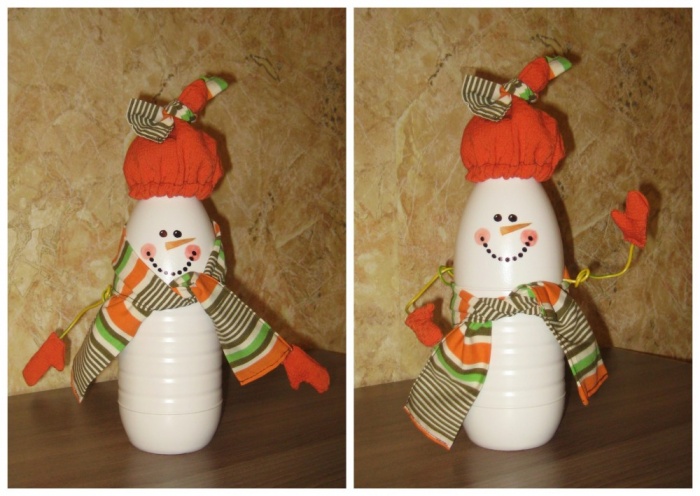
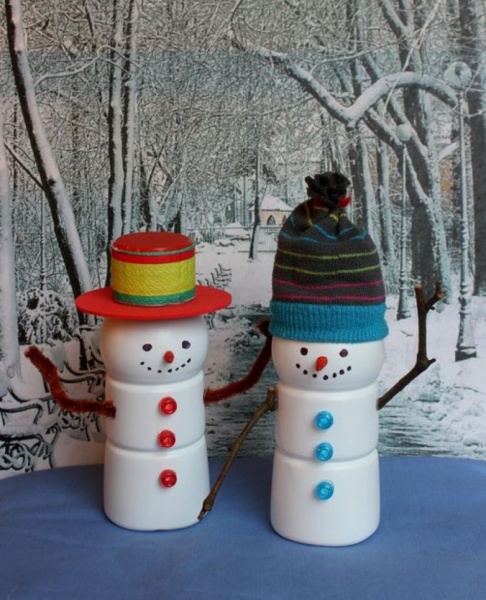
"Snowmen" from plastic bottles.
Mine, we clean the bottles from thick white plastic bottles of different sizes from labels. Suitable from kefir, activia, actimel, immunel, etc.
We cut out accessories from scraps of fabric, depending on the intended characters: mittens, scarves, hats, etc. If you need to sew something (for example a hat) - take a needle and thread and make a couple of stitches.
We glue the obtained "clothes" on the bottles (PVA) with glue. We fasten hats. Draw the eyes and mouth with a marker. From orange paper we twist sharp cones imitating a carrot nose. Glue and glue.
It is very easy and quick to create such figures. And the process itself, in which all family members are involved, gives the joy of anticipating the New Year's holiday, family communication and creative self-expression. A kid can give such a handmade gift to his grandmother / grandfather, which, of course, will cause them genuine admiration.


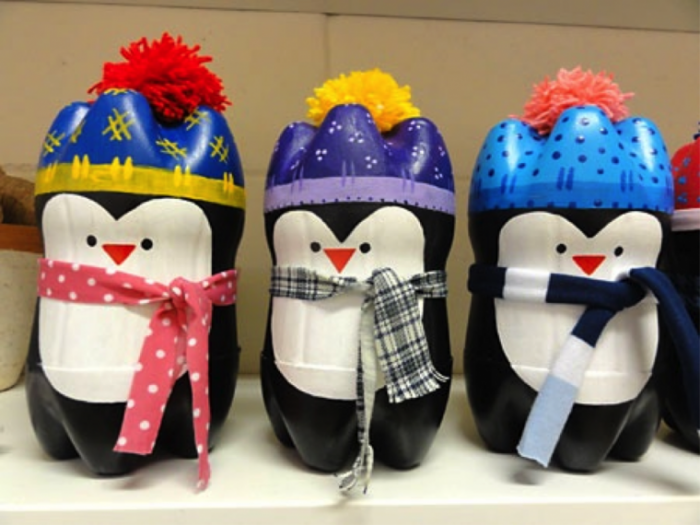
"New Year's Penguin" from plastic bottles.
 You will need:
- 2 plastic bottles of the same volume;
- hot glue gun;
- acrylic paint (black, white and any other colors you like);
- primer;
- black marker for CDs;
- clear nail polish;
- woolen thread and cut woolen fabric.
1. Thoroughly wash and dry the bottles. Take one of the bottles and cut off the bottom. Cut the second container in half. To work, you need the bottom of one bottle and the bottom half of the other.
2. To hold the parts together, insert one part into the other to a depth of about 2-2.5 cm. Mark the edge that you want to grease with glue. Disassemble the parts again, grease the edge of one of them with the (larger) glue (up to the mark), "put on" the bottom of the second bottle from above.
It will be enough to apply only 4 drops of glue, while monitoring its temperature so that the plastic does not melt.
3. After that, apply a primer to the part and distribute it well over the entire surface - the primer is needed in order for the paint to lay down better.
4. On a piece of cardboard, draw a penguin's belly and cut out the resulting template. Place it on the bottle and circle it with a black CD marker. Color the belly in White color- work carefully so as not to smear the black outline. Apply 2 or 3 coats of paint.
5. Paint the body and legs of the penguin black. Wait for the paint to dry. If necessary, touch up the contour of the abdomen with a thin brush. Choose a paint of any color you like and color the penguin hat with it, then decorate it with peas, snowflakes, stripes, etc. After that sketch out the eyes and beak.
6. After the paint is completely dry, apply a thin layer of clear varnish to set the result.
Make a pompom if desired. To do this, wind several layers of thread around two fingers folded together. The more revolutions, the fluffier the pompom will be. Carefully remove the skein from your fingers and drag it in the middle with the thread. After that, cut the loops and trim the protruding threads.
The finished pompom can be glued to the penguin's hat. Use a narrow piece of wool for the scarf - just wrap it around the penguin's neck and tie.

Psychologist-consultant Statsenko L.V.
Content
And we are here, as always with our interesting and original ideas New Year's crafts. This time we will create crafts from plastic bottles. Firstly, do not forget that plastic takes more than 100 years to decompose, so we must use it to the maximum in order to do less harm to nature.
Secondly, these crafts will not require too much cash injections from you. Thirdly, a lot of interesting gizmos can be made from this improvised material. In our article you will find figurines, a garland, a piggy bank, Christmas decorations and many other crafts from plastic bottles.
Christmas figures from plastic bottles
These crafts on New Year from bottles are created very easily. Here is a set of required items:
- plastic containers;
- scissors and a stationery knife;
- paints, brushes;
- textile;
- Knitting;
- felt;
- glue gun.
For example, you can make adorable penguins. To do this, you need to cut the workpiece in half, and cut off the bottom for the cap. Next, they need to be painted like penguins, glue the parts with a glue gun and decorate the figures with textiles.
A little advice - instead of a glue gun, you can use scotch tape, which you just paint over later.
Use acrylic paints, they fit better on plastic.

From this simple and affordable material, you can also make bright and beautiful apples, which can be placed under the tree or to decorate the kitchen with them. By the way, the decor is suitable not only for the New Year, but also for other holidays.

For a child, you can make a toy - a horse on a stick. If you improvise, you can also create a dog, because this is a symbol of the upcoming 2018. And the color, by the way, is yellow! So use a lot of yellow when creating your wonderful crafts.
Christmas tree decorations from plastic bottles
If a lot of the material we need has gathered in the house, and you already do not know where to put it, then our advice to you is for creativity! Let this container be creative! You can make wonderful snowflakes from the bases. They only need to be slightly colored and attached with a string so that they can be hung. Use a thin brush to paint the pattern. From such blanks, you can create a whole garland or wreath on the door.

Crafts for the New Year from bottles are both original and not expensive.
But these bells are obtained from the tops:

A whole ball can be crafted from bottle bases. Details can be painted, or you can use it in its original form:

Crafts from plastic bottles for the New Year is an opportunity to give a second chance to old things, an opportunity to join the culture of recycling things, sorting garbage. Thus, we consciously approach the use of resources, and besides, you can always call yourself a trash art artist, and this, by the way, is a very fashionable movement nowadays. In general, such handicraft is good on all fronts!
And the following Christmas balls made of stripes, which are decorated with various beads, paints, ribbons and other decor:

Snow balls
Another cool idea is to use plastic bottles to create Christmas snowballs. What we need:
- smooth plastic bottles;
- acrylic paints, brushes;
- sequins;
- decorative figurines;
- glue;
- foam or artificial snow;
- sequins, beads.
To begin with, you need to cut off the top and bottom of the bottle so that one tube remains. A circle needs to be cut out of polystyrene along the diameter of the pipe, we will attach our decorative parts to it.
Then, having coated the sides of the foam with glue, it must be glued to the main part of the composition, placing it inside the decoration.
The top and bottom of the pipe can be decorated with cut-off parts of the bottle, glued with a glue gun and decorated with artificial snow and ribbons. Crafts from plastic bottles are ready! You can also sprinkle sequins, sequins and beads inside.
Conversely, you can use only the top and bottom to create a kind of New Year's snow globe.

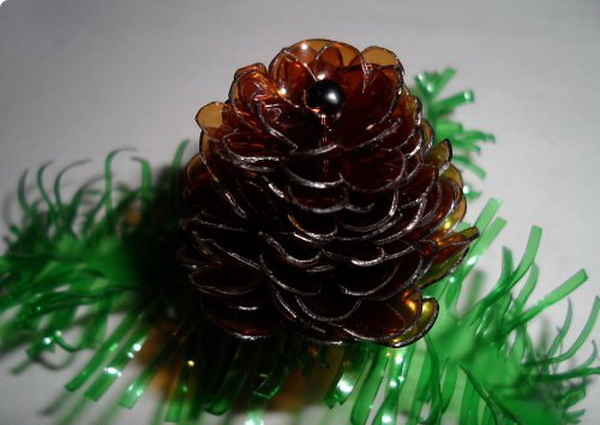
Cones from plastic bottles
Another decor option when plastic is used to create a cone. It is better to use brown blanks immediately.
From your material you need to cut something like daisies and string them on a string. Make blanks of different sizes so that you end up with a bump. Fir branches can be cut from a green bottle.
Plastic bottle wreath
For this we need the bottoms of plastic bottles, wire, bow and other decorations.

Details can be painted gold to add pomp and completeness to the craft, as well as disguise the material from which the wreath is made.

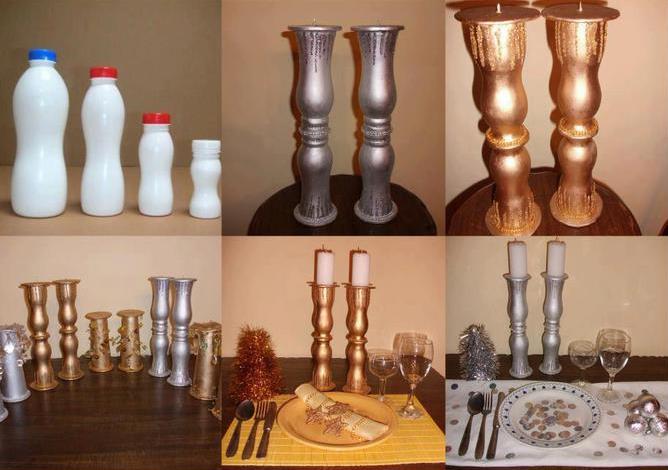
Candlestick for New Year
One of the New Year's attributes is a candle. Well, you and I can make very good candlesticks.

The next candlestick is made of two components, decorated with coffee beans, but, most importantly, it is a beautiful decorative candle.

By the way, do not forget that you can use not only bottles of mineral water or sweet water, but also of yoghurts, kefir and other products.
Souvenirs for the New Year
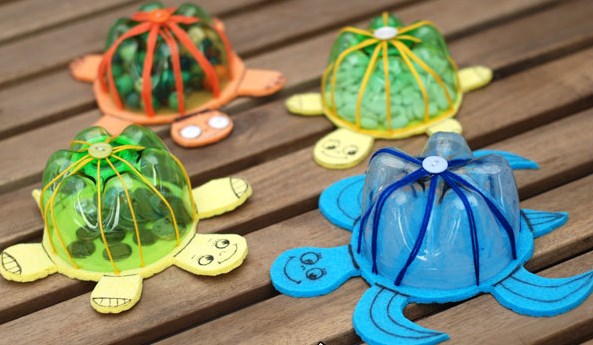
Something comic and funny can be prepared for guests or kids. For example, make a piggy bank out of a plastic bottle. And what? Very original! It will turn out to make a piggy bank-dog - it will be even better!

Use acrylic or spray paints, felt details, fabric, beads and various other decor for decoration. But children will definitely be delighted with such funny turtles. For the base, use thin kitchen sponges or foamiran. We have already described how to work with this material in our articles.
And how do you like a whole flower bed of tulips in the middle of winter? Such a composition can decorate a summer cottage or a courtyard of a private house. The first time guests will not understand for sure that these beautiful flowers are made from ordinary plastic bottles. As they say, crafts from plastic bottles for the New Year are a manifestation of imagination and ingenuity.

And a few more options for non-winter colors in the performance of the simplest and most affordable material at hand:


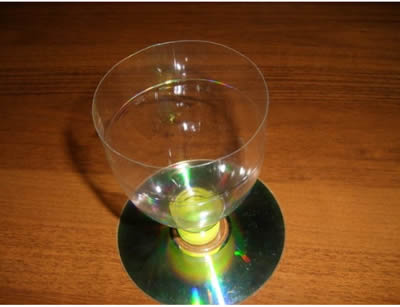
Plastic bottle cup
If you want to stand out from the crowd, have a special attribute, or you need to have a cup in accordance with the costume, then it can very easily be made from the material we know. By the way, read our articles where we tell you how to make crafts for the New Year from a bottle of champagne - this can also come in handy. So, the cup:
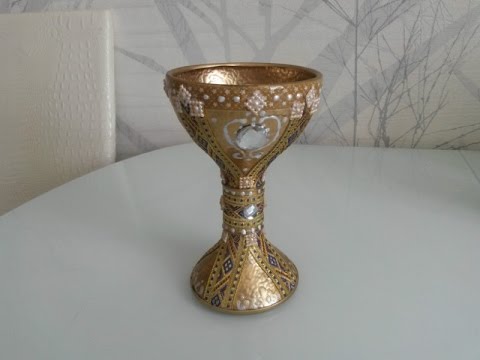
Luxurious, right? And, at first glance, you can't tell at all what it is made of, and at the second - too!
The design of a future wine goblet or as a reward might look something like this:

Or like this:
We love to tell you about different unusual crafts, about the materials from which you can make amazing things and which are in almost every home. All this in order for you to find a moment for creativity, for relaxation, for your hobby. Slow down the time around you, let, as they say, the whole world wait while you create beautiful things. Well, in conclusion - crafts for the New Year from bottles of video master class:
See how you can create a fun garland that can be hung in the kitchen or in the children's room, or wherever you want, at your discretion.
Post Views: 467