How to make light figures out of balls. Volumetric figurine-fish from several balls
If you haven't found a suitable hobby yet or want to change it, then creating figures from balls is perfect for this. Twisting (this is how this activity is called in a different way) is fun or even an art form that creates all kinds of shapes from balloons. It can be both fun and quite serious business - real craftsmen can create very complex structures. Initially, only clowns in circuses or parks did this to entertain people. Now, any person can happily learn this action on their own, since twisting balls can be bought in stores.

Habits That Will Make You Happy

What traits make a woman attractive

It is worth noting that making figures from balls in fact may not be as easy as you think. True, over time and after several workouts, you will gain experience and can easily make even the most complex figures.
Real masters of this business have long begun to engage in real art, and they do not even pay attention to primitive figures of animals. Some of them can even make balloon clothes that are shown at fashion shows.
If we consider the methods of making crafts, then two main types can be distinguished: these are monosyllabic and polysyllabic models. The main difference between the two is the number of balls used. If monosyllabic models are based on only one ball, then in polysyllabic ones there is often such a situation when the master uses several balls to create a figurine, which may differ in size and color.
In addition to diverse ways of twisting, there are many different directions and each of them has its own professionals. In our article, we will try to help you understand how to make figures from balls.

What happens if you stop washing your hair often

Ten habits that make people chronically unhappy
Benefits of drinking coffee
How to make shapes from balls?
Before we begin to explain something to you, we need to list those items that may be needed during the manufacture of the model:
- Special balls that can be bought in stores. These balls are made for twisting and have slightly different characteristics than regular balls. For example, this concerns their weight - they are much heavier and cannot fly in the air even when pumped with helium. There are also balls that have different lengths or sizes.
- Scissors with which you can trim off excess parts of the balls.
- Scotch tape - preferably double-sided.
- Black marker.
You may need a marker and tape only if you will be making a complex model. If you are new to this business and have never created figures using balls before, then you need to learn a few simple rules:
- Try not to completely inflate the balloons. Leave a small tail that will make it easier for you to break the ball into "bubbles". Before you inflate it, think carefully and calculate how many "bubbles" you need. Through the tail, you can very easily release air.
- If you are new to this business, then do not buy very hard balls. They are more difficult to twist or squeeze - softer ones are much better for this purpose. Over time, you will be able to move to more solid models.
- Start doing any action with the ball from its head and always leave a place near the "tail" - excess air constantly accumulates there.
- When you are trying to make a good twist, make sure that it is in the same direction as the others. It should be borne in mind that for a normal spin, you need to scroll at least three hundred and sixty degrees to this place, otherwise you will not succeed.
- Before you start doing anything with the balloon, you need to straighten it well, otherwise you may damage it while inflating or it will simply burst.
- Mechanical units can be used for inflation. Hand or electric compressors work well. True, such devices are best used by professionals.
How to make the simplest figurine?
So, you have read what you need to get started and memorized all the rules. Let's move on to practice and try to make one of the most simple models... We have chosen a heart shape as an example, for which we will use only one balloon. Take a red balloon, pump it up. At the same time, remember that you need to leave a "tail" of a few centimeters. Once you've inflated it, bend it in the middle and twist it slightly so that it doesn't straighten out. Connect the ends - the heart is ready.
As you can see, this is very simple figurine... We have specially selected this one to give you a first idea of working with the material. This will come in handy in the future.
There are a huge number of schemes on the internet that you can use. Good luck and success to you!
Video lessons
Impossible to imagine children's party without balloons... Such bright, gentle, weightless - they fill everything around with joy and create an atmosphere of fun and carelessness. Sausage balls by themselves do not represent anything special, but, falling into skillful hands, they turn into real masterpieces. Why don't you also learn how to make a dog out of a balloon?
The art of making balloon figurines
Twisting a ball and turning it into intricate figures is a whole trend in modern art, called "twisting". Today this trend is more popular than ever, and it all began in the distant 1930s, when the production of long balls first began. It is not surprising that magicians were the first to spin the balls, because this is a real sight.
The balloons of that time were not of high quality, but the situation changed dramatically after World War II, when balloons became thinner and stronger. The peak of popularity of twisting was at the end of the 20th century, at which time fans of twisting air figures began to unite in clubs, conduct lessons, and organize exhibitions. Initially, the twisting found its fans in the United States, and later spread throughout the world.
How to inflate the balloon correctly
Before making a dog out of a ball, you should familiarize yourself with the basic rules of twisting, which will greatly facilitate the whole process. First, you will need:
- long balls;
- hand pump;
- patience.
Secondly, you need to learn how to properly inflate and tie the balloon:
- before inflating, the balloon must be stretched to ensure an even distribution of air;
- the ball must be put on the pump nose, squeezed between the index and thumb of the left hand, and with the right hand pumped the air with reciprocating movements;
- the tip of the ball must remain un-inflated, otherwise the air will have nowhere to go when twisting, and the ball will burst;
- the tail of the inflated ball must be tightly tied, and modeling will begin with it.
Classic balloon dog
So, the balloon is inflated and tied according to all the rules. How to make a dog from a sausage ball? The circuit is pretty simple.

- We twist the ball in three places, as shown in the picture. Twisting involves rotating 360 degrees or more, twisting all the bubbles in the same direction.
- We twist the first and last twist (if we count from right to left in picture 1). We get a head with ears.
- If you get to this point, then you figured out the basics. We continue to figure out how to make a dog out of a ball. The diagram (point 3) shows how to make the front legs. Again we twist the ball in 3 places, forming 3 bubbles, and then we twist the first and third twists together, as in the previous paragraph.
- We make three more bubbles and twist according to the old scheme - we get hind legs and a tail.
- Now you know how to make a dog out of a long ball.
It's hard to say what kind of breed our dog has. But if you take a longer ball and make the body more elongated, then we can confidently say that the four-legged ball is a dachshund.
How to make a poodle dog out of a ball?
Another recognizable silhouette of a dog, a figurine of which can be made, is a poodle. How to make a dog from a sausage ball (scheme 2):
- Inflate the balloon, leaving the ponytail un-inflated.
- We twist the ball so that we get a chain of 4 bubbles: big-small-big-small.
- We twist the first and last twists - the poodle's head is ready.
- Next, twist 1 bubble for the neck.
- Now you need to make the front legs of the poodle. To do this, make two oblong bubbles and twist the twist in front of the first leg with a twist after the second leg.
- We make one bubble for the body, and then 2 more for the hind legs, we connect.
- In the rest of the ball, no more twists are required. Half the air must be pushed into the very tip of the balloon. Thus, the dog will have the place from which the tail grows, as well as a beautiful shuttlecock at the tip of the tail.

Compositions from balls
We have already figured out how to make a dog out of a ball. But if, in addition to balls, you also have scotch tape, a marker, perseverance and a flight of imagination, then you can make a whole composition, which you will not be ashamed to present as a gift not only to a child, but also to an adult. To create such compositions, balls are used different colors and sizes.

Balloon dog worth 58 million dollars
The famous American artist Jeff Koons, whose works are included in the list of the most expensive sculptures in the world, draws his inspiration from quite ordinary things. Inspired by the theme of balloons, in 1990 he created a series of sculptures dedicated to figurines using the "twisting" technique.
The most expensive of them - the sculpture of the orange dog - was sold in 2013 for a record $ 58 million. palace on the Grand Canal in Venice.
The author created 5 sculptures of dogs of different colors, but only the cost of the orange one broke all records. Another passion of Mr. Koons is sculptures that resemble flowers from balloons. The composition "Tulips", which is a bouquet of seven intertwined flowers, amazes with its weightlessness and festivity. Flowers, like dogs, are made of polished stainless steel.

Imagine, create a holiday with your own hands, teach this to your children. A air balloons they will help you with this!
Balloons in themselves are great fun for children of all ages. But today we have the opportunity to enhance the child's positive emotions from playing with balls - to teach him how to create figures from sausage balls. This activity will bring the child a double benefit - it will bring a huge amount of pleasure and have a positive effect on his development.
Not so long ago, children could see interesting figures made of balls (flowers, dogs, swans, etc.) only in a circus or an amusement park. And today they have a great opportunity to create such works of art on their own. Of course, without the help of an adult, initial stage, the child, most likely, cannot do it, but the result will be impressive. And there is nothing to say about the kid's delight from the process of making the figurine! After all, a minute ago it was an ordinary long ball, and now it is a real masterpiece.
And all that is needed for a child to master the art of making figurines from sausage balls is a set of colored long balls and a small pump (of course, you can try to inflate the balls with your mouth, but it will be quite difficult for the little master to do this). By the way, do not forget to inform your child that creating figures from balls is called twisting and they are engaged in it not only for their own pleasure, but also professionally. However, in order to learn how to create complex compositions from balls will take time and patience.
Toys out of thin air - Twisting.
Making figurines from long balls: benefit for the child.
Twisting can not only give a child joy and fun, but also bring a lot of benefits for his development. So, the creation of figures from sausage balls has a positive effect on the formation of the following qualities of a child:
- Coordination of movements. In the process of creating figures, the child has to carry out complex movements, because this activity requires the kid to do everything accurately and clearly. Hand strength is also trained. It only seems to adults that force is not needed to twist the ball, but the child feels it in a completely different way - each turn requires a lot of effort from him. Thanks to well-developed coordination of movement, the child will not have problems with writing and other precise activities in the future.
- Creativity. Every kid is endowed with imagination by nature, but its development requires a variety of tasks, which include creating figures from balloons. It is important not to limit the child's imagination with the available instructions. Let him independently come up with an original figurine, in the creation of which his emotions will find a way out. After all, every object from the world around a child can become an idea for creating a new image. These are plants, animals, vehicles, insects and much more.
For many children, creating figures from sausage balls has become a favorite pastime for a long time. After all, it does not require special perseverance and patience, and even the most active child can learn the art of twisting.
- Spatial thinking. Before creating a figurine from sausage balls, a child needs to imagine how exactly it is necessary to twist the ball in order to get the figurine presented in the instructions for beginners. A sense of proportion is also well developed in the course of this task. Having learned to work with the schemes once, the child in the future will be able to use them when performing more complex activities (modeling ships, embroidery, knitting, weaving from elastic bands, etc.).
- Fine motor skills. In the course of creating figures from balls with his own hands, a child has to perform conscious complex movements, which leads to the formation of neural connections, since nerve impulses must be transmitted from different parts of the brain to carry out this activity. It should be noted that along with the development fine motor skills various parts of the brain are also improved - from motor to speech.
An undeniable bonus for a child who excels at twisting is increased attention from peers. After all, children always want to be close to someone who knows how to do something interesting and unusual.
Creating balloon figures: what a beginner needs to know?
In order for the child to not find mastering a new lesson too difficult and frightening, it is necessary to inform him of the following rules for creating figures from balls:
- Before starting to inflate the balloon, you must slightly pull on the tips. Thanks to this, it will not burst and will be filled with air evenly.
- It is important not to completely fill the balloon with air, but to leave the “tail” 3-4 cm long. This is necessary so that during the manufacture of the figurine the ball does not burst due to the fact that during the process of squeezing it in several places there will be no place for excess air to go.
- All twists when creating a figure must be performed in one direction - from yourself or towards yourself. In this case, the turnover must have at least 360 degrees, otherwise the finished product will unwind.
- It is necessary to start creating a figurine from the side of the ball from which it is tied. This will allow all unnecessary air formed in the process of making the figurine to accumulate in the “tail”.
Making a flower from balls: step by step instructions.

Flowers from balls-sausages.
Perhaps the easiest figurine to make is a flower - it is from this that you can begin your child's acquaintance with the art of twisting. To make a flower, you need to prepare two balls - green and red, and then do the following:
- Having stepped back about 10 cm from the string of the green ball, twist it - this will be the core of the flower.
- Fold the green ball about in half and twist the top of this fold, and then in the same way fold the rest of the ball in half again and twist the second top - these will be the leaves of the flower.
- The red ball must be tied into a ring.
- The resulting ring should be folded with a "eight".
- Collapse each of the available parts of the "eight" again with the "eight".
- Insert the stem into the center of the resulting petals and the flower is ready.
How to make a balloon dog?

Sausage ball dogs.
Another simple but very interesting figurine is a balloon dog. You can offer it to your fidget when he once again begins to pester you with a question, how to make figures out of long balls pets.
A dog can be made from just one long ball. To create a figure you need:
- Twirl the bubble, stepping back a little from its tie, - this will be the muzzle of the future animal.
- Twist two more bubbles, and then connect them together - these will be the ears.
- Twist a bubble about 3 cm long - neck.
- Following the example of the ears, make the front legs of the dog and turn them down.
- Collapse the long bubble - the body of the dog.
- Make the hind legs the same as the front ones.
- Collapse the last bubble - this will be the tail of the animal.
For more realism, using a black felt-tip pen, you can draw eyes and a mouth for the dog.
Sausage ball butterfly: instruction for beginners.

Sausage ball butterflies.
To create a butterfly, you need 4 long balloons, the colors of which the child can choose on their own. Don't limit his imagination! Three of the existing balloons must be inflated, and the fourth should be left in its original state. Two inflated balloons will be needed to make the wings, so it is important that one of them is shorter than the other, the insect's body will be created from the third balloon, and the fourth (not inflated) will be needed for its antennae. A child will be able to get an interesting butterfly from four long balls after taking the following steps:
- Tie in a ring, and then twist the "eight balls" intended for the wings.
- He will bend the third ball (the body of the butterfly) in half, insert, into the resulting loop, the rear wings of the butterfly (the "eight" smaller in size) and fix them by twisting the "ball-body".
- Will secure the front fenders in the same way as the rear ones.
- Divides the rest of the "body-ball" into two halves by twisting.
- He will put the resulting halves together and with the help of both ends of the ball, fix the part in the neck of the butterfly - this will be the head of the insect.
- Will push the fourth (not inflated) balloon between the details of the "head" to create the antennae of the butterfly.
- Draws the eyes with a permanent marker.
You can invite your child to make several of these colored butterflies and decorate the nursery with them. Most likely, the kid will like this idea, because the figures made by him from the balls will be located in an open place and he will be able to proudly show them to everyone.
You can get acquainted with the assortment in more detail in the catalog of our online store
What do you associate with balloons? Celebration? Childhood? Fun? Perhaps almost everyone will answer this question that way. And that's all, because it was when we were little that balloons could be found at birthdays, in the circus or during other festive events in a city where funny animators turned into real wizards, creating various figures from balls. Such small or large figures of various animals and colors look very unusual and therefore attract the interest of not only children, but also adults.
You can create crafts from balls on your own at home and for this you do not need to have any special skills. It will be enough to buy just a few balls and you can start working miracles. As a rule, balloon crafts are not particularly difficult, but the result is stunning, so even a child can do such an unusual art form called twisting. Crafts that come out of the balls can be used to decorate the house for the holiday or to present the made figurine to friends.
In addition, you can make good money on crafts from balls. Since such crafts are very popular. They are usually used to decorate the holidays, creating fabulous atmosphere, and the very process of creating such figures is even a separate type of entertainment for children's parties. In addition, crafts made from balls in the form of flowers are in great demand during such holidays as March 8 and Valentine's Day, because such unusual bouquet will be very an original gift... So you can make good money on crafts from balls.
If you decide to get serious about creating crafts from balloons, then get a small pump, thanks to which you can quickly inflate balloons and create figures, while spending less energy.
What do you need to create balloon crafts?
Before you start twisting, you need to prepare a little. To do this, you must first clearly define what kind of craft you want to create. After you have made your choice, go to the store and buy a little more balls than you need for the chosen craft. This is necessary in order to avoid the situation of a repeated trip to the store if the ball suddenly bursts during operation.
When all necessary materials will be with you, you can get to work, but do not forget to free up a few extra hours so that you do not rush anywhere in the process of creating crafts, but simply enjoy creativity without wasting extra nerves. In addition, it is important to tune in the right way, namely, not to think that nothing will work out, because the work of creating crafts from balls is very painstaking and requires clear self-confidence.
Balloon dog
Perhaps, it is this craft that is most familiar to everyone from childhood. A dog made of balloons is most often made by animators as a small gift for their viewers, and all because it takes very little time to create it, but the craft still looks magical, beautiful and original.
So, to create this craft you will need:
- Just one oblong ball of any color you like.
- The desire to make a craft
- Patience
Such a craft is done very simply and quickly. Inflate the craft balloon first, but not completely! Leave some void about 5-10 centimeters.
Roll three small sausages on the other side of the free side. Now let's move on to creating the head, for this take two sausages, namely the first and the second, and twist them together, the head is ready!
Moving on to further creating a dog, which will be performed according to the same principle. So in order to make the neck and front paws, you also need to twist 3 sausages and twist the second and third together, only now you will need to twist your legs down.
The torso is made even easier for this you only need to twist one large sausage. The craft is almost ready, it remains to make the hind legs and tail. To do this, twist three more sausages, but now you need to twist the first and the second together, this is how the legs will turn out, and from the third sausage there will be a tail.
That's all the balloon dog craft is ready!
Chamomile from balls
Flowers from balloons are a beautiful and original gift for various holidays. Making such a gift with your own hands is quite simple, and besides, there are quite a few options for how to make a flower from balloons, but it is the version of chamomile from balloons that is the most beautiful and widespread among all.
For such a craft, you will need:
- White round balls 5 pieces
- Yellow round ball
- Two long green balls
- Patience
So, in order to make a camomile from balls, you first need to inflate all the round balls, both white and yellow. White balls should be larger than white balls. First, take two white balls and secure them with a strong knot. Now tie 3 more balls together and combine these designs. The petals are ready, move on to the stem.
To do this, you need to inflate the green balloon, but not completely leaving a little free space. At the end, make two small sausages and tie them together, wrap them in different directions.
Now you need to fasten these two parts with a core. To do this, take the remaining inflated yellow ball and stretch it along the center of the petals, wrap the circles on the stem with the tail from the ball and tie this structure with a knot.
The balloon flower is ready!
In order for the flower to be easier to fasten, you need to make all the petals of the same size. To do this, cut out an opening of the required size in the cardboard and, inflating the balls, measure by inserting half of it into the template, and inflate the ball until it fits perfectly into your circle on the template. Thus, do with each petal, then all the balls will be the same size.

Heart of balls
Perhaps, it is this craft made of balls that is very multifunctional, because a heart made of balls is also used as a simple gift and as decoration for festive design. Halls for weddings are often decorated with such a heart, because it is the heart that seems to speak of the love of the young. Such a figure is used to decorate the premises in honor of the birth of a child or just for a birthday. In addition, with such a heart, you can confess your love in a very original way. Therefore, everyone is practically obliged to be able to do such a craft from balls, besides, this activity is not particularly difficult.
For crafts you will need:
- For the heart, you will need as many as 150 round balls, this is certainly a lot, but it's worth it
- 2.5 meters of wire
- pliers
- Several hours of free time
- Patience
So, first you need to make a heart out of wire. To do this, connect the wire in a circle using pliers and do as diligently as possible perfect shape hearts. This process is very important, therefore it is recommended to pay special attention to it.
After you have made the heart from the wire, work on the balls. They all need to be inflated, of course, this process is quite long and painful, so use a small pump to inflate the balloons, so you will finish much faster.
When you inflate all the balloons, they will need to be tied four pieces together. To do this, first tie two balls per knot, and then combine two such structures with each other.
After that, all the resulting structures of four balls will need to be put on a prepared wire heart. Putting on the balls is quite simple, you just need to wrap them around the wire.
When you put all the balls on the wire, you will get a beautiful heart of balls, which can be presented or used as a decoration.
In order for the design of the balls to be more beautiful, it is recommended to put them on the wire in checkerboard, so that one ball of this would stand between the two balls of the previous row. This will hide the wire under the balloons and make your heart look much better.

Bright decoration from balls for the new year
For this composition you will need:
- 20 green balls, round shape
- Thread
- And, of course, the desire to create a holiday
So, take 5 balloons and inflate them to the maximum. After you have inflated 5 balloons, we tie them by the tips to each other. After that, we inflate 5 balloons just not as much as the first 5, and also tie them together. And so we continue until you have a very small composition that looks like petals like a flower. After that, the very first thing we did will be the base, the next one is a little smaller and we connect. And we do so further. If you do everything right, then you will have a wonderful tree. You can put a real star on top of your tree. And this composition can be wrapped in rain. 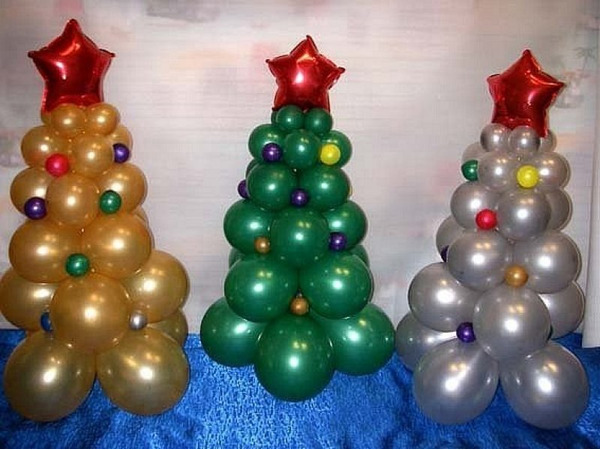
Now we will make a fairy-tale character of Santa Claus's assistant, a snowman
For this we need:
- Round balls white 10 pieces
- Round red ball 1 piece
- Decorating balls 1 blue, 1 orange and 1 white
- Scissors
- Two-sided scotch tape
- Self-adhesive foil in red, black, blue and white
- Marker
Let's start, take two white balloons and inflate, one should be larger than the other. After inflating, we tie the balloons. Now the balls need to be connected together. Now you should prepare a collar for the snowman. To do this, take 4 white balloons and inflate them and tie them. Then you need to tie them in two. Now the resulting balls of 2 need to be twisted so that they come out like a flower. Now two big balls, which we did at the very beginning, we twist with the resulting collar. And you get a torso and a head with a collar. Now we create the same way as the collar for the stand. On the resulting stand, we glue the tape and put our snowman.
We take balls for decoration and make hands for our snowman. This requires sausage-shaped balls. Inflate the balloons and halve the balloon and twist. Now, in place of the connection of the torso and head, we wrap our arms. For mittens at the beginning of the ball we twist 2-3 times, on the other hand we do the same.
We make a hat for our snowman, we take a ball for decoration of blue color and inflate it. Then we connect it so that the circle comes out. Take our red balloon and inflate it in the same way. Now we need to connect with tape and you should have a hat. We attach the hat to the head of your snowman using the same tape.
Now from self-adhesive film we make eyes and a mouth for our snowman. And we glue it to our snowman. We take the remaining ball orange and do not inflate it much. This will be our spout, which we attach with tape. Our snowman is ready.
Now we have a snowman and a Christmas tree, these are integral attributes of the New Year and which bring a smile and joy to everyone who sees them.

Balloon bear
The craft in the shape of a teddy bear will surely please both children and adults. This unusual toy can become an interesting decoration to create a festive atmosphere, or the bear can be just very an unusual gift... It will not be cheap to buy a bear made of balls, and why spend money if you can make it yourself and, at the same time, it is not worse.
For crafts you will need:
- 5 large round balls of any color
- Linkolun
- 3 small balls of distinctive color from the large balls.
- 4 small balls of the same color as the large ones.
- 2 oblong balls
- Beads
- Unnecessary ball
So first, take the need to inflate all the balloons, it will not take you a lot of time. Now take four balls and tie them together, these will be the bear's hind legs and, moreover, the basis for the figure. In order for the craft to stand, it will be necessary to make a weight for this base, it is very simple to complete this task. To do this, you need to take a small unnecessary ball and pour some water into it, tie the weight well with a knot and tie it to the adhesion point of 4 balls.
After that, you need to make the torso, it is quite simple to do, for its manufacture you will need one linkolun that must be attached to the base. The torso is ready.
Now you need to take 4 small balls of the same color as the big ones and tie them together. Now attach the resulting structure to the top of the linkolun and proceed to making the head. This is the hardest part of making a balloon bear. In order to make a head, take a large balloon and inflate it, mark the places for the ears and muzzle and deflate the head. In the places that you marked, drive the beads and wrap them with pieces of dangling balls. Then you can gently inflate the balloon. Now make the ears and nose. The ears and nose must be performed using a technique called an apple, more details about this technique can be found on the Internet. Now connect the details to the head and draw the eyes.
Attach the head to the rest of the structure and make the handles. To do this, inflate two oblong balls and make twists at their ends that connect at the ends. Now we attach the handles to the body and, if desired, decorate the bear with small details. That's all, the balloon bear craft is ready.

Bunny from balls
Such a craft made of balloons like a bunny will definitely appeal to all children. The craft looks very unusual and original. It can be, as well as a wonderful gift, and interesting decoration for festive design. Such a figurine from balls is very simple and to create it you do not need to have a special talent, just your desire and patience will be enough and everything will definitely work out.
To create a bunny from balloons, we need:
- Pump
- Scissors
- Black marker
- Blue balls SHMD 2 pieces
- White ball SHMD 1 piece
- Trim pink ball SMD
So, let's take the ball blue and inflate it, tie it and make a ring. For the tracking action, you need to find the middle of the ball, and with the other hand take it where we tied it. Now we make a figure that looks like an eight, and put it aside for now. We take the second balloon and inflate it, so that the tail remains about 6-9 centimeters. Now we make a bubble on it about 5 centimeters.
We take our figure eight and attach it with a joint to the bubble and twist them together. Now on the resulting leg we make a second bubble, the same as the first one. We twist the resulting bubbles several times, but this must be done so that the bubbles do not unwind. Set aside what came out for now and take a white balloon and inflate it.
You should leave a tail about 10-13 centimeters, now we make 3 identical bubbles on this balls. The resulting bubbles need to be twisted together, the next action that needs to be done is another bubble of about 20 centimeters, and bend it in half, and twist the ends. We make another exactly the same bubble and repeat the same procedure. We lower the remaining piece of the ball and make a knot.
Now we take the blue balls, and we dress the long end of the resulting muzzle from the white ball. On the blue ball, on which we put the white ball, make a bubble about 15 centimeters in size. We make the same bubble as we did just now and twist it together. Make two more bubbles slightly smaller than the previous two bubbles. Expand the first two bubbles and insert the two bubbles that we just made between them. Take the pink balloon and inflate it not much. Tie a long tail to a blue ball. Now we cut off the remnants of the pink ball. We take a marker and draw eyes for our rabbit.
If you do everything right, you get a wonderful rabbit, which will be a wonderful decoration for any holiday. 

Summing up, I would like to note that the figures from the balloons that are given in this article are only a small part of what can be made from balloons, since it is simply impossible to list all such crafts. The number of options for figures from balloons every year becomes more and more, people have more and more new ideas that they successfully implement.
But, despite the fact that there are a huge number of options for such crafts, they all have one definite feature, which is that all such figures are very simple to make and this activity can be done even with children. DIY crafts from balloons are an interesting and unusual hobby for both children and adults. In addition, you can make good money on such a hobby. So the balloon figures are interesting and exciting, and besides useful activity, on which you can also earn.
How to inflate long balloons? Recently, long balls for modeling can be found in almost every major supermarket. Usually, a balloon kit comes with a special pump for inflating the balloons, but if you don't have one, you can look in the store or use a bicycle pump with a nipple nozzle to inflate the balls. Both of these simple devices can also be used to inflate round balloons. To inflate a long balloon, you need to grab the top and stretch it several times in length. Then gently knead in your hands. It is important to do this carefully so as not to damage the surface of the ball, otherwise you will have to throw it away. Long balloons should be inflated carefully and as slowly as possible. If you hurry up, the balloon will burst. As they say: hurry up - make people laugh. Pull the neck over the pump inlet and begin to inflate. Hold the ball firmly with one hand, with the other pull the pump piston back. Moving the piston back and forth, you need to pump up a long ball. It is important not to make sudden and quick movements, otherwise the product may simply burst. It is worth remembering that a small "tail" should be left at the end of the ball. This is necessary so that the ball does not burst when twisting, so that the air can move freely inside. Do not overdo it and inflate the balloon strongly, otherwise it will be too tight and may burst when twisted.
If you don't have a special or bicycle pump on hand, you can try to inflate the long ball with your mouth, but this will take a lot of effort. First you need to properly stretch the ball. To do this, fill it with water and hold it under the canopy for a few minutes or swing it like a pendulum. Then drain the water and dry the ball. The latex will become soft and elastic. It will immediately be noticeable how it stretches a little. This will make it easier to inflate. You can also simply inflate and deflate the balloon several times, then wrinkle it in your hand and stretch it. So, all the preparation procedures have been done. Let's start to inflate the balloon. You need to take the neck of the balloon in your mouth, holding it with your fingers at the very lips, inflate a small segment about three centimeters long. Continuing to inflate the long ball, you need to gradually intercept and pinch its small pieces. As you inflate, you need to gently stretch the ball, pulling it away from you, helping it fill with air. Then release some air from the inflated balloon and tie the neck into a knot. It should not be forgotten that after the balloon has been inflated, it is necessary to release excess air from it. This removes excessive pressure on the walls of the ball, thus avoiding rupture. It is also necessary to remember that when inflating the cheeks, the balloon cannot be inflated. This will hurt your cheeks, and the balloon will remain a piece of colored latex. Do not try to inflate the entire balloon in one fell swoop. Nothing good will come of it anyway. The product will simply burst, and this is money and effort wasted. The article talked about how to inflate a long balloon, how you can make all kinds of funny and entertaining toys from long modeling balloons that will decorate any holiday, both adults and children, and become pleasant surprise for loved ones and work colleagues. This is a very difficult process, but worth it!