Grandfather Frost with her hands from the fabric. MK: Santa Claus from Flis
Before the New Year holidays, many parents, as well as educators of kindergartens and school teachers ask actual question: How to make an outfit for the chief New Year's Hero personally. You can buy ready carnival costume in the store or order tailoring new Year's dress in atelier. But it is not always beneficial in the financial issue, but to buy a cheap and poor-quality frost or Santa Claus, which is sold in every supermarket, no desire. In such a wizard, the defortion is unlikely to believe, and christmas story will be spoiled.
Composite parts of the outfit
First, let's understand, from which parts is the decoration: it is a fur coat, hat, mittens, bag with gifts, a magical staff and a white beard with a mustache. Of course, the main and fairly difficult part of the outfit is a fur coat, which is necessary exclusively on patterns. By the way, if you show the smelting, you can use the pattern of a bathrobe with long sleeves Or the old coat of the simplest style.
Pattern of the New Year decoration
Before sewing fur coats and caps for Santa Claus first choose the cloth with a short pile. This may be, for example:

For finishing, the fur coats and caps will need:
- white fur;
- batting;
- singrytegong, which can be replaced with a beautiful white cloth.
Fur coat for the main character
 Usually, these roles trust men, but women often have to dress up in his grandfather. The fur coat is dressing on clothes, so the size will be about 50, 52, 54. Yes, the grandfather 46 size will seem funny, and it must be alimply. So fabrics will need a lot. First you need to remove the measurements by a centimeter tape from the one for whom it is necessary to sew a suit of Santa Claus. Then you need to carefully examine the selected pattern and make sure that it is suitable in size.
- piece of chalk or dry soap wash;
- ruler and centimeter tape;
- ready, carved pattern.
Then you should cut out the matter, leaving the seams on the seams about two centimeters.
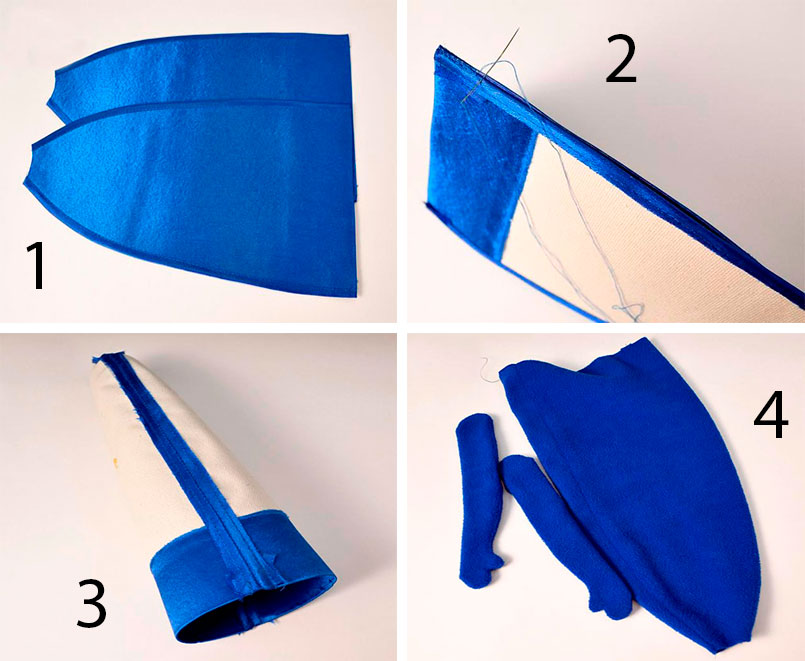
Fur coat sews out of five parts: Two front shelves (right and left), back, collar and belt.
 After the parts are cut and cut, you can start connecting parts. First, it is necessary to crimp the shoulders on the shoulders two front shelves with the back, then flash the side seams on the involving side. All seams need to be treated with zigzag, overlock or special scissors, so that later the edge of the material is not attracted and did not diverge.
Separately, you need to flash the sleeves and handle the seams. Then the sleeves should be swam in the coats. The main thing is to do it correctly so that the sleeves sat right.
When the main part of the coat is ready, it remains to sew a collartailored from white fur or any other fabric. You can also carve out and sew a collar from the same fabric as a fur coat, and then put fur on it.
The last detail of the Uraz is the belt (Kushak), it should be wide and long so that it can be twice to circle around the waist and tie in front. To carve out such a belt, a special pattern is not needed, you can carve out the part in size, twenty centimeters wide, taking into account the allowances on the seams and three meters long. If you have only short pieces of matter, and there is no segment of a suitable length, make a part of a cushion of several segments and sew them with each other.
Then the resulting workpiece Kushaka must be folded in length exactly in half, carefully beatened the edges inside and strain the entire part on the sewing machine. Your belt is ready, its tips from two edges can be reeded with white artificial fur, fringe or cloth.
New Year's hat for Santa Claus
 After the fur coat is ready, you can do tailoring caps for the breakouts of Santa Claus.
This will require a pattern. With the help of a centimeter tape, remove the measurements from the one to the thing. If you sew a child, all the measurements need to be removed from the baby, on an adult outfit - from an adult.
When the size of the selected pattern is perfect, it can be transferred to matter. It is necessary to transfer to the cloth with the desired size.
The cap consists of three details:
- top part;
- band.
 After the finished pattern is transferred to the cloth from the wrong side, you need to carve out all the details, not forgetting about the allowances on the seams. Then it is necessary to sew the top of the hat with the bottom. So that the cap kept the shape, you should sew a starch cotton fabric or from cardboard, tight paper. At the end of the work, the cap, like the coat collar, it is necessary to reap the white fur or cloth.
If you are preparing the magic making frost for a class or kindergarten, an indispensable attribute of such a magic stick-staff should be. Also need a bag with gifts. Consider how to sew it.
Bag for frost
Sew a bag for frost gifts quite simple. To do this, you will need a cut that you liked the matter, sewing machine, tailoring centimeter tape and fifteen minutes of free time. Ideally, a bag for gifts Grandfather's grandfather must be sewed from the same fabric as the entire costume. But if there are no similar matter left, the bag can be sewed from any, the main thing is to suit the color or were universal colors:
- red and blue;
- silver and golden;
- white and oil.
 So, it is necessary to carve two identical rectangular parts with a length of 1 meter and 80 centimeters width. Both details are sustaining on the sewing machine from three sides from the wrong side, the edges of the seams to handle zigzag or overlock.
The top of the bag is fastened to five centimeters and step on the typewriter. In the resulting lapse you need to insert a braid or tape, with which the bag will be tightened. Instead, you can carve a tissue strip, a length of seventy and width of ten centimeters, and add edges. Then sew it centered to one side seam On the front side so that the bag can be tied up with this ribbon.
So that all the details of the New Year's decoration of the Grandfather Frost looked magically and truly fabulously need to add to the decoration additional decor . The easiest way to decorate the outfit brilliant tinsel, which you can sew:
- along the edges of the fur coats;
- on cuffs;
- on the collar;
- as edge of the header.
You can embroider snowflakes manually or on a sewing machine with silver, gold or white thread; Squinting flickering sequins, rhinestones, beads and other decor elements. You can bind openwork snowflakes and sew them on the fur coat and the head of the Frost's grandfather.
Manufacture of Society
 The image of frost will be unfinished if there is no magical in hand, fabulous Egg. Make it quite not difficult. It is necessary to take a long-terrain, wooden or plastic, wind and puncture it with foil. And you can also paint white, silver or gold paint from the canister.
The top of the magical press is crowned with a big star. Cut out a large five-pointed star from a dense cardboard and enclose it with foil or paint paint. Edges of the stars and staff can be decorated with brilliant tinsel, glue large beads, rhinestones, snowflakes and any new Year's decorMade by personally or purchased in the store.
You can supplement the magic star of a couple of small bells, which will produce an original, fabulous effect from the appearance of a frost grandfather on a holiday.
Mitches for grandpa frost
Hands - it is the element in which the Datvora knows in the grandfather frost of his daddy, his wretched or a fizruck, so mittens must be a mandatory component. Carnival costume.
 For sewing, the mittens need to pick up the fabric, the same as for tailoring, hats or bag. If you sew mittens for the baby, then the pattern must be reduced.
It is necessary to transfer patterns on the fabric. Each mitten consists of three parts: one rear and two internal (top and bottom). To cut the mittens for the second hand, make the pattern to the material in the mirror reflection.
Then you need to cut the material taking into account the allowance for the seams (one centimeter) and sew. First, the internal parts of the mittens, then connect them to the back. All seams are flashing from the wrong side and are necessarily processed by zigzag or overlock.
Mittens, like other parts of the costume, can be decorated with tinsel, snowflakes, beads, rhinestones or other Christmas decor.
How to make a beard
An important detail in a frost costume - this beard, white, fluffy, magic. If you could not get a ready-made beard, you can make it yourself personally. From the following materials:
- from the synthet board;
- synthetic wool;
- artificial fur;
- white yarn;
- paper or fabric.
 We will analyze an example of creating from the old, forgotten, white or beige woolen sweater of machine knitting.
Must be taken old sweater, PVA glue, scissors, small flap white color.
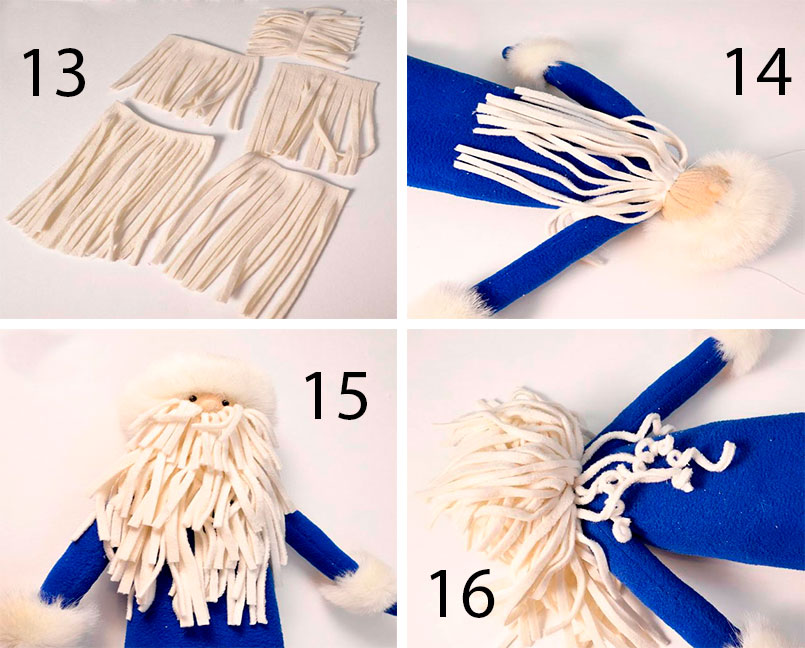
First, on white cotton matter, make a sketch of the beard of the desired size and cut it with scissors along the contour. Do not forget to make a hole for your mouth and strings, with which the beard will stay on the head.
Then you need a sweater to gently dissolve into separate threads, ranging from the lower edge of the beard, thread for string, can be small beams. It is necessary to glue the beard on the tissue base of smooth rows of threads, filling the entire free territory and creating a real beard for the Frost's grandfather. Thanks to the machine knitting, the threads will turn out strongly twisted, curly. According to this principle, it is possible to make a beard of a white ribbon strips, which florists use, pre-encourage them with the help of the scissors blades or from the strips of ordinary white paper.
Artificial fur beard Also quickly crammed and looks great. It can be done rounded or triangular shape. It is attached, like a beard of a sweater, with a gum or rone.
Bearding for a child and men can be made from household heater materials. Take the lingering rope and cut it on the same segments. With the help of a gun and hot glue gradually, a row behind next, stick the rope pieces on the tissue base for a beard.
If you have remnants of wool for fooling, you can make a mustache and beard for a fabulous hero from it. From the fabric, prepare the basis, stick the wool strands, ranging from bottom.
 So that the image of the new year's chief hero turned out to be full, be sure to make my grandfather specific makeup with a makeup or female cosmetics. Draw a red nose and ruddy brushes, white shadows make the eyebrows to be under the white beard.
If you can knit with knitting or crochet, then you can not only sew out, but also to tie.
Now you can easily make a suit and a unique image of your favorite New Year's character.
ATTENTION, only today!
Pillows with animal silhouettes, especially with a silhouette of Rudolf deer, look very in winter. You will need to print a picture of a deer or other animal on the printer and cut down the contour. Cut the silhouette from any fabric by the template, connect with adhesive flieselin and affect it to the pillow.


The silhouette can be created differently if you cut the "window" in the form of an animal directly in the pillowcase and put the "patch" from any tissue. "Pack" after that sew large hand stitches.

Pillows with appliqués for the new year
The easiest way to decorate the usual pillow, thereby turning it into the festive. Fabrics and figures can be the most different: Christmas trees, snowflakes, snowmen, and so on. Let the children lay out the figures as they want, and already then set (if there is a sewing machine) or affect (if you use fliesline) the appliqué details to the pillow.


Cushions with christmas socks
New Year's pillows can also be decorate with mini-christmas socks. It can be knitted socks or carved from fabric and pasted on a pillow. The original and simply option is to take a few identical baby socks and sew them to the pillow.


Pillows gifts for the new year
It's very easy to arrange in the form new Year's gift. As, however, any other pillow. You just need to bandage the cushion with a decorative ribbon so that it turns out a lack of gift.


Figured New Year pillows
In the shape of a Christmas tree, stars, Christmas socks and animals will look very original in any interior. Yes, and make such pillows to the new year are not so difficult for the new year: cut two pieces of fabric from the fabric, sushrot, leaving the filler hole, fill the pillow and squeeze to the end.


New Year's decorative pillows with buttons
If you like the options more complicated, a Christmas cushion, decorated with buttons - exactly what you need. However, the complexity here is not how to make the pillow itself, but in the fact that you will need a lot of time to sew all buttons in the form of a picture.


Pillows with inscriptions for the New Year and Christmas
Decorative pillows for the new year can be decorated with inscriptions. What to write? Yes, anything from wishes on New Year Before your favorite quotes about winter and winter holidays. The inscriptions can be from the fabric, felt written by paint or embroidered threads.


New Year's decorative pillows with pompons
Soft and fluffy, can decorate any, even the most boring pillow. Sew them in the form of a Christmas tree, snowman, a deer nose or in the form of an inscription decoration. And even small pompons can be beautifully realing the pillow around the perimeter. We are sure of the New Year's pillow with pompons will be the most favorite pillow with your household.


Pillow with a pocket for the new year
Christmas pillow with pockets perfectly replace christmas sock. A child will be able to put letters in his pockets to St. Nicholas or Santa Claus to find the presents in the morning.


Santa Christmas Pillow
Santa Claus Pillow? Or santa pillow? Yes, what's the difference, if this New Year's pillow is better than others can fill the house atmosphere of the holiday and the expectations of the miracle.


Such beautiful pillows for the new year you can help unusually decorate your home for the holidays and create an extra comfort and winter mood.
Tilde dolls possess extraordinary magnetism. These dolls are brought into the house a droplet of something truly magic and fabulous. Santa Claus Tilde is not an exception.
Let's put this year under the Christmas tree of the most magical Santa Claus in the style of Tilda! Santa Claus Tilda Master Class will require little preparation.
For the manufacture of Santa Claus in the style of Tilda, it is necessary:
- pattern doll
- calcular color
- fleece White and Red
- striped cotton or red peas
- black felt
- filler for dolls (syntheps or hollofiber)
- white beard yarn
- threads of different colors
- scissors
- pencil
- accessories for decoration (buttons, puments)

Print the pattern and cut the details of the crafts. Pattern pattern at the bottom of the article.

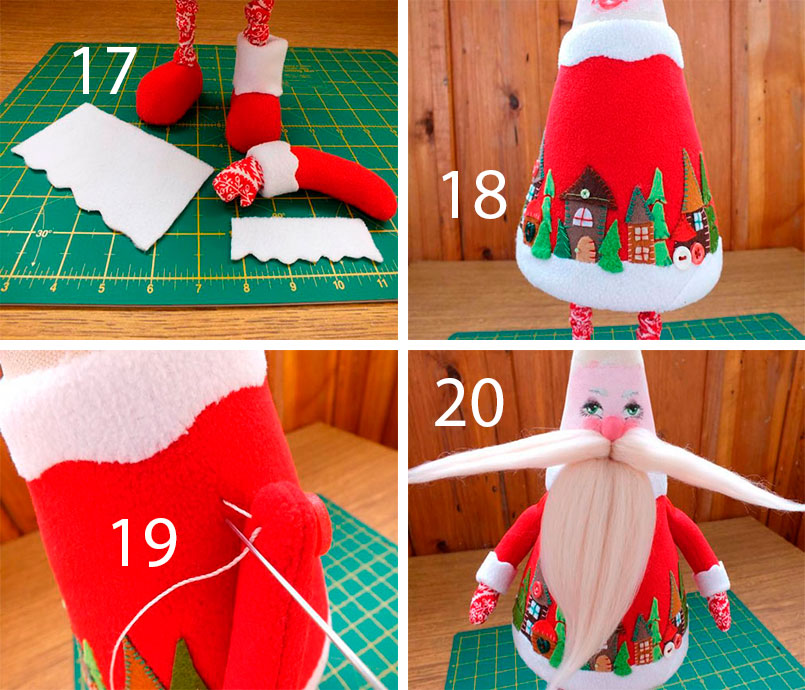
Calcuses fold twice. We put the body and hands on top of the fabric. We supply them along the contour.
We make lines in two layers of fabric on a typewriter on these contours. We leave open cuts at the bottom of the torso and at the top of the hands (through them a pack will be carried out).

Cut the stitched parts, departing from the seam of about 5-7 mm.

Soak torso and hands. Put them with syntheps.

We sew open sections.

Send your hands to the body.

From the fabric in the peas we cut 4 details of the legs. From felt Details boots (two in one direction, two looking mirrored on the other side). Send the upper cut boots to the lower cut of the legs.

Finished details of the legs fold in pairs on each other facial side Inside. We make a line along the contour, leaving open upper cuts of legs for packing.

Soak legs on facial. Put them with syntheps to the middle. We make a line across as indicated on the pattern immediately above the packing.

The upper sections of the legs are sewn and sew them to the body.

That's what we should get.

From the red fleece cut:
- 2 details of the fur coat
- 2 details of the pants
- 2 Details of the Cap
- 2 details of sleeves

From the White Fleece I cut:
- sleeveless Cuffs
- cap Lapel
- field of the lower edge of the fur coat
- front plank for fur coats

The details of the cap are folded with each other face inside. We flash on the typewriter, leaving open nizhny slice. Soak on the front. Send on the bottom edge with a white fleece.

To the lower edges of the sleeves and stanter sewing the cuffs of a white fleece.

To the front detail of the fur coat, first vertically in the center of the front bar. At the bottom edge of the front and back of the fur coat, sew the edge.

The details of the fur coats fold the front side inside and sew shoulder seams. Insert the sleeves in the armored arm.

The fur coat again folded the front side inside and sew the side parts. We start with the edges of the sleeve and finish the bottom edge of the fur coats. Turn the fur coat on the front side.

Each panta folded in half and make stepper seams.

One pant to invest in another in such a way that their front sides coincide and coincided open sections. Sew on the midline. Remove pants on the front side.

Dress up pants for Santa Claus. Evenly ruling around the body, collecting small folds.


Dress on santa fur coat and cap.

On the face of Santa Claus to embroider with black chicken threads.

From yarn cut threads and sew them to the face of Santa Claus. We will have a luxurious salary beard.

From the same yarn to make a pompon and sew it to the tip of the cap.

Decorating a fur coat with buttons and give Santa to the hand of a bubber.

What is Santa Claus without gifts? From bright red cloth, sew a luxurious bag and bandage it with a golden braid. Squeeze our magic character under the Christmas tree. Master class "Santa Claus Tilde with his own hands" approached the end.

Tilde dolls are not only very pretty externally, but can still serve as a faith for home and talisman, bringing good luck in the new year. Let the New Year's grandfather bring you good luck and prosperity!
Santa Claus Tilda Pattern


The favorite holiday is approaching the new year. I want to create fabulous atmosphere and festive atmosphere, and in this we will help creative crafts. In this article we will look at: how to make Santa Claus and Santa Claus with their own hands.
You will need: foam ball with a diameter of 6 cm, faux fur, Shabrak, Kosy Beeke, Holofiber, Hemispieces for Eye, Pattern, Snowflakes, Sewing Machine, Iron with Blankets, Scissors, Textile Glue, Crea Satin of blue color, fleece of white, bodily and blue, stick for the staff, silver braid.
Master Class
- Cut 2 details of the body from the shabra, glue crepe-satin, then treat long cuts of oblique bay.
- Fold the details of the crepe-satin to each other and sew the long sections of the seam through the edge.
- Form a rounded shape using an iron and a sleeve block.
- Put the details of the fur coats and the pens from the blue fleece.

- Sust, remove on the front side, and leave the holes for packing in the handles.
- Cover the ball with a bodily fleece and make a neck, wrapped with a thread excess fabric.
- Make and attach the nose, then attach the hemisphere as an eye.

- Put the fur coat on the blank from the shabra, insert your head into the body hole, then the trick.
- Make a cap in this way: Cut the rectangle on the volume of the head of the blue fleece, sew short side And get the top of the thread.
- Prepare fur stripes for cutting caps and sprinkles of fur coats.
- Attach the blue hat with hints to the head, then enter the fur strip of the online flushed and screw the fur to the top.
- Write the handles with a holofiber, squeeze the holes, decorate the wrist fur and the trick of the hand.
- Make a beard in this way: cut out several bodily fleece rectangles with a difference in a length of 1.5 cm. It is worth noting that the rectangles need to cover so that the fleece is stretched along the long side of the rectangle. Cut the fringe.
- Sew the beard details to the head, starting work with long blanks, gradually rising to the nose.

- Razzate and tighten the beard, forming curls.
- Decorate the fur coat by attaching the snowflakes.
- Wrap a silver braid wand to get a staff.
Chic Santa Claus is ready!
You will need: Red napkin, pattern, marker, glue scissors, paper, printer, hole punch, beep.
Master Class

Santa Claus from napkins is ready!
You will need: Wool, wands from ice cream, red felt, decorative eyes, red pompon, adhesive gun, body color paint, brush, scissors.
Master Class

Santa Claus from Wat is ready!
You will need: Felt thickness of 1 mm beige, white and black color, white felt thick 3 mm thick, dense cotton fabric beige color, wool for filling white, sintepon, wire, pattern, black beads for eyes, black and beige struts, scissors, pencil, Adhesive pistol, small bell and other decorations.
Master Class
- Print the template.

- Cut the body of Santa Claus and transfer it to a dense white felt.
- Cut the body of Santa Claus from felt.

- Cut the same body detail, only from a thin white felt.
- Cut shoes from a dense white felt, then the same shoes made of thin black felt.
- Cut out challenges for a slim white felt boot.

- Draw mittens and cut them out of a dense white felt.
- Cut out a detail from a thin beige fetra - flop of fur coats and caps.
- Cut 2 mugs on a pattern of cotton beige tissue.
- Take a nose from a small mug: pull the thread, type the Singisterboard and the sprinkle to the large mug.
- Sew black bispers as an eye.
- Sun face to the calf from a thin felt. It is worth noting that during the sewing you need to add some synthesis for volume.
- Make eyebrows and beard from wool for fooling, then attach the adhesive gun.
- Stick the header and fur coats.
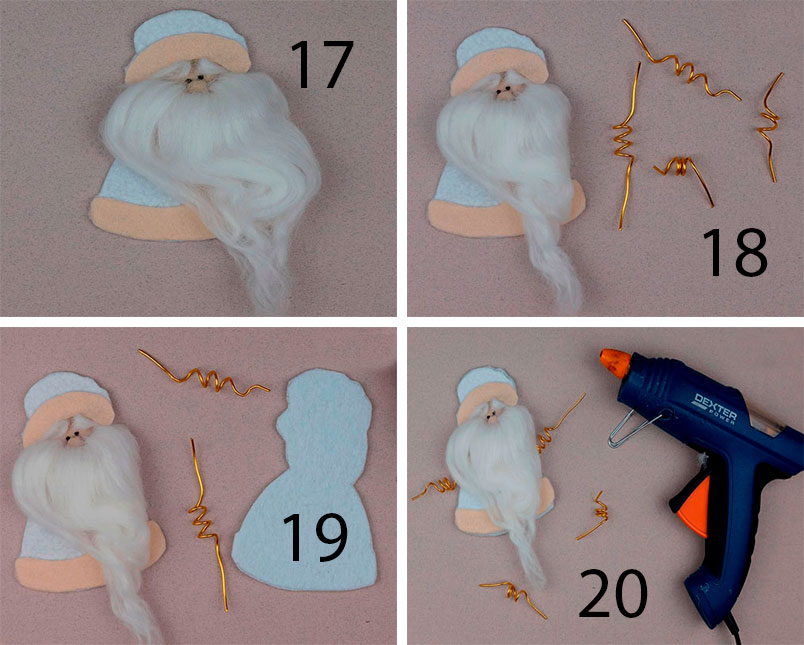
- Prepare 4 wire segments, tighten them to a pencil, giving them a form as in the photo.
- Spread the details of the body of the frost from a thin and dense felt, while incurred by the wire in the place of the handles and legs.

- Stick mittens and shoes to twisted wire segments.
- Cool from the wire holder for the bell and glue it to the mittens.
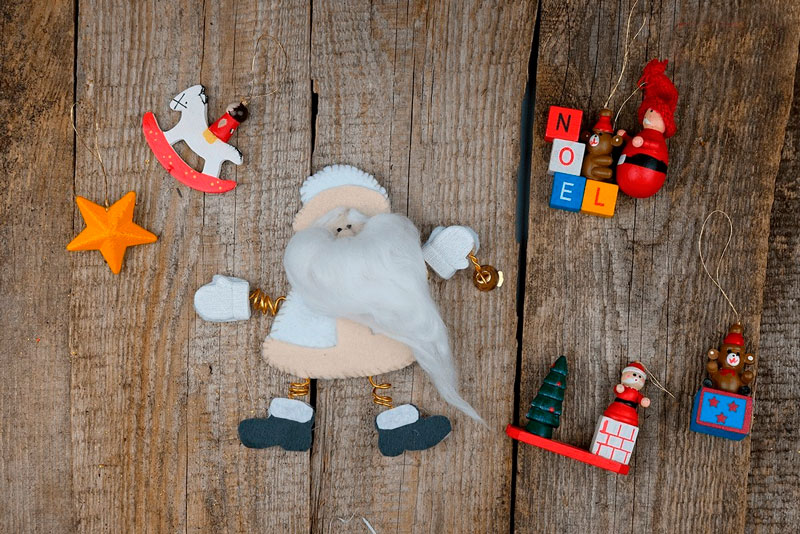
- Change the Figuroke Figurine of the Frost Figurine beige.
You will need: Bottle of champagne, hook, yarn, centimeter, edge, filler, ordinary thread, needle, puppet strands, glue, decoration.
Master Class
- Tie the head with bars without a beige yarn, on the principle of knitting a ball. It is worth noting that the number of rows without additives and grazing should be two rows less than for a ball.

- Make the basis of red yarn dolls: Tie a circle with columns with an attachment, fold it in half and make nodes at a distance, as shown in the photo.
- Tie hands and torso circular rowsthat narrow to the bottom.

- Tie a nozzle on a bottle of beige yarn and do not forget to constantly try to try it to be not very tight.
- Connect the bottom of the nozzle and the workpiece with your hands on the bottle.
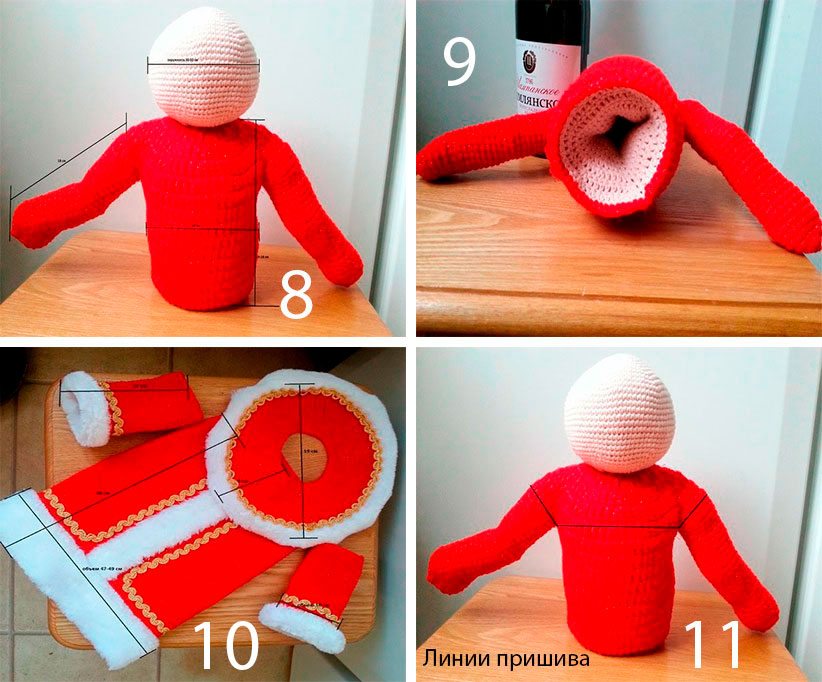
- Click the filler with a red blank handle and empty space.
- Dimensions: Head Circle 30 cm; Hand length 18 cm; The width of the body is 30 cm; The height of the body is 16 cm.

- Tie and decorate your clothes.
- Clothing size: diameter of the billet cap 10 cm; Sleeve length 12 cm; The length of the fur coats is 28 cm; Sleeves with 18 cm; The volume of fur coats 47 cm; Circle of the finished cap 32 cm.
- Sew clothes with ordinary threads, the sewage lines are indicated in the photo.

- Attach the puppet strands to the yarn and lock the glue. Make a beard from long strands, and for hairstyle, take shorter.

- Stick the header to the head.
You will need: Red cardboard, bodily color paper, 2 openwork napkins, scissors, marker, simple pencil, glue.
Master Class

Santa Claus Isper openwork napkins Ready!
You will need: Cotton Bright and Body Color Fabric, White and Red Fleece, Felt, Singry Training or Holofiber, Comb Ribbon (Wool for Fall), Foam, Flawing Needle, Fat and Thin Wire, Adhesive Pistol, Moment Crystal Adhesive, Tight Cardboard, acrylic paints and brushes, wires for wire, pliers, stationery knife, buttons, beads, beads, threads Moulin.
Master Class
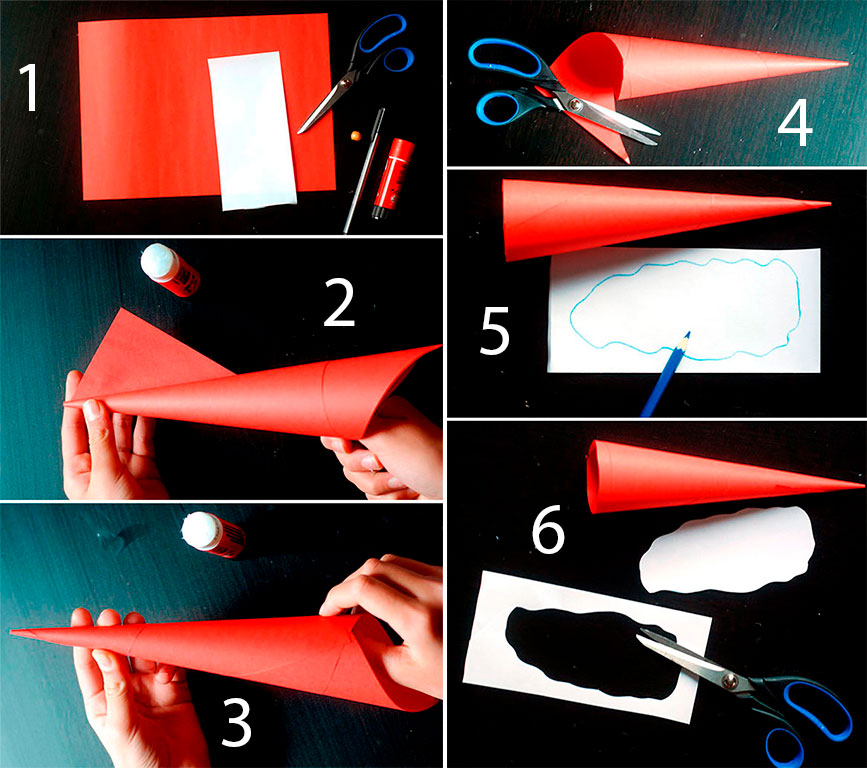
- Make a pattern of cardboard: cone sides 13 cm; Circle with a diameter of 6 cm and handles (arbitrarily).
- Spend a line through the center of the circle and divide on 3 equal segments, then do on their joints of the wire hole.
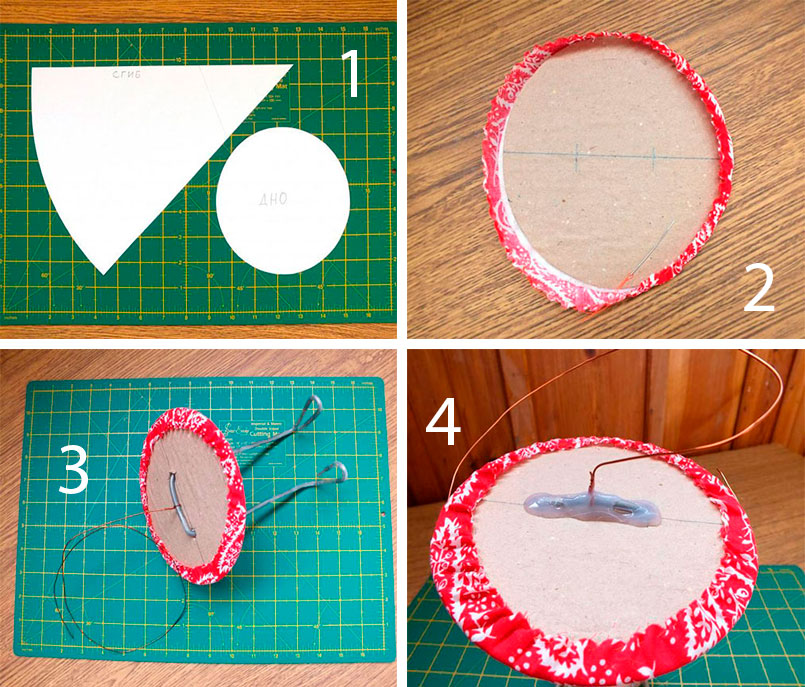
- Take a sinteponic circle and a circle of cotton fabric to the cardboard circle a little larger diameter, then torn the fabric around the cardboard using a thread and needle, as shown in the image.
- Bend thick wire in the letter P, then insert it through the holes in the cardboard, syntheps and fabric.
- Bend the ends of the wire in such a way that the footsteps come.

- Prepare a length of a thin wire long 25 cm and screw it to thick wire, then glue with hot glue. At this stage, make sure that the design is stable.
- Prepare 2 cotton fabrics with a length of 22 cm. 4 cm long. Fold along in half, position, remove, pull on the legs and trigger the secret seam to the bottom.
- Make a pattern of a cone from bodily fabric, fold in half, position, leaving 2 mm of the tops are not covered, adjust the edge around the circumference, proceed and remove the cone.
- Put on a thin wire cone deriving her end through a hole in the top. Write a Cone with a hollowube in such a way that the wire is in the center of the torso, then enter the bequeated edge to the torso in the circumference of the secret seam.
- Cut the big feet from the cardboard, then glue them to the wire footsteps of hot glue.
- Cut shoes from the foam rubber, and at the back, make a recess for the ankle wire, then attach them.

- Cut 2 oval from a red fleece, in the upper part. Relieve a triangle, cover the foam boots, the backstage of the secret seam and tighten the fleece around the cardboard sole.
- Cut 2 oval from felt the size of a little more cardboard soles, stick to the sole of hot glue, cut down the unnecessary and fierce felt to the fluxe wedge.
- Next on the cone line of the top of the jackets and the bottom of the cap, then roll the ball from the synthet board, cut the circle from the fabric, torn around the edge and enter the spout.
- Draw the face to your taste.

- Severe a jacket made of a red fleece in the form of a truncated cone, fold in half, scratch around the edge, then remove.
- Sustrate the handles and gloves from the red fleece and cotton fabric, as shown in the image.
- Tension the jacket on the body-cone and sustain from the bottom and the neck of the secret seam.
- Cut the figures from felt - Christmas tree, at home, then glue them to glue crystal and only then the trick is optional.
- Sweep a secret seam of a white fleece ribbon and decorate the composition by beads and buttons.
- Cut out the white fleece tensions of shoes and cuffs, fold in half, scratch around the edge, pull on the handles and legs, then the trick manually. In the same way, make a wavy collar.
- Singing your hands to the body with a buttoning attachment: pull a little thread, tie a nodule and proof by a moment.
- Tear away from the ribbon 10 cm of wool, collect in a bundle and reveal the needle to felting the beard.
- Tear off the beam 2 times thinner and 2 times longer then, reveal to the place of the mustache.
- Return another 2 beam as for the beard, then reveal on both sides of the face.
- Take the hairstyle on the sides and on the back of the same way.
- Crop from x.b fabric based on half of the cone elongated and narrowed to the top of the hood, sushring it leaving the hole above.

- Remove and wear the cap, removing the wire through the hole and arrive along the edge to the head. Tregate the loop of the wire.
- Make a pompon and a white fleece lapse, then enter them.
- Make a small Christmas tree from felt and glue it to the header as a decoration.
You will need: colored paper Red and white, scissors, glue, marker, pencil, wooden boussin.
Master Class
Santa Claus from Plate
You will need: Paper plate, colored paper, scissors, glue, marker, printer, eyes, hole punch, rope.
Master Class

You will need: Box, colored paper, scissors, glue, marker, pencil, button, elastic, envelope.
Master Class

You will need: plastic bottle, paints, colored paper, pompon, scissors, buttons, 2 bushings, glue, wool, white and black lace.
Master Class

Santa Claus from the bottle is ready!
You will need: White and red paper, scissors, pattern, printer, pencils or markers.
Master Class

Creative grandfather is ready!
You will need: cotton disks plastic spoon, glue, red yarn, eye butt, ribbon or thread for hanging, red felt-tip pen, scissors.
Master Class
- Take a cat drive.
- Generate its side part to the center.

- Make cuts around the edge of the circle.
- Draw a smile with a marker.
- Take a plastic spoon.

- Apply glue to a spoon, leaving her tip without glue.
- Mock yarn tight.
- Apply glue on both sides to the tip of the spoon and stick to the convex part of the face of Santa Claus.

- Stick a clean cotton walker on a concave part of a spoon.
- Cut the circle from the cotton disk and glue it to the tip of the spoon handle.
- Cut the circle from the cotton disk, pull it out with a felt-tip pen and glue as a nose.
In this article, we will talk not just about pillows, but about unusual pillows - about the "New Year." - It is, first of all, the decor. If she new Year- Singing the print with this holiday inherent this holiday (that is, a picture, photo or inscription). In this article, consider how you can arrange New Year. We will not analyze textiles, let everyone decide for himself, which cloth for the pillow to choose. It is clear that it is not difficult to sew your own hands, but you can buy. Of course, before buying a fabric or a finished pillow, you need to understand what more likes, inspires and raises the mood from the New Year's theme.
So everyone knows that the new year is:
- Machine that takes the Christmas tree
- Christmas decorations
- Santa Claus (or Santa Claus, who likes who likes)
- Snowmen
- Snowflakes
- New Year's wreath
- Deer
- Winter birds
- Christmas Flower Poinsettia
- Winter clothes
- Winter pictures
- Everything, everything, everything ...
So let's start in order. Pillows with the image of the tree perhaps one of simple options Registration of the New Year's pillow. Look at the photo below: even a child can make such an embroidery!
In this video, it is shown how you can embroider a Christmas tree with a few shades of green threads Moulin.
The following version of the embroidery of the New Year's pillow cannot be called simple. But, if you know how to embroider and gain patience, then for a while you can prepare such a beautiful pillowcase for the New Year's pillow.

When decoring the new year is very popular applique. All because the shape of the Christmas tree makes it easy to carve out and sew this drawing to the main background.


Moreover, the Christmas tree may be in the form of a common ate, which we used to draw in our drawings from childhood, and may consist of one or more of the inaccessible triangles.

Pofantize and, perhaps, your Christmas tree will be even more unusual than in the photo below.


The main background of the pillow can be any, choose by your mood. But keep in mind that on a white background, any applique looks much brighter.

You can surely be sure that the pillow made by your own hands will be a completely original instance if you used to applix your own ideas.

Pillow with a Christmas tree balka is also an interesting solution!

For such a pillow, two types of fabric will be required, one of them-fabric panels depicting new Year tree. You can search in stores ready-made pillows with this new year symbol.

Pillow postcard will be good gift Close to people.

The original execution of the tree-in-form, you can also try to make it yourself.

Here is another way to decorate the apparatus:
- need to take mugs neatly cut from soft fabric (By the way, not necessarily green)
- fold them in half
- take 3-4 mug into one hand, and take a sewing needle to another hand with a thread and hide the folded circles together with one or two stitches. Seam must be strong enough.
- such billets need to do quite a lot
- marker for fabric (or simple chalk) on the future pillowcase for pillow Draw a Christmas tree
- according to the resulting image, sew blanks from the circles until you see what happened

Such a pillow is not only beautiful, but still soft and comfortable! 
If you have no time to make pillow manufacturing or simply do not like homemakes, buy a cushion of factory manufacturing with New Year's topics in the store.


You will try, and in stores will find high-quality and original decorated pillows with New Year's pictures.

Of course, no one will argue that the Christmas tree on the New Year's pillow is the most common option. Want to decorate on your pillow to be unusual, but characteristic of the winter holiday, make an applique where "The car is lucky tree from the forest" .

There are options for this applique complex in execution, and there is also easier.

If you can't get a pillow with your own hands, there is always the opportunity to buy it in the store. (You just need to know exactly what I want!)

And the pillows can be decorated "Christmas toys." And, imagine it is absolutely easy with the help of the same method of appliqué. Cut out from the remnants of different fabrics (which is at home) circles of different sizes, "carrots", ovals and something else invent. Success or glue with tissue glue The resulting billets on the fabric, from which you intend to sew pillowcase for the New Year's pillow. Of different species Tips Make "Rods" for Christmas toys. That's how great it turned out!

When you sew a pillow (or select the desired option in the store), try to navigate the interior that is created in your home. New Year's pillow, of course, a decorative element in the interior, but at the same time she should decorate it, and not spoil.

New Year's pillow will not be on your sofa all year round. She will have to become the same festive attribute like a Christmas tree or Santa Claus. They appear in our homes once a year to create a festive mood.

In addition to appliqués, you can try to draw " new Year's toys"Right on the fabric, from which you will sew pillowcase for the pillow. To do this, you can use acrylic or textile paints. They are intended for painting cotton, silk and synthetic tissues. They are applied directly to the tissue with a brush, a stamp or painting well "fall" on the fabric, do not spread, do not dim and light-resistant. After applying paint to the surface, it is recommended to dry the painting within 24 hours. Then to try the iron without a pair of 5 minutes from the wrong side through paper or tissue at a temperature of the appropriate tissue type. 48 hours after stroking it is allowed to wash the product soft washing agents At temperatures from 30 ° C to 40 ° C without strong mechanical exposure.

The product that was decorated with the help of paints for fabric, acquire such properties as:
- brightness
- strength
- light resistance
- heat resistance (up to 40 s)
- lack of paint traces when friction

If neither the applique, nor the coloring of the pillows on your own forces is suitable for you, sew a pillow from the fabric (type tapestry) with an already ready New Year's drawing. 
Pillow - Santa Claus (or Santa Claus) Be sure to become good decoration For home in winter holidays. And all because this character almost all people cause only positive emotions. This pillow in the form of a star-frost is not easy. With such work only an experienced master will cope with such work.

This Santa Claus pillow looks like a soft toy.

In stores you can search for fabric with the image of Santa Claus, from which you can easily sew a pillowcase for the New Year's pillow.

Nice to sit at home and with good mood Sew your own festive pillow. Let it be "perfection", but this is your thing that you have invested your emotions and your fantasy. When you take this pillow from the cabinet to the future New Year holidays, you will always remember that pleasant moments when you sewed it.

The drawing on the fabric can be tried to apply with the beauty of the fabric.

If you can and love to embroider, you can embroider the New Year panel to decorate the cushion cover.

At the beginning I said that we would not discuss tissues in this article, from which you can sew a pillowcase for the New Year's pillow. So there is, we will not discuss, but only note that burlap, linen fabric and natural cotton fabric are suitable for making pillowcases for decorative Christmas pillows better than others. They create a special home aura, carry warm and comfort to the house.

Do you know that the pillow can be given to the new year instead of a postcard? Try!

Snowmenon New Year's pillows is as natural as trees and grandfathers. We use all the same appliqué. It can be done even manually: do neat stitches for your pillow, for example, such a decoration:

Snowmen are good because their "figure" is easy to draw and cut out of any piece of fabric. And then sew to the pillowcase and everything! New Year's pillow ready!

Come up with your snowman for yourself (of course, the Internet to help you!). Color caps and scarf select yourself.

And here it appeared a good opportunity to attach pretty a large number of buttons.

And, as always, we go to the store behind the pillow-snowman, if we do not consider yourself with needlewomen.

A variety of materials and colors, I hope, does not let you down from the way: you will find the pillow that you want.

Have you noticed what are all the snowmen? And all because they are also different in life. They are made from different sizes of snow balls and decorate than they have. Here is such a character!

It doesn't matter how the snowman you will have a pillow, just if the mood became New Year and again "waited" miracles.

Customize yourself on good, smile, choosing a pillow with snowmen!

Snowflakeson the new Year's pillows can:
- draw with paints for fabric
- stick special thermo-stickers in the form of snowflakes
- easy
- make appliqué
- buy fabric with snowflakes and sew from her pillowcase

Pillow with snowflakes can be:
- "Cold" - brilliant smooth fabric
- or "warm" - from soft volumetric tissue

Color, too, pick up your interior.

A simple or elegant pillow with snowflakes to choose, decide for yourself. It is important that these New Year characters be recognizable.

New Year's wreath became popular in the design of our new Year holidays. He is made with his own hands or buy ready-made in the store and hang on the door or on the wall. And why not make a pillow with such a pattern? It turned out such "manual" job: a pillow is sewn from pieces of fabrics, and in the center of the elegant print-New Year wreath.

Able to embroider can be done by the manufacture of such a product. 
Deer- This is who brings to us a winter holiday! This beautiful animal has the right to decorate the New Year's pillow.

Here is the shrinking deer, and immediately understandable, where the traveler in the sleigh is in a hurry! Such a drawing can be easily applied to the pillow with and paint for fabric.

You can, with the help of the same stencil, portray only the contour of the deer.

Or make an applique only animal head.

Options for "cartoon" or funny deer are also not rebored.


It is easiest to buy fabric with "winter" pattern and sew a pillowcase for a pillow.

If it is not difficult for you to sew a pillowcase from the pillars, then dare!

Outside the window December: frost and snow, and"Winter" birds settled on the pillows.

Completely recognized bulges peck their red berries.

New Year's pillows with winter birds are able to decorate any home, as they are very decorative.

They can be made several pieces so that the interior becomes particularly expressive.

Do not forget about christmas Poinsettia Flower . Look, what pillows can work out. It is important for the manufacture of the flower itself to choose such a fabric that will not turn. Cut petals is not difficult, and then gently sew them in the form of a flower to pillowcase.


But already familiar to us the patchwork way of creating a picture. Also meant the poinsettia-christmas flower.

Such a pillow can also be called a "New Year", because we are not worn in the summer warm mittens.

Patchwork I. Santa Claus caps : You will have, of course, try, but the pillow is elegant.

I called this part "Winter pictures". Each person has its own ideas about winter holidays. Someone may remember the old fairy tales who heard in childhood, someone loves the winter forest ... And someone has pictures with old in mind new Year's postcards. Now in stores you can find pillowcases with such pictures.

Always in New Year's appearance looks where snowflakes fall at home.

And here is the city with the dressed up Christmas tree.

To create such a pillowcase, you need to buy cloth with a winter panel and just sew.

Below some more photos for inspiration. Rejoice in holidays, exercise your home! Live happily!


