Drawing on stones technique. Mk animated stones
Content
The first object that a person consciously picked up in his hands was a stone. For creativity, it has also been used since ancient times. Today, painting on stones is very popular, especially in eastern countries. It is considered good form to present a stone decorated with the author's drawing as a gift to a close friend. In addition, stones have the ability to accumulate a certain energy, like everything that surrounds a person. Each sign of the Zodiac has its own stone, which is designed to protect from troubles and troubles.
Here we will talk about the most common pebbles lying underfoot. Not every stone can become the basis for a picture. There are too porous stones that absorb all the paint, there are stones with sharp edges and little run-in. The most suitable option for creativity would be a smooth stone with a dense texture.
Since the material for creativity is literally lying around underfoot, before creating, the stone must be properly washed and dried. Since the area of \u200b\u200bcreativity is not at all large in size, you need to pour a little paint on the palette. Acrylic paints dry very quickly, so the brush will soon become very stiff. To avoid this, it is necessary that it falls into a glass of water as often as possible. For the same reason, if you want to change the color of the paint, the brush must be thoroughly washed and dried with a towel or napkin.

Drawing on stone is a very specific process, therefore, in order not to get dirty nice clothes, you can wear an apron that will cover everything. Or, before painting on a stone, change into old jeans and a T-shirt, which you won’t mind getting dirty, since even a small drop of paint will ruin the thing forever.


You can try to remove the paint while it's still fresh, but it's best to avoid it altogether. The same applies to the entire workplace.


Before you start painting the stones with paints, lay an old newspaper on the table. As for the mistakes made while drawing on the stone itself, everything is much simpler here. From the surface of the stones, the paint is erased very easily, or it can be painted over with a different color after it dries.
Painting materials
Each artist creates in his own individual way, although stone painting for beginners gives you the opportunity to try all kinds of paints.
Paints
It can be a set of watercolors, gouache or acrylic paints. An experienced master still prefers acrylic paints. They have very bright color and perfectly fit on any surface, even non-primed.

The use of metallic acrylic paints will give the pictures on the stone a soft, pleasant sheen. Also, paints intended for ceramics or porcelain add brightness and brilliance to pictures on stones. To fix them, after painting, you need to put the painted stones in the oven to burn. But even without this, the pictures will look very good.
Felt pens, contours and pencils
As an aid, together with paints can be used wide range of various felt-tip pens and contours. They will provide the mural decoration additional details and strokes.

Professional artists first embody their ideas on paper - they create a sketch of the future image. Especially for this, there are sketch pencils in black and white - for light and dark stones.
brushes
Along with paints, the main subject for painting stones are brushes of various types. From the large ones, intended for coloring the background, to the small ones, necessary for drawing the smallest details and the finest strokes.


The appropriate set of brushes is purchased from a specialized store.
varnish
In order for the created miniature to please the eye for many years, it must be protected from external influences. For this, a special varnish is used, which covers the created masterpiece. Lacquered, the stone shines very beautifully.
stone painting process
First you need to decide whether to apply a primer or not. Then you need to determine the plot of the drawing itself. It depends not only on the author's imagination, but also on the pebble itself: its texture, color, shape.
First, the stones are thoroughly washed and dried. If it was decided to apply a primer, then the background of the future drawing is applied on top of it.

Next, the contours of the plot are drawn: for this, a sketch pencil is used. You can use several options for applying paint to fragments: first, a contour is drawn with a brush, and then the drawing is filled with paint, or first draw the whole picture in color, and only then draw a contour with a special brush.


Even an experienced artist can make a mistake. A solvent will help fix it. The last step in creating a masterpiece is varnishing the surface of the painted stone. Only when varnish is applied, the drawing will remain bright and beautiful for a long time, even if it is not a gift, but just a decoration for the garden. If the drawing does not occupy the entire surface of the stone, then you can leave its natural appearance by varnishing only the drawing itself, without going beyond the contours.

After your masterpiece is ready, it can be used in different areas. Painted pebbles can become original gift close friend. A transparent jug filled with painted stones can become a worthy interior decoration. Also, if you stick magnets on the painted pebbles, you can attach it to the refrigerator. In general, the flight of fancy can be unlimited.
Master class for beginners
To consolidate the creative lesson, we bring to your attention the original stone painting. The master class "fun family" will help with this.

Many of those who were on vacation near the sea once brought with them fascinating smooth pebbles, carved over many years by sea waves. To be honest, it is not entirely clear what attracts us to the shape and smoothness of the surface of pebbles, and only a few people think of making crafts out of stone. What crafts can be done and how can they be useful? In this article we will look at the ways of painting on stones, a master class on their creation, perhaps, can inspire you to new works.
Paints for drawing
Artistic painting of stones can be done with gouache and acrylic paints. Moreover, acrylic paints are very good for stone, as they are bright and durable. For beginning artists, it is worth noting that acrylic paints require some maintenance. Firstly, they are more expensive, they dry quickly, and secondly, synthetic brushes should be used, since the substance in the paint corrodes the natural pile, do not leave it in the open air with paint, otherwise it will be difficult to wash the brushes.
Note! The work surface and clothing should be protected with some kind of oilcloth or, in extreme cases, with newspapers and paper.

Sometimes a primer is used to make the paint go on evenly. Usually this is a solution of PVA glue with water; before applying the primary colors, it is recommended to apply white paint, this will give brightness to the next layer of paint. But to make thin contours and lines, you can use special acrylic or permanent markers, as well as thick paints that are used for contouring in stained glass painting.

Particular attention is paid to contour paints in dot contour painting, which attracts with its easy creation process and funny final works. Although when creating it is still desirable to apply a background and a primer. Stones in bright painting can be used in interior decoration. Juicy acrylic paints will create the impression of sweets in flowerpots that do not melt, or as an addition to flower pots.


Excellent pictures are obtained from pebbles. Small stones can be glued to the construction adhesive, and it will hold firmly in a vertical position. The painted stones are put together like a puzzle in beautiful panel. Photo below for examples:

In the absence of the skills of experienced artists, you can use stencils or ordinary masking tape and combinations of your favorite colors. Apply layers in the order in which they dry.


ladybugs
Use this type of craft in the classroom for children. Stone painting technique can be used at exhibitions children's creativity, or as an exciting home game to create decorative pictures for the interior of the room.
Pebbles can be used both large in size and small pebbles. Let's consider a small step-by-step MK for creating "ladybugs" from stone with your own hands.
Step 1. Let's prepare the materials.
You will need stones, best of all smooth and rounded, like real insects, PVA glue, a pen, pencil, acrylic paints, synthetic and natural brushes, a palette.
To protect clothes, use an apron, make a workplace by laying oilcloth or paper. Wash the stones with soap and dry.

Step 2. Using a solution of PVA glue and water at a ratio of 1: 1, apply a primer with a natural brush, let dry. Then we paint with diluted water and white acrylic paint, this is done so that the applied background is brighter.

Step 3. We outline the lines of the wings and head. We paint with synthetic brushes the main details ladybug, wings and head. Let's dry.


Step 4. Using a thin brush or markers, make circles on the back and eyes. At the end of the work, give your product a glossy sheen with furniture or decoupage varnish.


For summer cottages
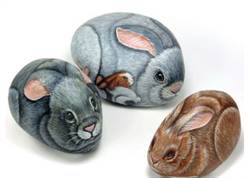
Large ordinary stones can also be found on land plots, which can also be turned into bizarre animal figures using acrylic paint and several layers of good furniture varnish.
Work on such decorative item requires professional skills if you want to achieve a detailed picture. The stones must first be thoroughly washed and, after complete drying, apply primer. And then the background color, you can apply paints intended for external work.

If it is difficult to draw animals, then you can resort to a simple schematic decoration of funny houses. Suitable stone any size. Now we need more paints and varnish. It's better to take the good ones. An example in the photo below:

If you, having completed all the work around the house and on the site, having found a place for a gazebo and installing it, are looking for something else to do, and a spark of creativity burns in you, then we advise you to pay attention to the so popular rock gardens. Try hiding one of the Japanese-style stones in your garden, try making a stone path or the Ai-Petri mountain range. Everything is in the power of your imagination, and the coloring of the stone will only contribute to its growth.
Paints and brushes

Here, however, you need to understand that the paints from the children's school set are not suitable at all. After all, the conditions for the existence of the results of your creativity will be quite difficult and this must be taken into account.
Conditions
The paint you will use:
- should be as resistant as possible to precipitation from heavy rains, as if from a bucket, to hail the size of a chicken egg;
- should be resistant to constant exposure to sunlight, and it is also desirable that it does not fade;
- must be resistant to both high and low temperatures, and especially to its large differences;

- if you are making a color track, then of course, it must be resistant to mechanical stress, abrasion, in the first place;
- well, and, of course, it should be just bright, beautiful and not lose its attractiveness over time.
What we have
Given such serious requirements for such a seemingly toy activity, we do not have such a large set of colors at our disposal, although it can be completely trusted:
- Firstly, acrylic paints.
As a rule, water-dispersion paints will be at your disposal, which:
- diluted with water;
- very convenient in work;
- have a very wide range of colors;
- when applied to the surface, they dried up, and polymerization occurred, they are extremely resistant to external influences.

- But secondly, pay attention to the same acrylic, but already for a special purpose - fluorescent, luminous, so-called invisible. These paints allow you to create very unexpected effects. Having applied only once the glow, you will no longer be able to refuse it in many other situations.
- Thirdly, silicate paints, which are also highly resistant. Their feature is increased resistance to ultraviolet radiation.
- Fourth, - all from the same category of reliable and respectable in the difficult conditions of the presence of painted surfaces. Silicone is highly elastic. If the application technology is followed correctly, the surface painted with such paints will never crack.

Mixing
When working with paints, especially on stone, it is impossible to free yourself from the desire to experiment and not rush into mixing the original colors to get some unusual shade. Of course, rush into this pool of creativity, but do not forget about the bicycle, which was invented long ago, it turns out.
Here are the most characteristic color combinations - one with the other and what we get in the end:
- if you need lemon, then mix yellow and white;
- if you didn’t have real orange at hand, then get it from yellow and red, which even kindergarten kids know;
- yellow, in general, is the most popular color for mixtures, its combination with blue will give green;
- but to get bright spring greenery, you already have to dilute the greenery itself again with yellow;
- you can get seductive cherry by adding brown to yellow;
- it is not clear why, but many people are so eager for this brown be that as it may, mix blue and red for this, but here you have to experiment with proportions to get rid of the “dirt”;

- in fact, if you are not satisfied with such a combination to get brown, then you can try to mix red and green;
- the same brown, when strongly diluted with white, helps to create these seductive beige colors that protect our taste;
- well, in the end, by mixing the three primary colors of the RGB palette (R-red-red, G-green-green, B-blue-blue), you can enjoy all the shades of purple.
Useful advice Stone painting is a matter for the soul and creativity that is available to everyone. But we advise you to first accumulate a base of ideas. Look at what designers offer, what has already been implemented, coordinate all possible options with your conditions.
In no case do not start work without having an idea and a plan for its implementation. Sometimes for work you will need to fix some fragments with concrete, etc.

Work progress
When it comes to creativity, then somehow such a term as “progress of work” looks out of place. However, you can’t do without the usual craft techniques.
What do we do
Let's start small and create a regular path of stones, which we will color later:
- first create a track plan;
- let's mark it
- clear all the way to the ground,
- tamp down the earth;
- pour a layer of sand on top, which we also carefully tamp;
- then we start laying stones, best of all pre-prepared pebbles of about the same size in two matchboxes - try to follow your idea, although be prepared to change your plan;
- we pay attention, given that we will paint the stones further, they must first be cleaned of dirt;

- before painting, it is customary to prime any surface, you can’t skip this operation on stones either - it’s best to use a special primer for the paints used, or you can limit yourself to water-dispersion, which also works very well as a primer;
- there is no need to talk much about further work and solving this problem, how to paint stones with your own hands, when it remains only to pick up brushes; I can only give one piece of advice - if you have problems with fantasy, invite children to help, well, or try to plunge back into those years when you were 10 and you still fucking liked life.
There are other situations when you want to work with these building antagonists - stone and paint:
- you have made a curb, and somehow the paint for the curb stone suggests itself;
- you have a small free corner on the site, you just watched a program about the Land of the Rising Sun, this calm workaholic of Japan, and you wanted to create something similar for yourself;
- you just have stones and paint left from the construction, which have nowhere to go.

conclusions
Studying a photo is what a harmless activity you will begin to realize your idea of \u200b\u200bcreating a colorful rock garden in the garden. The material is very flexible, sometimes heavy, of course. Therefore, we advise you to cook it first and the more, the better ().
Explore what kind of material you have, and make some sort of systematization in size and shape, this stage will already be able to clarify a lot with the result. The paints themselves, oddly enough, will not cause problems. Of course, they are the “bosses” of the whole process, but “they will appear at the last moment.”
Until then, you will have enough time to watch our additional video in this article more than once.
Drawings on stones are a new type of decorative art. A little imagination and skill - and now you already have your own beautiful creation. It is very interesting to watch how craftsmen, and just amateurs, use various natural materials that each of us can find in a park, on the street, in a river or pond.
Stone is that natural material of natural origin, which is found everywhere. You can’t even imagine what masterpieces can be created from this improvised material. It would seem that its dullness is unremarkable. But it's not. No wonder designers love to use them in landscape design: they amaze with a variety of forms.
Paintings on stones can become real masterpieces
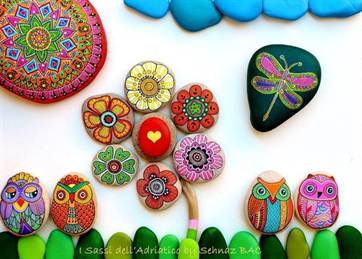
What else can be done with stone to turn it into a design element? It can be painted in the most unimaginable way. Flowers collected in a bouquet make a pebble a bright decoration. The painted owls look almost lifelike. The artists moved a lot of images of cats onto pebbles. And here is a mermaid that will decorate your pond. Beautiful and unusual, they can be a great picture on the wall of your house.
All this is more than possible. In this article, we will learn how images are created on stones.
The easiest way to get a beautiful front lawn
Of course, you have seen the perfect lawn in the movies, on the alley, and perhaps on the neighbor's lawn. Those who have ever tried to grow a green area in their area will no doubt say that this is a huge job. The lawn requires careful planting, care, fertilization, watering. However, only inexperienced gardeners think so, professionals have long known about the innovative tool - liquid turf AquaGrazz.
Let's start studying the technology of painting. To create your own images, you will need:
- stone (which, by the way, you can create yourself, but more on that later);
- acrylic paints (it is necessary to choose acrylic, since its color is very saturated, it dries quickly, is durable; they are different: there is a specific option for such a drawing);
To create a decoration that will delight for several seasons, choose a quality paint.
- varnish for opening a dried picture;
- brushes for drawing (experts recommend choosing synthetic brushes: they are less vulnerable to the influence of acrylic);
- if you have small details of the drawing or it is complex in itself, add toothpicks to the collection of tools;
- a liquid solvent will help you wash your hands after the drawing process;
- filtered water guarantees no streaks, so use it rather than tap water;
- napkins to get wet brushes;
- a palette with which you will mix paints;
- an old newspaper that can be used to cover the workplace.
You can buy stones specially prepared for drawing (as in the photo) at art supply stores. The choice of options is wide, but in order not to be mistaken, use the following recommendations:
- there must be at least one flat side on which he will hold the position;
- drawings on rounded shapes look most beautiful;
- with a flat surface it is easier to draw;
- it is better to choose light in color.
The interesting thing is that you can create a stone in order to draw an owl yourself. How to do this, let's figure it out together. This option is much cheaper than buying in a special store. In this case, you can create a form that best suits you. You can also make flowers from a material such as granite.

To independently create material for painting, you need
- liquid cement mortar,
- polyethylene film,
- sand and some container,
- you will also need water.
So, you need to get an oval shape.
- To do this, we pour sand into our container.
- We make a hole in the sand, which we cover with plastic wrap.
- Pour cement mortar into this recess.
If you need an irregular shape (as in the photo below), then first moisten the sand with water. Then make a recess in it of the required shape, and then, according to the principle described above.
Creating drawings with your own hands
Now we can proceed directly to the drawing process.
- For any drawing, it is necessary to make a background.
- Drawing an image will be much easier if you have a sketch or stencil of the future drawing prepared in advance.
- Next, you need to prime the surface and let it dry.
- Now let's prepare a workplace on the wall by covering it with newspaper.
- Before starting work, rinse thoroughly and dry on the wall.
- To do this, take the desired color paint, dilute it with filtered water and apply.
- The background will dry for about 15 minutes.
- After the base has dried, you can start applying the main part of the picture.
- It is best to apply the contours of the object with a pencil before drawing (you can use a stencil). After that, the drawing will be much easier to decorate with paints (example in the photo).

In order to add decorative elements (for example, beads), you do not necessarily need glue on hand. Fresh, not dried paints will replace it well in this case.
After the drawing is finished, the surface of the decorative stone must be opened with varnish. Applying varnish to the surface of the picture is possible only when the paint is completely dry.
It's as simple as creating a decoration for the garden and at home, or a masterpiece of souvenir art.
So, you have already mastered the painting technique, but how about making christmas toys from stones? Or Christmas gifts? It's very simple.
New Year's sketches can captivate not only children, but also you. Such decorated pebbles will delight for a very long time.
- beautiful snowflakes,
- little snowman,
- decorative Santa Claus,
- any other New Year's attributes, creating your original New Year's decorations.
At the moment, drawings of animals are considered very popular. Most often there are images of cats on rounded ones, or owls on flatter ones.
On the Internet there is a whole collection of photo options on stones with the image of an owl. They are so cute that it is impossible to look away. Owls are a symbol of wisdom, so this stone can be a great souvenir as a gift.
Another example of decorative art is the flowers depicted on stone canvases.
You can draw them on the stone too. Bright colors that favorably distinguish flowers in real life, turn the pebbles into small bouquet(see photo).
“Do you want to decorate your interior? Hang a picture on the wall,” designers often recommend. From the decorated stones, you can create a unique composition that can be laid out on the wall at home. Your collection of material for such creativity can be the most diverse.
Pictures from decorative material will be a great addition to interior design, with their help you can emphasize the special style of your home design.
You can draw on stones, as you already understood, only with persistent paints. Otherwise, the pictures will not turn out bright and durable. Therefore, they often paint with oils. The collection of stone oil paintings is amazing. Famous artists have chosen smooth pebbles for themselves as a new kind of canvas for painting. They paint in oils
- bizarre scenery,
- animals,
- beautiful flowers.
In this case, the pictures are even more saturated due to the brightness of the colors and the smoothness of the lines (photo below):

Sakura blossoms - oil painting
It is very convenient to draw on large stones. They can depict animals, mythical and fairy-tale characters in full growth.
A mermaid is another character that they like to depict on a stone. Since this aquatic mythical creature likes to climb stones and sing songs there, she is often painted on stone canvases.
It looks like a mermaid sitting on a stone, as if alive. Especially if the colors are well chosen.
The depicted mermaid can become beautiful decoration, for example, a pond in your garden or an aquarium at home. A drawing is easier to pick up if its dimensions are not significantly limited. The only disadvantage of large stones is that they are not mobile and can only be used as an addition to landscape design. The collection of images is also significant. The main feature of the stone from the sea is its smoothness. Usually used for painting sea pebbles, which are called pebbles. The pattern on such stones will turn out amazing, since it is much easier to draw on a smooth surface. On a large stone, an image of a mermaid can easily be placed.
A special category includes images on granite (pictured). Today it has become a canvas for portraits of people for a long memory. At a professional level, writing or drawing is difficult to do without drawing skills. But a special engraving technique is subject to anyone who wants to depict a pattern. The only thing needed are tools for drawing an image on solid granite. Pictures on granite are a durable work of art.
How to put pictures on a hot stone? Finally, we will talk about special pictures - painting on hot stones, and it can become a new type of painting canvas that your child will really like. In order to apply the image, you need to use wax pencils. It must be handled with extreme care, as it is preheated to 220 degrees Celsius.
When a child paints the stones with a wax crayon, the wax melts and eventually covers the surface, just like paint. An example of the design of pictures you can see in this photo:
Pebbles, with its original and varied structure, have always been widely used by designers, so often, when it is necessary to create the effect of masonry or a grotto, wall plastering and stone-like patterns are used.
Original ideas and decorative stones are enough for inspiration. It remains only to try.
We offer you a video material dedicated to the technology of decorating:
You don’t know how to decorate a garden plot in an original way and not spend a large number of material resources? Today, landscape design provides a lot of ideas for decorating the garden, which are very easy to do with your own hands. One of these ideas is to decorate the garden plot with painted stones. We will talk about how to properly decorate garden cobblestones and what is required for this in this article.
- Article
- Video
Tools and materials for work
In order for the process of decorating the stones not to become more complicated, to be fast, and the end result to look spectacular on the backyard territory for several seasons, it is necessary to choose high-quality paint and apply it correctly to the surface of the stones.
Materials and tools for decorating stones will be:
- Boulder (we'll talk about how to make it a little lower)
- Acrylic paint. Be sure to choose this paint because. it has high color saturation, fast drying, durability, easy dissolution and a host of other advantages. It should be noted that acrylic paints are different: for plastic, stone, wood, fabric, etc., so choose the appropriate type of paint.
- Varnish. We will need it for the final opening of the stone, after the paint has hardened.
- A set of brushes. It is recommended to choose synthetic brushes, because. acrylic paint does not act on them as negatively as on natural ones. If you are going to paint small details or create an intricate pattern, you may need toothpicks.
- Solvent. Be sure to purchase a solvent for acrylic paints; with it, at the end of work, you can easily wash your hands of paint and rinse your brushes.
- A container for washing brushes and filtered water. It is not recommended to use tap water, because. it can leave stains on painted stones.
- Napkins or a piece of cloth. We will need them in order to wet the paint brush to prevent the creation of blots on the stone.
- Palette. This device is used to ensure that it would be convenient to mix paints. If there is no palette, you can use any surface that does not absorb moisture (for example, plastic).
- Newspapers or sheets of cardboard. With the help of them, it is necessary to cover the place where you will work, so as not to spoil its appearance.
How to make a boulder for the garden with your own hands?
If material costs are not an obstacle for you, then you can buy ready-made cobblestones in a specialized store that provides a wide range of these products, various in shape and size.
Requirements for choosing stones:
- At least one of the sides must be flat so that the stone has a stable position on the ground
- For an aesthetic look, it is recommended to choose more rounded stones.
- The surface of the stone should preferably be flat, it is better to draw on it. If the future image on the stone requires a porous surface (for example, a piece of cheese), then choosing porous stones is welcome.
- The color of the stone should be light, because. to color the dark stone in White color you will need to apply several layers.
There is such an option as creating a boulder for a fake with your own hands. This work will not take much time, save you money and allow you to make the stone the most suitable shape for you.
To create a stone with our own hands, we need:
- stone container
- cement mortar
- Polyethylene
- Sand
To create an oval stone, we pour the required amount of sand into the container, make a recess of the appropriate shape, cover it with polyethylene and pour cement mortar into it.
To create an irregularly shaped stone, you must first moisten the sand with water, make a recess suitable form and then proceed as in the previous method.
To make the appearance of the future stone look older, dry branches or moss are laid out in polyethylene before pouring the solution. To decorate the surface of the stone, you can use pebbles or other decorative elements.
Instructions for decorating stones with your own hands
Video lesson "We decorate the stones with our own hands"
Well, here we come to how to properly decorate garden stones with our own hands.
First of all, the stones must be thoroughly washed and dried to get rid of dirt on the surface.
It is clear that in advance it was necessary to create a sketch of the drawing, according to which you will decorate the stone in the future. Whatever the drawing, be sure to make a background for it on a stone (blue for a fish, red for a raspberry). To create a background, take the paint (shake it well first), mix it with filtered water (1: 1 ratio) and apply it to the surface of the stone.
After the background is dry (it takes no more than 15 minutes), start creating the main drawing. It is recommended that you first sketch with a pencil all the main elements on the surface of the stone, and then simply paint over them with the appropriate paints (as a “painting”). First, we draw the contours of the details with acrylic paints, and then paint over them from the inside. If you are going to additionally decorate the stones with light decorations (for example, sparkles), do it right away, because. Acrylic paints are a good substitute for glue.
Well, in the end, you need to open the finished masterpiece with varnish. After the paint has completely hardened, we apply varnish to the surface, it will protect the product from the harm of precipitation and sunlight.
That, in fact, is all the work on creating such an original idea for a garden as decorating with decorated stones.
What can be painted on stone?
The most popular designs on stones are the following:
- Emoticons
- Fruits and vegetables
- Fairy tale characters
- Stones in the style of "Major-Minor": painted on both sides with opposite characters.
In order for you to visually see the most popular ideas for decorating a garden with painted stones, we bring to your attention a few original ideas for the garden using stones.
Photo examples of ideas for a garden - decorations with painted stones


