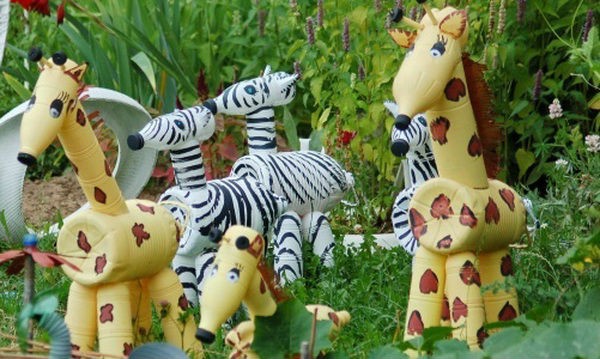
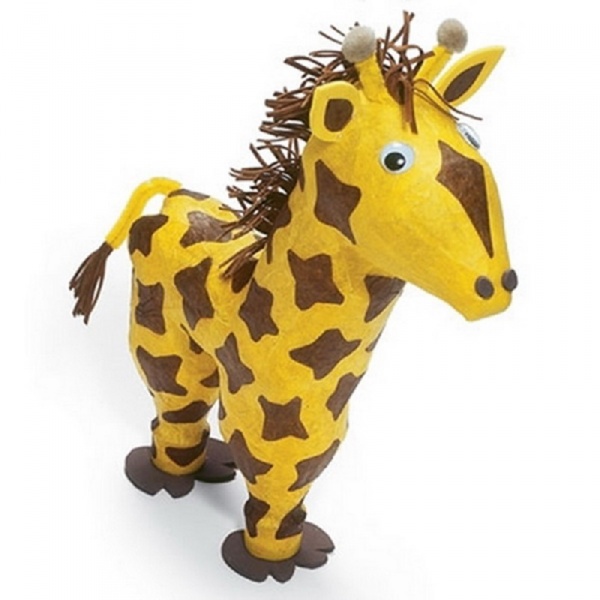
Giraffe from a plastic bottle step by step instructions. creative hobbies
Not everyone manages to relax in Africa, but anyone who wants to create an entourage of a sultry continent on their site is subject to it. The giraffe is a bright representative of the African savannah, its long neck will be visible from the most remote corners of the dacha. The process of making a giraffe plastic bottles do-it-yourself occupation is fascinating and does not require significant waste. The proposed master class will help to arrange various models animal for the site and the house.
street giraffe
It's hard to argue with the practicality of plastic bottles. Unbreakable material, resistant to precipitation and temperature changes, is an indispensable assistant in budget landscape design. Plastic crafts will successfully winter and will continue to please the eye for the next summer season.

For an attractive giraffe, very little material is required:
- plastic container for 6 l - 1 pc.;
- bottles of 1.5 l - 8 pcs.;
- plastic container for 1 l - 1 pc.;
- bottles for decorating small parts - 2 pcs.;
- acrylic paints corresponding to the color of the giraffe;
- glue for plastic;
- scissors and wire.
Comment! Bottles are preferably yellow or brown.

The algorithm of actions includes the following steps:
- The plastic container is soaked in warm water, after which it is cleaned of labels and glue. It is recommended to degrease the bottle before painting to form a uniform layer of paint. A classic solvent for plastic is not suitable; for this purpose, a solution of washing powder is used.
- The neck of a giraffe is formed from several bottles that have had their bottom and neck removed. The resulting cylinders are fixed with glue.
- In a 6 liter container, holes are prepared for mounting the neck of a giraffe. Before connecting the blanks, they are painted with the base color (yellow) in two layers with an interval for drying.
- Each leg of a giraffe is formed from two bottles of different sizes. They are connected in the place where the neck was, the bottom is not removed. Sand is poured into a plastic bottle that serves as the base of the leg so that the giraffe gains weight and stability. The upper part of the leg in the form of the bottom of the second bottle is glued to the body.

- A hole is formed in the lid of a 6-liter plastic container through which the wire is threaded and twisted. This blank serves as a frame for the giraffe's tail.
- A long strip with a spiral shape is cut out of a free plastic bottle. The element is gently heated over the gas until softened and gently wrapped around the wire frame.
- The giraffe tail at the end is decorated with a fringe, also cut out of plastic containers.
- In order for a plastic bottle giraffe to look like the original, he will need to prepare his ears, horns, eyes and mane. The selection of elements largely depends on the imagination of the craftsman. Eyes can be purchased ready-made or made from bottle caps, as shown in the photo below.


- Ears and mane are cut from plastic containers. The function of the horns will be successfully performed by small bottles or all the same corks. Details are chosen depending on the overall size of the giraffe.

- When all the elements are ready, they are fixed on a liter bottle that plays the role of a head. The mouth can be drawn with a marker or paints. After that, the head and mane are attached to the neck.
A cute giraffe will look organic next to a palm tree, also made from plastic bottles.

Home pet
Creations from plastic bottles can be a worthy decoration of the room. We will tell you in detail how to make a small giraffe.

Prepare the following set of materials and tools for work:
- Plastic bottles of 0.5 l - 6 pcs.;
- cigarette and foam paper in yellow and brown;
- suede fabric, adhesive tape;
- glue for plastic and PVA;
- thermal gun;
- doll eyes.

We begin the transformation of waste material into a funny giraffe:


An interesting process of creating a domestic giraffe is completed. But you can not stop there and continue to decorate the environment. Pretty quick and easy to make for the kids in the yard combined giraffe, consisting of plastic bottles and waste tires. All that is required is to bury the rubber tire halfway into the ground. It will serve as the body of the giraffe. The neck and head are made by analogy with a large animal, which is described in the first section.

Quite a bit of free time spent can transform the space of an apartment, territory in the courtyard of a house or your own suburban area. Dare, fantasize and enjoy the bright colors of the landscape, decorated with your own hands.
Note. See the pattern sheet for this toy for the frame diagram for your chosen toy.
Frames are made of wire 1.5 - 2 mm thick, aluminum or copper. The main thing is that it is plastic enough, and at the same time it can keep its shape well.
Frame configurations may vary. On each pattern sheet, where necessary, we provide a diagram of the frame with an approximate indication of its dimensions.
Scheme N1.
The simplest type of carcass is used for tails, spinning legs, and for making snakes, lizards, and other reptiles. For example, we need to make a frame according to the following scheme:
It is done like this: cut off with wire cutters or simply break off a piece of wire of the same length as indicated in the list of materials for our toy (that is, in our case, 5 + 1 + 1 = 7 cm), and round off the sharp edges with a needle file. Then you need to bend the ends of the wire (each 1 cm long) 180 degrees with pliers so that narrow loops form. You can squeeze these loops harder with pliers if this end of the frame is inserted, for example, into the tip of a mouse tail. So the frame will be less noticeable in it.
Scheme N2.
 |
The second type of frame is paired. In this case, we make a frame for two paws at once from one piece of wire. Let's start with the same thing we started with in the first case - cut off a piece of wire of the desired length. For example, let's take this diagram:
We will need 8 + 8 + 3 + 3 + 3 + 3 = 28 cm of wire (for the toy you have chosen, the frame diagram with dimensions is on its pattern sheet). Having cut the wire of the desired length, round off its edges and proceed to the manufacture of the frame. Bend the wire in half. You can use pliers for this, but if the wire is soft enough, you can handle it with your bare hands. Then, at the ends, we bend sections 3 cm long by 180 degrees, and, finally, having measured 3 cm from the folds, we bend both loops by 90 degrees. At the same time, the resulting loops, if we put the frame "on its feet", should lie flat on the surface, like feet. We will then insert these loops into the feet of our toy. This will give them the necessary rigidity and allow the toy to "stand firmly on its feet."
Scheme N3.
 |
Frameworks of this type are used mainly for the manufacture of various "artiodactyl" toys - horses, giraffes, cows, donkeys and similar animals. In this case, you need to make two such frames (according to the number of legs), and they can be of different sizes. Let's take this framework as an example:
We will need 9 + 1 + 9 + 1 = 20 cm of wire for its manufacture (a frame diagram indicating the dimensions for the toy you have chosen is on the pattern sheet of this toy). We act according to the scheme already known to us. We cut off (break off) a section of wire 20 cm long, round off the sharp edges with a needle file. Then we bend the wire exactly in half and wrap its ends 1 cm long by 180 degrees, squeeze the loops formed with pliers. Everything, our frame is ready!
Scheme N4
 |
There are also such non-standard animals as, for example, a giraffe or an ostrich. We also cannot leave their long necks without frames. But in this case, the frame must be made up of two parts.
For example, let's make a frame for a giraffe. First, we calculate the length of the wire that we need for this. For the lower part of the frame, cut off a piece 9 + 1 + 9 + 1 = 20 cm long, for the upper part - 15 + 1 + 1 = 17 cm (the frame diagram indicating the dimensions for your toy is on the pattern sheet for it). After that, we process all sharp edges with a needle file.
With the lower part of the frame, we will do the same operations as with the frames for artiodactyls, that is, bend the wire in half, wrap the ends 1 cm long by 180 degrees and squeeze the loops with pliers.
At the top of the frame, bend one end 1 cm long by 180 degrees, squeeze the loop with pliers. Roll the opposite end of the wire into a ring with a diameter of 0.5 cm, and, attaching it to the bottom of the frame (in the middle), tightly close its edges so that the parts of the frame are firmly connected.
So, the basic principles of making frames are clear to us. These principles can be used in the future for the manufacture of any, even the most complex and non-standard frames.
In the past, when the stores didn't have such a large selection of toys, children would come up with their own entertainment. All girls love dolls, so they made them themselves. They came up with various outfits, hats and shoes. We suggest you try to make paper clothes for a stylish sailor and his companion. To do this, you will need to print the sketch prepared by us on the printer and cut out all the details and dolls with scissors. Also, on the basis of cut out outfits, you can make others designed according to your own design. 1. For...
Crafts for children from cotton pads
crafts from cotton pads your child will like it, because they are soft to the touch, it is pleasant to work with them. Their advantage is that they are available, inexpensive and do not cause allergies. Suitable for children of tender age. There will be two types of crafts. I want to mention the need to prepare all the materials and tools necessary for making crafts right away, that is, before you start working with a child. So it will be possible to control that the child will not work with dangerous objects. Craft from cotton pads - Christmas tree ...
We make clothes for paper dolls
In order to make a beautiful doll and a lot of outfits for her, you just need to print the finished sketch on the printer. If it is not possible to print a color image, then let's show a little imagination. Print the sketch and follow the instructions. For this you will need: scissors; colour pencils. Step 1: Carefully cut out the printed doll with scissors, and then her outfits. Do not forget about the white rectangular clips with which the clothes will stay on the doll. Step 2: Now you need to colorize...
DIY paper doll clothes
Want to make clothes for dolls with your own hands, but don't know how to sew? Then make beautiful outfits from paper! It takes very little time, and besides, this process is very entertaining. You can print a ready-made sketch with clothes or draw any wardrobe items yourself. Such crafts for dolls are good because with a minimum amount of improvised means you can make a lot of outfits. different styles and color schemes. It is important to note that such outfits are only suitable for paper dolls, which can also be printed with ...
How to make a wonderful sock theater for your child
All little people love toys, and they especially like those toys that can move and talk with their mother's voice. Such toys not only amuse the child, but also help to quickly learn a verse or a song, show and tell about how to behave, and also be able to unquestioningly listen to the problems of the baby. You can make these wonderful toys yourself, with your own hands from what everyone has at home. For example, if you have lost one sock, then you should not rush to throw away the second one, but use it and create your puppet ...
A simple master class on making a money tree
Have you decided to make a gift with money and give the birthday man the opportunity to decide for himself what to spend it on? But there is no desire to just give them in an envelope, and there is no idea how to make a gift memorable either? We offer you to make a money tree with your own hands. Quickly and easily, almost from improvised means! This way to give money is very original, but at the same time simple and uncomplicated in execution. After the celebration, the birthday boy will have a cool designer thing that can decorate any interior. So let's get started. 1) To start...
Children's craft - a helicopter from egg trays. Master Class
The child asks for new and new toys every day, and every day he needs something to entertain him. Kits for creativity in stores are very expensive. But parents always have the opportunity to use waste material. A helicopter from egg trays is a craft for the smallest, it is performed using a fairly simple technique. The main thing is not to throw away the junk material that you often buy - these are eggs in trays, just this paper container will become the raw material for crafts. You need to show imagination to make crafts or play with the baby ....
We make ourselves a moving bunny on a scooter
Didactic material for the teacher primary school. Favorite work for children, which will bear fruit. For a primary school teacher, the most important element in the lesson is the successful behavior of students and the achievement of certain skills. At the lesson of labor training, it is necessary to interest children, and this is not so easy. We bring to your attention crafts made of cardboard, where each student can happily do exciting work for himself and consolidate practical skills in using the necessary tools. Also note that...
Not everyone manages to relax in Africa, but anyone who wants to create an entourage of a sultry continent on their site is subject to it. The giraffe is a bright representative of the African savannah, its long neck will be visible from the most remote corners of the dacha. The process of making a giraffe from plastic bottles with your own hands is an exciting activity that does not require significant waste. The proposed master class will help you design various animal models for the site and at home.
street giraffe
It's hard to argue with the practicality of plastic bottles. Unbreakable material, resistant to precipitation and temperature changes, is an indispensable assistant in budget landscape design. Plastic crafts will successfully winter and will continue to please the eye for the next summer season.
For an attractive giraffe, very little material is required:
- plastic container for 6 l - 1 pc.;
- bottles of 1.5 l - 8 pcs.;
- plastic container for 1 l - 1 pc.;
- bottles for decorating small parts - 2 pcs.;
- acrylic paints corresponding to the color of the giraffe;
- glue for plastic;
- scissors and wire.
Comment! Bottles are preferably yellow or brown.
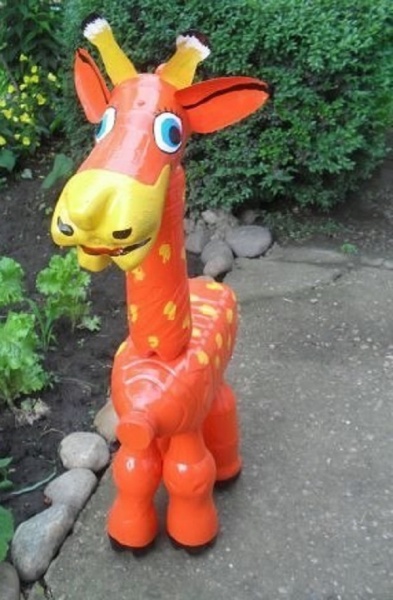
The algorithm of actions includes the following steps:

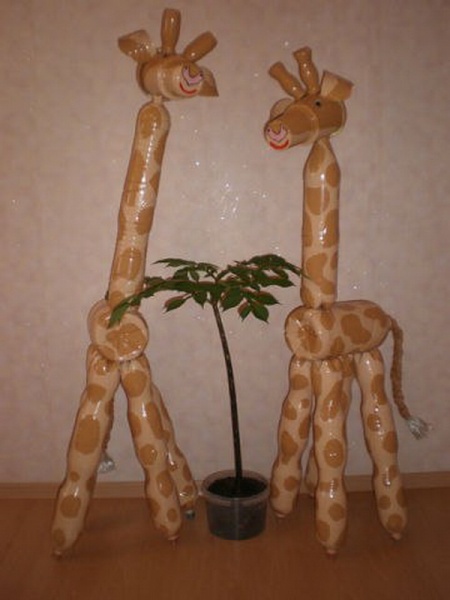
A cute giraffe will look organic next to a palm tree, also made from plastic bottles.

Home pet
Creations from plastic bottles can be a worthy decoration of the room. We will tell you in detail how to make a small giraffe.
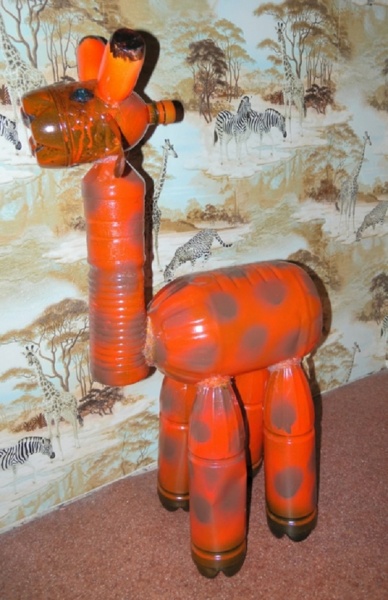
Prepare the following set of materials and tools for work:
- Plastic bottles of 0.5 l - 6 pcs.;
- cigarette and foam paper in yellow and brown;
- suede fabric, adhesive tape;
- glue for plastic and PVA;
- thermal gun;
- doll eyes.
We begin the transformation of waste material into a funny giraffe:

An interesting process of creating a domestic giraffe is completed. But you can not stop there and continue to decorate the environment. Pretty quick and easy to make for the kids in the yard combined giraffe, consisting of plastic bottles and waste tires. All that is required is to bury the rubber tire halfway into the ground. It will serve as the body of the giraffe. The neck and head are made by analogy with a large animal, which is described in the first section.
What could be more interesting for a child than a kind and beautiful toy. And if this toy is made by hand loving mother or another close girl or woman, then she simply has no price.
Let's talk today about how with the help of threads different color create a toy giraffe, 25 cm tall. Our giraffe will be very flexible and beautiful.
What will be needed for this?
Need thread different colors so that they combine the colors of the rainbow, hook number 2, eyes, stuffing, glue, hand wire.
Level of preparation for knitting: the most elementary, the time spent on making the toy is about 3 hours.
All the necessary thread colors are shown in the photo.
Action one. We make the front limbs.
Our giraffe will be unusual in that it will look more like a person who has arms and legs than an ordinary animal. Therefore, his forelimbs will be slightly smaller than his hind limbs.
In order to tie the "hands", we need to tie the two initial loops, which are called air loops. Next, you need to gradually add loops, when 1.5 cm is connected, it is important to switch to pink color threads, in total you need to knit 7 multi-colored motifs of 2 cm each.
Next, you need to repeat by making the second hand of the future toy. Here's what happens in the end.

Action two. Torso.
The body of our giraffe is made in a similar way as the arms. Two air loops are also recruited, then their volume increases. We start with a yellow thread, only the size of the knitted multi-colored parts is no longer 2 cm, but 3.5 cm. The product also uses 7 multi-colored motifs. To the area of \u200b\u200bthe arms and neck, knitting tapers significantly, as shown below.

Action three. lower limbs.
The lower limbs are connected in the same way as the upper ones. So many motives. However, now the height of each motif reaches 2.5 cm.
Having made two legs of the future toy, we get such a blank.

Next, we need to fill our product with filler, and also sew the upper and lower limbs to the body. But there is no need to rush into this yet. Let's put what we've done so far and move on.
Action four. Head
We make the head of the future giraffe as follows: we take red threads, we tie together two loops, called air loops, we begin to actively add loops. So we knit 5 cm, then we shorten the loops, we knit 2 more rows, and then we switch to the yellow thread. After 2 rows yellow color add loops. After another 3 cm, we finish knitting.
It turns out here is such a head of the toy.

Next, we tie the ears of the giraffe with a red thread. To do this, we knit 12 air loops, then we compact them and we get ears.
The giraffe also needs yellow horns. We do them as follows: we knit the upper circle and lead the wall down. The size of such a horn is 5 cm.

Action five. Tail.
There is no giraffe without a tail, you can, of course, leave your toy tailless, but it’s better to make a tail for it. What's more, it's easy to make. We take several multi-colored threads and connect air loops with them (approximately 25 VP). We close the loops, add a bow and the tail is ready.

Action six. Eyes.
The easiest thing in ours is to glue the eyes of a giraffe. We use for this the usual glue "Moment" or its high-quality analogues. Here is what we end up with.

Action seven. Sew on the head and body, add the limbs
You can sew the head to the body with the help of simple threads and an ordinary needle. We also did it without too much trouble.

Now you need to insert a wire into the body in those places where the front and hind limbs will be. The wire must be wrapped with adhesive tape so that its sharp edges cannot harm anyone.