Quick hairstyles in 5. Easy hairstyles for yourself in five minutes
Hairstyle in 5 minutes even on long hair is real. Various variations of beams and braids are made simply, look original and spectacular. Another advantage of most quick solutions is that they require only elastic bands and hairpins to create them. Gels, mousses, varnishes, curling irons and other styling attributes do no harm, and in the evening there is no need to comb and wash off the styling results for a long time.
We have selected the best video tutorials for beginners to learn how to do simple and quick hairstyles at home on their own.
Six cool daily
Alya and Ira on the channel "Beauty Salon" help to find the answer to the question "What can I do to go to work or study, but do not spend several hours at the mirror?". The first hairstyle is suitable for women whose hair does not differ in volume. To make it, you have to spend about 60 seconds. The secret of the second is the use of a corrugated curling iron and the creation of a zigzag parting. The third, fourth and sixth ideas are options for a careless beam. And the fifth is a tail that hides the elastic.
Lightweight and fast
Video for those who have to braid daily. Anastasia, who became the new host of the School of Beauty channel, demonstrated 3 options for simple everyday hair looks for long haircuts.
- The combination of a braid and a fishtail, which must be performed at least 14 times.
- The hidden ponytail gives the girl an elegant look.
- It is called a false scythe. It is suitable for those with thin hair.
Chic evening: for medium length
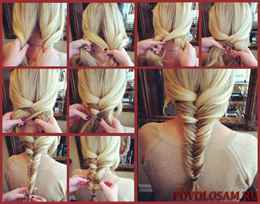
When invited to a gala event, and there is no time to visit the hairdresser, you can use the video tutorial that demonstrates the process of creating a voluminous evening hair look. The model used is a mannequin that meets the competitive requirements of the international association OMC and has blond human hair of medium length. With the help of several rubber bands, invisible hair and varnish, the author of the video makes a beautiful bunch in a few minutes. It will be appropriate at a wedding, prom, dinner party. And it can be used everyday.
Easy to make at home
Those who want to come to school, institute or office in a new way every day can take advantage of Tatyana's master class, who showed several interesting options for working with hair. The first method is created on the basis of ponytails. The shape of the hairstyle is similar to 2 flowers. The second method will help out if you are late - the hair from the forehead and temples is collected in an interesting bun shape, and remains loose at the back. Some ideas solve the problem of long bangs getting into the eyes and causing discomfort. The fourth styling looks elegant and looks great with both casual clothes and evening dresses.
Like popular female bloggers in 1-5 minutes
Video for those who want to have a hairstyle like popular Instagram blogger girls. Rina made a useful video that allows even lazy and impatient girls to learn how to make spectacular hairstyles for medium and long hair. It will take some time to complete any of them. The viewer will learn how to make voluminous horns from tails twisted with a tourniquet, a high tail on the crown and a voluminous one on the back of the head (leaving part loose), a bump on the crown. Fixing varnish is not required. All you need is a comb, invisible hairpins and an elastic band. Rina also shared a life hack: to get a more voluminous hair, you should release or loosen the strands.
Adding Volume
Masha Timoshenko made a video about 3 hairstyles that allow you to visually add volume. The first styling option is reminiscent of the style of Princess Jasmine from the cartoon "The Adventures of Aladdin." It consists of a parting in the form of a zigzag with elongated strands and 2 ponytails. Each of them is divided by rubber bands into 5 parts. To create another, you need manual dexterity to make a spikelet to the top of your head, and a little imagination to decide how to style the part of the haircut, fastened with an elastic band: a bun or a pigtail. The latter consists of a tail entwined with curls and fixed with hairpins.
Five everyday
Owners of long curls can take advantage of a master class that demonstrates the process of creating several quick everyday hairstyles that do not have to be fixed with varnish. Some styling begins with twisting strands from the temples, then a tail is created. However, the difference between them is that the finished No. 1 is a neat bun, while in No. 2, part of the hair remains loose. For methods No. 3, No. 4 and No. 5, the upper curls are collected in a ponytail using a thin elastic band, then you need to make a bun or an unusual tail with the help of stealth and a few strands.
To go to work
Will be of interest to girls who want to learn how to make simple but stylish hairstyles for the work environment. The basis is ponytails, pigtails and twisted strands. For fixing, invisible, hairpins and varnish are used. After watching the video and practicing styling your own hair, you will be able to create a new hairstyle every day, spending a few minutes at the mirror. Any of them will look neat and suitable for creating a business image. In addition, beautiful hairpins can be used.
We do it in two minutes
Alya on the Beauty Salon channel tells how to make five cool hairstyles if you don’t have time, but you don’t want to leave the house with your hair down. Any of the styling takes no more than two minutes. To get volume, you can use dry shampoo or a corrugated curling iron.
- You need 2 small elastic bands to create "horns". They can be supplemented with pigtails.
- Loop fixed with invisibility.
- Beautiful braids
- Tail located at the crown
- low ponytail
Beautiful summer
- It is a voluminous horns, performed with an elastic band in 2 minutes. If you add pigtails to it, you get a mischievous option, suitable for a summer festival.
- More complex, but it can be used as a casual or evening dress, for example, for a prom. It is created on the basis of 2 ponytails made at the back of the head and twisted into bundles.
- Volume braids.
Hardworking - a bright light burns through life, lazy - a dim candle
Hairstyles for long hair in 5 minutes - 50 easy ideas
Long hair is a real gift of nature. If you like to experiment with your appearance, look different every day or are going to a celebration, then do-it-yourself hairstyles for long hair will definitely come in handy. We have collected for you some ideas of simple hairstyles that you can do yourself with the help of improvised materials.
Not every girl can afford to grow the length - someone has split ends, someone's hair does not grow below a certain length, and someone lacks volume. Long hair looks beautiful and charming on its own, even when naturally tousled, it attracts men's looks. So, let's begin!
original tails
It is perhaps difficult to find a more popular hairstyle among owners of long hair than a regular ponytail. He helped you more than once, while you were in a hurry and did not have time to do your hair or even wash your hair. However, the ponytail can be created not only with a single rubber band, there are more creative ways to create this hairstyle.
Cord
This hairstyle is done in just two to three minutes. First you need to create a regular tail. Then divide it strictly into two equal parts. Twist them with each other with a rope - as if you are trying to weave a braid of two strands. To prevent the hairstyle from falling apart, the tension must be sufficient, but be careful not to twist the hair too much. Twist the end of the cord with another rubber band. For this purpose, it is fashionable to use invisible rubber bands, but if you wish, you can, of course, take a bright one.
stepped
Do you remember Princess Jasmine's hairstyle? If you have long and thick hair, you can create something similar on your head.
Comb your hair thoroughly and spray it with a fixing spray. And then everything is simple - first you make a regular tail, and then pull it with rubber bands at regular intervals along the entire length. The areas between two adjacent elastic bands should be fluffed up to create the effect of volume and roundness.
Side
To get started, comb well and make a side parting. On one side, begin to twist the hair into a roller and fix it with hairpins. As soon as the roller reaches the opposite ear, tighten it with an elastic band. You can combine this hairstyle with a cord if you do not braid a roller, but a ponytail of two strands.
everted
And now we will learn how to do the tail in reverse! First, make a regular tail, as you are used to. Now divide the hair above the elastic into two equal parts. There should be a small hole in the middle. Twist the resulting tail into a tourniquet and insert it through this hole. Then you can fix the tourniquet on your head, pull it with an elastic band or dissolve it.
Hairstyles with braids
Contrary to popular stereotype, long hair braids are not as time consuming as they seem. With pigtails, any girl will look beautiful and feminine. The main thing is to learn how to weave them. Perhaps at first it will take you more time to master the technique, but then you will learn how to do it very quickly and surprise others in a new romantic way every day.
Braid headband
Select a small strand of hair at one of the temples and braid a thin pigtail. Repeat the procedure on the opposite side as symmetrically as possible. Throw both pigtails over the frontal part of the head towards each other and secure their ends with invisibility. In the same way, you can make a rim from one thick braid - you get a national Ukrainian hairstyle.
Tail and braid
With the help of a pigtail, you can also diversify the usual ponytail. Having collected the hair in a ponytail, separate one strand about 3 cm thick and braid it in a pigtail in any way convenient for you. You can drag the resulting pigtail with an elastic band and leave it in the total mass of hair, or drag the base of the tail to it and fix it with invisibility.
mermaid tail
A very romantic hairstyle that will give you a little mermaid charm. How to weave this graceful and delicate braid:
- Separate two identical strands of about 3 cm in girth from the temples. Cross them at the back of your head.
- Let's say the right one is at the top, and the left one is at the bottom. Then fix the strands with your right hand, and grab the same thin strand on the left side with your left hand. (If the left one is at the top, vice versa).
- Put a new strand on the top strand, connecting them into one. Overlap again and repeat the procedure.
- When the braid falls below the level of the neck, continue to grab strands from the loose tail in turn. The braid will gradually taper and become very thin at the end.
Video
french braid
This hairstyle not only looks spectacular, but is also very practical - the hair does not get out of it, and the braid itself does not interfere with you. You can braid one French braid in the center of the head or asymmetrically, as well as two braids on the sides. The weaving technique is based on the usual braid of three strands. The essence of weaving is that the extreme strands move in turn to the center - almost every woman can do this hairstyle.
The French braid differs from the usual one only in that it begins to be braided not from the entire volume of hair, but from three central strands, and then you expand the hairstyle, adding more and more strands from the sides. There is also a reverse French braid or dragon - its difference lies in the fact that the side strands are captured not up, but down, under the nearest strand.
Spit waterfall
This hairstyle is based on the French braid. It is suitable for girls who love loose hair, but at the same time, a braid rim will make the hairstyle complete. In this case, the braid is woven horizontally, from temple to temple. All those strands that you grab from the sides, you use in weaving a French braid, but then leave it free to hang. This hairstyle is perfect for a party, romantic date, going to the cinema or theater.
Scythe shell
Great hairstyle for those with long hair. First, you weave a braid in any way convenient for you - regular, French, mermaid tail, etc. Then you put the resulting braid on your head in the shape of a shell or any other figure, fix it with invisibility, fix it with a styling tool.
Bows, bundles, shells and others
Decorative elements of the hairstyle always look unusual and attract attention. However, girls do not do them as often as the stronger sex and the beauties themselves would like. And all because many are convinced that it takes a lot of time and experience to create figures on the head. But actually it is not. Having given enough time to training in front of the mirror, everyone can flaunt a beautiful and unusual hairstyle.
hair bow
Prepare a thin rubber band and invisible hairpins. Make a regular tail, but not in the center of the head, but slightly shift it to one of the sides. Pull the bun out of the tail by pulling the mass of hair in the opposite direction. Divide the bundle into two parts, you will get two loops - this is exactly the halves of the bow. Now take the end of the ponytail and bring it back between these halves, and then wrap it around the base of the bow and secure with bobby pins.
fast beam
On the basis of the ponytail, you can also make a bun that is fashionable in the coming season. To do this, first you will need to collect a high tail, and then divide it in half. Twist one half around the base of the tail and secure it with an invisible hairpin. With the second half, do the same, but do not fix it too much, leave a slight effect of negligence. The same bundle can be made if you first braid the entire volume of hair into small pigtails.
Shell
This hairstyle is perfect for a festive event, whether it's a graduation or a wedding, and it is done in front of a mirror in 5-7 minutes. So, we start as usual with a ponytail, collect the hair in the usual way, and then move the elastic band down 6-7 centimeters. Twist the hair into a bundle and begin to turn it inward, towards the roots of the hair, as if you were winding the threads on a spool. If you do everything right, then the elastic that fixes the tail will be inside the shell, and it will not be visible. Secure the hair with hairpins and invisible, fix with varnish.
Hair roll
Comb well and collect your hair in a low ponytail. Then lower the elastic a little and divide the hair above it into two parts. Pull your long hair through this hole, twisting it into a ponytail, like in a reverse ponytail. But now we will not leave the tail, but hide the tip inside the roll, attach the side parts to the head, and then fix it with invisibility and varnish. Now they won't bother you. A hair roll is well suited as an office hairstyle for every day.
For loose hair
What owner of long hair will refuse the pleasure of flaunting her loose hair? However, to keep your hair looking neat, we recommend pairing your loose hair with different hairstyles.
side parting
Asymmetry is back in fashion. Comb your long hair to one side. To prevent the hair from flying apart, fix it with a hair styling product. You can diversify this hairstyle by adding various headbands and decorative hairpins - for example, a classic rectangular hairpin on the side is well suited for the office. Curly curls laid on their side look even more impressive, with a flower on one temple - a great hairstyle for a celebration.
Quick curls
Curled curls have always been considered an adornment of a girl. You can create them in just 5-10 minutes. Comb your hair thoroughly and apply a heat protectant without skipping a single strand. Then braid the entire volume of hair into thick or thin bundles - depending on whether you would like to see small or large curls in the mirror. Now slowly run the iron over each tourniquet. Undo the braids and spray your hair with hairspray to create a style.
corrugation
You can also make a stylish hairstyle if you use. You can choose a styler with the curl size you need to match your facial features.
Most importantly, do not forget about thermal protective agents and care for weakened hair.
wet effect
A win-win option for a party with friends or a romantic date, as well as a walk on a summer day. This hairstyle suits almost all girls, and also goes well with light summer dresses and sundresses. To create, you need to wash and lightly dry with a terry towel, and then apply the mousse along the length, but without affecting the root zone. Let your hair dry naturally, do not touch the hair dryer. If you want playful wet curls, wind your hair with soft curlers or braid it for a while into small pigtails, and then unwind it back.
Hairstyles with accessories
Jewelry works wonders - you can look stylish and feminine with the right headband, headband, decorative flowers, etc. The main thing is to choose accessories in such a way that they match your style and facial features. And there are a great many hairstyles with their use - choose and experiment!
For example, you can do this hairstyle with a hairpin for long hair:
- Divide the hair into front and back parts according to the level of the ears;
- Divide the front part in half again with a symmetrical parting;
- Tie the two front halves together in a knot;
- Point both ends down towards the rest of the hair.
- Decorate the resulting knot with a stylish hairpin.
Conclusion
Hairstyles for long hair with your own hands will help you look individual and unique, you can look different every day. The creation of each hairstyle takes no more than 10 minutes, so in the morning you do not have to spend much time in front of the mirror. Try these hairstyles to listen to compliments from others, feel desired and attractive.
In the summer, circumstances oblige us not only to lie on the beach, but also to go to work, walks and dates. If you can put on a light cool dress on your body, then the situation with hair is more complicated. The high air temperature forces girls to look not only for stylish, but also for quick ways to remove their hair. We offer 55 hairstyles of different styles that you canSpit
If you think that a classic braid is too banal for a summer outing, here are some fairly simple but stylish options that will be a great alternative to a traditional hairstyle.Option 1
To begin, make a parting on one side and start weaving a braid from the opposite temple. Move diagonally, weaving strands from the crown and forehead area. As a result, you will get a stylish asymmetrical and not at all hot summer hairstyle.Option 2
This is a very simple and quick technique that will help to improve the classic braid a little. First of all, tie a not too tight ponytail with a thin, inconspicuous elastic band. Make a gap above the elastic in the hair and thread the tail through it. Then, braid your hair with whatever technique you like. Thus, a simple everyday hairstyle is ready.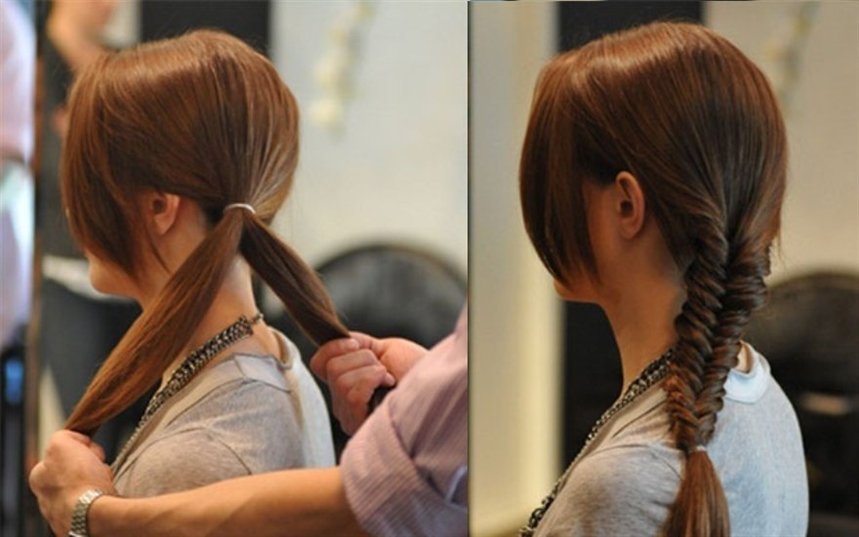
Option 3
This hairstyle looks great on long hair. To start, tie a ponytail that is not too tight on the side. Make a gap above the elastic and pass all the hair through it. To add volume, relax a few strands. A little lower, tie another elastic band and repeat all the steps again. The number of sections depends on
Option 4
To get such a careless, but stylish braid, you need to wind your hair with light waves and make a bouffant at the crown. Then braid the braid with any technique that you know. When the braid is ready, pull it in different directions to add volume. At the end, divide the hair into two parts, tie in a knot and secure with an invisibility from the inside.
Option 5
Separate at each temple (above the level of the eyebrows) one side strand. Braid them. Grab a curl next to each pigtail and fasten them to the back of the head with an elastic band or hairpin.Repeat the steps, separating the strands near the ears. Braid them into pigtails, grab the neighboring curls and fasten them to the back of the head. The rest of the hair can be left loose or braided.

Option 6
Comb your hair with a side parting. Separate the strand near the ear and braid the pigtail with any technique. Don't braid too tight. Secure the end of the braid with a transparent rubber band. Release the strands from the braid to give them volume. The final touch: spray hair with varnish. This option will look best on curly hair. If you have straight curls, spend a couple of minutes curling with a curling iron.
Option 7
Make a side parting. Separate a strand at the parting and start braiding, grabbing the hair that frames the face. Use any technique. When you reach the neck, change the braiding technique and weave the remaining hair into the main braid. When finished braiding, put the elastic on the end of the braid. Loosen the strands, from which the hairstyle will appear more magnificent. Lastly, spray your hair with hairspray.In the photo below, you can see a combination of a simple braid and a fishtail. Looks very impressive.

Option 8
A quick and easy hairstyle that even a first-grader can handle. Despite the ease of weaving, the end result is a styling that others will find unusually difficult.So, divide your hair into three equal parts. From each part we braid one braid, the ends of which we fix with small elastic bands. Now take one braid and fold it into a ball. We fasten it with hairpins at the base of the back of the head. We make balls from the remaining braids.
This hairstyle has only one drawback: the true Rapunzel will have to tinker with braiding their curls. But owners of medium length hair will cope with weaving in a matter of minutes.

Option 9
An inverted braid seems unusually complex, but in reality everything is very simple. The weaving technique is surprisingly simple and with its help you will create a unique hairstyle in a couple of minutes.First level: separate one strand above the forehead and make a ponytail. So that the ends of the hair do not interfere with your work, wrap the ponytail at the crown and secure it with a clip.
Second level: capturing the side curls, we make the second tail. At the same time, we retreat a little from the first tail. Now remove the clip. We divide the first tail into two halves, between which we draw the second tail. We wind the tip of the second tail up and fasten it with a clip. Leave the ends of the first tail at the bottom.
Third level: grab a strand a little lower, connect it with free ends (from the first tail). We make the third tail. We remove the clip, divide the tips of the second tail into two halves and pass the third tail between them. We fasten the third tail with a clip on the back of the head. Leave the ends of the second tail at the bottom.
We repeat the steps as needed. When you finish braiding the braid, secure the end with an elastic band. The turn of the final touch: carefully release the strands, starting from the very first. The higher the strand, the more volume we give it. It is not necessary to braid your hair to the end - the hairstyle will look chic even with three levels.

If you are looking for a simple but original summer hairstyle, an unusual ponytail will be a great option for both everyday life and evening walks.
Option 1
To do this hairstyle, first twist the hair a little at the ends. Tie the tail with a thin elastic band. Make a gap in your hair and thread the ponytail through it. If necessary, curl your hair a little more or part the curls with your fingers to add volume.
Option 2
For this hairstyle, the hair must be even, so if necessary, use a flat iron to straighten it. Then, divide your hair into two layers: top and bottom. Gather the top layer of hair with a thin elastic band at the back of the head on either side of the head. From the bottom layer, weave a braid in the opposite part. The thickness of the braid depends on your personal wishes. Wrap the elastic around the ponytail with a pigtail and secure the tip with a small hairpin.
Option 3
To create a more elegant ponytail, you will need hair foam or wax. Make an even parting (in the center or side, which suits you better) and collect the hair on one side. Apply foam on them and divide into two equal strands. And then just tie a knot twice in a row. Fix with a thin invisible elastic band right under the knot, and wind the ends of the hair a little or make a light bouffant.
Option 4
To make this stylish ponytail perfect for any kind of summer event, you'll need a curling iron, hairspray, bobby pins, and a little time. To start, curl your hair at the ends. Then divide them into 4 parts: at the back of the head, at the crown and on both sides at the temple, and tie them with elastic bands so that they do not mix with each other. Take the hair from the crown and comb it a little from the inside, and then twist it with a flagellum and secure it with invisibility. Repeat the same with the hair at the temples. When the hairstyle is ready, sprinkle it with varnish, for reliability.
Option 5
Very romantic summer hairstyle. To make it, divide your hair into two parts along the parting line. Braid pigtails on both sides, which converge at the back of the head from the temples. Tie them together with a thin elastic band. Then separate a thin strand from the tail and braid the pigtail. Wrap an elastic band with it and secure it with an invisibility from the inside. Comb the tail a little with a comb or twist with a curling iron.
Option 6
The ponytail is one of the most popular and versatile hairstyle trends in the world. This option is very fast and original. First, curl your hair at the ends and then divide it into two sections. From the hair at the crown, begin to weave a loose braid, weaving all the strands into it along the line of the forehead to open the face. The pigtail should end at the back of the head, and then lift the rest of the hair and gather it together with a thin elastic band. To hide the elastic, you can wrap it with a strand of hair and secure it with an invisibility on the inside.
Option 7
Another easy and quick way to make an elegant ponytail. Curl your hair at the ends to make light waves. Then split them into two parts. Comb the hair at the crown a little and tie it high with a thin elastic band. Gather the rest of the hair just below and also tie with an elastic band. To create more volume at the top of your hairstyle, loosen a few strands at the crown.
Option 8
This is a great way to turn an ordinary ponytail into an original hairstyle in a few minutes. Tie all your hair into a ponytail at the back of your head. Separate a small strand and wrap it around the elastic to hide it, and secure it with an invisibility from the inside. Then tie another elastic band just below. Make a gap in the resulting sections and pass the hair through it. Tie another elastic band a little lower and repeat the procedure. The number of sections directly depends on the length of your hair. To make the ends look natural, twist them a little with a curling iron or iron.
Option 9
Divide your hair into 3 strands (central and two side). Secure each strand with an elastic band if you're doing your own hair. So the hair will not get tangled. Fold the central strand into a tourniquet and wrap it around the side ponytail on the right. Separate one curl from the left strand. Roll it into a bundle and wrap the right tail. We also fold the remains of the left strand into a tourniquet and wrap the tail around it. We fix the hair with an elastic band.This hairstyle has several advantages. Firstly, we do not need to observe a clear symmetry (uneven strands give a chaotic gloss). Secondly, the lack of parting allows you to mask some defects: unpainted roots, dandruff or too sparse hair.

Headband made of ... hair
This is the easiest and most original way to replace the usual headband and remove hair from your face on a hot day.Option 1
First, divide your hair into two sections. Gather the hair at the back of the head with an elastic band so that it does not interfere, and proceed to the strands at the front of the face. Make a parting on either side and start weaving a braid, weaving strands into it along the forehead line. When the "rim" is ready, loosen the hair at the back of the head and enjoy the original hairstyle.Option 2
Separate a small strand of hair in the neck area and weave a thin pigtail out of it. Wrap it around your head and secure with an invisibility on the opposite side. This hairstyle looks great on curly hair.
Option 3
Make an even parting and separate two strands on both sides of the head. Weave them into pigtails, not too tight, and tie at the ends with invisible rubber bands. Connect them together at the back of the head and fasten with invisibility.
Option 4
Separating the strand in the area of the bangs, we make a pile. Near the ear on the right, we separate one curl and form a flagellum, twisting the hair away from us. Secure the tip with a clear rubber band. Take the invisible and fasten the tourniquet on the back of the head, closer to the left side.We repeat the steps on the opposite side: we separate the strand at the ear; we form a flagellum; fasten the end with an elastic band. We start the second flagellum under the first and fasten it with an invisibility.

Hairstyle in 30 seconds
If time is running out, and you are in a hurry to an event where you need to be smart - these options are for you!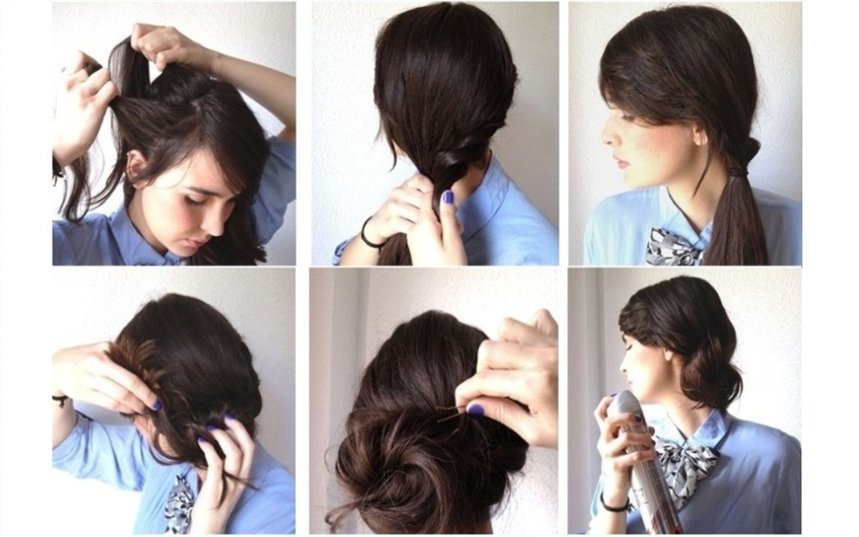
Option 4
Divide your hair into three sections. The average should be larger than the rest. Weave a voluminous braid out of it and fold it into a knot using invisible or hairpins. Strand, which is on the left, roll into a tourniquet and let go around the knot counterclockwise (bottom). The strand that remains on the right, wrap around the hairstyle clockwise (through the top). Secure with invisible or sprinkle with varnish.
Option 5
To make such a hairstyle, you need hairspray, invisible hair and a little time to practice. To start, fluff up your hair with your hands to get a good volume, and coat it with plenty of varnish. Then gather your hair together and wrap it inward to form a shell. Secure your hair with bobby pins. You can leave a few loose strands to give the hairstyle a sophisticated carelessness.
Option 6
This is a very easy way to make a knot at the back of your head. First of all, tie the tail and divide it into two equal strands. Twist each strand in a clockwise direction. Then begin to twist the strands together (counterclockwise). Tie the tourniquet at the end with an elastic band and fold it into a knot at the back of the head, securing with hairpins.
Option 7
Tie a ponytail at the back of your head, not too high. Make a gap above the elastic and pull your hair into it. Then, carefully curl the ponytail into a shell and secure with a hairpin or other accessory.
Option 8
To make a hair bow, you will need a thin elastic band, invisible hair and 1 minute of time. To begin, tie a knot high on the top of your head and divide it into two parts. Pass the tip of the tail in the middle and secure with an invisibility behind. This hairstyle is also called "Lady Gaga Bow".
Option 9
The creation of this hairstyle will take more time than the previous ones. You will need a foam donut and hairpins. Tie a high ponytail, put a “doughnut” on it and hide your hair one strand under it, securing it with hairpins for reliability. At the end, the hairstyle can be decorated with a bow or other accessories.
Option 10
Figured "donuts" look much more interesting than ordinary round ones, if you like bunches of ballerinas. Such "donuts" can be bought in specialized stores or ordered online. The execution technique is no different from the classic options. Hair must be plugged into a donut.
Option 11
Gather your hair into a ponytail high on top of your head. Divide the tail into two halves, wrapping each with a flagellum. Now fold the bands around the elastic band. We twist them tightly and in opposite directions (left - to the right, right - to the left). Fix the hair with invisible hair and fix it with varnish.
Option 12
Divide your hair into two halves. Take the first strand, separate the curl from the forehead. We twist the curl away from us, starting at the forehead and ending behind the ear. We tie the first ponytail low at the back of the head. We do the same with the second half of the hair. And now it remains to twist the bagels. Ready!
Perhaps the easiest way to escape the summer heat and still create a sophisticated hairstyle is a Greek headband.
Option 1
Put a Greek headband on the top of your head and thread small strands of hair under the elastic. You will get a beautiful hairstyle in just a few minutes.
Option 2
This is a more complex example of how a Greek headband can be used. You will need two headbands for this hairstyle. Put one under your hair, and then bouffant at the back of your head. The second - put on the crown and wrap the strands under it. Voila!
"Malvinka"
One of the fastest and cutest hairstyles is familiar to us from an early age, thanks to Malvina, a girl with blue hair. The main difference between this hairstyle: the hair is loose, the upper strands are pinned high at the back of the head.Option 1
A great way to diversify the image if your hair barely touches your shoulders.Separate the strand above the bangs and backcomb. We put a roller under the strand and fix it. Velcro curlers can be used as a roller. They stick better to the hair. We grab the side curls and (together with the combed strand) we fix them on the back of the head with an elastic band. Using any thin object, we stretch the hair a little from above, giving it volume. A Chinese stick or an ordinary hairpin will do. It is better to pull strands with your fingers on long hair, but not on short hair.

Option 2
Separate one strand at each temple (above the ear) and fasten them to the back of the head with an elastic band. With the first strand we grab the curl, draw it over the tail and wind it behind the first strand. We repeat from the opposite side: we grab the curl, draw it over the tail and wind it under the lock. We connect the ends of all four curls with an elastic band. It makes a cute heart.
Option 3
Using a hair straightener, twist the ends on a few side strands. Separate one strand at the crown and backcomb with a comb. To keep the strand in place, spray it with hairspray. Having laid the combed strand, pin your hair with a hairpin, making a “malvinka”. Ready!A great option for a romantic date, going to the theater and even for a wedding.

Option 4
Grab a wide strand (from forehead to ear) at each temple. Secure the strands at the back of the head with an elastic band, masking it with a thin curl. Randomly, in random order, braid a couple of thin braids. For more blunders, you can curl the ends of your hair a little.
Option 5
Separate a strand from each temple and make two flagella (turning the strands away from you). Connect the flagella at the back of the head, tying them with an elastic band. From the loose ends of the tourniquet, braid a pigtail, choosing your favorite technique. For example, ala "fish tail".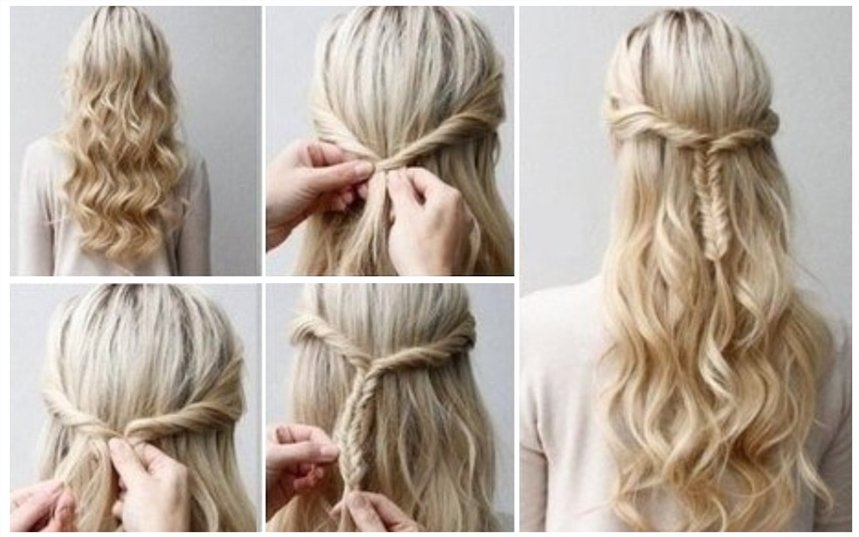
Emphasis on accessories
With the help of ribbons and scarves, you can turn even the most ordinary ponytail into a work of art. Someone will think that hair with a scarf resembles a collective farm style. And wrong! It is fashionable and beautiful - even Hollywood stars flaunt branded scarves skillfully tied to their hair. In summer, a scarf will protect you from the scorching rays of the sun. He also has other advantages: with the help of a well laid scarf, you can hide hair imperfections, regrown roots, gray hair or a rare parting.Option 1
Release and comb your hair. Tie a knot around the middle of the scarf. It can be a regular or decorative knot - to your taste. Put the scarf over your forehead (so that the knot is a little to the side). Tie a double knot at the back of your head and hide the ends of the scarf behind the base of the fabric.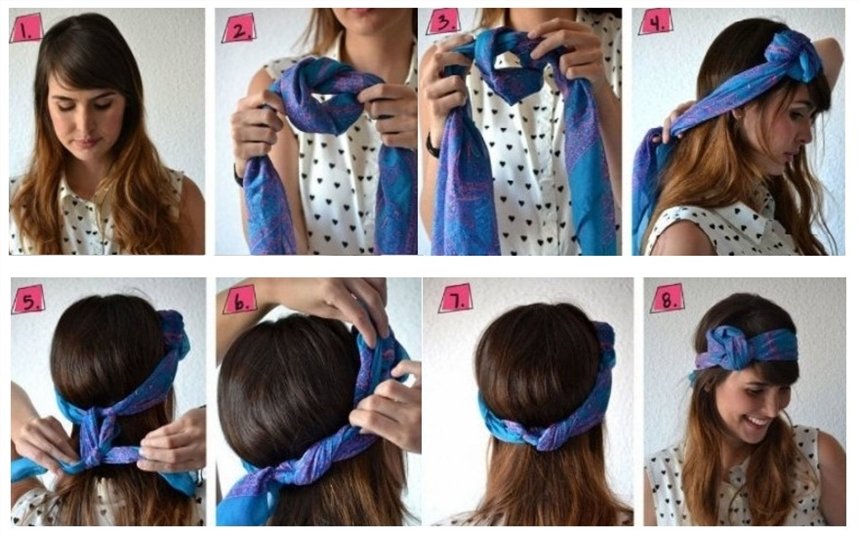
Option 2
Do you like trendy pin-up looks? Then this option will suit you.Divide your hair into two sections: back (crown and nape) and front (forehead). Gather your hair in a bun at the back. You can pre-braid it in a braid, which will allow you to give hairstyles fixation. Twist the hair in front into a tourniquet, style it with a donut and secure with invisible ones. Finishing touch: tie your head with a cute scarf or shawl.

Option 3
Another great version of the image of "pin-up girls". Make a long bang by separating a strand above the center of the forehead. Collect the rest of the hair in one or more tails (the ends of which we curl with a curling iron). The most important stage is the formation of bangs. It is the large bangs that are one of the distinguishing features of this style. We wind the front strand onto the curling iron. We give it the desired shape and sprinkle with varnish. Behind the bangs we tie a small handkerchief with polka dots with a bow.
Option 4
The popularity of The Great Gatsby rekindled interest in American culture in the 1920s. And, of course, this interest has not bypassed the fashion world. Ladies of that era, going to a party, preferred short hair, and long curls were removed under a catchy headband. However, the bezel was also worn on short hair. In addition, the hair is often curled. If you like visiting Mafia clubs or jazz bars, then retro styling will come in handy. Let's look at one of the ways to create such a hairstyle.Comb your hair to the side and put on a glamorous headband. We pass the hair by the rim - strand by strand. Voila! For owners of short hair, we advise you to smooth the curls with gel and (where can you go without it?) put on a headband!

Among these hairstyles, you are guaranteed to pick up a few for yourself.
Any woman wants to look royal not only on holidays, but every day. And it doesn't matter how much time she spends in front of the mirror or in the hairdresser's chair, because the main thing is the result! If, moreover, the master tried and made a hairstyle that suits its owner, the admiring glances of men and the envious sighs of women are guaranteed. At least on the way back from the hairdresser. Meanwhile, for everyday life, a beautiful hairstyle is done quite easily, you just need to remember a couple of simple rules.
Beautiful hairstyle in 5 minutes with your own hands
Rule one: there is no bad hair, there are hairstyles that are not suitable for a specific face shape and color type. If a woman searches and tries different options, she will eventually find her hairstyle, which will become an integral part of the image.
Rule two: everyday women's hairstyle must meet five requirements:
- fortress (do not disintegrate during active movements or from the wind);
- variability (transformation of the basic model for any situation);
- ease of creation;
- elegance;
- naturalness (minimum accessories and varnish)
For medium length hair
Hairstyles for medium hair hold primacy among all other types, since every third woman has hair of this length. And this is understandable: a limited number of men like too short hair, and special care is needed for long hair.
In addition, happy owners of shoulder-length, slightly below or shoulder-length hair have various options for hairstyles, and they are easy to create with the help of simple accessories such as hairpins, headbands, elastic bands, etc.
So, what hairstyle can you do to yourself on medium hair in 5 minutes?
Inverted ponytail
The simplest of the quick hairstyles is called an inverted ponytail. It is done like this: comb your hair and collect it in a ponytail. Then, at the base of the tail, at the back of the head, divide the hair into two parts and drag the tail into the hole formed, as if turning it inside out. The result should be a tail with a beautifully twisted roller. See photo instructions for details.

Knot at the back of the head
Another type of quick hairstyle for medium length hair is the classic knot at the back of the head. Here's how it is done: collect the hair in a ponytail, fix it with an elastic band. Wrap the resulting design around the base of the tail. Prick with pins.

About curls
Is it possible to make yourself curls for medium length hair? Will they last and for how long? This question is asked by many owners of not too long hair. Yes, yes and yes again! In addition, on medium-length hair, curls look even better than on long ones, because they do not just hang down the back, but beautifully frame the face.
To create lush curls, hair must be wound on a curling iron or small curlers and dried. Then you can fix the hairstyle with mousse or varnish. If the curls turned out too steep, you can comb them a little and fix them with varnish.

Of course, it’s still better not to do such a hairstyle at school, because it looks quite grown-up, but for some social events or for a service where there is no corporate dress code, it’s just right.
Pigtail
If the length of your hair allows you to braid a pigtail, you can try this option. For example, the original "braid with a bun" hairstyle. She, no doubt, will be appreciated by courageous women who are not afraid of experiments.
You need to braid the pigtail on one side, starting from the temple, and make a bun from the remaining hair and twist it at the back of the head. Secure the ends of the hair with invisibility around the base of the bundle.

Owners of long hair: completely new hair styling options
Now let's talk about what are beautiful everyday hairstyles for long hair.
If you have very long hair, you can try to remove it from your face without sacrificing length, and do it in just 5 minutes! For example, a ponytail with a small fleece, which is suitable not only for a girl, but for any woman up to 50 years old.
We make a ponytail with fleece
Comb the hair and divide horizontally into two parts - upper and lower. Raise the top, and secure the bottom with a hairpin. Close with the top batch of hair and stab again. Collect hair in a ponytail, leaving a small strand at the neck. Secure the tail with an elastic band. Wrap the remaining strand around the base of the tail and secure the tip with a hairpin.

Congratulations, a beautiful do-it-yourself hairstyle for long hair is ready in 5 minutes!
Bundle with spikelet
And if it is necessary that the hair does not hang down the back, you can beautifully put it in a bun, but with a pigtail - a “spikelet”. You will be surprised, but there is such a hairstyle. For her, you need to comb your hair and make a horizontal parting. Braid the lower part of the hair into a pigtail - “spikelet” and secure with an elastic band. Gather all your hair into a ponytail and make a high bun. Attach it to the crown with pins.

Beautiful hairstyle in 5 minutes with your own hands: all the secrets of a variety of weaving
The ideal option for owners of medium and long hair is, of course, braids. I want to talk about them separately, because few people know how to make a beautiful braid, while spending a minimum of time.
We present you the two most popular options for weaving braids for medium and long hair - a fishtail and a Greek braid.
Pike tail (that's what it was called before)
A fishtail braid is woven like this: the hair is divided into two parts, and during weaving, the strands on one side are connected to the strands on the other side. It turns out a very original weaving, which differs from the usual three-strand braid.
Goddess of Olympus
The Greek braid is another variation based on the braid. Her weaving begins with side strands. To weave such a braid, the hair is combed and a few upper strands are separated on the left side of the head. The braid is weaved gradually, including the side strands in it. Weave to the ear. Then make the same braid on the right side. At the back of the head, the hair is collected in a ponytail and a bun is made.


Owners of short hair: an elegant mess is in trend!
Oddly enough, but for short hair, you can do a lot of different everyday hairstyles. When you get tired of wearing a regular haircut, you can just start experimenting with styling. The people around you will appreciate it!
First, you can make a so-called elegant mess on your head. All the steps to create it are so simple that this hairstyle cannot even claim to be a five-minute one - ladies often do it much faster!
So, the easiest of the quick hairstyles for short hair is done as follows: put a little hairspray on your hair and ruffle your hair. You can sprinkle a little hairspray on the roots of your hair to give them volume.

Short hair looks very attractive both in a disheveled form and smooth. For example, in this hairstyle: moisten the hair and apply a straightening serum. Dry with a hair dryer and straighten at the very roots. Lay with a round brush, slightly twist the ends. Fix hair with varnish on top.

As you can see, all the hairstyles presented in the article are quite easy to perform and give a woman a unique sense of attractiveness and confidence. And what can attract a man if not a charming and self-confident woman?
Video on the topic of the article
In the morning there is often not enough time, especially for long complex hairstyles. In order to arrive at school a few minutes before the start of the lesson and with beautiful styling, you can learn how to do easy hairstyles for yourself in just 5 minutes.
- To make your hair neat and spend less time combing, you need to prepare in the evening. Hair in the morning will not be too tangled if you comb your hair well before going to bed.
- If the hair is voluminous and difficult to style, wetting with water or applying a special styling product will help.
- It is not difficult to make a hairstyle in 5 minutes if you know the exact technique of execution and be able to apply it. If this is a new styling that is done for the first time, then you must first practice in your free time. After several attempts, the hairstyle can be done in just a few minutes. All the necessary accessories that may be needed in the process of doing the hairstyle should be at hand. It's best to keep everything in one place.
What do you need to do your own hair?
To make a hairstyle without much effort, you need to have hair styling products. They will help to cope with naughty hair and make styling neat.
These funds include:
Also, when performing hairstyles, you may need a hair dryer, ironing, hair tongs. Other accessories that will be required for hairstyles are invisible, hairpins, elastic bands. In some styling, you will need hairpins, headbands and bandages. 
Doing your own hair is more convenient in front of a large mirror in which you can see how the hair looks from all sides. To see the rear view, you need to take the second mirror and stand between them.
Light hairstyles with braids
Easy hairstyles that almost anyone can do are braided hairstyles. Forming bundles is simple, you need to select a strand of hair and twist it. 
To make a styling with 2 bundles, it is necessary to separate small strands from the temples. To begin with, a tourniquet is formed on one side and fixed with an invisible or hairpin on the back of the head, the same is repeated on the other side. You can combine the bundles and tie them together or fix them separately on the sides. At the same time, the hairstyle looks neat, and the hair does not fall on the face.
You can make tourniquets all over the head. In this case, the hair is divided into several small strands, which are alternately twisted into bundles and fixed below the back of the head. The ends of the hair are left free. Of these, curls or a tail are formed and fixed with an elastic band.
shells
Hair should be combed and moistened, so it will be more supple and smooth. Then you need to tie the tail and form a tourniquet. Having twisted it, the tips are hidden inside the roller, and fixed with hairpins.
Hairstyle with 2 shells is done in just three steps, but it will look spectacular. It is necessary to divide the hair into 2 equal strands. First, a tourniquet is made, twisted into a shell on the left side and fixed. Then the same is repeated with the right strand of hair. 
There are many variations of shell hairstyles. Laying can be smooth or a little sloppy. To make a neat shell, you must first straighten your hair with an iron, and apply a styling product. For a more voluminous shell, the hair can, on the contrary, be slightly combed.
gulka
Gulka refers to simple and quick hairstyles, performed on straight and curly hair. First, moisten the strands or apply a fixative so that they do not fall out. Then they are collected in a ponytail at the crown, head tilted down. The tail is twisted into a loose tourniquet, which turns into a bun at the base. The ends are fixed with an invisible or hairpin.
When performing hairstyles, you should make sure that all hair is collected and there are no strands that have fallen out. If the length of the hair does not allow you to make a high bun, then you can lower it a little and form it closer to the back of the head.
Two pigtails
Braided hairstyles are suitable for everyone and are done in a few minutes. To do this, you just need to learn the technique of weaving braids. 
To make 2 pigtails, you should make an even parting in the middle and divide the hair into 2 parts. Then you need to comb your hair and start weaving the braid in front of the first strand of hair.
After weaving is completed, the ends of the strands are tied with an elastic band. Then they begin to form a pigtail from the other half of the hair and also tie the ends with an elastic band. For a change in hairstyle, the ends of the right braid can be tied with ribbons under the left braid, and the ends of the left, on the contrary, under the right.
Spikelet or fishtail
Light hairstyles to school for yourself in 5 minutes can be done using spikelet weaving or a fishtail.
To weave a spikelet, the hair must be divided into 3 strands. Weaving begins as a simple braid, then, when the right and left strands are woven once, strands are taken alternately from both sides from the remaining hair and superimposed on the middle one. 
This technique should be braided until all loose hair is in the braid. The ends are tied with an elastic band, and the hair is fixed with varnish or spray.
The spikelet can be diversified by braiding it not in the middle, but on its side. The braid begins at the temporal part on one side and, during weaving, smoothly shifts to the opposite side. You need to finish weaving on the other side so that the tips are on the opposite shoulder. You can braid the braid to the end and tie it with an elastic band, or collect the remaining hair in a ponytail.
A fishtail is not much more complicated than a spikelet, but it looks completely different. Hair should be divided into 2 equal parts. Then take a thin strand of hair on one side and put a strand on top of it from the opposite side.
To keep your hair from tangling, you need to hold the braided strands with your thumb, pressing it to your head. The ends are tied with an elastic band or a hairpin. To make the braid appear more voluminous and magnificent, you can pull the strands to the sides. Hairstyle in the form of a fish tail is better to weave on medium and long hair.
french braid
To make a hairstyle with a French braid can be done quickly if the weaving technique is familiar:
- Hair should be combed and moistened with water.
- Then a strand is separated in the middle from the frontal part of the head.
- A strand of the same width is separated from the side.
- Put it on the first strand.
- The strand on the other side is also placed on top.
- Continue to separate the same strands on both sides and put them on top of each other.
- Tie a tail or braid a braid to the end and fix it.
There are many variations of French braid hairstyles, one of which is called the waterfall. Weaving begins from the temporal part of the head. The central strand is selected and the side strands are alternately added to it. 
A French braid is woven, but after a few weaves, it is necessary to put the lower strand on the middle one and let it go down. This action is done every 2-3 weaves, while the upper strands should all be collected in a braid. You can complete the weaving at the temporal part of the opposite side, or go lower. The ends should be tied with a thin elastic band.
Malvinka
Light hairstyles to school for yourself in 5 minutes - malvinki. In their creation, you do not need to have weaving skills, as they are based on a regular ponytail. It is necessary to collect the upper part of the curls in the tail and fix on the crown. 
The remaining strands remain free, you can twist them with tongs or straighten them with an iron. Laying will not look very simple if the tail is made into a bun. To do this, when tying your hair with an elastic band, you should not get the tips. You can also braid a pigtail from the tail and you get a malvinka with a scythe.
Another variant of a malvinka can be a bun. To do this, you also need to connect the hair in the tail and roll it into a tight tourniquet. Then it is necessary to wrap the flagellum at the roots of the hair and stab the ends with invisible or hairpins.
bundle
The ideal light hairstyle for school is a bun, you can make it yourself in 5 minutes, while the hair will be neatly collected and not get on your face.
Before collecting the hair, it is recommended to comb it thoroughly, then wet it or apply a styling product so that it does not crumble and does not tangle. To create a high bun, you can tilt your head down, so it will be more convenient to collect all the hair. 
Then a tail is made and tied with a thin elastic band. The hair is twisted closer to the roots of the hair and fastened with hairpins, and the ends are hidden under the bun and fixed with invisibility.
For a low bun hairstyle, the hair is tied at the bottom and tied into a loose ponytail. Above the elastic, you need to move a little strand and thread the tail there. If the hair is long enough, then you need to do this several times. The ends are fixed with an invisible or hairpin. You can decorate such a hairstyle with hairpins with decoration or a hairpin, fixing it in the middle of the beam.
Hairstyles with crabs
If there is such a type of hair accessory as a crab, then you can make an easy and quick hairstyle.
With small crabs, the hair on the sides is carefully removed from the face and stabbed. You should separate the strand on the right side, twist it clockwise and stab at the back. You can stop at this, or you can collect a strand from the opposite side, twist it counterclockwise and stab it with a crab at the same level as the first one.
The rest of the hair remains free, but the face is open. The same styling can be done with a single crab. To do this, the hair is gathered at the top and sides and pinned up at the back. In fact, it turns out a malvinka with a crab
To collect all the hair, you need a large crab. You need to comb, collect the tail, twist it into a tourniquet and stab it with a crab at the back of the head. If the hair is long, then you can leave the ends free to distribute them over the hairpins.
Greek
Hairstyles in the Greek style look feminine stylish, but at the same time, with proper skill, they can be done in 5 minutes. For classic Greek styling, you will need a special bandage with an elastic band on one side. You need to put a bandage over your hair so that the elastic is at the back. 
The front of the bandage can be lowered to the forehead or raised above the bangs. Then they begin to alternately wind small strands on an elastic band and hide the tips. When all the hair is collected, fix the hairstyle with varnish.
A hairstyle option is possible when not all hair is collected. It is necessary to put on a bandage and twist only the upper strands onto an elastic band. The lower strands remain loose, they can be wound on tongs and form light curls.
Greek hairstyle can be done without additional accessories, you only need hairpins and stealth. It is necessary to collect small strands at the back of the head, twist them and fix them with a hairpin.
Braids from tails
To make a braid of tails, you will need a lot of small elastic bands.
Hairstyle technique:

There is another technique for weaving braids from tails:
- Gather the top hair and loosely tie with an elastic band.
- Above the elastic, part the hair and twist the ponytail through the hole.
- The side strands are gathered together, tied in a ponytail and also turned inside out.
- Continue such actions until all the strands are braided.
- The rest of the hair is collected in a ponytail and secured with an elastic band or hairpin.
Inverted tail
Light hairstyles to school yourself in 5 minutes do not have to be boring. To make an inverted tail, you need to collect the hair at the back of the head and tie it with an elastic band.  Then you need to part the hair over the elastic to form a small hole. The tail is turned out, passing it between the parted strands through the top. Comb loose hair and fix hair with varnish.
hair bow
A hair bow looks original and unusual, and you can make it without much effort, if you follow the following technique:

Flashlights
The lantern hairstyle is easy to do, but it will look better on long hair. Gather your hair into a high ponytail and tie with an elastic band. Stepping back a little from the first gum, tie the second and so on. To get flashlights, you need to push the hair between the elastic bands to the sides.
wrapped braid
To make a twisted braid, gather your hair into a low ponytail and tie it with an elastic band. From this tail, a regular braid is braided and fixed. Above the top elastic, part the hair and thread the braid between them several times. Fix the hairstyle with hairpins and fix with varnish or spray.
There are a lot of easy hairstyles that you can do to your own school in no more than 5 minutes. The main thing is to know the exact technique of execution and then it is possible to have time to style your hair beautifully and at the same time not be late for lessons.
Video: hairstyles in 5 minutes
9 bundles to school and work:
Simple hairstyles in a couple of minutes for every day: