How to make a ship out of paper in stages. How to make a boat out of paper: step-by-step instructions for creating various floating models - a sailboat, steamer, canoe, etc.
Content
Recently, decorative items that are created from recycled materials or from materials that are conventionally called garbage, for example, cardboard boxes from under equipment, are in fashion. On the other hand, it became fashionable to create various figures and models of equipment from paper. In this article we will try to create some interesting cardboard ship models. For some of these models, you will need ready-made templates, and some products can be created without diagrams, using your imagination. At the end of the article, you will definitely find a video tutorial that will help you consolidate your knowledge and create an interesting product from improvised means. Let's not waste time, prepare materials and start creating.
Templates
Let's start by trying to create a ship using templates. They are easier to work with. What you need:
- thick cardboard (you can use an old box);
- scissors;
- pencil;
- ready template;
- glue or tape;
- colored paper and other decor.
First you need to print the template and transfer it to the main material. By the way, if you are using cardboard that is not too thick, then the template can be printed directly on it.
You should get about the following details:

Next, you need to dilute a little PVA glue with water, cut ordinary paper into pieces and, dipping them into the solution, glue them to the base of the ship. Remember the papier-mâché technique. It is better to connect the parts of the ship themselves with adhesive tape.
It remains now to arrange the blank with the prepared decor. It can be colored paper, wrapping paper, fabric. The ship can also be painted with regular watercolors.


You also need to make a mast for the ship. You can use a regular twig and some thick cardboard round timber.
Any boat must have a flag. For it, use a cloth and applique made of paper or material. The sail can also be made of cardboard, use bushings from toilet paper.

Making a big ship
This option is suitable for young children who love fun games. For such a ship, you will need a large box. It can even be packaging from under the refrigerator or from a large TV.
First, you need to connect the box valves and make the boat's sharp bow. On the sides, you need to cut a few rounds to make improvised portholes. Use a thick stick and cloth to make a flag. Use paints to paint the ship.

Do not forget about details such as the anchor - it also needs to be made of dense material and decorated. A large cardboard ship with your own hands is ready to sail through the endless expanses of the apartment.
We use matchboxes
Let's call this modeling, because we will create an entire ship from several matchboxes. What you need:
- cardboard;
- glue;
- matchboxes;
- wooden skewer or thick paper;
- colored paper;
- felt-tip pens;
- scissors.
First you need to glue together two matchboxes short sides... Glue another box on top in the middle.

Now you need to cut out a rectangular piece of paper and glue it on top to the structure.

Now we need to cut a strip out of thick colored cardboard, with which we will shape the bow of the ship.

Now you need to cut out a piece of cardboard that will correspond to the contours of the ship, take a look at the photo:

Now the bottom and top of the ship need to be held together with glue. Next, you need to make a mast. You can use a wooden skewer or twist the A4 sheet very tightly and secure the tip so that the sheet does not unwind.

A hole must be made in the upper matchbox of the ship so that the mast can be inserted. Remember to use glue.
Now it remains to cut out the sails from colored paper, paint them and attach them to the mast.
The matchbox ship is ready! It can be made wider and taller by using more matchboxes. If you use very thick cardboard for the bottom of the ship, then it is quite possible to launch it on the water and participate in competitions for the title of the fastest boat.
Do-it-yourself cardboard spaceship
We suggest using a fairly simple option that will literally create a 3D model. To do this, you need to cut out several identical parts from cardboard, but in different sizes. The parts need to be fastened together, but between them, either a thin piece of foam rubber, or a small piece of thick paper. It will look something like this:

Or like this:

An entire space station can be made using cardboard toilet paper and duct tape sleeves.
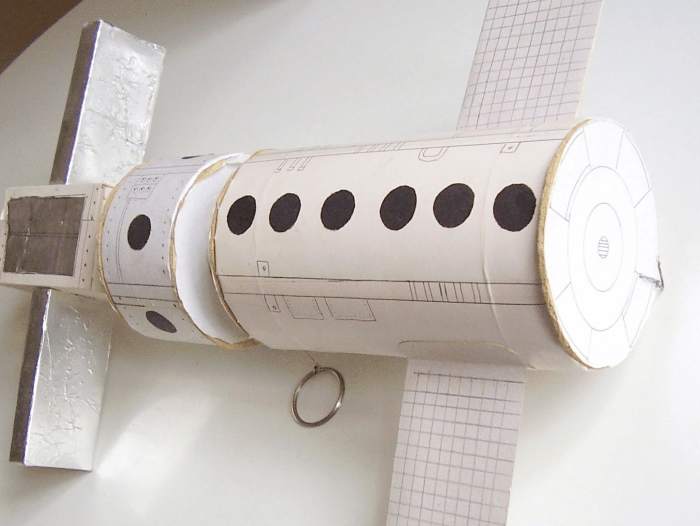
Use silver foil, a pair of compasses, a black felt-tip pen, and a simple pencil to give the spaceship a realistic look.
Cardboard is a rather convenient and easy-to-use material, but if you know a few nuances, then the work will seem even simpler, and the product itself will turn out to be neat:
- when working with very dense material, use fairly sharp scissors, or even better - stationery knife;
- before bending the cardboard parts, it is better to draw along the dotted lines not with the sharp side of scissors or an old pen that does not write, then the material will bend neatly and evenly;
- not in all cases a glue gun can be used. For example, if you work with thin material, then it is better to use office glue or PVA;
- work in a room where the humidity is not too high, otherwise your products may delaminate or parts may not stick together;
- the room should be light, it is desirable that there is a window that can be opened and ventilated;
- and we always advise you to work only in a good mood.
How to make a ship out of cardboard with your own hands - a few more interesting options
We would like to offer some more interesting and beautiful options ships that you can do yourself.


IN this case used milk carton, cartons and sleeve.

And this is a luxury boat made from a regular cardboard box.

With a little practice and imagination, you can get such a beautiful pirate ship made of cardboard with your own hands. We always advise you to involve children in your creativity. They will be especially pleased to know that they are creating a boat just for themselves. In parallel, you can think of a pirate costume, as well as make a telescope, a hat and a cardboard knife out of cardboard. Such participation of children in creativity helps to develop their imagination, attentiveness, perseverance, the desire to create something for themselves with their own hands. Be sure to involve children in cleaning. Explain to them that you need to fold all the materials after you, put them in their places, and also need to clean the workplace so that you can do your creativity again later.
Modeling ships is fun and exciting. Marine theme always popular. The stories about bloodthirsty pirates, brave discoverers and the military of the past centuries are always fascinating. How to make a boat out of cardboard, what is required, how difficult is it? This article will help you find the answers. Detailed master class product creation, tips and tricks. 1
Cardboard is a dense and reliable material from which, if desired, you can make various crafts. Working with it will not cause any difficulties if you apply these tips:
- if the cardboard is dense, take sharper scissors or - cut it with a clerical knife;
- if you are going to bend the finished parts of the product along the outlined dotted lines, circle their outline with the blunt side of your scissors or with a non-writing pen - the cardboard will bend easily and much smoother;
- a glue gun is effective, but not always suitable - if the material is thin, it is easier to replace the strong glue with PVA or ordinary office glue;
- make sure that the room where you will work is not too humid, otherwise the finished products will then delaminate or the parts will not stick together normally;
- ventilate your room regularly, adjust the light;
- if the model is complex, watch the video instead of text master classes;
- work in stages when the mood is good.

Beginners usually start out simple, gradually making it harder for themselves. Anyone can make a ship out of cardboard, even a child. If you follow all the instructions.
A boat made of matchboxes
Who said you need special cardboard? Any material at hand will do. For example, several empty matchboxes have accumulated at home. Great, then this master class will do.

What you need:
- 3 box;
- A4 sheet - white;
- A4 sheet - colored;
- cardboard;
- glue.


Manufacturing:
- Take 2 boxes, connect them with the end sides and glue them carefully. Glue the third over them.
- Cut a long strip from the paper. See that its width matches the size of the box. Now glue the boxes with it.
- Cut a thin (1-1.5 cm) strip of cardboard, then fold it in half. Glue tightly to the boxes, forming the nose of the future ship.
- On the rest of the piece of cardboard, draw outlines - outlining the bottom of the boat.
- Mast. Cut off ¼ of the sheet and twist it diagonally tighter. Make a small round hole at the top of the future ship. Treat it well with glue, then insert the end of the mast there.
- Cut out the sails from paper (colored sheet), a small flag. Use a regular hole punch to make a pair of round holes in the finished sails. Pass them one by one through the mast, and glue the flag on top.
To make a ship made of ordinary cardboard with your own hands brighter, you can paint the finished craft.
Ship out of milk carton
Run out of milk at home and left a box? Excellent! You can make a real ship.

What you need:
- milk carton;
- 2 sticks;
- rubber;
- Scotch.
Manufacturing:
- For milk, manufacturers use special cardboard, in addition, it is waterproof, you can even arrange "swimming". A 1L long box is used here.
- First, you need to carefully glue it all over with opaque tape (so that the ship does not advertise the dairy company).
- Measure and mark on the box all the places to be cut. Draw lines with a felt-tip pen and follow them, cut through the box with scissors, forming the base of the boat.
- Some details (as seen in the pictures) are cut out separately.
- Attach two sticks symmetrically at the bottom back to the stern of the future ship. Connect the ends with a regular rubber band (a pharmacy will do).
- Attach rectangle - motor screw. The ship is ready, it remains to paint or add other details - figures of people, to make the steering wheel.
Pirates' ship
A real pirate formidable ship is recognizable by the color of its sails, flag and other visual signs. You can supplement the finished product with figures with "Lego" - pirates. It is worth attracting a child to work - the process is fascinating, at the same time educational.

What you need:
- cardboard box;
- glue gun;
- ruler;
- pencil;
- breadboard knife;
- a piece of foam;
- twine;
- branches (collect small);
- fabric (for pirate sails);
- templates.


Manufacturing:
- You can draw diagrams for the ship with your own hands from cardboard, but if your drawing skills are not great, it is better to choose ready-made templates. Select suitable ones, print them and carefully transfer them to cardboard.
- Cut one side of the future ship step by step, then the other. It is better to choose (or draw) simple templates, without complex squiggles.
- The ship needs 2 side, bottom and 1 rear. Measure each with a ruler, making sure they fit.
- Using a glue gun, gently connect the 2 sides to the back.
- As it dries, glue the bottom. It turned out to be a large cardboard boat.
- Find a long, even branch in advance, cut off the excess. Attach the mast to a small square of styrofoam and glue it tighter to the bottom.
- Cut a small "L" shaped even piece from the cardboard, forming the stern. When finished, glue it on the back.
- You need 2 thin sticks or skewers - they must be tighter attached side by side to the mast. These are the sail holders. To be sure, additionally wrap them with twine.
- Sail. Cut it (a regular medium-sized square) out of the fabric. Color it by drawing a gloomy pirate skull, make romantic scarlet sails or whatever you want.
- Punch a few small holes along the bottom and top of the fabric. Cut the string into equal small strips and thread them through those holes. Tie the finished sails to two branches on the mast.


Here's how to make a boat out of an ordinary box and other materials at hand. By the way, the ship should be supplemented with a yard (pirates usually forced their prisoners to walk along it), with a rudder, and cut a small anchor.
Floating ship
Why limit yourself simple crafts when can you create a real ship that will float? Of course, you need to make more efforts, but the result will certainly please.


What you need:
- wide tape;
- a piece of styrofoam (does not sink);
- the cloth;
- cardboard;
- thin wire;
- cutter;
- wooden boards (small);
- threads;
- scissors.
Manufacturing:
- Frame. Step by step creation a volumetric ship begins with its hull. Using a cutter, carefully cut the hull, forming the outlines for the deck first, the bow. Then cut off two sides obliquely, and make the bottom as flat as possible.
- You may need a stencil or photo examples to create the poop. When tracing the lines, immediately leave 7 mm, draw again. Once finished, you can cut it out. You will get the patterns for the skin of the future ship.
- Decoration. Color the patterns. For example, you can take a photo of a pirate, military or ancient Viking ship. Separately, on the pattern of the future deck, mark all the places where you will install the masts. Gently cover each cardboard model with tape. It will provide protection against possible getting wet.
- Now attach the finished patterns to the foam base one by one. Take glue or tape to secure it.
- Masts. They are carved from thin boards. Try to make the masts sharp at their base, and narrowed at the top. Secure it with wire to the finished masts.
- Sail. Remember, if you plan to make a ship - a sailboat out of cardboard, then you will have to fit several masts and make more sails. After all, sailboats were moving thanks to the wind. Once the sail is cut, literally sew it onto the finished mast. Use a needle to make several identical punctures, pass a thread through them, then tie the ends on the yards. In shape, the pair will be narrower in height. When finished, stick the masts with their sharp ends into the base of the ship.
- Steering wheel. It is needed so that the ship then sailed straight. Cut a couple of identical pieces from regular cardboard, then symmetrically stick them in the stern area into the very base, positioning them so that they get water.
- Test descent. See if the boat suddenly collapses or sways, attach additional weight from below or inside - a nut or a large bolt. And it is better to hang it by wrapping the wire, stepping back 5-8 cm down from the bottom of the ship.
Motorboat out of the box - video
Steam engine boat - video
Cardboard steering wheel
What ship will sail normally if there is no rudder? You will need a ready-made template on the steering wheel for the ship with your own hands made of cardboard. However, if your drawing skills are sufficient, you can create the layout yourself.


What you need:
- thick cardboard;
- skewers;
- scissors;
- pencil;
- glue;
- threads;
- paints.


Manufacturing:
- Draw two identical circles, then cut them out. Inside each, you need to cut a second circle, but smaller, so that you get flat rims. Remember, the size of the headbands determines the size of the product.
- Cut out some small circles for the center of the wheel.
- Rays. Measure the length you need with a ruler and adjust the skewers, removing the excess with a knife.
- Sharpen the ends of the beams carefully. The junction should also be sharpened, so they fit better together.
- Assembling the steering wheel. After connecting the beams and holding them together, cover the top with a second circle. Fasten everything with glue. Repeat similar manipulations with the second, large rim.
- To make the edge of the resulting steering wheel smoother, you can sand it with sandpaper.
- Wrap the ends of the rays one by one with thread, giving them the desired volume. All that remains is to paint the finished product and attach it to your ship. By the way, the steering wheel is needed for any ship model, be it a modern yacht, a steamer or a medieval sailing ship.
In order for the steering wheel to fit organically, you need to make a boat out of cardboard, which was originally used to make the steering wheel.
A boat made of paper is very attractive for children, because its making is very simple and at the same time exciting. And how many games can you think of using such boats: and start up streams in the spring, and splash in the bathroom, and maybe even play a sea battle. There is a lot of entertainment for children, but adults also have a lot to learn, for example, to build a huge ship with their own hands, which will become your pride and become a decoration item.
Let's get down to looking at paper crafts - boats!
A boat made of paper for beginners with instructions
The simplest boat on A4 paper, this instruction is intended for beginner origami lovers. All you need is paper. Probably most of us are familiar with this folding method.
Origami boat with step by step photos of folding


Paper ship for children
 This is a boat that is easy to make and will surely appeal to children. It is good because it is convenient to paint and fantasize about the seas.
You will need a square piece of paper and glue. Follow the instructions and please your kids with wonderful boats. 


How to make a ship out of paper
This is no longer a boat, but a whole ship on which you can depict many cabins and play interesting scenes with your child. Follow the scheme and you will have the same wonderful ship.
One of the most affordable materials for creative pursuits is ordinary paper. Most children love to make paper crafts with their own hands, cut out various figures, glue postcards. And the origami technique allows you to make crafts without the help of scissors and glue. Both boys and girls are especially fond of folding paper ships and boats, with which you can immediately play on the water. How to make a boat out of paper in three ways, we will tell you below.
There are a lot of schemes and instructions for creating different "navigable" origami, if you wish, you can even create a whole fleet out of paper. We have chosen three types of figures among this variety and decided to tell you how to make a classic paper boat, a steamer with two pipes and a catamaran boat. Stock up on paper, as we're getting started!
Classic paper boat
Surely almost every adult made such boats in childhood. Follow the step-by-step instructions and visual diagram below to learn how to make a paper boat with your own hands in just nine easy steps. You can also use white paper sheets, but origami from double-sided colored paper will look more interesting and fun. So:

- Fold an ordinary A4 rectangular sheet in half.
- Bend both corners of the sheet to the center so that they do not occupy the entire area of the folded A4, but about three quarters.
- Fold the loose bottom strips of paper up on both sides.
- Corners are formed on the sides, which must be bent in the opposite direction.
- Then take your workpiece in your hands and, as if unfolding it from below, fold the left and right corners of the figure together.
- You should have the same square shape as in the sixth diagram of the diagram.
- Fold the bottom corners of the square up on both sides, but do not bring the corners to the very top, leave a little space - about 1 cm.
- You will get a triangle that you need to unfold from the bottom and fold in the same way as in the fifth step of the instructions.
- Grab the upper corners of the resulting square and pull them to the sides, revealing our boat. Follow the fold line to form a firm bottom.
The paper boat can go to conquer the waves!
How to make a paper steamer
Next, we will tell you how you can make not just a boat out of paper from just one sheet, but create a whole steamer with two pipes using the origami technique. Boys will especially like such a sea vessel, because it looks more unusual and impressive than boats and sailboats.
Prepare a square sheet of paper. If you do not know how to make a square out of paper, then follow these steps:
- Take an ordinary A4 sheet and start folding one of its corners diagonally so that the adjacent sides of the sheet coincide - as shown in the figure.
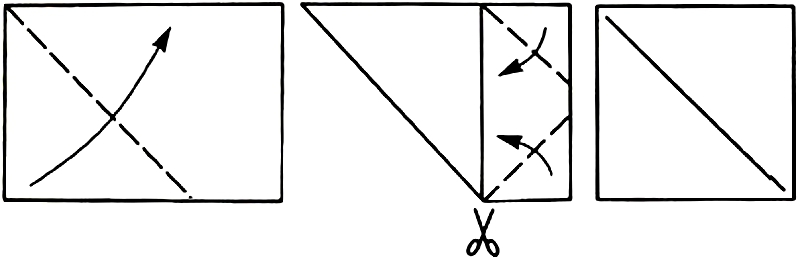
- Iron the fold well to keep it in shape. The rectangle formed on the side must be bent forward or backward, and then cut along the fold line using scissors, or tear off using a ruler. You now have a square origami paper blank.
Let's start creating our two-tube steamer:

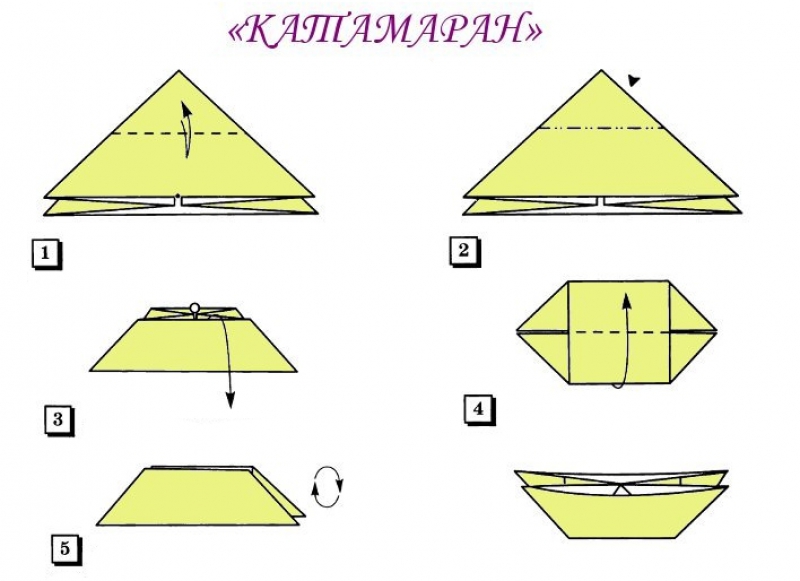
Paper catamaran boat
And now we will lay down an interesting vessel, which consists of two hulls and is called a catamaran. Due to its structure, this boat is very stable and can reach a higher speed - these characteristics can be applied to its paper version, in comparison with other boats. To make this boat, you need to learn how to fold such a basic origami shape as a double triangle.
- We take a paper square. We bend one by one the two upper corners of the leaf to the opposite lower ones for the appearance of diagonal cross fold lines.
- We bend the upper part of the square to the lower, connecting them along the edge line to get a horizontal fold in the center of the sheet.
- And now the most important thing: we grope for the center of the square from below, and we try to bend the side triangles inward, pressing them to the bottom of the sheet and folding them in half. The top half of the square will bend over the bottom.
- The triangle is almost ready, you just need to turn its upper right and left hind wings in the opposite direction, to the left and to the right, respectively. Voila!
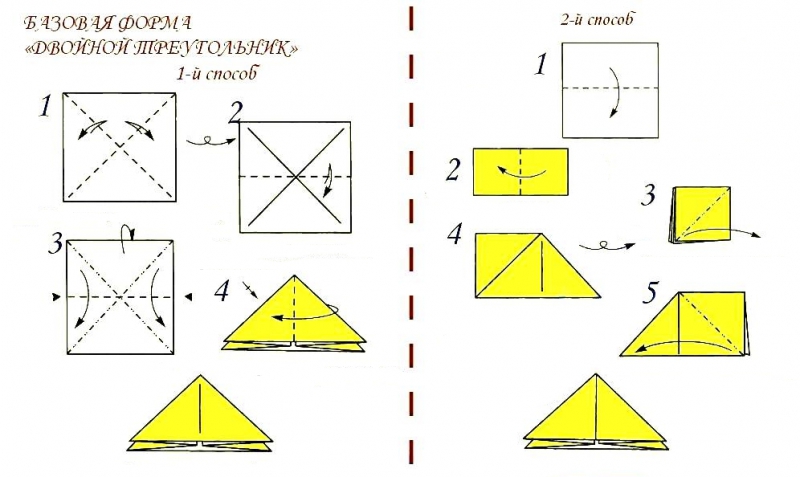
- The blind corner of the figure must be bent to the center of the lower part of the triangle.
- The small triangle formed due to the bend at the top should be bent inward.
- Stretch the shape by pulling the outside.
- Bend the lower part of the figure up.
- The resulting figure is our catamaran of two boats, it just stands upside down now. Flip the boat - the catamaran is ready!
We hope the step-by-step instructions, origami diagrams and video tutorials presented here have helped you tame paper and enjoy creating a paper fleet. Having mastered such crafts, you can proceed to creating more complex products and paper models: planes, tanks and cars.
Many people remember that glorious time when we didn't need a brand new smartphone or a modern laptop for entertainment. Snowballs, tags, robber Cossacks, taggers are the childhood games of the majority modern parents that they can never forget. One of these many fun is to launch homemade boats along the streams of water during the rain or spring thaw.
Sometimes whole hordes of kids gathered over the puddles to make a boat out of paper or other scrap materials and send it to compete with others. The winner usually received the glory of the coolest shipbuilder of the yard! So how to make a paper boat? You will read about this in our article.
Are there puddles outside after the rain? It's time to remember a fun childhood and launch a boat made with your own hands or teach your own children this lesson! Break away from your TV and computer! For such a case, you do not need much, it is enough to have a sheet torn from a notebook at hand, and you can make a boat out of paper.
If your miracle does not suit a ship like everyone else, then offer him to make his own galleon from any other material. Most materials that do not sink in water are suitable for this.
Previously, kids could use for this purpose:
- Styrofoam;
- Plastic bottles;
- Plasticine;
- Wood.

This can be incredible beautiful products, however, do not limit yourself to them! Maybe you can make something amazing from a shell walnut or a wine stopper. Do not drive yourself and your children into any framework and do not be afraid to fantasize! In this article, we will explain in more detail how to make a paper ship in stages.
Methods for making paper ships
If a child comes up to you and asks to teach you how to make a paper boat with your own hands, and you have long forgotten about such games, our article will help you remember forgotten knowledge. Read it a couple of times, practice, and you will be able to show off to the kid different variations of your paper destroyer - from an ordinary notebook sheet, cardboard, milk cartons or matchboxes.
Classics of the genre - origami
This is classic version paper ship. Most of the kids made these toys during boring school hours. If you have forgotten some points - look at the picture, this is a diagram of a paper boat. Remember!

Manufacturing plan:
- You will need a rectangular piece of paper. Both an ordinary sheet from a notebook and printer paper will do.
- It needs to be folded in half and folded to the center at right angles.
- Fold the remaining edges of the sheet up (on both sides).
- We wrap the free corners inward. The result should be a triangle.
- Reduce the angles of the base of the triangle in such a way that we have a square.
- We bend the lower corners up (both sides). You should now have a triangle again.
- Flatten the corners of the base of the triangle. You have a square again, take it by the corners and stretch it to the sides.
- Pull until you get the ship shown in the last picture. Smooth out the sides, this will make it more stable.
Happened? Now you can do simple origami paper boat for children. Repeat the experiment a few more times and you can safely teach your baby! At the end, the finished product can be decorated and, depending on the child's desire, put on the water or put in a prominent place at home - a shelf in the nursery or a sideboard in the living room are perfect for this role.
Two-pipe boat made of paper (motor ship)
Let's say you and your children can already make a paper boat yourself. If you are no longer satisfied with such a primitive vessel, it's time to start exploring new options. This article presents several ways to fold the original boat. Below is written step-by-step instruction boat made of paper. It differs significantly from the previous one in its appearance, and if the children liked it, hurry up to start studying!

The procedure for assembling a two-pipe boat made of paper:

Now you know the second way, how to make an origami boat out of paper. If such a product is going to be swimming, then try dipping it in beeswax or paraffin to make it waterproof. You can also use paper that does not absorb water so quickly to keep the boat afloat as long as possible. For this purpose, cardboard, for example, will do. Ready? Launch your frigate!
The third version of a beautiful paper boat for children and adults. Why for adults? He is very attractive! Such a ship can be made in any size, and it will become a highlight of your interior.
However, unlike the two previous options, you should not send it sailing. When it gets into the water, the boat falls on its side, which reduces its chances of further use as a toy.
After all, what child would want to watch his ship sinking? If you decide to make a sailboat as an interior element or a land toy, we will help you!
The procedure for assembling a sailing boat out of paper with your own hands:
- We need a square sheet. You can take a regular A4, fold it in half and cut off the extra strip.
- Fold the leaf twice diagonally. Now in front of you is a square with clearly defined lines and a center.
- Bend the top of the sheet with an angle towards the middle.
- Repeat this with two more tops to form an envelope.
- Bend the lower corner to the other side, stepping back about 1 cm.
- Fold the workpiece in half so as to break the middle diagonal in the opposite direction.
- Now the most difficult thing: you need to fold the product so that the center is inside.
- It remains to tuck the bottom edge of the sailboat so that it can stand.
- Decorate the craft as you wish.

So you learned one more scheme of a paper boat. If your child likes origami, then a few hours of fun is guaranteed!
We present to your attention another method of making a paper boat for children, in which we need: matchboxes, cardboard, PVA glue. This option is more laborious, but the result is appropriate!
Scheme of a boat made of matchboxes:
- Three boxes are required. Glue them - two together, one on top. You can use almost any glue, but it is better to use regular PVA.
- Now take an A4 sheet and cut a strip across the width of the box along the long side of the sheet.
- We glue our blank with a cut strip.
- We take a sheet of cardboard and cut a strip slightly more than 1 cm wide along the long side.
- Bend this strip in half and glue it to the boxes to form the bow of the ship.
- Place the ship on the cardboard and outline the outline. This is the bottom of our ship - cut it out.
- Glue the bottom to the ship.
- Almost everything, but the ship needs a mast! Take an A4 sheet and twist it tightly diagonally.
- In the upper box you need to make a hole, coat the mast with glue and put it in place. Let it stick for one minute.
- Sail. Use a piece of colored paper to make them look pretty. Punch two holes (you can use a hole punch or a clerical knife) and let the child decorate the sails as he wishes.
- Put on the sails and glue the flag, it will not let them slip out.

And one more ship in your harbor. What to do with them - decide for yourself, and in the meantime we will share a few more options for such ships.
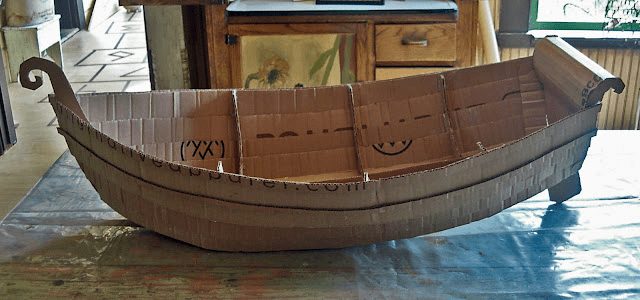
Ship made of cardboard
The cardboard craft comes in many different sizes. You can make it miniature for spring fun, or you can make it huge for any other purpose. Such a boat turns out to be incredibly beautiful, and its creation requires a minimum of consumables.
Pirate ship
So, a list of everything you need:
- Cardboard;
- Scotch;
- Glue;
- Paper;
- Two thin sticks;
- Water;
- Coarse thread;
- Cloth and scissors;
- Brush and paints.
Feel free to get to work!

It is not necessary to strictly follow the instructions, repeating the design one-to-one! Create as your imagination allows you.
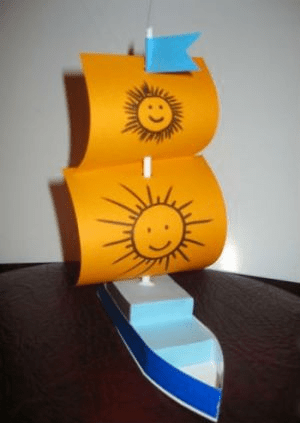
Cute sailboat
The ships can be very different. For example, here's another inspiration!
For its manufacture, even less materials are required than in the previous variation. We only need:
- Cardboard;
- Scissors;
- Glue;
- Colored paper;
- The pencils;
- Scotch;
- Ruler.

Execution order:

The simplest option. All he needs is an empty milk carton, colored paper, thread, stick, cloth, thread.
Execution order:
- Buy milk in a cardboard box, drink it.
- Cut the box to make the remainder resemble a boat.
- Paste it over with colored paper.
- Attach the stick (mast) to the middle of the boat.
- Hook the sail onto the mast and tie it with a string to the bow.
As a result, you might end up with something like this:

You already know how to make a paper boat, but how to decorate it? This is especially true of origami boats, because they look quite simple without embellishments. Alternatively, let your child paint the craft with colored pencils, paints or felt-tip pens.
Otherwise, you can try using professional origami paper (patterned, foil, painted, etc.) or materials at hand.
On a note! When choosing a material, take into account its weight, otherwise your boat will simply lose balance. In this case, not only will you not let it go on the water, it will not even be able to stand straight.
Another idea is to decorate with origami in the following ways:
- Textiles;
- Painted paper;
- Colored napkins;
- Leaves of trees.
You might end up with something like this:

Perhaps you will come up with something more interesting, it all depends on your mood and flight of imagination. Good luck with your creativity!