Sew a long dress with your own hands without a pattern. Dress patterns for beginners
Dress in Greek style... mmm ... a dream. Where to find, where to go shopping?
Ladies, head to the fabric store if you want to have a truly one-of-a-kind Greek dress.
Your goal is light flowing fabrics (muslin, satin, silk, jersey, thin knitwear, velvet). The fabric should be fluid, thin, easy to fit into soft folds and not wrinkle much.
(By the way, please note that among the flowing fabrics, you can find those that do not crumble on the cut, then you will not need to process the edges after sewing the dress.) The length of the cut should be at least 3 meters.
We will create a dress in the Greek style ourselves. And no patterns! Just a flight of fancy and a mirror. And every woman must have both.
Don't have a sewing machine? So to create a Greek dress, it is not particularly needed.
Have you never sewed anything? And the Greek dress does not need to be “sewn” in the generally accepted sense of the word (with drawings of patterns, darts and darts).
The first way to create a Greek dress.
"Wrap Up and Tie Up"
Here is a visual diagram:
Two decorative pins on the shoulders and tie with a ribbon at the waist or under the bust.
Of course, this simplified version of the dress will swing open in any wind. Therefore, it is this model that will be appropriate at a beach resort over a swimsuit.
And in order to make a full-fledged Greek dress out of this, all you need to do is sew the sashes of the dress along its right side from bottom to top so that the body does not look out. The result is an elegant outfit in the Greek style. This model is good because, while not fitting the body at all, it nevertheless emphasizes the beauty of its curves, thanks to the fluidity of the fabric, seductively flowing over the body. And according to this method of modeling, completely different dresses can turn out, depending on what color and quality of fabric you will use to create them.
For example: ivory satin, thread river pearls around the wrist, a discreet but exquisite brooch on the shoulder made of the same pearl, hair scattered over the shoulders - and you get the image of a young Aphrodite emerging from the foam of the sea, and your wardrobe is replenished with a fashionable day-type Greek dress.
Or the same model but: black silk, a brooch on the shoulder and a gold-colored bracelet, smoky eye makeup - and this is an evening image of a formidable goddess.
The second way to create a Greek dress.
Drapery on the body.
The great French fashion designer Madame Gré created her dresses in the Greek style, draping them by hand on the body of the model. Her way of making antique dress became classic, and her clients included Grace Kelly, Jacqueline Kennedy, Marlene Dietrich and Barbara Streisand.
As the ancient Greeks used to say: “Not the gods burn the pots,” and we will try ourselves as a fashion designer.
Here is a picture of a Greek dress made from a single piece of fabric.
High-fashion? Yes, high, but not so high that we could not reach it.
What you need: fabric is a little more than 2 of your height from heels to shoulders (if you want a dress to the floor). A decorative braid or ribbon of such length that it is enough to wrap around itself under the chest and at the waist twice.
Let's start. They spread the fabric on the floor, found the middle on it and drew a line in chalk. This line will lie on your shoulders.
Now in the center you need to make a hole for the head - draw a perpendicular line (about 15 cm to start with, so that the head crawls through) and cut it with scissors.
We put our head in the hole, and now we need to decide to what level we will deepen the neckline. (On the dress from the photo there is a neckline that is deep to the waist. But you can stop it under the chest as well, tie it with a ribbon there, and then you can no longer wrap another ribbon around the waist, let the fabric flow freely down, starting to fall right from the ribbon under the chest. And it will be a slightly different model of the Greek dress, less frank). But let's continue...
So, they put it on the head, and marked the desired level of cutout depth on the fabric with chalk. They removed it, spread it on the floor, drew a line to our mark and cut the cutout to the end with scissors. Along the line of the shoulders, the fabric was gathered with pins and then we proceed as shown in the figure.
They tied a ribbon under the chest, but not over the fabric, but under it, on the body. We take the pins and, laying the fabric in folds, pin them to the ribbon, draping first one chest, then the other.
About the same we do with a tape at the waist.
Now, when we already see the image of our future Greek dress, and we are satisfied with how the fabric lay down, you can thread the needle and, taking out one pin at a time, sew our folds to the ribbon with large stitches (or you can sew everything all over again, and then already remove the pins). Stitches can be made oblique and crooked, anyway, we will sew on top of another ribbon or braid, and we will already sew it neatly.
So, we blinded the front of the dress in the Greek style.
The back can be done the same as the front - with a cutout and two ribbons. Or show your imagination, play with drapery. Using the method of pins and pinches for hair, find the very location of the folds when the fabric flows in the most interesting way for you, emphasizing your strengths and hiding your flaws.
The pictures show 3 ways to drape the back of the dress. The third method, “swing”, is achieved by gathering the fabric up (the left and right edges of the fabric are gathered, and the middle sags freely, forming these most beautiful “swings”) Accordingly, for the third method, fabric on the back hem needs 1-2 meters more .
But when playing with fabric and fantasizing, keep in mind that the dress must be provided with free entry and exit, that is, somewhere it must be fastened and unfastened. It is best to sew on the side, at the ends of the ribbons of the front of the dress, one elegant button, and at the ends of the ribbons of the back of the dress - a loop. Thus, it turns out that the dress above the waist does not have side seams, but is fastened with buttons (or Velcro, or decorative fasteners - to your taste).
The third way to create a Greek dress.
Drapery on the "lining".
Let me explain what a "slip" is. Imagine that you have a short dress in a figure, that is, almost in a slip. But you don’t wear it and you won’t wear it, because once you spilled bleach on it, and the stain cannot be removed. And if you still haven’t thrown it out yet, then rejoice, you don’t have to sew a lining on purpose - this dress will serve ideal basis to create your new gorgeous Greek dress. That is, it will be this very “lining”.
Put on the slip, take a flowing fabric in tone, throw it over your shoulder (or cut a hole for the head, as in the previous method), form folds and pin them to the slip with pins. Then you sew them on first with a rough thread with simple coarse stitches, take out the pins, try them on again and, if everything suits you, sew them on by hand with neat neat stitches. Pull out the draft thread, cut off the excess fabric, if necessary, make a seam. As a basis for drapery, you can use not only a sheath dress, but also a tight-fitting T-shirt or bra. The main thing is that the drapery completely hides the base, and the base itself is the same color as the drapery fabric.
As you can see, a Greek-style dress can literally be made with “bare hands”. Without any drawings and mathematical calculations. Guided solely by intuition and a sense of beauty.
Go ahead, take the fabric and try, create! And you will definitely succeed!
As the ancient Greeks said: "To learn how to play the harp, you need to play the harp."
Original entry and comments
Olga Klishevskaya specially for the site Women's Conversations 2010 - 2011, womenstalk.ru. All rights reserved.
fashion designer
Hello dear readers! Have you decided to sew a dress, but don't know where to start? Let's try to help. We will not argue that this is a very simple matter, but not so difficult! Our tips will definitely help you deal with it. After all, it is not the Gods who burn the pots. So, let's begin.
How to sew a dress: where to start
Model selection. For the first time, choose a simple dress model. Fewer connectors and decorative seams, details. Stop your eyes on concise things. Beauty is in simplicity. Don't forget bright and stylish accessories, they will complement the image.
Fabric choice. The fabric must match the purpose of the dress and be Attention! easy to work. That is, do not cause additional difficulties in the processing of seams, ironing. Textured dressing, pile fabrics, chiffon, natural silk... they are all very beautiful, but they will create a lot of unnecessary problems with the risk of throwing a failed masterpiece into the far corner. Let, for the first time, it will be without a pattern that requires alignment at the seams.
Butt. It means all Additional materials required to sew your dress. These are adhesive (non-woven fabric, dublerin), edge, zippers (for the first time we advise you to choose models, preferably without it, because not every beginner can beautifully and correctly process a zipper, and even more so a secret one. Well , or practice on an unnecessary piece of fabric.), lining, accessories, threads, etc.
Pattern. How to sew a dress without a pattern? For a beginner, the task is difficult. Even if the dress consists of a rectangle, it is not some kind of abstract rectangle. It is tied to a specific figure with the help of measurements, and to the model of the dress - by proportions and details. Therefore, a pattern is still needed!
Simple dress pattern

For these simple dresses, the pattern is based on a rectangle, and is based on measurements taken from the figure.The dress is big enoughoversize, the sizes shown in the figure correspond to 42-50 R.R.

See what original dress! Here, the fabric print comes to the fore. The pattern of the dress is extremely simple. There is a rule of good taste - the brighter, more decorative the material, the simpler the style should be.

For lovers of a non-trivial approach to creating clothes, this solution will be interesting. The dress is a tunic made of rectangles sewn together. This simple dress looks very stylish if it is made of thin suede, or suede-like material.

Ready-made dress patterns
If you have a ready-made dress pattern, then consider that you have already done half the battle. A good pattern increases your chances of getting a new thing at times! On our site we have understandable patterns of dress models that are easy to sew for beginners and for those who have experience in tailoring.
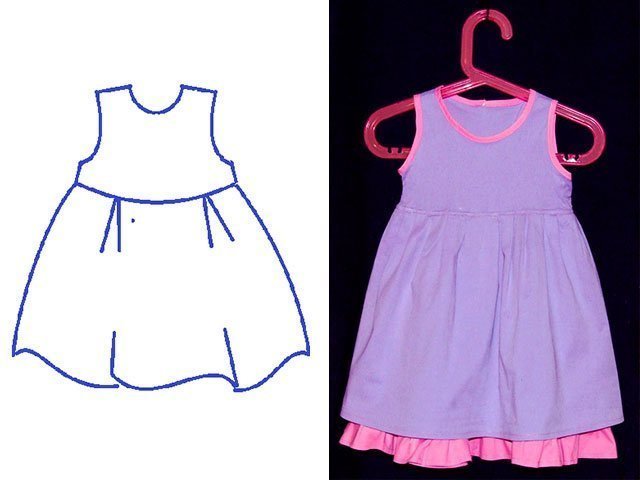
Pay attention not only to the photo of the dress, but also to the technical drawing. It will help you more clearly understand how you can use the finished pattern, adapting it to your image. It's no secret that dresses sewn according to the same pattern, but from different fabrics, look different.
For example, this dress.

Sewing a dress according to ready-made patterns and, moreover, using technology will not cause much difficulty even for a beginner. Here the main thing is accuracy, accuracy and attentiveness. The result will not disappoint you, because this model is very relevant not only in summer, it can be sewn from elegant fabric, getting a wonderful evening dress.
Surprisingly easy to sew, and looks very stylish. Here it is necessary not to miscalculate with the choice of fabric. Let the knitwear not be too liquid, but, nevertheless, softly drape and good quality so that pellets do not form when worn (there must be natural threads at the base).

We have designed many dresses. The choice is yours!
How to sew a dress without a ready-made pattern
If you want to go all the way to creating the chosen dress yourself, then this is also possible.
For example, let's take such a dress model as on the inimitable Italian and Street Style legislator Giovanna Battaglia. It's really stylish.

Making a pattern for him is not difficult even for a beginner. Let's take a closer look.
For modeling you will need. You can create it by any method of constructing patterns. Of course, this will take you a lot of time, but if you plan to continue sewing for yourself, then you need such a foundation, you simply cannot do without it. By the way, it is also recommended to sew off a base sampler from an unnecessary piece of fabric, after trying it on, take into account all the errors in the construction by adjusting the base pattern.
Don't want to spend precious hours building? There is a way out. Our service is here to help you. The program, created by professional designers and programmers, will build according to your standards in a matter of seconds. All you have to do is print.

Modeling is shown based on a semi-adjacent silhouette specifically to preserve the chest tuck.
- side seams needs to be straightened
- we transfer the chest tuck from the shoulder line to the side seam line, under the armhole. To do this, we will cut along the intended line from the side seam to the top of the tuck, not reaching a couple of mm, close the tuck in the shoulder and it will open under the armhole. more about transferring tucks. It is necessary to build up the tuck, not reaching the center of the chest by 2 cm, reducing it to nothing. Those. shorten the length of the tuck by 2 cm.
If the figure allows you to make a dress with a more flattened silhouette, then you can use it, then modeling is not needed at all
Sewing this dress is not difficult, but finishing will take time and perseverance. Braid a la Chanel, which gives a special chic to the image, can be made with your own hands. Look at the photo. The work is certainly painstaking, but creative. And what is the result!
 Chanel braid https://altatkani.ru/ , https://www.livemaster.ru/
By the way, having, you can also sew yourself a basic dress, which, as you know, is necessary in the wardrobe of any woman. By slightly changing the neckline or armhole, making the dress cut off at the waist, adding a sleeve, you will get a model to your liking.

By ordering a base pattern in ours, you will receive, which you need to print, and on sheets of any format. How? Answer . The main part of the work has been done, now let's change the pattern a little. For example, we will draw relief lines, deepen and expand the neck, as in the first photo.
1 step. Let's translate the chest and shoulder darts into the armhole. To do this, let's outline the relief lines going from the armhole lines through the waist darts to the bottom of the dress. Cut and open the darts in the armholes of the back and front. Learn more about translating tucks into .
2 step. Let's adjust the relief lines more smoothly. Lengthen and narrow the dress along the side seams. Let's add a slot. Slot width 4 cm.
3 step. It remains to deepen and expand the neck line according to the model.
Modeling a pattern, as you can see, is not at all difficult. You can also make the neck in a boat, as in the second photo, or in a V-shape.
Adjustment of the neckline can be carried out directly during the fitting, without changing the position of the line on the pattern itself. And the details of processing (turning, lining) are cut using the details of the top, i.e. the main details of the dress.

You can model and sew a basic dress using a ready-made pattern of a similar dress, if you have a typical figure. On our website there is such a pattern -, sizes are given from 40 to 52 by 4! growth. It is very similar to the dresses in the photo, only it has a sleeve. The presence of a pattern, which is more of a plus than a minus.

The pattern of this dress is very easy to adjust to your liking. The silhouette for these models suits us - this is the determining factor, instead of reliefs here are tucks, you can leave them. We will change only the front panel of the skirt, making it less voluminous at the waist line - we will remove the folds and stitch the tucks. Let's shorten the sleeve.

The pattern can be used to create such a model.

Dresses are similar in that they have the same cut - detachable at the waist, plus they have skirts in a circular pleat. Here we will have to slightly change the length of the shoulder and make a cutout on the back.
We will extend the shoulder line on the back and on the shelf to a value of 12 cm. new line armholes.
From the point located at the intersection of the lines of the neckline of the back and the middle line of the back to the waist line, draw a cutout line for the back according to the sketch (as in the photo).

The data in the pattern set are undercut facings for processing the neck and armholes. in this model are not useful, they can be easily made independently according to the details of the top. The details of the facing of the back can repeat the pattern of the back completely.

Memo: how to sew a dress
To obtain success and quality in the manufacture of the product, always adhere to certain rules of sewing technology:
Before cutting, decant (iron through a damp iron) the fabric, fold in half edge to edge, front part inside. Lay on a flat surface, table, fold away from you.
Lay out the prepared pattern details on the fabric, circle the contour with chalk or remnants, add allowances for the seams, which you mark parallel to the cuts of the details. Check if everything is correct. Cut along the seam lines.
Baste darts, shoulder, side seams. Try it on. If there are changes, correct. Proceed directly to tailoring.
The assembly of the product is always carried out after the preliminary preparation of smaller parts. Those. first, the collar is prepared, the pockets are turned and ironed, the sleeves are processed with cuffs, stitched to the sleeve, the head of the sleeve is assembled for assembly, preparing it for wetting into the armhole.
They prepare the back - they process tucks, coquettes, folds, they iron everything. shelf
- tucks, gathers, coquettes, they trim pockets ... they iron everything. In general, each seam, after sewing on the machine, must be ironed. This is a very important rule, observing it, you will receive, guaranteed, a better quality item than the one that is only at the end of tailoring. Checked!
And only after that we proceed to the assembly. Stitch shoulder seams, iron.
We grind the side - iron. Don't forget about slicing.
We sew a collar, sleeves. We hem the bottom.
Summarizing the material of the lesson, I want to say - if you decide to sew a dress, you must definitely sew, but try to make the sewing process as easy and accessible as possible. Don't complicate! With the help of basic or ready-made patterns, as well as patterns requiring small changes, according to your style, this can be done much faster and better than starting from scratch. That's what projects like ours are for. We try to make the sewing process as convenient and enjoyable as possible.
Now, you know the answer to the question - how to sew a dress? Nevertheless, the main step towards the creation of a new thing will be - begin and do not be afraid, but believe in yourself! We, as always, will try to help you with this. Good luck!
With the onset of summer, you want to add colorful summer dresses to your wardrobe. But there is not always time and opportunity to buy a few new products. Therefore, we suggest you sew them with your own hands! Your product will be exclusive and exactly the way you want!
This season, very popular white simple dresses and sundresses from light fabric. They can be both classic and with embroideries or other accessories. Such models are suitable for girls with any type of figure and height.
How to sew a simple summer dress with your own hands - tips for beginners
It is quite easy to sew such a model, because it has a simple cut. The most important thing is to decide which material sew it. Any lightweight material will do: cotton, linen, chintz. But, in addition to choosing the material, you need to take measurements yourself so that the pattern is correct.
When building it, you will need the following measurements:
1. Bust and overbust
2. Neck girth
3. Shoulder length, from back to waist and future product
4. Shoulder length
Popular articles:

Summer dress for girls
It is very difficult for mothers with children to find a lot of time for complex and large patterns. Therefore, we will provide you with several simple tips , like at home sew summer dress do it yourself. To do this, we need a T-shirt or T-shirt, on the basis of which we will make a pattern.
1.The very first thing is to find a T-shirt that fits well on your child, and place it on a large sheet of paper, drawing paper or graph paper.
2.Position and align the product on paper and trace around with a pencil. Following the photo - instructions below, lengthen the side lines.

DIY ball gown for a girl
This style is already more difficult to sew than the previous ones. For this, you are provided video for a detailed description of the sewing process.
Long and straight dress (video)
It is suitable for romantic dates - you can create a beautiful summer evening look.
https://youtu.be/Rr0vORgcH9w
Off shoulder dress
This model is very relevant this summer. It is very comfortable, practical, and most importantly - beautiful. For more information on how to sew a model on the shoulders with open shoulders without sleeves, our video will tell you:
Do-it-yourself summer dress quickly and without a pattern - models from different fabrics
Summer dress without a pattern very easy to sew. The length of the product can be chosen according to your taste. You will learn more about how to sew it with your own hands, without using the scheme, from the video:
Knitwear style
Take a piece of knitted fabric with viscose content- a square with a side of 150 centimeters. Next, you need to fold it in half and take off hip measurements And chest. At the bottom of the material, measure the half-girth of the larger measurement. After which you need draw a line up, but do not reach the edge of 25 centimeters.
Now the product can be stitched, extending the line by 1 cm, as shown in the photo.
In the formed backstage stretch the tape. Shoulder cuts can be stitched, or pinned with a brooch.
Cotton and linen beachwear
This dress is very suitable for a beach look. And most importantly, his very easy to sew by hand. Perfect for him cotton or linen. We cut out identical back and front parts from the selected fabric. We fold them and sew the side seams. It should be noted places for sewing in rubber bands into the product. To do this, just attach the dress to you. Rubber bands are cut to the same size: Wrap yourself with an elastic band so that you are comfortable. We sew the elastic bands and evenly placing them on the product, sew them on. You can also make a frill, if necessary.
From chiffon and chintz: photo
Trace a T-shirt with seam allowances on the selected fabric. Immediately simulate cutout.
Make a trapezoidal flare from the armhole line on the back of the dress, making a cutout for the skirt. Mark the length of the skirt in the middle of the back, for example, 115 centimeters, and round the hem to the side seams.
Summer dress from old things: master class
Take old t-shirt And skirt, or a piece fabric lying around at home. They must approach each other. The top is better knitted and the skirt should be lighter. You will make such a model in less than an hour.
1. Cut the shirt in the middle or slightly lower, depending on the volume of the chest.
2.Material for the skirt wrap around g waist about two times and trim. Fold the fabric in half and sew up the sides.
4. Connect the top and bottom, as shown in the photo below, and bast the parts together. The top should be without folds, and the bottom should be vice versa. If everything is done correctly, then boldly sew on a machine.
DIY summer dress for pregnant women
Only one measurement should be taken - hips
. If you already have big belly
, so is its volume.
1. Cut out your chosen fabric rectangle - 130 cm by 160 cm and fold it four times.
2. From the fold line you need to measure ¼ waist or hip measurements + five centimeters. From this point, set aside 40 cm up.
3. For sleeves you should set aside 30 centimeters and connect the dots, as shown in the photo.
4. Cut out the part along with the neck. Sew the dress and process its bottom. In the sleeves, you can make a drawstring and stretch an elastic band into it.
The task is not the easiest, although for those who have the skill to work with sewing machine and a needle, this task is quite within our power. Therefore, if you have the skill of a simple pattern and you have a fantasy, then everything should work out for you. The main thing is that there is a desire and patience, which may well replace experience.
And it is important to keep in mind that when sewing a dress, everything must be done correctly and consistently. Consider the process of creating a transforming dress that can replace half of your wardrobe. Before sewing the dress itself, prepare a quality fabric and pattern. In the very tailoring of such a dress, in cutting the material and sewing, there is nothing particularly difficult, even a girl at school, at a labor lesson, can sew it. The most important point here is the choice of fabric.
The fabric should be not only beautiful, but also practical and functional. It is best if it is elastic double-sided knitwear or supplex. A suitable pattern can be found in any women's magazine, in the same place, as a rule, tips, recommendations and drawings are given. Usually the dress takes about three meters of fabric.
How to sew Nice dress with your own hands? In the process of tailoring a dress, it is necessary to carefully monitor the processing of the seams, they must be performed with the utmost care. After all, even if the dress turns out to be exquisite and exclusive, then poorly processed seams will be in dissonance with your creation, immediately giving out its handicraft. The seams must be done in a professional manner.
Before starting sewing work, a similar dress in front of your eyes will be a good help to you, a similar dress can be found either in your wardrobe or borrowed from a friend. Before you sew a dress with your own hands, you need to measure yourself, that is, take measurements. Measure the circumference of the chest, the height of the belt, the height from the knees to the waist and from the knees to the collarbone.
There are three main details in the transforming dress: the main part is a rectangle made of fabric, a belt and ties. The belt is made equal in length to the volume of the chest, and in width it should be 20 centimeters, if it is folded in half. The length of the ties is about three meters and a width of one and a half centimeters. As a rule, the fabric of the main part goes to the ties.
When making the main part of the dress, a rectangle of fabric is taken according to the pattern, folded in half and an incision is made along the fold to insert the belt. After that, choose the length of the dress. After trying on the dress, you can begin work on the drapery of your product, and here it all depends on your taste and imagination. How graceful the folds on your dress will be will depend only on you. Below - detailed wizard step by step classes.
How to make elegant and fashionable light dress for... couple of minutes!!!
How to sew a stylish dress with your own hands in 5-10 minutes. This model will look exquisite on a large figure and help hide fat woman minor flaws.
Tailoring of a modern dress with sleeves. Step by step master classes for beginners.
When you look at the prices in clothing and footwear stores, your feet lead you to the departments of bit equipment for a brand new sewing machine. In my head, like a signal light, the question flashes: can I really not be able to sew a dress with my own hands? “It’s unlikely to succeed quickly,” the rational brain answers, and you stop at a crossroads: either return for an expensive thing, or go for a typewriter, or even go home.
Don't be afraid to start sewing
In fact, there are several options for creating outfits at home when you pay once for the purchase. sewing machine and then you just buy fabric cuts, which in terms of 3-5 times cheaper than buying a finished product. Remember, sewing a dress with your own hands is quick and easy when you master the techniques that we will describe today!
How to sew a dress in an hour: choose a fabric
In general, you should not bother too much with styles and complain about the fact that you do not have cutting skills. In fact, there is a general law for beginners: choose a product for yourself with a simple cut, but the fabric should be catchy, expensive in appearance and touch, with beautiful pattern or original colors. It is also advised to choose fabrics that do not wrinkle well in order to look neat in the product. It is best to create ensembles from knitted, viscose, angora fabrics. Naturally, flax, silk, coarse calico, etc., which are more difficult to process, are also chosen, but it is better to start with low-wrinkling knitted fabrics.

The pattern can be made either by yourself, or re-shot in a fashion magazine, or draw curves of lines directly on the fabric and boldly cut with scissors. You can master the first two options yourself, since the article is not enough to describe how to build the basis for the pattern. I can only say one thing: ask a seamstress you know to make a dress pattern for you personally, so that later you can independently apply it to a piece of fabric and model styles. For a nominal fee, the tailor will provide you with such a service and show you how, from a paper pattern for a regular straight silhouette make a product with a flared skirt, reliefs, flounces, a detachable or high waist.
What you need to sew a dress with your own hands quickly: a pattern on fabric
To begin with, choose for yourself a piece of matter that is beautiful enough in itself, since the style will be simple. The size of the canvas you will need is 200 cm by 150 cm. Fold the fabric in half so that you have a piece of 100 cm by 150 in your hands. Take it so that your arms are wide apart to the side. Thus, it turns out that your arms are extended in a straight line and its length is 1.5 m, and a canvas equal to 1 m hangs down.
Draw with chalk or soap
Bring the divorced hands together with the fabric - thus, it will be folded in half again. The canvas for cutting is ready: the matter is folded 4 times and is ready to be painted with smooth lines and cut. The side that has 100 cm down will be the length of the dress. The one that has a folded width of 75 cm is ½ shelves and long sleeve. From the top point, measure seven centimeters down and to the side, connect with a smooth line - this will be your neck. If you extend the line to the side, you get a neck with a boat. You can draw with both chalk and remnants - the lines are the same, only the chalk is more difficult to wipe off later, and traces of soap are removed with an iron.
How to sew a dress with your own hands quickly: draw the front and back shelves
From the middle, set aside ¼ of the width of your hips + 1 cm for allowance and freedom of fit. Draw a strip parallel to the middle of the matter along the points that have turned out. Let's say you have a hip circumference of 100 cm, which means that you should set aside 25 + 1 = 26 cm from the middle. This will be your front and back shelves.
We cut the sleeve
A one-piece sleeve will help you quickly sew a dress with your own hands. For beginners, this option is good decision, and then you can experiment by making it detachable, cutting out the armhole in general, creating the style of a sleeveless dress, but for now let's stop at a one-piece cut. Set aside 20 cm from the top fold - this will be the depth of the armhole. Sleeve width at the bottom: measure the wrist or forearm (whichever length you choose) + 2 cm for allowances. Connect the armhole and the bottom of the sleeve with a smooth line. Also, you can make a sleeve " bat”, that is, extend the armhole almost to the waist or hips. And the line with which you will connect the bottom of the sleeve will already look like a semicircle.

Designate the waist on the pattern
Tie your waist with a belt and measure a line from the seventh cervical vertebra to the waist at your waist. On the fabric, set aside this size from the neck - this will be the line of your waist. From this line, measure 20 cm - this will be the line of the hips. At the level of the waist, make a recess of 2 cm and smoothly connect the points of the armhole, the bend of the waist and the point of the hips.
We sew the side seams and the sleeve with one line, the processing of the neck
Cut out the details of the dress along the lines. Take the remaining piece of fabric and place an unfolded neck circle on it. Circle the neckline with chalk and add 1 cm to this line - this will be a seam allowance. Remove the very panel of the dress and from the line that you drew, set aside 7-10 cm. This will be another circle (or your neckline). Stitch it to the neckline, if you need to make a cut for the fastener, consider this when cutting. Stitch the side seams and your dress is ready in a hurry!