Manicure diamonds gradient. Ombre using a fan brush
Widespread among professionals nail service and lovers of nail designs has gradient manicure or whatever it is called ombre. To understand what is "ombre" you should think about the origin of this term, which in French means “shadow”, that is, a smooth transition of shade from light to dark. V at home gradient manicure (ombre) with regular varnishes can be done in several ways. one. With a sponge(varnishes are applied directly to it, and then transferred to the nail with patting movements. Design lovers advise applying white varnish as a substrate, it will add brightness and saturation gradient. 2. With a fan brush. Varnishes are applied to the manicure mat, shaded and then the nail is painted over with a brush. 3. Gradient manicure with eye shadow applicator done as follows: varnishes are applied directly to the nail, and then the border between the varnishes is blurred with patting movements.
Gradient manicure with stickers
Photo and idea from Yagala
Delicate and at the same time contrast attractive gradient manicure - 2017 made with two EL Corazon® Active Bio-gel Color gel polish "Cream" No. 423/285 and No. 423/304 . The collection of creamy bio-gels consists of several dozen shades - organic color palette for your gradient manicure
. The author of the idea complemented the design with an elegant ornament - a water sticker for nails. 
Photo and idea from Yagala
Airy, graceful Gradient manicure winter - 2018/2019 made with just one color EL Corazon® Active Bio-gel Color gel polish "Peacock" s tail "No. 423/1061. Duochrome nail polish will change from blue to green depending on the lighting, intriguing others. The varnish contains holographic flakes that give it shine. Great idea for winter nail design 2018/2019, do you agree? 
How to make a gradient French manicure?
Photo and idea from Yagala
How to do a double gradient manicure
Photo, video, idea from Yagala
Do you guess that gradient manicure maybe double? To make this design you will need a nail stencil. Let's look at the technique of performing a double gradient manicure step by step: 1) cover the nails with a base coat (the lightest shade); 2) apply on the area around the nails "cuticle protection from varnish - Cuticle Defender" Kaleidoscope by EL Corazon®; 3) using a sponge and varnishes, apply a gradient to the nails; 4) glue the stencil; 5) make a gradient again, but in the opposite direction; 6) at the end, cover the nails with a top coat and draw lines with a stamping varnish in gold color Special paint for stamping nail art No. st-21 gold. The author of the idea used 3 polishes from the series for the gradient EL Corazon® Active Bio-gel Color gel polish "Cream" . 
Gradient manicure by Walerica
On the Photo below is a beautiful tricolor gradient manicure by Walerica. The longer the nails, the more colors you can use for gradient manicure. Walerica made an interesting bright selection of three colors: #Stm-33 girlish joy (pink), #Stm-34 blue Hawaii (light blue), #Stm-31 emerald bay (green). Dense stamping ink is well suited for a contrasting gradient transition. A wide range of stamping varnishes will allow you to choose color combinations to your taste. note that gradient manicure complemented by stamping, while the nail design does not look overloaded, it looks bright, original and positive! 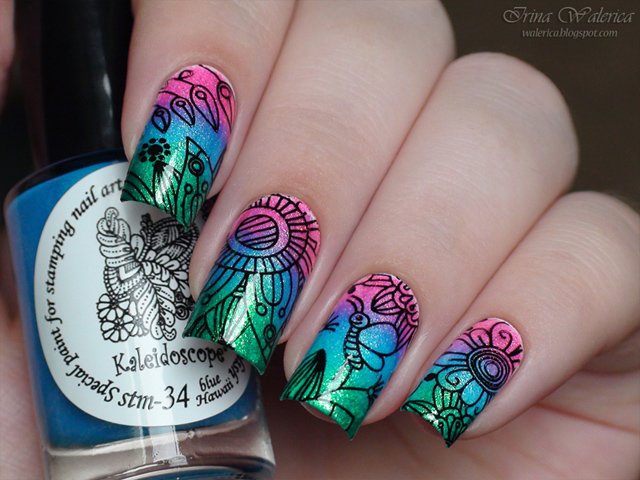

Walerica tested the paint and noticed that on the substrate white color These shades are the best. On dark-colored substrates, the emphasis is on the gold shimmer, you can also get a beautiful peculiar effect on the nails.

The drawing is applied to the nails using a metal stencil for manicure with an ornament "on the whole nail". Such a stencil is interesting in that each time you can get a new pattern.


Gradient manicure photo

Gradient manicure photo

Photo for the site "Gradient manicure" courtesy of Walerica. More information about her work can be found on the website http://walerica.blogspot.ru/search/label/El%20Corazon
(Attention! Copying materials from her blog is possible only with the consent of the author himself!)
Three color gradient manicure
Photo and idea from Yagala
Ombre manicure.
How to make an ombre manicure with one varnish?
Gradient manicure (ombre) can also be obtained using thermal varnish. If you have long nails gradient will manifest the best way. Company EL Corazon®
launches two collections of nail polishes. 
Gradient manicure with a pattern "Palm trees"
Photo and idea from Yagala
Gradient manicure at home is most often done with a sponge. And if you have a fan brush, then you can try to make gradient manicure using it, as in this master class. For gradient author ideas chose a contrasting combination of bright Kaleidoscope by EL Corazon® nail polishes. . gradient manicure supplemented with stamping. Watching the video, please note that a transparent stamp was used in the work. Thanks to him, you can accurately position the drawings on the nail. You can buy transparent stamps wholesale and retail from us. Company EL Corazon® offers a wide range of nail stamps, including transparent ones. Thematic drawing is applied with black stamping paint, which is a bestseller in the company EL Corazon® . Browse video and learn all the subtleties of performing a stylish summer manicure.
Gradient manicure with gold paint
Photo and idea from Yagala
To make a spectacular gradient manicure you need to choose a beautiful harmonious combination of colors. For any manicurist who has a huge palette of shades, this will not be difficult. And if you do manicure at home then the selection of colors may puzzle you. Gradient can be light, dark, bright, it all depends on your preferences. On this Photo presented tricolor gradient manicure with a smooth transition from a light shade to the darkest - black. Cherry can be replaced with any other color of medium saturation, while leaving light and dark in combination. And if you want to repeat gradient manicure, which is shown in this Photo, then you will need three thick nail polishes: EL Corazon® Active Bio-gel Color gel polish series "Cream" No. 423/270, No. 423/289 and EL Corazon®"Charm and beauty" No. 878.
Gradient manicure for the club
Photo and idea from Yagala
Gradient manicure in this photo made with just two colors: bright varnish yellow color and light beige. If you find it difficult to choose colors for gradient manicure, then feel free to use a combination of any shade with white or neutral nude color (as in this photo). A light and bright gradient is complemented by stamping. Black varnish for stamping Special paint for stamping nail art No. st-01 black is the leader in sales in the company EL Corazon® . Lovers of beautiful nail designs love it for its high density, optimal drying speed and affordable cost. Black stamping varnish covers any coating and is combined with all colors, so it is often used. with gradient manicure.
The site contains interesting sections on nail design at home:
Ombre manicure in the photo beautiful design 2018 takes pride of place. Laudatory odes to him do not get tired of singing nail designers of all stripes. Almost any nail fantasy only becomes more beautiful if you skillfully arrange a stretch of color. You will find exquisite examples of fashionable gradient nail design and two popular master classes in this article.
Fashion trends for ombre manicure 2018
Gradient, ombre, degraded, stretching ... No matter how they called this nail design over the past few seasons. All this means a smooth transition from one tone to another. At first, the technique meant a gradual darkening of a light shade, but then the concept expanded. Today, this is no longer enough for a trendy manicure, and the steepest gradient is obtained by combining contrasting tones like orange and blue, pink and green. In a word, combine the incongruous and you will be happy!
Fashion trends in 2018 have marked their favorite with a neat horizontal stretch. The vertical one is no longer in trend, and the flow of tones from finger to finger is considered clumsy at all.
But in the decor, art is not limited from the word “absolutely”. Drawings, rhinestones, monograms, applications are only welcome, because the only thing to be wary of in the 2018 ombre manicure is banality! So the craftswomen practice in color combinations and their decoration.


How to make an ombre manicure: two master classes in 5 minutes
The main thing for what fashion technology attention is drawn - this is a gradual stretching without flaws. Even last year, you could smear a couple of strips on a sponge and seal it to your nail. With a probability of 99.9%, the result would not be neat, and even with bubbles.
Today, the maneuver on "and so it will do!" won't pass. One has only to consider the 2018 ombre manicure in the photo - the perfection and purity of the fusion of shades catches the eye. This beauty is easiest to achieve at home in two ways. They will be discussed.
Lesson number 1: gel polish gradient (feathering with a comb brush)
A special brush will allow you to create a gradient on your nails with gel polish faster than all other tools. She has hair different lengths, and they are sparse towards the tip. You can cut the same shape from a regular flat brush, if, of course, your hands grow from the right place. And you can buy ready-made.
Gel polishes for this technique are needed with clear pigmentation, but not very dense. They should not noticeably strip, otherwise the result will be untidy. In addition, you will not be able to apply 3-4 layers. It is always easier to start practice with light tones, and then proceed to juicy contrasting ones.
So, you will need:
- Base and finish for gel polish.
- Blue and black gel polishes.
- Comb brush.
- LED lamp.
- Liquid to remove stickiness.
- Cotton discs.
- File the edges of your nails, work with a buffer, shake off sawdust and degrease your nails.
- Apply base and dry for 60 seconds.
- Cover the nail with blue varnish, on which you will stretch the gradient, and dry.
- "Scallop" gently fluff.
- Fill in the area around the lunula with black. Stepping back the symbolic border of a couple of millimeters, cover the rest to the edge with blue varnish.
- Now, with small strokes up and down, pull the black lake to the bottom. Make a couple of rows and wipe off the brush. Continue strokes from where you left off.
- When the strokes become almost transparent, dry the brush and separate the villi.
- Start stretching the pigment again from the first row. By this time, the transition will become noticeable. Having reached the end, polymerize the result.
- Again put black and blue on the same borders and drag down. After two or three rows, wipe the tool.
- As a final chord, patting with a clean “scallop”, go through the entire stretch. This is done so that no bubbles remain. Dry.
- Overlap your work with a finish.
For inspiration - bright examples this technique. Having got the hang of it, you can use not just two colors, but much more.


And this video tutorial clearly shows the whole process:
Lesson #2: Airbrush Gradient
An airbrush is a pen-shaped device with a nozzle at the top. Pour special paint into the funnel and “blow” it onto the nails. Plus technology - saving time and quality results. Minus - a good tool is quite expensive, it costs about two thousand rubles.
Tools:
- Airbrush.
- paint for him.
- A piece of paper (so as not to stain everything around).
- Base, top and gel polish.
- Defender.
- Liquid for degreasing and removing stickiness.
- Ultraviolet lamp.
- Apply a base on the prepared and fat-free plates, dry and cover with gel polish.
- After drying, remove the sticky layer and buff the surface a little. Shake off sawdust.
- Coat the skin around the plates with a defender and wait for it to dry.
- Pour paint into the nozzle and, holding the “pen” at an angle, spray on the tips of the nails from a distance of 15-20 centimeters.
- Pull off the protector film.
- When everything is dry, cover your work with a finish and send it for polymerization.


The design is more original if you use different stencils for airbrushing. Just about this second video lesson:
Rainbow nail art ideas in today's trends
Learning how to blend colors perfectly is already an achievement. But look at what amazing possibilities the unity of the gradient with decor and fantasy opens up.
On short nails
It is easier to practice at a short length, especially if you want to learn how to use a brush. Palette - any, pastel or, on the contrary, very juicy, even neon. The rounded square loves kamifubuki, rhinestones and rubbing on the merger of tones.


On long nails
The dark scale will look great and predatory. Pair black with red, purple, emerald, navy… Draw, print geometry, add sparkles.


And now about each nail art in more detail!
Matte
Everything is simple. Overlay your work with a matte finish for sophisticated, subdued art. For autumn and winter manicure it's a win-win.


Geometry
The geometric gradient is best displayed on a pastel base. Mix pink with white, blue, mint green and black or white gel paint to create subtle patterns. The fence gradient is still in trend.
The sketchy representation of silhouettes of animals is gaining popularity. Of course, it’s difficult to draw a fox head on your own, so use stencils.


"Broken glass"
"Glass claws" and ombre perfectly complement each other. Make a vertical stretch so that the color flows from one finger to the next. Glue the foil in the dark areas.


monogram
You can decorate all the fingers with a gradient, but place curls on only one, preferably the ring finger. The violet-pink base and graceful curls with gel paint sprinkled with powder look luxurious.


Lunar
Immensely aesthetic will be a hole, designed in negative space, and a color weave below. Give preference to juicy colors. Black can be mixed with dark pink, lilac, blue…


Watch this master class and learn unusual art:
french
The most common solution is to duplicate the smile color with one of the tones used in the base. For example, did you design a red and black ombre? Stretch a black smile down below. Such a jacket flaunts mainly on square short claws and looks completely non-trivial and very catchy.


gradient stripe
The novelty is just gaining popularity and one look at this art is enough to fall in love once and for all. Stripes are quite easy to draw by hand, just follow the algorithm, as in the video:
You can also use an airbrush. For this, stencil tapes come in handy.
- Cover the plates with gel polish, top, remove stickiness and stick strips near the side rollers so that they fit very tightly.
- Spray the paint, remove the stencil.
- Finish line. If desired, you can sprinkle the strip with sparkles or powder.


Kamifubuki
Choose sequins to match the palette from which the ombre will stretch so that the design is not clumsy. Stretching can be done on all nails or only on one, but let kamifubuki be in minimal quantities. A good example in the photo is two marigolds with a blood-black gradient, and confetti perched on one.


With an image
Thin stems look great on a colored field. Choose dusty shades for a combination, and then the art will be very gentle. Pastoral pictures are also hard to imagine without ombre. Of course, floral images hold the palm. You can draw at least a whole bouquet on your fingers if the petals are in harmony with the base palette.
By the way, the ability to stretch colors will come in handy in your drawing. Gradient buds or butterfly wings will become much more realistic than in mono color. Choose a clear palette - this is yellow, a huge range of blue, green in alliance with milk.


With rhinestones
Feel free to indulge in fantasy! Pebbles show themselves superbly in color fusion. Make a blue-black gradient and draw a fragile line of rhinestones near the hole. The more shades there are in the ombre, the more elegant the rhinestones will look. Do not be afraid to mix warm and cold tones, art with a yellow and blue transition will be very catchy. You can build a whole "starfall" on a matte indigo sky - from large stones to small ones.


Perfect manicure fashion girl should be combined with the outfit, but washing the varnish daily and applying it again - such a task seems overwhelming to many, and even harmful, because even a safe wash damages the top layer of the plate. The solution was found - the gradient on the nails, the photos allow you to see its beauty, and the combination of several colors is a great solution for any outfit.
What is a gradient on nails (ombre, degrade)
Until quite recently, no one knew about such coverage and could not even imagine that this was possible. While the world was going crazy for a jacket, a completely new concept had time to appear - gradient nail design, which even looks impressive in the photo, to say nothing of reality.

What is this manicure? The nails are painted with smooth color transitions, and these can be shades of the same color or completely contrasting tones. There are complex and simple varieties, and experienced craftsmen even make the design not with two, but with a large number of colors.

What are the techniques for creating such an effect
There are two options for applying varnish. Both look great and have their own performance features:
- Horizontal - easy to perform, even a child can handle it. It is necessary to buy 5 different varnishes, similar in tone, but with a smooth transition from dark to light. Each nail is painted in different colour, the little finger is made the most saturated, and the thumb is the lightest.
- Vertical - this is more difficult to make, but it looks more luxurious if you choose the right varnish. 2 bottles are bought, each nail is painted in the same way - with a smooth transition from dark to light. The tip is darker than the base.

Also vertical technique can be performed different ways: varnishes are applied directly to the sponge, mixed on the working surface in advance or already on the nail. The last option is easy to perform, but it will look extremely sloppy.

Note! To perform a gradient, it is better to take varnishes from one manufacturer or at least type. It is impossible to combine metallic, glossy and matte effects at the same time - it looks ridiculous.
How to create a gradient technique at home

It is not difficult to make nails with a color transition, as in the photo. You will need a standard set of tools:
- Varnish bottles - carefully choose colors and consistency. For the first time, a couple of shades are enough, and it is better to take close tones, after that you can safely experiment.
- Sponge - you can buy at a nail store or find a suitable product at home. But the pores must be very small, otherwise you will not be able to achieve smooth transitions.
- A piece of plastic or film where varnishes will be mixed.
- A mixing needle or a thin brush.
- Good nail polish.
- Color fixer.

You should also stock up on pre-treatment cream for the skin around the nails, but be careful not to get the product on the plate.
To make a gradient on the nails, study the popular photos of 2017. You will need not only working tools, but also great patience, the procedure requires painstaking work:

- Give your nails correct form, work with the cuticle, polish the plate, in general - carry out standard procedures.
- Apply a base - it can be just a transparent varnish, or one of the selected shades.
- On the plastic, apply several stripes of the selected colors so that they are side by side. Mix them with a needle at the joint.
- Press the sponge against this surface and then against the nail. Do this carefully, without smearing the colors, and remove immediately.
- Remove the excess around the edges to give accuracy.
- Apply a fixer on top.

A multi-colored manicure is ready, even if it did not immediately turn out the same as on the best photos 2017, but with experience the skill will definitely come.

Note! If you have not done a gradient on your nails before, looking at the photos of 2017 and new manicures is not enough. Contact the master who works with the stretching technique: you yourself will see the procedure and understand how it is carried out.

What colors and their combinations are ideal for a gradient
True classics are similar colors, such as bright red and pink. In any case, they will look advantageous and blend perfectly. Good combinations are:
- light green and yellow;
- pink and white;

- blue and lilac;
- black and blue;

- black and red;
- brown and cream.

In fact, the right combination of nail polishes different colors presented in the photo are rather single ideas. You can come up with a design yourself, sometimes even incongruous shades suddenly harmoniously fit together. The main thing is to complete the design carefully.

The transition of tones can be performed not only horizontally, but also diagonally, vertically - as you please. Also, the gradient is constantly being upgraded, interesting details are added to the design. For example, you can try to decorate the tips with sparkles, or combine a classic jacket and ombre in one manicure.

It is very difficult to make a design on short nails, the gradient looks better with a free edge, when a platform for creativity opens. Use stickers, experiment, create new image which you will remember. Better yet, contact a professional.

It is interesting! There are novelties on the market for creating a gradient - special varnishes that react to temperature. They are applied as standard, but give the effect of degradation. You only need to buy a quality product, as fakes will not give the desired result.
Interesting combinations for multi-colored nails
If you want to create multi-colored nails, given the harmonious combination of colors, then pay attention to the photo. collected for you best ideas manicure world:
- White design - the design resembles a jacket, only the transitions from white to flesh color are carried out smoothly.

- Black design - Black is combined with dark scarlet, dark blue or dark green. Good for formal occasions and evening wear.
- Red manicure - if you are a femme fatale, this design suits you. Rest assured, all eyes will be on your hands. The burgundy tone is combined with rich red.

- Pink design for sophisticated ladies and day wear is just perfect. A soft pink and more saturated color is involved here.
- Brown - includes a caramel shade and almost flesh. For a celebration, be sure to add glitter.

Luxurious gradient will decorate any girl, giving her hands an incredibly beautiful appearance. Of course, creating such a design is not easy, but it does not need to be changed every day, choosing nails to match. And if you apply a gel polish in the salon, you will walk around for at least a couple of weeks with the chic design that is becoming increasingly popular in 2017.
Related videos
Gradient is a relatively new direction in the design of nails. A smooth transition from shade to shade or iridescent overflow makes it possible to combine this type of manicure with almost any style of clothing.
Content:
Most of all, this technique is attracted by the simplicity of execution. You can create a gradient manicure yourself, the effect of such a design is not inferior in its attractiveness even to complex techniques that only a professional master can perform.
If you wish to create vivid image, but the lack of practical skills, the gradient will be the most suitable.

simple gradient
A simple and affordable way for everyone to apply a gradient is to use a sponge. With its help, you can create smooth transitions that cannot be done with a brush. Sponge prints must be done carefully. Their number on one nail depends on the desired intensity of staining: the more sponge prints, the richer and brighter the manicure will be.
Having applied the gradient, the nail is immediately covered with a fixing compound from above. This will help to avoid transferring its porous structure from the sponge to the nail.
The disadvantage of this method is that before processing each nail plate, it is necessary to reapply varnish on the sponge, because most of it is quickly absorbed.
Despite some inconvenience during the procedure, the result is worth it.

brush gradient
To apply a gradient manicure with a brush, you will need the same materials as for the sponge application technique. But the peculiarity of this method is that it is possible to apply varnish in both vertical and horizontal directions.
Adhering to the algorithm, you can even create a gradient on the nails yourself:
- At the first stage, you need to choose shades of varnishes so that when they are combined, you get a smooth transition from light tone to dark or from saturated to muted.
- In order for the manicure to last longer, the nails must be properly prepared: make at least the simplest manicure, carefully polish the nail plate.
- The base is applied to the prepared nail with the first layer. Give it time to dry.
- The skin surrounding the nail is best treated with cream. This will make it easier to remove excess polish after a manicure.
- The selected color of varnish is applied carefully, trying not to step over the edges.
- Varnish of a different color is applied so that it covers half of the nail from the cuticle to the tip.
- Until both layers of varnish are completely dry, create a gradient. Do it with a sponge. She gently blots the border of the merger of two shades of varnish. The movements must be fast and jerky.
- When the nails dry a little, a fixative is applied with the last layer.

Gradient manicure options
- white gradient
The white gradient is similar to french manicure. Smooth transitions of pale pink or cream and white lacquer give a special grace to the hands. Favorably looks white gradient on the background of tanned skin.

- black gradient
Black color is universal, it harmoniously combines with many colors. The combination of black and white polish on one nail will give the image rigor and elegance. And the combination with rich scarlet color simply cannot but attract the attention of others.

- red gradient
A gradient manicure made in red tones can include polish from bright to almost black-burgundy. This design is perfect for an evening event.
Sometimes a red gradient is made with transitions to a different color scheme.

- pink gradient manicure
Makes any look delicate and feminine. It suits women regardless of status and age, is appropriate in any setting.

- blue gradient
Blue lacquer is a great alternative for those who find the classics boring and uninteresting. Advantage of blue color in its versatility, in the presence of a large number of different and interesting shades.
Beautifully and neatly made, suitable for everyday life and for celebratory event.

- shiny gradient
Gradient manicure can be not only in the form of a color transition. Stretching effect can be created using confetti or sparkles.
At the first stage, the nail is varnished with the main color. Then, glitter is abundantly applied to the edge of the nail plate, and with the help of a brush they are stretched to the nail hole, thinning the layer.
Glitter will create a festive and spectacular manicure. In this case, glitter can be used in the same color as the main varnish, or vice versa, to focus on the contrast.
Using confetti in nail design, focus on its size. For example, place larger confetti at the end of the nail plate, and smaller ones towards the middle.

- Gradient with design elements
The most spectacular, but at the same time the most difficult to perform, is a gradient with design elements. There may be several options. A manicure is widespread when an emphasis in the form of a pattern or a gradient of a different color is placed on one or several nails of one hand at once. A drawing located on top of color transitions requires special skills of the master, as there is a high risk of overloading nail plate or make it bigger.
The curly or geometric gradient always looks original, which implies the presence of shapes and outlines of the stretch line.
Not less than spectacular view has a gradient using foil tape or rhinestones.


Gradient manicure cannot leave anyone indifferent. Among all the variety of its types, each woman can choose the one that will suit her mood.
Good afternoon - today I will tell you everything about the gradient coloring of nails, when it turns out on a manicure SMOOTH COLOR TRANSITION- and it turns out the coloring, which the French call ombre. In this article of nail art lessons, I have collected all the ways of gradient manicure -
- We will make ombre nails in marine and space topics ...
- We will paint on nails southern sunsets with palm trees and northern twilight
- V technique "Scotch" and "Glue strips"– we will make some new gradient designs.
- I'll show you how to do it moon manicure with color transition
- I will show you so many nail designs that you can COMBINE with gradient nail backgrounds.
... and we will do all this with our own hands - at home.
I promise - it will be interesting ... only here you will find a FULL PINK OF PHOTO-IDEAS for a gradient manicure. I will not just give you a photo - I will give you detailed instructions for each of the proposed options for ombre nails - and you can do all these nail art lessons at home with your own hands.
And before we start our tutorials… I want to LOVE YOU with this amazing iridescent gradient nail design.
So let me introduce...
HIS MAJESTY - Gradient Manicure.
Manicure can and SHOULD (!!!) be combined with ACCESSORIES. Your earrings... shoes... handbag - they should TELL WHICH POLISH COLORS to choose for your gradient home manicure.
We bought charming earrings with blue and light green crystals - immediately go shopping for the same colors of ombre nail polish.


Your evening clutch bag - should inspire you to create a gradient on your nails in the same color scheme.

Your favorite shoes- will also tell you the desired color and design of the gradient manicure.


And of course, the dress - it can also give a starting point for choosing shades of a smooth color transition on the nails (here's the example of the images from the photo below - a pink manicure under a dress, and a blue manicure under a blue dress).


Luxuriously! Is not it?
In this article, I have collected all information - DIVIDING IT INTO THREE PILES.
- First, I will show TWO WAYS to make a gradient manicure at home (and you choose the one that seems convenient to you personally)
- And then I’ll show you what scope for creativity this opens up. gradient way nail coloring ( there are no such photos in runet yet - I spent more than one day to dig them out for you)))
- And of course I will several step by step lessons to create beautiful compositions on gradient nails
- LET'S START IN ORDER...
What is a gradient OMBRE MANICURE -
technical secret.
Gradient coloring of nails is a way of applying varnish, when one shade of color smoothly passes into another. Like in the photo below...
My first experience in applying a smooth color to the nails with a sponge - took exactly 1 hour (this is for both hands) - I have already done my second gradient experience faster - in 40 minutes . So get ready to puff a little longer. And then with experience comes dexterity and speed.
This manicure technique is a godsend for those who can never sensibly and evenly paint their nails even on a comfortable left hand ... always crooked and smeared (I myself am like that). And the gradient is good for that - that it turns out exactly even for those who have never been able to evenly smear the varnish with a brush, so that there are no traces.
HOW AT HOME
simple and quick - make a manicure with a color transition.
2 main ways:
FIRST WAY – CLASSIC “rainbow on a sponge”.
The photo below shows the principle of how to make such a manicure with a sponge. On the plastic we apply three stripes of color (for example, hot pink \ pale pink \ white). We apply a sponge to our "rainbow"- and on its surface there is an imprint of a rainbow. We apply the sponge to the nail so that all three colors fall on the nail plate.

Although I draw a rainbow with a BRUSH immediately on a sponge (and not on a board). And I apply ... I draw again and apply again.
Which sponge is right for you. It is better to take not an ordinary dishwashing sponge (it is too loose) - but it is better to take a cosmetic SPONGE (for applying foundation on the face) ... or a foam puff from your compact powder. The sponge has smaller pores-holes and the varnish lays down more evenly. And it’s more convenient to hold such a thin sponge in your hands than a loose sponge
You may be intimidated by the fact that…
The first sponge print on the nail - will be pale(almost invisible)...
Don't be scared. It should be so. In order for the color to become saturated and deep, you need to repeat the sealing of the sponge to the nail almost 10 times ...
But even when you have already pressed the sponge to the nail 10 times, you still won’t like the color with its dullness and fading. The photo in the computer is so shiny, but I have a dull color. Don't worry - it's fixable. This dullness of shades gives a rough sponge ...
The color will shine with depth only after- how you cover the gradient nail with COLORLESS POLISH (it is better to take a colorless finishing diamond polish).

I do so - I smear the sponge and print it in turn to each nail on my hand - I start from the thumb to the little finger (the print is almost invisible to the little finger).
Then again I put a rainbow of lag on the sponge - and again I print it - from the large to the mini finger.
Somewhere around 7-10 times you have to make such layers ... until the color becomes bright. And then I compare my fingers - if somewhere the color is as bright as on the others - I apply the sponge again. Then I cover it all with "diamond liquid polish to complete the manicure." And after such coverage - the color becomes 2 times deeper and more saturated ...
After that ... we remove traces of varnish that got on the skin ... by the way, you can pre-glue the skin with pieces of plaster or adhesive tape (then you will have to clean less) ... Or use the tricky FILM method - which will be discussed below.
The second way is POINT APPLICATION OF THE GRADIENT on the nail.
If you want to cover with a gradient ONLY THE EDGE OF THE NAIL... then you can make a gradient in a SIMPLIFIED WAY.
That is…
- First, paint the nail in one color ...
- And then with the EDGE OF THE SPONGE with another varnish, blot the tips of the nails several times.

But - in the CLASSICAL WAY (rainbow on the sponge), it still turns out a MORE SMOOTH color transition on the nail. Since it is better to use on two contrasting varnishes ... and use SEVERAL COLORS AT ONCE of the neighboring palette of shades.
Here is shown below exemplary work to create a gradient on the nails with this SECOND METHOD.
We will need:
- 2 multi-colored drops of varnish -
- and 2 small pieces-stubs of a sponge (cut off a corner with scissors so that its surface of the sponge is not smooth, more loose - this way it will leave more blurry prints).

- cover the nail base shade(ours is pink).
- dip the stub of the sponge in contrasting color(black) - we apply it (with blotting tyts-tyts-movements) on one half of the nail SO - so that it is thicker at the tip of the nail, and not very close to the middle.
- Dipping another piece of sponge to base(pink) color - AND NOT IMMEDIATELY (!!!) on the nail, but first we poke the sponge somewhere on the surface of a piece of plastic or paper - to remove excess varnish from it) and only then lightly press the sponge to the nail in the BORDER zone between different varnishes…
- Wait for it to dry and apply colorless varnish. And that's it - the nail is ready - we made a gradient manicure by hand.

As you can see, it looks less neat than the gradient with a single piece of sponge ...
But on the other hand, THIS METHOD is suitable if you need to make a ZONE GRADIENT (as in the manicure from the photo below - where each zone of the nail is painted in its own separate color).
It is in this PIECE-FOAM way that a manicure is done in the style of SPACE(which will be discussed later in this article) ...
There are CLEANER WAYS
applying a gradient to a manicure.
I call clean methods of applying a smooth transition of colors those after which it is NOT NECESSARY TO CLEAN THE SKIN AROUND THE NAIL.
There are also two ways:
The BRUSH method is both convenient and clean.
Its beauty is that we can brush over the nail so as not to touch the skin of the side ridges and cuticles (you don’t have to peel off the paint from your finger for a long time).

FILM way - the fastest.
there are modern SKIN PROTECTIVE COMPOSITIONS - we apply them to the skin ... they immediately thicken and form a protective FILM around the nail.

And after all the dirty work with the gradient sponge, all we need to do is tear off this film, and with it the adhering varnish (as shown in the photo below)
And now the most interesting part of the article ... now you will see WHAT EXACTLY you can make beautiful on gradient nails.
How to DECORATE a gradient manicure:
33 great photo ideas.
Gradient background - for the Scotch technique
You see how impressive this manicure design looks - and everything is very simple to do. First, paint the nails in a gradient technique. We are waiting for them to dry thoroughly - that is, they will become completely solid.
And then we stick Scotch tape on each nail - you can lay the adhesive tape so that there is a SEALED PLACE on the nail in the form of a strip(as in the photo with black nails) - or in the form of a triangle(in the photo of white nails). We make a piece of adhesive tape more authentic, so that later its long tip can be conveniently grabbed and torn off from the nail.
Then we cover the OPEN AREA OF THE NAIL (the one that is not sealed) with any varnish (black, white, others) - and when the paint is applied - we pick up the adhesive tape and carefully peel it off. It turns out that what was under the adhesive tape remains iridescent and gradient, and the rest of the zone is uniformly colored.

Or vice versa - first we paint the nails in BASIC ONE COLOR ... we glue the tape ... and only then we make a gradient - as in the photo below. ...
- We paint the nails in the base color GRAY ...
- Seal the sides of the nail with TAPE ...
- We paint the open part of the nail in a GRADIENT turquoise-white color.
Gradient DUSK and SUNSETS on manicure.
The theme of the chosen colors (yellow and orange, smoothly turning into red) itself hints at a luxurious tropical sunset.


You can draw exactly the same palm tree on your nails at home ... and exactly the same silhouette of a girl walking against the background of a sunset gradient sky.
So I found a master class on how to draw a palm tree on a gradient manicure at home.

Or against the background of such a sunset gradient on the nails, you can draw outlines of monuments and architectural sights.

What could be more beautiful than a gentle PINK-BLUE DAWN.
And if against the background of this amazing colorful blurred sky draw metropolis outlines… It turns out very beautifully.

Simple DRAWINGS on a gradient of nails.
On a bright color transition, clear graphic drawings look good - in black or white varnish. Or it could be stickers.
DOTS PATTERN on gradient manicure.
It also looks good bitmap on the nails. Points are being made not with a brush - but with special tools - dots manicure sticks.
Here in the photo below we see a gradient color transition on the nail and a pattern of flowers made of dots. Moreover, pay attention pink flower dots are applied to the white half of the nail - and white dots are applied to the dark half of the nail.

Gradient manicure with STAMPING (printing) technique.
The technique of stamps can be combined with the technique of iridescent colors on the nails. Everything is simple here. We make a smooth transition of color on the nail - in the shades we need - and when everything dries up, we apply any stamp pattern on top - from a purchased stencil.

Or it may not be prints - but ready-made decals for nails.

MARINE THEME on a gradient manicure.
You can make a gentle color transition in turquoise-white-blue tones. And decorate with sparkles, rhinestones or small fragments of shells. And we will get nails - which will ideally fit into the holiday days on the shores of the warm sea.

Ombre nails with glossy lacquer finish.
Look how beautiful the gentle transition of the light palette of nail polish shades looks - white-pink... white-blue... white-yellow... white-green.

To create such a manicure, you need to find rhinestones that shimmer with shades of color (or varnish-confetti) ... and it is IN THE SAME shades that you make a smooth color transition on the nail ... and then decorate the gradient background of the manicure with rhinestones with the same color overflow.
This is how we achieve this airy feeling of gentle harmony - reflections of rhinestones and nail colors
Or you can ... buy a standard varnish with black and white confetti. It will go with any shade of the gradient. It also looks good and beautiful on gradient nails - it looks like a complex design. But we all know that such nails are easy and simple to do at home.

Gradient nails WITH rhinestones and studs.
And of course, a chic manicure with large rhinestones can also be created against the background of a smooth gradient of bright colors.
Black rhinestones look spectacular on a bright background of a color gradient ...

Or you can make one nail black - and against this background, make an interesting composition from rhinestones matched to the colors of the gradient.
Rhinestones can be placed not on every nail - but in the corner of the nail on the ring finger. You can place one rhinestone at the hole of each nail - or place a chain of rhinestone drops at the side of the nail plate.

Gold rhinestones-riveting look good on a DARK TRANSITION manicure - with rich juicy shades of the gradient .
MOON MANICURE with a gradient color transition.
We paint the nails in the base color - close the hole in the nails with a semicircular piece of masking tape (or special round stickers for moon manicure) - and paint the open nail in a gradient.

You can come up with your own gradient moon manicure design. There is only one thing in common - there should be a gradient on the nail and a nail hole painted in one tone.

DOUBLE-LAYER GRADIENT on nails - using the "Scotch" technique
A very interesting ombre nail design can turn out if done on them DOUBLE gradient…
- First, paint the nails once in a gradient (this will be the bottom layer)
- Then seal part of the nail with adhesive tape and again make a gradient over the open zone - SO THAT next to the light zone of the lower gradient layer there is a dark layer of the new gradient layer.

Gradient ombre manicure - with GLUE STRIPS.
There are coils with thin adhesive strips on sale. They are glued on the nails - to get a stencil of a narrow striped shape. That is, they covered the nails with a base varnish - dried and glued the stripes - and applied a gradient layer over the stripes - remove the strips and empty spaces remain under them, unfilled with a gradient.
Strips can be glued CROSS TO CROSS - to get a checkered pattern on ombre nails.
Or you can make regular stripes - parallel, in the form of zigzags, or place them in divergent rays.

Or you can stick the strips in a more curly way - to get YOUR ORIGINAL PATTERN on a smooth transition in the color of the nails.

This nail design can be decorated with large rhinestones.

Space and water elements - on gradient nails.
Unexplored depths of space... secret nebulae and milky way- just easy to convey with a sponge using the ombre manicure technique.

In the same way, you can recreate using a gradient on the nails. rampant water element... foamy splashes of waves ... a dolphin diving into them, or a tired seagull.

Amorous theme on a gradient manicure.
For Valentine's Day, you can also do a special manicure with a heart using the color transition technique.

And here is a manicure with a heart on the nails. First we create a gradient - then we stick an adhesive tape, and cover it with a white layer.

Red and black passion on gradient nails.
By the way, my personal first experience with gradient nails was with a RED-BLACK color transition. I decided to just try to practice - to be honest, I didn’t believe that I would get something intelligible the first time - and as a result, the first time I got an excellent manicure (even on my uncomfortable right hand it worked out well).

By the way - if you like bright black and red manicure- then I invite you to my article
Here are ideas for a gradient ombre manicure - which can be implemented at home.
As you can see, everything is quite simple.
Olga Klishevskaya, specially for the site