DIY summer maxi skirt. We sew a fluffy maxi skirt with our own hands: a simple master class
Sewing a simple skirt to the floor will not be difficult even for a novice craftswoman. After all, you can do without a pattern, it will be enough to make just a few measurements. In this article, we will analyze in detail what and how to measure, how to cut out the details and sew. For those who do not want to bother with building a drawing, I offer ready-made free patterns for a long skirt, which can be downloaded at the end of the article.
How to build a floor-length skirt pattern
First, we need to decide on the fabric. It is desirable that it be stretched in the transverse direction. Otherwise, the skirt will hinder movement.
Required measurements:
- Waist circumference,
- Hip circumference (optional measurement, needed for checking),
- Length from waist to outside of foot.
- Step length (needed so that the skirt does not hinder movement).
With the first three measures, I think there should be no questions. But in order to measure the length of the stride, or rather even say the circumference, you need to take your usual step and measure the circumference with a centimeter tape, clasping the ankles.
On a fabric folded in half, set aside a quarter of OT on top, for example, if your waist is 68 cm, then you will need to set aside 17 cm + seam allowance.
Set aside the length along the fold line, for example 90 cm.From the resulting point, set aside a quarter of the circle of the step. So, if your measurement of this value was 88 cm, then you will need to postpone at least 22 cm.Of course, you can measure more, but if you take a smaller segment, keep in mind that walking in a skirt will not be very comfortable. To rectify the situation, we will have to make an incision, but we sew without it.
Finally, check to see if the skirt is tight at the hips. To do this, measure about 18-20 cm below the waist and measure the width in this area, it should be at least a quarter of the circumference of your hips. If you have a narrow waist and very wide hips, you will have to slightly increase the waist mark, and increase the width of the lower segment by the same amount.
Method number 2. According to the method of Marlene Mukai.
Marlene Mukai proposes to build a pattern for a long skirt, taking the hip circumference as a basis. Below are the drawings of such skirts. We see that initially a rectangle is drawn, the width of which is a quarter OB. We measure a quarter of OT from above, and one more quarter of OT is laid down from the edge of the rectangle. The edges of the skirt need to be slightly rounded. In my opinion, Marlene Mukai's patterns are one of the most accurate and at the same time simple. By the way, all measurements in the drawings are indicated taking into account allowances. The size chart is below.


How to sew a maxi skirt
Cut out the details of the pattern. Place them right side to side and sew the side seams. Hem the hem.
For processing the top, cut a strip of fabric, the length of which will be equal to OT, the width is about 20 cm. Fold it in half and sew to the upper edge of the skirt. If you have very wide hips, and the fabric is not elastic, then you can cut the strip longer, and then insert an elastic band into it or stitch the rubber veins.


Other options for maxi skirts
Here are some more options for long skirts. The size chart for these drawings is the same as for the sewing patterns by Marlene Mukai.


Vera Olkhovskaya
The half-sun floor-length skirt is one of the most popular skirts of recent seasons. Keeping the silhouette of the "sun", it is more comfortable to wear and, of course, more economical.
It should be noted that a half-sun skirt will be more complimentary for figures of medium and large fullness than a sun skirt or a straight skirt. With the modern tendency to “sew for the overweight the same as for the thin ones”, this is important when choosing a style.
In a word, a half-sun skirt is the skirt that should be paid attention to by all fashionistas, home couturiers and professional clothing designers.
Cut half-sun skirts without patterns
The consumption will be about 2.5 m of fabric. We calculate using the formula:
2 radii + skirt length + 2 patterns
Radius = 1/3 waist circumference
Add 3 cm on each side of the skirt for the fit (trim of the length).
You can cut it out in a turn (Fig. 1), that is, without folding the fabric, but you can fold the cut in half along the transverse thread.
We start by measuring the length of the skirt plus 3 cm along the edge, which is at the edge of the table, then the diameter (that is, two radii) for the notch and again the length of the skirt plus 3 cm. We outline the center and draw a semicircle from it.
mki, and, then, from the semicircle of the recess we draw a semicircle of the bottom of the skirt.

Another point to consider: the only middle seam of the skirt is at the hem and therefore will look tight. To avoid this, cut off the small "triangles" from the side of the edge (Fig. 2).
Cutting a semi-sun skirt for beginners can be simplified even more if you use a notch pattern for cutting.
As for fabrics, today half-sun skirts are sewn from almost all fabrics of the dress assortment. The only exceptions are, perhaps, only stretch fabrics with high elongation and fabrics that stretch strongly along an oblique thread (for example, chiffon).
Of the fabrics unsuitable for flared skirts, wedge skirts, skirts with a difference in length and "tatyanka" skirts are recommended.
Patterns of skirts and women's trousers
| |||||||||
A skirt is one of the oldest items of women's (and in some countries, men's) wardrobe, the basis of which is a rectangular piece of fabric attached to the waist. Simple models of skirts require minimal effort and time in order to turn a piece of fabric lying around in the closet into a stylish new thing.
Tutu - dancer's skirt
Unusual for our ear, the word tutu in English is called a ballet tutu, as well as fluffy tulle skirts that have become very popular. You don't need a sewing machine to make such an outfit. All that is needed to create a spectacular skirt for a children's party, dancing classes, a photo shoot, and, if desired, for a ballroom or even a wedding dress is about an hour and a half, a sufficient amount of tulle cut into stripes, an elastic band for a belt (2-3 cm wide ) and decorations.
It is best to use narrow tulle in strips 15 cm wide. The most convenient way to do this is with a cardboard template. The length of such a template should be equal to the length of the skirt plus 1 cm.
The creation of a skirt begins with a belt. Stretching slightly, determine the desired waist, add 4 cm and sew (Fig. 1).
After that, using a template, cut tulle strips, the length of which will be equal to twice the length of the skirt plus 2 cm. For a decorative effect, their ends can be cut off with a corner.
Then a ring of elastic is put on the back of the chair and strips of tulle are fixed on it (Fig. 3). To do this, fold the strip in half and pass both ends through the resulting loop. All knots must be made the same, in no case pulling the elastic band, otherwise the skirt will slide down.

For greater beauty, several colors alternate in the skirt. Approximately for a waist circumference of 60 cm, 70 strips are needed... The finished skirt is decorated with ribbons, artificial flowers and other decor (Fig. 4)

Romantic "Tatyanka"
The "tatyanka" skirt suits well skinny women with narrow hips. This model does not require the construction of patterns and fitting to the figure, it can be sewn, being able to perform only a straight line.
For "tatyanka" you will need a wide elastic band and dress fabric (not too dense). First, measure the waist with a thick elastic band, stretching it slightly. Add two centimeters to the measured length and cut off.
The ends of the elastic are trimmed, the resulting ring is stretched as much as possible and the resulting length is measured - it will be half the width of the finished skirt (in ordinary patterns, the width of the "tatyanka" is equal to one and a half thighs). The fabric is folded in half along the measured width (Fig. 5).

Then the sewn belt is fixed at the waistline and the desired length of the skirt is measured. Add allowances for the hem and attachment of the belt, and cut out a rectangle of the desired size.
The cut rectangle is folded in half with the front sides inward, the side seam is cleaved with pins and stitched.

Next, they tuck and process the bottom, after which they proceed to the most difficult operation - attaching the belt. To do this, on the skirt and on the elastic band, he marks 4 main points with pins - 2 lines of the side, the middle of the back and the front, after which they are combined.
Stretching the belt evenly, pin the skirt and the belt at intermediate points, and then trim them, stretching the elastic as much as possible. The best way to do this is with a zigzag stitch.

For kids' and beachwear, you can simply stitch off the tucked-up top of the skirt and thread the elastic into the resulting tunnel.

Pleated skirt
Bell skirts
Flared skirts fit any body shape... They look simple and elegant, are often built directly on fabric, have a minimum number of seams and require only two measurements - waist and length. The design of such skirts is based on a circle (sun), with a central opening for the waist. This circle, in turn, is cut out of a square, which, with a large length, requires a large consumption of fabric. More economical are skirts that are sewn from part of a circle, for example, a quarter-sun skirt. It is based on a square folded diagonally twice (fig. 9)

The upper cut of the skirt matches the waist line. Its length should correspond to the waist, so the radius of the upper circle is defined as twice the waist divided by three. For example, with a waist volume of 60 cm, this radius will be 60 * 2/3 = 40 cm. To this value, add the length of the skirt, for example, if the desired length is 110 cm, you will need fabric with a width of more than 150 cm and the same length.
On a folded piece of fabric, mark with chalk the boundaries of two partial circles. It is convenient to do this with a tape secured with a pin in the upper left corner of the fabric. The radius of the first part of the circle corresponds to the waist, as calculated above, the radius of the second is equal to this value plus the length, add seam allowances.
 Since the fabric can stretch during cutting, it is recommended to take the length of the upper radius a little less and adjust the size when sewing and trying on. This skirt has a small expansion downward, so you need to control the length of the arc corresponding to the volume of the hips, its radius will be 20 cm larger than the radius of the upper cut. If the hips are wide, you need to lower the upper cut line by 1-2 cm, and plant it when sewing. The skirt is connected along the back seam, into which a zipper is sewn, a belt is sewn on top, the length of which is 4 cm longer than the waist.

The semi-sun skirt is easy to cut and sew, it fits any body shape and looks simple and elegant... Its basis is half a circle (Figure 12), and the radius of the upper semicircle is calculated as the waist volume divided by 3, that is, with a waist of 60 cm, the radius of the upper semicircle is 20 cm.To determine the radius of the lower semicircle, add the length of the skirt to this number. That is, for a skirt 110 cm long, you need a rectangular piece of fabric, the width of which is more than 130 cm, and the length is more than 260 cm.

You need to cut such a skirt on a piece of fabric folded in half in half of the pattern, or by making markings directly on the fabric.

The flying sun skirt is very effective, it is suitable for slender women... It is cut on a full circle basis. The radius of the inner circle is calculated as the volume of the waist divided by 6 (10 cm for a waist of 60 cm), for the radius of the outer circle, the length of the skirt is added to this value.

A short skirt can be cut out of a square of fabric without side seams, in this case, its top is placed on an elastic band. Long skirts are cut from two semicircles, in this case, the consumption of fabric can be determined only by placing a pattern on it in the most dense way.

 Owners of a thin waist can be simplified by sewing by gathering the top with an elastic band (like in a “tatyanka” skirt). However, in this case, for the radius of the upper part, it is not necessary to take into account the volume of the waist, but the volume of the hips, which, accordingly, will increase the consumption of tissue.

Skirts are suitable for absolutely every woman, and age and complexion do not play any role in this. Skirts that have the maximum length are always in trend. When wearing such skirts, a woman looks attractive and charming, since maxi skirts are able to emphasize the seductive curves of a woman's figure, which makes the male half of humanity look around and stare at passing beauties in such an outfit. In our article, we will look at how to sew a maxi skirt with your own hands.
How to sew a maxi skirt?
Sewing a maxi skirt is not a particularly difficult task, but in any case, you will have to spend some time and put in a little effort. Since the skirt is long enough, you need to sew it carefully, without any flaws, otherwise the appearance of the product will deteriorate. The cut of maxi skirts is almost the same, but you can create interesting models that will visually differ quite strongly from each other.
For sewing this product, you must prepare the following materials in advance:
- fabric with a knitted base;
- an elastic band that is used for clothing;
- tape measure;
- scissors used for fabric;
- threads of a suitable color;
- sewing machine or needle and thread;
- sewing pins;
- pencil or tailor's chalk.
Taking measurements
Before you start sewing a maxi skirt, you need to take the appropriate measurements:
- We measure the circumference of the hips. To do this, you need to measure the volume of the hips with a measuring tape, which corresponds to the girth of the widest part of this part of the body. The tape should be parallel to the ground as you wrap it around your hips.
Important! At the time of taking measurements, you should slip your thumb under the measuring tape so that in the end the product does not turn out to be too small.
- After that, you need to take a measurement of the waist circumference. To do this, you need to measure the waist circumference with a centimeter tape, or, to clarify, find the area where the belt from the skirt is usually located. You should decide in advance on the model and specify how high the belt of your self-made skirt will be located.
Important! Your natural waist line runs along the narrowest area of your body, which is usually at the level of your belly button. In order to avoid a tight belt, it is necessary to slip your thumb under the measuring tape when measuring the waist circumference.
- Now you should determine the length of your product. To do this, measure the distance from the point of the waist to the ankles or to the area where you will have the end of the skirt with a measuring tape.
Important! For all maxi skirts, the length, which is measured to the ankles, is the standard. There are models of maxi skirts, in which the length varies from ankle to calf, which is also the length of the “maxi”.

Preparing the fabric
Let's consider how not to make a mistake in choosing a fabric for sewing a maxi skirt:
- The purchase of material on a knitted basis is the most ideal option for a simple and comfortable product. The knitted fabric is able to stretch a little, which is important when worn.
- You should choose a dark color scheme or a dense enough fabric so that the made skirt does not show through, otherwise you will have to wear another petticoat or make a lining. In the summer and hot autumn days, it is not very convenient.
- When you are in the store, try to determine how far the knitted fabric of your choice stretches. The best option is knitted fabric, which can stretch by 25-40%.
- When choosing a fabric, pay close attention to an important nuance - whether the fabric can stretch in all directions. This must be taken into account, as over time your product may become much longer and you will have to shorten it.
Important! You should not type a knitted fabric with a margin at that time if you accidentally made a mistake with the cut or with the calculation of the required amount of material. As a rule, a maxi skirt will need from 1.35 to 1.85 m of fabric.
- You also need to purchase an elastic band, which should be designed for sewing clothes. The width of the elastic should be about 7.6-8.0 cm.
- Before you start cutting and sewing knitwear, you need to wash and dry the fabric. This procedure will allow you to avoid further unnecessary shrinkage of the fabric during washing.
Important! In order for the sewn maxi skirt to serve you for a long time, you must adhere to the recommendations for caring for a product made from the selected knitted fabric.
Cut open
Consider the process of cutting and sewing a maxi skirt:
- Fold the knitted fabric in half. In this case, it is imperative to monitor the location of the shared thread so that the elasticity of the fabric is not disturbed and that the material is stretched in the right direction.
- Fold the fabric with the right side inward.
- The rows of knit stitches should be horizontal from one edge to the other, but never vertical.
- Now you need to set aside the top point and mark the bottom of the future product. The top section of one of the two main elements of the pattern should be half the width of the waist plus 2.5-4.5 cm for seam allowances.
- In this case, the lower part of the product should be 30.5-35.5 cm wider than your waist. Thus, taking into account the folded knitwear in half, the bottom of the cut part should be 15.5-17.5 cm wider than the top.
- All details of the skirt, as well as the upper, lower lines, must have vertical symmetry.
- Part marking should be done with a washable marker or tailor's chalk.
- Connect lines between the top and bottom of the product. Thus, the sides of the skirt are formed, which will diverge from the top of the product to the bottom.
Important! If, when cutting, you manage to lay out the knitted fabric in such a way that one side line is located strictly along the fold line of the material, then you can spend less time on sewing, since the number of seams is halved. If the drawing cannot be tilted normally to the fold of the knitted fabric, then the product is cut out with two side seams.
- If the pattern is built correctly, then you can start cutting out the details. To do this, you need to chop off two layers of material and cut out two parts that have trapezoidal shapes using tailor's scissors along the drawn lines.
Important! For smoother cuts, you can use a cutting mat and roller knife. The fabric must be cut very carefully so as not to stretch it. If the material is stretched during cutting, the cut parts are deformed.
Sewing:
- Now you need to sew the side seams. With the folded parts facing inward, the sides need to be sewn from top to very bottom, while it is necessary to retreat from the cuts about 1.25 cm.
- At this stage, you need to check the waist line. To do this, try on the product. If the waist is large, then you need to stab the excess fabric and lay new seams. If the waist is small, then you need to open the seams a little and lay new ones.
- If you are sewing on a sewing machine, then you need to set the straight stitch. If you do not have a sewing machine, you can sew by hand using a “back needle” stitch for greater strength.
- Now it remains to hem the bottom of the skirt. To do this, it is necessary to wrap the bottom edge of the product by 2.5 cm, having previously swept up the fold before sewing. You can sew the bottom edge of the maxi on a sewing machine. If using a manual hem, you can use a back seam or use a different stitch to hem.

Sewing on the belt
Let's consider step by step how to sew a belt on a maxi skirt:
- Cut out the fabric for the belt. The material for the belt should be exactly the same length as the waist, with a 2.5 cm seam allowance added.
- It is necessary to check that the share thread matches the share thread on the product.
- The piece of material for the belt should correspond to a width of about 25.4 cm.If you fold the piece in half, you get 12.7 cm.
- Sew the elastic into the belt. We pin the elastic to the inside of the belt. To fix it, we stitch it along right in the middle.
- The length of the elastic should be about 2.0-2.5 cm shorter than the waist, but when stretched it will reach the size of the waist. If you take an elastic band of the same length as the waist, then when worn, it will not hold on to the waist, since the product will be very loose.
- When sewing on the elastic, stretch it to match the ends of the belt material.
- Now fold the belt in half and sew. After that, we fold the front half of the belt to the side to which the elastic was sewn. We lay a line along the cuts of the material, after which we connect the belt using a line in a ring.
- When folding the belt in half to form a ring, the wrong side must be outward. The stitch should be sewn 1.25 cm from the edge of the cut. After that, you need to turn the belt over your face, thus hiding the seam allowances.
- Then you need to sew the belt to our product. To do this, with the wrong sides, you need to attach the belt to the upper part of the skirt and sew on a sewing machine.
- The connecting seam of the belt must be positioned in such a way that it is level with any side seam of the product.
- When you sew stitches, remember to allow a 1.25 cm allowance.
- We turn the product onto the front side, while the belt must be turned up.
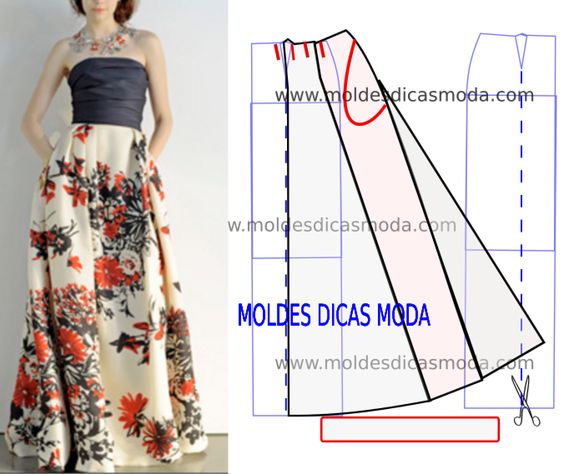
We sew a fluffy and voluminous maxi skirt
Consider how to sew a fluffy and voluminous model of a maxi skirt.
First you need to take measurements:
- measure your waist;
- retreat 5 cm from the waist and measure the girth by the bones in the same way;
- measure the length of the made clothes, which corresponds to the length from the starting point located on the waist line to the bottom of the future skirt.
Consider the process of making a future product:
- Cut out two rectangular fabric cuts from the material, which corresponds to the front and back. The length of the fabric is the length of your garment plus the seam allowances.
Important! Cut out semicircles on both sides of the two parts, which will later be pockets. In the direction they are located slightly below, and they should be large enough for the location of the hands. Basically, pockets are placed 20 cm lower than the waistline.
- Next, mark the center point of the pattern in width to form the folds. There should be 4 folds on each side of the skirt. First, you need to lay 2 folds in one direction, and then two in the other direction.
Important! The folds should be slightly sloping and even, but not parallel to each other.
- After that, you should make exactly the same folds on the second part, which corresponds to the back of the maxi skirt.
- We sew the folds very close to the edge of the product, in this case the seam looks neat.
Important! If using a sewing machine, use a slow speed.
- We fold both patterns with the front sides and sew along the edges, we also sew the pockets. We do not sew a seam over any pocket, since there will be a secret lock in this place.
Important! First you need to try on future clothes so as not to be mistaken in the size of the waist. Only then can a zipper be sewn into the cut.
- In order for the product to lay down neatly on the bones and not puff up, it is necessary to pay attention to the line of the hips and the width of the belt being made.
- We cut out a strip from the main material that corresponds to the length of the waist circumference and plus allowances of about 10-15 cm. We apply the front side of the cut out part to the front side of the product and sew from one edge of the secret lock to the other. Next, along the seam, fold the belt inward and iron it. Sew up the edges near the zipper. From the seamy side, this piece of material is simply left free, or it can be fixed on the tucks of the formed folds so that it is not visible from the outside.
- We bend the bottom of the manufactured product, iron it and sew on a sewing machine.
Your self-sewn maxi skirt is ready.
How to sew a maxi skirt from an old dress?
Consider the option of a sewn product without a preliminary pattern. Any novice needlewoman without special skills can very easily and quickly sew a maxi skirt, while she does not need to purchase special fabrics.
In order to independently make an interesting outfit, we need:
- a dress that has long gone out of fashion;
- an old T-shirt that matches the color scheme;
- scissors for fabric;
- sewing pins;
- pencil or tailor's chalk;
- sewing machine or needle and thread.
Consider the manufacturing process:
- In the dress, you need to cut off the top that matches the length of your future skirt. If the model of the dress has darts, then you need to cut off below the darts line.
- Next, in an old T-shirt, cut off the bottom processed edge.
- Then you need to cut off the middle part of the shirt, which is about 25-35 centimeters wide.
- After that, you need to measure the size of the waist. In the case of wearing a skirt on the hips, you must use the size of the hips, which should be halved and set aside on the workpiece. A line should be drawn with a pencil or chalk, then chopped with sewing pins and stitched on a sewing machine. Cut off the rest of the material.
- Thus, you have formed a belt for the future product. Next, fold the workpiece in half so that the front side is outside.
- After that, it is required to put the top of the future outfit inside the belt and connect in such a way that the raw edges of the belt and skirt are in a circle. The side seams of the future skirt should be aligned with the side seams of the belt.
In this article, we have offered you several ways to sew a maxi skirt, and you should make sure that they are all simple. Other options are also not particularly difficult, so you can choose a model of your choice and act, creating new things for yourself!
If you decide that you will sew a fluffy maxi skirt, then the most important thing is to choose the right fabric: it should be dense, only in this case the pleated skirt will be voluminous. Thick heavy satin is best suited for sun skirts and voluminous maxi skirts, a more expensive material is mikado fabric (silk).
How to understand how much fabric you need for a skirt: on average, a voluminous pleated skirt will need from 2 to 3 meters of fabric if your clothing size is from 42 to 46.
You will also need a secret lock, threads to match the fabric, and sewing tools, of course.
We sew a fluffy and voluminous maxi skirt according to the pictures
First, take your measurements:
- measure your waist;
- step back 5 cm from the waist and also measure the girth (by the bones);
- measure the length from the waistline to the hemline of the future skirt.
Step 1:

Cut two rectangular cuts from the fabric (back and front). Piece length is the length of your skirt + seam allowances. Cut out semicircles on both sides of both pieces - future pockets. They should be directed slightly downward, the hand should fit in there. As a rule, pockets are made 20 cm below the waist line.
Step 2

Mark the center of the part across the width to fit the folds. There will be 4 pleats on each side of the skirt. First fold two folds to one side and then two to the other - they should be even and slightly sloping, not parallel to each other. Pay attention to the received width of the waist and hip lines so that the underwired skirt fits neatly and does not bulge.
Then fold the same folds into the second back of the skirt.
Step 3
Sew the folds as close to the edge as possible to keep the seam neat. It is better to use a slow speed on the sewing machine for this.
Step 4

Fold both skirt pieces right side in and sew along the edges (including the pockets). Do not sew a seam over one of the pockets - a secret lock will be inserted there.
Step 5
Measure your skirt to make sure it fits you. And only then sew a zipper into the cut.
Step 6

Cut a strip from the main fabric with a length equal to the waist circumference + allowances, about 10-15 cm wide. Attach it with the right side to the front side of the skirt and sew from one edge of the zipper to the other. Then fold this belt inward along the seam and iron. Sew the edges in the zipper area. From the back side, this piece of fabric can be simply left free, or fixed on the tucks of the folds, but only so that it is not visible from the outside.
Step 7
Fold up the hem of your maxi skirt, press and sew.
That's all, you are great - you yourself sewed a fluffy maxi skirt with your own hands. Of course, this is a simple and not the most impeccable option, but it will be perfect if you urgently need a festive skirt.

Fluffy maxi skirts are now in trend - they can be worn not only for a social event or holiday. great for summer walks or going to work.