Irish lace knitting lessons. Master class on knitting an Irish lace motif
IMG_5257-1.jpg.
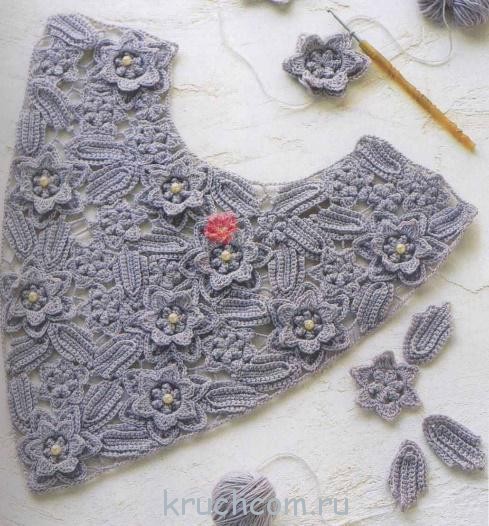
Here it is my first dress in IR.
Next, I will describe how it came to me. maybe my work will be useful to someone
I was inspired by Irish lace from the Internet, I decided to try to make it for myself in the same style.
I have not worked with Irish lace yet, but it will be all the more interesting.
To begin with, I knitted samples of some motifs that I like and are not particularly difficult to perform.
Below is a detailed description of each of them. 
WP_20160515_10_10_46_Pro.jpg
Here one skein of 50g is untied.
Threads Violet from YarnArt. 
WP_20160601_18_52_28_Pro_1.jpg 
WP_20160520_11_35_58_Pro.jpg
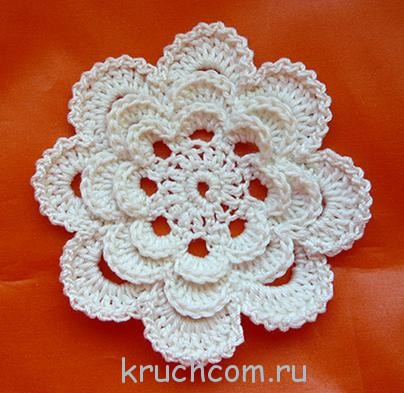
These are multi-layered flowers, how many are obtained from one hank.
I knit the rest of the skein or small elements or, like here, a twig for how long the thread is enough. 
WP_20160520_11_36_36_Pro.jpg
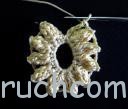
Flower knitting:
Dial 6 in. n. connect into a ring.
1r. Three lifting loops, 15 double crochet in the ring.
2r. 8 arches of 3 air loops with fastening with a single crochet.
3r. Above each arch we make a petal. the first and last single crochet, and in the center 5 tbsp. with a crochet.
4r. 8 arches from 5 c. p., with fixing under between the leaves of the previous layer.
5r. Above each arch we make a petal. the first and last single crochet, and in the center 7 tbsp. with a crochet.
6r. 8 arches from 6 c. p., with fixing under between the leaves of the previous layer.
7r. Above each arch we make a petal. the first and last single crochet, and in the center 9 tbsp. with a crochet.
If the description is not very clear, there are many schemes of similar flowers.
Here you can fantasize with the number of layers and the shape of the petals 
.jpg
This is a leaf diagram. I'll post more details with pictures.

WP_20160522_13_04_51_Pro.jpg
1. tie a chain 16 in. connect in a ring, tie with 24 tbsp. b \ n, and make 3 lifting-turn loops

WP_20160522_13_07_27_Pro.jpg
2. Rotate the work. Skip one lower st b\n. Knit 11 st b / n, capturing both pigtails.
Arch of 5 air loops. Skip one lower st b\n. Knit 11 st b / n, capturing both pigtails.
3 lifting loops.

WP_20160522_13_10_47_Pro.jpg
3. Rotate the work. Skip one lower st b\n. Knit 10 st b / n, capturing both pigtails.
Then four st b / n under the loops of the arch. Arch of 5 air loops. And three more st b / n under the loops of the arch. Further
we continue knitting st b / n, we stop without knitting 2 st b / n to the edge and make three lifting-turn loops.

WP_20160522_13_13_23_Pro.jpg
4. Rotate the work. Skip one lower st b\n. Knit st b / n in each lower. Three Art. b / n under the loops of the arch.
Arch 5th c. n. and four more st. b\n under the arch. At this stage, be careful.
On the side where we knit three columns under the arch, a concave one will form, where four is the convex edge of the leaf.
After four art. under the arch we continue knitting, not reaching two tbsp. to the end.

WP_20160522_13_16_40_Pro.jpg
5. Rotate the work. Skip one lower st b\n. Knit st b / n in each lower. Four st. b / n under the loops of the arch.
Arch 5th c. n. and three more st. b\n under the arch. We continue knitting, not reaching here and in the next rows for three tbsp. to the end.
We make three loops of lifting-turning.

WP_20160522_13_20_59_Pro.jpg

WP_20160522_13_25_16_Pro.jpg

WP_20160522_13_29_47_Pro.jpg

WP_20160522_13_34_26_Pro.jpg

WP_20160522_13_39_28_Pro.jpg

WP_20160522_13_45_06_Pro.jpg

WP_20160522_13_50_25_Pro.jpg
6.--12. We continue to knit everything in the same way, guided by the principle, after turning at the beginning of one st. skip,
under the arch we knit 4 tbsp with a convex and 3 from the concave side and at the end three tbsp. unbindable.
We continue to knit until the leaf reaches the desired size. I like the number 12. One large + 11 small holes.

WP_20160522_13_57_58_Pro.jpg
13. We untie similarly to the previous rows, but already under the arch we make only 7 tbsp. b\n.

WP_20160522_14_02_20_Pro.jpg
14. we untie in the same way, but on the rounding we do 2 tbsp. b \ n surplus, so that the round edge does not pull.

WP_20160522_14_05_00_Pro.jpg
15. Well, we knit the final row to the middle of the rounding, the last st. replace it with a blind loop and fix it.
A blind loop will allow you to finish knitting nullifying.

WP_20160522_14_06_23_Pro.jpg 
WP_20160522_14_06_37_Pro.jpg
In the process of knitting, the leaf is very spinning, so it looks unsteamed.

WP_20160523_17_41_40_Pro.jpg
50 gr leaves and small parts from the rest
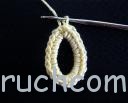
Next is a small MK motive "Curl" 
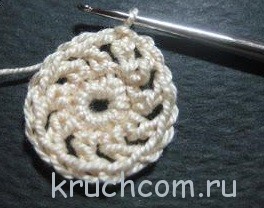
WP_20160525_14_19_47_Pro.jpg
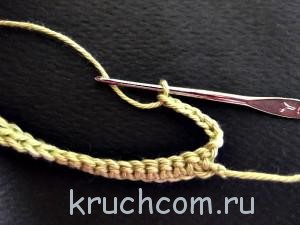
1. Tie 20 cm of cord "pigtail". Make 3 lifting loops. Link Art. s\n

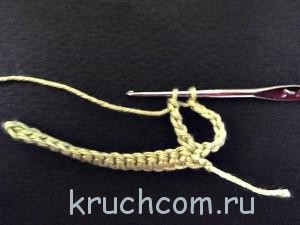
WP_20160525_15_54_28_Pro.jpg
2. Wrap around the column. I do 5 pairs of twists. In total, knit 12 entwined columns in each loop of the pigtail.
Thus, the pigtail lies in a circle.

WP_20160525_16_03_25_Pro.jpg
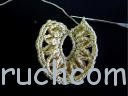
3. Tie 9 more twisted columns with fastening through one loop into a pigtail,
so that there is no further rounding or it is minimal.

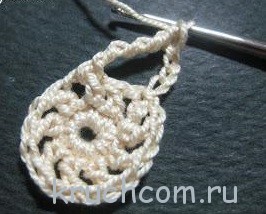
WP_20160525_16_06_19_Pro.jpg
4. Next 3 tbsp. s \ n in two steps, 3 tbsp. s \ n in one go, 3 tbsp. b\n. and further to the end of the motive with deaf loops.

WP_20160525_16_13_08_Pro.jpg
5. Rotate the work. Tie with arches from 3 c. p., fixing Art. b \ n between entwined columns,
and in the area of \u200b\u200bdeaf loops in every third.
Fasten with a blind loop opposite the fourth entwined column. to form a loop.

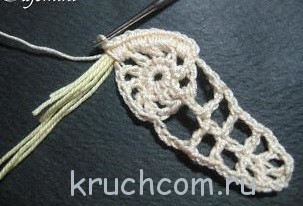
WP_20160525_16_26_09_Pro.jpg
6. rotate the work. Make a strapping of arches: 2 tbsp. b\n, 3 c. p., 2 tbsp. b\n.
Finish with a blind loop.
This is such a cute and not at all complicated curl

WP_20160530_16_54_44_Pro.jpg
50gr. curls.
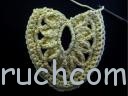
Next I will knit a large openwork shell 
WP_20160601_22_45_39_Pro.jpg
1. Tie a pigtail about 32cm - 100 loops

WP_20160601_22_56_30_Pro.jpg
2. 3 lifting loops and st. c \ n in the first loop of the pigtail. 2 in. P..
Then knit two tbsp. c \ n in every second loop of the pigtail,
alternating with two n. knit 25 pairs.

WP_20160601_23_04_27_Pro.jpg
3. Continue to knit pairs of columns, but already alternating with one in. n. to the end of the pigtail

WP_20160601_23_21_25_Pro.jpg
4. Rotate the work. Tie arches st. b\n: 3pcs under 1c. n, 4 pcs under 2c. P.
Fasten in a ring opposite 21-22 pairs of columns, so that it fits nicely in a circle.
Knit 3 blind loops in pigtail loops

WP_20160601_23_27_10_Pro.jpg
5. Art. b \ n in the third loop of the strapping of the arches. again 3 deaf loops in a pigtail.
St s \ n in the third loop of tying the arches.
thus knit six tbsp. s\n.

WP_20160601_23_39_03_Pro.jpg
6. Next, knit 4 deaf loops in a pigtail, and go to the columns with two crochets,
to loosen the shell a little. Make a tie at the end of the braid
three st. b\n the last column of three air loops. Secure the end of the work with a blind loop.

WP_20160601_16_33_46_Pro.jpg
I imposed almost half of the volume.
I start to indulge, I scattered motives on the dress,
I appreciate what happens.
Bought 12 skeins in total. This is scattered 4 skeins.
So the second half will go somewhere the same.
The remaining threads for the assembly and possibly a small sleeve,
will be seen along the way.
I hope to meet 12 skeins
Another motive "spiral"

WP_20160605_15_23_19_Pro.jpg
1. Wind 3 turns of thread around your hand. you can use a template: a book, a ruler, etc.
The final size of the element will depend on the length of the wound thread.

WP_20160605_15_25_38_Pro.jpg
2. Knit 2 tbsp. b\n under three threads.
Thread an auxiliary thread to make it easier to keep the work at the beginning.

WP_20160605_15_27_09_Pro.jpg
3. Knit 5-7 tbsp. b \ n already under all six threads

WP_20160605_15_27_58_Pro.jpg
4. Pull out the auxiliary thread and move the knitted posts to the edge,
so that the hole closes at the beginning and so that the turns lie more tightly.

WP_20160605_15_43_34_Pro.jpg
5. Continue knitting with columns, every 10-12 columns I shift them slightly compacting,
as much as pleasing to the eye.
When the row ends, I insert an auxiliary thread so that the work lies more comfortably in my hand

WP_20160605_15_50_37_Pro.jpg
6. Knit to the end, pull out the auxiliary thread
and knit another 5-6 columns in the extreme loop.
Fasten and cut, leaving 50 cm of free thread, thread it into a ketel needle.
Or any with a large comfortable ear.

WP_20160605_15_53_17_Pro.jpg
7. Next we will sew. We lay out the laces in a circle and sew the pigtails behind the loops.

WP_20160605_15_59_59_Pro.jpg
8. This is the front side.

WP_20160605_16_07_20_Pro.jpg
9. We continue to sew as much as we like. Either to the end or leaving a ponytail.
I'll leave a little tail for now.
When assembling the dress, you will see what to do with it next.

WP_20160608_16_35_23_Pro.jpg
Berry or button, as you please.
1. Wind 10 turns on a pencil.
2. 3. 4. Knit three rows of single crochets over each other, sticking the hook always in the center.
You can knit more until the hole in the center closes.
The volume of the berry depends on this.
I plan to use this element immediately.
Therefore, I immediately make two lifting loops.

WP_20160608_16_41_11_Pro.jpg
I turn the button inside out on the face, from this side it looks more convex.
I attach it to the shell inside with a deaf loop, make two more deaf loops, for a total of three deaf loops in a pigtail.
Then, in a button, a double crochet and so we alternate almost to the end.
At the end, I make the columns longer, I determine by eye, one column with two crochets,
and two more columns with three crochets. Trying not to pull and lay down nicely.

WP_20160609_13_52_13_Pro.jpg
Untie the fifth hank
In the comments there was a question about the number of the hook. I find it difficult to answer.
I have an old Soviet set for 4 rubles 50 kopecks. I use the smallest one.

WP_20160623_12_15_11_Pro.jpg

WP_20160626_11_58_28_Pro.jpg
Another skein of curls.

WP_20160714_12_56_56_Pro.jpg
Another skein of leaves.
It turns out a lot of dense elements.
I decided to introduce another easier one.

WP_20160713_10_43_26_Pro.jpg

WP_20160713_10_46_22_Pro.jpg

WP_20160713_10_50_44_Pro.jpg

WP_20160713_10_54_42_Pro.jpg

WP_20160713_11_10_09_Pro.jpg
And Here is the release of one hank of violet with this flower.

WP_20160713_11_10_11_Pro.jpg
For further work, assembly of the product, it turned out that additional devices would be needed.
I made them myself in a couple of days.

WP_20160715_17_34_09_Pro.jpg
These are oval pillows for placing under the recesses of the buttocks and hips.

WP_20160715_20_09_41_Pro.jpg
This is a 33/40 cm rectangular tablet for collecting straight sections.
For convenience and rigidity, plywood is inserted inside.

WP_20160716_14_14_33_Pro.jpg
Focusing on the size of my cups, I made two hemispherical pillows,
for convenience of work in the field of chest tucks.

WP_20160716_16_21_22_Pro.jpg
Such a set of pillows for work turned out.
On the advice of experienced craftswomen, I decided to use foam rubber.

WP_20160721_21_51_36_Pro.jpg
Now the manufacture of the basis for the work, on which the elements of lace will be swept.

WP_20160722_01_37_34_Pro.jpg
All elements are laid out on the base and swept inside out to themselves.

WP_20160722_01_37_47_Pro.jpg
Since I have, well, not a model figure at all. And I know from experience that the most interesting
it's like a product will sit on a real person.
In the magazines, they are all super beauties.
So for those who are curious, here are my parameters, height 153, hips 104, chest 88, waist 74.
For edging the neckline and the zipper line, I used a cord based on a pigtail,
tied on both sides with a crustacean step.
In the process of basting, I still had to tie the elements. not enough.
And I decided that they should be dense.
as a result, the elements took 10 skeins of Violet threads from YarnArt 282m in a 50 gram skein.
The dress is already tangible, weighs half a kilo.
I'm moving on to assembly.
I decided to collect with the help of a needle with the same thread, in other words, to sew a mesh.
Working with a tablet looks something like this, we prick a straight section.
We sew. We break off. We are moving. We prick the next section.

WP_20160814_17_01_16_Pro.jpg
On the undercuts, for convenience and greater anatomical accuracy of the product, we use pads.
So he got rid of the front of the dress.

WP_20160904_17_46_22_Pro.jpg
And back

WP_20160904_17_46_51_Pro.jpg
The view from the inside wrinkles a little, because when we prick on the tablet, we stretch the elements and the canvas a little.
don't let that bother you, the better it will fit.

WP_20160904_17_47_40_Pro.jpg
We assemble the sleeve in expanded form on the tablet

WP_20160917_18_33_09_Pro.jpg
We sew the mesh of the sleeve.

WP_20160920_09_48_28_Pro.jpg
Stitch the side seams of the sleeves.

WP_20160920_10_51_17_Pro.jpg
We sew the sleeves into the armhole.

WP_20160920_15_46_32_Pro.jpg

WP_20160920_15_46_56_Pro.jpg

WP_20160920_15_52_29_Pro.jpg
Using a small pad, we begin to sew the mesh along the side seam of the sleeve and armhole.
here you will have to tinker, piercing the product in small sections due to the complex shape of the armhole.
But it's worth it!!! do not neglect the accuracy of the cut, the product will thank you later,
And sit down on the figures like a glove

WP_20160920_16_30_17_Pro.jpg
Further, after the entire mesh is sewn,
I washed the dress by hand and without ceremony
on the spin cycle 800. the dress is cotton, dries for a long time.
it is better to dry in a warm place.
then ironed without removing from the base.
And then she cut off the basting.
I will not describe the manufacture of the lining.
who knows how to sew will sew.
Who does not know how, order a dressmaker.
Tip, the lining also needs to be sewn according to the figure.
I used the same pattern as for the base.
do not forget to allow for freedom of fitting, so that
when walking, the dress did not crawl up.
Lace and lining were connected by hand along the line of the neckline and zipper.
This is what the dress looks like from the inside.

WP_20161005_11_21_50_Pro.jpg

WP_20161005_11_22_07_Pro.jpg

WP_20161005_11_23_00_Pro.jpg

WP_20161005_11_23_10_Pro.jpg
I decided to sew a slit on the back of the skirt with a flower, but I left a slit on the lining,
the lining is not jersey.
The dress is not long plus elastic, there is no discomfort when walking.

WP_20161005_11_36_55_Pro.jpg
A little close up.

IMG_5257-f.jpg
And this is all that remains of 12 skeins of thread. almost back to back.

WP_20161005_12_04_10_Pro.jpg
Well, here is the finish line. Thank you for your patience to read to the end.
Good luck to everyone in all endeavors.
And pleasure from the work done.

IMG_5314-1.jpg
Irish lace (or Scottish) is one of the oldest and most complex arts in the world. For beginner craftsmen, it will be quite difficult to knit a product using this technique the first time. But a person has serious motives, for example, he wants to make a special gift to his loved one with his own hands, then he will definitely succeed. In addition, on the Internet you can find patterns and patterns for crocheting Irish lace.
Irish lace (or Scottish) is one of the oldest and most complex arts in the world.
This needle skill is to tightly connect separately related elements into a single composition. The knitting is very dense, and the patterns are beautiful.
There is an opinion that only experienced knitters can knit Irish lace. We cannot agree with this, because if you correctly follow the knitting patterns and do everything according to the description, you will be able to do a wonderful job. Let at first it will be a small leaf or a snowflake, but over time, you can learn how to knit a dress or sundress with the technique of Irish lace.
This craft has classic elements:
- Bunch of grapes.
- Shamrock.
- Leaflet.
- Round leaf.
- Rose.
- openwork flower, etc.
Gallery: Irish lace (25 photos)


How to quickly knit a product using the Irish lace technique (video tutorials)
What tools need to be prepared?
- Hook. This is the main tool for such knitting. It should be selected for the threads that are used in the work.
- Threads. For such knitting technique, you need to take three types of threads in thickness. The pattern itself is knitted from a thread of medium thickness, a thin thread is taken for the mesh, and the thickest thread for the warp.
- Scissors.
- Needle (optional).
- Paper template.
Work begins with knitting those elements that will make up the finished pattern. Often beautiful patterns are obtained while knitting a thick and medium thread together.

Tools may vary.
Each knitted element is fixed on a paper template. This action should be mandatory, because, even despite the density of knitting, the element may unravel if it is not fixed.
When all the elements are done, they should be fastened with a horse mesh. Parts are placed face down on paper.
Irish lace for beginners: step by step instructions
When a person is just starting to engage in such a craft, he should start with fairly simple schemes. For example, you can tie a small flower.
Step-by-step instruction:
- At hand, the master should have a rather thick elongated object. For example, you can use a pencil or a knitting needle. Thread should be wound around the object. You need to do this several times.
- After that, the resulting ring is removed from the base.
- It is necessary to knit 30 columns in it. Single crochets are made.
- To knit a bourdon, a thick thread is needed, but if it is not there, then the usual thread should be folded. It is imperative to think over the supply of thread, because if it is not enough, it will be difficult to fix the product in order to finish working on it later.
- Then the flower petal is knitted. To do this, you need to form 1 air loop for lifting. A flower can have as many petals as you want, but for beginners it is better to make a few to master this skill.
Crocheted Irish Lace: Master Class
Master Class:
- The first step is to tie the initial chain of lace. With a slip knot, the thread is attached to the hook, after which 21 air loops are knitted. A lot of thread for the initial chain should be allocated, since if it is not enough to collect all the loops, then the row will have to be tied up.
- An additional loop in the row must be required. It is necessary to rotate the product when knitting. It is not necessary to knit in anything, its main purpose is to align the edge of the lace.
- Then a series of elongated loops is made. The hook is led to the next loop in the row from it, while it grabs the yarn and stretches it. Please note that the size of the buttonhole depends on the size of the stitch. Thus, the tighter the lace is knitted, the smaller it will turn out.
- This action is repeated throughout the chain. After knitting the last row, an additional loop is moved to the knitting needle from the hook, after which 21 loops are pulled there.
- Then the loops should be grouped. 5 of them are crocheted and the yarn is pulled out. An air loop is formed. There should be 4 of them. To simplify the task, the loops should be well drawn out.
- The columns are knitted without a crochet in elongated loops. 5 rows should be knitted. The action is repeated until the end of the row.
- After moving to a new row, the columns continue to be knitted without a crochet.
- Knitting continues until the product reaches the desired size.

Knitting in this technique is not so difficult
At the end, the thread is threaded through the last loop and cut with scissors.
Technique and principles of Irish lace
Work starts with the right pattern. If a wardrobe element is knitted, then the pattern should ideally match the figure. If you make even minor flaws, then later you will have to redo the work for several hours. Therefore, each pattern must be built individually.
Many novice craftsmen cannot understand what to do with the threads left over from the motives? There are a lot of these threads left, so for some they become a problem. Everything is not as difficult as it seems at first glance. It is enough to take into account in advance that the threads should remain more than necessary for the yarn, since at the end it will need to be cut off by threading it into the last loop.

Work starts with the right pattern
Another important point in Irish lace is the knitting of motifs. During this, you always need to control the level of thread tension. If it is too tight, then the product will turn out to be narrow and small, and if on the contrary, it will be loosely stretched, the product will be shapeless.
To add zest to the work, you should use threads of different thicknesses. So the work will be more beautiful. A mesh should be made from a thin thread, and separate elements of clothing should be knitted with a medium thread.
What mistakes do beginners make in Irish lace technique?
- Wrong thread color. Many mistakenly believe that the color range of threads in one product, knitted with Irish lace, should be varied. This is not true. So that a person in such yarn does not look like a Christmas tree, it is enough to use a maximum of 3 colors when knitting. But these colors should match well.
- Lots of motives. Many novice craftsmen make motives "in reserve", wanting to test themselves. This is wrong, especially if clothes are knitted. For example, a blouse that is not knitted according to a pattern can simply hang on the body. It's not beautiful.
- Sheer knit. It must be remembered that the technique of Irish lace involves a fairly transparent knitting. Therefore, if a jacket is put on, connected by this technique, then under the bottom you need to wear a turtleneck or T-shirt. If there is a desire to wear just a jacket, without anything underneath, then the knitting should be tight enough, then the product will not be enlightened.
Irish lace: the basics of knitting flowers (video)
Yes, Irish lace is not an easy knitting technique, but anyone can learn how to master it. As the saying goes: "There would be a desire." If you practice long enough, you can not only tie a small flower with Irish lace, but also make a wonderful sweater, scarf or sundress according to mk.
Irish lace is an ancient crochet technique dating back to the 14th century. It was in those days that Irish typesetting canvases were born, the relevance of which has not been lost today. On the contrary, products decorated with Irish lace or completely knitted from the motifs of this technique reflect the current trends in knitted fashion, while adding a luxurious zest to the female look.
Many needlewomen avoid lace knitted according to Irish motifs, because working on them is incredibly painstaking and requires virtuoso crochet skills from the craftswoman. However, you should not avoid Irish fabrics, the main thing is to try once, fortunately, today a huge number of master classes on knitting products with Irish lace are offered to the attention of needlewomen.
The basic principle of the Irish lace fabric is its execution from separate motifs (leaves, flowers, openwork cords, paisley cucumbers, other plant elements), which are subsequently combined into a single composition using an openwork grid (regular or irregular).
Before you start Irish knitting, you need to carefully select the materials: yarn and hook. You need to choose a thread taking into account its stiffness and thickness. To knit Irish lace, it is better to immediately stock up on three types of threads in thickness: thick (for making dense volumetric patterns), medium (for knitting most of the lace patterns), thin (for tying the future product with a net).
If the lace is knitted from silk or fine cotton yarn, it is better to take a hook with a diameter of no more than 1-1.2 mm, this is the only way you can forget about the need to constantly monitor the tightness of the loops. In order to get larger motifs and thick yarn, it is better to use hook No. 1.5-2.

The pattern of any product made using the technique of Irish lace is knitted from motifs that are interconnected using a thin openwork background (mesh), forming a type-setting canvas.
In order to get to know Irish lace better, and at the same time practice knitting the most popular motifs, we suggest picking up a hook, thin yarn and following the detailed instructions given in the master classes below.
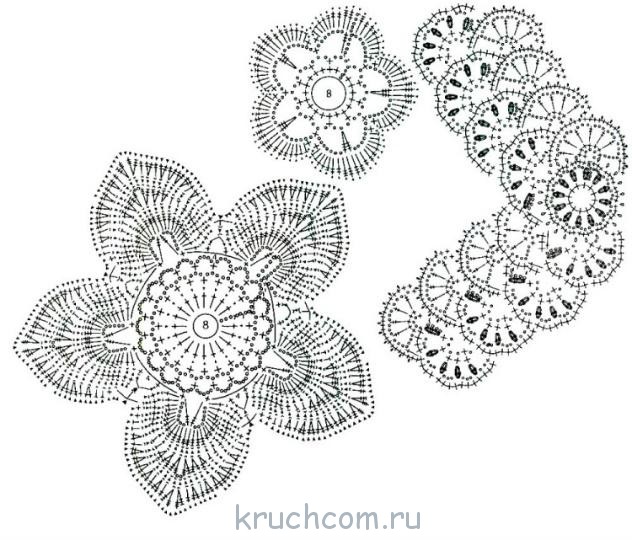
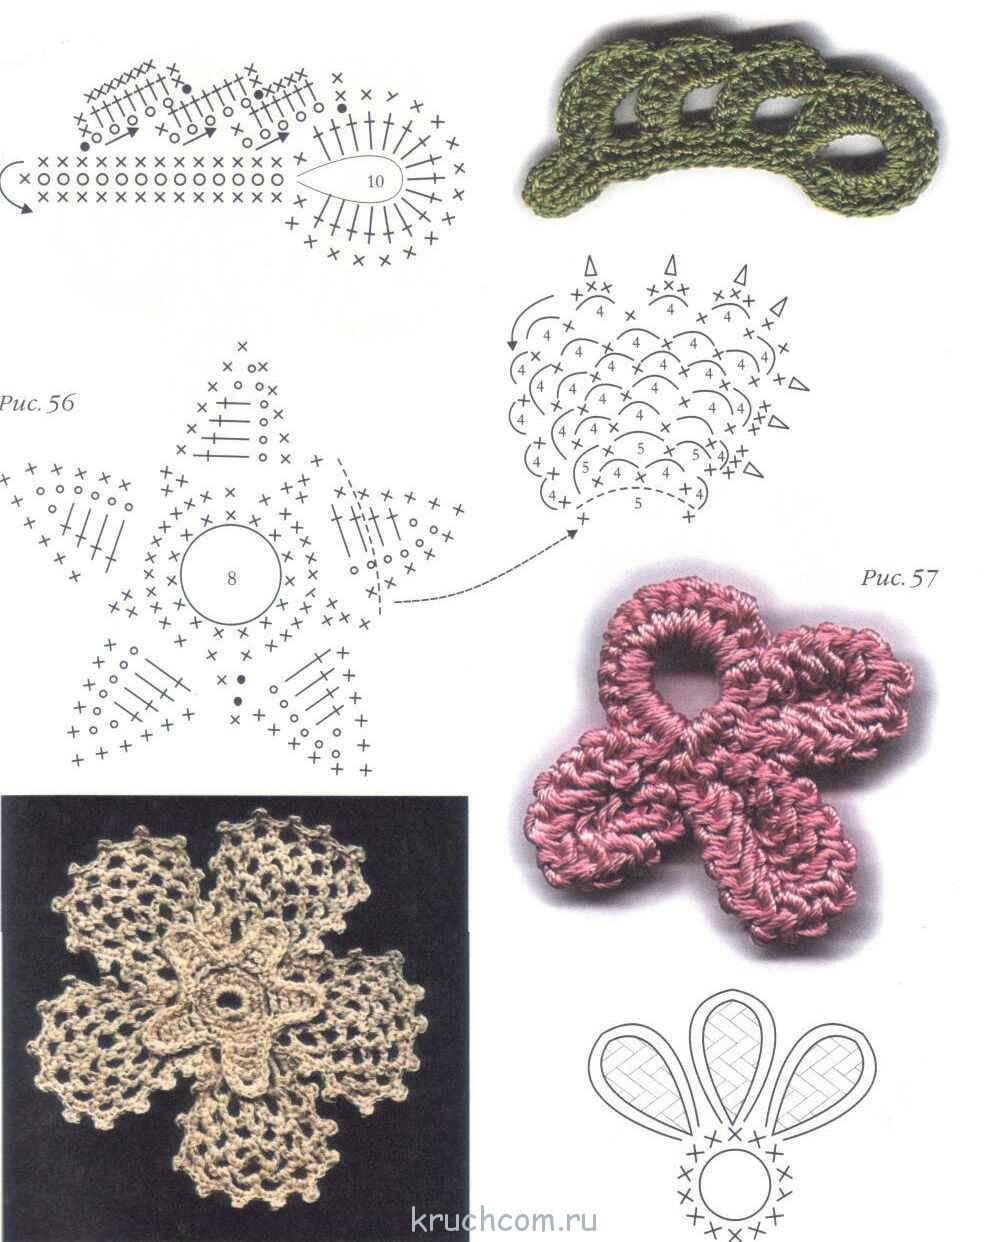
Volumetric three-tiered flower in the technique of Irish knitting
Volumetric multi-row flowers are one of the most popular motifs of Irish knitting, for many they are an indicator of the use of this technique on the finished product.
Such a floral element is called the "Irish rose". There are countless variations of knitting a motif, and if you understand the principle of knitting it, then anyone, even a beginner needlewoman, can easily modify the shape of a flower by changing the shape of the petals and increasing / decreasing the number of tiers.
The flower is knitted from soft yarn, for greater rigidity of the edge of the petal, you should crochet a number less than the thickness of the thread, or use a bourdon (thicker base thread).
Knitting pattern:
Conditional abbreviations in the text:
- VP - air loop;
- runway - runway lift;
- SS - connecting column;
- RLS - single crochet;
- CCH - double crochet;
- С2Н - double crochet;
- С3Н - a column with three crochets;
- PR - previous row;
- PS - half-column.
1) We collect a chain of 5 VPs, connect them into a circle with the help of the SS, tie the ring with the 8th RLS.
2) We knit 2 CCHs into each loop of the PR - in total we should get 16 CCHs.
3) We knit in rapports: 5 VP + 2 RLS in the next 2 loops of PR. We finish the row. We get 8 petals.
4) We make the strapping of each petal: 1 RLS + 5 CCH + 1 RLS, in the jumper between the petals - 1 PS.
5) To give the flower volume, the petals are knitted with relief columns.
Densely arranged petals are superimposed on each other, due to which a three-dimensional effect is created.
So, we knit the second tier of petals: 7 VP + embossed column, exciting PR column at work. We repeat the row with rapports until the very end.
6) We tie all the received arcs of the second tier with rapports: 1 RLS + 7 CCH + 1 RLS; in the loop between the arcs we knit 1 PS. The second tier is ready:
7) We knit the third tier of petals: an arc of 10 VP + a relief column, an exciting column of PR at work. We repeat the row with rapports to the end.
8) We tie each received arc of the third tier with rapports: 1 RLS + 10 CCH + 1 RLS; in the loop between the arcs we knit 1 PS. The third tier is ready:
9) We tie the edges of the petals of the third tier with rapports: 1 PS + 1 VP. Motive completed!
In order to get acquainted with the process of knitting three-dimensional Irish flowers in real time, we suggest watching a vivid selection of video tutorials on floral motifs:
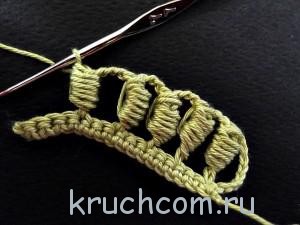
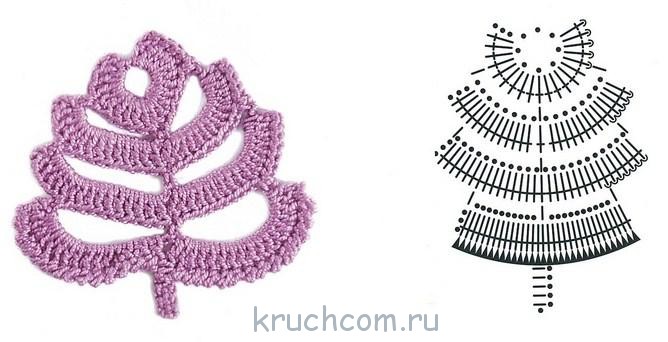
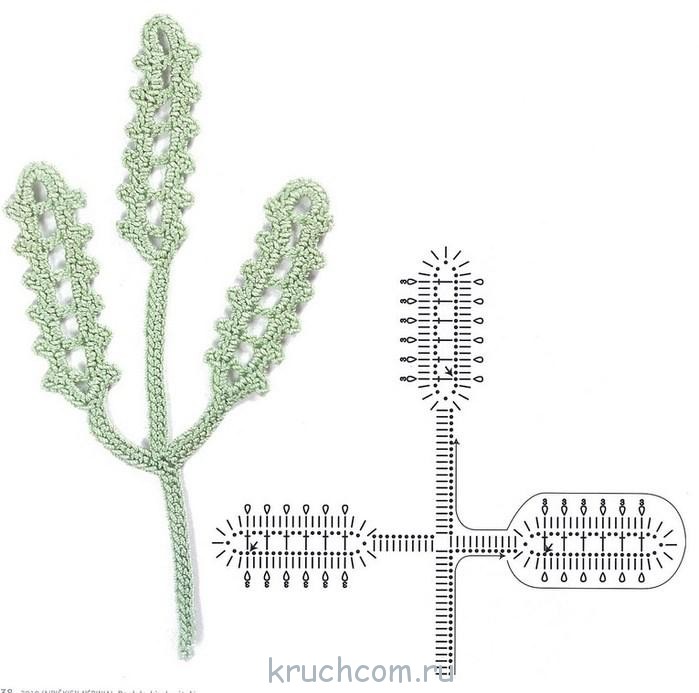
Fantasy leaf with lush columns

No less floral motifs such elements of Irish lace as leaves are in demand. They can be very different - both openwork flat and ornate voluminous. We bring to your attention step-by-step instructions for knitting such an original leaflet:
Working process
1) We collect the basis-chain of 18 VPs (it can be either more or less, the size of the sheet depends on it in fact).
2) We knit a row of RLS along the chain from the VP, but skip the last VP.


3) Turn the knitting over, pick up a chain of 8 VPs.
4) We perform С3Н, skipping two loops in the base chain. We do not knit the last loop of the column and loop.
5) We make eight threads around the column.
6) We drag the main thread through all the twists, but in order to get a magnificent column, it is better not to tighten the thread too much.
7) We knit together two free loops.

8) We collect 3 runways, we do this after each volumetric column.
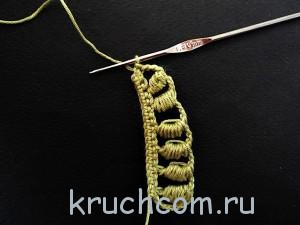
9) We knit the next C3H, skipping 2 loops at the base of the leaflet.

10) We repeat all the steps with threading the column. By analogy, we knit two more such magnificent columns with 8 twists.

11) We knit the fifth volumetric column CCH, we make 6 threads on it.
12) We knit the sixth column PS + 5 twists.

13) We finish the row: 5 VP + SS in the last loop of the leaf base.
14) We tie the second part of the base of the sheet in the same way as the first part, but in the opposite order.

15) We end with a chain of 8 VP + SS.
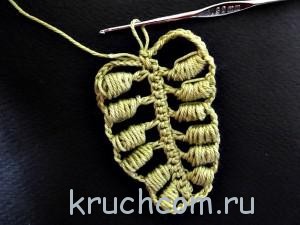
16) Then - we tie the arches between the posts - we knit RLS.

17) We collect a chain of 18 VPs, using it to create a leaf stalk.

18) We turn the knitting over, tying the stalk of RLS.

19) We tie the leaf itself with the following rapport: 1 SS + 1 VP. Ready!
In Irish technology, there are a huge number of options for knitting leaves, with detailed master classes for the manufacture of which can be found in the following videos:
Openwork motif "heart"

Such an unusual Irish motif will definitely attract attention. It not only gives the Irish canvas an incredible relief, but also adds an exquisite gloss to it. In shape, the motif resembles a heart or a horseshoe, and can be used to decorate formal dresses, including evening and even wedding dresses.
Working process
1) We collect the base-chain of 16 VP. With the help of SS we wrap the chain in a circle.

2) We tie a circle with 22 sc, introducing a hook inside the circle.
3) We turn knitting, we collect 4 VP. We knit with a “corn” pattern, skipping 2 loops of PR. We finish the series 1 VP + 1 CCH.
4) We turn over the knitting, we tie the arches from the VP of the 5th RLS.

5) Turn over, tie next to RLS.

6) The next step is to knit a row of RLS, at the same time, you need to insert the hook into the back half-loop of the PR.

8) We complete the motif by knitting the “crustacean step”.

9) We turn the knitting over to the front side, we knit arches from 4 VP along the upper edge. And the last step - we tie them with the 6th RLS.


We offer a detailed video tutorial on knitting another type of Irish crochet heart:
Fashionable lace motif "paisley pickles"

Paisley cucumbers are widely used to decorate women's clothing - their curls complement the design of blouses, skirts and dresses. Irish lace offers us an original version of knitting paisley cucumbers - this work is not at all difficult, and the result is breathtaking.
Working process.
1) We collect the base-chain of 6 VPs, we enclose it in a ring with the help of the SS, we tie the 8th RLS.

3) We close the ring with the help of the SS. We knit 4 VPs, skip one SSN PR, knitting SZN in the next column.

5) We attach the bourdon threads (4-5 threads folded together), we tie the entire RLS element.
6) As soon as knitting has reached the sharp end of the bourdon, we collect 20 RLS, we connect them in a circle, retreating from the end of the motive about 6 loops.

7) We continue to tie RLS.

8) We knit the final row with RLS, but with such rapports: 2 STB + picot from 4 VP.
Cucumber paisley motif in Irish style is ready!

Video tutorials on knitting Indian cucumbers using Irish lace technique:
Knitting patterns for Irish lace motifs
For pro-craftswomen who are fluent in crocheting, we provide a large-scale selection of patterns of Irish motifs:


Undoubtedly, Irish lace is one of the most difficult crochet techniques. In order to comprehend it perfectly, days and even months of hard training in knitting lace motifs are needed. However, it is definitely worth it - works made by Irish lace are highly valued not only aesthetically, but also financially.
It should be noted that the Irish lace technique is used for knitting all kinds of items of women's wardrobe: light blouses, blouses and tunics, airy sundresses and romantic floor-length dresses, as well as all kinds of accessories - stylish handbags, openwork gloves and exquisite collars. Irish lace also looks interesting in interior decor - they are used to knit openwork napkins and tablecloths, tie vases and even photo frames.
Today "Crochet" introduces you to one of the most beautiful techniques of our favorite type of needlework - Irish lace. You will find step-by-step instructions for making the product from start to finish, a master class on knitting the most common elements, and there will be videos and detailed lessons for beginner craftswomen about connecting individual motifs in Irish lace.
As always, all photos and diagrams open in large size if you click on them.
This technique is fundamentally different from our usual knitting. Usually we knit the whole product  or its details - front, back, sleeves, and then we connect, that is, we work as if we were sewing. In Irish lace, we do not create a canvas all at once: here, individual motifs are first made - usually flowers or geometric patterns, and only after that we combine them into a single canvas. This approach has its pros and cons.
 The undoubted and main advantage is fantasy, freedom of creativity in drawing up a pattern. You choose any pattern that suits you - and you can fill it in the way you like best. The main thing is to have a taste and correctly compose a composition, that is, to prove yourself as an artist.
In addition, from the motifs you like, you can create any product - be it a napkin, a jacket, an ornament, or, for example, a cardigan.
Important: if you are going to knit a dress, skirt or blouse with Irish lace, you will need a lining - because the product will be quite transparent.
The difficulty lies in the fact that the mass of individual elements must be connected to each other, and even so that the part does not deform and looks aesthetically pleasing. This is what we will try to teach you in our lesson. But first, let's get everything ready.
We'll need
Yarn for Irish lace
 The beauty of Irish lace is built on the contrast between rather tightly knit motifs and the openwork mesh that connects them. Therefore, we need at least two types of yarn: thicker for motifs and much thinner for mesh.
For motives, the most important thing is that they keep their shape. Therefore, synthetics will not suit us, the classic is cotton, mercerized cotton on average 100 grams per 500 meters.
For the mesh, you can use the thinnest threads - up to 100 grams per 1000 meters.
For laces, yarn of medium thickness is suitable - about 800 meters in 100 grams - and the same one that you knit motifs.
Important: we experimented with different types of yarn and came to the conclusion that the perfect thread for Irish is YarnArt, which you see in the photo.
Hook for Irish lace
 Since we need to knit quite tightly, we choose a slightly thinner hook than usual - then our Irish lace motifs will keep their shape well. For tying, you will need an even thinner hook - about a number thinner than the one used to make the motif itself. And the hook for making an irregular grid should be completely thin.
Hooks are selected based on the threads with which you knit - before starting work, you must definitely knit several samples in order to navigate the density of knitting and stop choosing the right one. Of course, for this it is most convenient to stock up on a set of hooks, where they are ordered by numbers.
In addition, we will need
- Blunt needles for knitwear or cross stitch to hide the ends of the threads and connect the elements of Irish lace together.
- A needle threader or a thin wire - without this simple device, it is very difficult to insert a knitting thread into a needle.
- Tailor's pins in large quantities - they will be required when assembling the product.
- Removable thimble. It is good because it fits the size of the finger and as a result does not fall off.
- Thread and needle. We will need to baste the elements to the pattern.
- Paper pattern of the finished product or part of it. On it we will create a sketch.
- Pens and pencils. They will be useful not only for drawing a sketch - we will wind a thread on them to tie the rings.
- Monochromatic fabric. We will transfer the pattern to it and we will pin and tag our motives.
- Fine tailor's chalk.
- The tablet. This is a desktop for connecting our motifs into a single product and making a grid.
How to make a tablet for Irish lace
 The ideal material for a tablet is furniture foam rubber. Its thickness should be greater than the length of your pins so that they stick easily into it and do not fall out. In order not to be mistaken, take a thickness of 5-6 centimeters. Length and width - no more than half a meter by half a meter.
Do not try to make a tablet for the entire size of a large product - it will be inconvenient for you to reach. Do it in such a way that your hand can easily reach any part on the tablet. When a part of the work is ready, you will move it, because the details will be swept in, and you can work on.
Foam rubber should be covered with a plain fabric - preferably cotton, ideally - coarse calico. From below, we need a solid base - plywood, plastic or something similar, but preferably as light as possible - during operation, the tablet will often have to be turned over, and if it is heavy, you will quickly get tired.
Putting it all together.
- We cut out a piece of foam rubber, and make the size of the solid base a little smaller - let us have a soft edge.
- We put foam rubber on the base, fabric on top.
- Turn the base up, fix the fabric on it. It is most convenient to do this with a furniture stapler. Do not forget to tuck the edges of the fabric inward to make it neat. We fasten first in the center of the side, then in the corners, and only then along the entire length. The fabric should be a little stretched.
What to do if you don’t have a furniture stapler on your farm, and foam rubber is sold in huge sheets? Any company that makes upholstered furniture to order will help you. There, there will be a piece of foam rubber, and they will pin the fabric to you in a minute. Or you can team up with friends, buy a sheet of foam rubber for the whole company, and someone's husband, using a drill and a thin drill, will make holes in your plywood with which you can simply sew the fabric.
Important: make some covers for your tablet - such as those on an ironing board. Firstly, it will protect it from dirt and you won't have to re-tighten it, and secondly, you will be able to change the color of your desktop so that it contrasts with the product you are knitting.
And now, when everything is prepared with us, we take the threads, the hook - and get to work!

How to knit Irish lace - workflow
We make a pattern
If you are planning to knit clothes, then first you need an ordinary sewing pattern. We transfer it to the fabric, taking into account the fact that we do not need seam allowances - we will connect the parts to each other with a hook.
Choosing motives
It all depends on your taste, the main thing is that the motives are combined with each other. Usually, either geometric shapes or floral motifs are used in one product, and these two types do not combine well with each other.
We knit samples
To make it easier for yourself to work on the composition, you need to knit one sample of each motif. When they are ready, we will moisten and iron them.
Important: you need to iron the products from the inside out, laying them on a soft base. A damp terry towel folded several times is best.
After that, we will outline each motif on paper and cut it out. Let's make some of these patterns.
Create a composition
And now on our pattern we will expand our templates the way we like. At this stage, we need to decide not only on their location, but also on the number - after all, it is much more convenient to know in advance how many of which motives we need. Cutting out extra patterns from paper is much faster than tying the missing motifs.
Important: we will lay out the motifs with the wrong side up, so that the composition will turn out to be a mirror image of the finished product.
We knit the required number of motives
When we have the required number of templates, we lay them out on the fabric in the final version of the composition and circle with chalk. Now we just have to calculate how many motives of what kind we need, and tie them in the right amount.
Washing and ironing
If you have a laundry bag - that's just great - you don't have to collect motifs all over the washing machine drum. We put our creations in a bag and select the delicate wash mode. We will not dry with a typewriter - we need motifs wet in order to properly smooth them with an iron. We iron according to the same rules as described above.
Collecting the drawing
First, we lay out the motives on the fabric according to the circled pattern and see what we got. At this stage, you can make adjustments to the composition if something is not to your liking. Now we pin them with pins so that they do not move. If your detail is large and does not fit on the tablet, you need to sweep the motifs.
Important: you need to lay it out face down so that you have the wrong side of the product in front of you, to which we will attach the connection elements.
And now we just have to combine it all into a single canvas.
Connecting elements in Irish lace
Connection without mesh
If our motifs fit snugly together and do not create large gaps, you can connect them without knitting a mesh. How? Just sew. You can use ordinary sewing threads of a suitable shade, or you can use the ponytails left on the motifs for this.
 We will thread with a needle threader Or with a wire We will stretch it under three or four loops of the binding We will retreat one loop back - and again under three or four loops We will cut the thread - our motives are connected
Whatever method we choose, even at the stage of knitting motives, after finishing work on each of them, we cut the thread so that the tail is quite long - so that it can be inserted into the needle and made at least a few stitches. We will use a needle for knitwear or for cross-stitching - it should have a large eye and a blunt tip. If we do not plan to use ponytails for connection, they must be tucked under the harness with the same needle.
But a special charm to products in the technique of Irish lace is given by an irregular mesh.
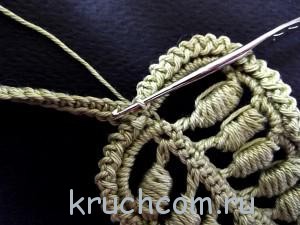
How to knit an irregular mesh
- The first and most important rule: you need to attach the mesh not to the edges, but to the back of the elements, so that the work turns out to be voluminous.
- The grid in Irish lace is knitted with air loops and columns with a couple of triple crochets.
- The shape of the cells is four- and pentagons. We need to ensure that we do not get triangular cells.
- Be sure to attach the grid cells to the protruding parts of the motifs: corners, petal edges, etc.
- When making a canvas from a grid, we use tailor's pins: we tied a cell - one of its corners was fixed with a pin on the tablet, so that later we can attach another cell to it.
Several chain stitches Column with several crochets Irregular mesh is done from the inside
To make it even clearer, watch the video on knitting an irregular mesh.
Elements of Irish lace and a description of their implementation
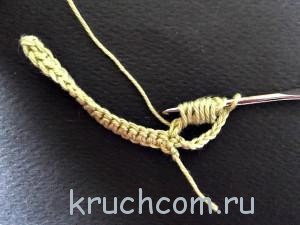
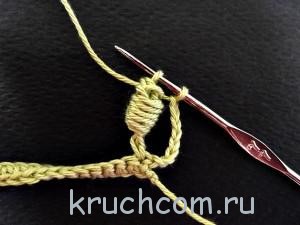
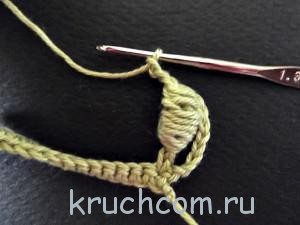
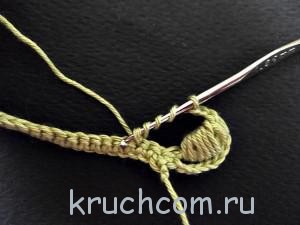
 With this cord, you can turn around, for example, the edge of the neck, or you can make an independent decorative element out of it. Its implementation is interesting in that in the process we will always turn on the strings.
We knit three air loops and make a single crochet in the first of them. Rotate the cord clockwise 180 degrees. On the left we see a loop into which we knit the next single crochet. We turn the cord again and knit it not in one, but in two loops on the side. And we continue to work, turning and knitting the columns in two side loops.
Caterpillar cord, step 1 Caterpillar cord, step 2  Caterpillar cord, step 3
  Caterpillar cord, step 4 Caterpillar cord, step 5 Caterpillar cord, step 6
  Caterpillar cord, step 7
  Caterpillar cord, step 8
  Caterpillar cord, step 9
If we need to make a curl, and in Irish lace they are very often found in drawings, we apply the technique. We will pick up 10-12 unfinished single crochets on the hook and close everything at the same time. If we make a curl to the left, we collect loops along the top row, if to the right - along the bottom.
Such a cord can be tied. Most often, the strapping is performed with a “crustacean step” - we taught it to perform in a lesson about how. But you can dream up with any other types of edging.
 In fact, bourdon is a thread with several additions that we tie, but many craftswomen also call bourdon a cord that is knitted in this way. How many additions to make - depends on your plan: the more of them, the more prominent the element, but do not forget that with their increase, the cord loses its elasticity. You can use the same thread that you knit with as a bourdon. But more often we feel sorry for her - then we use any thick sewing threads. The main thing here is to tie the bourdon tightly so that it is not visible.
How to knit on bourdon
- We measure the thread in several additions of the length we need. We cut off from the ball, while we do not cut the thread anymore.
- We attach a thread to the ring with an air loop, which we will tie.
- We begin to knit single crochets very, very tightly to each other.
- As we approach the end of the bourdon, it becomes uncomfortable for us to hold it. Let's use an additional thread. We will thread it into the strings of bourdon and knit the cord to the end.
- We will make the last column in the same ring of threads into which we inserted an additional thread. After that, it can be taken out.
If you do not know how long the bourdon you will need, you can take a thick yarn of a suitable color. Then, to start work, we will tuck it in and we will tie our burdonchik first in two additions until the tuck is over. To complete the work, we cut the yarn from the ball, leaving a margin, tie it again in two additions, finish in the same way as described above, and then tighten the thread and cut.
In addition, a chain of air loops can be used as a bourdon. Everything is simpler here - we will start and finish knitting in the first and, accordingly, the last loop.
It would seem: what can be interesting in cords? However, all the work below is done by them. Try to draw any closed image yourself, pin the cord along the contour with pins and fill the middle with a grid. You will already have a product that can be used, for example, for appliqué.
And here is a selection of templates for marine motifs.


ringlet
Here we roll the bourdon into a small ring. The best way to do this is to use a ballpoint pen with the refill removed. Having made the required number of turns, we thread the hook into the hole of the handle for the rod and drop the bourdon onto it, after which we tightly tie it with single crochets.
We wind the thread on the handle We drop it on the hook We tie it with single crochets We fasten it with a connecting post
berry
We make a berry from a ringlet. When it is ready, we continue to tie it with single crochets in several layers until the hole in the middle closes. Such a berry can also serve as a button.
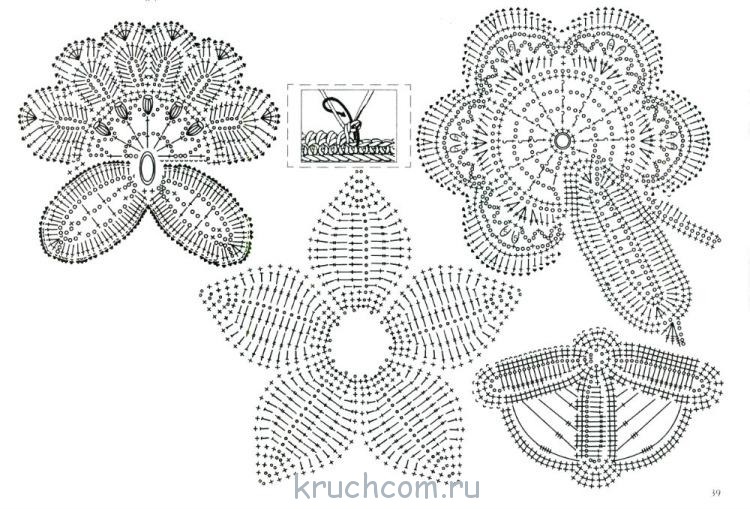
Patterns of Irish lace motifs will be in separate crochet lessons for flowers and leaves that we are preparing for you.
Freeform
 Freeform in Irish lace is a technique when new elements are tied onto already finished elements. This is done in order to get a canvas without gaps. In this technique, you can make the product as a whole, or you can separate its large elements, so that later they can be adjusted to each other and sewn.
Due to the density of the friformer, it is often used for knitting warm products. They can make a coat, jacket, woolen dress. Yarn, as a rule, is chosen in different colors.
The tips here are simple: you need to use different drawings, but having the same style - you should not combine marine with floral, and the threads should be harmoniously combined in colors.
Here are some pictures for inspiration. The left element is just a part of the coat that you see under it.


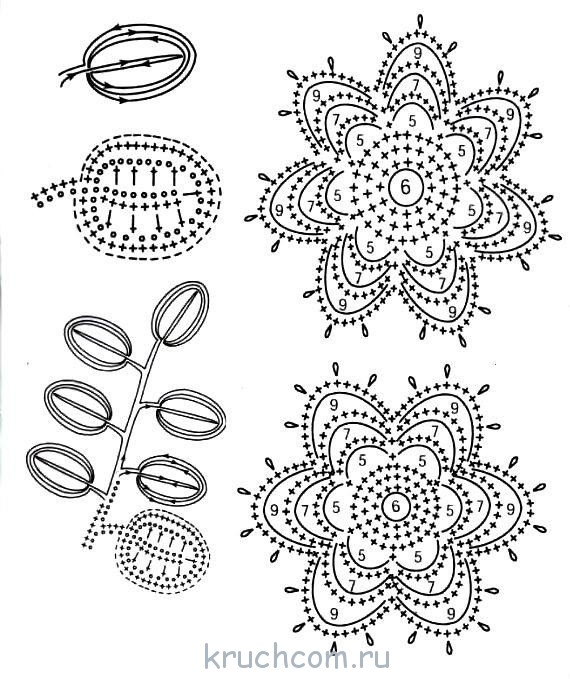
Seamless knitting in Irish lace
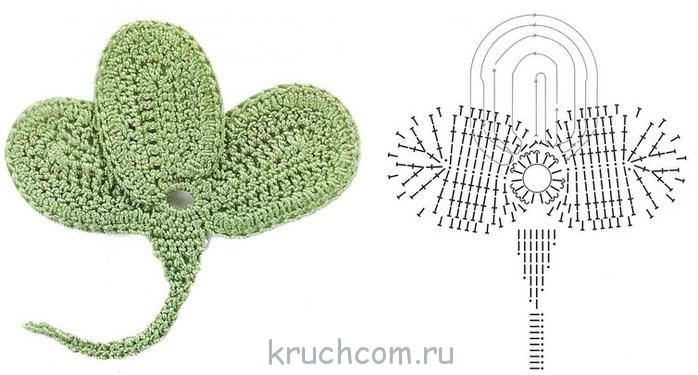
Is it possible to avoid working with a lot of motifs and knit the whole canvas? You can, if you immediately attach the motives to each other. This dress is knitted with Irish lace using a non-separating technique. Not entirely - the flowers are connected separately, but without separation - only blocks of leaves, then the blocks are tied around the perimeter. But placing the leaves tier by tier, you can knit a canvas of any size. Here are the schemes of flowers and leaves and examples of the arrangement of leaves for continuous knitting.
Leaf diagram Bud diagram Flower diagram
three leaves element
Now try to practice on a small product and knit using Irish lace technique.
Knit with us, share our lessons with your friends on social networks and send photos of your work!
Chic model in the technique of coupling guipure. Like a skirt, but you can wear it as a short sarafan.
SIZE 44-48
You will need: 600 g of yarn of your chosen colors (60% linen, 40% viscose, 400 m x 100 g); for flowers and leaves (180 m x 50 g), a little grass yarn, sectional dyeing, 3 spools of Madera viscose silk for the net; hooks No. 1.5-2 for motifs and No. 1.25 for the grid; 2 large green beads.
The model is made in the technique of coupling guipure. Before starting work, it is necessary to make a pattern of details (Fig. 2) from a dense fabric, taking into account the waist circumference, the desired length and degree of expansion of the skirt, sew up one side seam. Then tie a variety of motifs: flowers and leaves, focusing on the basic schemes A - I.
Attention! The patterns are not an exact copy, but only show the principle of knitting. In the author's original model, there are no identical flowers, and we recommend that you follow her example: fantasize and improvise as you go. When knitting petals, vary the height and number of double crochets, the number of tiers of petals knitted, as well as the number of rows of stitches in each tier. The decoration of individual flowers are voluminous middle-berries, made with a thread of a contrasting color, as well as the middle, made with yarn with a pile. Moisten the finished motifs, steam and dry. Lay out the motifs on the pattern face down, making up the desired composition. Fix the most acceptable position with pins or a basting. Assemble the canvas by fastening the individual "elements of the pattern to each other and to the side parts as follows: sew the places where the motifs meet with the main thread, fill the gaps with an irregular mesh. Tie the upper edge of the skirt with several rows of RLS. Use the caterpillar cord as a belt. Pass it along the waist , fasten large beads at the ends.