Phone case crochet panda description. How to crochet a phone case - a stylish bag made of yarn and beads
A skilled craftswoman of crochet needlework will “dress” any little thing in a case - from your favorite smartphone to a cute vase that acts as a decor in the corner of the room. Although, according to the degree of complexity of knitting, the covers are among those items that lend themselves even to beginners who hold the hook in their hands for the first time.

Of course, you should start with the simplest - knitting a cover for a mobile phone. Having comprehended the basics of crocheting, many needlewomen move on to more complex levels: knitting covers for stools, chairs and even car seats! 
Today we will take you into the world of crocheted covers. Perhaps, let's start with the most popular - covers for smartphones in different variations (step-by-step photo master class, as well as a detailed description of knitting openwork covers). Next, we will invite readers to try to knit capes-covers for chairs (loin technique and square mosaic) and finish with a master class for professional craftswomen - detailed instructions for making a decorative cover for a vase.
Mobile phone cases
Here the fantasy of craftswomen has no limits. Cases for smartphones and phones can be anything: simple and multi-colored, with drawings or knitted embossed motifs, as well as in the form of your favorite cartoon characters and other popular characters. 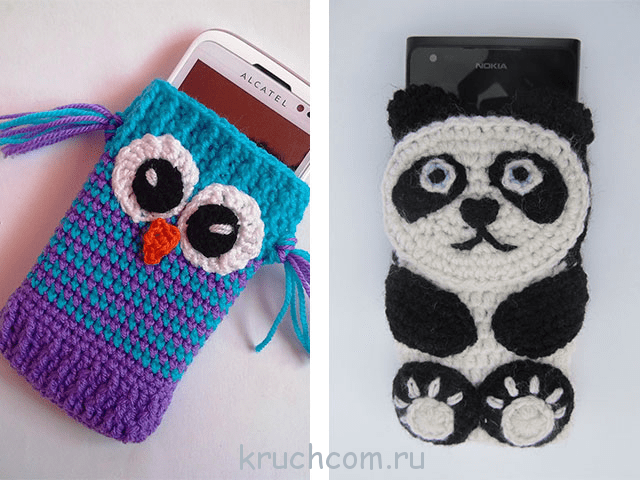
When starting to create such a case, it is important to remember that its main purpose will be to protect the screen and phone case from scratches, bumps, and falls. Therefore, you need to select the right yarn that can create a strong knitted fabric. Thin threads for openwork knitting in this case will not work, it is better to stay on acrylic or cotton yarn of medium thickness, you can also consider combinations of threads with wool or merino. We select the hook in accordance with the thickness of the thread. 
Text abbreviations:
- VP - air. the loop;
- Runway - air. lifting loop;
- Art. s / n - double crochet;
- Art. b / n - single crochet;
- Art. s / 2n - a double crochet;
- pet. - the loop;
- chain - chain;
- PR - previous. row;
- SS - connection column.
So, let's start knitting!
A step-by-step master class on knitting a simple dense cover

First you need to measure the smartphone and dial the appropriate number of loops to close its front side in width. For example, we take 25 VP. 
We take the main thread, we knit st. s / n (in each pet. - 1st column). 
As soon as knitting reaches the last. pet. chain bases, you need to tie 9 tbsp. s / n. Next, we go in a circular way, tying the base chain on the second side - all the same st. s / n in each pet. chain At the "turn" - again 9 tbsp. s / n. Total we get: (50 + 18) = 68 loops. This number of loops will remain unchanged throughout the knitting.
Track. 2 rows knit st. s / n (in each pet. - 1st column). In the end, it should look like this: 
We attach the yarn of the desired color, do not cut the main thread, leave it on the wrong side of the work. We knit a trace. way: 2 tbsp. b / n, 3 tbsp. s / n, stretched from the 1st row of knitting. 
Track. we knit a row with ordinary st. b / n yarn of the same color.
Track. we knit a row with a thread of the main color, according to the pattern (make sure that the relief alternates) using the combination already known to us: “2 tbsp. b / n, 3 tbsp. s / n, stretched from the "color" row of knitting. 
We get this pattern: 
We knit all subsequent rows in the same way. 
As soon as the case reaches the desired height (almost covers the smartphone completely), we start tying: we knit, alternating. s / n + 1 VP. 
We finish knitting with two rows of Art. b/n.
We do not cut the thread, from the end of the last row we start knitting a lace: we collect 60 VP, on top of which we knit a row of st. b/n.
Stylish and durable phone case is ready to use! 
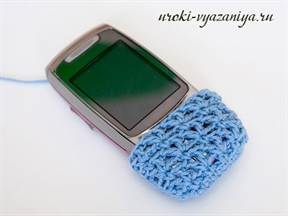
Pink openwork case for women's pens

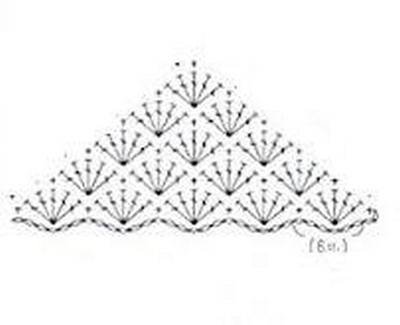
Knitting pattern:

The cover differs from the previous one in a more complex “fan” pattern. Knitted with threads of two colors.
We knit according to the scheme.
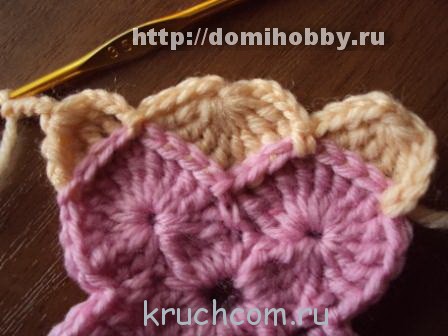
We collect a chain. on 11 VP, on both sides in a circle we tie them st. s / n, while - in the extreme loops of the chain. knit 9 tbsp. s / n, in the remaining loops - according to the 1st tbsp. s / n.
In the second row we knit according to Art. s / n - in each loop, one at a time, without additions.
We continue to knit according to the scheme, do not forget to change the color of the thread, while repeating rows 5-6 the number of times until the cover reaches the desired height. Fans from s / n columns are knitted under st. w/n PR. At the end of the knitting of the main fabric of the cover, we knit a simple rope from the VP (tie a SS or st. b / n) or a more complex decorative cord - you can “caterpillar” or galloon.
Openwork phone case for romantic ladies

Knitting pattern:

Knitting order:
We collect a chain. on 21 airways (18 airways + 3 runways).
Row number 1: 5 tbsp. s / n in the 4th VP chain., 16 tbsp. s / n in the next. 16 VP chain., 4 tbsp. s / n in the next. VP chain., 16 tbsp. s / n on the reverse side of the chain. We are finishing a series of SS.
Row number 2: 3 runways, 1 tbsp. s / n in the next. s / n PR, 2 VP, 14 rapports: “1 tbsp. s / n in the 2nd tbsp. s / n PR from the hook, 1 tbsp. s / n in the next. Art. s / n PR, 2 VP. SS.
Row number 3: 5 VP (3 runway + 2 VP), 12 rapports: “2 tbsp. s / n in the next. an arch of 2 VP PR, between the columns - 2 VP each. SS.
Rows No. 4-16 - knit according to the scheme.
We knit a lace: from one VP, we knit rapports: “3 runways, 2 unfinished. Art. s / n, knitted together on one pet. base" until the desired length is reached. We thread the lace between the arches of the 15th row, close it in the SS ring, cut the thread and hide it inside. We thread the satin ribbon into the arches of the 8th row, tie it into a bow.
Schemes and detailed instructions for knitting covers for stools and chairs
In almost every house in the kitchen there are boring stools that have lost their appeal over time. With the help of a hook, you can return them not only to their former beauty, but also bring original notes to them. By tying stools to match the color scheme of the kitchen interior, it will be possible to create an absolute feeling of comfort and warmth in the kitchen. 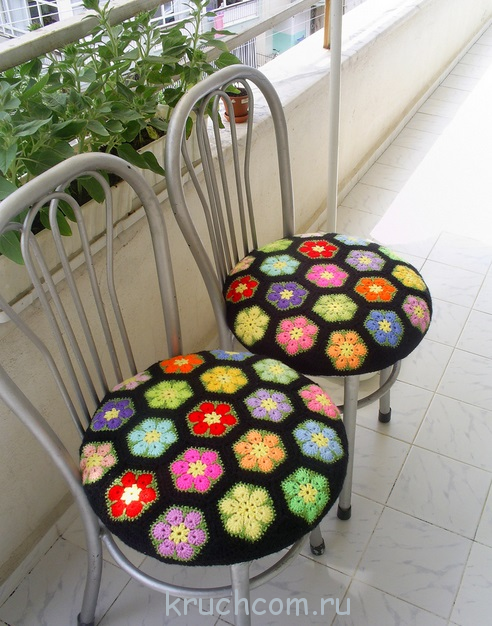
Decorating chairs and stools with your own hands is extremely simple, see for yourself!
Step-by-step tutorial for knitting a stool cover with a mosaic pattern of squares
Such a pattern must be crocheted from the center, in the shape of a square. The color of the yarn is selected individually, it needs to be changed after every two knitted rows. Thanks to this knitting, a mosaic pattern is obtained.
The advantage of knitting such colorful stool covers is the ability to use leftover yarn from previous knitting projects. 
Knitting progress:
We twist the self-tightening ring. We knit 1 tbsp. s / n, and immediately knit with rapports in the ring: “4 runways + 4 tbsp. s / 2n, united by one vertex + 4 VP + st. w/n. There should be 4 rapports in total. 


We finish row No. 1 with the SS, we start knitting the 2nd row: we find the top that unites the 4th st. s / 2n PR - we knit a trace from it. rapports (4 p.): “12 tbsp. s / 2n + SS in Art. b / n PR ". The end of the row is SS. Change the thread color. 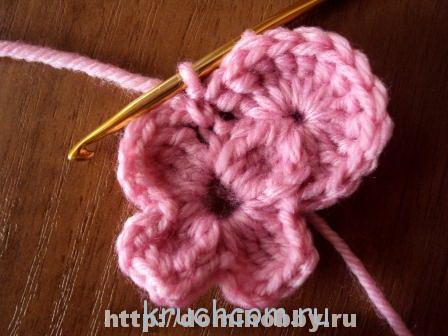
Row No. 3 is knitted from a corner fan of 12 tbsp. s / 2n (we count 4 tbsp. from the beginning), we knit with rapports to the end of the row: “4 runway, 4 tbsp. s/2n, combined one top (attention: the hook is inserted from the back of the columns!), 4 VP, SS in the next. pet., 8 relief. Art. s / 2n, 4 VP, SS ". 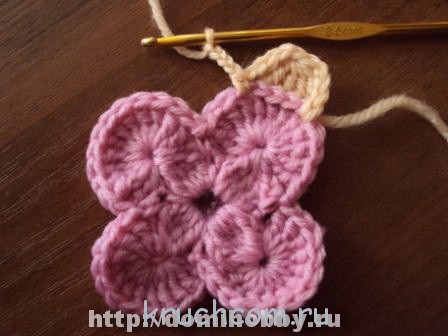

Row number 4: we knit with rapports to the end of the row: “12 tbsp. s / 2n from the top of 4 tbsp, PR, 8 tbsp. s / 2n from the top of the 8th tbsp. ETC". In the corners you should get arches of 12 tbsp., On the sides - 8 tbsp each. SS. We cut the thread. 
Row 5: Attach the new color yarn to the corner fan. We knit according to the principle of row No. 3, but we knit 4 embossed columns in the corners with a total. top, on the sides - 8 columns with total. top.
Row number 6: in the corners we knit fans from 12 tbsp. s / 2n, on the sides - 8 tbsp. s / 2n. 
Knit a square fabric until it completely covers the stool. Next - we knit 3-5 rows with a single-color thread without increments, i.e. we knit in the corners of 8 tbsp. s / 2n. At the end of the knitting of the cover, you can knit two ties in the corners (we collect a chain from the VP, we tie it with st. b / n), only 8 pcs.
In addition to the kitchen interior, you can knit potholders and hot pads according to the principle of such a pattern. 
Cover for chairs in loin knitting technique
Covers for chairs made using the "fillet" technique look interesting - they are sophisticated, airy, and at the same time they can always boast an incredible pattern, similar to hand embroidery. Chair covers are distinguished by the need to connect two parts at once: the seat and the back. 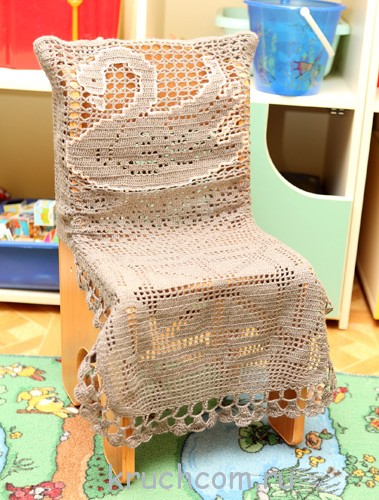


Stages of knitting a cover:
Back: we collect a chain. out of 123 VPs (118 VPs + 3 VPs + 2 VPs).
Row number 1: 1 tbsp. s / n in the 9th VP chain. from the hook, 2 VP, for knitting fillet cells, repeat 39 times next. rapport: 1 tbsp. s / n in the 3rd VP of the main. chain., finish Art. s / n.
Rows No. 2-54 are performed with fillet knitting according to scheme No. 1, in the forward and reverse direction, not forgetting about knitting the pattern - a swan.
Row number 55: add 9 tbsp. s / n.
We continue knitting according to scheme No. 2, we knit from 1-49 a row inclusive.
Seat: attach the thread on the back side of the main. chain backs and knit straight and back using the “fillet” technique according to the seat knitting pattern (rows No. 1-44).
Assembling the cover: we carry out side seams. We tie the free sides of the cover according to the strapping scheme in 6 rows with an openwork pattern.
Exclusive cover for a vase
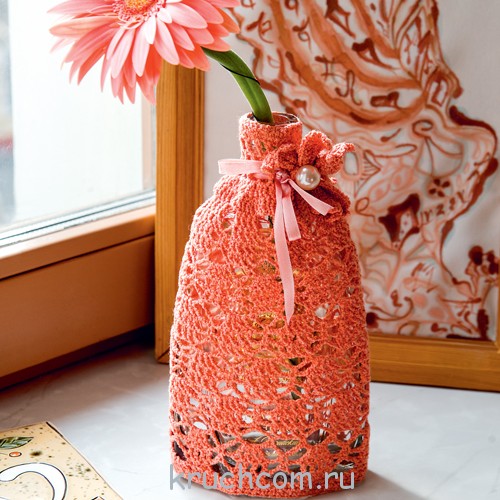
You can also “dress up” your favorite vase - an openwork cover made of a thin strand is a real proof of this! And if you tie several of these accessories in different colors, it will be possible to select a consonant “attire” for a vase for each bouquet.
Knitting pattern for a vase cover

Working process:
We start with the chain. on 32 VP, we close the SS in a ring.
Row number 1: 1 runway, 31 st. b / n in the ring. SS.
Row number 2: 1 runway, 31 st. b / n in each pet. ETC. SS.
Row number 3: 4 VP (3 runway + 1 VP), 16 rapports: 1 tbsp. s / n in the 2nd tbsp. b / n PR, 1 VP. SS.
Rows No. 4-5: 4 VP (3 runways + 1 VP), 16 rapports: 1 tbsp. s / n in the next. Art. s / n PR, 1 VP. SS.
Row number 6: 3 runway, 3 tbsp. s / n in an arch from 1 VP PR, 16 rapports: 1 tbsp. s / n in the next. Art. s / n PR, 3 tbsp. s / n in the next. arch of 1 VP PR. In total, you should get 64 tbsp. s / n. SS.
Rows No. 7-33: we knit according to the scheme, each completes the SS.
Petal (8 pieces): from the chain. on 14 VP we knit five rows according to the pattern of knitting a petal.
We assemble a vase: we form a flower from eight petals, sew it to a vase, decorate it with a bead or a rhinestone. We pass the satin ribbon into the loin cells. We put the cover on the vase, for convenience, you can fix its correct position with a glue gun.
Video tutorials on crocheting covers
Crocheted covers are very popular with needlewomen, so there are plenty of master classes on this topic on the net. We have collected the best of them:
Knitting lovers have long provided everyone around with new clothes. Husbands, children and even toys walk around in knitted things. But there is no limit to fantasy, so knitting for gadgets has become a new trend in fashion. Threads are used to create original cases for phones, smartphones, TV remotes and even laptops. For those who want to crochet a phone case, work tips and detailed diagrams are a must. Following simple recommendations, you can make a unique original accessory. Such items will surely attract attention, and their creator will become the object of universal praise.


Crochet soft cover from the remnants of yarn with patterns
In this article, we will show you how to crochet a mobile phone case from leftover yarn. You can use threads of any colors and textures, creating your own original options.

We crochet a stylish cover, starting with the manufacture of its future bottom. To do this, a chain of air loops is drawn, corresponding in size to the width of the model for the phone. An air loop is knitted for lifting, the work is turned around and three single crochets are made from one loop. Until the end of the row, knitting continues with single crochets. From the last loop, you must also knit three single crochets. Continue knitting with single crochets in the opposite direction, at the end of the row, make a connecting column. After that, knitting will continue in a circle, using the specified pattern.

In the process of knitting, you need to try on the work to your phone. When the length of the canvas becomes the same as the length of the phone, you need to make a border according to the diagram below.

Repeat the pattern once, then take a thread of a different color. With this thread you need to knit one more time the entire scheme. As a tie, a chain of one hundred air loops of the same color is used. The resulting lace must be pulled into the holes obtained in the hem pattern. Thus, work on the manufacture of a light air cover is completed.

Original women's accessory with a job description
Below is another knitted case for your favorite phone with a hook, the easiest way is to study the work with a diagram and a description of the implementation.

For work you will need:
- Remains of pink and white yarn;
- Hook number two and a half.
First you need to dial a chain of air loops corresponding to the width of the phone. Keep in mind that the pattern is quite voluminous, so you do not need to add loops for a loose fit. Knitting continues with a pattern "Shells" shown in the diagram below.

After the first row, the work turns, continues with the same pattern with a connecting post at the end of the row.
For the next row, you need to use a thread of a different color, knitting is done in a circular manner. Three lifting loops are made, two double crochets from one loop, one loop is skipped, one single crochet is made. Thus, continue to the end of the row, finish with three air loops and a connecting column. The third row is knitted in the same way as the first according to the scheme. Next, we knit a phone case, alternately alternating the execution of the second and first rows.
When the part reaches the required length, you need to knit the cover according to the diagram below:
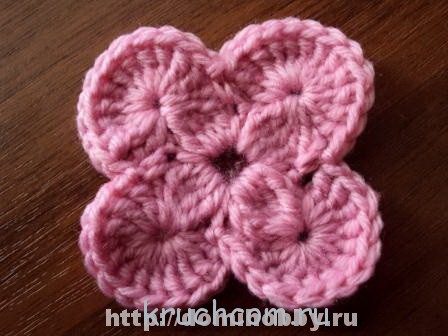
First, one single crochet is performed, then four shells in a pattern. Then in each row three, two, and then one shell are knitted. When the last shell is finished, a chain of air loops is made on the edge. It will function as a buttonhole. Now it remains to sew the button itself and decorate the finished cover. To do this, you need to make a flower according to this scheme.

Create a children's cover with a kitten
This cover is perfect for a gift not only for children, but also for adults.

Work begins with the execution of the body. To do this, a chain of air loops is drawn, corresponding to the width of the phone. Next, you need to knit four rows with single crochets. Then knit in single crochets in the round until the desired length is obtained.
For the ears, one double crochet stitch is knitted, then knit three double crochet stitches from one loop. Then perform a triple crochet and knit three single crochets along the edge of the resulting arc.
Eyes: a chain of eighteen air loops is dialed. It is knitted in single crochets, making two additions along the edges. Next, several rows are knitted with single crochets in a circle. Then again evenly you need to reduce the loops. The part in the middle is tied with a thread, as shown in the photo. The eyes are stuffed with cotton and a beaded pupil is made.
Today, everyone has a mobile phone or smartphone, even very young children, it is an essential attribute of modern life. The functionality of the device matters at the stage of its selection, but the aesthetic side of the issue shows itself already during operation. Phones scratch, break, and a convenient case is simply necessary for their safety. You can always buy a ready-made accessory in the store, but it will be much more pleasant to use a thing that is made by yourself, such as a knitted cover.
Crochet slipcover tools
To create a case for a mobile phone, you don’t need much, just take care of the material and tools:
Additionally, it is worth acquiring various decorative elements, because the finished product can be decorated.
How to tie a phone case
You need to start working on the cover by studying the diagram and taking measurements. So, there are two ways to make a product:
- tie the pipe, and at the end connect one of its edges with single crochets;
- start knitting from the bottom of the cover and continue it in a circle.
With the first method, the thickness of the phone will not be taken into account at the bottom of the case, and when put on, the corners will be sharp and stick out not very attractively. Therefore, it is better to resort to the second path and start knitting from the bottom.
The cover is knitted with columns without a crochet in a circle
The cover is knitted in the round without decreases or additions until the desired length is reached.
Using threads of different colors, you can get a striped case
When the case is ready, you need to think about the fastener. It may not be at all, but you can use a button or button. If desired, from the back of the case, you can impose a strip of single crochets, which would overlap the top and go to the front of the case, and put a button on it. For a button, a chain of air loops secured with an eyelet will suffice.

To close the cover with a button, you need to tie a loop
My friend is engaged in knitting products for sale, and she does not create clothes. In our city, unusual knitted covers made it popular and in demand. Its tables on inserts were full of the most original accessories - a cover in the form of a minion, with a pug, an owl cover, etc. I myself became the happy owner of a cover in the form of my favorite cartoon character - Homer Simpson.
Case decoration options
When the base is ready, you can start decorating. Here you can not limit your imagination, using different techniques:
- Impose additional elements and sew them onto the base. So you can create a cover in the form of a muzzle of an animal or simply with colored knitted circles. The decor may well go beyond the cover itself, for example, you can make paws or ears.
- Sew decorative elements from felt. This material does not crumble along the edge and is easily cut, so you can create an excellent appliqué from it.
- Make embroidery with beads, attach beads, spikes, etc. Here it is worth using small-sized elements so that the cover is convenient to use.
- Make tassels from bundles of thread.
Photo gallery: ideas for knitted phone cases
 Knitted elements can be sewn to the cover, creating a variety of characters
  To complete the picture, you can add tassels from bundles of threads
  By tying the ears, paws and eyes, you can make a cover in the form of an animal
  Decorative elements can be cut out of felt and sewn onto the cover
A yarn cover is a comfortable, cozy little thing through which you can express your individuality. Such a product will be pleasant to wear yourself, and it will also be a great gift. To create a cover, you only need yarn and a hook, and the scheme itself is so simple that even a beginner can handle it.
Now there are many different patterns for crocheting all kinds of things. But beginners should start with something as simple as a phone case. It is very important to understand the principle of work, so that the result is a beautiful finished product - from the initial loop to the last. If there is no hook with threads for this, then it is recommended to buy all the necessary materials in one place, so it is easier to find the right tools.
First you need to decide for whom you want to crochet a phone case. From this you will need to build on:

Necessary materials
 The hook is usually selected for certain threads. Everything is simple here - the size of the recommended hook is already registered on the threads. If you take 100% cotton knitting material, then the finished product will not stretch. Synthetic threads will keep color for a long time. The thicker they are, the easier and faster it is to tie the required height.
Thin threads are not suitable for openwork knitting, although they look airy, spectacular, but the main task of the case is to protect the iPhone or any other smartphone from bumps and scratches.
It is best to take thick acrylic from three hundred meters per 100 g. Cotton from two hundred meters per 100 g is also suitable, various variations with some impurities. The budget option is microfiber, it can also make a nice product.
It's easy enough to crochet your first phone case. Descriptions are different. But the simpler the first scheme is, the faster the product will be connected.

Preparatory stage
 First, measure the phone and write out the required dimensions. But you can attach the beginning of knitting to your smartphone and determine the dimensions by eye, but there is a risk of not guessing - you will have to redo all the work.
They draw the chosen scheme or a picture invented by themselves and put down the calculated dimensions of the mobile phone.
Hands pull the thread slightly to understand whether it stretches or not. You need to add two centimeters to the width so that the smartphone easily enters and exits the finished product. You can add three centimeters in height - so the phone will not fall out. But whether or not to increase the height also depends on the presence or absence of a fastener - this also needs to be thought out in advance. A crochet “owl” phone case or in the form of another animal will look beautiful, but for complete beginners this may seem difficult.
Air loops
You need to learn how to create air loops. To do this, you can watch the corresponding training videos or even ask the seller in the store to show it clearly when buying threads. But two options for a set of such loops are common:
- Create a loop by pinching its tip with your fingers, thread the hook inside and twist twice. Next, a thread is pulled into the loop - this is the first loop.
- The thread is wrapped around the index finger. With the help of a hook, a thread is pulled into the ring, which is not cut off from the main ball. The first loop turned out - it is pulled out and tightened.

Connecting posts
The beginning of the chain and its end are laid, the hook is immediately threaded through two loops, the thread is pulled out. Then they already begin to knit in columns in a circle until the desired length is obtained.
Knit with single crochets. To do this, the hook is threaded through the loop of the last row, the thread is tightened, the loop is pulled out on the hook, two loops are obtained, the hook is pulled through them again, the thread is pulled out - one loop remains.
There should not be a hole at the end of the cover, so the bottom must also be tied. This is done using a single crochet, while it is required to capture two sides of the product. After finishing work, a thread five centimeters long is left, then it is simply hidden in the finished product, crocheted from the inside out.
Clasp options
 It remains to determine how to wear the cover, because its upper has not yet been finalized. You can do this on your belt, neck, or just in your purse or pocket. If you plan to wear the product on your belt, then you need a double holder. It can be the shape of a backpack or two handles on the edges.
To wear as an accessory around the neck, choose a long cord. The quality of the lace is important - it should not scratch the skin and should be very durable. For wearing on the arm, ties in the form of a puff or an adjustable handle are suitable.
For reliability, the case itself must be closed. There are several options for this:
- tightening (add three centimeters along the length);
- clasp valve;
- button and loop;
- button;
- lightning.
Velcro will not work - they will cling to the yarn, making unpleasant hooks on the product. The buttons are also not the most popular variant of the fastener - the reliability of the clutch is average, they may not fully close and the phone will fall out.
Additional design
 When the cover is completely ready, you can decorate it further. For this, artificial flowers, leaves, pompons, rhinestones and beads are used - there are a lot of options. You can safely experiment, guided by ideas from the Internet or come up with your own unique options.
You can complicate the task and create a cover in the form of a bear, dog or mouse. To do this, choose threads that are suitable in color and begin to sew on the missing details on the base: eyes, paws, nose, ears.
Or you can immediately buy ready-made decorative eyes in a needlework store and sew them onto the base. There is usually a lot of such decor sold. Even ordinary buttons can be used for these purposes. And the little animal's mouth will replace some red lace.
Minion case
Minions are famous characters from a cheerful colorful cartoon. Not only the child will be happy with the cover in the form of a bright yellow minion. For such creativity, threads of three colors are required: blue, black and yellow. Their thickness should be the same. Finishing requires gray, white threads. Not to do, of course, and without a hook. Then proceed to the following step-by-step actions:

With beads and beads
 Beads are small shiny beads that will decorate even a simple product. But such work will be more laborious, especially if a multi-colored scheme is used. Beginners are advised to knit a simple case, and then move on to complex patterns.
It is very important that the thread can freely pass through the beads and beads, while they should move easily along it. In addition to threads, hooks and beads, you will need a special beading needle. Large beads are strung on a thread and its placement is monitored - it will be visible only on the front side.
The resulting covers are options for beginners that will be a good motivation to continue creating. Similarly, you can tie a pencil case, a small cosmetic bag or a wallet. The main thing is creativity and imagination.
The phone case is designed to protect your mobile device from external influences. Today on sale there are a wide variety of options for such products for every taste. But, in addition to factory covers, many needlewomen knit such accessories with knitting needles and crochet. In this article, we have collected examples for you, based on which you can create knitted clothes for your mobile.


Even a novice craftswoman will be able to tie this phone case. Here you will need basic knitting skills, as well as step-by-step following of the presented instructions.
For knitting, you will need to prepare yarn in two shades: basic and contrasting, as well as knitting needles and a needle.
The knitting of the cover begins with a set of loops (p.). Their number depends on the width of the phone plus two extra, which will be used later as seam allowances. In this case, the pattern is nineteen sts wide and nineteen rows (p.) high. On each side of the pattern, leave an equal number of stitches so that the motif itself is in the center.
So, in the example considered, the number of points typed is equal to twenty-five, or approximately seven and a half centimeters. Next, you need to knit in a garter way, namely, alternating rows of front and back buttonholes.


In the process of knitting, try on a future phone case. In total, you should knit enough rows to cover the back of the phone (approximately one third).
Having completed the knitting of a single-color fabric, you can start knitting a jacquard pattern with knitting needles, based on the following pattern:
According to the scheme in the first p. motive - nine points. in this case, you need to subtract nine from all the points and divide the result by two. You will get eight sts.
Then, in the first p. knit 8 sts with a thread of the main shade (OO), then 9 sts with a contrasting thread (KN). Next come 8 p. OO.
In the second r. you need to knit 1 p. OO less. 7 p. OO, 11 p. KN and 7 p. OO.
In the third - also 1 p. OO less. Knit 6 p. OO, 13 p. KN and 6 p. OO.
Fourth and fifth pp. knit on the basis of the third.
In the sixth - 7 p. OO, 11 KN and 7 p. OO. This is where the subtraction of motive begins.
In the seventh - 8 p. OO, 9 p. KN, 8 p. OO.
From the eighth row, fingers are knitted with knitting needles. 5 p. OO, 1 p. KN, 2 p. OO, 9 p. KN, 2 p. OO, 1 p. KN and 5 p. OO.
In the ninth p.: 4 p. OO, 3 p. KN, 2 p. OO, 7 p. KN, 2 p. OO, 3 p. N, 4 p. OO.
Tenth r. : 3 p. OO, 5 p. KN, 2 p. OO, 5 p. KN, 2 p. OO, 5 p. KN and 3 p. OO.
In the eleventh: 3 p. OO, 5 p. KN, 9 p. OO, 5 p. KN, 3 p. OO.
From the twelfth a couple more fingers are knitted with knitting needles: 3 p. OO. 4 p. KN, 2 p. OO, 2 p. KN, 3 p. OO, 2 p. KN, 2 p. OO, 4 p. KN and 3 p. OO.
In the thirteenth: 3 p. OO, 4 p. KN, 1 p. OO, 4 p. KN, 1 p. OO, 4 p. KN, 1 p. OO. 4 p. KN and 3 p. OO.
In the fourteenth: 3 p. OO, 3 p. KN, 1 p. OO. 5 p. KN, 1 p. OO, 5 p. KN, 1 p. OO, 3 p. KN and 3 p. OO.
In the fifteenth: 4 p. OO, 2 p. KN, 1 p. OO, 5 p. KN, 1 p. OO, 5 p. KN, 1 p. OO, 2 p. KN and 4 p. OO.
In the sixteenth: 7 p. O, 5 p. KN, 1 p. OO, 5 p. KN, 7 p. OO.
The seventeenth row of the motif for the cover is knitted by analogy with the sixteenth.
In the eighteenth: 7 p. OO, 4 p. KN, 3 p. OO, 4 p. KN, 7 p. OO.
In the nineteenth: 8 p. OO, 3 p. KN, 3 p. OO, 3 p. KN, 8 p. OO.
This row is the last in knitting a motif in the form of a paw print. After that, the knitting of the phone case continues with the thread of the main shade. Thus, you will need to knit another third of the product. Work as many rows as you need to close the phone case on both sides.
At the final stage, it remains only to sew the side parts of the knitted fabric.
As a result, based on this scheme of actions, you will receive an original phone case with a simple jacquard pattern.