Show a beautiful manicure with a pattern. How to make a beautiful manicure with patterns on your nails? How to Draw Patterns on Nails for Beginners Using Dots - Using the Point Technique
Nail design, nail art, has long been elevated to the rank of art. Many women want beautiful designs on their nails to decorate their manicure, but most of them don't know where to start, how to paint. Here we will give some pretty interesting tips with which you can independently create stylish and very beautiful designs on your nails.
Nail design, especially nail art, is a fun and interesting experience. If you decide to design "for yourself" and decorate your manicure yourself, first of all, you need to purchase tools and materials that may be useful to you.
Painting tools and supplies
1. Nail varnishes, base for varnish, fixer, top coat, varnish thinner, nail polish remover - this is the minimum from which the design begins.
When buying varnishes, pay attention to its structure and smell - it is better to refuse strong-smelling varnishes. Also pay attention to the expiration date.
2. Acrylic paints - they are absolutely harmless to the health of nails, have a huge palette of colors, easily fall on the nail, acrylic paints dry quickly and, finally, they are relatively cheap.
If you do not need the entire set of paints, then you can buy one or more specific colors, which, you see, is very convenient.
3. Newbies in design will also need to buy several brushes, preferably a set of brushes of different sizes from natural hair.
4. A collection of various decorative elements necessary for design - these are rhinestones, stones, sequins, beads, foil, mica, feathers, colored threads, nets, confetti, mirror dust, fimo, stickers, fabric decorations, shells, dried flowers, sparkles, bouillons , lace, etc ..
5. Glue is essential for fixing various decorative elements.
Novice creators should definitely study the theoretical component of painting with acrylic paints, and only then proceed to the practical part.
Of course, it will not be difficult for an experienced master to apply the most ornate designs on nails in a matter of minutes. But if desired, such a design is quite within the power of a beginner.

An uncomplicated design is performed with a thin brush and acrylic paints. You can start with simple lines and points of different diameters, in this case the risk of making a mistake is minimal, and the result will certainly please.


To create an exquisite manicure, you will have to try and, above all, be patient.


The procedure for applying drawings on nails
So, are your nails and hands okay? So you can start creating beautiful drawings using acrylic paints.
- First, degrease the nails. For this purpose, use a special tool, moreover, it will prolong the life of the manicure.
- Then the nail plate is covered with a transparent base. Professional craftsmen advise using such a tool, otherwise the unprotected plate may deteriorate under the decorative coating.
- It can be based on varnish of a very different shade. Apply a layer of varnish and wait for it to dry completely. On an unfinished surface, a drawing made with acrylic will "float".
- The time has come for the most important and fascinating stage - this is the painting itself - the drawing on the nails. If the drawing is performed for the first time, then it is better to experiment first on a piece of cardboard. This will allow you to adjust your hand to the brush, determine the pressure and intensity of the selected color. Already several such attempts will allow you to create clear and beautiful lines, and even patterns and simple drawings.
It is better to start by painting the ring finger. For example, you can draw a butterfly with white paint, and then decorate it with smooth lines and neat dots.
The drawing should not be overloaded, but a couple of gentle strokes will be quite appropriate. You can remove excess paint or varnish with a toothpick dipped in nail polish remover. If you don't like something, you can always start over.
The resulting pattern is fixed with a top coat. It will add shine to your manicure. The result will surely please, because the painting will give the nails a romantic design and emphasize the image of the owner!
One of the simplest nail designs is to decorate the edges with colored glitters. Although it is very easy and simple, such a manicure looks bright and impressive.

Drawings on nails - varieties
Classic French manicure can be an inexhaustible source of inspiration. For example, you can change traditional colors and make it brighter and more intense.
The usual white line can be decorated with decorative elements and various patterns.
 Drawing on nails with cats

Do you prefer a bright colored manicure? You can also decorate it with a pattern and add some golden shades - this adds airiness.


Nail Art - Floral Motifs
Floral motifs are applied with a thin brush, sometimes a needle can be used. Painting such a picture is quite difficult and requires patience and talent.


 Drawings on nails - flowers

It is this print that never goes out of style. And to make such a drawing is not so difficult. First of all, it is necessary to paint with varnish 2 times. Depending on which print you choose, apply the patterns with a thin brush and acrylic paints.
But if the spots are not even, then do not despair, because they do not have to be all the same, this is the advantage of this pattern on the nails.


Watch a video on how to make beautiful nail art:
It is important to have the entire arsenal of necessary tools. When creating a beautiful manicure with a painting, there are several key points to consider.
First of all, it is, of course, a well-groomed appearance of both nails and hands in general. Indeed, even with a luxurious painting, the imperfect shape of the nails, untidy cuticles and dry skin of the hands will erase all the positive impression. At the end of this article, we will provide basic care guidelines.
Custom designs on nails - hieroglyphs
Recently, there has been a great deal of interest in everything related to the East.
This also applies to new trends in manicure. Drawings - hieroglyphs on the nails give a positive charge. Each of them has its own meaning - it can be happiness, health, beauty, etc.
When using these symbols, it is important to choose the right colors that can bring out all their beauty. It is best to paint the symbols in traditional black and choose red nail polish as the base color, which, when combined with black, will become a beautiful Japanese theme.

 Drawings on nails - hieroglyphs
 How to decorate nail art with rhinestones and stones

Now it is very fashionable to do manicure with stones and rhinestones. Rhinestones should be chosen based on the length of the nails. Apply two coats of varnish. Outline the drawing with colorless varnish and with tweezers add prepared rhinestones and stones to certain points of your drawing. This design gives the nails a unique look.


You can also create simply amazing designs on short nails, see some options.


The more you paint, the better you will do it, the main thing in this business is not to give up - draw whatever you like and what comes to mind. So you will find only your own, unique pattern on the nails.

How to take care of your nails and hands
Don't forget that even the most beautiful nail designs will lose their appeal if your hands and nails are not well-groomed. Here are some basic guidelines for hand care:
- The nails should rest from the varnish - after removing the old varnish, do not rush to cover with a new layer, let them "breathe" for several hours.
- Nails hate washing dishes and using any chemicals, so always wear rubber gloves when doing housework.
- Pamper your nails with baths - dissolve sea salt in hot water, add vegetable oil, 3 drops of iodine and 5 drops of lemon juice, and hold your nails in this mixture for 5-10 minutes.
- For shiny and healthy nails, rub a mask of lemon juice, vinegar, grape or cranberry juice from time to time.
- Pay attention to your diet - eat more yoghurts, cheeses - preferably fresh, nuts and marmalade.
Beautiful, well-groomed hands always give out a sophisticated girl who knows her worth. Thin, flaky nails of varying lengths and shapes can give your appearance a touch of untidiness, untidiness, even if your appearance is otherwise impeccable.
Therefore, never forget about your hands and nails. And having learned how to quickly and beautifully apply drawings on nails, you will always have a unique, inimitable manicure.
Drawings on nails video
Pictures on nails photo
Pictures are clickable 


Nail design, especially if it was created with your own hands, is a great idea in terms of self-expression and image creation. The easiest decorating method is simple nail art... Making them is not at all difficult, there are many ideas that have already been invented earlier. But there will be even more of them if you connect your own imagination. You should start with the simplest techniques, gradually improve your talent and capabilities.
Simple drawings for new masters
At first, not everything will be as smooth as we would like. It's because:
- At first- you are worried, afraid that you will not succeed;
- Secondly- you have not yet gained experience and skill - this is a matter of time and diligence;
- third- you probably do not quite understand what you can draw with and how exactly it is done.

If you follow the main rules, the self-learning process will be more effective:
- Before work, you need to remove the cuticle from the nail plate. A simple warm bath will help with this, into which the hand is lowered for 10 minutes. So it will be easier to lag behind the marigold.
- With a wooden stick (you can use a toothpick) and nail tongs, cut off the coarse dermis (skin) around the nail plate.
- Next, you need to polish the nail plate. By the way, this should be done not only before applying a manicure, but also for prophylaxis, at least once a month. Instead of polishing, if there is no special file at hand, a simple degreasing with a nail polish remover will suffice.
- Basically, the marigolds are ready for drawing. But there is one caveat. Before painting, you should apply a foundation. On it, the drawing lays down more accurately, the drawing process becomes easier. The manicure as a whole will look neater.
- After applying the foundation, wait about 20 minutes.
Now that's for sure everything, you can safely start drawing.

What tools and materials should be at hand
Before the procedure for drawing a picture, prepare materials and tools for work, their list and varieties will depend on what you plan to work with, which material you know how to use better, and decide on the theme and color parameters.
Nail polishes
In your work, you will find it useful:
- clear nail polish;
- fortified;
- medical;
- lacquer fixer;
- sequins;
- glitters;
- decorative powder;
- several different shades of varnish.

Instruments
Drawing cannot be imagined without tools, so everything will be listed below, it may come in handy in one case or another:
- stickers;
- ready-made stickers;
- template plates;
- brushes;
- needles;
- toothpicks;
- ordinary or decorative scotch tape;
- foil;
- dots;
- acrylic paints.
The simplest drawing ideas for novice masters
Having prepared the nails for work, you can apply a drawing on them with any tools, even handy ones - those that every girl has one hundred percent at home.
Needle work
Original and even in some places uncomplicated drawings can be drawn from a needle. How to use it:
- You do not need to immediately draw on the nail, try to do it on paper. Firstly, you will understand how it works, and secondly, this way you can choose the proportions as close to your nail as possible.
- Apply the base (transparent base) to the nail plate, wait until it is completely dry. The base is always applied in 1 layer.
- After the first base coat has dried, you will need to apply another layer - the background one. Choose the color of the nail polish that will accentuate the marigold, for example, white.
- There is no need to wait for the second layer to dry. You can work on immediately.
- Somewhere in the middle of the plate, drip on a white background, three small dots of, say, red varnish, forming a triangle or alternately one after the other along the nail.
- You can draw with a needle by immediately poking it in the middle of the uppermost point, stretching it to the bottom, and so on to everyone, one by one. There will be such an ornament as in the photo.
- You can drop, for example, the same white varnish into the center of a red drop, then, when stretching, a white stripe on a red background will go behind the needle.
- You can stretch the varnish from side to side, then an unusual pattern is obtained at all.

The color palette in such simple drawings has no definite boundaries. The author himself decides what and with what to combine.
You don't need to work on all your nails at once. Draw them in order from the very beginning to the victorious finish. Otherwise, you will definitely not succeed.
Paint with a brush
This drawing technology is a little more complicated, but with a great desire, any novice master will cope with this task.
Practice, for a start, no artificial nail plates - this will be a very good workout. If they are not at hand, draw a marigold on paper, approximately the same size and shape as yours
Drawing technology:
- On prepared nails, first, as always, a base coat of colorless or medicated varnish is applied.
- Leaves the nail to dry. In this technology, all layers must dry completely as they are applied.
- After the base is completely dry, apply a background coat. The color in this technique should be chosen so that it contrasts with the future painting. First, in one step, the brush is led from the center towards the cuticle, then the left side of the plate is painted over, then the right. If you notice, then you should get only 3 strokes of the brush.
- Further in the work you will need a very thin brush. Soak it in the varnish, be sure to remove the excess. And, as they did in school before, start drawing an element of a pattern or the drawing itself.
- The final step should be the consolidation procedure. That is, the marigold is completely covered with colorless varnish, along with the pattern.
Here, for clarity, we give a photo of simple drawing ideas.

This technology uses a different number of colors. First, try drawing hearts, simple flowers, lines, and other geometry. If you feel the strength to draw a more complex ornament, feel free to get down to business.
Simple painting on nails with acrylic paints
These paints are respected by professionals, and those who know how to paint with them. Their peculiarity is that, in the process of work, they do not spread, they are easy to apply, dry quite quickly, and hold for a long time. Moreover, they are not dangerous for human health. Going on sale:
- colorless;
- translucent;
- covering (overlapping the previous layer);
- pasty.
They can be diluted with water without problems. Easy to mix with each other. After drying, on top of them, you can safely apply another pattern, without fear of damage to the original layer. The coating is breathable, looks very attractive and bright.

According to the technique of drawing drawings, there are:
- Oil. It is applied in a pasty and undiluted form. are called so because I resemble oil painting.
- Pasty. It resembles batter in consistency. The composition is not diluted, it is used in the form in which it was purchased. You can only add pigments to it, if the idea of the drawing requires it. Draw in the form of thick strokes. When the paint dries, it looks like painting with gouache.
- Watercolor. Water first needs to be mixed with a binder, only then water is added here. The drawing in its pure form is similar to a watercolor ornament. It is characterized by high quality.
- Sliding. You can mix this composition with a structured nail gel. The difficulty here is that it will be quite difficult for a novice master to predict the final result. But after a few trainings it will be possible to learn this too.
- Glazing. You need to work with this material carefully. All layers to be applied must be very thin, almost invisible.

You can paint with any type of brushes that you know how to work with. For training, it is enough to purchase 6 basic shades and whitewash in order to correct the errors made in time. To understand them in work, you first need to draw a field in the form of a checkerboard on paper.
For 6 colors, 6 squares of about 2 × 2 cm will be required.On this field, one by one (one by one) apply the purchased paints - paint over the whole square with one pigment, then draw them with horizontal rulers of a different shade, and finally with vertical lines in a different color. You should end up with 36 colors.
Drawing with a brush using acrylic paints
Draw a twig with acrylic paint:
- For the background choose a very light color (then choose a dark color) or vice versa. In our example, it is lilac.
- Draw curved lines in yellow. Choose the location at your discretion, not necessarily exactly as shown in the photo.
- On this arc, draw, with curved lines, leaf figures of the same tone.
- Make the veins inside the leaves brighter for that.
- Secure the result with a transparent fixing layer.

If this drawing seems too easy for you, try to recreate these simple ideas. In the first photo, the drawing technique is shown in pictures.

Learning to draw with dots
From the simplest drawings to very complex ornaments, professionals paint with dots. The simplest techniques are a combination of dots, commas, rulers and so on of different sizes. The tool needs to be soaked in paint or varnish and start painting with it like a regular brush. In the process of work, the amount of the coloring agent decreases, this can be seen by the ingredient on the nail ornament, which makes the drawing more natural and realistic.

You can draw nails with dots as you like. With it you can draw:
- flowers or animals;
- modify the traditional version of the French manicure;
- it is easy for them to create New Year's motives;
- personify the seasons on the nails;
- very stylish abstraction turns out to be drawn with dots.

Drawings using regular tape
Plain household tape can go a long way in nail art. With it, you can make very different shapes, drawings and even compositions. Geometry is the easiest to do - it is based on lines, and it is very easy to cut them out with adhesive tape. The cut strips can be applied to the nail plate in any order or sequentially if you want to create a specific shape.
Scotch tape technique:
- As in all previous cases, the nail is prepared first.
- The first layer is base.
- After drying, apply the background one as you like.
- While the varnish is drying, cut a few thin strips of tape (about 1 mm wide, you can also thicker if you want it), the length should be larger than the size of the nail, so that later there will be no difficulties with removing the strips.
- If the background layer is dry, stick the tape over the nail the way you want it.
It is very important that it is solidly high. Otherwise, removing the stripes can damage the background layer if it is not dry well.
- From above, cover the entire surface of the nail with varnish of a different shade or several - this is also your prerogative in choosing.
- Allow a few seconds for the varnish to dry, but not completely dry.
- Peel off the pasted strips and see what you get.
You can leave everything as it is, or you can still finalize the drawing with a thin brush or dots. Add sparkles, circles and other elements with a different varnish color as well.

Today, there are many types of decorative tape on sale, it can also be used to create drawings. Here there is no need to cut the strips yourself. It can also be used for decoration. Glitter on nails always looks beautiful, and with decorative tape - excellent and unique.
Toothpick drawings
Simple, but unique patterns on the nails can be done with a regular toothpick. She is an indispensable attribute of every home, always at hand, can always help in creating a complete image. If you have already learned how to work with a needle, then there will be no problems with drawing drawings with a toothpick. The drawing technique and sequence are similar here, only the drawings are slightly different.

Other Methods for Creating Simple Nail Art
In addition to drawing with your own hands, you can use ready-made drawings - stickers, stencils, stokers, template plates.
Stickers
Choose a specific color for your base. Paint the nail plates with it.
After completely dry, stick the selected sticker on top. They are glue-based.

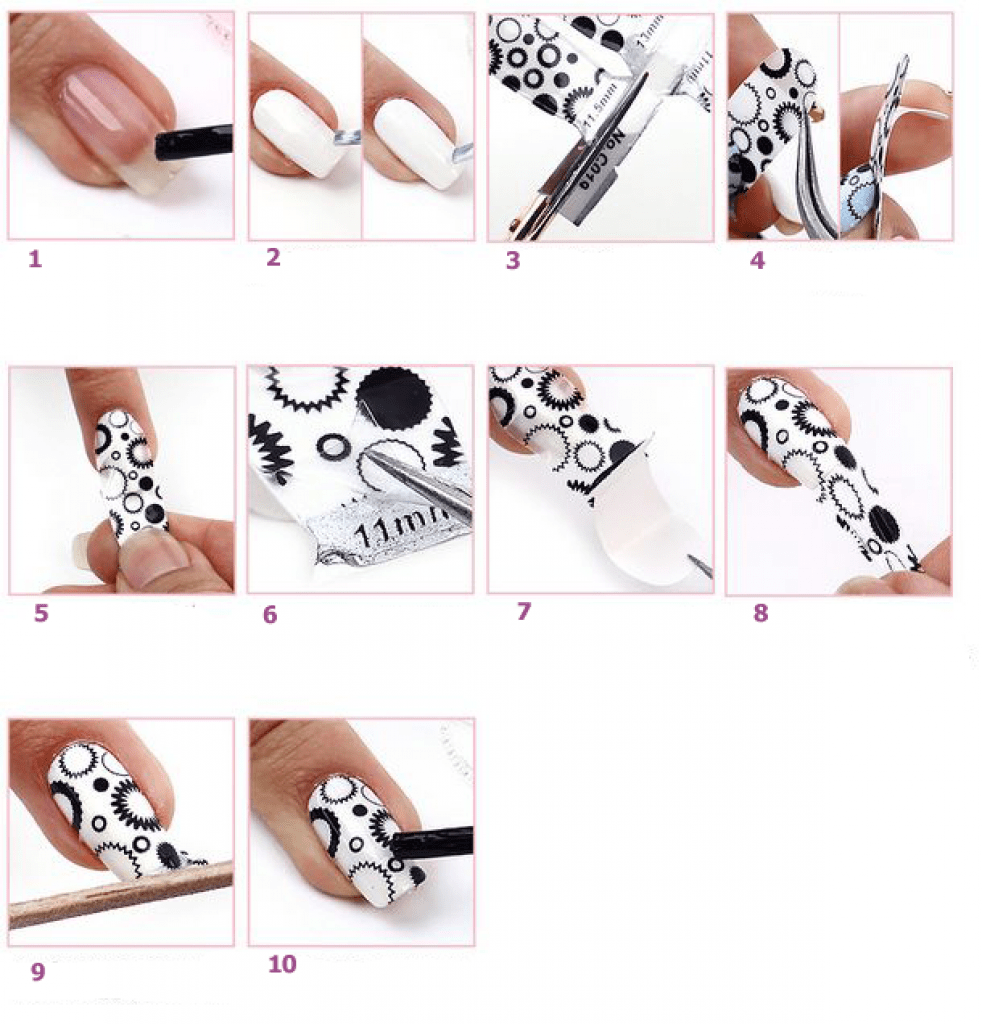
There are some that need to be placed in warm water before gluing. After 10 seconds, they take it out, gently grab the figure with tweezers and transfer it to the nail.

Another type of stickers
Recently, the design of nails in women is not a fake interest. In addition, the design of nails with a pattern in modern times can be considered an art.
Of course, most women watch their appearance, while nails are of no small importance. Therefore, every lady wants to have very beautiful nails with an unusual and stylish pattern.

However, not every woman can perform a high-quality decoration of her nails, since not everyone has an idea where to start, and how nails are painted.
This article will help solve this problem and will be a visual aid with various illustrated pictures.

It is worth noting that the design of nails, as well as their painting, is a very funny and creative event.

However, if you are thinking of decorating your manicure yourself, you will need to have various accessories and necessary materials that you may need in the process.
Painting tools and supplies
The most important and basic thing that you initially have to acquire is various chemical elements, as well as additional compounds and solutions: fixer and solvent for nail polish remover and other liquids.


Next, you need to have acrylic paints in your arsenal. This type of paints has no harmful and side effects on the nails, while they have a very wide range of colors. Their main advantage is that acrylic paints fit very well on the nail and dry very quickly, while they have a low cost.

It is also necessary to purchase an important tool when working with nails, this is a set of brushes made from natural hair, it is advisable to have two different sets.

As decorating elements of decor, you can use various items that must be available: a variety of rhinestones, stones, beads and other items. You cannot do without glue, which is used when gluing various decorative elements on the nails.


All beginners need to study well the theoretical materials on painting and decorating nails, and only after that you can get down to business.

The design of the simplest nail design with a pattern is made with a special brush with the thinnest tip.

They are designed to work with special acrylic-based paints, with which it is desirable to apply small arbitrary outlines, it is allowed to supplement these lines with various points.

This work will have a very chic and unique look, but the work will not be very difficult.
The procedure for applying drawings on nails
Before you start decorating your nails using acrylic paints, you must:
- At the initial stage, it is necessary to prepare the nails for work, that is, it is necessary to degrease them.
- Next, you need to apply a special nail plate, on the surface of which a transparent base is applied.
- After that, you need to apply a special nail polish and wait until it dries well.


So, let's move on to the most important and serious stage, this is the decoration of the nails, in other words, the painting of nails.

For those who are going to perform such an operation for the first time, and even on their own, it is recommended to practice a little with a pattern on some surface. This is necessary so that the hand can get used to the brush a little.

After a short period of time, the hand will adapt well to the brush, and only after that you can apply a variety of patterns, as well as beautiful patterns on the nails and smooth lines.


It is worth noting that the easiest way to decorate your nails after painting with paint is to perform high-quality decoration with decor items, for example, beautiful sparkles.

French manicure with a pattern
Manicure design in this look is a classic style of nail design.

At the same time, the drawing has a bright and rich shade, in which there may be a small line or small, uncomplicated lines of a dark color.

Colored nails with drawings
If you add colors of golden or gilded shades to a light and bright manicure, this will give the manicure more freshness and lightness.

Nail Art - Floral Motifs
This is one of the most difficult manicure design options.

The fact is that it is necessary to paint in this style with a very thin brush, which in itself is very difficult.


In addition, the implementation process will take quite a long time, and it will also take a lot of patience and perseverance.

Leopard print on nails
This is one of the most popular and demanded styles of manicure design. The reasons for this phenomenon are very easy to explain. The fact is that it will not be difficult to apply a drawing on your own.

In order to complete a unique and stylish nail design, you will need to have all the special equipment and tools, as well as high-quality material.

Of no small importance is the condition of the nails and skin of the hands, since fingers that are not well-groomed can cause negative feelings.

Custom designs on nails - hieroglyphs
Today, a certain interest is shown in oriental topics. Oriental themes and manicure did not go unnoticed.

The drawn hieroglyphs on the nails look very impressive and unique.

As a rule, the main color of this style is red, and black must be used as an additional color. This color scheme is typical for Japanese themes.

How to decorate nail art with rhinestones and stones
Quite an interesting design in this way. Nowadays, a very relevant design of manicure is the presence of decorative objects on the nails, such as rhinestones or pebbles.


How to take care of your nails and hands
Of no small importance is the condition of the hands and nails, since their untidy appearance will negatively affect the appearance.

Therefore, so that this does not happen, you will have to follow the following rules:
- after you have got rid of the old varnish, it is not immediately advisable to apply a new layer, but it is necessary to give the nails a little respite for a certain amount of time.
- it is not recommended to find nails in any chemical preparations, and in case of urgent need, you need to wear rubber gloves on your hands.
- periodically dip your nails in a special solution that makes the skin of your hands and fingers more beautiful.
- periodically wipe your nails with lemon or its juice, this will provide them with a longer bright and rich shine.
- it is recommended to carefully consider healthy and proper nutrition. Include dairy products, various nuts, and even marmalade in your daily menu.

Thus, beautiful drawings on nails with varnish can be done by yourself, without resorting to the services of specialists, if you follow all the necessary recommendations in this article.

There are also many different samples from the photo of the drawings on the nails. Therefore, you can safely get down to work, and the result will surprise not only you, but also your loved ones.

Photo examples of drawings on nails


An uplifting mood and a desire to surreptitiously admire your hands are feelings familiar to every girl leaving the salon after a manicure. An interesting nail design will emphasize and complement the special image of its owner. Modern materials transform nails into a work of art. Gel polish is not losing ground - it is still a relevant choice. This is not surprising, because it makes it possible to embody almost any fantasy.
Monochromatic coatings of any color look refined and elegant. In the spring, girls tend to choose gentle, bright and light shades, which were so lacking during the cold, dark winter. In the summer, with the onset of the vacation time, it is permissible to come off and apply the brightest and most juicy colors, because the office dress code ceases to dictate the rules. Neon and light, up to white varnishes look good on tanned hands. In winter and autumn, colors become restrained, obeying the tone of clothing and the mood of the seasons.
You can decorate a monochromatic manicure in many ways, among which every girl will find an option to her taste. Foil decor is still in vogue. Diverse color, interesting texture and unique shape of prints make each design unique. A discreet matte sheen will decorate and set off any base color, and if you want more daring solutions, then choose a bright mirror foil and enjoy the original effect.
Rubbing will also make any manicure more interesting. One or two nails, decorated with iridescence, have already become classics of this trend. But all the nails decorated with a mirror shine look good. For lovers of matte nails, too, good news: this manicure holds high positions. According to the observations of the masters, a matte manicure looks fresher for longer, scratches and cracks are not noticeable on it, and it does not bore as quickly as a bright gloss.
Rhinestones, small and large, single, lined with a pattern or covering the entire nail, remain in demand as well. The perfect choice for a luxurious evening look. Look especially good against the background of deep burgundy, black, green shades. In artificial light, their play and play of shine will decorate your hands no worse than real jewelry.
A considerable niche is occupied by art painting, drawings and monograms, gradients and graphic patterns. It is difficult to find a master who will soundly paint on nails, but such a painting in miniature looks incredibly impressive. Monograms evoke thoughts of the Victorian era, lavish balls and sophisticated ladies. The crisp graphics, on the other hand, look ultra-modern and youthful.
The length of the nails deserves a separate discussion. At its peak, almond shape and medium length, but short nails coated with dark varnish look no less impressive. The only negative, in a small area, the master does not always manage to bring your ideas and fantasies to life. Also keep in mind that very light varnish does not look particularly advantageous on short nails.
Fortunately, in modern fashion there are no clear frames and strict rules for combining colors. The only rule in creating a modern manicure is the absence of one! The price is individuality, and your choice cannot be wrong, the main thing is that you like it. Don't be afraid to experiment and change images.
Tweet
Class
Beautiful and simple nail art is a great way to diversify your daily manicure. It is not at all difficult to make such a manicure, and at the same time, a simple nail design is in trend today. There are many ways to create beautiful nail art at home. Today we will pay attention to simple techniques that are suitable for beginners.
Simple nail art using tape
Scotch tape is a faithful friend of all novice manicure lovers. You can use special adhesive strips that are sold in stores to create a manicure. But it is quite possible to get by with ordinary scotch tape.
The easiest manicure with scotch tape is a manicure with different stripes or color blocks. First, you cover the nail with one color of varnish, wait for it to dry. Then stick tape on half of the nail and cover the second part of the nail with another varnish. This way you can get a very simple but beautiful two-tone manicure.
In a similar way, you can create several stripes on the nail, as well as various geometric shapes and color blocks.


Photo tutorial on creating a simple manicure with scotch tape

Another option for creating a simple but effective manicure using scotch tape is to cut out the template you need from the scotch tape. These can be thin stripes, circles, etc.
Photo tutorials on creating simple drawings on nails


Photo of simple drawings on the nails


Simple nail art with dots
The most common dots in different colors and sizes will help create a huge variety of simple nail designs. Special tools are sold for creating dotted nails, but you can do without them. To perform a manicure with dots, different things can go that are in any home: hairpins and invisibility, old rods from pens or pencils, toothpicks.


If you have found enough small objects at home that allow you to create points of different diameters on your nails, then you can start experimenting. For inspiration take a look photo of a simple manicure with dots below.


Photo tutorials on creating a simple manicure with dots


Simple manicure with a needle
Manicurists can create truly complex and beautiful designs with a needle. But since the article is devoted to simple nail design for beginners, I offer you a very simple video tutorial on creating a manicure with a needle. It looks almost like a water-based manicure, and does not require as much effort.
Gradient on nails
Many people love a beautiful color transition on the nails, but not many can easily create such a design on the nail. But everything will become much easier if you know one manicure life hack. You can quickly and easily create a gradient on the nail with a sponge and eye shadow. All that is needed is to cover the nails with varnish, which will be the main color in the manicure, and wait until the varnish dries, but does not dry completely. After that, apply a matching eye shadow with a sponge and cover the nail with transparent varnish.

Another easy way to diversify your manicure is to add glitter to it. You can use glitter varnishes or, again, eye shadows.


And one more important point. If drawing on nails is difficult for you (and especially with your left hand!), Then start with a simple manicure, where the drawing is performed on only one nail.

After all, drawing or writing something on one nail is always easier and you will definitely succeed. And over time, your skills will get better and better and you will be able to move on to more complex drawings. Great manicure everyone!