Letters do it yourself to school from any materials with photos and videos. Crafts from buttons with your own hands: From the review of materials before creating paintings, accessories, New Year's decorations, postcards and interior decor work from buttons with your own hands
Projecting hostesses, gently disappear buttons and save them, suddenly come out! Some have such accessories will be copied for years or all their lives. But not everyone knows that it can be used not only for its intended purpose, but also for the manufacture, decoration and creating whole masterpieces! In this article, you will learn how to make original crafts from buttons with your own hands from the simplest, but not less creative and up to very complex compositions.
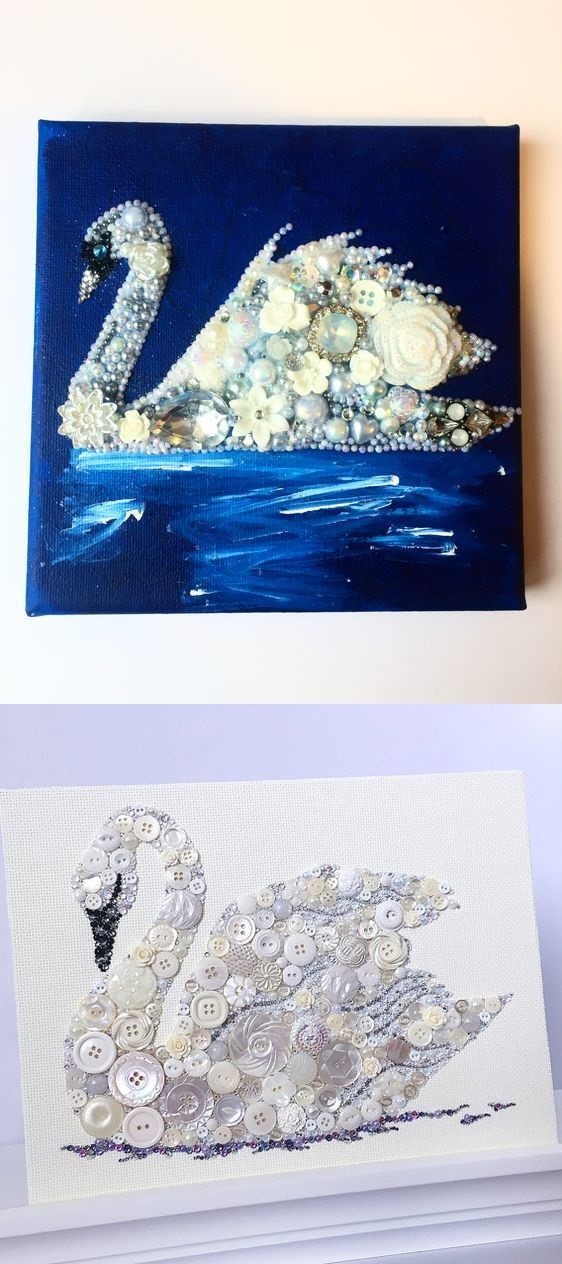
Pictures from buttons
About the technique of creating pictures from buttons
Almost everyone in the house there is a certain stock of buttons to create a whole picture.

First you need to understand what you would like to portray them. Some prefer abstraction, i.e. Buttons can be sewed in chaotic order. It is perfect for the decoration of sofa pillows. But perhaps your imagination drew a certain picture.
If you have decided what you want to portray, you can start the next stage. Using the copy paper, move the sketch on the fabric - it should be sufficiently dense. Due to this, it will not be deformed due to the weight of the pougs themselves.
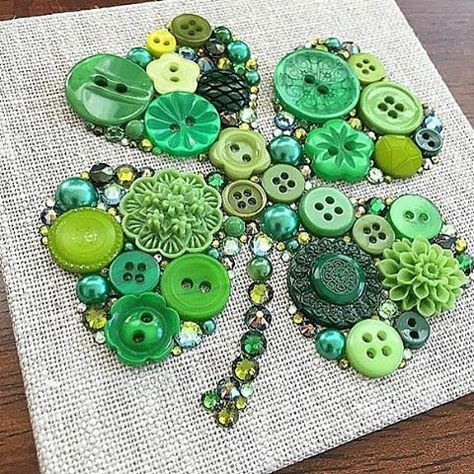
After you sketched on the fabric, start picking down buttons and combine them on the canvas, like a mosaic. Sewing do not rush because you can allow an error.
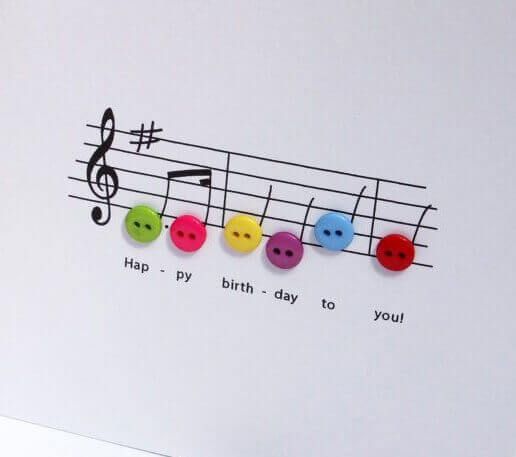
The simplest thing is to create a bright melody on paper from buttons.
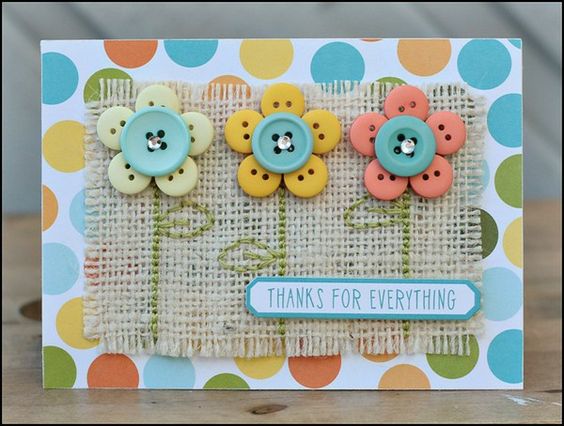
On the burlap "put" cute daisies ...
... or decorate your congratulations to the butterfly
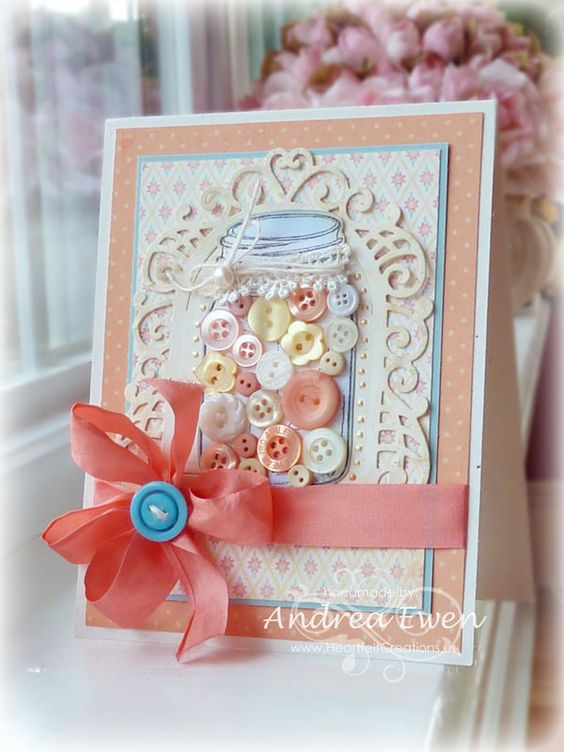
It is originally watched by buttonholes in the bank.
The maritime theme is relevant and everywhere.
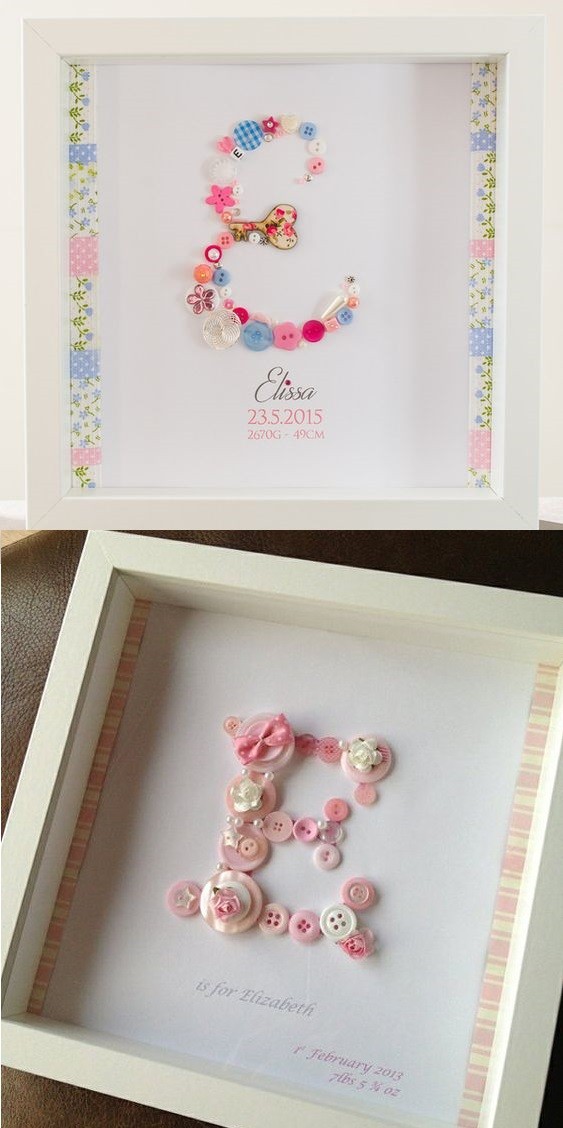
Baby crafts, metrics and monograms
From multicolored buttons for young children, there can be volumetric toys. For example, from colorful butchers of a variety of size can be glued down a frog, fish or caterpillar ...
If on the button, from which you decided to make a face of animals, there are no holes under the eyes or spout, then you can do them with a hot nail.
Button beads are also suitable for training fingers and hands, help. Try to use different buttons on the touch, make nodules between them.
In addition, your baby will last faster and remember the letters if they do themselves. You can make such a panel monogram with it. Perhaps it will be the initial letter of his name. It will also taste taste, help you get the skill of a combination of various colors and textures.
You can simply enclose the letter with all the colors of the rainbow from red to violet ...
... and in addition to buttons use other decorative elements.
With the help of buttons and rhises, you can make an original metric to someone as a gift.
It can be small feet of a boy's feet or a girl.
And maybe children's palms.
Or the initial letter name with the birth date. Perhaps you can come up with something your own, individual, for such a case!
In addition, you can teach "draw" your child with buttons, rhinestones and beads.
It is better to start with simple panel, such as a bright balloon.
The option is more comprehensive - with a color transition from light blue to dark blue.
From buttons you can create all sorts of images with animals, for example, with a bright red fox.
Filling the contour buttons and beads can serve as a kind of coloring or. It will educate in the child the preferabity and patience, and most importantly will teach bring the work started to a logical end.
Christmas decorations from buttons
The simplest is to collect buttons on a wire or fishing line of different sizes and colors.
Or wrap a cardboard blank with twine or threads and "dress up" with large bright buttons. Star Such a Christmas tree can be made in the form of a fluffy pompon.
From buttons you can make a bulk sprocket in pastel colors. Do not forget to fill the empty space between large buttons - smaller or rhinestones.
Using golden buttons, you can make such an elegant!
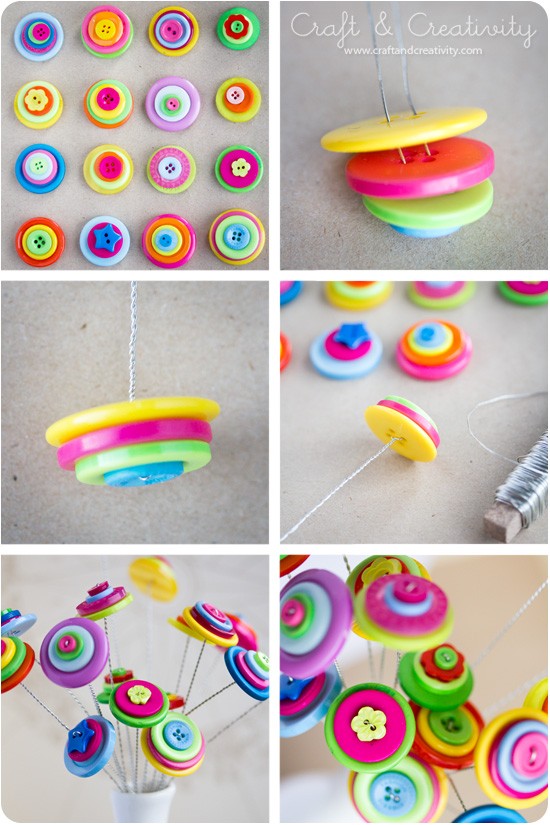
Make such a bouquet is not difficult at all. To do this, you will need: wire, buttons, decorative elements, pliers.
We begin work with the fact that we sort the buttons in diameter and colors. We form butchers in the form of peculiar pyramids, of which will be a bouquet.
Then we ride buttons on the wire in a built order. After all the buttons were on the wire, the ends of it intertwine each other, thereby fixing the pyramid-flower.
The stalk of the wire flower can be spiral or to re-adjust the tape ribbon of suitable color. For a bouquet we prepare 21-25 flowers.
You can decorate a bouquet of butterflies, bows, etc.
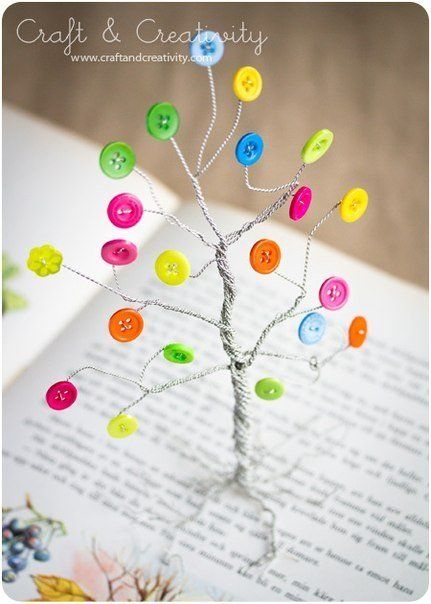
It is even easier to make a tree of happiness. It has enough buttons, wires and pliers for its manufacture.
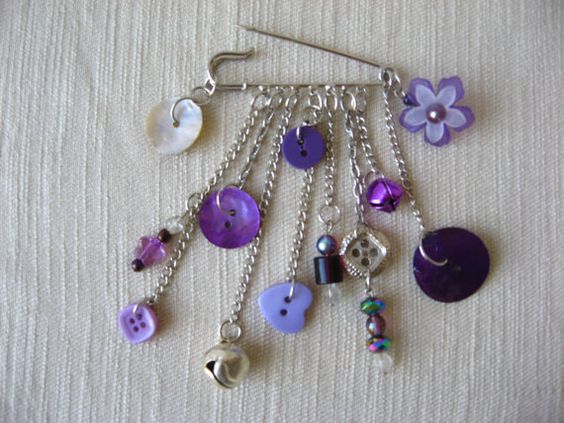
Accessories from buttons
From buttons you can create various accessories, as well as decorate shoes.
With bright buttons, home slippers will play in new paints
Also, buttons are a wonderful material for manufacture.
You can cover buttons with a larger cloth and make such a wonderful autumn composition.
From buttons, you can make up very interesting, and most importantly creative and individual things.
On a piece you can put unusual buttons of various shapes, the main thing is that they are combined with the color of the fabric and among themselves. It turned out an original decoration that can be put on, for example, under a white or pink shirt.
Bright buttons in polka dots can be collected on decorative twine or leather lace.
On a chain with wire, a bright bracelet is obtained.
Or such a non-lass, but no less attractive bracelet with roses.
Overlapping one button to another, smaller on the big - we get beautiful items for the necklace. They suspend all sorts of decorative elements - angels, dragonflies, hearts, etc.
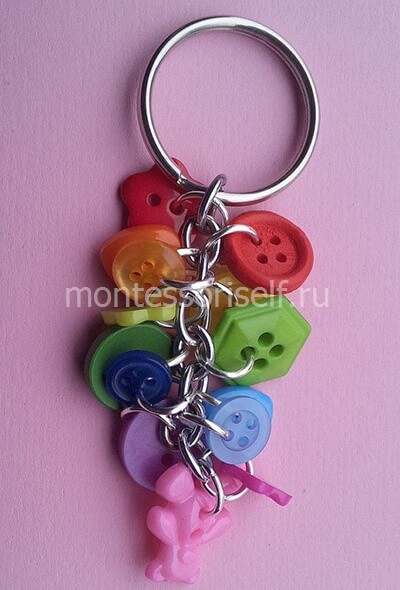
The bunch of buttons can be suspended by keychain, looks bright and interesting!
Interior decor objects
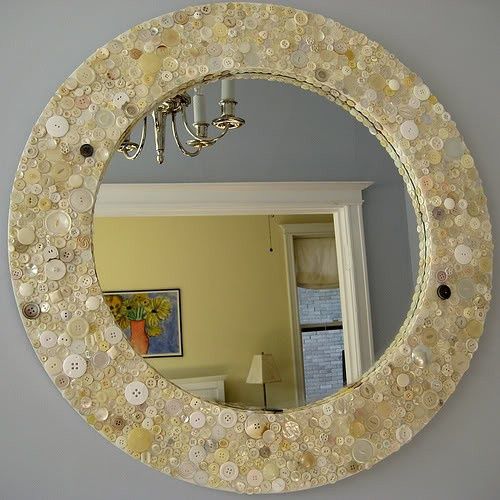
Buttons are also very universal material for decorating the interior of your home. For example, a simple mirror can be decorated so w.digger.
Using buttons of pastel tones, you can make such a noble mirror. Something to make a color focus from the darker button.
Using the same principle, make your own original photo frames. Combine buttonholes of various textures, but at the same time pick it up so that they are in one style. For example, pearls look very elegant with gold.
Bright purple and lilac butchers are perfectly combined with rhinestone and bronze elements. Photos will look brighter in such a photo frame!
Or make a bright photo frame, combining buttons with other decorative elements or even small toys. Such a photo frame perfectly fit into the nursery.
Of the simple unpaid butchers, you can glue the original colorful stand under the mug. For gluing items, it is better to use superclauses.
Coffee jars can also be played with butchers. Put the jar with buttons of any color, top with the aerosol paint.
The countertop can also be originally decorated, posing buttons in a chaotic order or a specific pattern.
You can make a bright mosaic cloth.
Any decor will be revived. Make beautiful color transitions, overlapping alone butchers on others.
Or another option - delicate pink-lilac hours, but already with numbers from buttons.
Buttons are perfect for decoration. Create your chamomile field!
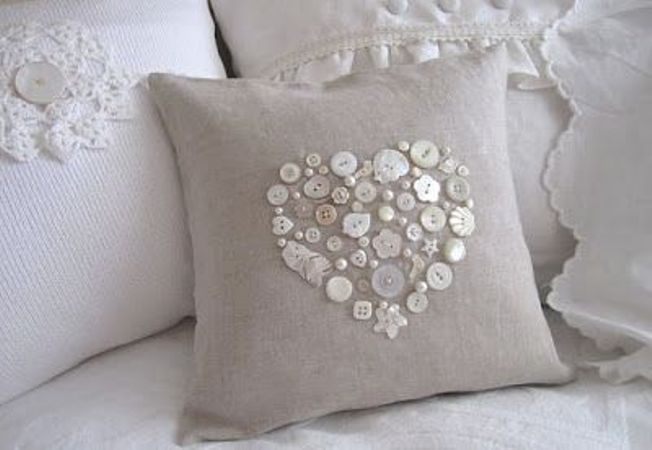
Or make the original pillow decorated with decorative elements of the sewing theme: small coils of threads, decorative scissors, centimeter tape and, of course, buttons.
Using buttons, you can make any pattern on the pillow, the simplest and cute - heart.
From not very attractive brown buttons you can make such fun acorns. Use a foam blank as a middle. Next, plunder the pugs of the mustache. The hat can be made of an old food, covered with cloth.
Make a globe from buttons!
Punk and paintings
Consider the secrets of choosing and combining materials in the manufacture of paintings and panels.
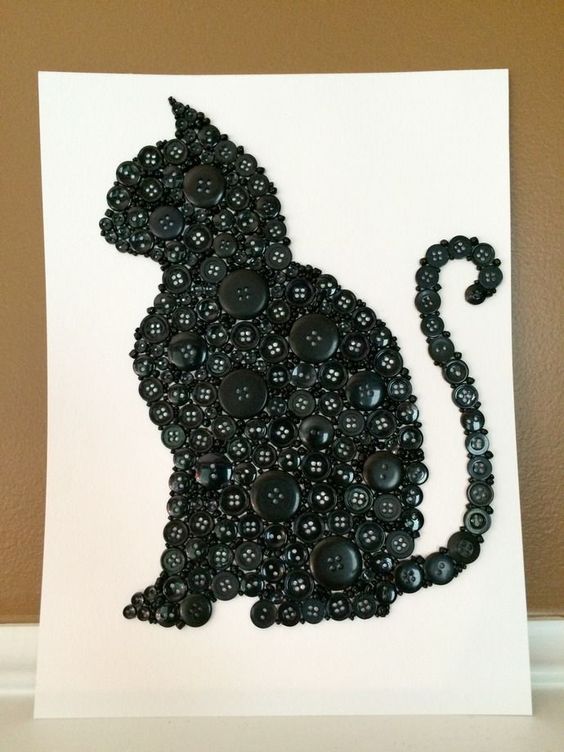
First, you can make "flat" pictures from buttons ...
.... And the same volumetric options, for example, sticking the buttons of the brass on each other ...
... Either to stick the little ones to large buttons, beating each big button.
The background of the product plays an important role. You can post a picture on the fabric canvas, and you can make strokes with paints, so the picture will look more brighter and spectacular.
A pattern of buttons can be monochrome ...
... either with a predominance of one color, but with bright engines ...
... or other bright accents.
And you can make a depicted pattern and completely multi-colored.
The main thing to be able to harmoniously combine buttons, and the material is already the tenth.
Rhinestones and beads are a bright "feltster" when drawing up paintings.
Do not be afraid to use bright colors!
Animalism is very common and in this form of needlework!
- Bright starfish
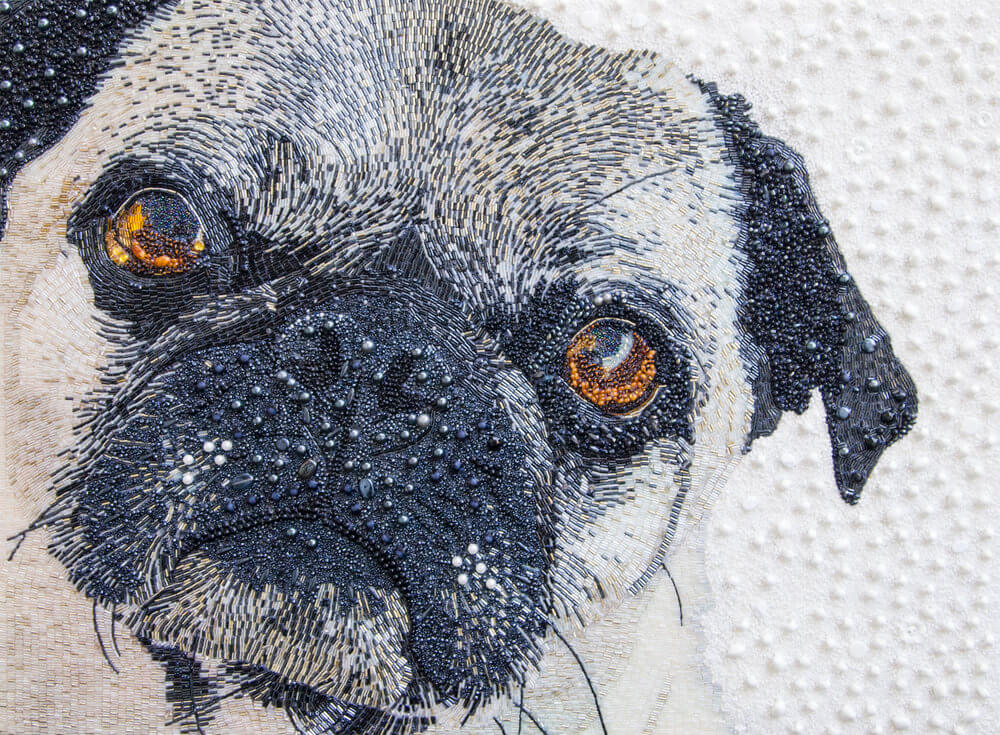
Having learned to make simple paintings, you can go to challenging works. For example, the manufacture of portraits from buttons.
Perhaps you can succeed in portrait painting of butt art.
[ndome] all do it yourself Shows in his master class, how to create a portrait from a button:
Creating portraits is, of course, the highest pilot! Persons mainly make up a light bead, in rare cases from the butchec themselves.
Masterpieces of butt art from famous masters
There are artists in various countries that are known to the whole world and they received this fame due to their work from the buttons. They admire the whole world!
Augusto Esquiel is an Argentine artist who works with buttons of various colors and creates delicious installations. This, without exaggeration, real works of art!
Buttons for Augusto began with a button of buttons found in the attic. They were quite ordinary, but the whole box. Augusto began to create three-dimensional images from buttons and fishing line, together with its spatial imagination. It pulls the fishing line or thread between the two surfaces and has buttons on them in accordance with the idea. As a rule, thread and buttercupy garlands are attached to the ceiling.
Black piano ("Upright Piano") is considered the most famous work of his work, which he created from 30 thousand butchers. This sculpture weighs 20 kilograms. Augusto created his masterpiece for two months.
In addition to the piano, other musical instruments from simple buckles were created.
Also, Augusto under the power of the creation of portraits of famous people.
Sarah Jane Connors -Huzhnik, creating pictures from buttons and beads. Children's passion surrounded into art, Sarah began to create magnificent paintings that were exhibited at various exhibitions.
The artist takes 1-2 months on the production of one picture. Each bead and buttonchka is attached to the canvas with glue.
Materials for their works Sarah finds on the "flea" markets, flea markets, in charitable stores. The artist pays a lot of attention to details, so carefully selects materials in shape, color scheme and size.
In their works, the artist transfers the inner beauty of nature and every creature.
Background of paintings is created with no less diligence and thoroughness.
Pictures of Sarah Jane Connors is a bit of a vivid example of the recreation of the beautiful!
Jane Perkins
Jane Perkins is a famous British artist of our modern day. She paints his paintings with buttons, beads, hairpins, toys, covers, boxes and other small things that will seem like old unnecessary trash. The materials for creativity she collects where it is possible - on the street, with friends and acquaintances ...
Each such picture is unique, even if the artist made the same picture twice. First, Jane freshes the buttons on hot glue, so that they can be seal and, if necessary, adjust the shade of the image. When the picture is completed, the artist has been looking at it for some time and makes certain changes. Next, buttons are attached to the tight.
Most of the pictures of Jane were bought in private collections. The most famous work is the Queen of Great Britain, President of the United States, Mona Lisa, Marilyn Monroe, etc.
The peculiarity of Pictures Jane is that they should be considered from a long distance. They are large enough in size and made large "strokes", which were made from the chips of designers and other elements.
See even more pictures jane perkins you can in this video Ruby Kon.:
Do not be afraid to try something new, create original and creative from something to pain your usual! All inspiration and creative success in all endeavors.
Rubric


Crafts from buttons to do is not at all difficult, probably because you have a large box with old buttons, so what to lie to them without a case when you can do something bright and unusual? The New Year holidays are coming soon, and it is worth thinking about to give your family and loved ones. This does not have to be a dear gift, you can do something with your own hands.
One options can be crafts from buttons with their own hands. Here are some ideas as they can be used as a gift or decoration.


Christmas decorations from buttons
Since the buttons are different, starting in their form and sizes, ending with the color range, they can be used as a scenery of various postcards and not only.
Read also: New Year's decorations with your own hands.


Christmas tree and toys from buttons
With the help of buttons, you can create original toys in the form of a snowman, Santa Claus, Snow Maiden, snowflakes, so on. But now we will look at the option how to make a New Year's ball.

In order to start work, we will need to be stocking the following material:
- Ball base. It can be made of polystyrene, foamflast, floristic sponge or mounting foam.
- Plug with a bead head.
- Buttons.
- Ribbon.
Depending on what a ball you want to use, it can be ordered in the online store. If it is a floristic sponge - buy in any flower department. The ball from the mounting foam is theoretically can be done by himself, but this is a rude process. Alternatively, you can use a ball from the fabric, having previously stamped it with a mid-syntheps.

Select the color of the ball. If he should be white - then do nothing with him. But if you want something color, you will need to repaint it with a canister.
Article on the topic: Beautiful shelves in the plasterboard wall: finishing options
And so, when everything is ready, we can proceed to the main job.
To start, take the ball and attach a ribbon on it. With it, we can then hang the product on the tree. And so, the ribbon is ready, proceed to buttons.


We take the buttons you like and secure it to the ball with the help of the pin. You can combine the colors and the size of the buttons, also adjusting the space between them. It can remain empty or fill it with additional elements.

Our ball is ready, now you can safely hang on the tree.
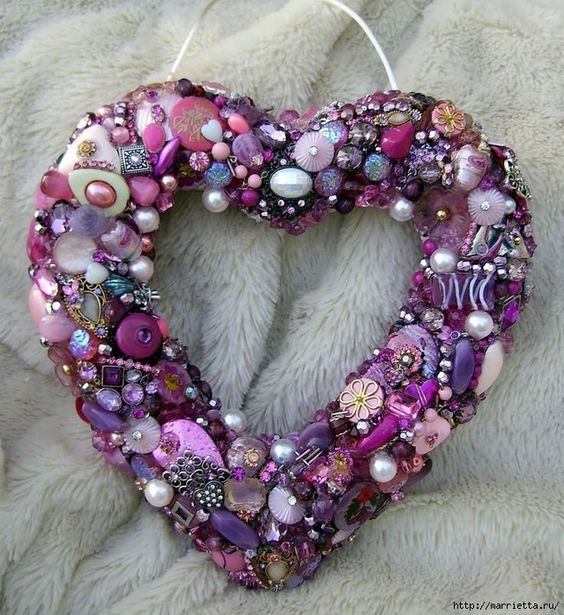
Decorative wreaths from buttons
Wreath on the door became a very popular decor element on New Year holidays. Most often, they are hanging on the outside, but no one forbids using it and in the inner interior of the apartment.
A wreath of buttons is becoming more popular from year to year, because you can make it yourself, without spending a lot of strength.

There are several options for this craft. The easiest to cut the cardboard in the form of a circle, additionally making a round space in the middle. Then plane it with multi-colored buttons, additionally using decor from christmas twigs.

The second option is to sew a cover, which to fill with Sintepun. The case must be in the form of a round wreath. When the workpiece is made, we turn our buttons on it.
Christmas Christmas trees
Small cone-shaped Christmas trees will look great in the home interior.

In order to build such a Christmas tree, a little will be required:
- Cone from cardboard, foam or polystyrene.
- Buttons.
- Colored paper or fabric.
- Pins or glue.


The work process will be identical as with the balls. The only thing is if you use foam or polystyrene, then secure buttons on the pins. When paper material is best to use glue. The basis of the Christmas tree will be good to paint or puncture something green.
Read also: Ideas, what you can make a Christmas tree with your own hands.
Garland from buttons
As the saying goes: "All ingenious is simple." So with our guils from buttons. It seems nothing to look quite interesting and creatively.
Article on the topic: Expand the corridor


There will be a fishing line, wire or thread. In general, any material on which our buttons can be bought.
Postcards and pictures from buttons
Also a creative and non-standard gift that can be done in a short time. Here already make up anything. A card can be simply decorated with buttons or include entire drawings that are suitable for New Year's topics.


Master class "Bowl of buttons"
The most interesting thing is that you can make crafts not only on your own, but also with your children. Usually kids are very fond of this activity, and their joy there are no borders.
For a master class, we will need:
- Buttons of different colors and sizes (small small).
- PVA glue.
- Balloons.
- Scissors and brushes.
- Jar.

Progress

As a result, we will have a bowl of buttons in which you can store anything.
Craftsman "Machine" from buttons
Another task that can be done with your child is. By the way, you can also do other crafts from the buttons along with the children - choose any drawing, create the contour and stick the buttons to the base - then we will tell you in detail how to do it.
From the materials you will need:
- Buttons.
- Pin.
- Tube.
- Wire (thin).
- Adhesive tape.
- Glue.

Progress:
- First, cut off the tube two pieces, a long 2.5 centimeter.
- Then stretch the wire through the cut tube, and at the end, attach to the button.
- We make another such workpiece and insert both into the clothesp. One fasten the front, another behind. Both fasteners with a tape.


