Volumetric ball on the Christmas tree from paper circles. How to make a paper ball with your own hands? Paper balls for the New Year
Fans of crafts made of cardboard paper, as well as connoisseurs of unusual Christmas decorations, will definitely like the idea of making paper Christmas tree decorations with their own hands. Creating such unusual unique and bright jewelry with your own hands will not take you much time, it will not require special materials and skills from you. On the contrary, it is a great idea to entertain yourself and your children, show creativity, decorate not only the New Year tree, but also the interior with unique decorations.
Everything that is required of you to create such a paper decoration is usually available in every family, especially if you have children. The list of things you need looks like this:
- Paper scissors
- Loose colored cardboard and paper. It is not necessary to buy it specifically. It can be old postcards, magazine covers, holiday wrapping paper, cardboard from boxes. However, for the most interesting combinations, it is better to prepare the paper specially and in advance.
- Beads, rhinestones, beads, sequins (also often accumulated in the house in specially designated vases or caskets)
- Thick thread, or thin braid, or decorative cord
- Ruler
- Compass
- simple pencil
- Needle or awl
- Glue for decorating the ball
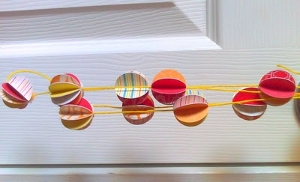
Garland of colorful paper balls
Perhaps the easiest way to create paper balls for decoration. From loose multi-colored paper we cut out circles of the same diameter, 6-8 circles per ball. We put the sets of circles of each future ball into piles. Exactly in the middle, we sew each such pile from edge to edge.

This can be done with a few staples using a regular stationery stapler. It will be most convenient if you have a sewing machine at hand, with its help you can sew several piles at once, getting an almost ready-made garland. Bend and evenly distribute the halves of the circles obtained after sewing to get real balls from the piles.

As a result, you can make different bright garlands of balls this way. If you use other shapes instead of circles and vary their sizes, color combinations, if you show real creativity, you can get simple and very original decorations.
Prefabricated paper balls
This version of paper balls will require a little more attention and skill. For each such ball, you will need to cut out 12 parts of the same size from loose cardboard.

The basis of such a ball is a pentagonal connection, so it is important that the correct pentagon can be evenly entered into the details of your ball, while the shape of your part can be anything. Most often, for ease of manufacture of such a ball, circles are used as parts, sometimes flower-shaped parts with five rounded petals, or actually regular (equilateral) pentagons.

Having cut out all 12 parts we need, we make identical cuts on them along half of each side of the pentagon inscribed in detail, as shown in the figure. With the help of such cuts, we can connect the parts to each other by inserting in pairs with a notch in the notch. It is more convenient to first assemble the halves of our ball, using six parts each, then connect the hemispheres together.

Combining bright colors, patterns on cardboard, using different shapes and sizes, you can make amazing balls for decorating a Christmas tree or home. Pull the cord, thread or braid through the opposite connections. On the one hand, the thread can be fixed with a knot with a bead, on the other hand, make a loop for the Christmas tree branch.

Using the same parts, but without cuts, you can glue a paper ball from the same 12 parts. Parts of the prepared colored cardboard parts outside the inscribed pentagon (outside the dotted line in the figure) can be glued in pairs or sewn with a stapler or sewing machine. In the same way, you can connect parts using triangular faces (by inscribing a triangle in a circle), but you will need 21 such parts.
striped balls
You can make such balls very simply. You will need 12-15 ribbons of the same size from colored paper. We put all the paper tapes in a pile. We pierce the stack from both ends and thread the thread, braid or cord through the holes obtained. We tighten the cord so that the stack of ribbons is bent in a semicircle.

Then we push the tapes of the stack apart and distribute them evenly around the axis, which is the same cord. We get a wonderful striped ball. Such a ball turns out to be very beautiful if you use paper of two colors or patterns and alternate such ribbons in a stack.

Get creative by combining different papers or by combining different widths of ribbons, decorate the thread of the ball with beads by placing a bead in the bottom and top knot, or even inside your ball.
This is how the simplest materials and tools can give free rein to your imagination, help your children show their creative talent, inspire a wonderful New Year's mood and create wonderful decorations for the Christmas tree and your home.
Our site publishes materials for those who want to make Christmas and New Year a real holiday for their children, a holiday that they will remember for many years to come. Here, to help parents, we publish articles and materials on the preparation and conduct of the New Year holidays. Including New Year's master classes on making original Christmas tree decorations and Christmas decorations with your own hands. If you start making Christmas decorations, Christmas decorations and gifts for friends and relatives in advance, then by December 31 your house will turn into a real New Year's fairy tale! We offer to make Christmas balls on the tree You will learn how to make a Christmas ball with your child with your own hands, get acquainted with the schemes of Christmas paper balls, photos of Christmas tree decorations.
1. DIY Christmas ball (option 1)
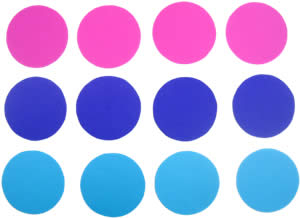
To make this Christmas decoration, you will need colored paper, thin wire, a stapler, and glue. The balloon you see in the photo above was made from three different colors of paper (pink, blue and light blue).
Work plan
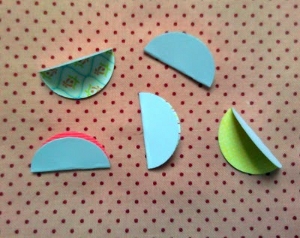
1. Take a small glass or glass (glass) and circle it on paper with a simple pencil 12 times. You should have 12 circles (4 circles of each color). Cut out the circles with scissors.
2. Fold each circle in half and stack them together as shown in the picture below. We use paper in three colors (A, B and C) to make this Christmas ball. Stack the circles in the following sequence - ABBCCAABBCCA. If, when making a New Year's ball, you used paper of two colors (A and B), then in this case the circles should have been folded in the following sequence - ABBAABBAABBA.
3. Fasten the circles of paper together with a thin wire, wrapping it around them along the fold line. Twist the ends of the wire together. If you do not have wire, then you can fasten the circles with a regular stapler.
4. Spread the circles and glue the adjacent halves of the circles to each other. Each half must be connected to one adjacent at the top, and with the other - at the bottom.
2. DIY Christmas balls (option 2)
Cut out three circles of the same size but different colors from colored cardboard or thick paper. In the first of them cut a cross (fig. a), in the second circle make a horizontal cut in the middle and perpendicular to it two cuts in the direction from the circle to the center of the circle (fig. b), and in the third - four cuts in the form of a cross, also along direction from the circle to the center (Fig. c). Pass the circle "c" into the circle "b". In circle "a", bend the corners formed as a result of its incision; you get a square hole. Pass circles “b” and “c” into it, having previously folded them. Then straighten the corners again (fig. d). Attach a thread to the resulting ball.
3. Christmas paper balls (option 3)
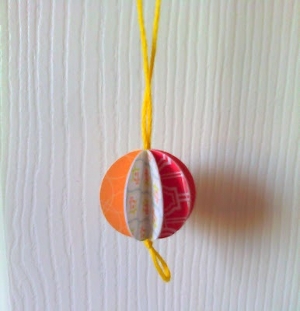
From old postcards or colored paper, you can make such cute Christmas decorations - Christmas balls.
You can print ready-made colored circles for making a colorful Christmas ball using this technique.
4. Making a Christmas ball (option 4)
Very easy to make Christmas paper ball. To make it, you will need colored paper and glue.
Work plan:
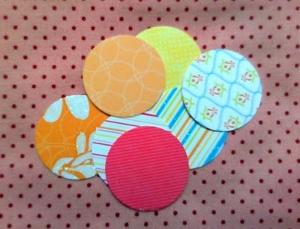
1. Cut out eight identical circles from paper of different colors. Although, in fact, the number of circles can be any, but not less than three.
2. Fold each circle in half, right side inward.
3. Glue the halves of the circles together as shown in the photo below. Glue is applied to the wrong side of the halves of the circle.
4. Before finally sealing the New Year's ball, thread a thick thread or ribbon through it. You can also make a wonderful Christmas tree garland from a large number of paper balls.
Note: such a Christmas decoration can be made not only in the form of a ball, but also in any other shape. To do this, use different stencils.
5. DIY Christmas ball (option 5)
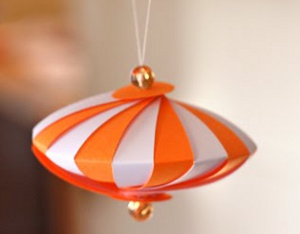
To make these wonderful Christmas lanterns, you will need to cut colored paper into strips of the same length and width. The length and width of the strips depends on the size of the flashlight you want to make. To make one paper lantern, you will need an average of 14-16 strips of paper
When making Christmas balls, you can use strips of paper of different colors and beads to decorate Christmas toys with your own hands.
If the strips of paper are bent in the middle, then you get such a New Year's decoration.
6. How to make a Christmas ball (option 6)
We suggest you make such a cute and easy-to-make New Year's craft from old postcards with your child.
1. Using a small glass or wine glass, draw and cut out eight identical circles.
2. Using another object with a round base but smaller in diameter, draw and cut out two small circles.
3. Fold each large circle in half, and then in half again.
4. Stick four folded large circles on one small circle, the remaining four on the other. As a result, you will get two halves of your future Christmas ball.
It is very IMPORTANT to correctly place the quarters of the large circles on the small circle. Try to carefully straighten the "pockets" of the folded circles and in advance, before gluing, estimate the correctness of their location. At the same time, focus on the very first photo, which shows a finished ball.
5. Now you just have to glue the two finished halves together and, when the glue dries, straighten all the pockets. Christmas ball is ready!
7. Do-it-yourself ball of threads (spider web balls)
Thread balls look very attractive, do not require special skills and money. Many did them at school in labor lessons. And the use of these gossamer balls is limitless: just as an element of decor, and as a lampshade, and as New Year's toys. From several of these balls of thread, you can make all kinds of toys: snowmen, birds, fish. In general, everything that is enough for imagination.
Making balls from thread:
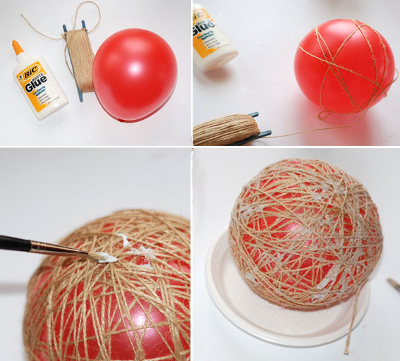
1. You will need: scissors, balloons, fat cream (Vaseline), any yarn, PVA glue, a bowl.
2. Dilute PVA glue with water, approximately 3:1.
3. Inflate the balloon to the desired size, give it a round shape, tie it with a thread.
4. After unwinding the required amount of yarn, put it in a bowl and leave for 5 minutes.
5. We smear the ball with a fat cream and wrap it with yarn, first leaving a large distance between the thread.
6. Gradually reduce the distance between the threads until the whole ball is wrapped in yarn and resembles a cocoon.
7. Cut the thread and glue it to the ball. Leave it to dry (at least a day).
8. Gradually untying the balloon, gently blow it off, and then remove it from the thread cocoon; tie a rope to the thread ball on top for fastening.
When making a ball, you can use yarn (threads) of any color or paint with any paint or sparkles (spray). Especially for the New Year, you can decorate this thread ball with tinsel and stars. Hang small balls on the Christmas tree, decorate the room with large ones. Fantasize more!
If you are unable to wind the glue-soaked thread around the ball, you can wind the dry thread, and then thoroughly soak it with glue with a brush or sponge.
Instead of glue, you can use sugar syrup or starch paste. To prepare the paste, take 3 teaspoons of starch in a glass of cold water, mix thoroughly and bring to a boil. Instead of a thread, you can take a thin copper wire and wind it around the ball in the same way.
Old Christmas balls can be updated by wrapping each of them in a piece of beautiful fabric and tying it with a ribbon.
Website: http://adalin.mospsy.ru
Paper
New Year's
balloons
1. DIY Christmas ball (option 1)
To make this Christmas decoration, you will need colored paper, thin wire, a stapler, and glue. The balloon you see in the photo above was made from three different colors of paper (pink, blue and light blue).
Work plan:
1. Take a small glass or glass (glass) and circle it on paper with a simple pencil 12 times. You should have 12 circles (4 circles of each color). Cut out the circles with scissors.
2. Fold each circle in half and stack them together as shown in the picture below. We use paper in three colors (A, B and C) to make this Christmas ball. Stack the circles in the following sequence - ABBCCAABBCCA. If, when making a New Year's ball, you used paper of two colors (A and B), then in this case the circles should have been folded in the following sequence - ABBAABBAABBA.

3. Fasten the circles of paper together with a thin wire, wrapping it around them along the fold line. Twist the ends of the wire together. If you do not have wire, then you can fasten the circles with a regular stapler.


4. Spread the circles and glue the adjacent halves of the circles to each other. Each half must be connected to one adjacent at the top, and with the other - at the bottom.

CHRISTMAS DECORATION - DECORATIVE BALL HONEYCOMB

2. DIY Christmas balls (option 2)

Cut out three circles of the same size but different colors from colored cardboard or thick paper. In the first of them cut a cross (fig. a), in the second circle make a horizontal cut in the middle and perpendicular to it two cuts in the direction from the circle to the center of the circle (fig. b), and in the third - four cuts in the form of a cross, also along direction from the circle to the center (Fig. c). Pass the circle "c" into the circle "b". In circle "a", bend the corners formed as a result of its incision; you get a square hole. Pass the circles "b" and "c" into it, having previously folded them. Then straighten the corners again (fig. d). Attach a thread to the resulting ball.
3. Christmas paper balls (option 3)
From old postcards or colored paper, you can make such cute Christmas toys - Christmas balls.

It is not necessary to make a large, complex ball; you can make a small Christmas ball with fewer parts.


4. Making a Christmas ball (option 4)
Very easy to make Christmas paper ball. To make it, you will need colored paper and glue.
Work plan:
1. Cut out eight identical circles from paper of different colors. Although, in fact, the number of circles can be any, but not less than three.
2. Fold each circle in half, right side inward.
3. Glue the halves of the circles together as shown in the photo below. Glue is applied to the wrong side of the halves of the circle.


4. Before finally sealing the New Year's ball, thread a thick thread or ribbon through it. You can also make a wonderful Christmas tree garland from a large number of paper balls.
Note: such a Christmas decoration can be made not only in the form of a ball, but also in any other shape.
5. DIY Christmas ball (option 5)
To make these wonderful Christmas lanterns, you will need to cut colored paper into strips of the same length and width. The length and width of the strips depends on the size of the flashlight you want to make. To make one paper lantern, you will need an average of 14-16 strips of paper.

When making Christmas balls, you can use strips of paper of different colors and beads to decorate Christmas toys with your own hands.

If the strips of paper are bent in the middle, then you get such a New Year's decoration.
6. How to make a Christmas ball (option 6)
We suggest you make such a cute and easy-to-make New Year's craft from old postcards with your child.

1. Using a small glass or wine glass, draw and cut out eight identical circles.

2. Using another object with a round base but smaller in diameter, draw and cut out two small circles.

3. Fold each large circle in half, and then in half again. See photo below.

4. Glue four folded large circles on one small circle, the remaining four on the other. As a result, you will get two halves of your future Christmas ball.
It is very IMPORTANT to correctly place the quarters of the large circles on the small circle. Try to carefully straighten the "pockets" of the folded circles and in advance, before gluing, estimate the correctness of their location. At the same time, focus on the very first photo, which shows a finished ball.

5. Now you just have to glue the two finished halves together and, when the glue dries, straighten all the pockets. Christmas ball is ready!


Making balls from thread:
1. You will need: scissors, balloons, fat cream (Vaseline), any yarn, PVA glue, bowl.
2. Dilute PVA glue with water, approximately 3:1.
3. Inflate the balloon to the desired size, give it a round shape, tie it with a thread.
4. After unwinding the required amount of yarn, put it in a bowl and leave for 5 minutes.
5. We smear the ball with a fat cream and wrap it with yarn, first leaving a large distance between the thread.
6. Gradually reduce the distance between the threads until the whole ball is wrapped in yarn and resembles a cocoon.
7. Cut the thread and glue it to the ball. Leave it to dry (at least a day).
8. Gradually untying the balloon, gently blow it off, and then remove it from the thread cocoon; tie a rope to the thread ball on top for fastening.
9. The balloon is ready!
When making a ball, you can use yarn (threads) of any color or paint with any paint or sparkles (spray). Especially for the New Year, you can decorate this thread ball with tinsel and stars. Hang small balls on the Christmas tree, decorate the room with large ones. Fantasize more!
If you are unable to wind the glue-soaked thread around the ball, you can wind the dry thread, and then thoroughly soak it with glue with a brush or sponge.
Instead of glue, you can use sugar syrup or starch paste. To prepare the paste, take 3 teaspoons of starch in a glass of cold water, mix thoroughly and bring to a boil. Instead of a thread, you can take a thin copper wire and wind it around the ball in the same way.
9. New Year's do-it-yourself. New Year decoration
Old Christmas balls can be updated by wrapping each of them in a piece of beautiful fabric and tying it with a ribbon.

Decoration for ceremonial events of halls, houses, apartments with balloons has become very fashionable. They create airy beauty, conviviality, novelty and positive. An ignorant person in needlework will ask the question: "How to make a ball out of paper?" And to do it is simple, easy and interesting. Abroad, in hobby-lobby stores, round foam plastic balls of various sizes are sold for this purpose, on which flowers, butterflies, and other decorations are then glued. In our country, you will not find this everywhere yet, but we are used to getting out of the situation. We offer several options for manufacturing balls.
The basis for the ball can be made from threads. In a bottle of PVA glue, make parallel holes on both sides and pass a thread with a needle through them. Inflate the rubber ball of the desired size, start winding the adhesive thread around it (it passes through the bottle) until it is completely covered with a net. Leave to dry for a day. When the threads harden, the ball can be pierced and carefully removed from the resulting thread ball. Attach a rope to the balloon to hang it on. Now stick the prepared flowers from crepe corrugated paper on this base, you can use office colored paper or floral paper. Cut corrugated paper into strips 20 cm long, 3.4 cm wide. Stretch one side of the strip. Twist the strips, tie the unstretched side with threads. Fluff, give a beautiful shape. Get a pretty rose. Another way: from office colored paper, prepare strips of the same size - 20X30 cm. Only they need to be cut like noodles, not reaching the edge, twisted onto a toothpick or thin stick, glued the edge, spread the petals. It turned out an aster or chrysanthemum. Or you can just cut out the flowers according to one pattern, decorate with a large bead and stick it on the base of the ball, as in the photo. There are a lot of flowers on the ball. For a medium ball with a diameter of 20 cm, you will need about 40 pieces.
Another way to make a paper ball
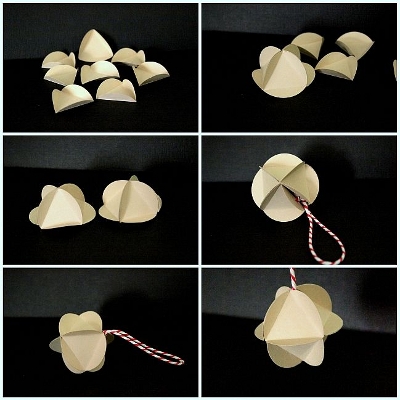
This method is faster and easier than the previous one. If in it paper balls were made using glue, there was a lot of work with making flowers, then this is not the case here. The ball is assembled without glue. It also looks beautiful, and is done quickly and easily. To work, you need thick paper or thin colored cardboard, scissors, cord.

You need to cut 12 identical flowers, the shape is shown in the photo. Each petal is cut along a horizontal line from right to left, not reaching the edge. The cut of one petal is inserted into the cut of the other until the ball is assembled. Insert the cord into one of the templates and fasten it, as shown in the photo. These balls are easy to assemble and disassemble. If you make several balls of different colors, but the same size, then you can mix them, you get multi-colored compositions. As you can see, paper balls are very easy to make. It is quite possible to create such a masterpiece with your own hands.
Next method

With this method, you also need glue, postcards or thick colored paper. You need to cut out 10 template circles of the same size. Draw a triangle inside each. Bend the edges of the circle along the line of the triangle. They are connected with glue until you get a hemisphere. Do one more. The whole ball will take five triangles. Do not forget to fasten a rope to one of them. Now glue the two hemispheres. Another way to make a ball out of paper is now familiar to you.
The simplest ball

This method is available even to small children. The ball is made from corrugated paper. Two sheets of paper of different colors, approximately 30 cm wide, 50 cm long, should be folded like an accordion and loosely bandaged in the middle. Round or sharpen the edges on both sides. Gently open and fluff the petals of a large flower - a ball. Glue the two side edges in the middle. This beauty, of course, is short-lived. One or two drops of rain - and there is no ball, but in dry rooms it can please the eye for a long time.
Conclusion
Make paper balls: it's beautiful, simple and easy!